


STARS!
The Premiere Space Strategy Game
PLAYER’S GUIDE
http://www.webmap.com/stars!
rec.games.computer.stars
II
COPYRIGHT AND CREDITS
Design and Programming |
Jeff McBride and Jeff Johnson |
Addtional Programming |
Jeffery Krauss |
Producer |
Brian Walker |
Graphics |
Eric Chang, Michael Miller, Michael Reichmann, |
|
Emblazon Multimedia |
Music |
Emil Herceg at Arte Wisdom |
Sound Effects |
Mahendra Sampath |
Intro |
Minds Eye |
Documentation |
Kurt Kremer, Brett Kremer |
Technical Advice |
David Pugh |
Playtesting |
Bill Bolosky, Dave Buchtal, Kent Cedota, |
|
Daniel Chenault, Paul Enfield, Michael Grier, |
|
William Herlan, Peter Henriksen, Peter Horodan, |
|
Brent Jensen, Mark Kenworthy, Stu Klingman, Steve Kruy, |
|
Robert Lamb, Jim Lane, John LeVee, Hilton Lange, |
|
Chris McBride, Jeff McCashland, Beth Moursund, |
|
Chris Noon, Tony Pacheco, Chris Peltz, Tony Reynolds, |
|
Jenifer Schlickbernd, Eric Snapper, Andrew Sterian, |
|
Jeff Stone, Richard Sun, David Thiel, Brad Thompson, |
|
Thomas Voigt, Ross Youngs |
Special Thanks To... |
Sam Belcher, Peter Celella |
Packaging Design and Artwork |
Sharon O’Neill |
Production |
Antony Bond, Gary Lucken |
© 1996 Entertainment International (UK) Ltd. All Rights Reserved. Published by Empire Interactive
CONTENTS
Welcome 1-1
GETTING STARTED
Single Player Setup |
2-1 |
|
Playing the Tutorial 2-1 |
|
|
Starting a Single Player Game 2-2 |
|
|
Setting and Viewing Winning Conditions |
2-3 |
|
Multi-Player Setup |
3-1 |
|
Setting Up a Single Computer, Multi-Player (Hot Seat) Game 3-1 |
||
Setting Up Network-based Multi-Player Games 3-4 |
||
Setting Up Modem, FTP, and Play by E-mail Games 3-7 |
||
Setting and Viewing Winning Conditions |
3-9 |
|
Adding Expansion Players 3-10 |
|
|
Being Absent from Play 3-11 |
|
Finding Multi-Player Games on the Internet |
3-12 |
Passwords 3-12 |
|
Using a Timer Application? 3-12 |
|
Creating a Universe from the Command Line |
3-13 |
Things Every Stars! Player Should Know 4-1
Tuning Stars! to Your Display Resolution 4-1
Replaying a Previous Turn 4-2
Saving Your Game -- What It Means 4-2
IV C O N T E N T S
Exiting the Game 4-4
Options for Launching Stars! 4-5
Copy Protection 4-7
THE STARS! SCREEN
The Stars! Screen 5-1
Screen Layout 5-1
Command Pane 5-2
Messages Pane 5-11
Scanner Pane 5-12
Selection Summary Pane 5-17
PLAYING STARS!
Planets 6-1 |
|
|
|
|
Your Home World and Other Inhabited Planets |
6-1 |
|||
Population 6-2 |
|
|
||
Minerals |
6-4 |
|
|
|
Mines 6-5 |
|
|
|
|
Factories |
6-5 |
|
|
|
Building Planetary Defenses 6-5 |
|
|||
Planet-based Scanners |
6-6 |
|
||
Starbases |
6-7 |
|
|
|
Stargates |
6-10 |
|
|
|
Mass Driver Basics 6-11 |
|
|||
Terraforming |
6-14 |
|
|
|
Planet Reports |
6-21 |
|
|
|
Production 7-1 |
|
|
|
|
How Production Works |
7-1 |
|
||
Adding an Item to the Production Queue 7-2 |
|
|||
Removing an Item from the Production Queue |
7-3 |
|||
Production Templates |
7-3 |
|
||
Clearing the Production Queue 7-7
C O N T E N T S V
Adding Auto-Build Items to the Queue |
7-9 |
|||||||||
Changing the Order of Planets in the Production Dialog 7-10 |
||||||||||
Conditions that Affect Production |
7-11 |
|
||||||||
Research 8-1 |
|
|
|
|
|
|
|
|
|
|
Fields of Study |
8-1 |
|
|
|
|
|
|
|||
Browsing Stars! Technology |
8-2 |
|
|
|||||||
Allocating Resources for Research |
8-4 |
|
||||||||
Cost of Research |
8-5 |
|
|
|
|
|
|
|||
Ship and Starbase Design |
9-1 |
|
|
|
|
|
|
|||
How to Approach Hull Design |
9-1 |
|
||||||||
Designing a New Hull from Scratch 9-2 |
||||||||||
Editing an Existing Hull Design |
9-3 |
|
||||||||
Deleting an Existing Hull Design |
|
9-5 |
|
|||||||
Counting the Humber of Hull Designs |
9-6 |
|||||||||
Adding Ship-based Scanners |
9-7 |
|
|
|||||||
Adding Cloaking Devices |
9-8 |
|
|
|
||||||
Engines |
9-8 |
|
|
|
|
|
|
|
|
|
Learning About Other Players’ Hull Designs 9-9 |
||||||||||
Trading Ship Designs |
9-9 |
|
|
|
|
|||||
Managing Fleets |
10-1 |
|
|
|
|
|
|
|
|
|
Assembling Fleets |
10-1 |
|
|
|
|
|
||||
Warp Speed |
10-1 |
|
|
|
|
|
|
|||
Finding a Specific Fleet |
10-3 |
|
|
|
||||||
Switching Between Fleets |
10-4 |
|
|
|
||||||
Naming Fleets |
10-4 |
|
|
|
|
|
|
|||
Using Fuel |
10-5 |
|
|
|
|
|
|
|
||
Routing Fleets |
10-7 |
|
|
|
|
|
|
|||
Rendezvousing Fleets |
10-8 |
|
|
|
|
|||||
Splitting Fleets |
10-9 |
|
|
|
|
|
|
|||
Merging Fleets |
10-9 |
|
|
|
|
|
|
|||
Scrapping Fleets |
10-10 |
|
|
|
|
|
||||
Report for Your Fleets |
10-11 |
|
|
|
|
|||||
VI C O N T E N T S
Navigation |
11-1 |
|
|
|
|
|
|
|
Adding Fleet Waypoints and Tasks |
11-1 |
|
||||||
Notes and Tips on Waypoints and the Scanner |
11-2 |
|||||||
Deleting Fleet Waypoints |
11-3 |
|
|
|||||
Stargate Navigation 11-3 |
|
|
|
|
||||
Wormhole Navigation |
11-5 |
|
|
|
||||
Colonization |
12-1 |
|
|
|
|
|
|
|
Choosing Planets to Colonize |
12-1 |
|
||||||
Colonizing an Uninhabited Planet |
12-2 |
|
||||||
Shuttling Colonists with Freighters |
12-3 |
|
||||||
Hey, that Planet’s Already Inhabited! 12-4 |
|
|||||||
Mining 13-1 |
|
|
|
|
|
|
|
|
Mining Colonized Worlds |
13-1 |
|
|
|||||
Calculating the Rate of Decrease in Mineral Concentration 13-2 |
||||||||
Mineral Concentration and Mining Efficiency |
13-3 |
|||||||
Remote Mining |
13-3 |
|
|
|
|
|
||
Transporting Freight |
14-1 |
|
|
|
|
|
||
Shipping Freight |
14-1 |
|
|
|
|
|
||
Transferring Fuel and Cargo to Other Fleets 14-2 |
||||||||
Jettisoning Cargo |
14-2 |
|
|
|
|
|
||
Creating a Custom Transport Zip Order 14-3 |
|
|||||||
Flinging Mineral Packets |
14-4 |
|
|
|
||||
The Basics of Combat 15-1 |
|
|
|
|
|
|||
Fleet-to-Fleet Combat |
15-1 |
|
|
|
||||
Bombing Planets |
15-4 |
|
|
|
|
|
||
Mineral Packet Bombardment |
15-5 |
|
||||||
Ground Combat |
15-6 |
|
|
|
|
|
||
Minefields |
15-6 |
|
|
|
|
|
|
|
Starbase Combat |
15-9 |
|
|
|
|
|
||
Claim Adjusters and Terraforming as a Weapon |
15-10 |
|||||||
Declaring Enemies and Friends |
15-10 |
|
||||||
C O N T E N T S VII
Battle Plans 15-11 |
|
|
|
|
|
|
Battle Report |
15-16 |
|
|
|
|
|
Viewing Opponent Fleets in the Summary Pane |
15-17 |
|||||
Viewing Enemy Ship Designs |
15-17 |
|
|
|||
Fleet Report on Enemies and Other Players 15-18 |
||||||
Patrolling 16-1 |
|
|
|
|
|
|
Assigning Patrol Orders |
16-1 |
|
|
|||
Patrol Targets Enemies Only |
16-2 |
|
|
|||
Patrol and Battle Plans |
16-3 |
|
|
|
||
Scanning and Cloaking |
17-1 |
|
|
|
|
|
Scanner Technology |
17-1 |
|
|
|
||
Selecting Fleets in the Scanner Pane |
17-2 |
|
||||
Scanning Planets 17-3 |
|
|
|
|||
Cloaking, or Hiding From Opponents’ Scanners |
17-4 |
|||||
Detecting Opponents’Fleets |
17-4 |
|
|
|||
Pirating Using Stealth-based Scanners |
17-6 |
|
||||
Reports 18-1 |
|
|
|
|
|
|
Keyboard Shortcuts |
18-2 |
|
|
|
||
Sorting Report Fields |
18-2 |
|
|
|
||
How the Sort Order Affects the Display Order of Planets and Fleets 18-2 |
||||||
Printing a Map of the Universe 18-3 |
|
|
||||
Dumping Information to a Text File 18-3 |
|
|||||
Diplomacy and Trade |
19-1 |
|
|
|
|
|
Player Relationships |
19-1 |
|
|
|
||
Trading Fuel and Minerals 19-1 |
|
|
||||
Trading Technology |
19-2 |
|
|
|
||
Trading Ships |
19-2 |
|
|
|
|
|
Trading with Transdimensional Beings |
19-2 |
|
||||
Joint Mining Ventures |
19-2 |
|
|
|
||
Claim Adjusters and Orbital Terraforming 19-3 |
|
|||||
VIII C O N T E N T S
RACE CREATION
Designing Custom Races |
20-1 |
|
|
Opening the Wizard |
20-1 |
|
|
Advantage Points |
20-1 |
|
|
Step 1: Basic Race Definition |
20-2 |
||
Step 2: Primary Trait |
20-3 |
|
|
Step 3: Lesser Traits |
20-11 |
|
|
Step 4: Population Growth Factors 20-13 |
|||
Step 5: Population Efficiency |
20-16 |
||
Step 6: Research Costs 20-17 |
|
||
Finish 20-17 |
|
|
|
Predefined Races 21-1
Alternate Reality Races 22-1
THE GUTS OF STARS!
The Guts of Combat |
23-1 |
|
|
|
|
|
About the Battle Board 23-1 |
|
|
|
|||
Armor, Shields and Damage |
23-2 |
|
|
|||
Weapons and Battle Devices |
23-3 |
|
||||
Damage Repair |
23-7 |
|
|
|
||
Movement, Initiative and Firing in Battle |
22-8 |
|||||
The Guts of Cloaking |
24-1 |
|
|
|
|
|
Cloaking when the Ship is Empty |
24-1 |
|
||||
Cloaking for a Fleet with More than One Ship 24-3 |
||||||
The Effect of Multiple Tachyon Detectors |
24-3 |
|||||
The Appendix of Cloaking 24-3 |
|
|
||||
The Guts of Mass Drivers |
25-1 |
|
|
|
||
Damage Potential of Mass Packets |
25-1 |
|
||||
Packet Decay Rate |
25-1 |
|
|
|
||
Speed and Distance |
25-1 |
|
|
|
||
C O N T E N T S IX
Damage and Recovery Formulas and Calculation 25-2
The Guts of Mine Fields |
26-1 |
Types of Mines |
26-1 |
Detecting Mine Fields 26-2
Ship Cloak Effectiveness and Mine Fields 26-2
Race Traits and Mine Fields 26-2
BACK OF THE BOOK
Keyboard Shortcuts A-1
Technology Tables B-1
Armor B-2
Beam Weapons B-3
Bombs B-4
Electrical B-5
Engines B-6
Hulls B-7
Mechanical B-8
Mines B-8
Mining B-9
Orbital B-9
Planetary B-10
Scanners B-11
Shields B-11
Starbase Hulls B-12
Terraforming B-12
Torpedoes B-13
Files Used in Stars! C-1
Frequently Asked Questions D-1
Glossary Gl-1
Index In-1
X C O N T E N T S

INTRODUCTION
Some leaders are forged in battle. Others prefer formal training with less bloodshed. With Stars!, your training ground is the tutorial. Use it, and you’ll massively reduce the chances of getting your butt kicked early by the computer or other more experienced players. The ancient races responsible for the formation of the Stars! universe didn’t play the tutorial. Read what happened to them.
1WELCOME TO THE
STARS! UNIVERSE
IT’S A RELATIVELY SMALL UNIVERSE, AFTER ALL
Somewhere out on the edge of the Universe, two great races (the Sznip, a race of crustaceans, and the Fermis, a race of nuclear plasmatoids) have destroyed themselves and the chance for all remaining sentient races to evolve and expand into (nearly) infinite space. Once upon a time there was a theory that said the Universe was made up of interconnected bubbles of space/time. The Sznip and the Fermi War proved it. The detonation that destroyed both these super races also caused these bubbles of real space to pop (actually a simultaneous replacement of real space with null). All the bubbles that is, but one. This bubble of space/time, your bubble, is all that remains. And it’s small (too small) and full (too full) of sentient species, each on the verge of colonizing other planets and traveling between the stars. Each race is hungry to control the little bit that’s left.
There’s bound to be trouble.
WHAT YOU’RE DOING HERE
Fortunately, the destructive element found in the terrible weapons of the Sznips and Fermis does not exist in the Universal Remnant. So there is a limit to the trouble you and your opponents can cause. During your first year, you’ll be ready to build your first simple space ships. Eventually you’ll build interstellar cruisers and planet bombers, freighters the size of small moons, and weapons that will make your opponents tremble or shrug, depending on their confidence level. You’ll colonize world after world as quickly as only your race can. You may get lucky, and find artifacts left by those ancient races that catalyze your research efforts, or encounter transdimensional beings offering you knowledge that only they possess, and at low, low prices. By the time the space dust settles, 100, 200, perhaps 500 or more years will have passed, and either you or one of your undeserving opponents will be calling the shots. Or, shot up, war-scarred, and with too few resources to continue, you’ll call a halt, shake hands and all settle down for a foot stomping game of Fizbin.

1-2 I N T R O D U C T I O N
It’s the 2400th year of the Planetary Era. Your world is resource rich and bustling with technological development. Your political leaders are giddy and, with much fanfare, have just declared this as the first year of the Galactic Era. Your people are looking for a real leader.
YOU ARE THE MASTER STRATEGIST
Use the Stars! control panels to command your capitol worlds and fleets, to seek out strange new worlds and new civilizations, to boldly help your neighbors understand their role in the doctrine of Manifest Destiny.
Stars! may seem complicated at first glance. Lots of tiles and windows, lots of text, lots of colors. These things require a little explaining. Only a very little.
But not here. You won’t need to pay more than cursory attention to most of the information on the screen, most of the time. It’s there when you need it. You can even temporarily collapse some pieces if you find them distracting.
To orient yourself, before you go nose to beak with the other spacially challenged races, PLAY THE TUTORIAL GAME. Just click on New Game in the opening screen, then click on Tutorial in the New Game dialog.
To get help during play, LEFT-CLICK the mouse when you see this cursor: Also consider clicking on Help buttons in the dialogs and choosing the Help commands in the main menu.
Now get going. The universe is waiting, along with up to 15 other star-hungry races.
WHAT YOU’LL FIND IN THIS PLAYER’S GUIDE
Use this guide to help you set up any type of single or multi-player game, to familiarize yourself with the playing screen, and to learn both the high points and the details of creating and running the universe. For quick reference, everything in this paper guide is duplicated in the Stars! online help.
WE’D LIKE TO HEAR FROM YOU
Stars! was designed by strategy game fanatics for strategy gamers of all levels. Many features in the game have appeared at the request of the Stars! players community. So talk to us. Tell us what you think and what you want (keeping in mind that Stars! is turn-based, not live action).
Multi-player games
You can challenge other beings on a single computer or across a local area network, or by transferring turn files using ftp, modems, email, computer bulletin boards, or any other file transfer mechanism you can think of. There’s room for up to 16 of you in the Stars! universe, with any mix of human and computer opponents.
W E L C O M E 1-3
To contact us with your ideas and reactions, send e-mail to stars@webmap.com.
To learn more about the Stars! universe outside your computer, visit our official Web site, Waypoint Zero, at www.webmap.com/stars!, and our publisher’s handsome Web site at www.empire.co.uk.
To trade information and converse with other Stars! players, visit the Stars!
Usenet news group, rec.games.computer.stars.
1-4 I N T R O D U C T I O N
GETTING STARTED
Welcome to Universe University—a short course in creating the universe, hosting games, and operating Stars! within the confines of your computer . Here are the administrative nuts and bolts every leader needs to know. Stay awake. You’ll probably use only 10% of what you learn here, but you never know which 10% it’s going to be.

2 SINGLE PLAYER SETUP
PLAYING THE TUTORIAL
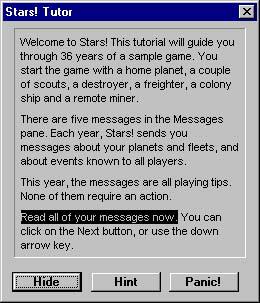
Stars! contains an intelligent, online tutorial that, in the course of one short (and very real) game, introduces you to a variety of basic strategies and familiarizes you with all the player tools. If you’ve never played Stars! before, we highly recommend that you play the tutorial first.
The current instruction is always highlighted.
¯Just click on New Game in the opening screen, then on Begin Tutorial in the New Game dialog. You can quit the tutorial at any time, saving your place to begin again later.

2-2 G E T T I N G S T A R T E D
¯To start the tutorial where you left off, or to start over, click on New Game and Begin Tutorial, or use the Help (Tutorial ) menu item.
STARTING A SINGLE PLAYER GAME
Like we said, if you’ve never played Stars! or a game like Stars! before, we recommend that you play the tutorial before you strike out on your own.
To start a new single player game:
1. |
Click on New Game on the opening screen or on File (New) from the |
|
Stars! main menu. |
2. |
In the New Game dialog, select the universe size, difficulty level and race |
|
to play. To learn about or modify the attributes of your race, click on |
|
Customize Race. The Custom Race wizard appears. |
3. |
When you’re done selecting game settings, OK the New Game dialog. |
|
You’ll be prompted to enter a file name under which to save the game. |
4. |
Enter any name up to eight characters long (don’t worry about typing an |
|
extension). Stars! creates a set of files containing data for that game and |
|
for each human and computer player in the game. You can save the game |
|
wherever you wish. By default, game files are saved in the Stars! install |
|
directory. |
|
The game begins, with your home world displayed on the screen and in |
|
the Command pane, Scanner pane and Selection Summary pane. For the |
|
first turn, the Messages pane contains tips that help you get started. |
5. |
Use this turn to investigate your home planet, start basic production and |
|
research, and send your scouts out to learn about the nearby worlds. |
6. |
Once you finish the turn, select the Turn (Generate) menu item or press |
|
the F9 key. Your next turn generates immediately. |
7. |
To quit, select File (Exit) or File (Close). If you’ve made changes since the |
|
start of the turn, Stars! prompts you to save. If you don’t save, you’ll start |
|
the same turn over the next time you open the game. |
8. |
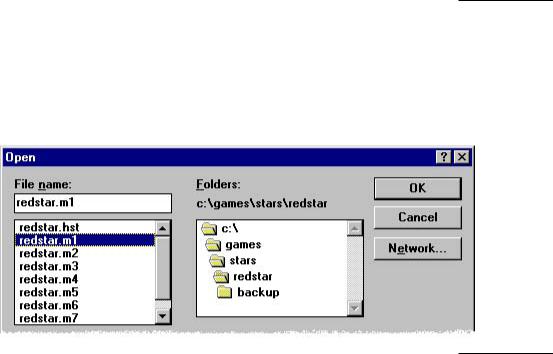
When you wish to continue the game where you left off, click on |
|
Continue Game on the opening screen. You can also click on Open |
|
Game, selecting gamename.m1 from the playing directory. |
You can learn about defining a race in chapter 20, Designing Custom Races.
You can click on
Advanced Game in the New Game dialog to specify the number of AI (computer) players and the conditions for victory.
IMPORTANT: The first time you play Stars!, exit using the
File (Exit) command. This writes the stars.ini file to the Windows directory, saving game options and helping to prevent that pesky serial number dialog from appearing again.
S I N G L E P L A Y E R S E T U P 2-3
SETTING AND VIEWING WINNING CONDITIONS
You can specify one or more winning conditions in step 3 of the Advanced New Game wizard. You can also accept the default conditions provided by Stars!. To view the winning conditions once the game has begun, choose the View (Race) menu item, then turn to page 3 of the View Game Parameters dialog that appears.
Because you can control the variety and combination of winning conditions, more than one player can be declared the winner. All players are notified in a message when someone wins. You can continue to play past this point, or end the game.
Track the score using Reports (Score) menu item (or by pressing F10). The Score sheet shows your score and current ranking, and a history of scores since the game began.
If Public Player Scores is selected in the game setup, all player’s scores and rankings appear in the Score sheet.
2-4 G E T T I N G S T A R T E D

3 MULTI-PLAYER SETUP
SETTING UP A SINGLE COMPUTER, MULTI-PLAYER (HOT SEAT) GAME
In a multi-player game, designate one person as the host. This person is in charge of generating turns and generally administering the game. A player can also act as host.
What the Host Needs to Do (Hot Seat Play)
Before you begin setup, have your players design their races and give you the race files for loading into the game. Alternately, you can customize a race for any player who wishes it.
To set up a multi-player hot seat game:
1.Click on New Game on the opening screen or on File (New) from the Stars! main menu. The New Game dialog appears.
2.Click on Advanced Options, then specify options such as the universe size, difficulty level, relative starting positions, accelerated play for BBS
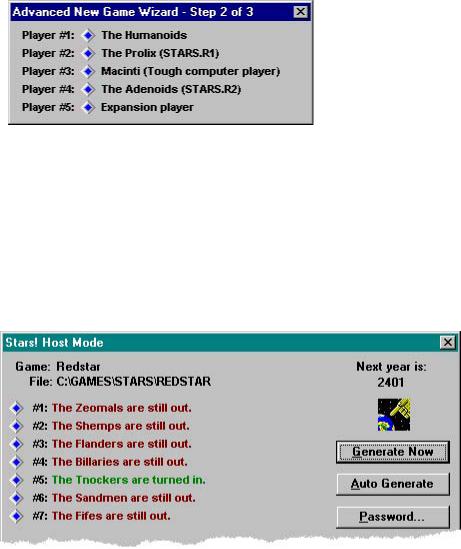
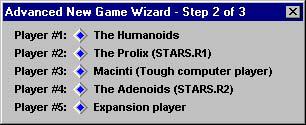
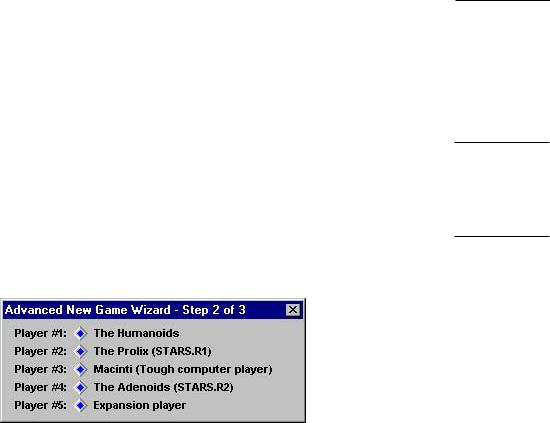
games, number and type of players (Human or AI), and the victory conditions. Be sure to load any custom race files provided by the players. Create player positions for latecomers if you think it’s necessary.
3.The order of players listed in Step 2 of the Advanced New Game dialog becomes part of the turn file name for each player.
Learn about creating a race in chapter 20, Designing Custom Races.
Learn about
Winning
Conditions, p 3-9
3-2 G E T T I N G S T A R T E D
Player #1’s file is gamename.m1 (for example, redstar.m1).
4.Tell each player their number. They’ll need it to open the correct file at the start of their turn.
5.You’ll be prompted for a game name. Enter any name up to eight characters long (don’t worry about typing an extension). Stars! creates a set of files containing data for that game and each player in the game. You can save the game wherever you wish. By default, Stars! will save the game files in the Stars! install directory.
6.The Stars! Host Mode dialog appears. Create a password, if you want to prevent other players from opening the game file. Click on Auto Generate to start the game.
7.Help the players understand what they need to do using the instructions in What Each Player Needs to Do. If you’re playing as well as hosting, you’ll probably find it easier to start a second instance of Stars!, playing from one and using the other to handle host duties.
¯ To quit the game, click on Close in the Host dialog.
M U L T I - P L A Y E R S E T U P 3-3
¯To restart the host, start Stars!, click on Open Game, and choose the gamename.hst file.
What Each Player Needs to Do (Hot Seat Play)
If you’ve never played Stars! or a game like Stars! before, we recommend that you play the tutorial before you strike out on your own. That said:
¯(Optional) Before the host creates a game, use Stars! Custom Race wizard to create a customized race, then give the race file to the host. Open the Custom Race wizard using the File (Custom Race wizard ) menu item.
Learn about creating a race in chapter 20, Designing Custom
Once the host creates the game, do the following: |
Races. |
1.Start Stars! and click on Open Game from the opening screen. Open your player file, gamename.mN. The Host needs to provide you with the gamename.
Your game begins, with your home world displayed on the screen and in the Command, Scanner and Selection Summary panes. For the first turn, the Message pane contains tips that help you get started. Investigate your home planet, start basic production and research, and send your scouts out to learn about the nearby worlds.
2.Place your game files in the same directory each turn. The directory location is your choice—we recommend creating a play directory within the Stars! directory to keep things simple.
3.Once you finish the turn, select the menu command Turn (Wait for New ). Stars! will minimize, waiting for a new turn. When the new turn is ready, it will beep once and flash, while displaying Turn Available.
Screen Layout
To change the basic layout of the Stars! screen use the View
(Window Layout) menu item. You can also rearrange and open and close tiles, and resize individual panes by clicking on their edges and dragging. For details, read the start of chapter 5, The Stars! Screen.

3-4 G E T T I N G S T A R T E D
If you wish, you can exit the game before or after you finish the turn. You can save your changes or start the turn again if you don’t like the way things are going. Read Exiting the Game on page 4-4 for more information.
If you plan to be absent for two or more turns, follow the instructions in Being Absent from Play on page 3-10.
SETTING UP NETWORK-BASED MULTI-PLAYER GAMES
In a multi-player game, designate one person as the host. This person is in charge of generating turns and generally administering the game. A player can also act as host.
What the Host Needs to Do (Network Play)
You will need to set up the game in a shared directory (sharepoint) accessible to all players. This sharepoint is the place that will contain all the game files, and where the players will go to open their games. The sharepoint can exist on a local area network, or via a modem connection (if you are using Windows 95 Dial-up Networking capabilities—just connect to the server machine or to another Win95 machine with the Plus Pack installed). You can also create network connections using PC-NFS or any other software that allows you to attach directories on the remote server as if they were local.
Before you begin setup, have your players design their races and give you the race files for loading into the game. Alternately, you can customize a race for any player who wishes it.
To set up a network game:
1.Create the sharepoint that will contain all the game files. We recommend keeping it simple—no more than one play directory per game, for all players in the game. You can create this directory within the directory containing the stars!.exe program, or anywhere else you wish.
2.Click on New Game on the opening screen or on File (New) from the Stars! main menu. The New Game dialog appears.
3.Click on Advanced Options, then specify options such as the universe
size, difficulty level, relative starting positions, accelerated play for BBS games, number and type of players (real or AI), and the winning conditions. Be sure to load any custom race files provided by the players. Create player positions for latecomers if you wish.
Learn about creating a race in chapter 20, Designing Custom Races.
Learn about
Winning
Conditions, p 3-9
M U L T I - P L A Y E R S E T U P 3-5
Player #1’s file is gamename.m1 (for example, redstar.m1).
The order of players listed in Step 2 of the Advanced New Game dialog becomes part of the turn filename for each player.
4.Tell each player their number. They’ll need it to open the correct turn file.
5.You’ll be prompted for a game name. Enter any name up to eight characters long (don’t worry about typing an extension). Stars! creates a set of files containing data for that game and each player in the game. Save the game in the shared directory.
6.Select Auto Generate in the Host dialog. The dialog will minimize, waiting for all players to submit their turns. Stars! automatically submits any turn into the shared directory. Once that’s done, Stars! automatically generates a new turn, then returns to wait mode.
7.If you want to force a new turn to be generated, double-click on the Stars! host icon, then select Generate Now from the Host dialog. To cause Stars! to auto-generate turns again, select Auto Generate again. The dialog will minimize and wait for players as before. Stars! will continue to follow any existing orders for players who didn’t submit their turns on time. All messages and data for the missed turns, such as planets discovered or battles fought, will be present when they load the new turn.
8.Help the players understand what they need to do using the following instructions in What Each Player Needs to Do (Network Play). If you’re playing as well as hosting, you’ll probably find it easier to start a second instance of Stars!, playing from one and using the other to handle host duties.
¯To quit the game, click on Close in the Host dialog.
¯To restart the host, start Stars!, click on Open Game, and choose the gamename.hst file.

3-6 G E T T I N G S T A R T E D
What Each Player Needs to Do (Network Play)
If you’ve never played Stars! or a game like Stars! before, we recommend that you play the tutorial before you strike out on your own. That said:
¯(Optional) Before the host creates a game, use Stars! Custom Race wizard to create a customized race, then give the race file to the host. Open the Custom Race wizard using the File (Custom Race wizard ) menu item.
Once the host creates the game, do the following on the machine where you’ll play:
1.Start Stars! and click on Open Game from the opening screen. Open your player file, gamename.mN. This file should be located in the shared play directory (sharepoint) set up by the host. The host is also responsible for supplying you with the gamename.
Your game begins, with your home world displayed on the screen and in the Command, Scanner and Selection Summary panes. For the first turn, the Message pane contains tips that help you get started. Investigate your home planet, start basic production and research, and send your scouts out to learn about the nearby worlds.
2.Once you finish the turn, select the menu command Turn (Wait for New ). Stars! will minimize, waiting for a new turn.
When the new turn is ready, the Stars! icon will beep once and flash, while displaying Turn Available. If you wish, you can exit the game before or after you finish the turn. You can save your changes or start the turn again if you don’t like the way things are going. Read Exiting The Game on page 4-4 for more information.
If you plan to be absent for two or more turns, follow the instructions in Being Absent from Play on page 3-10.
Learn about creating a race in chapter 20, Designing Custom Races.
M U L T I - P L A Y E R S E T U P 3-7
SETTING UP MODEM, FTP, AND PLAY BY E-MAIL GAMES
All multi-player games need one person to act as the host. This person is in charge of generating turns and generally administering the game. A player can also host a game.
What the Host Needs to Do (Modem/FTP/E-mail Play)
Stars is turn-based, not real-time. This means modems can be used to transfer turn files once they are generated. You can do this through a BBS, e-mail, upload/download from an FTP site, or using any other method you wish to transfer files from the host to player systems. There aren’t any special transfer protocols for modem users—you’re just uploading or downloading files.
Before you begin setup, have your players design their races and give you the race files for loading into the game. Alternately, you can customize a race for any player who wishes it.
To set up a modem or email-based game:
1.Click on New Game on the opening screen or on File (New) from the Stars! main menu. The New Game dialog appears.
2.Click on Advanced Options, then specify options such as the universe size, difficulty level, relative starting positions, accelerated play for BBS games, the number and type of players (real or AI), and the winning conditions. Create player positions for latecomers if you wish.
Player #1’s file is gamename.m1 (for example, redstar.m1).
The order of players listed in step 2 of the New Game dialog becomes part of the turn filename for each player.
3.Save the game using any name up to eight characters long. Stars! creates a set of files containing data for that game and each player in the game. You can save the game wherever you wish. By default, Stars! will save the game files in the Stars! install directory.
Tip: Notice the Accelerated BBS Play option in the Advanced Game setup. You may wish to check this option during setup to jump-start the game.
Learn about creating a race in chapter 20, Designing Custom Races.
Learn about
Winning
Conditions, p 3-9
3-8 G E T T I N G S T A R T E D
4.The Stars! Host dialog appears. Click on Close to stop the game until all players have submitted their turns. If you’d like to leave Stars! running, click on Auto Generate.
5.Before the first turn each player needs to download the universe file, gamename.xy, and their player file, gamename.mN (where N is the player number), for the newly created game. Alternately, you can upload or e- mailgamename.xy and gamename.mN to each player. These files will be located in the same directory in which you saved the game.
6.Help the players understand what they need to do using the instructions in the following section on What Each Player Needs to Do (Modem/FTP/E-mail Play). If you’re playing as well as hosting, you’ll probably find it easier to start a second instance of Stars!, playing from one and using the other to handle host duties.
After each player has sent you their turn (in the form of the log file, gamename.xN) do the following:
1.Place each player’s submitted log file in the directory where you set up the game.
2.Start Stars! (if it’s not already running), click on Open Game, and open the host file, gamename.hst.
3.If the Stars! host is set to auto-generate mode, it will automatically generate the new turn as soon as you move the player log files into the game directory. If you’re generating turns manually, then select Generate Now from the Host dialog. Stars! will continue to follow any existing orders for players who didn’t submit their turns on time. All messages and data for the missed turns, such as planets discovered or battles fought, will be present when they load the new turn.
4.Once the turn is generated, notify the players that the new turn is available. You can e-mail or upload each newly updated gamename.mN file or allow each player to download it themselves.
What Each Player Needs to Do (Modem/FTP/E-mail Play)
(Optional) Before the host creates a game, use Stars! Custom Race wizard to create a customized race, then give the race file to the host.
Once the host creates the game, do the following on the machine where you’ll play:
 Loading...