


R E D FA C T I O N
I N S T R U C T I O N M A N U A L

I N T R O D U C T I O N
Mars in the near future.
Mars is the planet of opportunity, its mineral wealth feeding the insatiable needs of Earth, a planet stripped of raw materials and minerals. Ultor Corporation, aptly named after the ancient Roman temple dedicated to Mars the god of war, owns all the mining rights on the planet. The company is an expert at maximizing production while minimizing costs. Fortunes are made
as cargo ship after cargo ship return to Earth filled with precious Noachite.
Mine workers, misled by promises of adventure and easy money, arrive on Mars by the shuttle load. Few ever make it back to Earth. Conditions in the Ultor mines are brutal. The work is dangerous and the miners’ living quarters are disgusting. Environmental suits and bunks are shared between miners on different shifts. Food is lousy and in short supply. And beatings from Ultor guards are commonplace.
Worst of all, a mysterious, disfiguring Plague is running rampant through the mines. As the death toll rises and Ultor remains complacent, the miners’ fear and discontent grows. Pamphlets and posters from an underground organization begin showing up all over the mining complex. Signed by the mysterious Eos, the pamphlets tell of bizarre deaths and missing comrades and urge the miners to take action against Ultor. Tensions run high. The mines are wired like a powder keg. All it will take is a spark…
During a shift change, a young miner is brutally assaulted by an Ultor guard. Another miner, Parker, witnesses the brutality and is quickly caught up in the chaos. He has no choice. Kill or be killed. A rebellion explodes across Mars.
Can you live long enough to become a hero?

C O N T E N T S
Getting Started . . . . . . . . . . . . . . . . . . . . . . . . . . . .2
Default Controls . . . . . . . . . . . . . . . . . . . . . . . . . . .3
New Game . . . . . . . . . . . . . . . . . . . . . . . . . . . . . . . .4
Load Game . . . . . . . . . . . . . . . . . . . . . . . . . . . . . . .4
Multi . . . . . . . . . . . . . . . . . . . . . . . . . . . . . . . . . . . . .4
Player . . . . . . . . . . . . . . . . . . . . . . . . . . . . . . . . . . |
5 |
Join Game . . . . . . . . . . . . . . . . . . . . . . . . . . . . . . . |
5 |
Create Game . . . . . . . . . . . . . . . . . . . . . . . . . . . . |
6 |
Options . . . . . . . . . . . . . . . . . . . . . . . . . . . . . . . . . .8
Game . . . . . . . . . . . . . . . . . . . . . . . . . . . . . . . . . . |
8 |
Video . . . . . . . . . . . . . . . . . . . . . . . . . . . . . . . . . . . |
9 |
Audio . . . . . . . . . . . . . . . . . . . . . . . . . . . . . . . . . . . |
9 |
Controls . . . . . . . . . . . . . . . . . . . . . . . . . . . . . . . . |
9 |
Extras . . . . . . . . . . . . . . . . . . . . . . . . . . . . . . . . . . .10
Quit . . . . . . . . . . . . . . . . . . . . . . . . . . . . . . . . . . . .10
The HUD . . . . . . . . . . . . . . . . . . . . . . . . . . . . . . . .10
Remaining Health/Armor . . . . . . . . . . . . . . . . . . .10
Ammo . . . . . . . . . . . . . . . . . . . . . . . . . . . . . . . . .11
Incoming Messages . . . . . . . . . . . . . . . . . . . . . .11
Saving and Loading . . . . . . . . . . . . . . . . . . . . . . .11
Weapons and Ammo . . . . . . . . . . . . . . . . . . . . . .12
Vehicles . . . . . . . . . . . . . . . . . . . . . . . . . . . . . . . . .20
Character Bios . . . . . . . . . . . . . . . . . . . . . . . . . . .24
Parker . . . . . . . . . . . . . . . . . . . . . . . . . . . . . . . . |
.24 |
Hendrix . . . . . . . . . . . . . . . . . . . . . . . . . . . . . . . . |
25 |
Eos . . . . . . . . . . . . . . . . . . . . . . . . . . . . . . . . . . . |
28 |
Credits . . . . . . . . . . . . . . . . . . . . . . . . . . . . . . . . . .32
Limited Warranty . . . . . . . . . . . . . . . . . . . . . . . . .33
1
G E T T I N G S T A R T E D
INSTALLATION
Insert the CD into your computer’s CD-ROM drive. Double-click on the “Installer” icon to begin installation.
Follow the on-screen instructions that appear after the Install Program begins.
START-UP OPTIONS
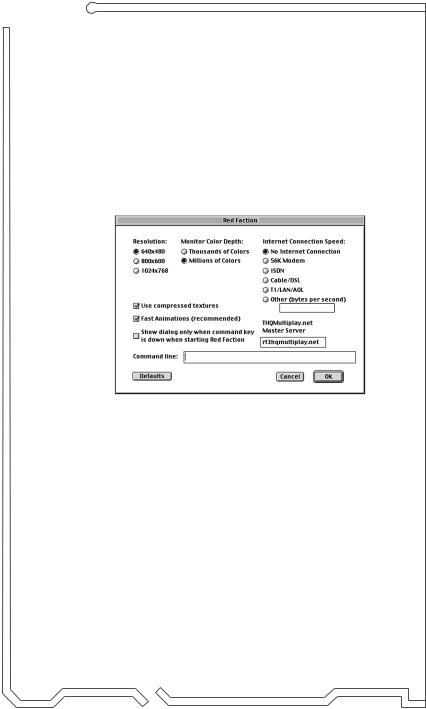
Resolution - Choose from the available screen resolutions. 640x480 allows for the best performance.
Monitor Color Depth - Choose thousands or millions of colors. Thousands allows for better performance on Mac’s with Rage Pro graphics.
Use Compressed Textures - Choose this option if your graphics accelerator card has 8MB or less VRAM. If graphic anomalies occur, turn this option off.
Fast Animations (recommended) - Improves framerate of the animations.
Command Line - Enter optional command-line switches.
2

D E F A U L T C O N T R O L S
With the Default configuration, you will use the mouse to look around the environment. Use the keyboard to control your movements.
BUTTON COMMAND |
ACTION |
Movement |
|
Run Forward |
W |
Run Backwards |
S |
Slide Left |
A |
Slide Right |
D |
Jump |
Spacebar |
Crouch |
C |
Slide Up |
Numeric Keypad + |
Slide Down |
Numeric Keypad Enter |
Look Up |
Numeric Keypad 2 |
Look Down |
Numeric Keypad 8 |
Turn Left |
Numeric Keypad 4 |
Turn Right |
Numeric Keypad 6 |
Weapons |
|
Fire Primary |
Mouse Button |
Alternate Fire |
Ctrl-Mouse Button |
Holster Weapon |
H |
Reload Weapon |
R |
Next Weapon |
] |
Previous Weapon |
[ |
Melee Weapons |
1 |
Semi-automatic Weapons |
2 |
Heavy Weapons |
3 |
Explosive Weapons |
4 |
3

Miscellaneous |
|
Use |
Return |
Quick Save |
F6 |
Quick Load |
F9 |
Message Log |
M |
Multiplayer Features |
|
Chat |
T |
Team Chat |
Y |
Multiplayer Stats |
Tab |
Note: These are the default controls for Red Faction. To customize the controls, select CONTROLS from the Options Menu.
N E W
When beginning a new game, you will be asked to indicate if you’d like to undergo Training before starting play.
L O A D
Use the mouse or arrow keys to select a saved game then double click or press RETURN to load the saved game.
Red Faction saves your game configuration and settings information. These settings are automatically loaded upon boot-up.
M U L T I
Up to 16 players can compete against each other using an Internet or LAN connection via TCP/IP. You can join a game in progress or you can set up a new game server from the Multi Menu.
4

PLAYER
Customize the appearance of your character for multiplayer games. Select from a list of options to change your name and model.
JOIN GAME
Select JOIN GAME to view the Servers
Screen. Here you can view a list of available games, the speed of each network, which multiplayer map is running, and the current number of players in the game.
1.LAN Only—This option is off by default, showing you all tracked Internet game servers. Turning this option on shows only games running on your local area network.
2.Next choose a game type.
•Deathmatch—Every man for himself, the player with the most kills wins.
•CTF—Capture the other squad’s flag as many times as you can in the given time limit.
•Team Deathmatch—The team with the most kills wins.
Note: Servers running mod games are shown in a different color in the server list.
3.Finally, find and choose a server to play on.
•Join—Click on a game name, then click on JOIN to connect to an available game.
•Get Servers—Request a list of available servers.
5
•Refresh Selected—Update the server information for the selected game.
•Add Server—Add a specific game server by entering its IP address.
•Refresh All—Update the information for all the listed game servers.
•Back—Return to the Multi Menu.
You can sort the available games by any of the following characteristics by clicking on its Tab above the server list: Favorites, Server Name, Ping, Map Name, Players and Game Type.
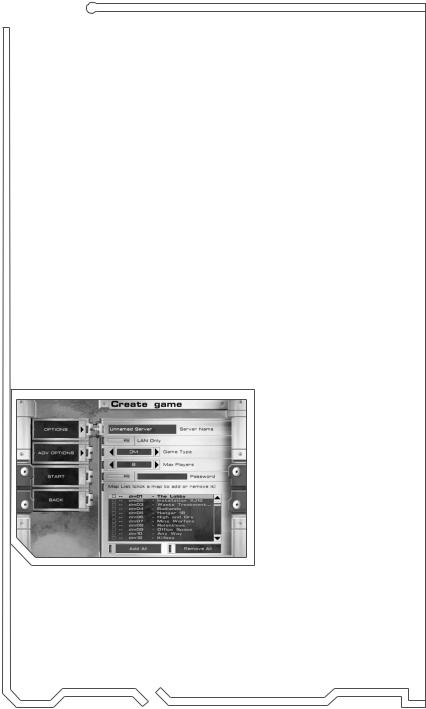
CREATE GAME
Host a multiplayer game on your computer. Customize your server by using the Options and Advanced Options menus before selecting START.
Options
•Server Name—To create a game, the first step is to give your server a name for other users to select.
•LAN Only—By turning this on, your game will be running only over your local area network, and not over the Internet via the THQMultiplay Game Tracker.
•Game Type—Decide the game type for the server. Notice how the Map List changes for
each game type—some maps are unavailable for different game types.
•Max Players—Select the maximum number of users that can connect to your server. The more connected users, the greater the possibility of slow-down.
6

•Password—Only players who know the password can connect to and play on your server.
•Map List—Add or Remove maps from the Map List by clicking on the Map name to change its status— click maps not on the list to add them, click maps already on the list to remove them. At the end of a level, the next map in the list will load automatically and will begin the next multiplayer game.
Advanced Options
•Weapons Stay—Select YES for permanent weapons placement.
•Force Respawn—With YES selected, each player will be forced back onto the map without pressing any keys.
•Falling Damage—Select YES for players to take damage from falls.
•Team Damage—Choose YES to allow a player to take damage from friendly fire.
•Balance Teams—With this option selected the server will automatically assign players to teams at the start of a level to maintain a competitive level of play between the two teams.
Start
After customizing the settings, select START to begin a new multiplayer game.
Note: A DEDICATED computer will run a game server for other users, creating a faster and more secure gameplay environment. You will not be allowed to play the game while in the Dedicated mode. You must use the “-dedi- cated” command-line option in order to run a dedicated multiplatyer server.
7

O P T I O N S
Set the audio, video, game and control settings in the Options Menu.
GAME
Difficulty Level
Adjust the level of difficulty between EASY/ MEDIUM/HARD/IMPOSSIBLE by clicking on the Right/Left arrows.
•Easy—The easiest setting available.
•Medium—The enemies are smarter and attack quicker.
•Hard—The game is extremely difficult when playing through the Hard level of difficulty.
•Impossible—If you can handle the heat, choose Impossible.
Toggle the following options ON or OFF:
•Show 1ST Person Weapon—Turning this option off means your currently selected weapon will not render in the first-person view.
•Autoswitch Weapons—With this ON, you automatically switch weapons when you find one better than what you’re using. The prioritized list of weapons can be changed below.
•Autoswitch Explosives—Turning this option OFF prevents you from accidentally autoswitching to an explosive weapon. Turning it ON keeps explosive weapons in the Autoswitch list.
Autoswitch Priorities
You can change the priority of each weapon or explosive here. Click on a weapon to move, then select either MOVE UP or MOVE DOWN to increase or decrease the weapon’s priority. The priorities will only be enabled when the Autoswitch Weapons and/or the Autoswitch Explosives options are turned ON.
8
VIDEO
Change the video settings to increase the performance of your system. You can greatly enhance the gameplay experience by reducing, or turning off, some of the video options.
Detail Level
Choose between LOW, MEDIUM, or HIGH detail. By toggling any of the options ON or OFF, this setting will automatically switch to CUSTOM.
Gamma/Brightness
Use the slider to adjust the color balance and brightness to match your monitor’s performance.
AUDIO
Move the sliders to increase/decrease the SOUND EFFECTS, MUSIC and MESSAGES volume.
CONTROLS
Customize the mouse and keyboard settings here.
Mouse Sensitivity
Use the slider to increase/decrease mouse sensitivity.
Mouse Y-Invert
When ON, the Y-axis on the mouse (UP/DOWN) will be inverted.
Select Action
Bind keyboard commands to specific actions here. After highlighting an action, click, press RETURN or click on Change Binding. Now type the new keyboard command you would like to use for the selected action. Selecting DEFAULT restores the original settings.
9
 Loading...