


RAILROAD TYCOON II©
User Manual and The Second Century
© 1998 Gathering of Developers. All Rights Reserved. The software and the related manual for this product are copyrighted. They may not be reproduced, stored in retrieval systems, placed on the Internet or World Wide Web, or transcribed in any form or by any means (electronic, mechanical, photocopying, recording, or otherwise) without prior written permission of the publisher. The software and the related manual are licensed to You pursuant to the terms and conditions of that certain Limited Software Warranty and License Agreement contained in the software and the accompanying written materials.
Railroad Tycoon II, the Railroad Tycoon II logo, PopTop Software and the PopTop logo are trademarks of PopTop Software, Inc. Gathering of Developers and godgames are trademarks of Gathering of Developers, Inc.
Microsoft, Windows 95, Windows 98 and Windows NT and DirectX are registered trademarks of the Microsoft Corporation.
All other brand names, product names, and characters mentioned in this book are trade names, service marks, trademarks, or registered trademarks of
their respective companies. All other trademarks are the property of their respective companies.
Contents: 1 2 3 4 5 6 7 8 9 10 21 Appendix
Chapter 1: Getting Started
About this Manual
About Railroad Tycoon II
Changes from Railroad Tycoon to Railroad Tycoon II
Installing Railroad Tycoon II
Starting Railroad Tycoon II
Chapter 2: Tutorial
About this Tutorial
Setting Up a Game
Exploring the Main Interface
Starting a Company
Laying Your First Track
Building Stations
Buying a Train
Entering the World of High Finance
Controlling Your Railroad Empire
Chapter 3: The Main Menu
Navigational Aid
Main Menu Options
Single Player
New Campaign
Load Campaign
New Scenario
Load Scenario
Multiplayer
High Scores
Credits
Quit
Chapter 4: The Main Interface
Navigational Aid
The Four Parts of the Main Interface
Navigating the Map
Viewing Buildings and Terrain
Checking Your Radar
The Primary Action Icons
Lay Track
Build a New Station
Bulldoze Objects
Map Overview
Purchase a New Train
Stock Market
Control Panel
File Options
The Center List Box
Cash Display
Date
Chapter 5: Stations
The Economy
The Role of Stations
Cargo Pickup and Delivery
Servicing Trains
Station Detail Screen
Structural Improvements
Cargo Supply/Demand
Chapter 6: Trains
Locomotives
Cargo
Get Your Trains Rolling
Train Purchase Window
Train Detail Screen
Instrument Panel
Route/Consist List Box
Train/Station Info
Map Router/Car List
More On Train Routing
Chapter 7: Players and Companies
Player Detail
Company Detail
Chapter 8: The Stock Market
Stocks 101
The Stock Market Screen
Personal
Corporate
Chapter 9: Multiplayer
Understanding Your Multiplayer Options
Connecting Your Game
TCP/IP
IPX
Modem
Serial
Setting Up a Multiplayer Game
Playing the Game
Chapter 10: Using the Map Editor
Starting a New Map
Loading a Map
Editor Basics
Navigating the Map
Map Editing Tools
Map Options
Chapter 21: UP & RUNNING WITH RAILROAD TYCOON II: THE SECOND CENTURY
Installing Railroad Tycoon IITSC
What's New
Campaigns
Gameplay Changes
Appendix
Industries
Tech Support and Troubleshooting
Limited Software Warranty and License Agreement
RAILROAD TYCOON II
1. GETTING STARTED >Table of Contents<
In this chapter:
•About this Manual
•About Railroad Tycoon II
•Railroad Tycoon vs. Railroad Tycoon II
•Installing Railroad Tycoon II
•Starting Railroad Tycoon II
About this Manual
It’s a truism at computer game companies that most gamers don’t read the manual—until a problem rears its ugly head. In that case, the average gamer wants to spend as little time as possible with the manual (or tech support), then get back to the game. This manual is designed to do just that—get you up and playing fairly quickly, while also providing an easy-to-use reference for the game. The manual is divided into nine chapters, organized in the order that you’ll need them if you’re new to Railroad Tycoon II:
•Chapter 1: Getting Started, includes information on the game, changes since the original Railroad Tycoon, and instructions for installing Railroad Tycoon II.
•Chapter 2: Tutorial, is intended to give you a jump start for playing Railroad Tycoon II. Go to this chapter to fire up the game and give it a test drive.
•Chapter 3: The Main Menu, provides detailed information about the game’s primary menu and all its sub-menus.
•Chapter 4: The Main Interface, covers every function available from the game’s main interface. This is where you’ll spend most of your time, so bookmark this section for easy reference.
•Chapter 5: Stations, provides an overview of planning and placing stations for maximum profitability.
•Chapter 6: Trains, covers purchasing a train, and selecting its destinations and cargo.
•Chapter 7: Players and Companies, includes detailed information about managing your company’s finances, as well as your personal wealth.
•Chapter 8: The Stock Market, has everything you need to know to corner the market and make beggars of your competitors.
•Chapter 9: Multiplayer, has everything you need to know to set up and play a multiplayer game.
•Chapter 10: Using the Map Editor, covers the basics of creating your own maps with Railroad Tycoon II’s built-in editor.
•The Appendix contains important information that goes beyond the fundamentals of the game, which is another way of saying, it didn’t fit anywhere else.
In addition, Railroad Tycoon II comes with a Readme file on CD, as well as a brief (read: not comprehensive) in-game tutorial that duplicates some of the content of this manual—for the 90 percent of the public that doesn’t read manuals.
About Railroad Tycoon II
Since the invention of the wheel, man has been obsessed with finding faster and more efficient ways of transporting people and goods to distant destinations. The ancient Romans used ruts or grooves in their roads to improve the flow and speed of traffic. In the 1600’s, miners laid down wooden planks on which they led horse-drawn carts to lighten their workload, and increase the speed at which they could extract coal and other raw materials from the mines. However, few things changed the world as dramatically and as quickly as did the introduction of steam power in the 1700’s, and the invention of the steam-powered locomotive in 1804.
Initially replacing the horse for freight work and thus earning the long-lived moniker "the Iron Horse," the steam locomotive and the railways on which they ran revolutionized the means of transportation and inspired visionary entrepreneurs and generations of song writers. Virtually overnight, it became feasible to haul cargo over great distances, and the railroad industry quickly became a cash cow for landowners and the railroad barons themselves. For the first time, long-distance travel was a reality, and new industries, folklore, and legends were created to cater to the needs and dreams of a more mobile population.
Railroad Tycoon II takes you back to this momentous period in human history. You slip into the role as chairman of your own railroad, and it is your job to be better, faster, and just plain smarter than your competitors. Good business sense is a must, but so is a healthy dose of guts to go for the glory of building and ruling your own iron empire.
As your fledgling empire grows, you’ll have the chance to bring rail travel to the cities of your choice, supplying them with the goods they need. You’ll also be given various tasks whose completion depends upon your ability to think faster than your competitors, make allies out of enemies, and above all, satisfy your shareholders. The stock market is another area where you can pad your fortune, or grind your rivals into dust. You can even hire managers—each with unique bonuses that contribute to your success—to assist you with everyday operations. There are as many ways to accomplish your goals as there are individuals playing the game, and each scenario won’t play the same way twice, resulting in a fresh game play experience every time. Once
you’ve mastered the role of chairman, you’ll be ready to take on other players in multiplayer mode, or even design your own maps and remake history as you see fit, in the extensive map editor provided with this detailed, addictive, and highly entertaining game.
Railroad Tycoon vs. Railroad Tycoon II
Railroad Tycoon II is the sequel to the award-winning simulation Railroad Tycoon. Although it does include many of the same features that have been updated in various ways, there are some major differences in the two games. Railroad Tycoon II features:
•Better graphics—Designed to run in 1024 x 768 resolution, Railroad Tycoon II is a much more visually impressive game than its predecessor.
•Full-motion video—As an enhancement to game actions, full-motion video clips are included at various stages.
•More engine and cargo types—With over 60 available engines and 34 cargo types, you’ll never run out of options when building your empire.
•A stronger financial market system—Railroad Tycoon II’s economic model is as close to the real world as possible, allowing you to even adversely affect your competitors’ stock by short selling and other robber baron tactics.
•Deeper industry webs—More types of cargo are produced, leading to advanced economic relationships between destinations.
•Territories—Your rights in certain areas will depend upon your railroads relationships within the area. So be good to your neighbors!
•More time periods—The game encompasses the years 1804 to 2020, allowing you to experience the early growth in steam engine railways, the power of diesels, and the modern era of electric engines.
•Nearly twice as many chairmen—Play as any of 40 chairmen, from Otto von Bismarck to William Wheelwright.
•Managers—Select from 40 managers with their own operational bonuses.
•Campaigns—An 18-scenario campaign, starting with simple scenarios, then moving up to more sophisticated and challenging scenarios when you’re ready.
•More configuration options—Set up the game the way you want it to play, even select and play maps separate from the Campaign mode.
•Sandbox mode—Play with no economic model active, with all the time and resources in the world. This is great for learning basic railway design as well as industry relationships.
•Multiplayer modes—Compete against other human players over a local area network (LAN) or the Internet.
•CD quality music—Upgraded sound system, including appropriate music to set the mood for industrial domination of your rivals.
•3D map environment—View actual terrain features, including trees, hills, and rivers, and rotate the map in any direction to better view your holdings.
• Full editor for maps and events—Build (or import) custom maps, and script every detail down to available computer opponents and timeline events.
Installing Railroad Tycoon II
For Railroad Tycoon II to work, your computer must meet the following minimum requirements:
•You must have either Windows 95/98 or Windows NT 4.0 or later installed.
•Your computer should be a Pentium 133MHz or better.
•There must be at least 16MB of RAM installed.
•You must have a 4x (or better) CD-ROM drive.
•Your graphics card and monitor must be capable of 1024 x 768 resolution and 16or 8-bit color depth.
•You must have MS DirectX 5.0 or greater installed. If you don’t, you can install it as part of the Railroad Tycoon II installation process.
•You must have at least 130 MB of available hard disk space.
To install Railroad Tycoon II on your computer
1 Turn on your computer and start Microsoft Windows 95 or later, or Microsoft Windows NT 4.0 or later.
2 Remove the Railroad Tycoon II CD from its case and place it in your CD-ROM drive.
3 If AutoPlay is enabled, a menu will appear once the drive closes. Select Install, and then follow the on-screen instructions.
or
If AutoPlay is not enabled, you’ll need to manually install the program: double-click the My Computer icon on your desktop, double-click the icon for your CD-ROM drive, and then double-click the Setup.exe icon. Click Install when the setup screen appears, and then follow the on-screen instructions.
If you have problems during installation, refer to the troubleshooting section of the Readme.txt file on the Railroad Tycoon II CD.
To uninstall Railroad Tycoon II
1 Turn on your computer and start Microsoft Windows 95 or later, or Microsoft Windows NT 4.0 or later.
2 Place the Railroad Tycoon II CD into your CD-ROM drive.
3 Click the Start button on the taskbar, select Settings, then Control Panel. Double-click Add/Remove Programs, select Railroad Tycoon II, then click Add/Remove to uninstall the program.

Starting Railroad Tycoon II
Once you’ve installed Railroad Tycoon II, there are three ways to start a game.
You can:
•Click the Start button on the task bar, select Programs, and then Railroad Tycoon II to launch the program;
or
•If AutoPlay is enabled, click Play on the Railroad Tycoon II menu that appears when you place the CD in the drive;
or
•Open Windows Explorer and go to the directory where you installed Railroad Tycoon II. In the main directory of the folder where the game resides, double-click the Rt2.exe icon to launch the program.
Sit back and enjoy the opening cinematic. Once the steam clears, you’ll see the Railroad Tycoon II main menu. If you’re one of those impatient types, who can’t wait to relive and reshape the formative years of railroad travel, you can click around in the game to your impatient heart’s content. If you’d like some guidance as to what to do to keep your trains running on time and turn a profit, turn to Chapter 2, Tutorial, which gives you a basic overview of the basic elements of Railroad Tycoon II (page 7). For a comprehensive overview of every menu, item, and function within the game, please refer to Chapter 3, The Main Menu, and Chapter 4, The Main Interface (pages 23 and 29, respectively).
>Chapter 1<
2. TUTORIAL >Table of Contents<
In this chapter:
•About this Tutorial
•Setting Up a Game
•Exploring the Main Interface
•The Map Overview
•Starting a Company
•Laying Your First Track
•Building Stations
•Buying a Train
• Selecting Destinations and Cars
•Entering the World of High Finance
•Controlling Your Railroad Empire
About this Tutorial
This section provides a brief overview of the basic elements of Railroad Tycoon II. It is not a comprehensive overview of every menu, item, and function within the game, but should get you up and playing fairly quickly—provided you belong to the 10 percent of the public that actually does read manuals.
You don’t have to complete this tutorial to play the game. In fact, if you’re one of those people who just likes to dive right in, you can refer to the brief in-game tutorial and click around in the game to your impatient heart’s content. However, if you have a few minutes to spare, we can save you a lot of time by showing you how to do the things you need to do to keep your trains running on time and turn a profit. For a comprehensive overview of every menu, item, and function within the game, please refer to Chapter 3, The Main Menu, and Chapter 4, The Main Interface (pages 23 and 29, respectively).
Setting Up a Game
Upon launching the game, you will find yourself in the main menu screen. This is your launching pad for starting new games, loading saved games, starting multi-player games, etc. The tutorial is based on a saved single-player scenario. Let’s dive into it…
1. From the main menu, select Single Player, then Load Scenario. A panel will open to the right, allowing you to select the game you wish to load.

2. Highlight the Tutorial game, then click OK.
Exploring the Main Interface
As you enter the main game, you’ll be greeted by a popup window explaining the goal of this game. Please read it carefully. As a recap, your goal is to reach $10 million dollars in personal net worth by the year 1900. That means you must accumulate a combined total of cash and stocks with a value of at least $10 million dollars by the year 1900. If you can reach $25 or $50 million by the year 1900, you will receive a greater victory. Click the OK button to close the window.
Next, press the PAUSE key twice. You’ll see that this toggles the game between paused mode and a game speed of "3". For now you’ll want to leave the game paused, so you can look around and set up your railroad without time pressure. When everything is set up, you can resume the game by pressing the PAUSE key again or by pressing the Plus (+) and Minus (-) keys.
There are four sections to the main interface:
•Main Window (A)—This is where the actual game play takes place. Consider this your window on the world. The four ovalshaped icons in the lower right corner of the window enable you to change your view by rotating it, or zooming in and out.
•Radar Area (B)—In the lower left corner, there is a radar view that enables you to move around the map without scrolling.
•Center List Box (C)—The rectangular box to the right of the Radar Area is the List Box—the nerve center of your empire. Use the four tabs to view summaries for Stations, Trains, Players, and Companies. This area also shows cash-on-hand for your company, and, to the left of the tabs, the current date.
•Activity Box (D)—The area in the lower right-hand corner is the Message window. You’ll receive various messages throughout the game, and can access them here.
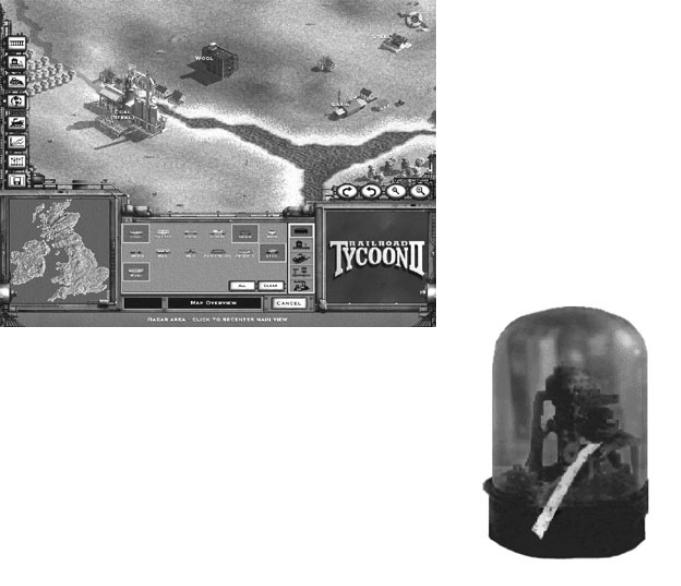
The Map Overview
With the game paused, the first thing you need to do is look around a bit. The Map Overview icon enables you to view resources on the map—a crucial part of planning your first route.
1 Click the Map Overview icon—the fourth one down on the left side of the screen that has a picture of a globe on it. In the List Box, you’ll see a graphical representation of all the resources (cargo) available in the game.
2 Pass the mouse cursor over any resource to temporarily highlight it on the map. Clicking any resource toggles the view of that resource on or off. You can select multiple resources, or overlay all
resources on the map at the same time by clicking the All button. A supply of a resource is shown in white; a demand for it is shown in yellow.
3 Move the mouse cursor to the edges of the screen to scroll the map in the direction you want. If you want to move to another area of the map quickly, click on that area in the Radar Area.
4 Experiment with the overview. Your goal is to locate areas where there are concentrations of resources and industry (supply and demand) that need one another. Resource locations are randomized, and will change each time you play. To get back to the regular list box view, click on the Cancel button at the bottom of the List Box.
Starting a Company
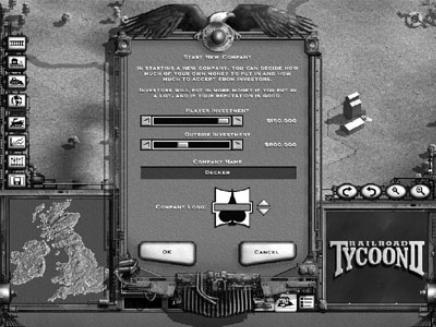
Before you can start laying track to connect the resources you’ve located, you need to own a company.
1. Click the Company tab in the List Box (it’s the rightmost tab.) Double-click Start a new company. When you start a new company, you decide how much of your own money you put into the company, as well as how much you will accept from investors. In general, you should accept little from investors if you plan to pursue complete ownership of the company, but you may choose to accept more to give yourself plenty of operating cash.
2. For this tutorial, slide the Player Investment and Outside Investment sliders all the way to the right. This will give you a whopping $1,650,000 total cash to spend.
3.Type in a name for your company in the Company Name box, or use the default name. Once in the Company Name box, press ESC if you want to leave the box without making changes, or ENTER if you want to keep the name you’ve typed in.
4.Select a Company Logo by using the up or down arrow, or use the one provided for you. Click OK to accept your selections and start your company.
5.Back at the main interface, you’ll see the logo and name of your company, your available cash, and your profits (which are
$0K at this point) in the List Box.
Laying Your First Track
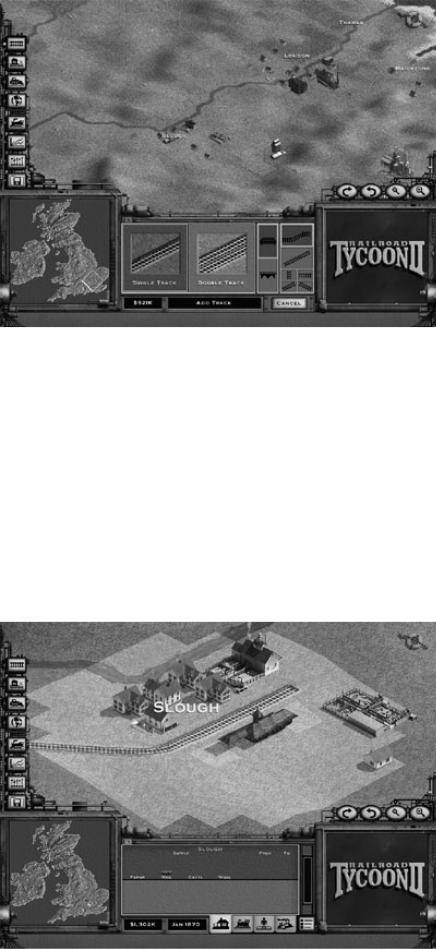
Now that you’ve started a company, it’s time to get down to business. The first thing you need to do is find a suitable route. You’ll find the city of Slough ideally situated to be the center of your new empire. Slough is near the far south central part of the map and just west of the city of London.
1. With the game paused, click the Lay Track icon—the top icon on the left side of the main interface that looks like railroad tracks—to start laying track. Your mouse cursor will change to a track icon.
2. The List Box gives you two track options, Single Track or Double Track. Select Single Track for now. The third option is bridge type, which is chosen by
clicking one of the two icons on the
right side of the List Box. Select Wooden Bridges (the top image).
3. To lay track, place the cursor between the sheep farm and the cattle ranch just to the east of Slough, then click and hold the left mouse button down. As long as you keep the mouse button down, you can move the mouse cursor around the screen, dragging your track around with it. Drag the cursor towards Oxford (further west), the next destination. You’ll notice that there are white, green, and yellow numbers all along the track. The white numbers are the costs for each piece of track. The green and yellow numbers are the grade (steepness) of that section of track. Yellow numbers are steep (red are the steepest), which will slow your trains down. You don’t want a steep grade, so before you release the cursor, press the ESC key to clear the proposed track. Now, click and drag smaller sections of track, releasing the left mouse button at the end of each short section. Trace your track around the hill.
4. When you think your track route looks good, click on the track button again (top left) to exit out of tracklaying mode.
TIP: The tabs at the bottom of the Center List Box will take you to the detail screens for trains, players, and companies, by double-clicking on an item in the List Box. Clicking the left or right arrows at the bottom of this view moves you from station-to- station, train-to-train, player-to-player, or company-to- company. These views are very useful for fast management of everything.

Building Stations
Laying track is only the beginning. Next, you need to set up stations in order to make resources available to your trains.
1. Click the Build a New Station button (Top left, second from the top).
2. There are three station sizes, Small, Medium, and Large. You can choose to place any of them at each destination on your track. The difference between them is the area they pull resources from, which is represented by a gold circle around them on the map. To see an example, click the Medium Station, then move your cursor, which now looks like a medium station, to a point along your track just south of Slough. You’ll notice the station automatically line up with your track.
3. Once the station is placed, any resources within the gold circle will be available at that station. Medium and Large stations have larger circles around them. Just be sure that its gold circle covers the resources
you want to access. In this case all of the houses, the sheep ranch and cattle ranch should be in the golden circle. When you’ve got the station covering the right resources and lined up to the track right, it will turn green. Now click the left mouse button and your station will be placed.
4.When you place a station, you’ll be shown a 3D representation of it. This is called the Station Detail Screen. Click the Buy button in this view to see the improvements you can add to the station. Purchase a water tower, a sanding tower, and a roundhouse for the station to improve train performance and maintenance. When you are done, click the Exit button in the bottom right.
5.Repeat this procedure at Oxford. However, you probably won’t need the three building improvements, as your trains will be able to carry enough water, sand, and oil until they return to Slough. Once you have two
stations connected by track, you’re almost ready to start shipping cargo between them.
Buying a Train
Once you’ve laid track and placed stations, you’ll need to purchase a locomotive to get things rolling.

Selecting a Locomotive
Based upon the time period and geographic location, various locomotives will become available as the game progresses. There are three locomotives available as you start this tutorial.
1. Select the Purchase a new train icon (the one that looks like a train) from the icons along the left side of the main window.
2. Next, select the 4-4-0 Eight-Wheeler from the list on the left. You did build a mostly level track, right? Notice that each locomotive’s stats appear on the right as you select one from the list. Click Purchase to complete the transaction.
Selecting Destinations and Cars
Now that you’ve purchased a locomotive, you need to decide which cargo to haul between your two destinations. The routing screen is where you choose destinations, select cars, and check the supply and demand at each station.
1. After you purchase a locomotive, the next screen you see is the Train Detail Screen. It will show the new train you just purchased, already set to go to your two destinations. The map on the right shows all available destinations —if you had more than two, you would select the destinations you want for this train on the map, and they would appear in the list on the left.
2. Double-click Slough in the List Box on the left, and the right side of the screen will switch from the planning map to a Car List panel. At the very top of
this panel you will see two passenger cars—the default consist. Clicking a car will move it off your consist, or list of cars. Clicking a car from the list below will add it to your consist.
3. At the very bottom of your screen, you will see a list of what the selected station supplies on the left side and what it demands on the right.
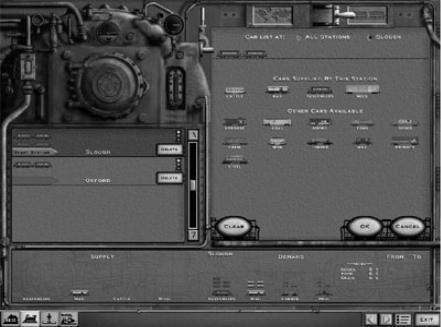
4. Cars available at this station will show up near the top of the Car List. Select one wool car and one passenger car. Check the demand at the other station to make sure you are hauling cargo that is in demand (we know you are but it’s a good practice). When you’re finished setting up the consist at this station, click OK to confirm it, then double-click the Oxford station listed on your consist list on the left side and select one passenger and one goods car. The wool you’ve delivered will be converted into fine goods to be transported back to the hard-working people of Slough.
5. You have one more decision to make here. Take a look at the two stations in the list on the left. The traffic signal will have the green light showing. Clicking this signal will change the light. This signal is what you use to dictate the behavior of this train in
that station. Your choices are:
Green—Don’t wait for cargo, proceed with whatever is already available at the station.
Yellow—Wait until at least half the cargo cars are full before proceeding.
Red—Wait until all of the cargo cars are full before proceeding.
For now, set the stoplight in Slough to yellow and the stoplight in Oxford to green. When you’ve made all your changes, press the EXIT button to return to the main interface.
That’s it—you’re all set! Set the game speed to "3" by pressing the PLUS key three times—you can set this faster as you get more comfortable with the game, but "3" or "4" are the best speeds for now.
Here are a few tips for keeping an eye on things from the main interface, now that your railroad career is underway:
•Set your train classes—From the list of trains in the List Box, click the icon to the left of each train to set it to Express, Normal, Slow, or Halted. These are the settings that dictate how this train will react when it meets another train on the same track, and they also allow you to change a train’s status on the fly.
•Manage your consists—Right-clicking each train’s consist in the List Box will show you its current destination, speed, cargo value, and weight. As you build more trains, you can view a bit more detail on all of them by using the List button, located in the bottom right corner of the List Box—it looks like a bulleted list.
•Use the List Box and Detail Screens to keep track of everything—The List Box and the Detail Screens (accessed by doubleclicking an item in the List Box) are very important interfaces. In each view, use the four tabs—Stations, Trains, Players, and Companies—and the List button to view statistics about each. Think of it as a hierarchy—the List Box shows you general information, while the Detail Screens show you in-depth information.
•Scout the map for opportunities—Once you’ve established a money-earning route, start looking over the map for other opportunities. A variety of approaches can be used to plan your railway’s path to glory. In this case however, look for ways to improve your production and improve the use of your existing assets. No need to spend investors’ money unwisely. Connect to London to haul cattle to the meatpacking plant there (unless you’re a vegetarian). The grain farm just south of Slough could increase the production rate of your wool and cattle farms by 50 percent!

• Buy lucrative industries—You can buy up cash-producing industries along your routes, or even along your competitors’ routes. Click a resource to view its profitability rating. The more loads that are carried to and from it, the more profitable it will be.
Entering the World of High Finance
So far, this tutorial has focused on getting your railroad up and running. Now it’s time to take a quick look at the other aspects of Railroad Tycoon II—company management and the stock market.
Company Management
Managing your operation requires more than just adding and working with stations, trains, routes, and consists. Remember when you set up your company, and you chose to have outside investment as part of your initial funding? Well, those investors have expectations for your operation, and they’ll hold you accountable for how well things are going. To see what they are looking at, we’ll be working in the Company Detail Screen.
1. To reach the Company Detail Screen, click the Company tab at the bottom of the List Box, and then double-click your company.
2.The Company Detail Screen shows your ledger—click on the different tabs and look around to get a feel for what information is present here.
3.Click the Finances tab. You could issue some bonds to raise more money, but for the moment, stay debt free and issue some more stock. Your current Share Price is listed on the left page. Click Issue Stock and a window will appear giving details of the transaction. Click OK in that window if everything is fine. Note the change to your current Share Price.
4.Feeling fickle? Buy Back Stock and take a look at its effect on your Stock Value. Investors are very particular about Share Price—they want it to go up. Period. Don’t disappoint them, or you’ll be out on your ear. Remember that chairmen are appointed, not born.
5.Experiment with the other options here (except Declaring Bankruptcy unless you’re ready to bail) and familiarize yourself with their effects.
The Stock Market and Personal Finances
Your personal wealth is, of course, directly tied to your company’s performance. In addition to your excellent management ability contributing to your company’s success, you can accumulate personal wealth by savvy investment in the Stock Market.
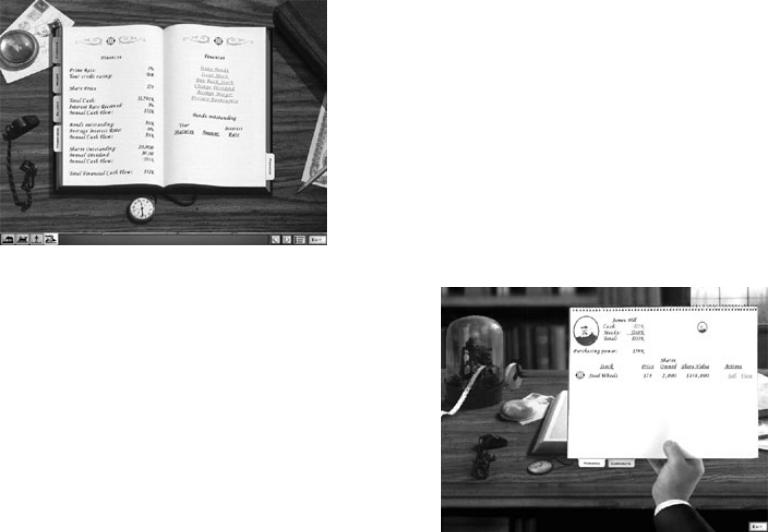
1.From the main interface, click the Stock Market icon along the left side of the main window.
2.You’ll be greeted with the Stock Market Detail view. There are two tabs here:
Personal—This tab enables you to view your current stock portfolio, as well as buy or sell stock.
Corporate—This tab gives details about your company’s financials, including a list of major shareholders and a five-year weighted return
among other things.
3.In the Personal section, you’ll usually see the option to Buy or Sell a particular stock. Unfortunately, you’ve used up all your cash to start your company, so you probably won’t see the Buy option yet. After a year or two, the accumulation of your salary and dividends may give you enough cash to buy some more stock.
4.Selling stock is done in the same manner. Just select Sell from the Personal section. Normally, you can only sell shares that you personally own. If you don’t have the shares to sell (usually this would apply to another company), then you’ll have another option—Selling Short. If the stock price drops—which is the intent here—then you cash in. If it rises, you’ll be forced to buy the stock to meet the Margin Call. If the company buys up stock, you may have to buy the stock at inflated prices. Be careful with this option.
TIP: If you don’t have enough cash to make a purchase, you might still be able to buy stock on Margin—essentially borrowing money to buy the stock. If you buy on Margin, and the stock value goes up, you’re in good shape. However, if it falls, you’ll be forced to sell stock to cover the Margin Call, even if it bankrupts you personally.
Controlling Your Railroad Empire
That about does it for this tutorial. You’ve seen all the important game elements, and had the chance to experiment a bit. If you’re a quick study, maybe you have a decent start. After experimenting a little, you might want to start a new game to use your knowledge. Also, don’t be afraid to jump right into the campaign—the first few scenarios are geared toward a novice player, and you can learn as you go.
As a summary, keep a close eye on the following:
•Routes—Find profitable ones and exploit them.
•Locomotives—Maintain them well, and upgrade whenever possible.
•Stations—Improve them to increase revenues and route performance.
•Industries—Buy them to pad company coffers and increase your holdings.
•Finances—Be a smart manager and run a solid, profitable business by maximizing revenue and return on investment.
•Personal Wealth—Increase it by good management and mastering the Stock Market.
•Competitors—Bury them by doing all of the above.
For more detailed information about any of the topics covered in this tutorial, read the rest of the manual (Oh come on, you’ve read this far already!) A few options you’ve seen in this tutorial, such as buying industries, buying stock on margin, and short selling, are only available if you set up a game on the expert financial and industrial models in the options panel. If you’re playing the campaign, they aren’t available until a few scenarios into it. We’ve given you a taste of everything here, though you won’t be able to use every option in every scenario.
>Chapter 2<
3. THE MAIN MENU >Table of Contents<
In this chapter:
• Navigational Aid
• Main Menu Options
• Single Player
• Multiplayer
• Campaign
•New Scenario
•Options
Navigational Aid

Main Menu Options
The main menu screen in Railroad Tycoon II gives you five options:
•Single Player—Select this option to start a single-player campaign
or scenario.
•Multiplayer—This option enables you to play with multiple human opponents. The multiplayer option is discussed in detail in Chapter 9, Multiplayer (page 65).
•Editor—The Railroad Tycoon II map editor enables users to customize or build their own maps for the game. Click here to access it. This option is covered in Chapter 10, Using the Map Editor (page 71).
•High Scores—Click here to view the high scores for the game.
•Credits—Take a look at the hard-working folks that brought you this game.
•Quit—Selecting this option will immediately return you to Windows.
Single Player

To start a single-player game, click Single Player on the main menu screen. The next menu will appear, giving you four options to choose from: New Campaign, Load Campaign, New Scenario, and Load Scenario.
New Campaign
Railroad Tycoon II’s campaign mode enables you to play through 18 individual scenarios, designed to be played consecutively. The first few scenarios start off fairly simple, then escalate in difficulty. To start a new campaign:
4. Click New Campaign on the Single Player menu.
2. Choose a difficulty. We suggest Normal Difficulty if you’re experienced with strategy games, or Easy Difficulty if you’re not. Stay away from Hard Difficulty until you’ve played at least one campaign all the way through. Note: You can’t change campaign difficulty after you’ve started, so choose carefully.
3. You’ll start with the first scenario, "The Iron Seed." Choose one of the available bonuses from the list below. The bonuses available will change from scenario to scenario throughout the campaign, and can be key strategic choices.
4. Click Play this scenario to launch the game and start the campaign. Skip to Chapter 5, The Main Interface (page 41), before you begin play.
Load Campaign
If you’ve already started a campaign and saved it in progress, click Load Campaign to bring up a dialog box with a list of

currently saved campaigns in it. Select the campaign you wish to load, then click OK. The game will be launched, returning you to the point where you previously saved your campaign.
New Scenario
When you select New Scenario from the Single Player menu, a dialog box will pop up with the following elements: Map, Options, Skill Levels, and Computer Players.
Map
Click this button to select the map your game will be played on and the Map dialog box will appear. Click on a map name to see the map and its description below. If the map is set up to allow it, you can also change the starting Date for the map by clicking the up or down arrow below the map. Once you’re satisfied with your selection, click OK in the map dialog box.
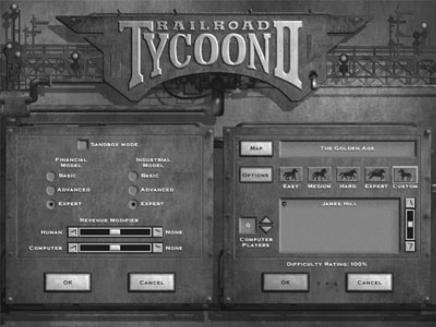
Options
Once you’ve selected your map, click the Options button. You should now see another dialog box to the left of the New Scenario dialog. These two dialog boxes contain all the options you’ll need to set before starting your game. The Options dialog contains the following settings:
•Sandbox mode—In this mode, you simply build and run trains. Money and competition are non-factors—all Financial and Industrial settings are toggled off—so build to your heart’s content.
•Financial model—This setting controls the financial aspects of the game. Set this option to Basic, Advanced, or Expert. The effects of these settings are as follows:
Basic—Stock Market importance is minimized. You may buy or sell your own company’s stock, but you can’t take over another company, or be taken over.
Advanced—Short Selling and Buying stock on Margin are disabled, but all other aspects of the Stock Market are enabled.
Expert—The gloves are off. All aspects of the Stock Market are enabled, which makes for some fairly vicious financial plays; consider yourself warned.
• Industrial model—This setting configures the industrial side of the game. Set it to Basic, Advanced, or Expert. The effects of each setting are as follows:
Basic—Stations will accept any cargo, paying only slightly less for cargo they don’t demand. All industries produce cargo, even if they aren’t supplied with their industrial demands.
Advanced—Stations still accept any cargo, but at half price if the cargo isn’t demanded by a station. Industries only produce cargo if supplied with their industrial demands.
Expert—Stations pay very little for any cargo they don’t demand. Price levels affect what stations will pay for a cargo, even if the station demands them. Your company can buy up any industries it finds appealing.
• Revenue modifier—The two sliders in the revenue modifier section of the Options menu can be used to increase or decrease the amount of revenue received for hauling cargo. You can set this for both Human and Computer players. When lowered for Human players, this results in less revenue per load, making the game significantly harder.
Skill Levels
In the Game Setup menu—the right-hand dialog box when the Options menu is open—you can change your skill level by clicking any of the horses to the right of the Options button with the following effects:
•Easy—Basic Financial and Industrial models are selected. Human player receives a +20% Revenue Modifier, while the computer receives a 10% Revenue Modifier.
•Medium—Advanced Financial and Industrial models are selected. No Revenue Modifiers for either computer or human players.
•Hard—Expert Financial and Industrial models are selected. Human player receives a -10% Revenue Modifier, while the computer receives a +10% Revenue Modifier.
•Expert—Expert Financial and Industrial models are selected. Human player receives a -20% Revenue Modifier, while the computer receives a +20% Revenue Modifier.
As you change the skill level, or any of the other Options settings, notice that the Difficulty Rating shown below the computer players changes to reflect the changes you make. Changes you make outside these skill settings fall under the Custom skill level.
Computer Players
The last Options setting you need to work with is the Computer Players option. In the text box below the Skill settings, you’ll see yourself (the human player) listed, as well as any computer players already in the game. Adding more computer players by clicking the up arrow drives the Difficulty Rating higher. You can’t decide which players to add, and in some scenarios, you won’t be able to remove all of them either.
Once you’ve set all the Options, clicking OK in both dialog boxes will start the game.
Load Scenario
If you’ve already started a game and saved it in progress, click Load Scenario from the Single Player menu, then select the game you wish to load from the listing that appears. Once you’ve selected it, click OK to launch the game and return to the point at which you saved your position.
Multiplayer
Railroad Tycoon II enables you to match wits with, and test your financial prowess against human opponents in any of four modes: TCP/IP, IPX, Modem, or Serial. For information on setting up a multiplayer game, see Chapter 9, Multiplayer .

High Scores
Click the High Scores button to see the current high scores for the game.
Credits
Click the Credits button to view a list of everyone involved in bringing Railroad Tycoon II to you.
Quit
Clicking Quit on the main menu takes you out of the game and back to Windows.
>Chapter 3<
4. THE MAIN INTERFACE >Table of Contents<
In this chapter:
• Navigational Aid
• The Four Parts of the Main Interface
• Navigating the Map
• The Primary Action Icons
• The Center List Box

Navigational Aid
The Four Parts of the Main Interface
Once the game is launched you will interact with the world through the main interface, which consists of four parts:
 Loading...