


Majesty Gold Manual 11/29/01 3:27 PM Page 1
Majesty®: Gold Edition
Front Manual Cover

Majesty Gold Manual 11/29/01 3:27 PM Page 2
TABLE OF CONTENTS
REQUIREMENTS AND INSTALLATION . . . . . . . . . . . . . . . . .4
System Requirements . . . . . . . . . . . . . . . . . . . . .4
Installing . . . . . . . . . . . . . . . . . . . . . . . . . . . . . .5
Playing . . . . . . . . . . . . . . . . . . . . . . . . . . . . . . .6
Uninstalling . . . . . . . . . . . . . . . . . . . . . . . . . . . .6
THE README FILE . . . . . . . . . . . . . . . . . . . . . . . . . . . . .7
MAJESTY®
WELCOME TO ARDANIA . . . . . . . . . . . . . . . . . . . . . . . . . .7 RULING YOUR KINGDOM . . . . . . . . . . . . . . . . . . . . . . . .10 Choosing a Quest . . . . . . . . . . . . . . . . . . . . . . .14 The Sovereign Interface . . . . . . . . . . . . . . . . . .15 Rulership in a Nutshell . . . . . . . . . . . . . . . . . . .22 Your Palace . . . . . . . . . . . . . . . . . . . . . . . . . . .24 Constructing Buildings . . . . . . . . . . . . . . . . . . .27 Using Buildings . . . . . . . . . . . . . . . . . . . . . . . .30
The Building Control Window . . . . . . . . . . .30 Combat Damage . . . . . . . . . . . . . . . . . . . .33 Repair Routes . . . . . . . . . . . . . . . . . . . . . .34 Upgrading . . . . . . . . . . . . . . . . . . . . . . . .34 Structures You Don’t Build . . . . . . . . . . . . .35
Your Heroes . . . . . . . . . . . . . . . . . . . . . . . . . . .36
Recruiting Heroes . . . . . . . . . . . . . . . . . . .36 Hero Behavior . . . . . . . . . . . . . . . . . . . . .36 The Hero Control Window . . . . . . . . . . . . .37 Improving Heroes . . . . . . . . . . . . . . . . . . .39 Orphaned Heroes . . . . . . . . . . . . . . . . . . .42 Caring for Dead Heroes . . . . . . . . . . . . . . .42
Reward Flags . . . . . . . . . . . . . . . . . . . . . . . . . .43
Placing Flags . . . . . . . . . . . . . . . . . . . . . .43 Managing Flags . . . . . . . . . . . . . . . . . . . .45
Claimed Flags . . . . . . . . . . . . . . . . . . . . . .46
Using Spells . . . . . . . . . . . . . . . . . . . . . . . . . . .46
Earning Gold . . . . . . . . . . . . . . . . . . . . . . . . . .48
Tax Collection . . . . . . . . . . . . . . . . . . . . . .48
Extortion . . . . . . . . . . . . . . . . . . . . . . . . .50
Marketplaces . . . . . . . . . . . . . . . . . . . . . .50
Trading Posts . . . . . . . . . . . . . . . . . . . . . .52
Gambling Hall . . . . . . . . . . . . . . . . . . . . .50
Freestyle Scenarios . . . . . . . . . . . . . . . . . . . . . .52
Multiplayer Games . . . . . . . . . . . . . . . . . . . . . .55
REFERENCE . . . . . . . . . . . . . . . . . . . . . . . . . . . . . . . .59
Buildings . . . . . . . . . . . . . . . . . . . . . . . . . . . . .59
Heroes . . . . . . . . . . . . . . . . . . . . . . . . . . . . . .82
Henchmen . . . . . . . . . . . . . . . . . . . . . . . . . . . .92
Monsters . . . . . . . . . . . . . . . . . . . . . . . . . . . . .96
Spells . . . . . . . . . . . . . . . . . . . . . . . . . . . . . .104
MAJESTY®: THE NORTHERN EXPANSION™
WELCOME BACK TO ARDANIA . . . . . . . . . . . . . . . . . . . .112 USING THE NORTHERN EXPANSION FEATURES . . . . . . . . .115 Choosing an Epic Quest . . . . . . . . . . . . . . . . . .115 Build Tree Editor . . . . . . . . . . . . . . . . . . . . . .116 Special Events . . . . . . . . . . . . . . . . . . . . . . . .118
REFERENCE . . . . . . . . . . . . . . . . . . . . . . . . . . . . . . . .119 Buildings . . . . . . . . . . . . . . . . . . . . . . . . . . . .119 Monster Lairs . . . . . . . . . . . . . . . . . . . . . . . .123 Monsters . . . . . . . . . . . . . . . . . . . . . . . . . . . .124 Sovereign Spells . . . . . . . . . . . . . . . . . . . . . . .126
APPENDIX: KEYBOARD SHORTCUTS . . . . . . . . . . . . . . . .127 LICENSE AGREEMENT . . . . . . . . . . . . . . . . . . . . . . . . .131 TECHNICAL SUPPORT . . . . . . . . . . . . . . . . . . . . . . . . .136 INFOGRAMES WEB SITES . . . . . . . . . . . . . . . . . . . . . . .138 MAJESTY ON THE WEB . . . . . . . . . . . . . . . . . . . . . . . . .139 CREDITS . . . . . . . . . . . . . . . . . . . . . . . . . . . . . . . . . .140
2 |
33 |
Majesty Gold Manual 11/29/01 3:27 PM Page 4
REQUIREMENTS AND INSTALLATION
You can’t start playing until you install the game. Here’s how.
SYSTEM REQUIREMENTS
Before you can install the Majesty: Gold Edition game and start playing, check this list to make sure that your computer has everything you need:
Operating System: |
Windows® 95/98 |
Processor: |
Pentium® II 233 MHz or higher |
Memory: |
32 MB RAM (64 MB RAM |
|
recommended, 128 MB for 3-4 |
|
player games) |
Hard Disk Space: |
600 MB Free (minimum |
|
install) |
CD-ROM Drive: |
4X Speed or faster |
Video: |
SVGA video card with 2 MB |
|
video memory* |
Sound: |
Sound card* |
DirectX®: |
DirectX® version 7.0 |
|
(8.0a included) or higher |
Modem: |
28.8 kps (28,800 baud) for |
|
modem/Internet play |
|
(56 kps recommended) |
Internet Access: |
Required for Internet play |
* These devices should be compatible with both Windows® 95/98 and DirectX® version 7.0 or higher.
INSTALLING
If you have all of the required equipment, then it’s time to install the game. To do so, follow these instructions:
•Turn on your computer (Windows® 95/98 should load automatically).
•Open the CD-ROM drive, place the Majesty: Gold Edition CD in it, and close the drive.
•This is a Windows® “AutoPlay” CD-ROM. That means that just putting the disc in the drive for the first time starts up the installation program.
If AutoPlay DoesnÕt Work
If the AutoPlay feature does not work when you put the CD in the drive, here’s how to start the installation program yourself:
•Double-click your “My Computer” desktop icon.
•In the window that opens, double-click your CD-ROM drive (it’s usually the D drive).
•In the list that appears, find a file named setup.exe and double-click it.
•The installation program should begin.
•Click the Install button to continue. (If you change your mind at this point, close the window to exit.)
•Follow the on-screen instructions to install the game. The installation program copies some files to your hard drive from the CD-ROM, then adds Infogrames Interactive/Majesty: Gold Edition to the programs in your Start menu.
•Majesty: Gold Edition requires DirectX® 7.0 or higher in order to run. If you do not have this already installed on your computer, click Yes when asked if you would like to install it.
4 |
55 |

Majesty Gold Manual 11/29/01 3:27 PM Page 6
PLAYING
Once the automated installation and setup are complete, the game is ready to play. To start:
•Make sure that the CD-ROM is in your drive.
•Now simply click on the Play Majesty: Gold Edition button when the title box appears. Alternatively (if the box doesn’t appear), you can click the Windows® Start button, then choose Programs/Infogrames Interactive/ Majesty: Gold Edition and then select Play Majesty or Play Majesty: The Northern Expansion to run the game.
UNINSTALLING
If you decide to remove Majesty: Gold Edition from your computer, follow these easy instructions.
•Click the Windows® Start button.
•Select Settings, then Control Panel.
•In the Control Panel window, double-click on
Add/Remove Programs.
•Select Majesty: Gold Edition from the list of programs and click the Add/Remove button.
•Follow the on-screen instructions to remove the game from your hard drive.
Note that the uninstall procedure does not remove files you’ve created — things like saved game files. You can delete these leftover files manually, or keep them if you intend to reinstall the game later.
6
THE README FILE
The Majesty: Gold Edition CD-ROM game has a ReadMe file where you can view both the License Agreement and updated information about the game. To view this file, click the Windows® Start button, the
Programs menu, the Infogrames Interactive sub-menu, then Majesty: Gold Edition. Finally, click the ReadMe option. You can also get to the ReadMe file by doubleclicking on it in the Majesty: Gold Edition folder on your hard drive.
MAJESTY®
WELCOME TO ARDANIA
Majesty offers you the throne of a fledgling kingdom in a fantastic world. As ruler, you make all the decisions that steer your kingdom — one of many in the land of Ardania — toward rise or ruin.
Ardania is a land both majestic and ancient. It is filled with a variety of peoples, and its wilderness is ripe with strange creatures — some curious, many deadly. The magic that flows through this land both enriches
and complicates the lives of its inhabitants. From the desolate Northern Reaches to the pleasant Central Plains, Ardania is a land of shifting aspect. Many forces are at work here, and where magic is involved, there are few limits to what is possible. This tendency toward constant change comes at a high price; Ardania is a land without unity. While some kingdoms share relations and
have established treaties, these, too, tend not to last. |
|
Ardania is without a central authority, making it |
|
a land of danger and uncertainty. |
77 |
|
Majesty Gold Manual 11/29/01 3:27 PM Page 8
This is the arena in which you must operate. Some might consider this land unstable and dangerous, but for a ruler who thrives on the elements of uncertainty and expected change, it can be a land of unending fascination.
A SINGLE THRONE &
MANY PATHS
ÒSo you think you are a worthy sovereign, eh?Ó
I was unsure of how to reply to the old seerÕs unexpected challenge. My vassals were commanded to wait outside the small dark chamber as ArdaniaÕs most famed prophet, Juleck, performed his invaluable services. This left me feeling somewhat vulnerable, especially when faced with such a legendary power.
ÒI...,Ó my mind stopped spinning and landed on its feet. ÒThat is what IÕm here to find out.Ó
ÒHumph,Ó Juleck muttered. He was one of the most distinctive people IÕd ever met. His lean, swarthy face was all angles. It looked as if it had been carved from stone. While his age showed clearly in his features, he moved with lithe precision about his disheveled hut. Piles of arcane oddities were spread on the earthen floor and across wide tree stumps that served as tables.
JuleckÕs voice was penetrating, effortlessly cutting through the chaff of personality and ego to speak directly to the soul.
ÒYou came here seeking easy answers and obligatory praise. But the future holds little of either for you.Ó
His truth burned me. I could not deny his words, but in speaking them, Juleck continued to cleave away any pretense IÕd brought with me.
His eyes locked with mine. They narrowed as his gaze bored into my mind. He stared at me intensely for a few seconds, and then his features relaxed. He had apparently found what he was looking for.
ÒVery well, young sovereign. Let us begin.Ó
While still staring at me, the seer began reaching behind him and blindly retrieving an assortment of strange items and artifacts from the walls of the small hut. Some animal skins, a fistful of dried sonaba nuts, and a collection of other bits and pieces — trinkets and charms — that I could not identify.
As his hands arranged the gathered items, Juleck started waving his arms about in reflexive ritual. A throaty chant escaped his unmoving lips. With each repeated cycle of sounds, it increased in speed. Faster and faster, until — just as suddenly as he had begun this bizarre exercise — he stopped. His head snapped downward in an inhumanly precise motion. His eyes focused on the cryptically arrayed artifacts before him. He began to speak, his words flowing like a quick-moving spring torrent.
ÒA sleeping evil awakes within your realm. The dead grow restless in the earth. I see the Lady of Death extending her bony fingers towards your Palace. Beware your aspirations of northern expansion. The bargain that you have struck is no bargain at all! Nothing is gained without risk and investment.Ó
8 |
99 |

Majesty Gold Manual 11/29/01 3:27 PM Page 10
I was prepared for some ill predications, but this, well, how could this be true? I asked, and Juleck replied, ÒIt is what I see. You stand at a crossroads, but there are no easy paths.Ó
We sat in silence for minutes as I absorbed JuleckÕs counsel. Finally, I asked, ÒWhat can I do to prepare?Ó
ÒIf your heart and mind are one, they will know what to do. How to act. Whose services to call. I sense that you have it in you to rule wisely. ItÕs in your blood.
ÒI have done all I can. Now, I am tired.Ó His voice trailed with the last statement.
ÒYour destiny awaits, Sovereign. Go.Ó
RULING YOUR KINGDOM
Ardania offers you many challenges, in the form of preordained quests. Quests are detailed, single-player adventures with many
random elements. In addition to the existing quests, you can also create and play your own challenges by generating freestyle scenarios. You’ll need to do this if you want to play a multiplayer
game of Majesty, and you can also play freestyle scenarios as single-player games.
10
When you begin the game, you go to the Introduction screen. There are several options here. Briefly:
Play Game |
Enter an unrecorded name to begin an |
|
|
entirely new game, or enter a recorded |
|
|
name to choose a new quest to pursue as |
|
|
that sovereign. You can choose this option |
|
|
by clicking on either the Play Game button |
|
|
or the magical Map lying on the table. |
|
Load Game |
To reload a game you previously saved, |
|
|
click on either the Load Game button or |
|
|
the treasure Chest. |
|
Multiplayer |
To set up and play a multiplayer Majesty |
|
|
game, click on either the Multiplayer |
|
|
button or the Window to the open |
|
|
countryside. |
|
Adjust Levels |
If you want to modify the volume settings |
|
|
for the game music and other sounds, |
|
|
click on either this button or the Horn |
|
|
hanging near the window. |
|
Credits |
To see the names of the people who |
|
|
worked so hard to bring you Majesty, |
|
|
click on either the Credits button or the |
|
|
open Book on its stand. |
|
Cinematics |
This option re-plays the opening movie. |
|
|
You can choose this by clicking on either |
|
|
the Cinematics button or the battle |
|
|
Painting hanging on the wall. |
|
High Scores |
To view the best scores on each quest |
|
|
(measured by several different |
|
|
parameters), click on either the |
|
|
High Scores button or the |
1111 |
|
glittering Chalice behind the |
|
lit candles.
Majesty Gold Manual 11/29/01 3:28 PM Page 12
Exit Game To close Majesty and go back to real life, click on the Exit Game button or the
Candles.
The most interesting choice right now is lying flat on the table. To look over the possible quests, click the Map (or the Play Game button). Before you can see the quests, you must enter a name for yourself. This is the name under which your scores and successes will be recorded, so feel free to be creative. Once you’ve entered a name, click the Accept button to move on.
ACCEPTING THE CROWN
The great hall of my familyÕs Palace was alive with the chatter of two score nobles and nearly as many servants. I had never seen our fair Palace more alive than on this, my coronation day. While I understood that it was an occasion of great celebration, the extent of the festivities still surprised me.
The hall had been proudly adorned in the colors of my family. Bright banners bearing our hawk and sunburst crest hung from the highest beams of the lofty ceiling. The great hall was filled with representatives from every one of our villageÕs guilds, as well as dignitaries from communities all over Ardania — from the Valmorgens of the Central Plains to Celdorinii from the furthest tip of the Western Provinces. Along the boundaries of the space, the Palace Guards stood silent vigil in their red tabards, halberds polished to a mirror-like sheen and held in the formal position of salute.
The coronation was a solemn occasion. My mother elected to step down from the throne and pass the crown to the next generation. In her wisdom, she chose to make sure that she was present for the transition of power in order to help shepherd the next reign toward the goals that were so important to her. While the popularity of my motherÕs rule lent a bittersweet edge to the rite, the revelry that followed made it clear that my subjects gave me their full support as the caretaker of their hopes and dreams for the future.
From the great hall, we adjourned to the courtyard, where the mood quickly changed from solemn to celebratory. The yard was filled to overflowing with tables full of rich foods, skilled performers from around the realm, and joyous visitors dressed in bright finery. The function lasted through the remainder of day and well into the evening.
So engrossed was everyone in the festivities that few took notice of the sudden agitation of the Palace Guards atop the wall. Across the courtyard, I caught the Captain of the guard taking my Royal Advisor aside for a brief few seconds. Once they were done, the Captain quickly returned to his men on the walls, while the Royal Advisor made a direct course towards me.
It was then that I first heard my Advisor utter a phrase which would become all too familiar before long.
ÒForgive the intrusion, Your Majesty, but a situation has arisen...Ó
The celebration was over, and the responsibilities only beginning.
12 |
1313 |

Majesty Gold Manual 11/29/01 3:28 PM Page 14
CHOOSING A QUEST
Having clicked the map on the table and entered your name, you are now at the Quest Selection map. This is a magical map of Ardania, on which the nineteen potential quests are marked with special icons. When you move your mouse cursor over one of these icons, the name of the quest appears in the title bar at the top of the map. Note that the map is larger than the screen. To reveal the portions of the map that are out of sight, move your cursor to the edge of the screen; the map will scroll to show you more terrain — and more quests.
Quests come in three difficulty levels: Beginner, Advanced, and Expert. You’re welcome to try any of them, regardless of your experience, but don’t say you weren’t warned. Once you have successfully completed a quest, a star is added to the map next to that quest’s icon. (If, for some reason, you wish to reset the game so that you have no completed quests, click the Erase Victories button.) Note that you can replay a completed quest, and the random factors will make it a new challenge each time.
Some of the quests are not available when you first begin a new game. The corresponding locations are represented by question marks. These are
challenges that are revealed only you have completed certain other The prerequisites for a hidden
are listed in the title bar, and those pre-requisites you have already completed are grayed out.
14
To choose a quest, simply click on its icon. (If you decide not to select a quest at this time and would rather return to the Introduction screen, click the Cancel button.)
Once you’ve chosen, your Royal Advisor briefs you on the situation and the story surrounding that quest. Next, you get a boiled-down outline of your goals. When you’ve read this, click the Continue button.
Majesty includes a map generator that creates a new, different map for every quest each time you play it. When you click Continue, you generate your map.
THE SOVEREIGN INTERFACE
Before we get into the day to day business of ruling your kingdom, we must digress for a moment to explain what you see on the screen. The Sovereign Interface is a set of magical tools that help you to be everywhere and control nearly everything in your realm. Like any tools, however, they’re of no use to you if you don’t understand what they’re for.
A |
|
|
|
|
|
K |
|
|
|
|
|
||
B |
|
|
|
|
|
L |
C |
|
|
|
|
|
M |
D |
|
|
|
|
|
N |
E |
|
|
|
|
|
|
F |
|
|
|
|
|
|
G |
|
|
|
|
|
O |
H |
|
|
|
|
|
P |
I |
|
|
|
|
|
|
J |
|
|
|
|
|
|
|
|
|
I. Tracking Window |
|
||
A. Treasury |
|
|||||
B. Mini Map |
J. Tracking Buttons |
|
||||
C. Terrain Toggle |
K. Time |
|
||||
D. Map Toggles |
L. Title Bar |
|
||||
E. Palace Button |
M. Main Map |
1515 |
||||
F. Control Window |
N. Message Scrolls |
|||||
G. Spell Bar |
O. ToolTip Bar |
|
||||
H. Spell Bar Toggle |
P. Options |
|
||||

Majesty Gold Manual 11/29/01 3:28 PM Page 16
Main Map |
This is the window in which all of the |
|
action and most of your royal acts take |
|
place. It gives you the best overall view |
|
of your characters, buildings, and foes. |
Map Toggles |
These buttons control the view in the |
|
Main Map. You can zoom the view in or |
|
out, and you can choose to display or |
|
hide the hit point bars and character |
|
names. |
Message Scrolls |
These handy notices serve many |
|
purposes. Click on any Message Scroll |
|
to see the message it contains. In |
|
Beginner quests, these are often tips to |
|
help you better understand the game. |
|
Scrolls can also convey important infor- |
|
mation about the current quest and the |
|
characters and events behind it. |
Title Bar |
This shows the name of your current |
|
quest. Click on the Title Bar to see the |
|
goals of this quest. |
Treasury |
This number indicates how much gold |
|
your treasury currently holds. |
Time |
Your elapsed time in game days is |
|
displayed here. This indicator is partic- |
|
ularly important during timed quests. |
Mini Map |
The entire quest map is displayed in |
|
this little window, though not in much |
|
detail. Characters and buildings are |
|
represented by colored dots. The white |
|
rectangle represents the area your |
16 |
Main Map is currently showing, while |
the blue rectangle indicates the focus of |
|
|
your Tracking window. Click anywhere |
|
in this map to refocus the Main Map on |
the area you clicked. Right-click in the same way to pick the focus of your Tracking window.
Terrain Toggle Click this to switch the display of terrain types on the Mini Map on and off.
Palace Button This button is a handy shortcut; click it to quickly select your Palace as the active building. Even if your Palace is out of view, its functions become available in the Control window. You can double-click here to zoom the Main Map to the Palace (and make the Palace the active building, as well).
Control Window Other than the Main Map, this feature provides a ruler with the most varied and important functions. The information displayed in the control window changes depending on what building, character, or other item you have selected. For example, if a building is selected, that is the active building, for which (if it is under your control) you can give orders. The detailed descriptions of how to use the various contents and functions of the Control window are in the sections throughout this manual, especially Using Buildings and
Your Heroes.
Tracking Window This window is used to watch the activities of specific heroes, buildings, or ocations. Like a scrying spell, it follows and stays focused on whatever you choose. This can be
handy for keeping an eye on key 1717 areas, monsters, and so on.

Majesty Gold Manual 11/29/01 3:28 PM Page 18
Tracking Buttons |
These give you greater control over |
|
what’s displayed in the Tracking |
|
window by letting you scan through all |
|
the things of a specific type. The |
|
options include reward flags, heroes, |
|
henchmen, and buildings; plus, since |
|
these buttons are additive, you can |
|
select to scan any combination of types. |
|
Click the button that corresponds to |
|
the type of thing you want to select, |
|
then use the right and left arrows at the |
|
bottom of the Tracking window to scan |
|
through them. You can also click the |
|
Auto-scan button to have the Tracking |
|
window cycle through them for you. |
Spell Bar |
All of the possible Sovereign spells are |
|
represented as icons on this bar. Those |
|
you can currently cast are highlighted. |
|
Clicking an icon readies the spell and |
|
changes your cursor. Now, clicking on |
|
a unit or location in the Main Map or |
|
Tracking window casts the selected |
|
spell. When you’re done, right-click to |
|
leave spell casting mode. |
Spell Bar Toggle |
This controls whether the Spell Bar is |
|
displayed. |
Tool Tip Bar |
As you run your cursor over the vari- |
|
ous parts of the interface, this area dis- |
|
plays information on what you’re |
|
pointing to and context-sensitive help |
|
text. Error messages and chat messages |
|
are shown just above this bar. |
Options Button Takes you to the Options menu. The helpful features there include:
•Save Game: Lets you store your quest in progress for future play.
•Load Game: This is how you play those saved quests-in-progress.
•Restart: Scrap all your progress in the current quest and start over from scratch.
•Main Menu: Return to the Introduction screen.
•Game Info: Review the goals of the quest.
•Adjust Levels: This not only lets you control the various volume levels (like the Horn on the Introduction screen), but also provides control over the game speed and the Fast Scrolling map option.
•Quit Majesty: Exit the game completely.
•Resume Play: Go back to the quest in progress.
Last but not least, here are a few important ways you can use the mouse:
•Right-click anywhere on the screen where right-click- ing has no function. This cancels your current action- in-progress and deselects the current selection (unit, building, or whatever).
•Double-click in an appropriate place to set a Reward Flag.
•Double-click on an existing Reward Flag to remove it.
•Double-click on a Message Scroll to dismiss the scroll.
•Double-click on a Gravestone to get rid of it.
18 |
1919 |
Majesty Gold Manual 11/29/01 3:28 PM Page 20
KEYBOARD SHORTCUTS
The mouse is a perfectly sensible way to control your kingdom, but you can respond to challenges more quickly if you learn the keyboard shortcuts (also called “hot keys”). These allow you to execute actions in one motion that might otherwise require multiple mouse clicks. Majesty has two kinds of shortcuts: dedicated, which you cannot change, and customizable, which you can modify to suit your particular needs.
All of the following are dedicated hot keys:
eIn a multiplayer game, this turns on the Chat feature. Pressing eafter you’ve finished your chat message sends the message and exits chat.
Important Note
Infogrames Interactive does not monitor, control, endorse, or accept responsibility for the content of text or voice chat messages transmitted through the use of this product. Use of the chat function is at your own risk. Users are strongly encouraged not to give out personal information through chat transmissions.
Kids, check with your parent or guardian before using the chat function or if you are concerned about any chat you receive.
Arrow keys These move (“scroll”) the map view.
zWhile any enemy is selected, the z places an Attack Flag on that enemy. If that enemy already has an Attack Flag, however, pressing the zremoves the flag.
1Makes your Palace the active building.
20
9Toggles the display of unit names on and off.
0Toggles the display of hit point bars on and off.
-Toggles the Main Map between the levels of zoom.
=Toggles the display of terrain textures in the Mini Map.
qOpens the Options menu.
There are some other dedicated keys that are available depending on what’s in your Control window. These hot keys generally correspond to the highlighted letters on buttons and other controls. For example, the letter ‘B’ on the Build button tells you that B is the hot key alternative to clicking the button. For a complete list of the keyboard shortcuts in Majesty, please refer to the
Appendix.
The customizable hot keys are those you can program to perform repetitive tasks quickly and efficiently. These come in two types: the Spell keys and Focus keys.
Spell keys You can assign each of the number keys (0 through 9) to a specific Sovereign spell. Select a spell from the Spell Bar, then press the c key and the number you choose. The next time you press that number key, the spell you associated it with is instantly selected (it is not cast, of course, until you select a target).
Focus keys You can assign the function keys 2 through 8to any unit or location in your kingdom. Select a unit or center the Main Map on a location and make sure that no unit is selected. Next press cand
the function key you choose. The next time you press that function key, the associated unit (if any) becomes selected and appears in the

Majesty Gold Manual 11/29/01 3:28 PM Page 22
Control window. If you press Sand the hot key, you both select the unit (if any) and center the Main Map on the assigned unit or location. Pressing aand the hot key selects the associated unit or location and centers it in the Tracking window.
RULERSHIP IN A NUTSHELL
The details are important, but for the details to make sense, it helps to have an understanding of the broad strokes — an overview of the process of running the kingdom. That’s what this little section is, a brief look at the big picture.
Your first action in most quests should be to construct buildings. Guilds and Temples are the heart of your kingdom. From these buildings, you recruit the heroes you need to accomplish the goals of the quest. To begin building, click on your Palace, the seat of your power. It becomes the active building, which means that the Control window shows the Palace and the controls appropriate to it.
The Buildings button is what you use to begin construction of a building. Click it, then select a building, then click the Build button. Now, you’re dragging an outline of the potential building as your mouse pointer. Click in the Main Map to place it anywhere you like — except that if the outline is circled in red, you’re in a bad spot. Move to a place where the circle is green, then try it. When you place a building, a construction site appears. The building is gradually assembled either by Peasants (who come from your Palace), magical energies, or industrious heroes such as Gnomes or Dwarves.
Once you’ve built a Guild or Temple, you can start to recruit heroes. To recruit a hero, select the appropriate building, then click the Recruit
22 button. When the hero arrives, they immediately start adventuring.
As is true of any ruler, you cannot control your subjects directly. All of your kingdom’s heroes have minds of their own, and they act according to their own priorities and goals. You can, however, motivate them to do what you want them to do. To guide your heroes, you rely on tools called Reward Flags. Reward Flags are bounties that you set on monsters, buildings, or — in some cases — heroes. These flags come in two types: Attack and Explore. One merely specifies that you want some hardy soul to reach the place where the flag is set, and perhaps collect something there. The other is a price on the head (or hearth) of the monster (or building) you’ve marked. You create flags using the Palace Control window. Click the Rewards button to try it. You determine both what the reward is for and the amount of the reward.
There are twenty-two spells potentially at your disposal; you gain access to them by building specific structures: Wizards Guilds, Temples, and such. With these spells, you can aid your heroes in their endeavors. As you build and upgrade more Guilds and Temples and such, more spells become available.
Constructing buildings, recruiting heroes, placing rewards, and casting spells all cost gold. You begin each quest with gold in your treasury. (The amount is shown at the top left of your screen.) As you do these things, this total steadily drops. Before it hits bottom, you need to gather more through your kingdom’s economy. Heroes gain money for killing monsters or fulfilling reward flags. They might also find gold in treasure chests. Eventually, your heroes return some of this money to their home Guild or Temple. Commerce buildings like the Blacksmith and Marketplace make money in other ways, like selling improved or additional equipment to your heroes.
2323
Majesty Gold Manual 11/29/01 3:28 PM Page 24
Any gold stored in a building is fair game for an enterprising monarch. Your Palace employs Tax Collectors, who travel from building to building, collecting your share of the profits these structures have made. The Tax Collectors then return to the Palace or to a nearby Guardhouse and add the collected funds to your treasury. This money allows you to continue building,
recruiting, casting spells, and setting rewards. (Be warned: monsters can kill your Tax Collectors.)
Those are the basics. If you’d like to try ruling with this little information, Ardania is waiting. If you’d prefer to be armed with more detailed information about how to wisely rule your kingdom, please read on.
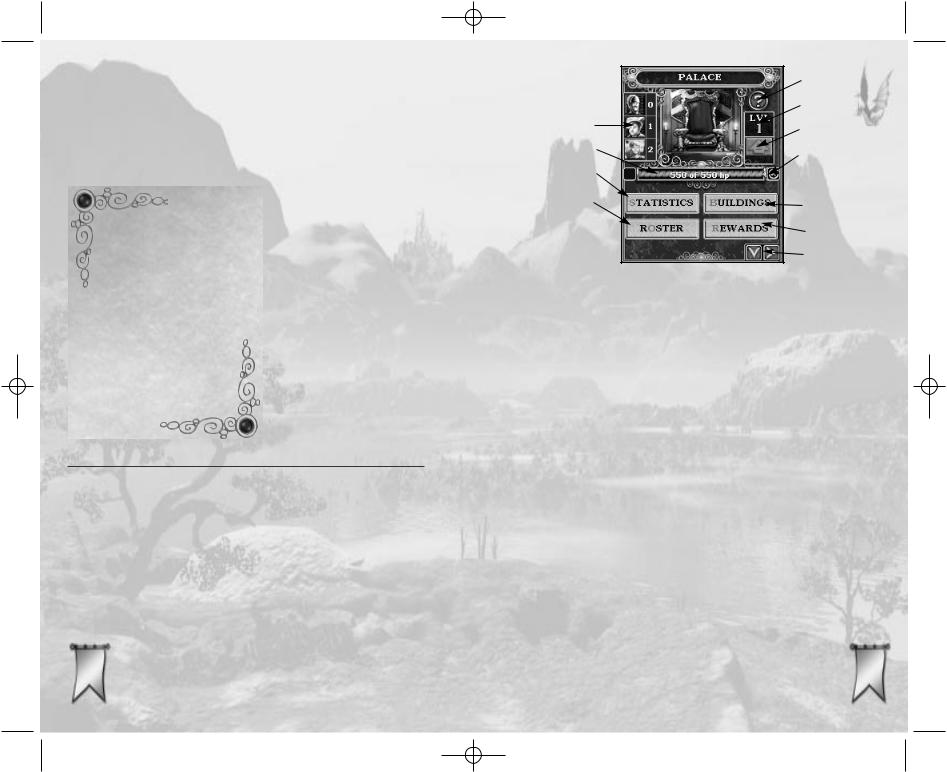
YOUR PALACE
Your Palace is the heart of your kingdom, from which you control most of your kingdom’s major functions. It’s also the source of and home for most of your henchmen — Peasants, Tax Collectors, and their ilk. These tenacious characters appear in your realm of their own accord and spend their days taking care of the mundane maintenance of your realm; adventuring is left to the heroes. There is a limit to how much gold the Palace can generate each economic cycle, and buildings without cost multipliers no longer add to the palace’s automatic income. A final
|
warning: if your Palace is ever destroyed, you |
24 |
immediately fail the quest. |
|
Help |
|
|
Level |
|
Henchmen |
Upgrade |
|
|
||
Hit Points |
Add to |
|
Statistics |
Repair |
|
Queue |
||
|
Roster
Buildings
Rewards
Tracking/Focus
When the Palace is selected as the active building, the Control window includes:
Henchmen |
Each Palace has the potential to support |
|
|
three classes of henchmen: Tax Collectors, |
|
|
Peasants, and Palace Guards. The number |
|
|
of henchmen supported by a Palace |
|
|
increases as the Palace is upgraded. These |
|
|
indicators tell you at a glance how many of |
|
|
each type your Palace is currently support- |
|
|
ing. Click on any of these to go to the |
|
|
Henchmen portion of the kingdom roster. |
|
Hit Point Bar |
This shows the structural strength of |
|
|
your Palace in terms of “hit points” |
|
|
remaining. This number falls as the |
|
|
Palace takes damage and rises as it is |
|
|
repaired or upgraded. |
|
Statistics |
Click this button to see a statistical |
|
|
overview of the key events in your quest |
|
|
so far. The report covers riches, build- |
|
|
ings, heroes, vice, and danger. It’s quite |
|
|
useful for giving you a sense of |
2525 |
|
what you’ve accomplished to date. |
|
Majesty Gold Manual 11/29/01 3:28 PM Page 26
Roster |
This button takes you to a screen that |
|
lists and allows you to quickly select |
|
from all your heroes, henchmen, and |
|
buildings. Buttons at the top of this list let |
|
you control which type is the focus. Other |
|
controls at the bottom let you sort the list |
|
by type, alphabetically, or by level. |
Building Level |
This indicator displays the current level of |
|
your Palace. |
Upgrade |
This is what you use to order your Palace |
|
upgraded to the next level. (There are |
|
three possible levels.) The Upgrade |
|
button is a feature common to many |
|
buildings, but the Palace has its own set |
|
of unique upgrade requirements. To raise |
|
your Palace to level two, you need |
|
sufficient funds and four living heroes. |
|
To upgrade it to level three requires a |
|
total of twelve living heroes (along with |
|
sufficient gold). The amount of gold |
|
required to upgrade to the next level is |
|
shown on the button — in red if you |
|
can’t yet afford it. |
Tracking/Focus |
Click the down arrow to put your Palace |
|
in the Tracking window. The right arrow |
|
focuses the Main Map on your Palace. |
Rewards |
This button takes you to the controls for |
|
placing Reward Flags. These are dis- |
|
cussed in greater detail in the section |
|
Placing Flags. |
26
Buildings |
Use this button to order your subjects to |
|
construct a new building. This is discussed |
|
in greater depth in the section Constructing |
|
Buildings. |
Repair Queue |
With this toggle button, you determine |
|
whether or not your Peasants should |
|
repair your Palace, should it be damaged. |
Help |
The Palace Help feature gives you a brief |
|
overview of its function and abilities, as |
|
well as some insightful back ground |
|
information. |
CONSTRUCTING BUILDINGS
SOVEREIGN’S TIP
There are three ways to select your Palace and make it the active building:
•Click on it in the Tracking window or Main Map,
•Click the button,
•Press the shortcut
The first step in trying to accomplish your quest goals is to start building up your kingdom. Without Guilds and Temples you cannot recruit the heroes necessary to complete your quest. Through the construction of support buildings, you can offer these heroes the chance to better equip and train themselves for the hostile regions of Ardania.
Every quest begins with, at the very least, your
Palace on the map. The Palace is your key to constructing all the other major structures you’ll need. Select it, then click the Buildings button in the Control window. The list that appears includes all the buildings currently available
Majesty Gold Manual 11/29/01 3:28 PM Page 28
for construction. (A toggle button lets you view all the buildings that might become available throughout the quest.) Those you cannot yet afford to build have their cost listed in red.
To order the construction of a building, select it from the list, then click the Build button. (You can also simply double-click the name of the building.) Now, your mouse cursor represents the outline of the construction site. Drag it over the Main Map to the place you want to put this building. As you’re moving the cursor around to find a location, a few things become apparent. First, your potential construction site has a circle around it. This circle indicates the building’s construction buffer. This buffer area provides extra room beyond the walls of all buildings, allowing characters to travel between them. Also notice that any buildings already placed on your map show their buffers — the total area they take up on the map — as a similar circular highlight.
If the image of your new building is red, this means that you are over an area that is illegal for construction. Either there is an overlap between an existing building and the construction buffer of the building you are placing, or there’s overlap between your new building’s buffer and the dark, hidden map area. Also, some buildings, like Trading Posts, cannot be placed too close to others (like Marketplaces). Some, like Wizards Towers, must be placed within a certain range from an existing structure (a Wizards Guild). All of these special placement rules are explained in the building entries in the
Reference section.
If you run into problems placing a building, try moving it to new locations until it’s no longer red. Note that hills
and other terrain objects (such as trees and rocks) do not obstruct the placement of your building. If there isn’t any available space for you to place the building, you can quit trying by right-clicking anywhere. Your heroes will need to explore further to clear room for the construction.
When you do find a suitable location, click to place the building. Peasants automatically come to the construction site and start to assemble your chosen structure (or magical energies carry out the process, if the building is wizard-related). The more workers at the site, the faster the construction occurs. When you place the construction
order, the cost of the building is immediately deducted from your treasury. The first building of a type that you build is always the cheapest. Once you start building multiples of any given building type, the successive duplicates normally become more and more expensive to construct. (There are exceptions to this rule, like the Wizards Tower.)
28 |
2929 |
Majesty Gold Manual 11/29/01 3:28 PM Page 30
USING BUILDINGS
Constructing a building provides some immediate benefits, but most buildings also have features you must choose to use. While most buildings share similar types of functions, the details differ from building to building. These differences are reflected in the building’s Control window display. You can see information on a specific building by clicking the building’s Help button, and greater detail is available in the Reference section under Buildings.
The Building Control Window
Whenever you select a structure as the active building, it shows up in the Control window. If the building is one that you own (have control over), you get more than information in this window. What functions are available depends on the type of building. You might have any (or all) of these:
A. Title Bar |
G. |
Tax Once |
M. |
Level |
|
B. Demolish |
H. |
Coffers |
N. |
Upgrade |
|
C. Number of |
I. |
Heroes |
O. |
Repair Queue |
|
|
Recruits |
J. |
Recruit |
P. |
Tax Route |
D. Hero Type |
K. Special |
Q. Track/Focus |
|||
E. |
Hit Points |
|
Ability |
|
|
F. |
Repair Once |
L. |
Help |
|
|
|
A |
L |
|
B |
|
|
|
|
|
C |
M |
|
D |
|
|
|
|
|
E |
N |
|
F |
|
|
|
|
|
G |
O |
|
H |
|
|
|
|
30 |
I |
P |
J |
Q |
|
|
K |
|
|
|
Title Bar |
This is the name of the building. You can |
|
click here to rename it. |
Hit Point Bar |
This shows the structural strength of |
|
this building in terms of hit points |
|
remaining. This number falls as the |
|
structure takes damage and rises as it is |
|
repaired or upgraded. |
Building Level |
This indicator displays the current level |
|
of the building. |
Upgrade |
This is what you use to order the build- |
|
ing upgraded to the next level. The num- |
|
ber of possible levels depends on the |
|
type of building, but it is never more |
|
than three. Every structure has upgrade |
|
requirements. Once those have been |
|
met, you can purchase the upgrade. The |
|
amount of gold required to upgrade to |
|
the next level is shown on the button — |
|
in red if you can’t yet afford it. |
Tracking/Upgrade |
Click the down arrow to put this site in |
|
the Tracking window. The right arrow |
|
focuses the Main Map on it. |
Repair Queue |
With this toggle button, you determine |
|
whether or not your Peasants should |
|
repair this building, should it be |
|
damaged |
Repair Once |
This button notifies your Peasants to |
|
repair the building one time, and then to |
|
leave it alone until you give other |
|
orders. |
|
3131 |

Majesty Gold Manual 11/29/01 3:28 PM Page 32
Coffers |
This readout displays the amount of |
|
gold awaiting tax collection. This infor- |
|
mation only appears on buildings that |
|
can contain or produce gold. |
Tax Route |
With this toggle button, you determine |
|
whether or not your Tax Collectors |
|
visit this building each time they make |
|
their rounds. This button only appears |
|
on buildings that can contain or pro- |
|
duce gold. |
Tax Once |
This button temporarily adds the |
|
building to your tax route. The next |
|
time a Tax Collector makes his rounds, |
|
he can stop here to collect taxes (pro- |
|
vided there is gold in its coffers). On |
|
subsequent rounds, however, he |
|
bypasses this building unless you give |
|
him other orders. This button only |
|
appears on buildings that can contain |
|
or produce gold. |
Demolish |
Click this button to destroy the build- |
|
ing. Your Peasants sell the materials |
|
for salvage, so you get back a small |
|
portion of the original construction |
|
price. |
Help |
The Help feature gives you a brief |
|
overview of the building’s function and |
|
abilities, as well as some insightful |
|
background information. |
Support |
This indicator shows how many heroes |
|
this building is currently supporting. |
Heroes |
This button, available only for Temples |
|
and Guilds, calls up a list of all the |
|
heroes associated with the building. It |
|
includes their names, level, and cur- |
|
rent actions. A toggle button at the bot- |
|
tom of this list changes the entries to a |
|
short form that shows only the heroes’ |
|
names. The Visitors button shifts the |
|
list to show the visitors in the building. |
Recruit Heroes |
The main role of Guilds and Temples is |
|
to support the activities of your heroes. |
|
Click this button to add a new hero of |
|
the appropriate type (Rangers from a |
|
Rangers Guild, for example) to your |
|
employ. The recruitment cost is sub- |
|
tracted from your treasury and the |
|
button turns into a progress bar show- |
|
ing you when the new hero will arrive. |
Special Ability |
Many buildings have special functions; |
|
for example, Guilds have guild skills |
|
and Temples have spells. The relevant |
|
special ability buttons activate that |
|
skill, provided that you have the funds |
|
to pay for it. The Spells button, for |
|
instance, takes you to a list of that |
|
building’s spells. |
Combat Damage
Each building and lair can take only a certain amount of damage before it collapses. This is represented by the structures’ “hit points.” As a site takes damage from attacks, these points are gradually lost. When the hit point total reaches zero, the building is destroyed.
32 |
3333 |
Majesty Gold Manual 11/29/01 3:28 PM Page 34
You can have a damaged building under your control repaired at any time before it reaches zero hit points. If you need a building that has been destroyed, however, your only option is to construct a replacement. Also, note that only fully repaired buildings can research new abilities or be upgraded; damaged sites must be brought into good repair first.
Repair Routes
Buildings damaged by attacks can be repaired. You can choose to have a building repaired every time it’s damaged (it’s in the Repair Queue), or you can have it repaired only when you specifically order it (Repair Once). The advantage of having buildings in the queue is that you can focus your royal attention on other things and let the business of repair go on in the background. However, if you want to carefully manage your Peasants, the Repair Once option comes in handy.
You only have a limited number of Peasants, and they divide their time between constructing new buildings and repairing existing ones. For the most part, the Peasants aren’t as intelligent as their ruler, and in heated moments, they might focus their efforts wrongly — for example, repairing a minor structure while a more important one is badly damaged and under attack. The Repair Once option lets you manage this situation by taking less important buildings off your Peasants’ Repair Queue, then calling for them to be repaired when the situation allows.
Upgrading
Many buildings may be upgraded one or two levels. (The number of possible levels depends on the type of
building, but no building goes above level three.) In order to upgrade a building you
34 must have the amount of gold indicated on its upgrade button. Certain buildings also have upgrade prerequisites. These are detailed in the
building’s Help text, and you can also find them in the Reference section. A missing prerequisite will be listed on the ToolTip Bar.
Once you meet the prerequisites for upgrading, just click the Upgrade button. This prompts your Peasants to add the job to their construction queue. Once they get to the site, they start to perform the upgrade work. The more workers are helping with the task, the quicker it is completed.
Structures You
DonÕt Build
Some buildings, like Houses, Elven Lounges, and Gambling Halls, are
generated without your involvement. They come about naturally as your settlement grows and certain requirements are met. Infrastructure, such as Sewers and Graveyards, are also created for you. These structures cannot be demolished or destroyed. In addition, in some quests your heroes might find existing buildings and add them to your kingdom.
As your settlement grows, the building roster comes in handy. To use it, select your Palace and then click the Roster button. Now click the Buildings button in order to make the list display all your village’s structures.
From this list, you can quickly tell what buildings
are in your tax and repair queues and if any 3535 building’s current status warrants attention.
Majesty Gold Manual 11/29/01 3:29 PM Page 36
YOUR HEROES
While it’s an important job to construct the buildings that make up your kingdom, the real key to your success in any quest lies with your heroes. It is only through their courageous endeavors that your goals can be accomplished.
Recruiting Heroes
You recruit heroes through Guilds and Temples. Each of these produces a specific type (some have two or more types) of hero and can support up to a maximum number. For instance, a Rangers Guild creates and supports a maximum of four Rangers, while a Dwarven Settlement creates and supports three Dwarves.
Each Guild and Temple has a Recruit button. This button shows you the type of hero it can recruit and displays the cost in gold for recruiting the next hero of that class. When you click, the gold is subtracted from your treasury and the button becomes a recruitment timer. This timer shows how long you have to wait before your new hero arrives.
Every hero carries a unique name and set of personal statistics, and all of them have minds of their own. Your new heroes spring immediately into action, pursuing their own priorities. Your challenge is to get them to accomplish your goals.
Hero Behavior
Heroes are intelligent entities (with the occasional exception). They have their own individual motivations and goals — goals that might not always coincide with your needs. For instance, no matter how high an attack
reward you place on a Skeleton, there is very 36 little chance that a Ranger will try to attack it.
Rangers know that their chances of damaging a
Skeleton with their arrows are slim. However, you can sometimes tempt them to consider such intimidating actions by offering a particularly high reward.
Likewise, don’t be surprised to see some heroes simply mill about. This is your cue to give them something to do. Are your Wizards just walking around and resting from time to time? Maybe you should build a Library, so they can go learn some new spells! Are your Warriors content to stay at home because there are no enemies to hunt? Maybe it is time to have them explore the surrounding area for monsters by placing explore flags!
Some heroes are smarter than others. For instance, the intelligent Wizards almost always equip themselves with any available Healing Potions, but thick-headed Warriors of Discord almost never do. Likewise, some heroes are more loyal than others. A Rogue’s only loyalty is to gold and wealth. In a multiplayer game, your own Rogues might attempt to satisfy a Reward Flag that another sovereign placed on your Palace. Paladins, on the other hand, can only be tempted to disloyalty by the most excessive rewards, if at all.
These are but a few examples from a long list of behavioral differences between your heroes. It is one of the challenges facing any sovereign to figure out, understand, and work with these differences, ultimately manipulating them to your best interests in order to accomplish your goals.
The Hero Control Window
As is true of buildings, heroes have useful details and handy functions that show up in the Control window when one is selected.
Name |
This is the name of the hero. If |
3737 |
|
a hero is level ten or higher, you |
can click in this field to change the name.

Majesty Gold Manual 11/29/01 3:29 PM Page 38
Type |
|
|
The hero’s class — Ranger or Wizard, |
||
|
for example — is displayed here. |
|
Hit Points |
This bar displays the hero’s maximum |
|
|
and current hit points. The bar rises |
|
|
and falls as the hero takes damage and |
|
|
heals. Once a hero’s hit points reach |
|
|
zero, the hero dies and leaves a |
|
|
Gravestone. |
|
Level |
This indicator displays the current level |
|
|
of the hero. As characters gain more |
|
|
experience, they move up in level. |
|
Experience |
This status bar shows how much more |
|
|
experience is needed before the hero |
|
|
attains the next level. |
|
Current Action |
Your hero’s current activity — hunting or |
|
|
fighting, for example — is displayed here. |
|
Weapon |
The weapon your hero is currently |
|
|
wielding and its bonus (if any) are dis- |
|
|
played here. If you move your cursor |
|
38 |
over this area and look at the ToolTip |
|
|
Bar, you see a description of the |
|
|
weapon. |
|
Armor |
What armor the hero is currently wear- |
|
ing and its bonus (if any) are displayed |
|
here. |
Spells |
This button opens a list of all the spells |
|
the hero can currently cast and a list of |
|
the enchantments in effect on that |
|
hero. |
Statistics |
Click this to see the hero’s unique per- |
|
sonal statistics. |
Items |
This button opens the hero’s inventory |
|
list. Use this to find out how much gold |
|
this hero has. |
Tracking/Focus |
Click the down arrow to put this hero |
|
in the Tracking window. The right |
|
arrow focuses the Main Map on the |
|
hero. |
Dismiss |
Click this button to dismiss the hero (or |
|
corresponding Gravestone) from your |
|
quest. The hero walks to the Palace, |
|
enters, and then disappears from the |
|
quest into early retirement. You can |
|
then recruit a replacement. |
Help |
The Help feature gives you a brief |
|
overview of the hero’s abilities, as well as |
|
some insightful background information. |
Improving Heroes
The longer they are out adventuring, the more your heroes increase in skill level. They do this by gaining experience (measured in points). Once a hero reaches a certain threshold of experience, that
hero’s level increases by one. Getting to higher 3939 levels is more difficult, as each promotion
requires progressively more time and experience.
Majesty Gold Manual 11/29/01 3:29 PM Page 40
When heroes go up in level, they get more hit points, they might get better at a particular skill, and they also can gain new spells or skills. The list of actions that heroes can undertake to gain experience is quite long, and to some degree, it is unique for each hero class. In general, if heroes are in the field adventuring, they are gaining experience. However, there are ways that you can promote heroes and make them better at what they do without risking them in the field.
Fairgrounds
The Fairgrounds provide two ways in which heroes can seek self-improvement. First, heroes can purchase upgrades to their combat skills. Second, they can take part in tournaments.
Tournaments are events held at the Fairgrounds. Each type of tournament focuses on refining a different one of your heroes’ combat skills. The focus might be melee, archery, or magic, and there are combination tourneys, too. Heroes that use the relevant skills are attracted to the Fairgrounds for practice. Combination tournaments are open to heroes using all types of combat skills.
Heroes who perform admirably in a tournament stand to gain experience and possibly even some bonus gold. By selecting the tournament type, you can guide specific classes of heroes to improvement. You can also close down the tournaments to force your heroes into the field.
Library
Libraries have several positive effects on your heroes. For starters, just having a Library in your kingdom
boosts the intelligence of all heroes recruited 40 after the Library has been built. However, the
Library’s most valuable role is in developing
magical abilities. Using this building’s research features, you are able to train your Wizards to use new spells and improve their intelligence. You can also teach intelligent characters new magic (even non-spellcasters), and afford them the opportunity to increase their magic resistance.
Equipment
Heroes can improve their equipment as well as their statistics and skills. This happens when they visit different buildings throughout your kingdom. Read the Reference section for all the details, but here are a few of the more useful examples.
Blacksmiths sell better weapons and armor to your heroes, but you have to spend gold in order to research each new level of improvement.
Wizards Guilds enchant your heroes’ weapons and armor, as long as they are willing to pay for the service. Enchanted weapons and armor add to damage and protection.
If you have a level two Rogues Guild, heroes can pay to have their weapons poisoned. A poisoned combatant slowly loses hit points over a given amount of time. It is quite possible that the infected character will die before the poison wears off.
Marketplaces also sell helpful items to heroes, though you must research each item in order for it to be available. At level one, you can get Healing Potions. Level two offers Rings of Protection, and the third level Marketplace introduces Amulets of Teleportation.
Heroes might also find improved weapons and armor as they adventure. Some lairs have hidden caches, which become available when the lair is destroyed.
4141
Majesty Gold Manual 11/29/01 3:29 PM Page 42
Orphaned Heroes
If a Temple or Guild is destroyed and heroes supported by that building decide to return home, the heroes note the lack of a home to return to and assume that their services are no longer needed. The heroes then walk to the Palace, enter, and leave your kingdom.
If, however, you build an appropriate replacement Guild or Temple before the homeless heroes reach the Palace, then the new structure adopts the orphaned heroes. This does not change the maximum number of heroes that the Guild or Temple can support.
Caring for Dead Heroes
When any hero dies, a Gravestone is left behind. These markers remain on the map for a limited time after the hero’s death. Gravestones of higher level heroes last longer than those of lower level heroes. If you have a Resurrection or Re-animation spell available, you can bring a hero back to life by casting that spell on the Gravestone. Once the Gravestone has gone, however, there is no way to bring the hero back.
You should count the Gravestone of any hero you expect to bring back toward the maximum number of heroes a Guild or Temple can support. So, for example, if you have two Rangers and two Ranger Gravestones you plan to revive on the map, that Rangers Guild (which holds a maximum of four members) should be considered full. You can immediately recruit new heroes to replace the dead ones, but if you do this, the lowest-level Gravestone is dismissed and the newly recruited hero assumes that membership slot. Thus, you would lose your opportunity to revive the expired hero.
You can also manually dismiss Gravestones by 42 selecting the stone and clicking its Dismiss
button or by double-clicking on the Gravestone itself.
REWARD FLAGS
An important key to success in your game is in learning how to motivate your heroes. Your main tools for doing this are Reward Flags. These are offers of gold to be awarded to any hero who successfully fulfills the terms of the flag — explore or attack the indicated target. There are two different types of flag, as seen here.
Attack Flag |
Explore Flag |
An Attack Flag tells your heroes to defeat the marked creature or destroy the marked building or lair. An Explore Flag offers a reward for reaching the marked location. Note that Attack Flags can only be placed on visible things, while Explore Flags can be placed anywhere. Attack Flags travel with moving targets, but Explore Flags stay wherever you place them.
Heroes don’t always respond to your Reward Flags. You have to appeal to their sense of greed — and each hero’s thirst for gold is different. Your reward must be high enough to outweigh the rigors of the distance to be traveled and the dangers to be faced.
Placing Flags
To place a Reward Flag, select your Palace. In the Control window, click the Rewards button to open the Reward Flags box.
To set the amount of the reward, use the plus and minus signs next
to the type of flag you 4343 want — Explore or
Majesty Gold Manual 11/29/01 3:29 PM Page 44
Attack. Once that’s done, click the name of the type of flag, then move your cursor onto the Main Map. Notice that you are now “carrying” a Reward Flag on your mouse pointer. Move your cursor to the target and click to place the flag.
Note that if you’re placing an Attack Flag, your cursor must be over a structure, character, or monster to be placed. Otherwise, the flag has a red “Invalid Target” marker over it. You can’t place Attack Flags just anywhere; they must be placed on valid targets.
If you are trying to place a Reward Flag with a higher reward amount than you currently have in your treasury, your cursor shows a red “Disallowed” marker with coins attached. This changes back to a normal cursor once your treasury increases to cover the amount, or after you decrease the reward amount to within reach of your funds. You can right-click to cancel flag placement.
Since placing flags is a vital part of success in a quest, there are two shortcuts you can take — after you have set amounts on both types of flag — to speed this action.
•Double-click on the intended target. If the target is a creature or building, you get an Attack Flag. If it’s vacant land, you get an Explore Flag instead. The flag bounty is dictated by the current reward amounts. You can set it manually after the fact; see Managing Flags.
•Press the zwhen an enemy target is selected (you see it in the Control window). This sets an Attack Flag on that target. Again, the flag bounty is dictated by the current reward amounts, and you can set it manually after the fact.
44
Managing Flags
Once you’ve set a Reward Flag, that can be the end of it until a hero claims the flag. However, you can also keep an eye on the flag and make
changes if things aren’t working out to your royal approval. Click on a placed Reward Flag to get that flag into the Control window.
Once a flag has been placed, you can only make changes to it in this window. Naturally the first thing you might be interested in is the flag’s effectiveness. To check this,
look at the View Heroes button. It has a number indicating how many heroes are presently responding to the bounty. If no heroes have been tempted by your reward, you might consider increasing the amount. (Keep in mind, however, that it does take a little time between when you place a flag and when heroes begin to take note of it.)
If you click the View Heroes button, you are presented with a list of all the heroes who are currently trying to achieve that flag’s objective. Clicking on any entry in this list centers the Tracking window on the chosen hero.
Once a reward flag is placed, it cannot be moved. However, you can increase the bounty. To do this, click the plus sign in the Control window. Each click increases the reward by 100 gold. The reward amount can not be decreased after a flag has been placed.
You can also remove a flag completely from the
map. Be warned! If you remove a flag, the boun- 4545 ty in gold it was carrying is lost — it does not get returned to your treasury. To remove a flag:
 Loading...