


L2003
RTS
1.Click the Real Time club icon.
The icon and pointer disappear and you’re ready to swing!
2.Move the mouse back (toward you) in a straight line.
The golfer starts the backswing.
3. When the golfer reaches the desired length of the backswing, reverse direction, moving the mouse straight forward (keeping the two arrows aligned behind the ball) to complete the swing.
No clicking required!
0702 Part No. X08-87784
SW
About Photosensitive Seizures
A very small percentage of people may experience a seizure when exposed to certain visual images, including flashing lights or patterns that may appear in video games. Even people who have no history of seizures or epilepsy may have an undiagnosed condition that can cause these “photosensitive epileptic seizures” while watching video games.
These seizures may have a variety of symptoms, including lightheadedness, altered vision, eye or face twitching, jerking or shaking of arms or legs, disorientation, confusion, or momentary loss of
awareness. Seizures may also cause loss of consciousness or convulsions that can lead to injury from falling down or striking nearby objects.
Immediately stop playing and consult a doctor if you experience any of these symptoms. Parents should watch for or ask their children about the above symptoms—children and teenagers are more likely than adults to experience these seizures.
The risk of photosensitive epileptic seizures may be reduced by taking the following precautions:
•Play in a well-lit room.
•Do not play when you are drowsy or fatigued.
If you or any of your relatives have a history of seizures or epilepsy, consult a doctor before playing.
Information in this document, including URL and other Internet Web site references, is subject to change without notice. Unless otherwise noted, the example companies, organizations, products, domain names, e-mail addresses, logos, people, places and events depicted herein are fictitious, and no association with any real company, organization, product, domain name, e-mail address, logo, person, place or event is intended or should be inferred. Complying with all applicable copyright laws is the responsibility of the user. Without limiting the rights under copyright, no part of this document may be reproduced, stored in or introduced into a retrieval system, or transmitted in any form or by any means (electronic, mechanical, photocopying, recording, or otherwise), or for any purpose, without the express written permission of Microsoft Corporation.
Microsoft may have patents, patent applications, trademarks, copyrights, or other intellectual property rights covering subject matter in this document. Except as expressly provided in any written license agreement from Microsoft, the furnishing of this document does not give you any license to these patents, trademarks, copyrights, or other intellectual property.
© 2002 Microsoft Corporation. All rights reserved. Microsoft, Windows, Windows NT, the Microsoft Game Studios logo, and Links 2003 are either registered trademarks or trademarks of Microsoft Corporation in the United States and/or other countries/regions.
Developed by Microsoft Corporation.
Microsoft and the Microsoft logo are trademarks of Microsoft.
The names of actual companies and products mentioned herein may be the trademarks of their respective owners.
T C
Installing Links 2003 |
Putting |
Starting Links 2003 |
Practice |
Creating Your Player |
In-Game Menus |
Starting a New Round |
Display Options |
Customizing a New Round |
Swing Types |
(Play Golf) |
Sand Shots |
Selecting a Club |
Rules & Modes of Play |
|
Mulligans & Gimmes |
Aiming Your Shot |
Online Play |
Rotating Your Golfer |
|
Classic Swing Type |
Links Career |
Chipping |
|
Post-Shot Options |
Arnold Palmer Course |
Dropping |
Designer 1.5 |
L
This manual’s design is inspired by real-life golf course caddy books (also known as course managers). Such guide booklets provide helpful information about each of the courses’ 18 holes, including par and handicap, graphic illustrations, a written description, yardages, and pro tips.
Like a caddy book, this manual provides helpful information, instructions, and tips on 18 topics, which are listed in the Table of Contents. Each of the 18 topics contains a topic title (such as “Installing Links 2003”), followed by a description of the topic written in the style of a caddy book (as if the topic were a golf hole).
Each topic has the following:
An illustrated fantasy hole depicting the theme of the current topic.
The Links 2003 crest with
topic number.
The name of the fantasy hole, its par, and the topic’s handicap rating (its complexity relative to the other topics—1 is the most
complex, 18 is the simplest).
TIP
Helpful gameplay hint.
NOTE
Extra detail.
FYI
Reference to where you can find additional information.
IMPORTANT!
I L 2003
This opening topic should get you off to a running start—it practically plays itself, so just sit back and take what the Setup gives you. Should be an easy par.
IMPORTANT!
Links 2003 requires Microsoft® Windows® 98, Windows® Millennium Edition, Windows XP, or Windows® 2000; 400 MHz processor; 64 MB RAM (128 MB RAM required for Windows XP); 16 MB video card.
To install Links 2003
1.Insert the Links 2003 CD 1 into your CD-ROM drive. If Setup does not run automatically, proceed to step 2.
2.From your desktop, double-click My Computer.
3.In the My Computer window, double-click the CD-ROM icon.
4.Click Install. Setup will guide you through the installation process.
Lanny’s Doormat
Par 3 | Handicap 17
FYI
New Features in Links 2003 include:
Real Time Swing.
The golfer swings simultaneously as you move the
mouse. See topic 14 (“Swing Types”).
Green Analyzer. A viewing mode that offers a quick way to analyze the green from any angle. See topic 10 (“Putting”).
Putting Assistant. Novice golfers get help lining up their putts. See topic 10 (“Putting”).
Links® Match Maker, E-mail Tournaments. Set up or join online games. See topic 16 (“Online Play”).
Information you need to know.
Quintuple Point
Par 5 | Handicap 18
TIP
Want a Pro to teach you how to play Links 2003? You can take interactive lessons on aiming, swinging (for all swing types), chipping, putting, and dropping. It’s like going to the practice green or driving range with the Club Pro!
To take an interactive lesson
On the Main Menu, click Lessons, and then click the lesson you want.
–or–
During a round, click the Menu tab in the bottom-right corner, click Lessons, and then click the lesson you want.
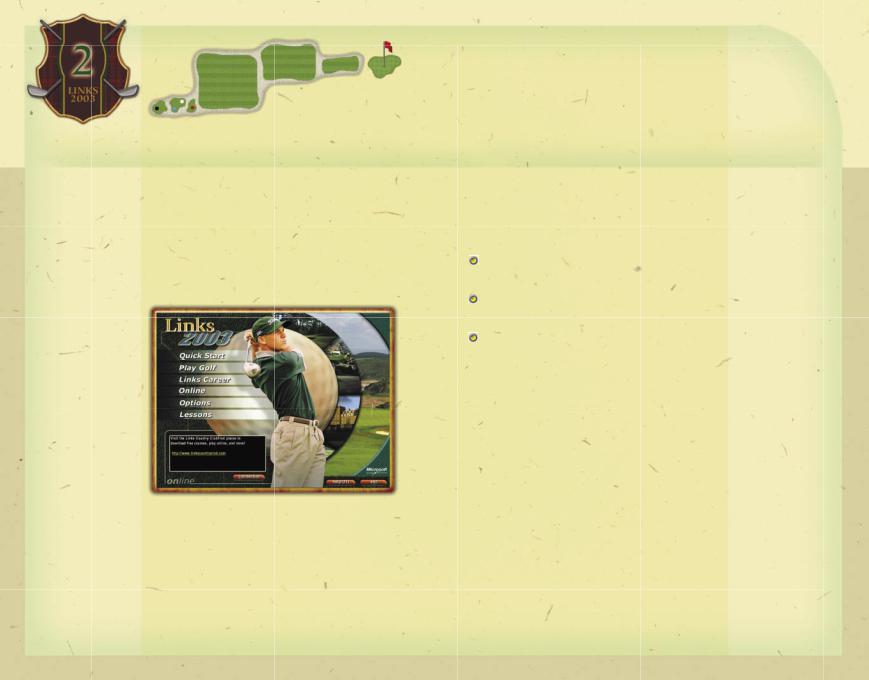
S L 2003
This 2nd topic has the lowest handicap of all 18—fi ve quick clicks and you’re there! Or, if you created a Links 2003 desktop icon during installation, double-click it to get there in two!
To start Links 2003
1.From the Start menu, point to Programs, point to Microsoft Games, and then point to Links 2003.
2.Click Links 2003. The Main Menu is displayed:
QUICK START—Begin play using default settings (see topic 4).
PLAY GOLF—Customize settings before starting a new round (see topic 5).
LINKS CAREER—Start a Links career (see topic 17). ONLINE—Select an online play option (see topic 16).
OPTIONS—Select settings for Game, Graphics and Sound (see next page).
LESSONS—Take an interactive lesson (see TIP). CONNECTION—Select online connection settings.
Options
Click Options on the Main Menu to display the Options screen, which is divided into three sections: Miscellaneous, Stats, and Settings. The only options important to getting started are under Settings:
GAME SETTINGS—Select options for yards vs. meters, your scorecard, animations, hole previews, and so on.
GRAPHIC SETTINGS—Select options for video cards, display modes, course animations, dynamic cameras, resolution vs. redraw speed, and so on.
SOUND SETTINGS—Select or edit sound scripts, set volume and channels, turn on or off course, crowd, and golfer sounds, and so on.
To select Game, Graphic, or
Sound settings
1.In the Main Menu screen, click Options.
2.In the Options screen, under Settings, click the desired setting.
–or–
1.During a round, click the Menu tab in the bottom-right corner of the screen, and then click Preferences.
2.In the Preferences screen, click the desired settings button.
FYI
Click Help in any screen to open the Links Help Menu and get context-sensitive information, as well as an index of almost 300 Help topics.
NOTE
The Options screen is one of many setup screens without a Next, OK, or Finish (or other command) button. To exit the screen, click Back.

Frankenstein
Par 5 | Handicap 9
TIP 1
You can import your own photo! At step 4, click Browse, and then click Help.
NOTE
Amateur: No hooks or slices; Putting Assistant available.
Professional:
Moderate hooks and slices; partial Putting Assistant available.
Championship: Full hooks and slices; no Putting Assistant.
Elite: Severe hooks and slices; aiming in Main Cam only; no Grid or Putting Assistant available.
TIP 2
The Caddy recommends a club for each shot. The
Putting Assistant helps Amateur and Professional level players to aim their putts (see topic 10).
CY P
Here’s your opportunity to show what kind of Links player you are. Fashion your own unique approach, and then fi nish #3 as a golfer to be reckoned with!
To use the Create Player Wizard
1.Type your name in the Player Name box.
2.From the Golfer Model drop-down list, select a 3D model for your player.
3.Click the arrows under Shirt, Pants, and Skin (if available) to select your player’s appearance.
4.From the Photo drop-down list, select a photo for your player (see TIP 1).
5.From the Sound Script drop-down list, select a voice for your player.
6.Specify if your player is rightor left-handed, and then click Next.
7.Select a Skill Level (see NOTE) and Tee position.
8.Specify if you want to Use Caddy and/or Use Putting Assistant (see TIP 2), and then click Next.
9.Select a Swing Type (see topic 14) and Swing Orientation (if applicable).
10.Select your Grid preferences (see TIP 3, next page), and then click Next.
11.Select your player’s clubs, and then click Finish.
12.You can click the Settings, Personality, Clubs, or
Club Distances tabs to view or edit your player’s attributes. When you’re fi nished, click OK.
IMPORTANT!
The Create Player Wizard appears automatically only the fi rst time you start Links 2003. To create other new players, or to edit your player after it has been created, follow the steps below:
To create a new player
1.On the Main Menu, click Options.
2.In the Options screen, click Players.
3.In the Players screen, click Create New Player.
4.Select a Player Type (see FYI), and then click Next.
5.Follow the steps for using the Create Player Wizard (previous page).
To edit a player
1.On the Main Menu, click Options.
2.In the Options screen, click Players.
3.In the Players screen, under Player, click the Player you want to edit in the Select Player drop-down list.
4.Click the Settings, Personality, Clubs, or Club Distances tabs, and then make your changes.
5.To save your changes and return to the Options screen, click OK.
TIP 3
The Grid overlays the terrain, highlighting its contours, and is especially useful for reading putts.
FYI
For more golfer options, click Golfer Settings in the Options screen.
FYI
Computer Opponents can be created and then competed against. Refer to Help (topic: “Computer Opponents”).
FYI
For information on cloning, deleting, or renaming a player, click the respective button, and then click Help.
Whirlwind
Par 4 | Handicap 16
FYI 1
Stroke is the most common mode of play in golf. Players compete individually to fi nish a round with the fewest strokes. For more information on the many modes of play available
in Links 2003, see topic 15.
FYI 2
Cam (an abbreviation of camera) refers to any viewing window in Links 2003. For more information on cams, see topic 13.
S N R
This topic can play out two ways: take the “scenic route” by customizing the gameplay and course conditions with the Play Golf approach, or take a straightforward shortcut by using the Quick Start method.
To use Quick Start
1.On the Main Menu, click Quick Start.
2.In the Quick Start screen, click a course in the Course to Play drop-down list.
3.Select the number of players for the new round (1-4).
4.From the Players in the Game drop-down list, select the players.
5.Click Begin Play.
Play Golf: Customize a New Round
Unlike Quick Start, which uses default settings such as Stroke mode of play (see FYI 1), no wind, average green speed and hardness, and so on, Play Golf lets you choose your own preferences (see topic 5).
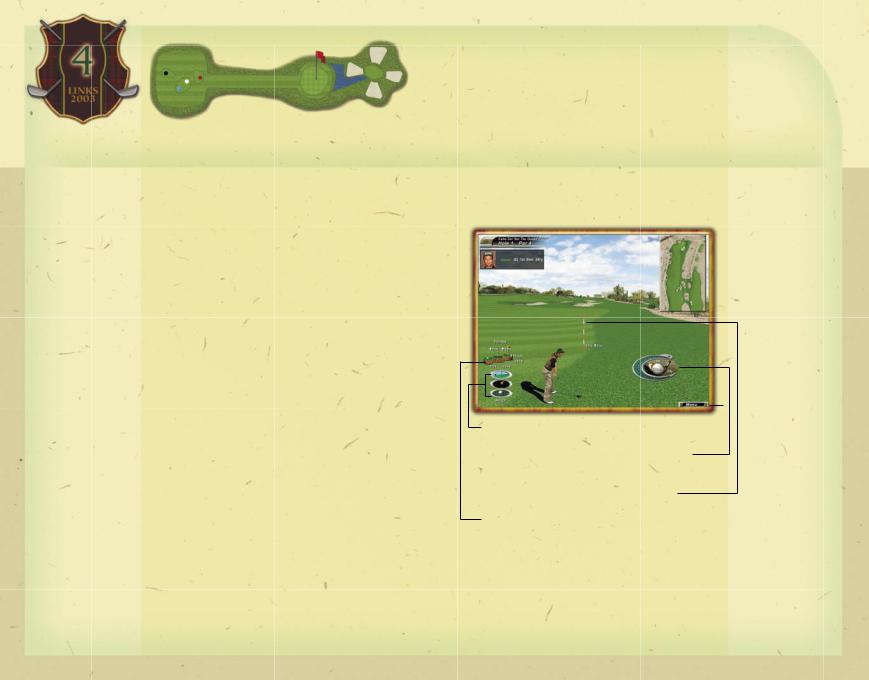
Links 2003 Main Cam
Whether you choose to Quick Start or Play Golf, the fi rst thing you see when you begin a new round is the Main Cam. See FYI 2 (this page) and the graphic (next page). This is the primary viewing window in
Links 2003.
|
|
|
Player Information |
|
Top Cam |
|
|
|
|
|
|
Displays an overhead |
|
|
|
|
Course Information |
|
view of the hole. |
|
|
|
|
|
|
|
|
|
|
|
|
|
|
|
|
|
|
|
|
|
|
|
|
|
|
|
|
|
FYI
The gauge shown is the Classic swing gauge. Each of
the other swing types (Easy Swing, PowerStroke™, and Real Time Swing) has its own gauge or icon. See topic 14.
Slope, Wind, and Lie Indicators
Display the slope of the terrain on which the ball lies, the direction and strength of the wind, and the type of terrain on which the ball lies.
Elevation Information
Displays the differences in elevation between the ball, the Aiming Marker, and the hole.
In-Game Menus 
See topic 12.
Swing Gauge/Icon
Click to execute the swing (see FYI).
Aiming Marker
See topic 7.
Ol’ Greenthumb
Par 4 | Handicap 14
TIP
To hand-pick pin positions for each green, select Custom Pin Positions, and then Custom Pins.
NOTE 1
Galleries are the crowds at golf events;
Tournament Objects are 3D structures, such as grandstands and camera towers.
FYI
Click CourseManager to add or delete courses, view course IDs and videos, or see a list of recorded players. In the Course Manager screen, click Help for more details.
NOTE 2
For information on recording a player’s round, refer to the Help Index (topic:
“Recording a Player”).
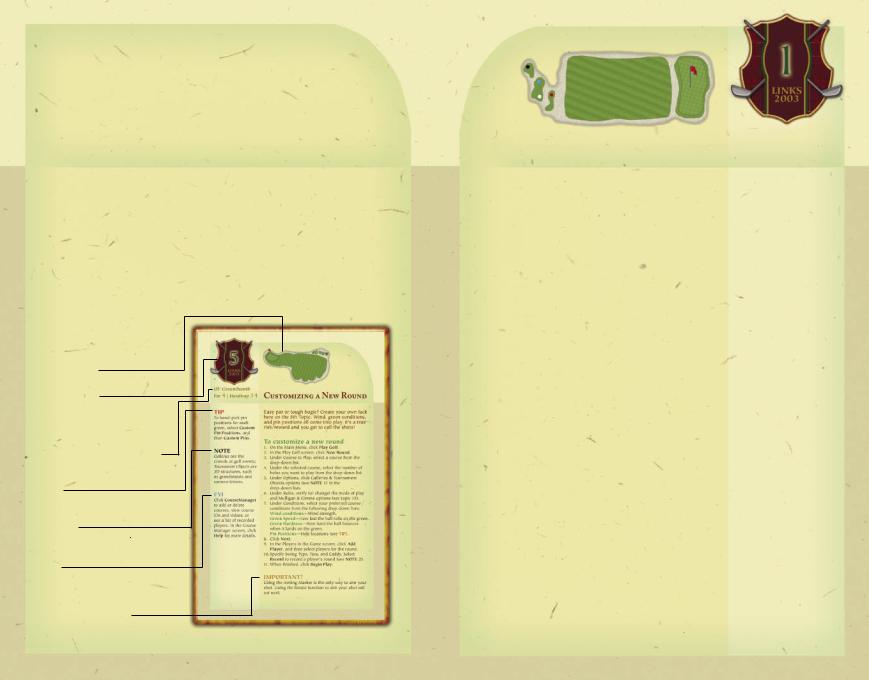
C N R
Easy par or tough bogie? Create your own luck here on the 5th Topic. Wind, green conditions, and pin positions all come into play. It’s a true risk/reward and you get to call the shots!
To customize a new round
1.On the Main Menu, click Play Golf.
2.In the Play Golf screen, click New Round.
3.Under Course to Play, select a course from the drop-down list.
4.Under the selected course, select the number of holes you want to play from the drop-down list.
5.Under Options, click Galleries & Tournament Objects options (see NOTE 1) in the drop-down lists.
6.Under Rules, verify (or change) the mode of play and Mulligan & Gimme options (see topic 15).
7.Under Conditions, select your preferred course conditions from the following drop-down lists:
Wind conditions—Wind strength.
Green Speed—How fast the ball rolls on the green. Green Hardness—How hard the ball bounces when it lands on the green.
Pin Positions—Hole locations (see TIP).
8.Click Next.
9.In the Players in the Game screen, click Add Player, and then select players for the round.
10.Specify Swing Type, Tees, and Caddy. Select Record to record a player’s round (see NOTE 2).
11.When finished, click Begin Play.
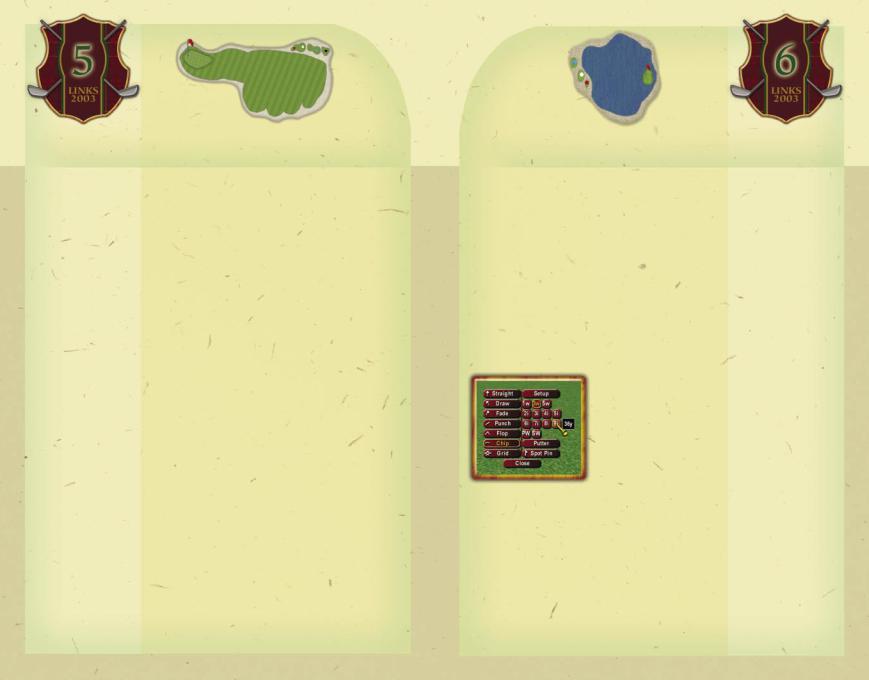
S C
You finally get to let out the shaft! Selecting a club is one of the easiest things to do in Links 2003. However, selecting the correct club (and knowing what to do with it!) is what separates the birdies from the bogies!
To select a club
1.Move the pointer to the bottom of the screen, and then click the Clubs Menu tab.
2.On the Clubs Menu, click a club to select it. The selected club will be displayed in the Swing
Gauge (if you‘re using the Classic or Easy Swing) or club icon (if you’re using PowerStroke or Real Time Swing).
Using the
Club Gizmo
The quickest way to select a club or change shot types is by using the
Club Gizmo:
1. Right-click the swing gauge or club icon.
–or–
Press TAB. –or–
If you have a three-button mouse, click the middle button.
2.Select a club (or shot type).
3.Click Close or move the pointer off.
Caddies’ Bane
Par 3 | Handicap 15
FYI
If you want to change one or more of the clubs in your bag, you’ll need to edit your player. See topic 3.
TIP
Want to customize your stance, swing plane, or trajectory? Click Setup on the Clubs Menu or Club Gizmo. For details, click Help in the Advanced Shot Setup screen.
TIP
To display the average distance of a club, move the pointer over it in the open Clubs Menu or Club Gizmo.
 Loading...