


JANE S-US NAVY FIGHTERS

Chapter 1
FLIGHT
PREPARATIONS
Air combat is the excitement fighter pilots live for. But behind every
white-knuckle second in the cockpit are hours of careful preparation.
Choose Activity Screen
The Choose Activity Screen acts as a “main menu” for the rest of the game.
Each of the options on the Choose Activity Screen are discussed below.
Choose Activity Menu Bar
The Choose Activity Menu Bar gives you access to the Graphics Prefs and
Sound/Music Prefs control panels. Options on these control panels are
described in the Install Guide.
Selecting Onscreen Options
You can select items on the screen using your mouse. Simply point at the
option you want to select and click the left mouse button. Many of the flight
preparation screens share features such as buttons and switches. These are
described below.
Menu Bar
All flight preparation screens have pull-down Menu Bars along the top edge of
the screen. To access a Menu Bar options, move the mouse cursor to a menu
and hold down the left mouse button. When the options appear, drag the
highlighted bar down to the option you want and release the mouse button.
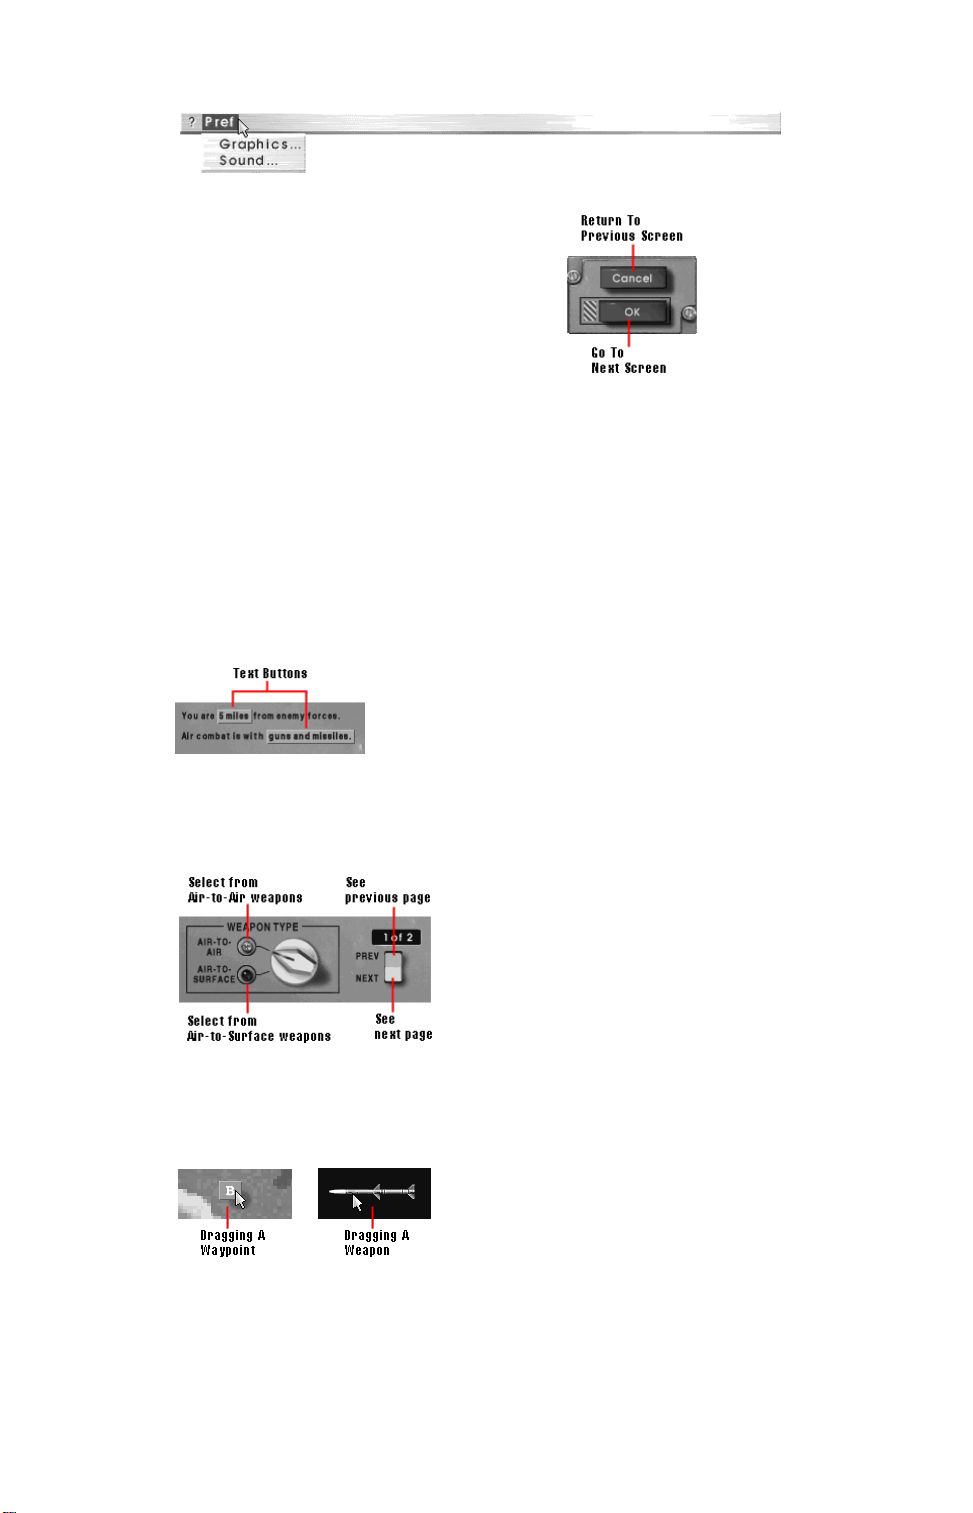
Buttons
Buttons are another method for
choosing options.
Those buttons identified by a blue hash mark allow you to confirm a choice
and proceed to the next screen. The keyboard equivalent for these buttons is
Enter.
Green buttons with the word “Cancel” on them allow you to return to the
previous screen or the Choose Activity Screen. The keyboard equivalent for
these buttons is Esc.
Text Buttons
Text buttons provide multiple options within the given context. Clicking on a
text button cycles through different options. The left mouse button goes
forward through the options; the right mouse button goes in reverse.
Switches and Dials
Switches and dials perform multiple functions depending upon what part of the
switch or dial you click on. Text written next to switches and dials indicate
what each particular position does.
Objects You Can Drag
Objects you can drag — such as map objects and weapons — can be moved
from one part of the screen to another. Click on the desired object select it,
and then use the mouse to drag it to the desired position.
The ? Menu
The ? Menu is available on every menu bar in the game. In the preparation
screens, the ? Menu contains a single option, Quit to DOS (Ctrl-C). In the
cockpit, the ? Menu contains an additional End Mission (Ctrl-Q) option.
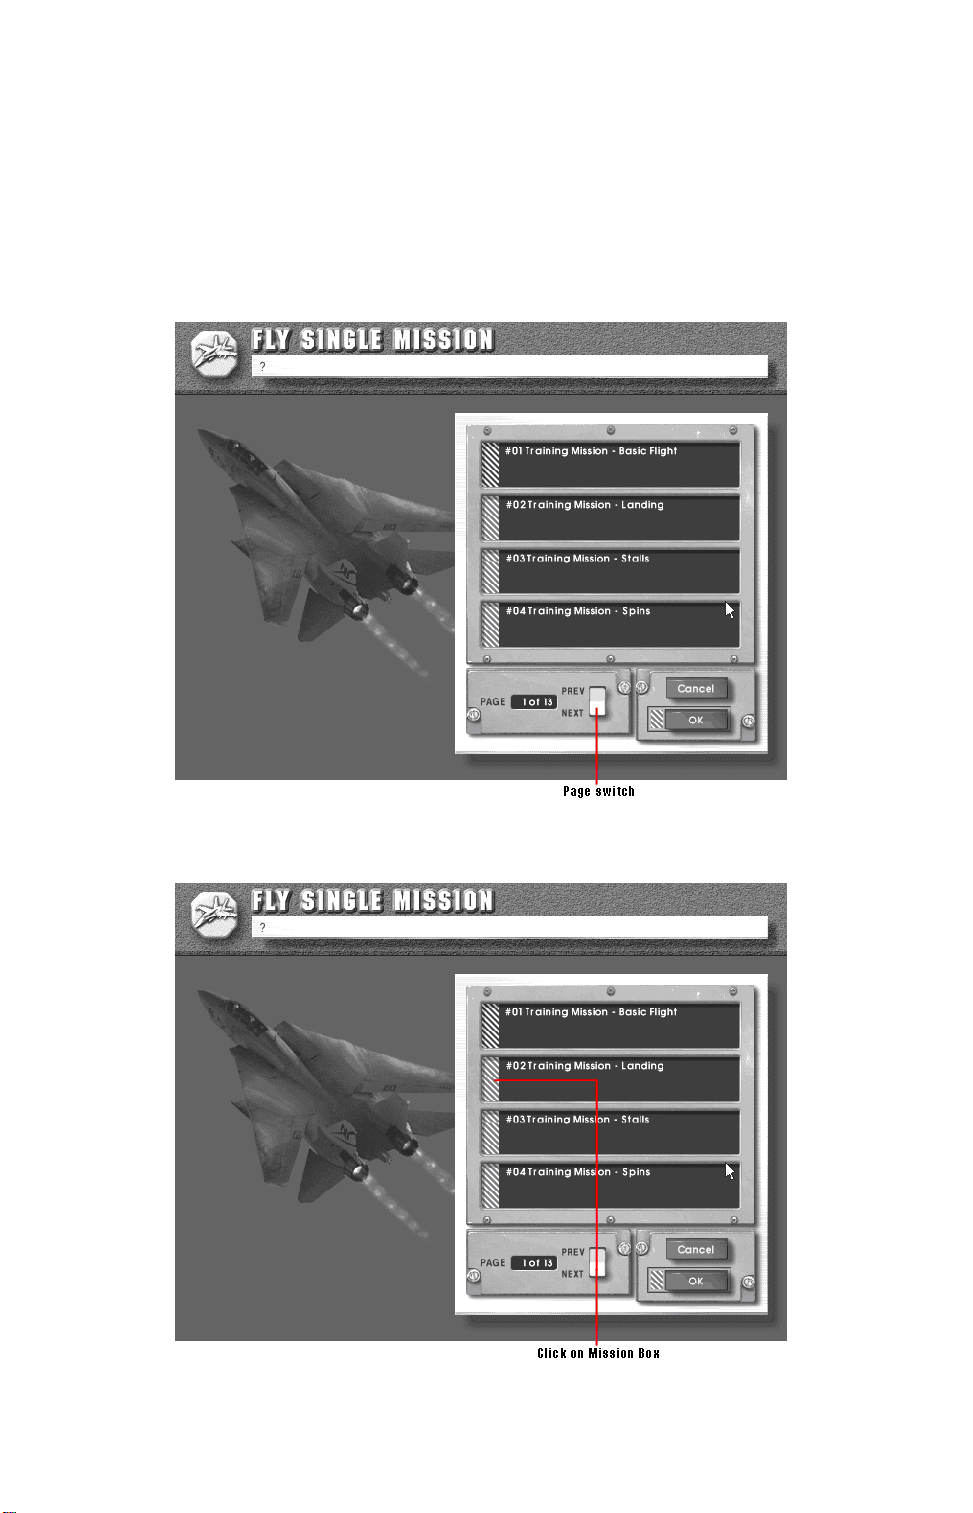
Play Single Mission
The Play Single Mission option allows you to undertake a single, unique
mission — either one of the many provided with the game, or one that you or a
friend has custom-designed using the Pro Mission Creator.
To play a single mission:
1. From the Choose Activity Screen, select Play Single Mission. The Fly
Single Mission Screen appears.
2. Clicking on the Page Switch allows you to view the available single
missions. When you see a mission you want to fly, click on the Mission
Box to move the yellow highlight to that mission.
3. Click on the Ok button or press Enter to select the mission. Depending
on how the mission was set up, you may see one or more of the following
screens: Mission Brief, Mission Map, Aircraft Selection, or Load
Ordnance. Each of these screens is covered in this chapter under Start
New Campaign.
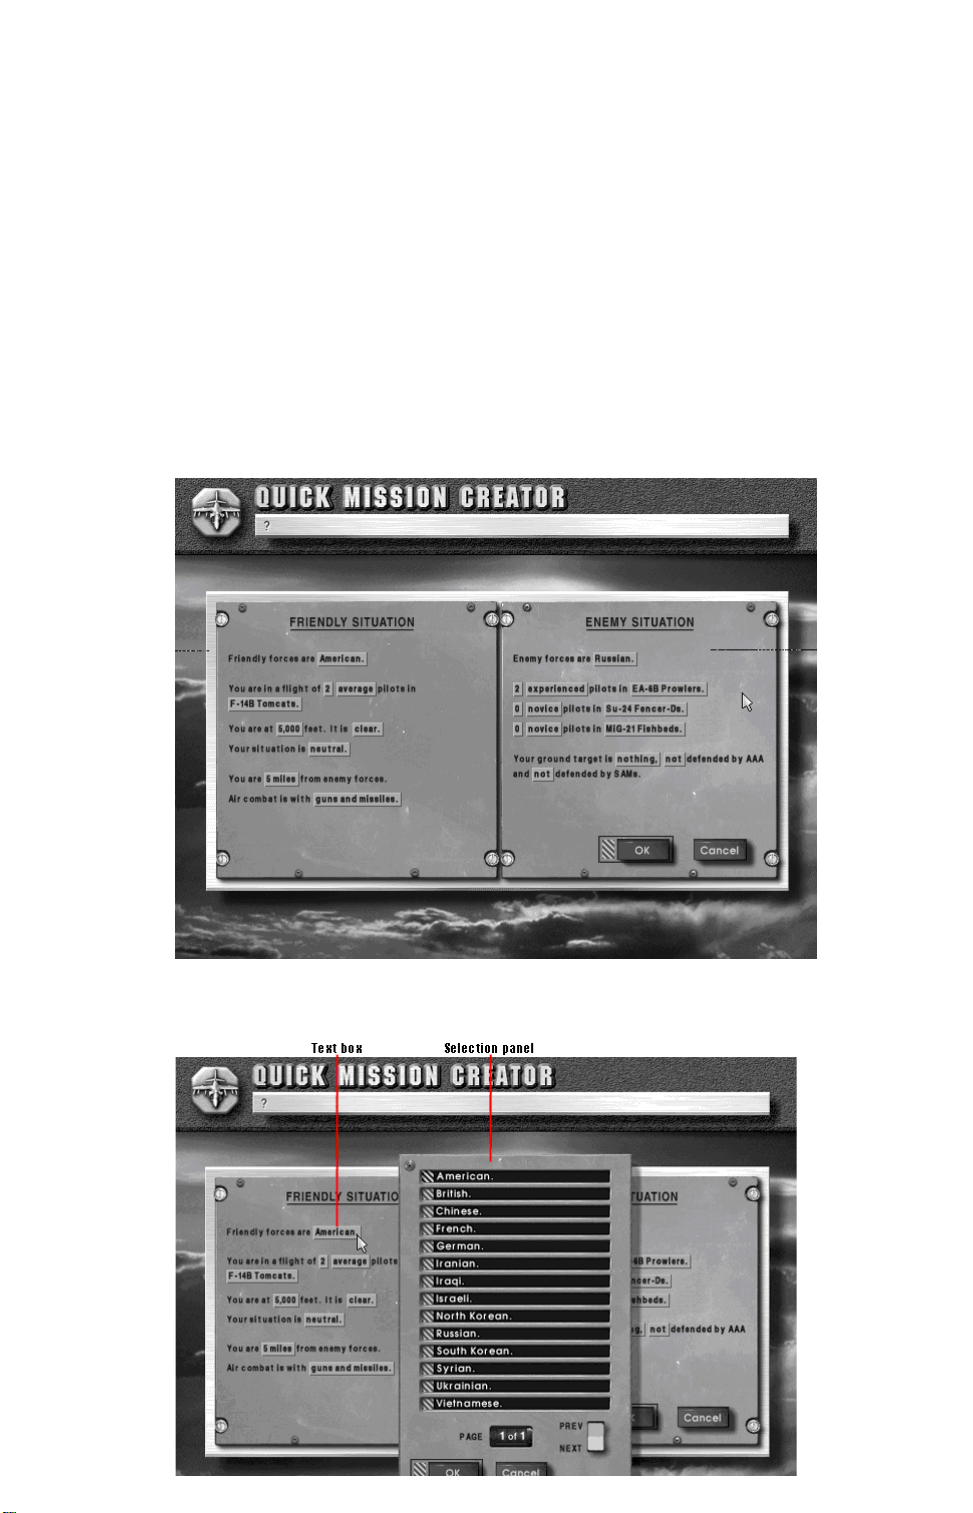
Create Quick Mission
The Quick Mission Creator allows you to set up an air combat engagement
quickly and painlessly. You specify general design parameters and the Quick
Mission Creator delegates most design tasks to the computer. Quick
Missions, therefore, retain the element of surprise, making excellent training
missions.
To create a Quick Mission:
1. From the Choose Activity Screen, select Create Quick Mission. The
Quick Mission Creator appears.
2. Click on the text boxes to bring up selection panels that let you change
various mission parameters for both friendly and hostile forces. These
parameters are explained below.
3. When you have set the mission parameters to your liking, click on the
OK button or press Enter. You will be placed in the lead aircraft of the
friendly group. All aircraft carry default weapon loads.
Setting Up Quick Missions
The Quick Mission Creator allows up to three friendly aircraft, three enemy
flights, and one option ground target in a single mission. How these units
begin the scenario and fight is determined by the parameters you specify.
Friendly Forces
As the name implies, friendly forces fly and fight with you. By clicking on the
text buttons you may alter:
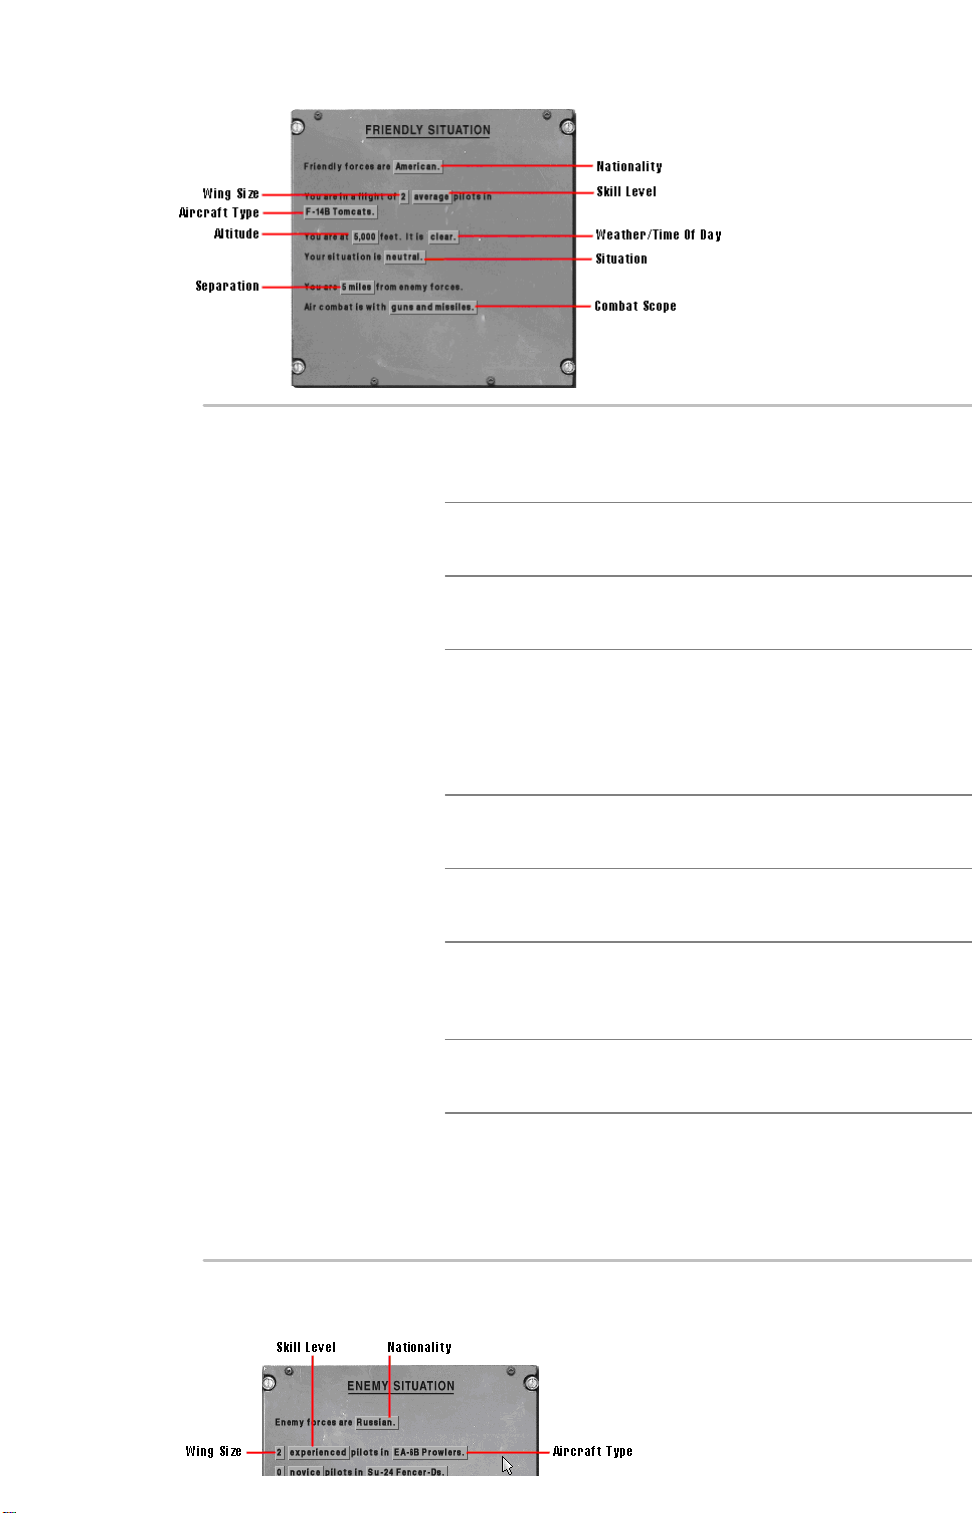
Nationality Select the nationality for which you will fly.
Choosing a nationality does not limit your choices
of aircraft.
Wing Size Specify the number of pilots (including yourself) in
your group, up to a maximum of three.
Skill Level Select Ace, Experienced, Average, or Novice skill
level for your wingmen.
Aircraft Type Choose the type of aircraft your forces will fly
during this mission. All friendly aircraft will fly this
same aircraft type. You may only choose one of
the six aircraft available to players: the F-14,
F/A-18, F-22, F-104, A-7, or Su-33.
Altitude Specify the starting altitude of the group: from
5,000 to 40,000 feet.
Weather/Time of
Day
Situation Specify the situation your friendly forces are in.
Separation Set the initial separation between friendly and
Combat Scope Select which weapons will be used: Guns Only or
Hostile Forces
For hostile forces, you may alter the following:
Set the weather or time of day: Dawn, Clear,
Cloudy, Overcast, Foggy, Sunset, or Night.
Friendly forces can hold the Advantage, be in a
Neutral situation, or be at a Disadvantage.
hostile forces: from 1 to 50 nm.
Guns and Missiles. Note that guns only means no
air-to-air missiles. Air-to-air ground missiles are
still allowed so you can attack a ground target if
you’ve specified one.
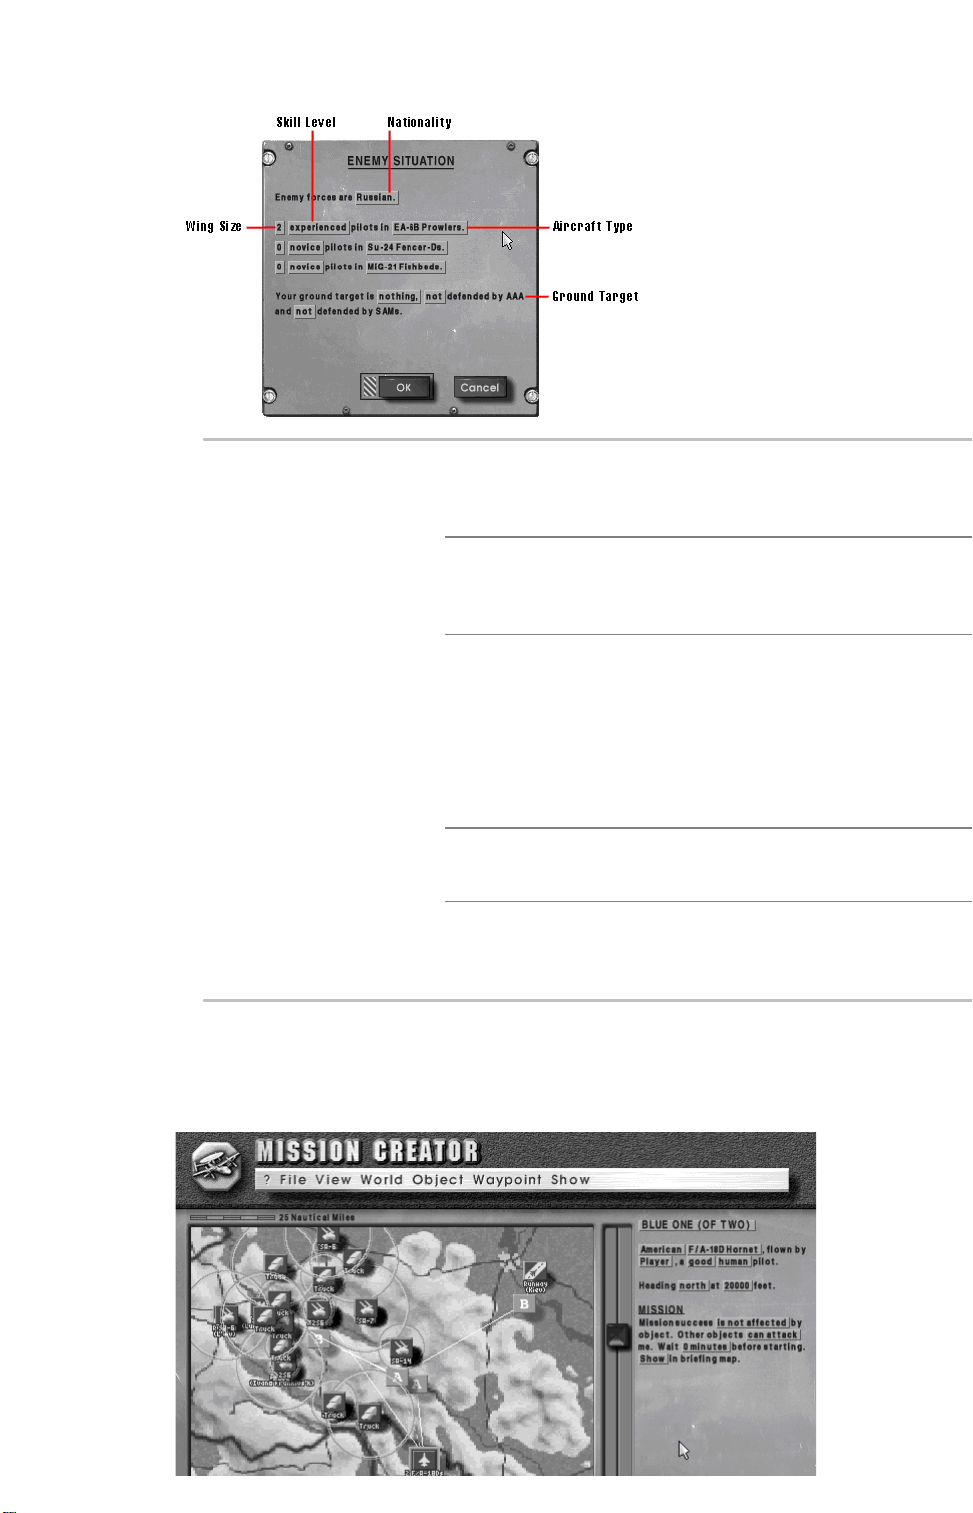
Nationality Specify which country enemy forces come from.
This is merely for designation purposes and does
not limit enemy aircraft to any certain nationality.
Wing Size You may add up to three enemy groups, each
with up to 5 aircraft. Select 0 to disable a
particular group.
Skill Level Choose from Ace, Experienced, Average, or
Novice for the specified group. Select Ace,
Experienced, Average, or Novice skill level for your
wingmen. As with the friendly forces, the skill level
indicates the range of skill levels in the given
group. The exact skill level per pilot is chosen
randomly by the Quick Mission Generator.
Aircraft Type Choose the type of aircraft used by the specified
group.
Ground Target You may select a ground target for your forces.
Additionally, you can determine how heavily
SAMs and AAA defend the target.
Create Pro Mission
The Pro Mission Creator allows you to set up complex missions involving
multiple wings, multiple ground targets, air defenses — even a campaign of
your own.
The Pro Mission Creator is a complex tool requiring a detailed explanation.
See Chapter 7: Creating Custom Missions.
Replay Last Mission
The Replay Last Mission option allows you to do just that: repeat the last
played mission. This option assumes that you haven’t quit out of U.S. Navy
Fighters since your last mission.
Start New Campaign
Campaign Mode is the heart of U.S. Navy Fighters. All of your training has
prepared you for this moment. Trouble brews in the distant parts of the world,
and you’ve been called upon to protect U.S. interests.
Select Campaign Screen
From the Choose Activity Screen, select Start New Campaign. The Select
Campaign Screen appears.
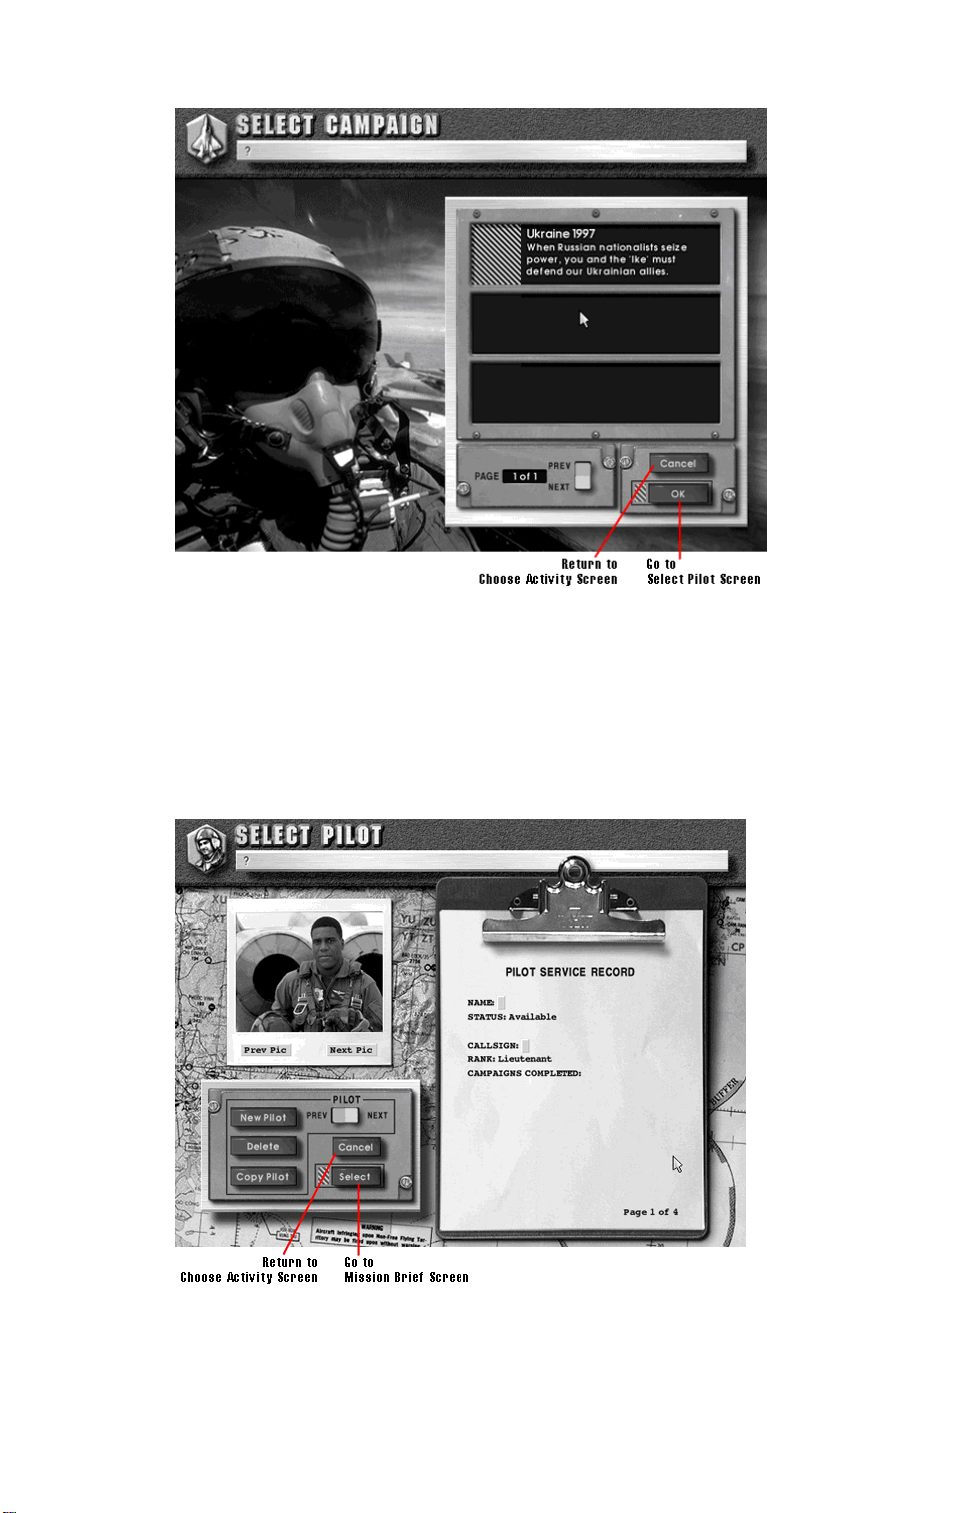
The original U.S. Navy Fighters comes with one 50 mission campaign: Ukraine
1997. Since this option is already highlighted, clicthe OK button or press
Enter.
Select Pilot Screen
The Select Pilot Screen does more than let you choose your alter-ego in the
campaign. A pilot is in essence a saved game. Creating a new pilot is
equivalent to starting a new campaign. Likewise, choosing a pre-existing pilot
is equivalent to continuing his campaign.
Use the Page Up and Page Down keys to flip through the clipboard pages,
which allow you to alter your aircraft’s nose and tail art as well as view any
campaign medals you may have earned.
Click on any of the following onscreen options to alter a pilot file:
Pilot Switch You can create multiple pilots, each active in a
separate campaign. Use this switch to select the
desired pilot.
New Pilot Create an entirely new pilot. The pilot begins with
the ranof Lieutenant and no awards or
commendations.
Delete Pilot Delete the currently selected pilot.
Copy Pilot Create a backup copy of your pilot. If your pilot is
killed or captured, you may resume his career
from the last backup.
Name Specify your pilot’s full name.
Callsign Specify your pilot’s callsign.
Squadron Choose your pilot’s squadron. Squadron choice
determines what emblems are displayed on your
aircraft.
Prev Pic View the previous picture. You choose the face of
your pilot.
Next Pic View the next picture.
Nose Art You may add customized artwork to the nose of
your aircraft.
Tail Art You may add customized artworto the tail of your
aircraft.
When you’ve created the pilot you want, clicthe Select button or press Enter.
Video Briefings
You typically fly two missions a day. At the beginning of each day you receive
a short briefing from the intelligence officer. Before each mission you receive
an additional mission briefing from your CO. You can skip any individual
briefing by pressing spacebar. If you want to skip all of the briefings before
any given mission, press Esc.
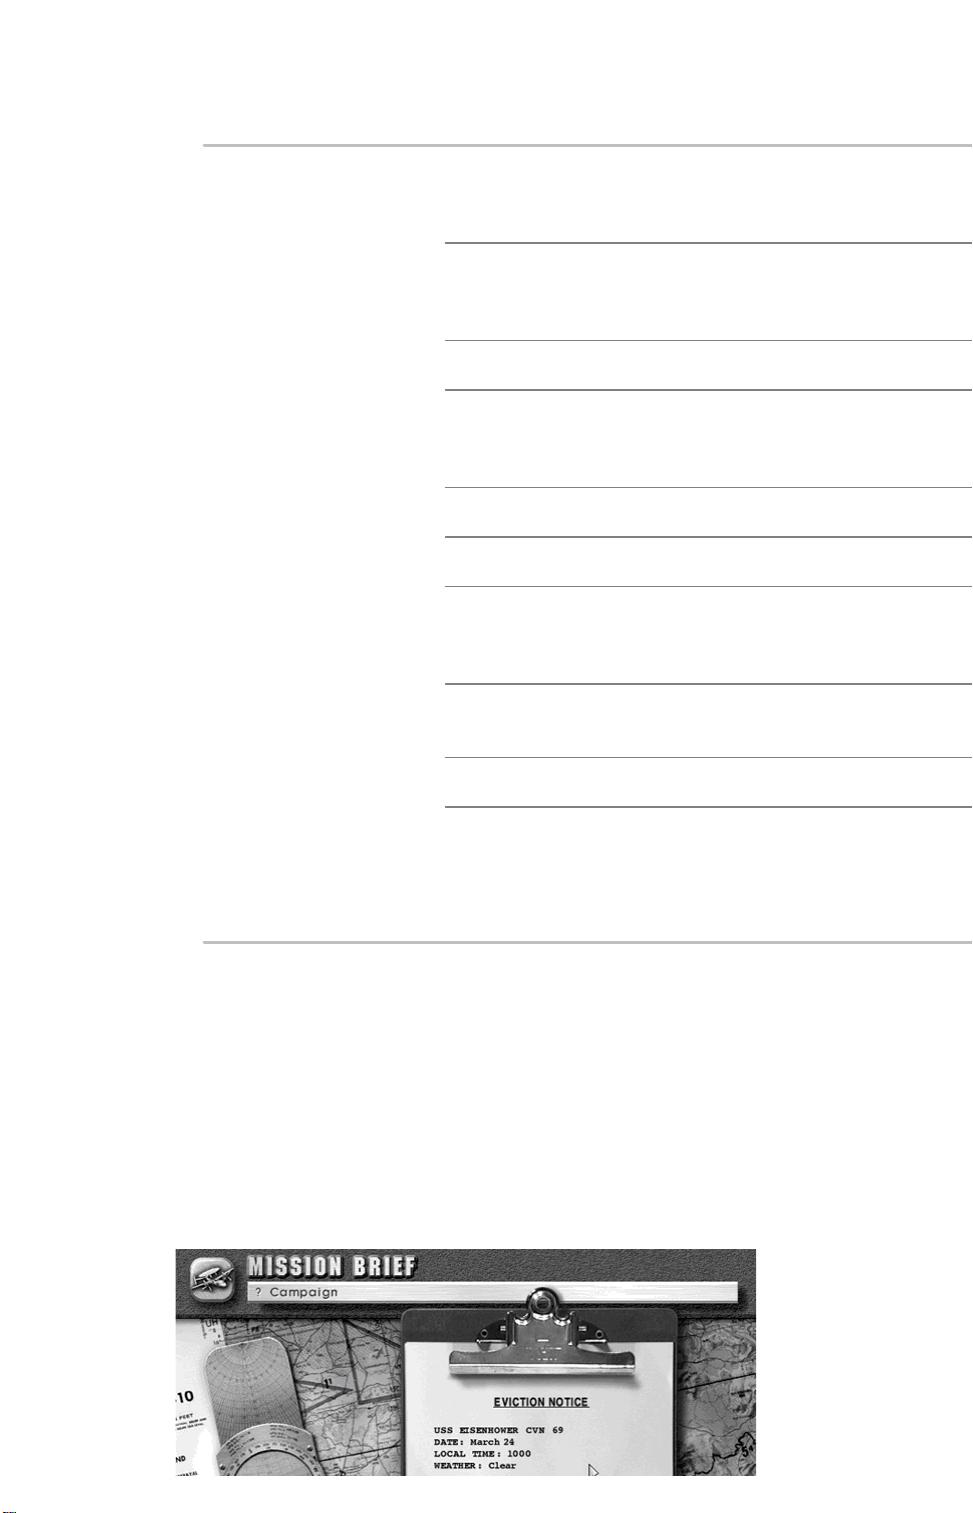
Mission Brief Screen
The Mission Brief Screen allows you to read the background and objectives of
each mission in the campaign.

Click on the Page switch or use the Page Up and Page Down keys to flip
through the clipboard pages. Once you feel like you’ve got a handle on the
situation, click on the OK button or press Enter.
Mission Brief Menu Bar
Campaign Menu
Option Description
Replay This
Mission
Exit Campaign Return to the Choose Activity Screen.
Go bacto the beginning of the mission so you can
view the videos again.
Mission Map Screen
The Mission Map Screen lets you plan your waypoints according to the
mission
objectives.
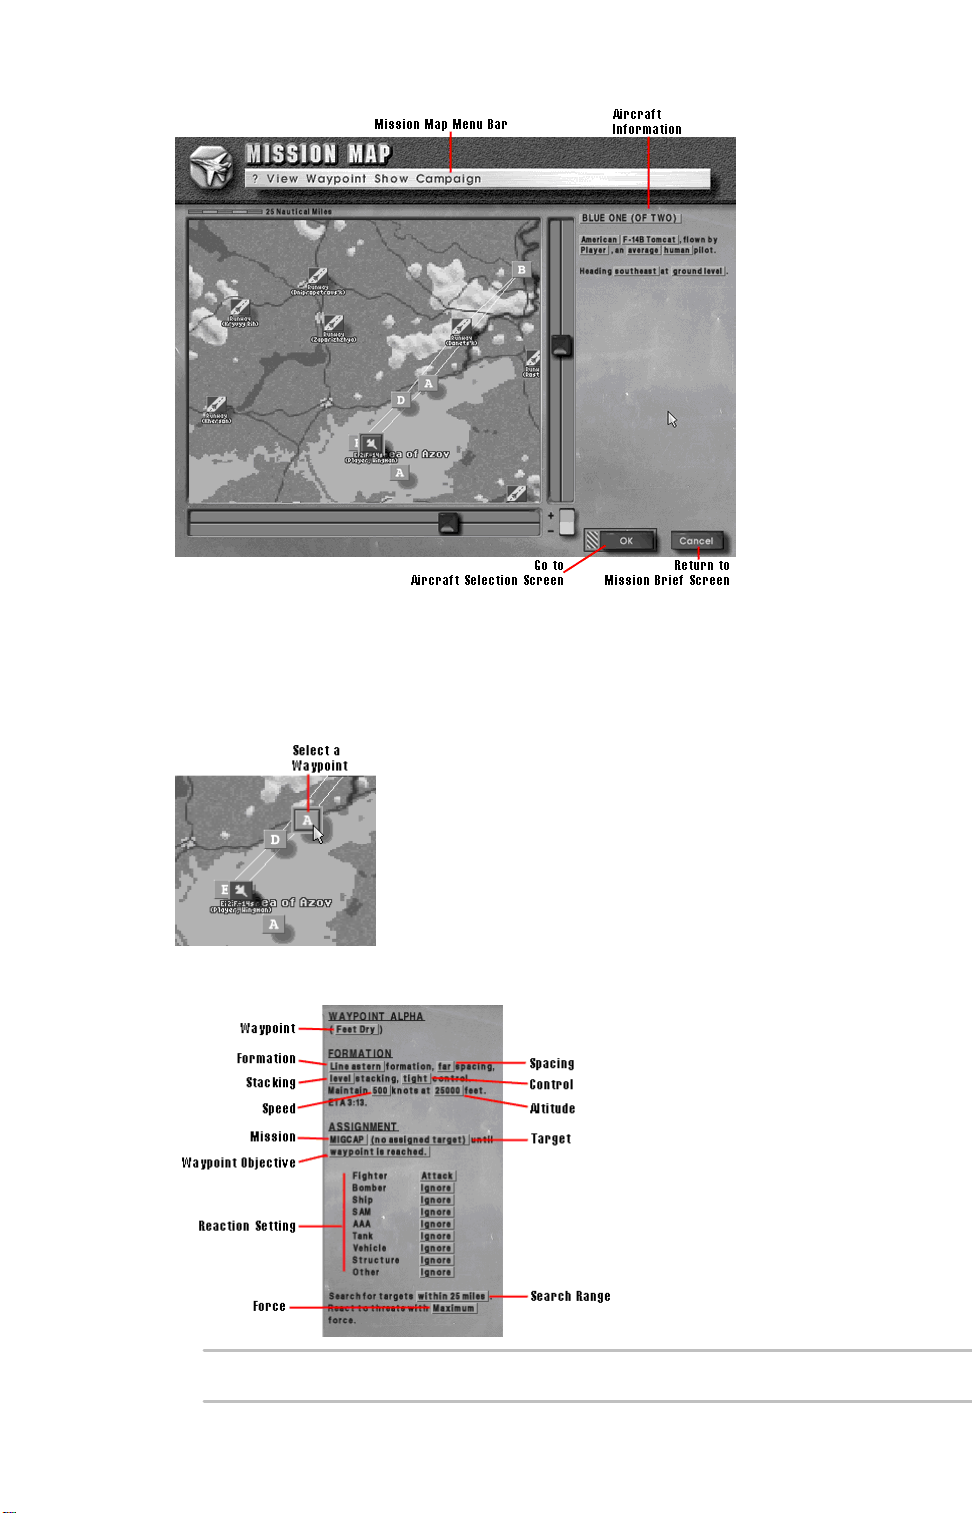
Editing Waypoints
You can edit waypoints in the mission for your wing only. Your superiors
designate the waypoints for other aircraft in the mission — these cannot be
altered.
Click on a waypoint to select it.
Waypoint settings appear in the Object Details panel. Click on the text
buttons to change the following settings:
Setting Options Description

Waypoint Brings up a selection panel that lets
you name the waypoint (Ingress,
Merge, Strike, Feet Wet, etc.)
Formation Echelon,
Line
abreast,
Line
astern
Spacing Far,
Near
Stacking High,
Level,
Low
Control Tight,
Loose,
Medium
Speed 0
3,000
kts
See Waypoint Formation for wing
formations, spacing, and stacking.
See Waypoint Formation for wing
formations, spacing, and stacking.
See Waypoint Formation for wing
formations, spacing, and stacking.
See Wingman Commands for control
setting descriptions
How fast your wing should travel to the
waypoint. Note that setting a speed
(for example, 3,000 kts) does not
guarantee that your particular airplane
is capable of that speed at the given
altitude.
Altitude 0
80,000
ft
Mission Normal
Flight
MIGCAP
BARCAP
Wild
Weasel
CAS
Anti-Ship
Hi/Lo
Sweep
Target Variable The enemy target you’re meant to
The altitude at which your wing should
travel to the waypoint. Note that setting
an altitude (for example, 80,000 ft)
does not guarantee that your airplane
is capable of attaining that altitude.
See Saving Custom Missions7_1_9 for
Objective descriptions.
destroy or the friendly object you’re
supposed to protect. Click on the text
button, and then click on the enemy
target or friendly object. If no specific
target is assigned, no assigned target
appears here.

Reactions Attack,
Defend,
Ignore,
Evade
Search Range Various The range within which your wingmen
The reaction of aircraft in your wing to
various types of enemy objects. These
represent your wingmen’s default
orders only — any orders you give
them during the mission replace these
orders.
will search for enemies. Note that your
wingmen are still limited by the type of
detection they are using.
Force Equal,
Double,
Maximum
Mission Map Menu Bar
The Mission Map Menu Bar gives you control over waypoints and your view of
the map.
View Menu
Option Key
Equivalent
Scroll left cursor
left
Scroll right cursor
right
Scroll up cursor upScroll map view up.
Scroll down cursor
down
No effect on your wing.
Description
Scroll map view left.
Scroll map view right.
Scroll map view down.
Center map at
cursor
Center map at
selection
Zoom in plus
Zoom out minus
Smart zoom When activated, you zoom in and out
N Center the map display on the current
cursor position.
B Center the map display on the
currently selected object.
Zoom in on map.
(+)
Zoom out on map.
(-)
on the currently selected object. If no
object has been selected, you zoom in
and out on the center of the map.

Waypoint Menu
Option Key
Equivalent
Add A Add a waypoint for a selected aircraft,
Delete D Delete a waypoint for a selected
Create loop C Create a loop between two waypoints.
Delete loop E Deletes a loop between two waypoints.
Description
wing, ship, or vehicle. The object must
be selected before you can assign it a
waypoint.
aircraft, wing, ship, or vehicle. The
waypoint must be selected before you
can delete it.
Select the beginning waypoint, select
Create loop, and then click on the end
waypoint. The aircraft will travel from
the initial waypoint, along any
intermediary waypoints, until it
reaches the end waypoint. It will repeat
this process indefinitely.
Select the end waypoint, and then
select Delete loop.
Select prev
waypoint
Select next
waypoint
Show Menu
Planes, SAM
sites, etc.
[ Select the previous waypoint for the
selected object.
] Select the next waypoint for the
selected object.
The Show Menu controls what classes
of objects are currently displayed on
the map. Complex missions may
require “decluttering” the screen by
disabling some frequently-appearing
units, such as AAA and SAM sites.
This menu allows you to hide classes
of objects while viewing a mission.
When a checmarappears next to an
object class, objects from that class
are displayed on the map. To hide a
class, select it from the menu; the
checmardisappears and objects from
that class are no longer shown on the
map. The units still exist in their proper
positions, they’re simply not
displayed.
Mission Map Menu Bar
Campaign Menu
Option Description
Replay This Mission Go bacto the beginning of the
mission to view briefings again.
Exit Campaign Return to the Choose Activity
Screen.
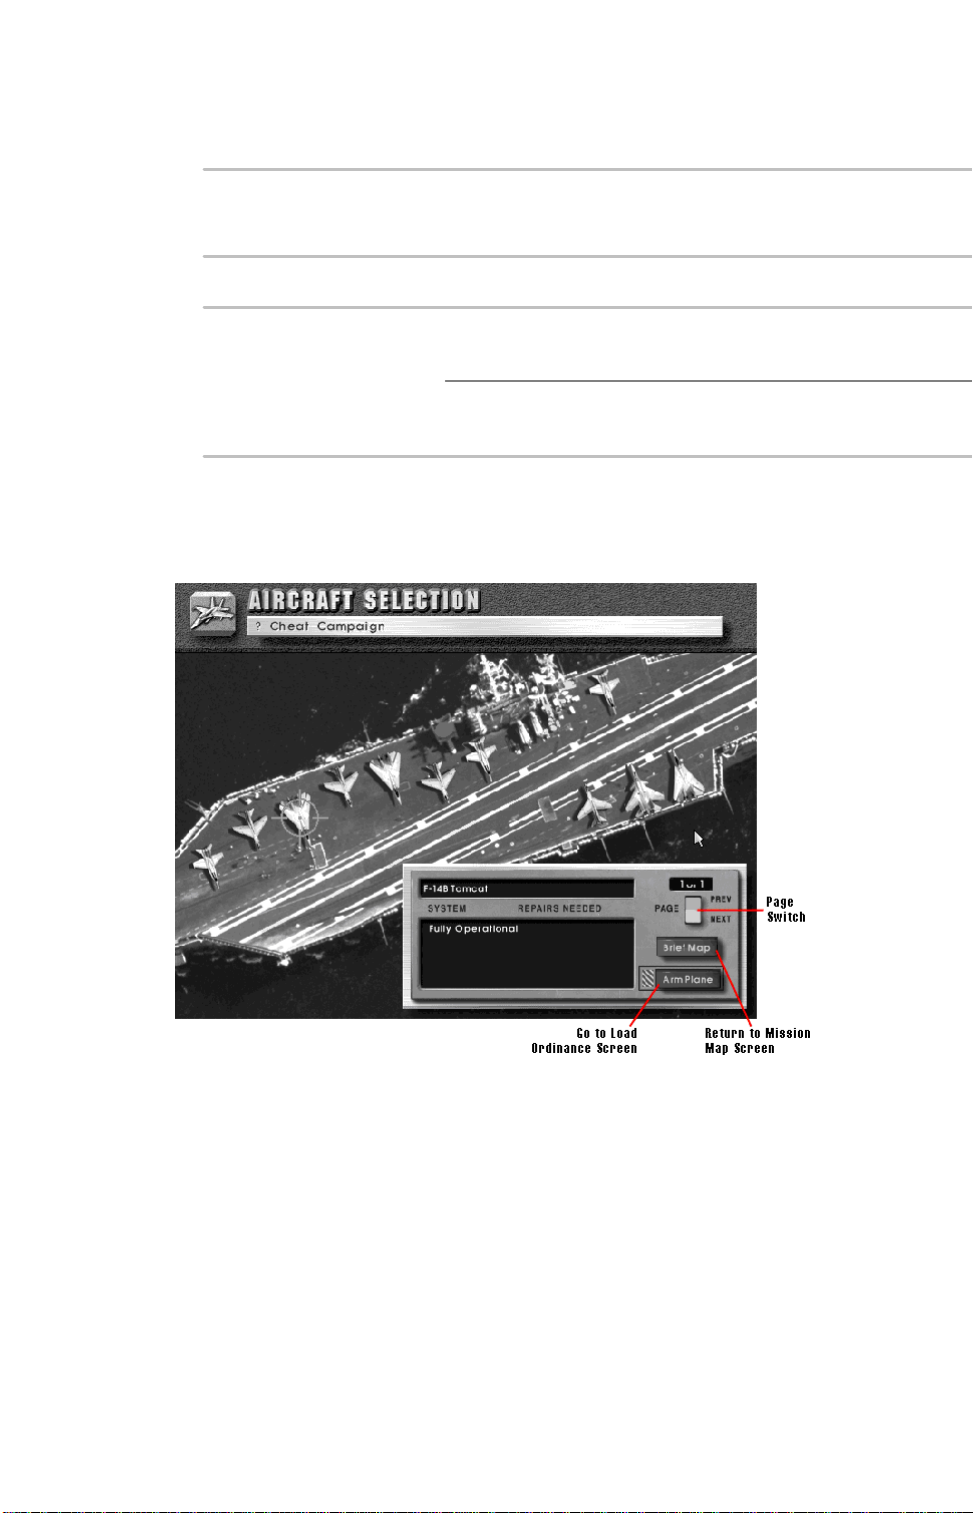
Aircraft Selection Screen
The Aircraft Selection Screen shows all of the aircraft available to you for the
rest of the campaign. This is where you decide which aircraft you’ll take up on
the mission.
There are a few considerations involved in selecting an airplane. Suitability to
the mission is your primary consideration. Here knowledge of the aircraft
available to you is invaluable. For example, it wouldn’t be wise to undertake a
strike mission in a F-14B, which lacks strike capabilities. Likewise, don’t rely
on the A-7E to be a good interceptor — it lacks speed and maneuverability.
Choose the right airplane for the right job.
Your second consideration is damage. It’s almost inevitable that your aircraft
will take damage in some missions. Damaged airplanes must be repaired, and
the man-hours of mechanic’s time available to you are limited. For details on
repairing aircraft see Repairing Aircraft.
Click on the airplane you want to fly on the mission , and then click on the
Arm Plane button or press Enter.
Aircraft Selection Menu Bar
Cheat Menu
Option Description
Allow Flying Any Plane Allow unlimited airplanes for the
campaign, including the F-22,
which normally doesn’t appear
until Mission 40. As a bonus,
you can also fly the F-104, which
would not appear on a carrier in
real life.
Campaign Menu
Option Description
Replay This Mission Go bacto the beginning of the
mission so you can hear the
videos again.
Exit Campaign Return to the Choose Activity
Screen.
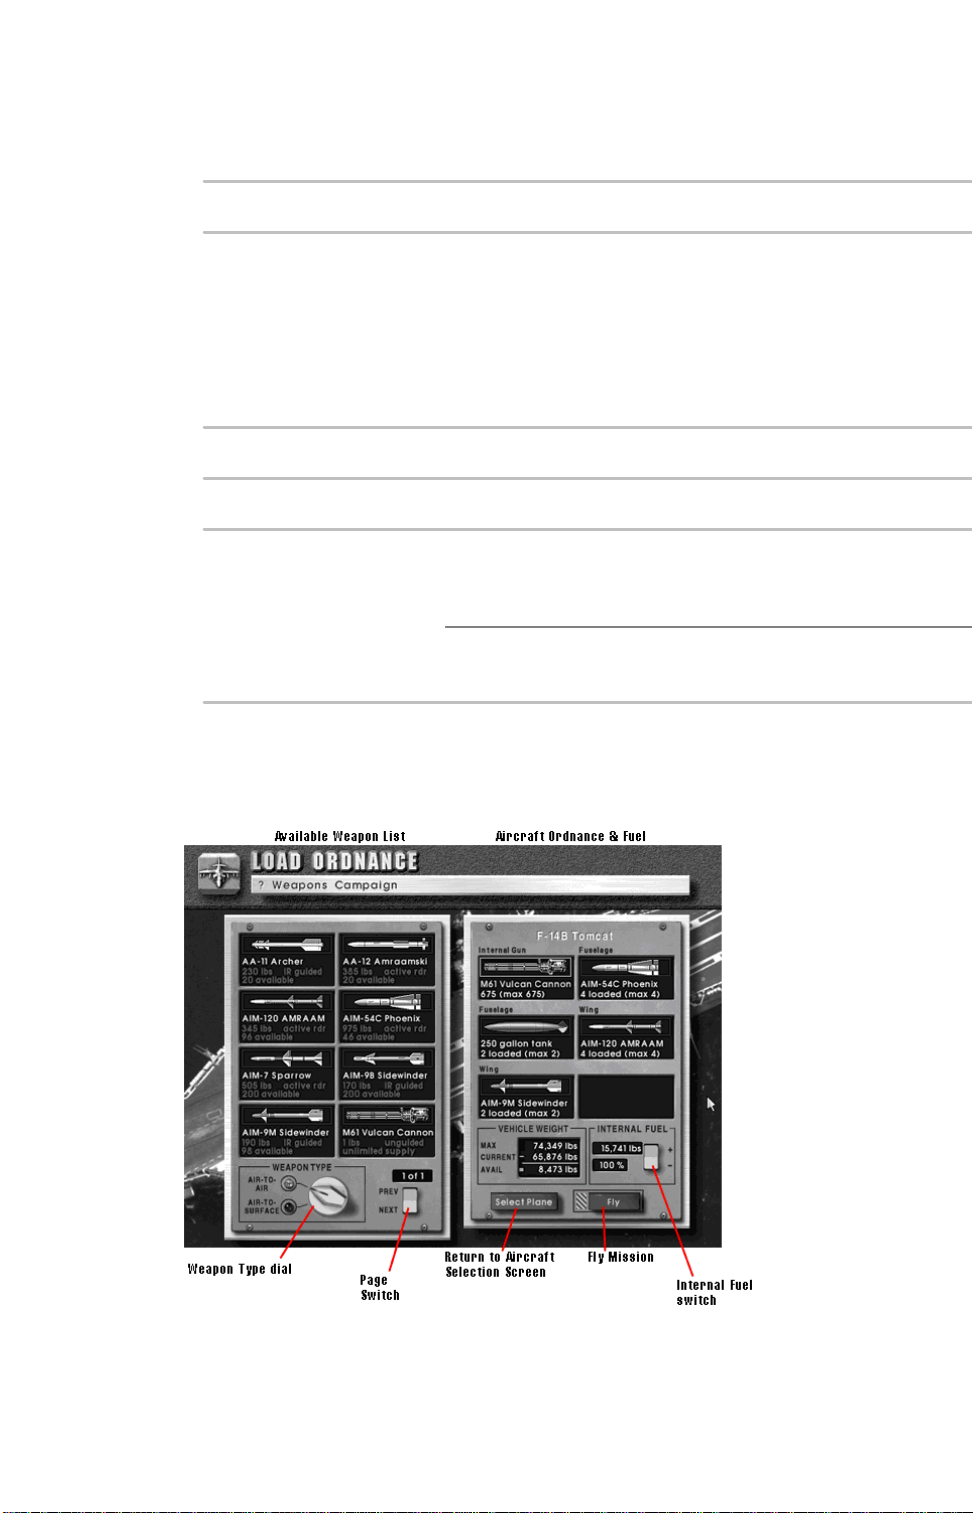
Load Ordnance Screen
The Load Ordnance Screen allows you to designate the number and types of
weapons your aircraft will carry in the mission. Your airplane’s hardpoints
appear on the right, while available weapons appear on the left.
Loading & Unloading Weapons
Use your mouse to choose weapon types (Air-to-Air or Air-to-Surface) by
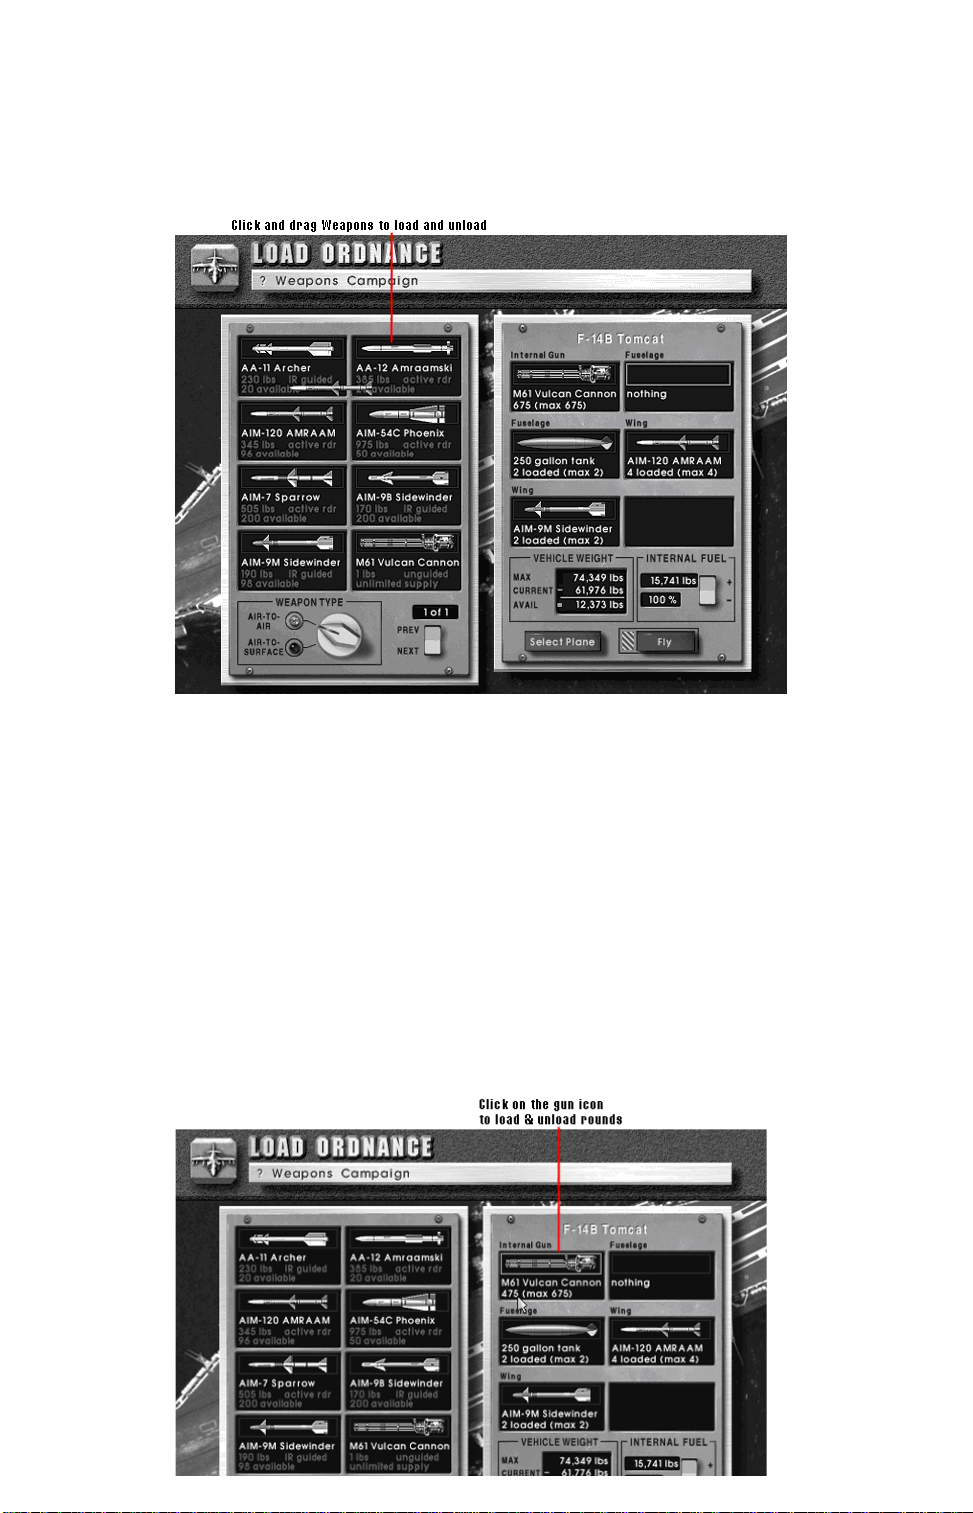
clicking on the red lights next to the Weapon Type dial.
To load weapons or extra fuel tanks onto hardpoints, move the mouse cursor
over a weapon, hold down the mouse button, and drag the weapon to the
hardpoint.
To unload specific weapons from your hardpoints, move the mouse cursor over
a weapon, hold down the mouse button, and drag the weapon bacover to the
weapon list. You can also select Unload All from the Weapons Menu to clear
all ordnance from your aircraft.
Weapon loads on aircraft must be balanced — that is, the weight distribution
on the wings and fuselage must be equal. Your weapon load is automatically
balanced for you as you choose weapons.
If you need to adjust the fully loaded weight of your airplane, you can left-click
on hardpoints to increase weapons or right-clicto decrease weapons. Once
you’ve loaded the ordnance you want on the mission, click on the Fly button or
press Enter.
Loading & Unloading Gun Rounds
To unload gun rounds, clicthe right mouse button on the gun icon. To reload
gun rounds, clicthe left mouse button on the gun icon.
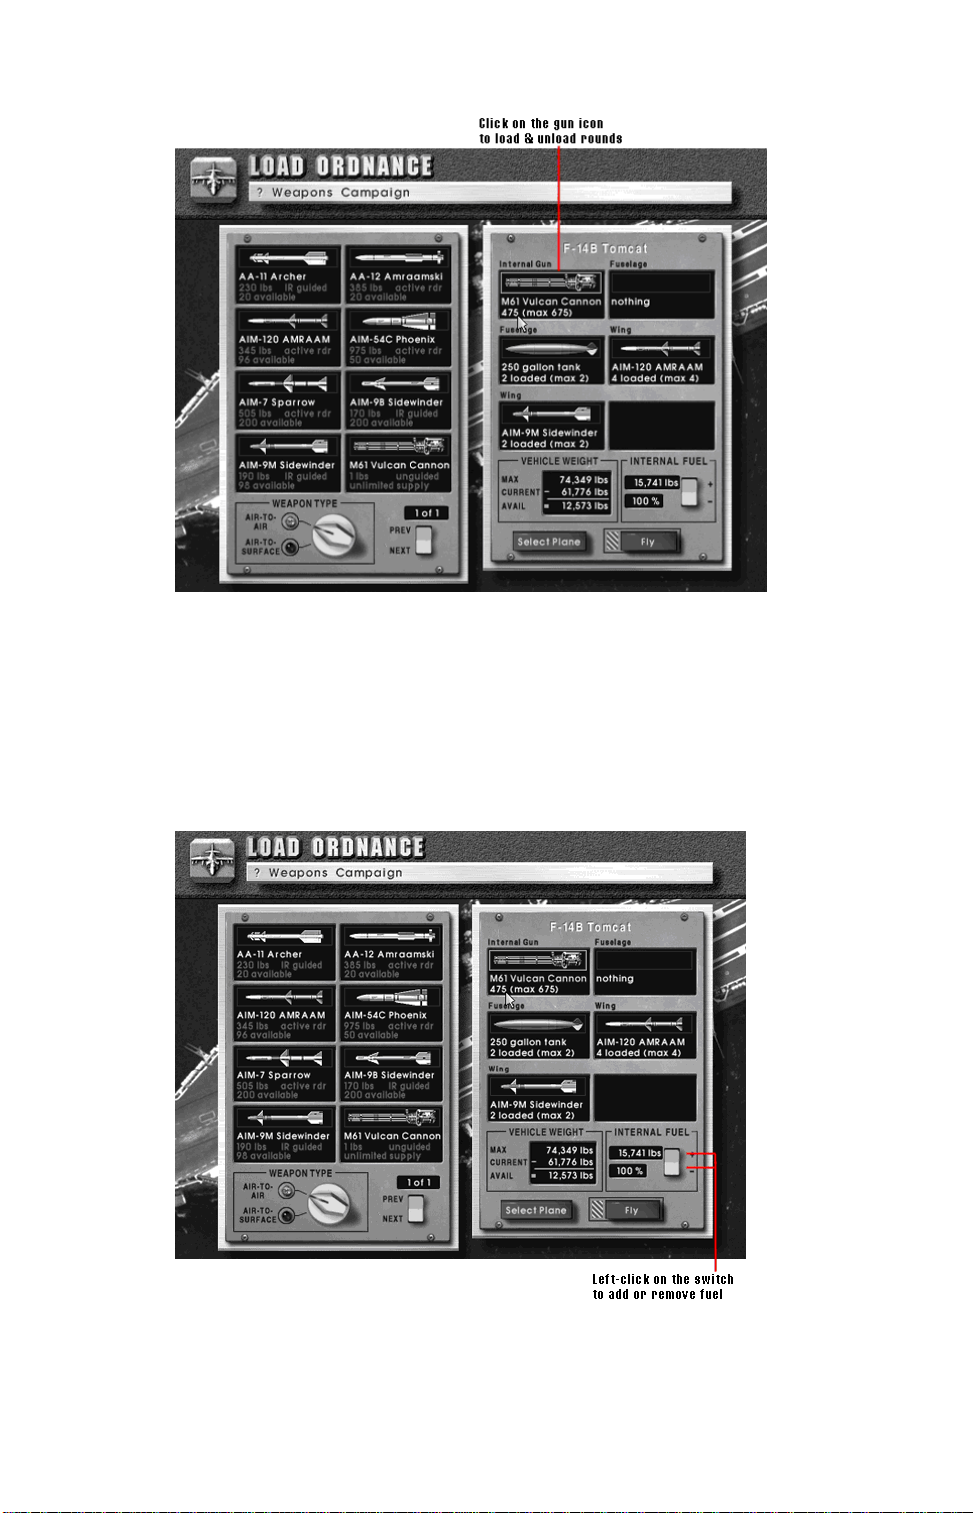
Adding & Removing Fuel
The current takeoff weight (in the Vehicle Weight box) is the combined weight
of your airplane, weapons, and fuel. You may need to reduce your internal fuel
to accomodate more weapons or, eliminate weapons to increase your fuel for
long-range missions. For example, the Su-33 has a massive internal fuel tank,
giving it exceptional range; however, at 100% fuel it can barely carry a few
missiles. To remove fuel from your internal fuel tank, move the mouse cursor
to the Internal Fuel Switch and left-click on the minus (-) end. To add fuel,
left-click on the plus (+) end of the switch.
Note that you must keep your weight under the maximum takeoff weight or
you won’t be able to fly.
Load Ordnance Menu Bar

Weapons Menu
Option Description
Unload All Unload all weapons from your
aircraft. Your internal gun
remains fixed, though it now
carries no rounds. Your internal
fuel supply remains unchanged.
Cheat (load anything anywhere) Gives you unlimited vehicle
weight, allowing you to load as
many weapons as you like onto
your hardpoints. Note that the
number of hardpoint stations
remains the same, thus limiting
how many kinds of weapons you
can take.
Campaign Menu
Option Description
Replay This Mission Go bacto the beginning of the
mission so you can hear the
videos again.
Exit Campaign Return to the Choose Activity
Screen.
Ending the Mission
You can end a mission by selecting End Mission (Ctrl-Q) from the ? Menu or
by exiting to DOS (Ctrl-C).
In order for the mission to end successfully, you must achieve all of your
mission objectives and get within 8 nm of the carrier. A radio message —
“We’re almost home!” — lets you know when you’re in the carrier’s protective
zone.
If you don’t achieve your mission objectives but make it bacto the carrier, you
fail your mission. If you end the mission before you make it bacto the carrier’s
protective zone, you fail the mission and lose an airplane.
Ejecting is another way to end the mission, and it’s a risky one at that.
Whenever you bail out, you lose that airplane from your inventory. If you’re over
enemy territory, you also run a risof being captured by enemy forces. This
ends the campaign immediately. If you’re rescued, you continue the campaign
minus the aircraft you lost.
Repairing Aircraft
After each mission, the Aircraft Repair Screen appears. This screen allows
you to make repairs to the limited number of airplane’s available to you in
Campaign Mode.

Anytime an aircraft is hit by enemy weapons, it takes damage. Aircraft require
a high degree of maintainance — even the stress of normal flight will result in a
small fraction of miscellaneous damage to your airplane.
Damage is measured in terms of percentages. At 100% damage, your airplane
is guaranteed the loss of one or more critical systems: oil lines, fuel tank,
radar, weapons, control surfaces, etc. Your airplane can take damage beyond
100%, but it won’t be capable of flying again until its damage is repaired to
under 100%.
You are allotted 50 man-hours of repair after each mission. You don’t
necessarily have to repair the airplane you just flew — you can choose to
spend these hours on any damaged aircraft on the deck. Note, however, that
hours are not cumulative; that is, you cannot save them from mission to
mission. If possible, spend all of the hours available repairing aircraft, because
they won’t be available to you on the next mission.
If an aircraft takes damage, you’ll notice yellow mules surrounding it. The more
mules, the more damage the aircraft has taken. You can view the exact
amount of damage on any of your airplanes simply by pointing the mouse
cursor at the airplane and clicking.
To repair the damage to an airplane, click on the damage line in the selection
panel. The man-hours needed to repair it are automatically subtracted from
your total.
Death, MIA, Reassignment
There are several ways for the campaign to end permanently. Your pilot can
die. He can bail out and get captured by the enemy. Or he can fail more than
five missions and get reassigned to some other part of the world.
In all of these unfortunate events, there is a way to turn bacthe hands of time
and give your hero another chance. After flying the losing mission, a dialog
panel will appear asking you if you want to try this mission again. If you select
No, you’re pilot is gone forever and that campaign is over. If you select Yes,
wait for the mission brief screen to appear. If you don’t want to replay the
mission now, select Exit Campaign from the ? Menu. If you don’t actually
want to replay the mission, just wait for the Mission Brief Screen to appear
and select Exit Campaign from the ? Menu.
Winning The Campaign
A campaign consists of a series of missions which must be executed in order.
As in real life, your primary goal is survival. You must survive all of the sorties
in your tour in order to win. This means that you don’t have to repeat individual
missions until you succeed at each one. If you fail a particular mission, its
assumed that other pilots step in and achieve your mission objective for you.
Keep in mind that the Brass doesn’t like to re-deploy assets to cover your
failures. While your superiors understand the formidable challenges you face,
they expect maximum performance from you. If you fail more than four
missions, you will be assigned a different tasfar away from the carrier. The war
will be over for you.
Resource Management
You begin the campaign with a limited number of aircraft of fighter aircraft.
What you see on the decis what you get, except that you have an unlimited
number of A-7E attack aircraft. In addition to your initial aircraft, you receive
one F-22 after completing Mission 39.
The goal is to complete the campaign with a limited number of aircraft and
missiles. Lose all of your best aircraft in the beginning missions and you may
find yourself in trouble down the line. Waste all of your expensive, high-tech
missiles too soon and you may not have enough to hit critical targets later on.
Continue Old Campaign
Campaigns are saved under the names of pilots. The Continue Old
Campaign option brings you to the Select Pilot Screen. Select the pilot
associated with the saved campaign you want to play.
For more details, see Select Pilot Screen under Start New Campaign in this
chapter.
Configure Hardware
The Configure Hardware option allows you to change the current game
configuration. Consult the Install Guide for more details on configuring the
game.
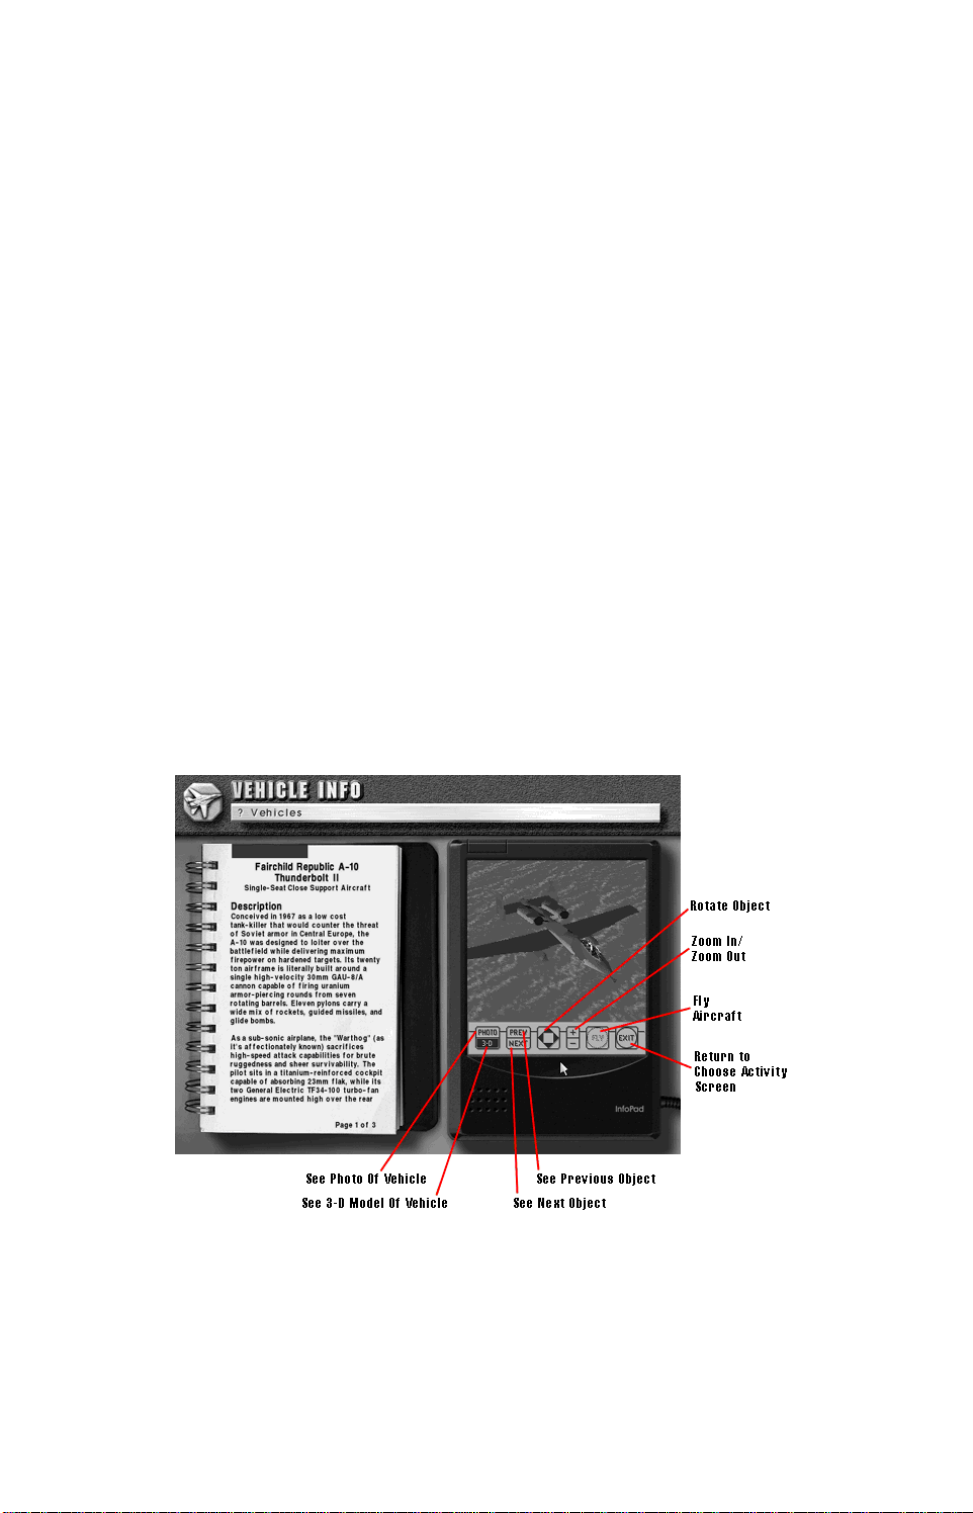
See Vehicle Info
The See Vehicle Info option lets you view all of the aircraft, ships, ground
vehicles, and objects in U.S. Navy Fighters.
Click on the onscreen options to manipulate your view or to looat another
object.
Use the Page Up and Page Down keys to flip through the text describing the
object. When you are finished looking at vehicles, click on the Exit option or
press Esc.
Vehicles Menu
Use the Vehicles Menu to change the class of vehicles you’re viewing.
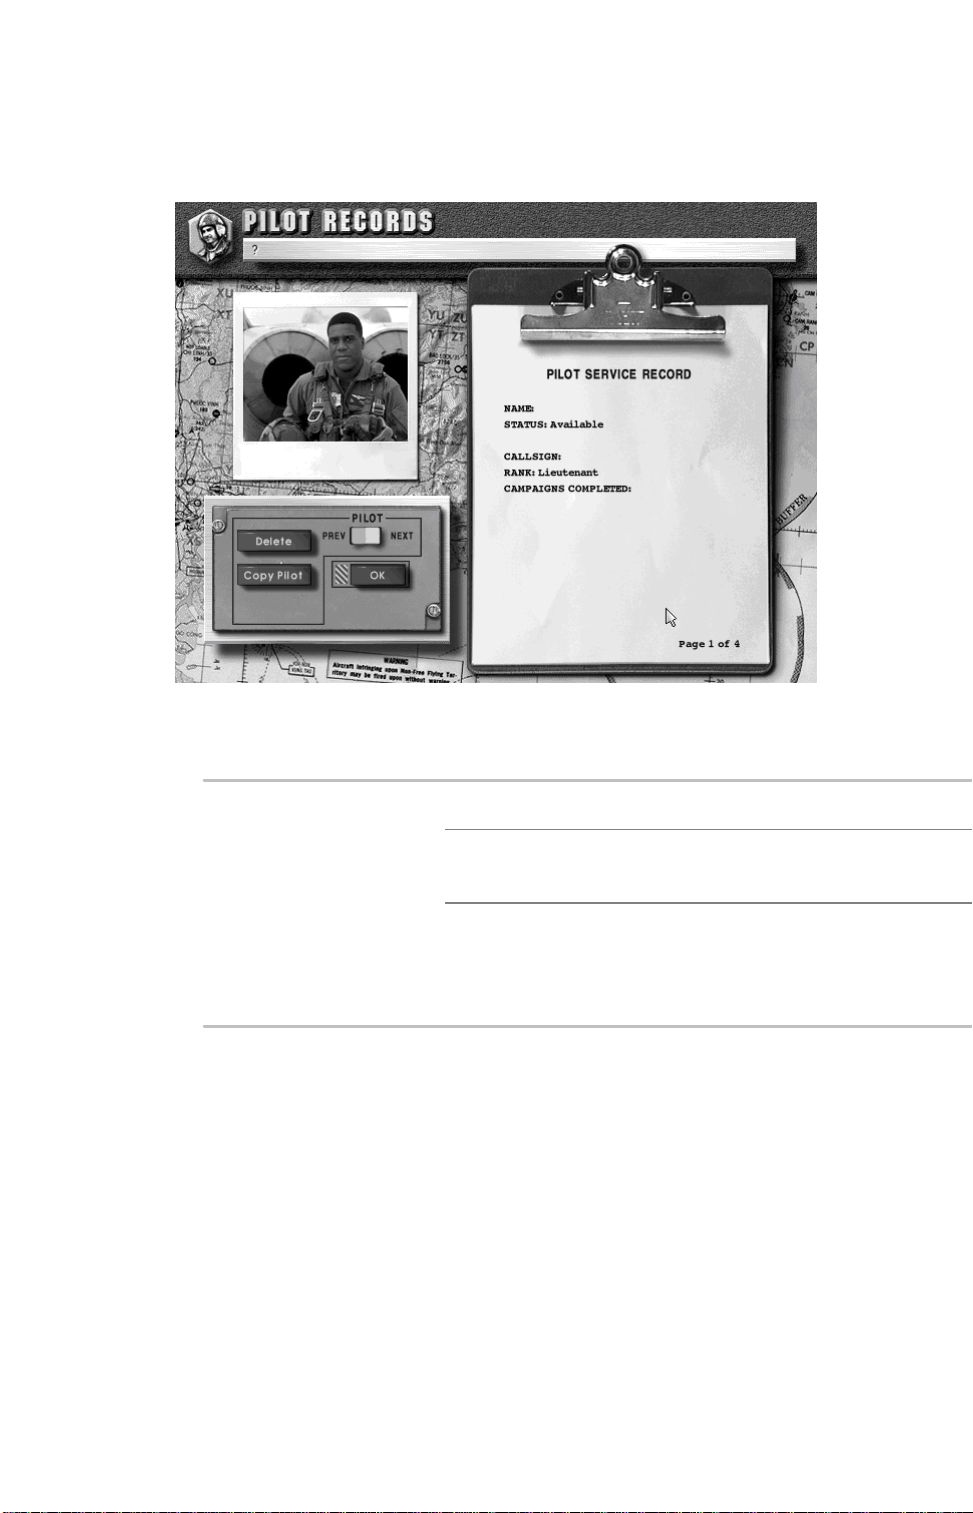
View Pilot Records
The View Pilot Records option lets you view all of the active and inactive
pilots.
Use the Page Up and Page Down keys to flip through the clipboard pages,
which allow you to view your aircraft’s nose and tail art as well as any
campaign medals the pilot may have earned.
Pilot Switch Clicswitch to view your pilots.
Delete Pilot Delete the pilot you’re currently
viewing.
Copy Pilot Create a backup copy of your
pilot. If your pilot is killed or
captured, you may resume his
career from the last backup.
When you’re finished viewing your pilots, press Oor press Enter to return to
the Choose Activity Screen.
Chapter 2
COCKPIT FAMILIARIZATION
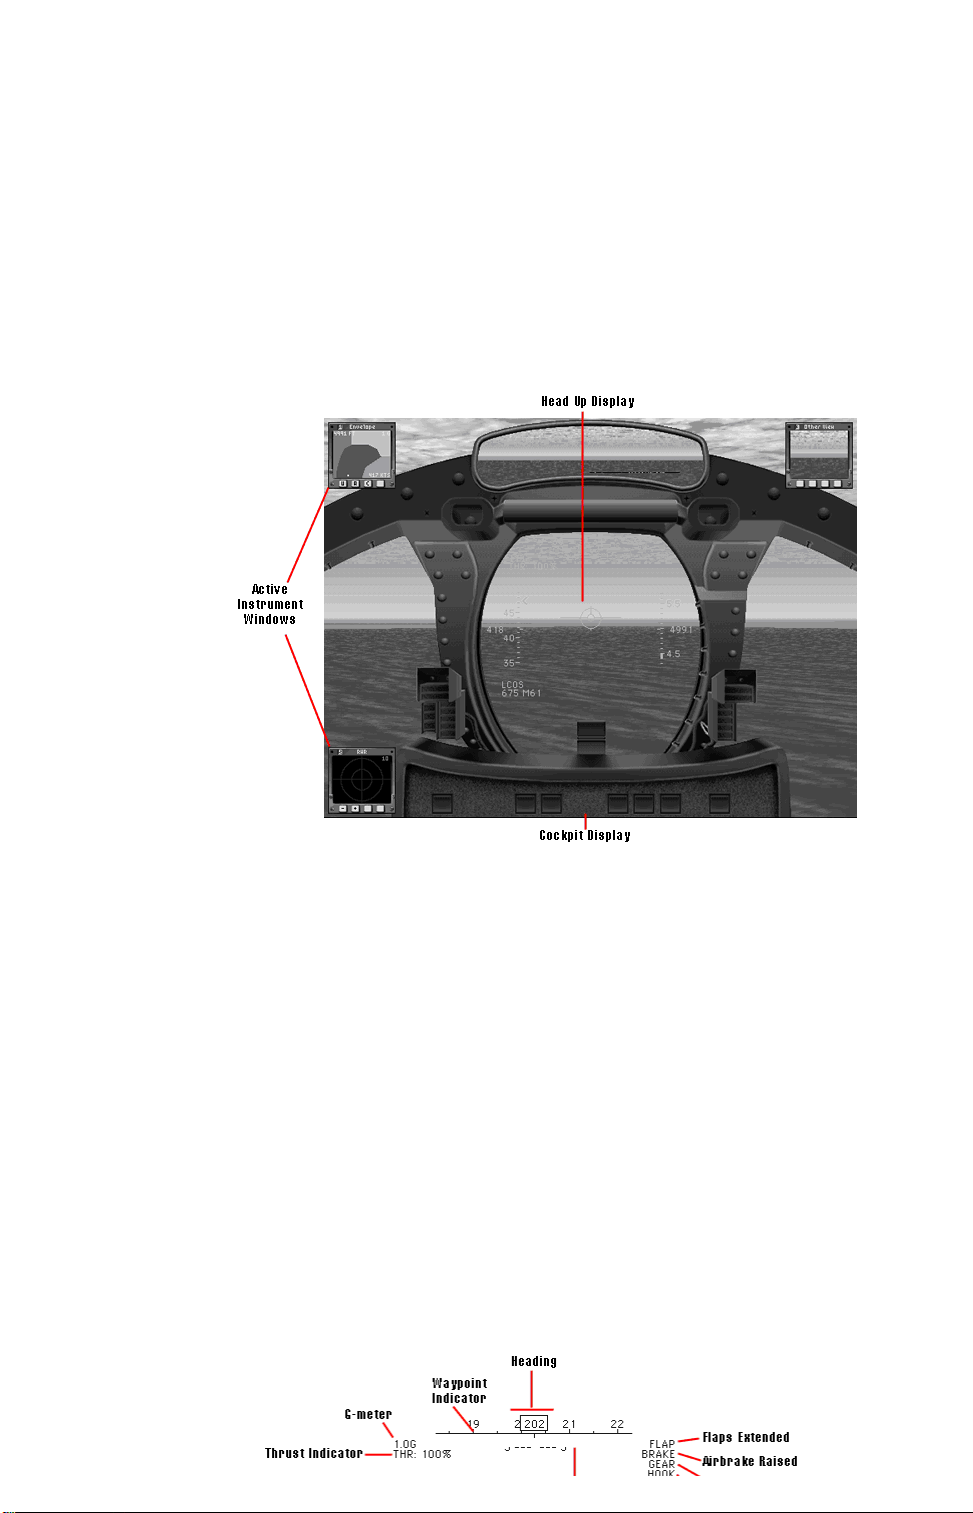
Cockpit Elements
While flying, your immediate environment consists of a cockpit display, the
Head Up Display or HUD, and a number of instrument windows that you can
activate.
The Cockpit Display
You can display the cockpit for added realism or hide it in order to increase
your view of the world outside. Press Backspace to turn the cockpit on or off.
The Head Up Display
The Head Up Display, or HUD, is a transparent sheet before the glareshield
upon which critical information is projected. The HUD reduces the need to look
at other instruments in the cockpit, thus allowing the pilot to concentrate on
the combat situation.
Information Windows
Information Windows let you display important instruments, views, and
information in the corners of your screen. You choose which windows are
displayed, depending on the nature of the task.
HUD Flight Information
Basic flight information is displayed whenever the HUD is active. Each
airplane’s HUD has slightly different symbology. For example, altitude might
be displayed numerically, or with a “tape,” or both.
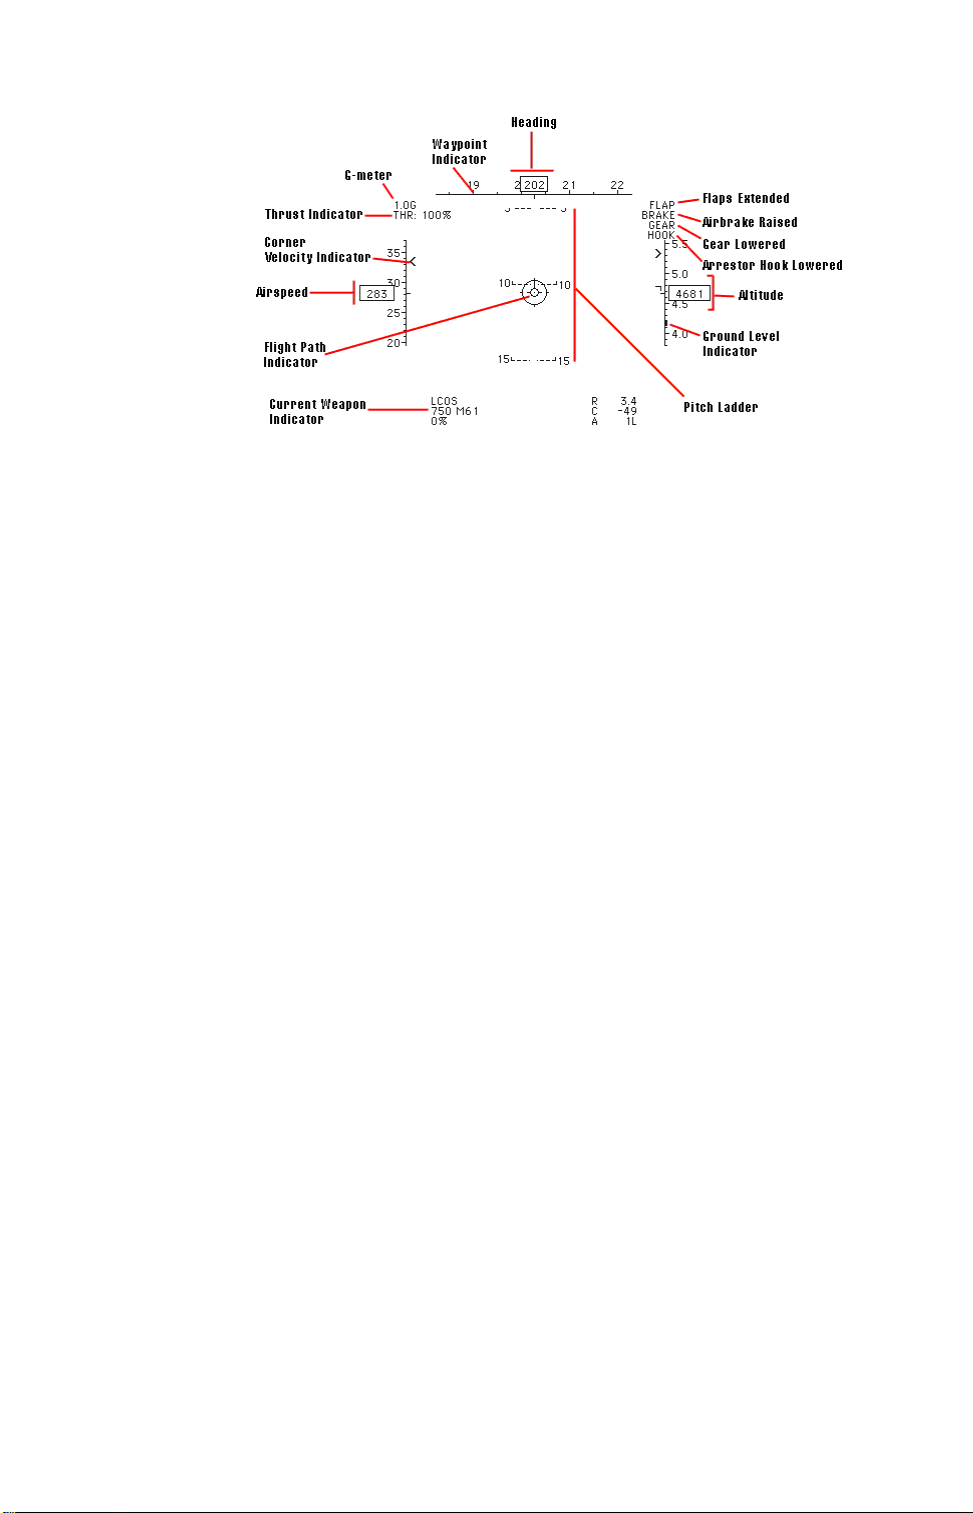
Above Ground Level Indicator
As you fly over land, ground level changes. The AGL indicates your relative
proximity to the ground below your aircraft. For example, when flying over a
mountain, you could be 5,000 feet above sea level but only 200 feet above the
ground.
Pay particular attention to the AGL when flying in clouds or fog.
Airspeed
The airspeed tape scrolls up and down, indicating changes in airspeed. Your
current airspeed is displayed numerically at the center of the tape. Indicators
show your maximum and minimum (ie, stall) speeds.
In U.S. Navy Fighters, your airspeed indicator measures true airspeed and not
indicated airspeed.
Altitude
The altitude tape scrolls up or down, indicating changes in altitude above sea
level. Your current altitude is displayed numerically at the center of the tape.
When the ILS is engaged, additional marks indicate your current vertical
speed (how fast you are diving or climbing) and what the maximum vertical
speed allowed for landing is.
For more information on the ILS, see HUD in Navigation Mode in this chapter.
For a detailed guide to using the ILS, see Chapter 5: Carrier Qualifications.
Auto
Indicates that the autopilot is engaged and steering your aircraft to the current
waypoint. Press A to turn the autopilot on/off.
Corner Velocity Indicator
The corner velocity indicator shows your corner speed at your current altitude.
If you’re flying faster than corner speed, the cue will be displayed below the
numeric airspeed readout. If you’re flying slower than corner speed, the cue
will be displayed above the numeric airspeed readout. When you fly at the
indicated corner speed, you have maximum turn performance available. Above
or below this speed, turn performance suffers.
For more information on corner velocity, see Turn Performance in Chapter 3:
Flight School.

Current Weapon Indicator
Indicates the current weapon and the number of rounds left.
Flaps, Gear, Brakes & Hook
The upper right hand corner of the HUD indicates the flap, gear, and brake
status. If FLAPS, GEAR, BRAKE, or HOOK appears in the upper right corner,
then the specified device is extended. If the word does not appear here, the
device is retracted.
Flight Path Indicator
The Flight Path Indicator shows which direction the aircraft is actually moving,
regardless of flight attitude. When Angle of Attack (AOA) is positive, the Flight
Path Indicator is below the HUD’s center. When the AOA is negative, the
Flight Path Indicator is above the HUD’s center.
For more information on Angle of Attack, see Chapter 3: Flight School.
G-Meter
The G-meter shows how much G the aircraft is currently pulling. For more
information on role of G-Force in maneuvering, see Chapter 3: Flight School.
Heading
The heading tape is your compass. It scrolls right and left, indicating changes
in your heading. Your current heading is displayed numerically at the center of
the tape.
Pitch Ladder
The pitch ladder indicates the aircraft’s pitch and roll relative to the horizon.
The center of the HUD always represents where the nose of your aircraft is
pointing. Each pitch ladder line represents 5 degrees above or below the
horizon. Positive pitch lines — indicating that the nose is pointed above the
horizon — are solid. Negative pitch lines — indicating that the nose is pointed
below the horizon — are represented by dashed lines. The ends of the pitch
lines always point toward the horizon.
The pitch ladder lines also represent your aircraft’s roll. Think of them as
representing your wings: when the lines are horizontal, your wings are parallel
to the horizon. When the lines are vertical, you wings are at a right angle to
the horizon.
Thrust Indicator
The thrust indicator shows the engine’s current throttle setting as a
percentage of maximum engine output. AFT indicates that afterburners have
been lit.
Time Compression Level
Rate of time compression appears in the upper right corner when time
compression has been activated. During time compression, your stick inputs
are reduced so your airplane is still controllable.
Waypoint Indicator
The waypoint indicator moves along the underside of the heading display
showing the direction to the selected waypoint. When the indicator is centered
under the heading readout, you are flying directly at the next waypoint.
For more information on waypoint navigation, see The HUD in Navigation Mode
in this chapter.
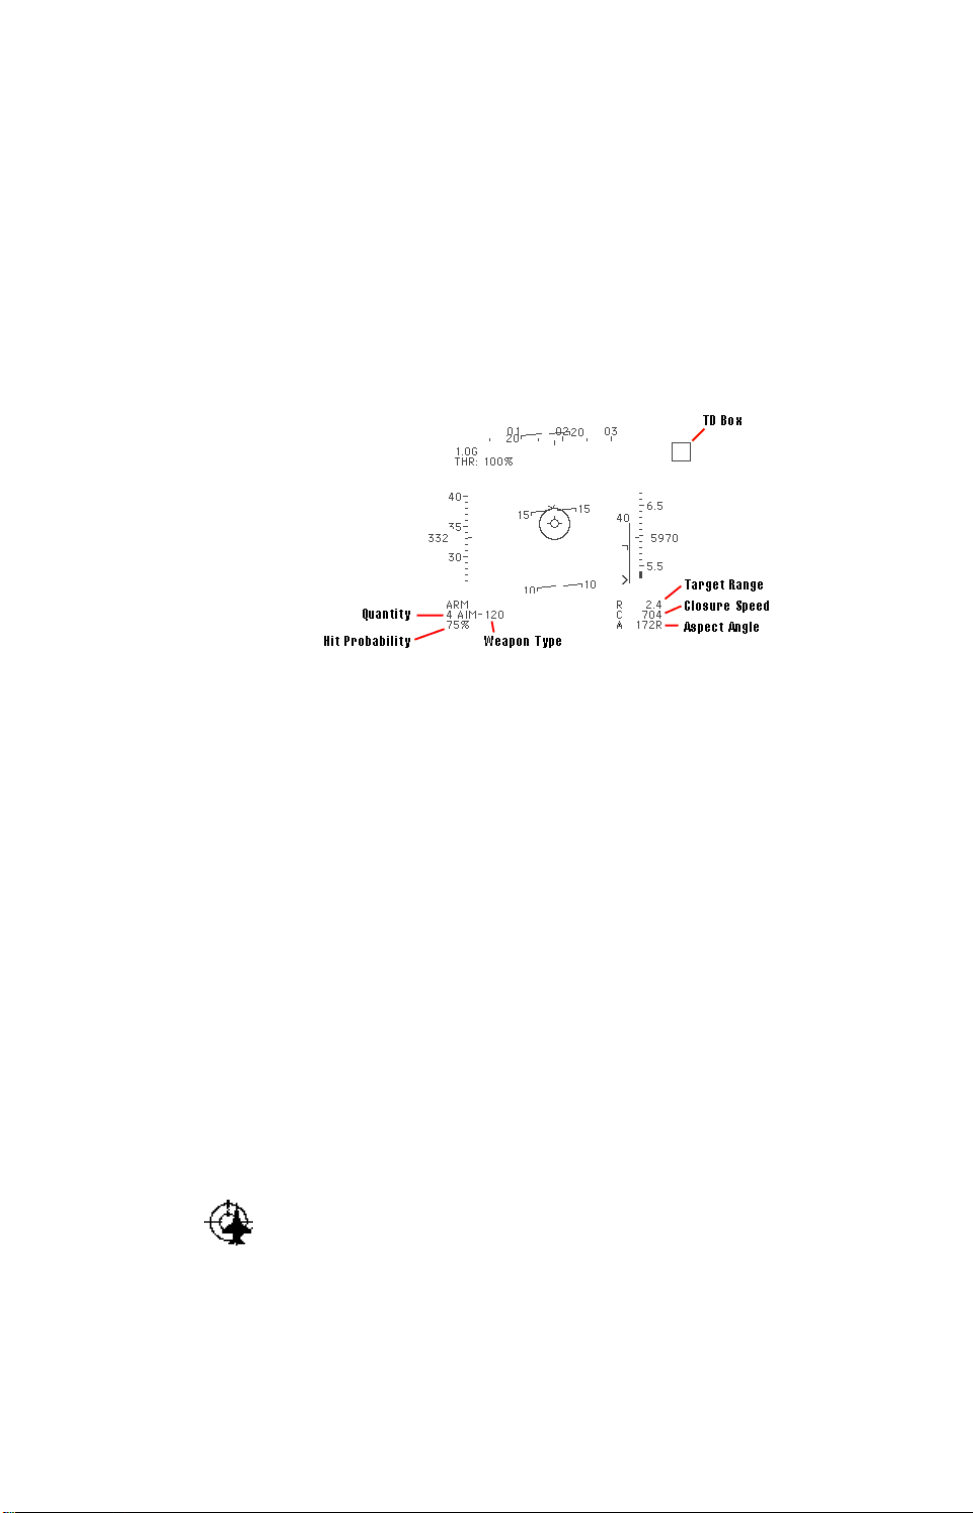
The HUD In Weapons Mode
Weapons Mode provides you with targeting symbology needed to designate
and engage targets.
Aspect Indicator
Indicates a targeted aircraft’s aspect angle in degrees. The aspect angle
measures the angle between the target’s nose and your airplane. When the
target is at 180 degrees, it’s facing you. 90L means that the target’s left wing
is facing you; 90R means you’re looking at the right wing. When a ground
target or ship is targeted, the aspect indicator reads XXXX.
This is the numeric equivalent of the aspect angle indicator in the center of the
HUD (see HUD Flight Information above).
Closure
Appears beneath the range indicator showing the target’s speed relative to
yours. A positive closure means the target is approaching you, a negative
closure means it is moving away.
Hit Probability
Shows the weapon’s current hit probability. The percentage takes into account
all factors which may affect the missile’s overall chance to hit — such as
weather — but does not consider enemy maneuvering.
IN RNG appears next to the hit probability when the target is within the
weapon’s minimum/maximum range.
Note that your missile must have a lock – not just a
minimum hit percentage – in order to have any chance
of hitting.
Offscreen Target Marker
The Offscreen Target Marker shows the shortest path to your current target. In
order to follow the shortest path, roll your airplane until the marker is at the top
of your screen, and then pull back on the stick. As long as the marker
remains at the top of the screen you’re following the shortest path.
Range
Indicates the range to the target in nautical miles (nm).
TD Box
The target designator box, or TD box, is superimposed on the HUD over the
target, even if the target is outside of visual range.
Weapon Type & Quantity
Displays the number and type of the currently selected weapon.
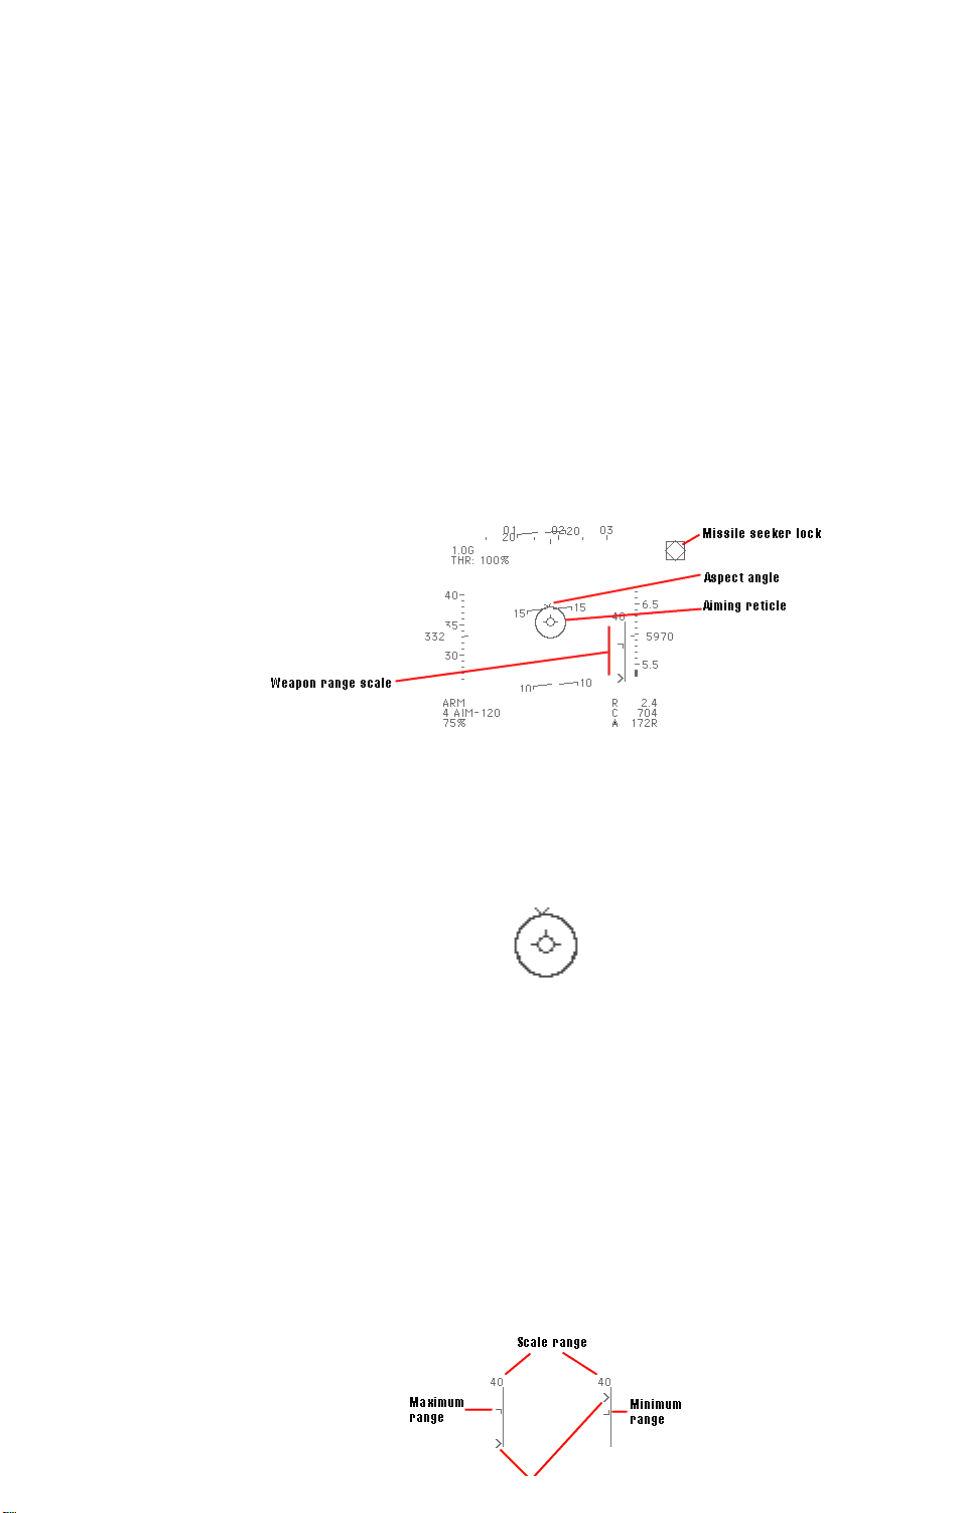
HUD in Missile Mode
In missile mode, the HUD shows not only the missile type and number
remaining, but information that’s useful in achieving the best launch conditions
for the weapon.
Aiming Reticle & Aspect Angle
The center of the HUD displays the aiming reticle, which is the center of the
missile seeker’s field of view. This circle remains fixed while the aspect angle
indicator moves around it. The aspect angle indicator shows the angle
between the target’s flight path and your line of sight to the target.
If the aspect angle indicator is at the top of the aiming reticle, the target is
heading directly toward you. If it’s at the bottom of the aiming reticle, the
target is heading directly away from you. If the indicator is along either side,
you are looking at his wing.
For hints on using the aspect angle information to your advantage, see
Chapter 6: Advanced Combat Techniques.
Weapon Range Scale
The vertical scale to the side of the aiming reticle shows your weapon’s
minimum and maximum range. The scale range is listed at the top of the
indicator. The target marker indicates where the current target is in the
missile’s range. If the target is outside of the missile’s range, the target
marker is not displayed.
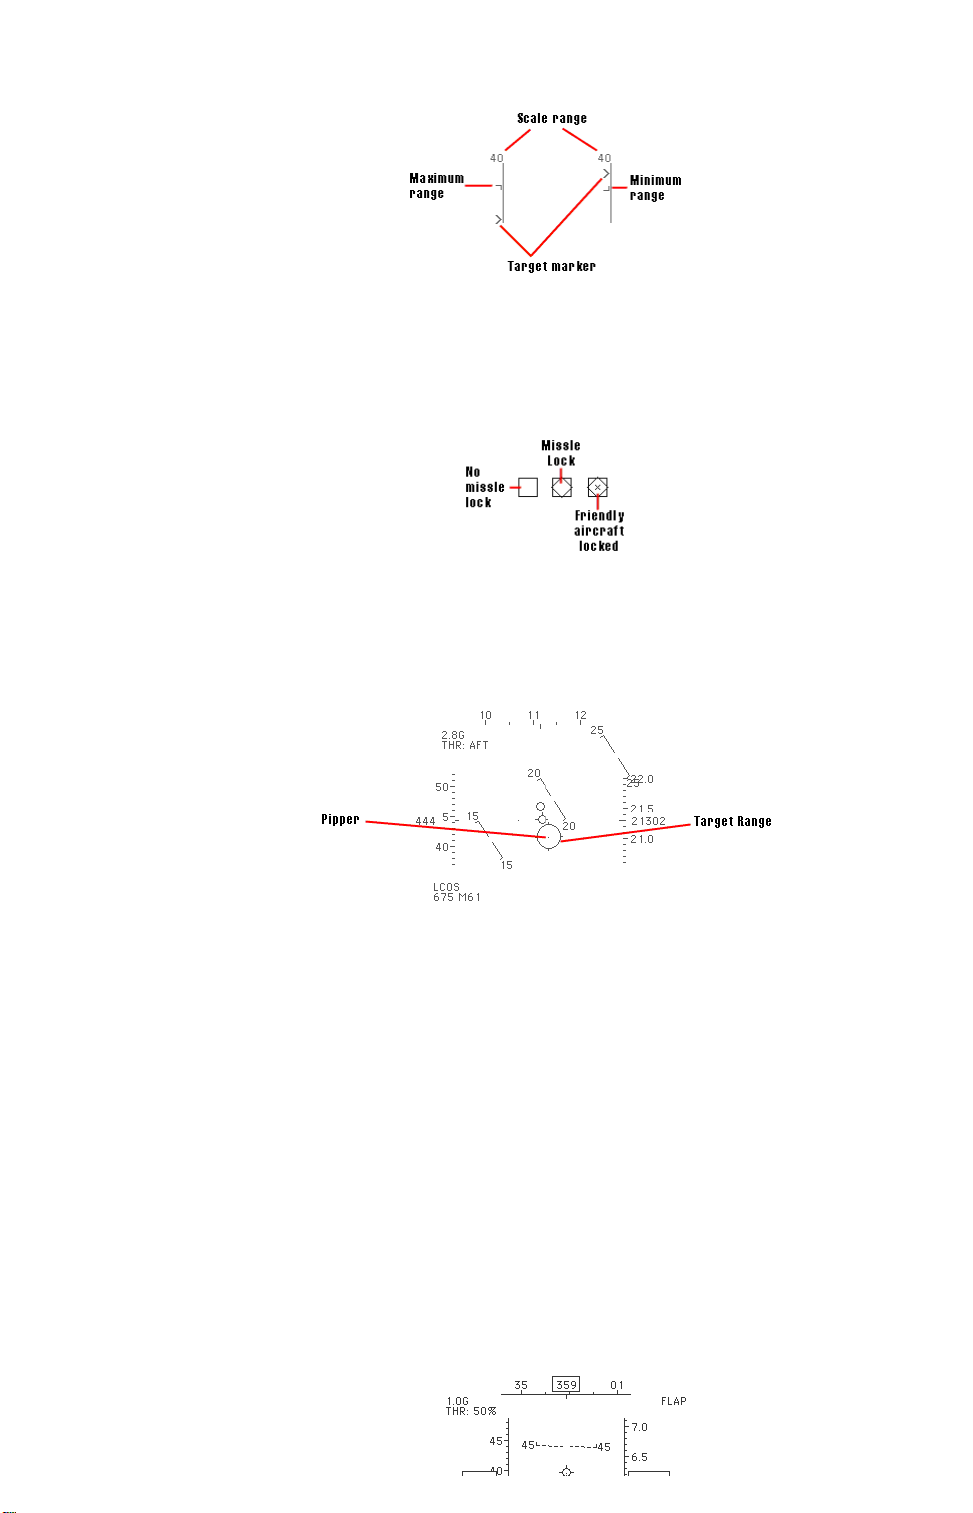
Missile Seeker
The missile seeker is represented by a floating diamond on the HUD. When
the missile seeker acquires the target, a flashing diamond appears in the TD
box. This indicates the missile is tracking the target and can be fired, but
does not indicate if you are in a good firing position.
HUD in Guns Mode
The HUD in guns mode shows the number of rounds left in your internal gun.
In addition, your gunsight changes depending on whether you’re attacking with
radar on or radar off.
When your radar is off, the pipper is set to indicate where a bullet will fall at
1,000 feet. If a target is beyond this distance, you need to lead the target
more. If the target is less than 1,000 feet, you need to lead it less.
With radar on and your target locked, the pipper changes range to match that
of the target and automatically calculates lead requirements. For you, this
makes life simple — just place the pipper on the target and fire. Your active
radar also provides your gun computer with range information. As you close in
on your target, a thick line moves along the perimeter of the pipper. This circle
measures range from your current position to the target. When there is no
thick arc on your pipper, your chances of hitting are zero. When the arc has
filled in the pipper, your chances of scoring a hit with a well-aimed shot are
excellent.
HUD in CCIP Mode
CCIP stands for Continuously Calculated Impact Point. The HUD in CCIP
displays all the symbology necessary to accurately strike ground targets with
unguided bombs.
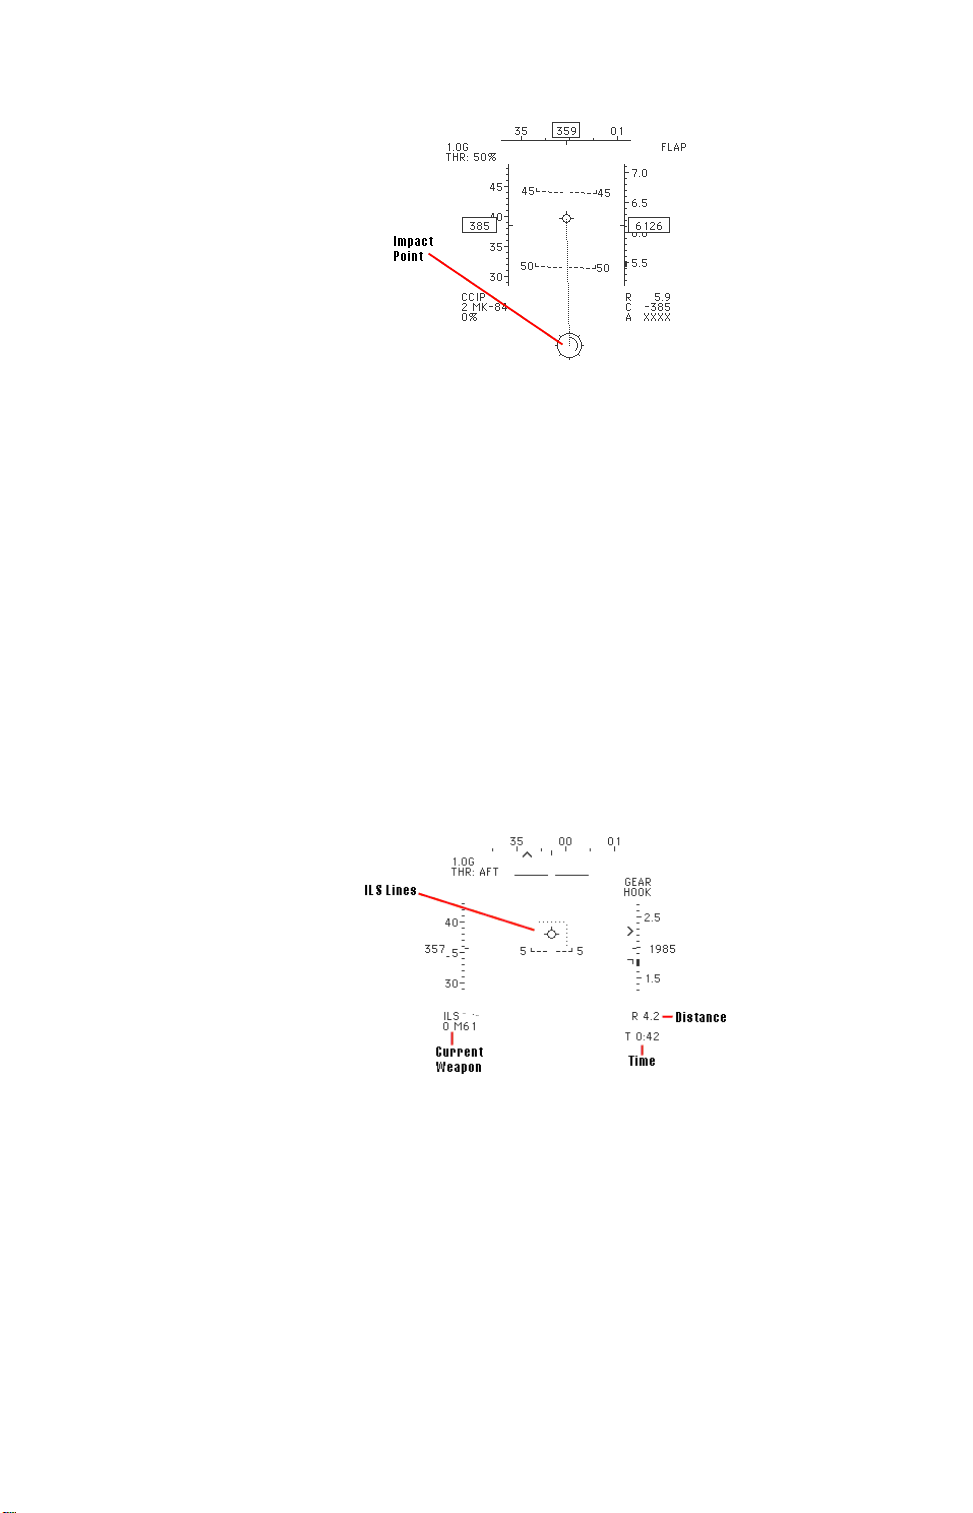
The dotted line extending from the center of the HUD indicates which path the
bombs will follow upon release, and the impact point pipper shows where the
bomb will land. In level flight, you often can’t see the pipper on your HUD; to
see the pipper, you must either dive or significantly increase speed. The
slower you fly, the steeper you must dive to keep the CCIP pipper on the
screen.
An arcing line moves inside the CCIP pipper. This circle measures range from
your current position to the drop point. When the inner arc forms a complete
circle the target point is 10,000 feet or more away. When the inner arc forms a
half-circle, the target point is 5,000 feet away. Accuracy reduces as range
increases, effectively limiting bombs to a 2 nm range. Beyond this range your
chances of hitting the intended target are very low.
The HUD In Navigation Mode
Navigation Mode provides you with the information you need to fly to
pre-established waypoints and make successful carrier landings. To switch
between Weapons Mode and Navigation Mode, press N.
Current Weapon
The current weapon is always displayed in the event that you need it.
Distance
The distance to the current waypoint in nautical miles (nm).
Time
The time to the next waypoint based on your current airspeed in
minutes:seconds
ILS System
The instrument landing system, or ILS, provides landing guidance. The ILS
 Loading...