


PMN 220-001

Heroes of Might and Magic
© 1995 The 3DO Company .
All Rights Reserved
Second Edition
The enclosed software program and this manual are copyrighted. All rights reserved. This manual may not be copied, photographed, reproduced, or reduced to any electronic medium or machine readable form, in whole or in part, without prior written consent from The 3DO Company. Portions of the program accompanying this book may be copied, by the original purchaser only, as necessary for use on the computer for which it was purchased.

Designed and Directed: |
Jon Van Caneghem |
Additional Design: |
Phil Steinmeyer |
|
Debbie Van Caneghem |
Lead Programming: |
Phil Steinmeyer |
Programming: |
Mark Caldwell |
|
George Ruof |
|
Todd Hendrix |
|
Bob Rakosky |
|
Michael Sean Clement |
Art Director: |
Julia Ulano |
Artists: |
Bonita Long-Hemsath |
|
Joel Payne |
|
Mike Winterbauer |
Music and Sound Design: |
Rob King |
Town Themes: |
Paul Romero |
|
Rob King |
Orchestral Arrangements: |
Paul Romero |
Classical Guitar: |
Frank Simes |
Harpsichord: |
Paul Romero |
Percussion: |
Rob King |
Writing and Manual: |
Rozita Tolouey |
|
Deane Rettig |
|
Bruce Schlickbernd |
|
Bill Fawcett |
|
William R. Forstchen |
Manual Illustration: |
April Lee |
Scenarios: |
Jon Van Caneghem |
|
Christian Vanover |
|
Clayton Retzer |
|
Mark Palczynski |
QA Manager: |
Peter Ryu |
Testing: |
Bryan Farina |
|
Douglas Rothman |
|
Pavel Vesely |
|
Walter Johnson |
|
Scott White |
|
Mark Caldwell |
|
George Ruof |
|
Scott McDaniel |
|
Benjamin Bent |
|
Deane Rettig |
|
Clayton Retzer |
|
Craig Konas |
|
Mark Palczynski |
|
Christian Vanover |
Heroes of Might
and Magic

Table of
Contents
Introduction |
5 |
Tutorial |
8 |
Main Menu |
20 |
New Game and Load Game |
21 |
Standard Game |
21 |
Campaign Game |
23 |
Multi-Player Game |
24 |
Adventuring |
26 |
Adventure Window |
26 |
World Map |
26 |
Heroes and Town/Castle |
27 |
Hero Locators |
27 |
Town/Castle Locators |
27 |
Adventure/Action Buttons |
28 |
Status Window |
31 |
Controlling Heroes |
32 |
Movement |
32 |
Heroes |
36 |
Hero Window |
36 |
Hero Trading Window |
40 |
Towns and Castles |
42 |
Town/Castle Window |
42 |
Common Dwellings |
44 |
Creature Dwellings |
46 |
Combat |
48 |
Castle Combat |
51 |
Letters From Lord Ironfist |
54 |
Mines and Resources |
73 |
Farm Castle Construction Hierarchy |
74 |
Plains Castle Construction Hierarchy |
75 |
Forest Castle Construction Hierarchy |
76 |
Mountain Castle Construction Hierarchy |
77 |
Common Dwellings |
79 |
Knight Castle |
80 |
Barbarian Castle |
82 |
Sorceress Castle |
84 |
Warlock Castle |
86 |
Miscellaneous Dwellings/Creatures |
88 |
Spells |
90 |
Keyboard Commands |
94 |
Introduction
Heroes of Might & Magic is a fantasy strategy game that pits the player against three diabolical warlords in a struggle for territory and resources. Dangerous warlords and creatures roam the land and await any hero who sets out to defeat them. Players hire heroes and use them to gather men, creatures and material for the fight against the other three warlords. Victory comes to the player with the right combination of tactical skill and strategic planning.
5

Basic Operations
Mouse
When the manual calls for you to “click” on something, place the cursor over the desired item, press the left mouse button (or the only mouse button for a Macintosh computer) and release the button. “R-click” means click with the right mouse button. Macintosh users need to hold down the and click with the mouse button when R-click is called for.
You can get information on most things in the game by placing the cursor over a menu, hero, map detail - just about anything - and R-clicking ( -click for Mac). Hold the button down while you read the information window. Releasing the button will clear the display.
The mouse cursor will change during game play to give you information or reflect the current command mode you are in. A complete list of these symbols appears in the Movement section of this manual.
File Selector
When loading or saving games, you will be presented with a standard File Selector window. To select a file, click on the name to highlight it. The name will now appear in the purple bar at the bottom of the list. Click on OKAY. Alternately, you can click on the highlighted name a second time or press the ENTER/RETURN key. Click on CANCEL to exit the menu without making a selection, or press the ESC (escape) key.
If the list is longer than the window can display, you can scroll through the list in two ways. Along the right side of the list is a slider bar and two arrow buttons. Click on either arrow button to scroll in the direction the arrow
6
indicates. To get to a selection fast on a really long list, drag the slider bar in the direction you want. To drag the slider bar, click on the slider button, and while still holding the mouse button down, drag the cursor in the desired direction.
7

Tutorial
Hate to wade through rulebooks? Want to get familiar with the basics of the game quickly and just go off and explore? You’ve come to the right place. This tutorial will walk you through a few turns of the Claw scenario. Once you have installed Heroes of Might and Magic, load the game and we’re off.
From the Main Menu, click on LOAD GAME. Then click on STANDARD GAME from the next menu. That menu will be replaced by the File Selector. Click on the file name Tutorial, to highlight it. The name of the file will also appear in the purple bar just above the two buttons at the bottom of the File Selector. Click on OKAY.
Lots of stuff to look at. The big window on the left is the Adventure Map. That’s your castle in the middle with your starting hero sitting astride a horse at its entrance. On the right are a variety of controls and indicators. Let’s explore these for a moment.
In the upper right is the World Map. There’s a pink box around the area of the map that is displayed in the
Adventure Map window. You start off only seeing a short distance beyond your own castle. As you move
8

your heroes about, more of the map will become visible. You can scroll the Adventure Map in a number of ways. Move the cursor to the extreme edge of the screen and the Adventure Map
will scroll in that direction. Give it a try. If you scroll too far and can no longer tell where you are, look up in the World Map. Place the cursor over the colored blob that is the territory your hero has charted and click. The castle and the surrounding environs are displayed again in the Adventure Map window.
Below the World Map is a display showing your heroes and castles. This is the hero and castle selector. The handsome blue fellow is the hero you happened to start with. There is a red outline around his box, indicating he is the “active” hero. Place the cursor over his picture and R- click and hold the button down. A window will come up displaying his name, statistics, and the type and number of troops that are accompanying him. Release the mouse button and the display disappears (you can R-click on many things in the game to get this kind of quick information). The blank boxes below Yog (your hero) and your castle are for future heroes and castles.
Beneath the hero and castle selectors are six buttons that will aid in playing the game. We’ll discuss these as we go through the tutorial.
9
The bottom display is the Status Window. It currently shows the active hero and his army. Place the cursor over this window and click. It now shows the amount of resources, towns, and castles you control. It will automatically return to the army display after a few seconds. Click on it again a couple of times. It will now show you the month, week, and day. New recruits become available each week, so it’s wise to keep track of the time. This tutorial begins a few days into the week so that several buildings could be added to your castle to get you into the thick of things faster.
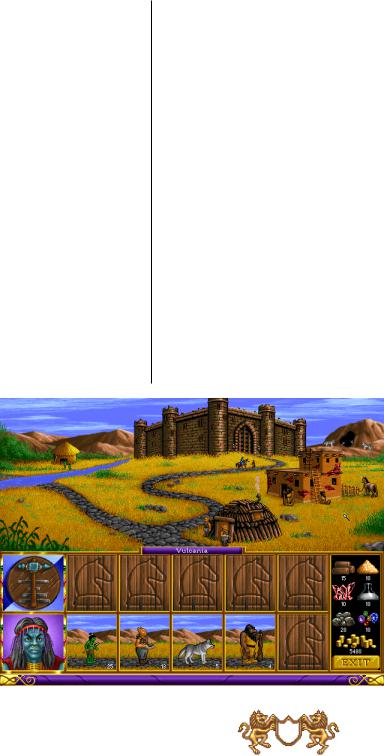
Place the cursor over the castle next to your hero’s icon in the castle selector and click (but not on the monochromatic castle in the group of six buttons). The castle now has the red box around it, indicating it is active. The Status Window also changes to display your resources, since your hero is no longer active. Click on the castle a second time to bring up the castle display.
Along the top of the castle window are the dwelling places of your potential recruits and the exterior of the castle. Place the cursor over any of the four dwellings and R-click (holding the button down) to see the type of troop, number available, and cost per troop. You will notice that nobody seems to be home at the moment (we already hired them into your
army).
Along the bottom of the display is your hero’s portrait, indicating he is in the castle. His accom-
10
panying troops are displayed in the row of boxes to his right. You can have up to five different troop types in any hero’s army. Note that there is one space available in Yog’s army, indicated by the wood-grained horse’s head. Let’s fill that up.
Click on the castle near the top of the screen. The upper half of the display now shows the various dwellings that can be purchased. You already have the Hut, Stick Hut, Den and Adobe dwellings (marked by the yellow check). The Shipyard and Pyramid both have prerequisites you don’t currently have and are marked with a red X. You
can only have one hero in a castle at a time, so Recruit Hero is also marked with an X. You can R-click on any of the buildings to get more information about them. For now, place the cursor over the Bridge and click.
A window comes up that tells you that the Bridge produces Trolls. It also requires that the Adobe dwelling was built in a previous turn (which we did for you already). It will take 20 ore and 4000 gold to build. A quick glance at the resources you have (displayed on the lower right of the screen) reveals you have the necessities. Click on OKAY.
The display shows the castle exterior again, and the Bridge is added on the far left. Let’s recruit some trolls
11

to fill out our army. Click on the Bridge and a window entitled Recruit Troll comes up. There are three available at 600 gold each. You are down to 1480 gold, and can only afford two. You can click on the up and down arrows to select the number of troops you want to recruit, but in this case, it is easier to just click on the
MA X button. That will automatically choose the maximum that you can afford, up to the limits of how many are available. Click on MAX if you haven’t already done so, and then click on OKAY.
Two trolls have been added to your castle garrison. The garrison occupies the five
boxes above the hero’s army. They will defend your castle if a hero and his army aren’t around, but aren’t involved if a hero is there. To transfer the Trolls from the garrison to your army, first click on the trolls. This highlights them with a red outline. Now place the cursor over the empty space of the hero’s army at the lower right and click. The trolls are now part of Yog’s army. You can transfer troops from box to box by clicking on one troop, and then clicking on the troop that you want them to exchange places with. You may also do partial troop transfers if the need should arise.
There are no more troops available for now, and you are almost broke – it’s time for Yog to go adventuring. Click on the EXIT button on the lower right.
We are back to the Adventure Window. Note that your hero Yog has the red border around his box indicating he
12
is the active hero. Move the cursor around a bit in the Adventure Map. The cursor will change depending on what it is over. Move the cursor over the treasure chest that is sparkling just below and slightly to the left of the castle entrance. As you move the cursor it will change to a rearing horse as it is placed over the chest. The rearing horse indicates that there is an event there that the hero can interact with. Once the horse is in the rearing position, click. A
green path of arrows is now displayed. This indicates the path the hero will take. He’ll avoid all events, encounters and obstacles to get to the destination you clicked on, now marked by a green X. Your hero can reach anywhere along the path where it is green. When the path or destination turns red, the hero won’t reach there until subsequent turns. Once the path is set, click on the destination a second time and the hero will move along the path towards the destination. Do that now.
You found some gold! You can either keep the gold or distribute it to the peasants for experience. At the start of each turn, you accumulate 1000 gold for each castle you own, 250 for each town, and 1000 for each gold mine. Building up
13

your castle and army is an expensive proposition, so the gold is needed there. At the same time, if you take the experience, your hero’s statistics will eventually improve, making him better in combat or spellcasting. Decisions, decisions. For the purposes of this tutorial, click on Yes, but learning when to choose one or the other is something your own experience and style will dictate.
Look next to your hero’s portrait and you’ll see a yellow bar indicating the amount of movement he has left this turn. Be aware that it doesn’t start at the very top of the bar – there are items that can improve his movement beyond
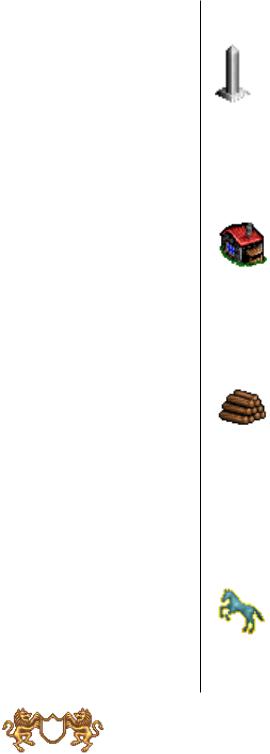
the normal. Yog still has some movement left, so let’s set a new destination. Click on the gray obelisk above and slightly to the left of your castle, making sure you have the rearing horse symbol. Note the numeral 2 on the right of the horse. That means it will take all of Yog’s movement this turn, and at least part of his movement next turn to reach there. Click to set the path. The destination is marked with a red X this time, indicating you can’t reach there this turn. Move the cursor over to the button with the horse icon near the right side of the screen and click. This is the Move button, an alternate command that tells your hero to move along the path once it is set.
That’s all for this turn. Click on the hourglass button. The Status Window will show the computer players thinking and the cursor will become a sundial. Once the cursor changes back and the Status Window reverts to Yog’s army, you can continue.
The red X is now green. Click on the Move button and Yog continues along the path you set last turn. Read
14
the text about the obelisk and click on OKAY. The Adventure Map is replaced by a puzzle, with a few of the pieces missing so that you can see part of a map beneath it. This map reveals the location of the Ultimate Artifact. As you find more obelisks, more and more of the map will be revealed. If you think you are near the center of the puzzle when you are looking at the Adventure Map, you can dig for it.( See Adventure/Action Buttons) – for now, we’re going to push on. Click on EXIT in the upper right where the World Map is normally displayed.
We have returned to the Adventure Map. There is a little house with a red roof just to the right of the obelisk. Click on that and move there. A troop of peasants would like to join us. Click on YES. Whoops! We filled all five slots available to our army, so the peasants can’t join us. Had there been an available slot they would have joined us. Also, if one of our troop types was peasants, they would have been added to the peasants we already had (troops of the same type always occupy the same slot and cannot be split within an army). Click on OKAY.
Click on the pile of wood neatly stacked to the right of your castle and move your hero there. A message will appear briefly in the Status Window saying that you have found a small amount of wood.
As you moved towards the woodpile, more of the Adventure Map was revealed to you. The hero unveils the map a set distance away as he moves about. Just above where the woodpile used to be is a wooden structure. R-click on it and you can see that it is a sawmill. The sawmill produces two units of wood each turn as long as you own it. Place the cursor over the front of the sawmill (be sure you have the rearing horse cursor icon) and click. You shouldn’t have any movement left, so just click on the hourglass again.
Click on the Move button. Read the text, then click on
15
OKAY. Note that there is now a blue flag flying over the sawmill, indicating that you own it. It will continue to add two units of wood to your resources at the start of each turn until an opponent hero captures it.
Below the sawmill there’s a gray circular item. Move to that. Text comes up telling you that it is an artifact. Unfortunately, this particular artifact was guarded by a pack of rogues. Click on OKAY to enter combat.
On the left side of the screen is the moving player’s troops (the Attacker), and on the right are the encountered troops (the Defender). Thus, your troops will be lined up on the left in any combat during your turn, and on the right in any combat during another player’s turn. Your troops are lined up from top to bottom in the same order that they were lined up from left to right in your hero’s display back at the castle.
Combat is fought in a series of rounds, with each unit getting to move and possibly attack once each round. The faster the unit’s Speed, the sooner it moves in the combat round. The computer will determine which unit gets to move first. Your wolves are your fastest unit and will have a glowing yellow outline when they are ready to be moved. R-click on them to see their statistics. Now move the cursor around the field. You can move the wolves to any position on the field where you see the yellow Running Man icon. All you need to do is click on the spot you want them to move to. A red X with a circle behind it indicates a spot they can’t move to. Some terrain may be impassable (usually marked by a tree, pit, bush, the odd flow of lava, etc.). Don’t move just yet.
On the extreme left is your hero’s tent. Place the cursor over the tent – when the cursor changes to a yellow helmet, click. A window will pop up with Yog’s lovely visage, his statistics, and a group of four buttons. These are
16

the Hero’s Combat Options. Starting on the left is the Cast Spell button (the crystal ball). Yog doesn’t have any spells. For now, the Cast Spell button is darkened and can’t be selected. The next button to the right
is the Retreat button (the running knight). Retreating loses all of your hero’s troops, but he’ll make his way back to any of your castles with his experience and artifacts intact and can be recruited again. The next button is the Surrender option (the white flag). This is similar to the Retreat option, except you must pay a penalty to the opposing hero. However, all your troops stay with your hero. The more troops, the bigger the payment. To surrender, there must be an opposing player’s hero to surrender
to, and these rogues don’t have one. Click on the last button (four arrows) to exit the Hero’s Combat Options.
Your wolves are still waiting patiently for orders. Click on the SKIP button in the lower right. All of the rogues will come charging forward, but won’t be able to reach you. Time to soften them up a bit. When the goblins come up, just click on SKIP again. Your big purple troll should be glowing now. That big rock he is holding can be thrown. Place the cursor over the nearest rogue. The cursor becomes an arrow, indicating you can fire at the troop without moving. Go ahead and click. The rock is thrown (R-click on the troll to see how many shots he has left) and the rogue troop is greatly diminished or wiped out. Do the same with the orcs. Your ogre troop is the slowest, and can’t get close enough to attack. Have him lumber forward a bit.
All the units have moved and a new round starts. Some of the rogues may have moved before your wolves. That’s okay. There will probably be one within range of your wolves’ movement in any case. Place the cursor near the closest rogue pack. It should change to a sword. The direction the sword is pointing from indicates where the wolves will be when they attack. There are definite
17
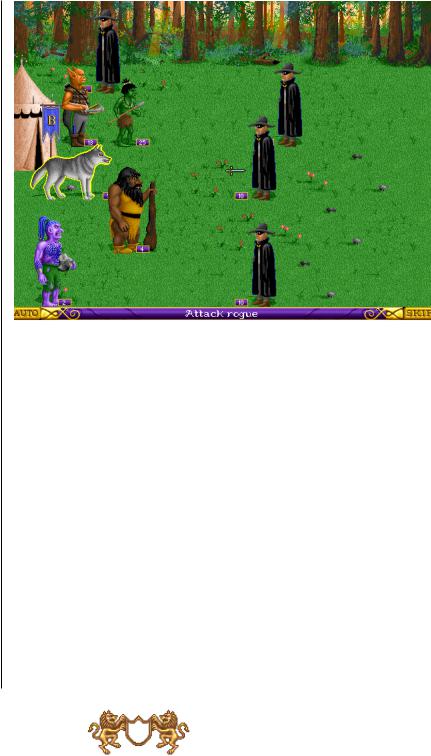
tactical considerations, but for the purposes of this demo, it doesn’t matter which direction. Choose one and click. Your wolves will leap to the attack. Any rogues that survive will then strike back. That is normally the end of that particular combat , but wolves have a special ability that allows them to attack a second time. They’ll do this automatically if any rogues from the attacked troop are still standing after the first attack.
With the basics of combat under your belt, this tutorial now abandons you to your fate (don’t whimper, you should be able to dust those rogues with Yog’s army). Feel free to continue on with the scenario, referring to the manual as questions arise. In two more turns, new recruits will be available at your castle. It might be wise to recruit a second hero, build up his army (while staying put to guard the castle), while Yog explores the countryside. Happy adventuring!
18

Main Menu
New Game: Click on this option (or press the N key) to start a new game. See the next section for more details on beginning a new game.
Load Game: Click on this option (or press the L key) to open one of your previously saved games. You will then have a choice of Standard, Campaign, or Multi-Player saved games. Click on the appropriate button. From the File Selector, click on the name of the saved game you want to load. Then click on OKAY. You can also click on the saved game a second time or press ENTER/RETURN to load the selected saved game.
View High Scores: Click on this option (or press the H key) to display the highest scores that have been achieved so far playing Heroes of Might & Magic. Click on the lower left button to switch between standard scenarios and campaign high scores. Click on EXIT to return to the Main Menu.
View Credits: Click on this option (or press the C key) to display a list of the people who brought you Heroes of Might & Magic. Click anywhere to return to the Main Menu.
Quit: Click on QUIT (or press the Q key) to Exit the game and return to your operating system.
20
NOTE: If you start a new game or load a previously saved game, be sure to save your current game first.
New Game and Load Game
After clicking on NEW GAME or LOAD GAME, you will be presented with three types of games to play.
Standard Game
Choose from any of the scenarios. A single game is played. To win, you must take all of the opposing warlord’s castles and towns, and defeat all their heroes.
Choose Game Difficulty: Click on the level of difficulty you wish to play. The level will affect the difficulty of the game overall. The settings are Easy, Normal, Hard and Expert. Default is set at Normal.
NOTE: You receive more initial resources for playing an easy level game, and receive less initial resources for playing a hard level game.
Customize Opponents: You may select the number of opponents in a game under Customize Opponents. You can also select the intelligence level of your opponent(s). Smarter computer opponents think longer about their moves and play better. You may choose up to three opponents, but must choose at least one. The settings are Dumb, Average, Smart, Ingenious and None. The default setting is three Average opponents. To change the default settings, click on each of the opponent buttons in turn.
Choose Color: A kingdom flag color must be selected by choosing one of the four colors presented. Your choices are Blue, Green, Red and Yellow. Click on the colored jewel to cycle through the color options.
Starting Resources
Easy:
10,000 
30
10
Normal:
7,500
20
5
Hard:
5,000
10
Expert:
21
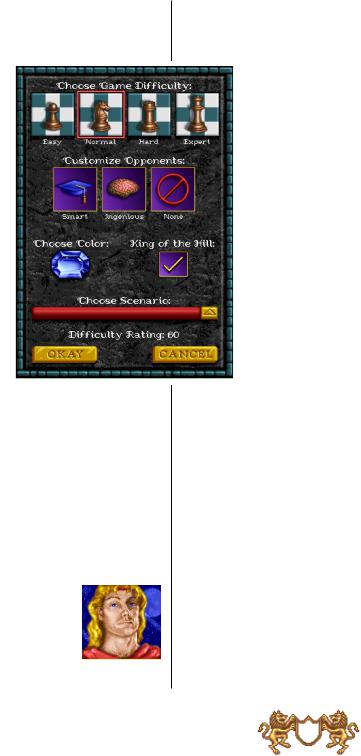
King of the Hill: Click in the box to turn this option on or off. When this option is checked, all of the computer opponents will ally against you.
Choose Scenario: Various scenarios are available to choose from. Each adventure will provide challenges and the player will encounter diverse enemies and creatures. Click anywhere on the colored bar to change the currently selected scenario. The File Selector window is now displayed. Click on the scenario you want to play. Displayed at the bottom of the window will be the map size (Small, Medium or Large), difficulty (Easy, Normal or Tough), and a brief description of the scenario.
Difficulty Rating: This number rates the difficulty of the game based on the player’s level of difficulty, the opponent’s level of difficulty and the scenario. The Difficulty Rating will be utilized in calculating the player’s score.
Having made your selections, you can now head out for adventure, fame and glory. In your travels, your hero will engage in fierce battles, encounter hideous monsters and find breathtaking treasures. As the game begins, the player starts with one hero and can have up to eight heroes at any one time.
Each hero will have different attributes and skills. Heroes will start with a small number of creatures in their army and the following statistics:
Knight
1 Attack , 2 Defense , 1 Spell Power, 1 Knowledge. A knight improves the morale of his creatures.
22
Barbarian
2 Attack, 1 Defense, 1 Spell Power, 1 Knowledge.
A barbarian suffers no movement penalties for moving over rough terrain.
Sorceress
0 Attack, 0 Defense, 2 Spell Power, 3 Knowledge.
A sorceress can move at double speed on water and starts with a spell book.
Warlock
0 Attack, 0 Defense, 3 Spell Power, 2 Knowledge.
A warlock has a larger visibility radius in the Adventure Window and starts with a spell book.
During your explorations your hero will encounter many towns and creatures. Encounters, while often filled with danger, are necessary if your hero is to accumulate experience points and gain levels. As heroes go up in levels, so do their attributes (Attack, Defense, Spell Power, Knowledge). As you encounter different types of creatures, you will become more familiar with their different powers and capabilities.
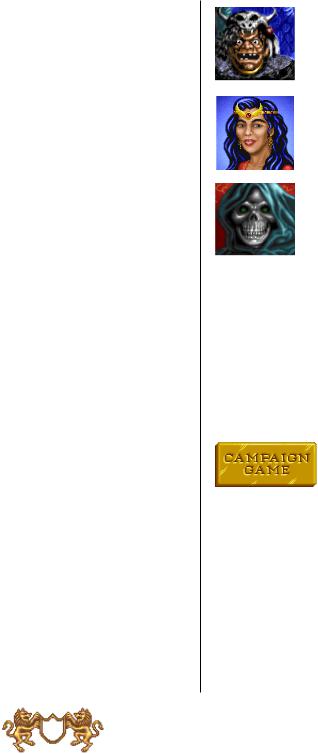
Campaign Game
The campaign game is a series of eight scenarios that differ in size, complexity, objectives, and difficulty. The starting information for your computer opponents is all preset – your only choice is the character you wish to play. Lord Ironfist starts with a Knight’s castle, Lord Slayer starts with a Barbarian’s castle, Queen Lamanda starts with a Sorceress’ castle, and Lord Alamar starts with a Warlock’s castle. You’ll play that character throughout the campaign. Click on one of these to start the campaign.
The campaign scenario introduction window will give you
23
the background and victory conditions for that particular scenario. The victory conditions change from scenario to scenario, so be sure to read the text! Don’t panic if you forget the victory conditions – you can display them at any time by clicking on the Game Options button and then the INFO button (or press the I key).
Each scenario must be won to proceed to the next, and begins on the following day. For example, if you completed the first scenario on day 6, the second scenario will begin on day 7. You will receive a rating upon completing the final scenario. This rating is based on the total time taken to complete these scenarios.
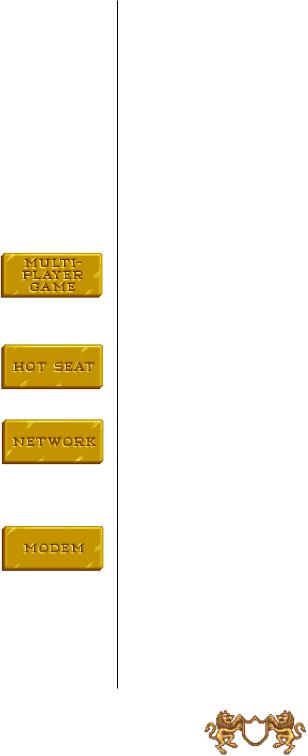
Multi-Player Game
If you want to play with human opponents, click on this. After making your selection, you will be given some more options to choose from.
Hot Seat: Each player takes turns at one computer and issues orders. You can have any mix of human and computer players, up to four total.
Network: You can play on a PC over a Net Bios compatible network or on a Macintosh via a LocalTalk compatible network with another human opponent. One player must click on Host, and the other must click on GUEST. The Host player sets up the game.
Modem: The Host player sets up the game options and calls the other player, who must be the Guest. You will need to select the appropriate port that your modem is connected to. You will then be asked to enter the telephone number of the Guest player. Type in the numbers as you would dial it normally – you don’t need to include dashes or parentheses. Click on OKAY when ready. The Guest player must have already selected the Guest option and the correct port for his modem before the
24
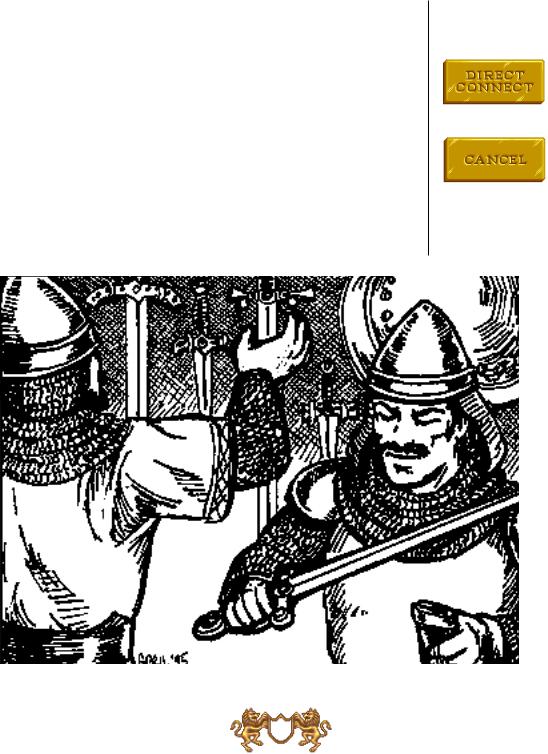
Host clicks on OKAY! Once connected, the Host will select the scenario options.
Direct Connect: This is the same as the Modem option above except there is no need to type in a telephone number.
Cancel
Oops! Click on this to get back to the main menu.
During a Multi-Player game, with the exception of Hot Seat, you may press the F1 key to bring up a chat window, allowing you to communicate with your human opponent.
25
Adventuring
Adventure Window
The Adventure Window is where all of the game action takes place. Here you can view the surrounding countryside, items, artifacts, towns, and enemy armies. As your hero travels, he will gain experience points as he faces numerous foes, performs tasks and overcomes other perils.
When your hero accumulates enough experience, he will gain new levels. The Adventure Window consists of five separate sections: Adventure Map, World Map, Locators, Adventure/Action Buttons, and Information Box.
World Map
The topmost section to the right contains a window showing the map for the scenario. You map the uncharted world as your hero travels through it. The map is an overview of the region your hero is currently exploring. Only areas you have explored are visible on the map, the rest is blacked out until you explore that area. The pink rectangle within this map shows the current section of the entire map. Clicking within this rectangle and dragging the mouse with the button held down will cause the map window to scroll to a new area, following the movement of the mouse.
Clicking the cursor outside the pink rectangle, but within the map area, will cause the map window to display the section of the map indicated. You can also automatically scroll the screen by moving the cursor to any side of the Adventure Map.
26
Heroes and Town/Castle
Four hero locator buttons and four town/castle locator buttons with scroll bars are located here. The left column of the locators is reserved for the heroes you recruit. The right column of the locators is for the towns and castles you own.
Hero Locators
Portraits of your heroes are located in the left column. Alongside each hero portrait is a yellow bar, indicating how much movement the hero has remaining this turn. The + symbol(s) represent a bonus to the hero’s standard movement. Clicking on the hero’s portrait will make that hero the “active” hero, and the pink rectangle will jump to his location.
The active hero is highlighted by a red border around its portrait box. By R-clicking on the hero’s box or icon in the Adventure Map, you can receive quick information on that hero. By clicking on the active hero or pressing the ENTER/RETURN key, you will receive more in-depth statistical information on that hero (See Hero Window). You can also scroll through the hero locators by pressing the H key.
Town/Castle Locators
The right column of the locators is for the towns and castles you own. The activated town/castle is highlighted by a red border. Clicking on a town/castle locator button will jump to that town/castle. By R-clicking a town/castle you receive quick information on that town/castle. By clicking on the highlighted box or pressing the ENTER/RETURN key, you enter that Town/Castle Window (See Town/Castle Window). You can only scroll through the town/castle locators by pressing the T key.
27
Adventure/Action Buttons
Next Hero: Clicking this option or pressing the TAB key will activate the next hero in your lineup (with movement points left) centering on his location.
Move: A hero who is displaying a movement path can automatically continue on the path by pressing this button or by pressing M on your keyboard.
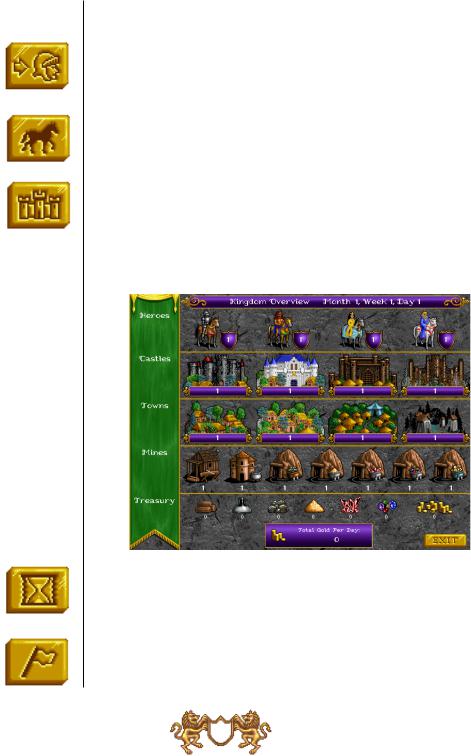
Kingdom Overview: Click on this or press K on your keyboard to display the Kingdom Overview Window. This window lists everything you own and summarizes your Heroes, Castles, Towns, Mines, Treasury, and gold per day. Click on EXIT or press the ESC key to return to the Adventure Window.
End Turn: Click on this option or press E on your keyboard to end your turn. Play will proceed to the next player.
Adventure Options: Brings up a menu of actions to perform in the Adventure Window.
28
You can use hot-keys to go directly to any of the following: V - View World, P - View Puzzle, C - Cast Spell, D - Dig/Search.
View World: Displays a detailed view of the world map, the area your hero is currently exploring. Only explored areas are visible. The view shows a miniature position of towns, castles, mines, etc. The blinking dot indicates your active hero’s position.
View Puzzle: Displays the puzzle map that
leads your hero to the Ultimate Artifact. As pieces of the puzzle are replaced by the actual map sections, the location of the Ultimate Artifact will eventually be marked by an X near the center of the puzzle. To uncover pieces of the puzzle you must seek out the various obelisks across the region that will expose pieces of the map and the location of the Ultimate Artifact. Click on EXIT in the World Map Window
or press the ESC key to return to the Adventure Window.
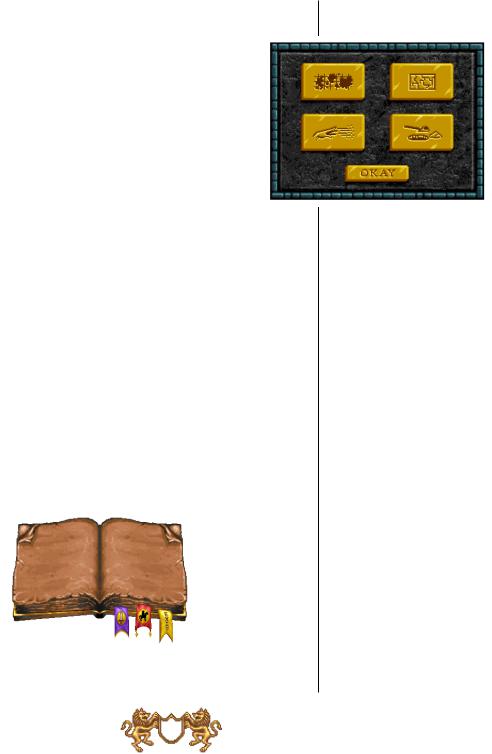
Cast Spell: Brings up the spell book, displaying only adventure spells for the current hero. Leaf through the pages by clicking the upper-left or upper-right corners of the spell book. Select a spell by clicking on its picture. Click on the EXIT bookmark or press the ESC key to close the spell book.
Dig/Search: This command is used when you wish to search the current hero’s location for the Ultimate
29
 Loading...