


TABLE OF CONTENTS
Requirements and Installation . . . . . . . . . . . . . . . . . . . . . . . . . . . . . . . . . . . .5
Recommended System Requirements . . . . . . . . . . . . . . . . . . . . . . . . . . . . . . . .5
Installing . . . . . . . . . . . . . . . . . . . . . . . . . . . . . . . . . . . . . . . . . . . . . . . . . . . . .5
Playing . . . . . . . . . . . . . . . . . . . . . . . . . . . . . . . . . . . . . . . . . . . . . . . . . . . . . . .6
Uninstalling . . . . . . . . . . . . . . . . . . . . . . . . . . . . . . . . . . . . . . . . . . . . . . . . . . .6
The Readme File . . . . . . . . . . . . . . . . . . . . . . . . . . . . . . . . . . . . . . . . . . . . . . . .7
The Main Menu . . . . . . . . . . . . . . . . . . . . . . . . . . . . . . . . . . . . . . . . . . . . . . . . . .7
Fly Now . . . . . . . . . . . . . . . . . . . . . . . . . . . . . . . . . . . . . . . . . . . . . . . . . . . . . . . . .8
Training . . . . . . . . . . . . . . . . . . . . . . . . . . . . . . . . . . . . . . . . . . . . . . . . . . . . . . . . .8
Custom Configuration . . . . . . . . . . . . . . . . . . . . . . . . . . . . . . . . . . . . . . . . . . . .9
Individual Missions . . . . . . . . . . . . . . . . . . . . . . . . . . . . . . . . . . . . . . . . . . . . .12
Starting Single-Player . . . . . . . . . . . . . . . . . . . . . . . . . . . . . . . . . . . . . . . . . . .12
Starting Multi-Player . . . . . . . . . . . . . . . . . . . . . . . . . . . . . . . . . . . . . . . . . . . .12
Loading Weapons . . . . . . . . . . . . . . . . . . . . . . . . . . . . . . . . . . . . . . . . . . . . . .13
Creating a New Mission . . . . . . . . . . . . . . . . . . . . . . . . . . . . . . . . . . . . . . . . .15
Campaigns . . . . . . . . . . . . . . . . . . . . . . . . . . . . . . . . . . . . . . . . . . . . . . . . . . . . .20
Starting a Campaign . . . . . . . . . . . . . . . . . . . . . . . . . . . . . . . . . . . . . . . . . . . .20
Reading Intelligence Reports . . . . . . . . . . . . . . . . . . . . . . . . . . . . . . . . . . . . .22
Reviewing the Preflight Briefing . . . . . . . . . . . . . . . . . . . . . . . . . . . . . . . . . . .22
Assigning Pilots . . . . . . . . . . . . . . . . . . . . . . . . . . . . . . . . . . . . . . . . . . . . . . .23
Loading Weapons . . . . . . . . . . . . . . . . . . . . . . . . . . . . . . . . . . . . . . . . . . . . . .24
Mission Planning . . . . . . . . . . . . . . . . . . . . . . . . . . . . . . . . . . . . . . . . . . . . . .26
The Post-Flight Debriefing . . . . . . . . . . . . . . . . . . . . . . . . . . . . . . . . . . . . . . .28
Changing Crew Assignments . . . . . . . . . . . . . . . . . . . . . . . . . . . . . . . . . . . . .28
Flying the Next Mission . . . . . . . . . . . . . . . . . . . . . . . . . . . . . . . . . . . . . . . . . .29
The Cockpit MFD Displays . . . . . . . . . . . . . . . . . . . . . . . . . . . . . . . . . . . . . . .30
AND Display . . . . . . . . . . . . . . . . . . . . . . . . . . . . . . . . . . . . . . . . . . . . . . . . . .30
System Damage . . . . . . . . . . . . . . . . . . . . . . . . . . . . . . . . . . . . . . . . . . . . . . .30
Tactical Situation Map . . . . . . . . . . . . . . . . . . . . . . . . . . . . . . . . . . . . . . . . . . .30
Radar Advance Warning System (RAWS) . . . . . . . . . . . . . . . . . . . . . . . . . . . .32
Fire Control Radar (FCR) . . . . . . . . . . . . . . . . . . . . . . . . . . . . . . . . . . . . . . . . .33
Weapons Display . . . . . . . . . . . . . . . . . . . . . . . . . . . . . . . . . . . . . . . . . . . . . .33
Target Acquisition Designation Sight (TADS) . . . . . . . . . . . . . . . . . . . . . . . . . .34
Engine Display . . . . . . . . . . . . . . . . . . . . . . . . . . . . . . . . . . . . . . . . . . . . . . . .35
Map Screen . . . . . . . . . . . . . . . . . . . . . . . . . . . . . . . . . . . . . . . . . . . . . . . . . .36
In The Pilot’s Seat . . . . . . . . . . . . . . . . . . . . . . . . . . . . . . . . . . . . . . . . . . . . . .38
Takeoff . . . . . . . . . . . . . . . . . . . . . . . . . . . . . . . . . . . . . . . . . . . . . . . . . . . . . .38
Aggressive Takeoff . . . . . . . . . . . . . . . . . . . . . . . . . . . . . . . . . . . . . . . . . . . . .39
3

Adjusting Airspeed . . . . . . . . . . . . . . . . . . . . . . . . . . . . . . . . . . . . . . . . . . . . .40
Liftoff and Low Altitude Hover . . . . . . . . . . . . . . . . . . . . . . . . . . . . . . . . . . . . .42 Liftoff and Hover at High Altitude . . . . . . . . . . . . . . . . . . . . . . . . . . . . . . . . . .43
Transition to Hover . . . . . . . . . . . . . . . . . . . . . . . . . . . . . . . . . . . . . . . . . . . . .43
Rapid Climb . . . . . . . . . . . . . . . . . . . . . . . . . . . . . . . . . . . . . . . . . . . . . . . . . .44
Rapid Descent . . . . . . . . . . . . . . . . . . . . . . . . . . . . . . . . . . . . . . . . . . . . . . . .45 Flying Backwards . . . . . . . . . . . . . . . . . . . . . . . . . . . . . . . . . . . . . . . . . . . . . .45 Flying Sideways . . . . . . . . . . . . . . . . . . . . . . . . . . . . . . . . . . . . . . . . . . . . . . .46 Engaging Ground Targets . . . . . . . . . . . . . . . . . . . . . . . . . . . . . . . . . . . . . . . .47
Engaging Aerial Targets . . . . . . . . . . . . . . . . . . . . . . . . . . . . . . . . . . . . . . . . .47
Navigating Waypoints . . . . . . . . . . . . . . . . . . . . . . . . . . . . . . . . . . . . . . . . . . .49 Speed Control . . . . . . . . . . . . . . . . . . . . . . . . . . . . . . . . . . . . . . . . . . . . . . . .49 Masking . . . . . . . . . . . . . . . . . . . . . . . . . . . . . . . . . . . . . . . . . . . . . . . . . . . . .50 Flying Ridges and Valleys . . . . . . . . . . . . . . . . . . . . . . . . . . . . . . . . . . . . . . . .51
The Communications Menu . . . . . . . . . . . . . . . . . . . . . . . . . . . . . . . . . . . . . .51
Realistic Flight Mode . . . . . . . . . . . . . . . . . . . . . . . . . . . . . . . . . . . . . . . . . . .54 Copilot/Gunner (CP/G) . . . . . . . . . . . . . . . . . . . . . . . . . . . . . . . . . . . . . . . . . .57
Communicating with the Pilot . . . . . . . . . . . . . . . . . . . . . . . . . . . . . . . . . . . . .57 Gunner’s and ORT Cockpits . . . . . . . . . . . . . . . . . . . . . . . . . . . . . . . . . . . . . .58 Acquiring Targets with the FCR . . . . . . . . . . . . . . . . . . . . . . . . . . . . . . . . . . . .59 Acquiring Targets with the TADS . . . . . . . . . . . . . . . . . . . . . . . . . . . . . . . . . . .60
Engaging Targets . . . . . . . . . . . . . . . . . . . . . . . . . . . . . . . . . . . . . . . . . . . . . .61
Basic Tactics . . . . . . . . . . . . . . . . . . . . . . . . . . . . . . . . . . . . . . . . . . . . . . . . . . .66
Two Pieces of Advice . . . . . . . . . . . . . . . . . . . . . . . . . . . . . . . . . . . . . . . . . . .66 Offensive Tactics . . . . . . . . . . . . . . . . . . . . . . . . . . . . . . . . . . . . . . . . . . . . . .66 Defensive Tactics . . . . . . . . . . . . . . . . . . . . . . . . . . . . . . . . . . . . . . . . . . . . . .69
Guide To Vehicles . . . . . . . . . . . . . . . . . . . . . . . . . . . . . . . . . . . . . . . . . . . . . .71
AH-64D Apache . . . . . . . . . . . . . . . . . . . . . . . . . . . . . . . . . . . . . . . . . . . . . . .71
WAH-64D Apache . . . . . . . . . . . . . . . . . . . . . . . . . . . . . . . . . . . . . . . . . . . . . .72 UHT-2 Tiger . . . . . . . . . . . . . . . . . . . . . . . . . . . . . . . . . . . . . . . . . . . . . . . . . .74
Mi-28N Havoc . . . . . . . . . . . . . . . . . . . . . . . . . . . . . . . . . . . . . . . . . . . . . . . .75 Helicopter Weapon Systems . . . . . . . . . . . . . . . . . . . . . . . . . . . . . . . . . . . . . .76 U.S. Vehicles . . . . . . . . . . . . . . . . . . . . . . . . . . . . . . . . . . . . . . . . . . . . . . . . .83
British Vehicles . . . . . . . . . . . . . . . . . . . . . . . . . . . . . . . . . . . . . . . . . . . . . . . .86 German Vehicles . . . . . . . . . . . . . . . . . . . . . . . . . . . . . . . . . . . . . . . . . . . . . .87
Russian Federation Vehicles . . . . . . . . . . . . . . . . . . . . . . . . . . . . . . . . . . . . . .88
Appendix: Guide to Acronyms . . . . . . . . . . . . . . . . . . . . . . . . . . . . . . . . . . . .93 Technical Support . . . . . . . . . . . . . . . . . . . . . . . . . . . . . . . . . . . . . . . . . . . . . .95 Grant of License . . . . . . . . . . . . . . . . . . . . . . . . . . . . . . . . . . . . . . . . . . . . . . . .96 Credits . . . . . . . . . . . . . . . . . . . . . . . . . . . . . . . . . . . . . . . . . . . . . . . . . . . . . . . .98
4

REQUIREMENTS AND INSTALLATION
Recommended System Requirements
Before you can install Gunship! and start playing, check this list to make sure that your computer has everything you need:
Operating System: |
Windows® 95/98 |
Processor: |
Pentium® 266MHz or higher |
Memory: |
32MB RAM |
Hard Disk Space: |
150MB Free |
CD-ROM Drive: |
4X Speed |
Video: |
SVGA video card with 2MB video memory* |
Sound: |
Sound card* |
DirectX: |
DirectX version 7.0 (included) or higher |
Modem: |
28.8kps (28,800 baud) for modem/Internet play |
*These devices should be compatible with both Windows 95/98 and DirectX version 7.0 or higher.
If you think you have all of these, but still have a problem running the game, please contact Customer Support for assistance. (Details can be found on page 95.)
Installing
If you have all of the required equipment, then it’s time to install the game. To do so, follow these instructions:
•Turn on your computer (Windows 95/98 should load automatically).
•Open the CD-ROM drive, place the Gunship! CD in it, and close the drive.
•This is a Windows "AutoPlay" CD-ROM. That means that just putting the disk in the drive for the first time starts up the installation program.
If Autoplay Doesn’t Work
If the Autoplay feature does not work when you put the CD in the drive, here’s how to start the installation program yourself:
•Double-click your "My Computer" desktop icon.
•In the window that opens, double-click your CD-ROM drive (it’s usually the D drive).
•In the list that appears, find a file named setup.exe and double-click it.
The installation program should begin.
5

•Click the Install button to continue. (If you change your mind at this point, close the window to Exit.)
•Follow the on-screen instructions to install the game. The installation program copies some files to your hard drive from the CD-ROM, then adds Gunship! to the programs in your Start menu.
•Gunship! requires DirectX 7.0 or higher in order to run. If you do not have this already installed on your computer, click Yes when asked if you would like to install it.
Playing
Once the automated installation and set-up are complete, the game is ready to play. To start:
•Make sure that the CD-ROM is in your drive.
•Now simply click on the Play Gunship! button when the title box appears. Alternatively (if the box doesn’t appear), you can click the Windows Start button, then choose Programs > MicroProse > Gunship! > Play Gunship! to run the game.
Uninstalling
If you decide to remove Gunship! from your computer, follow these easy instructions.
•Put the Gunship! CD-ROM in your drive.
•Now simply click on the Uninstall button when the title box appears.
•If you do not have the Gunship! CD handy, you can still uninstall the game. Here’s how:
•Click the Windows Start button.
•Select Settings, then Control Panel.
•In the Control Panel window, double-click on Add/Remove Programs.
•Select Gunship! from the list of programs and click the Add/Remove button.
•Follow the on-screen instructions to remove the game from your hard drive.
Note: The uninstall procedure won’t remove files you’ve created—such as Saved Game files. You can delete these leftover files manually.
6
THE README FILE
The Gunship! CD-ROM game has a ReadMe file, where you can view updated information about the game. To view this file, click the Windows Start button, the Programs menu, the MicroProse sub-menu, then Gunship!. Finally, click the ReadMe option. You can also get to the ReadMe file by double-clicking on it in the Gunship! folder on your hard drive.
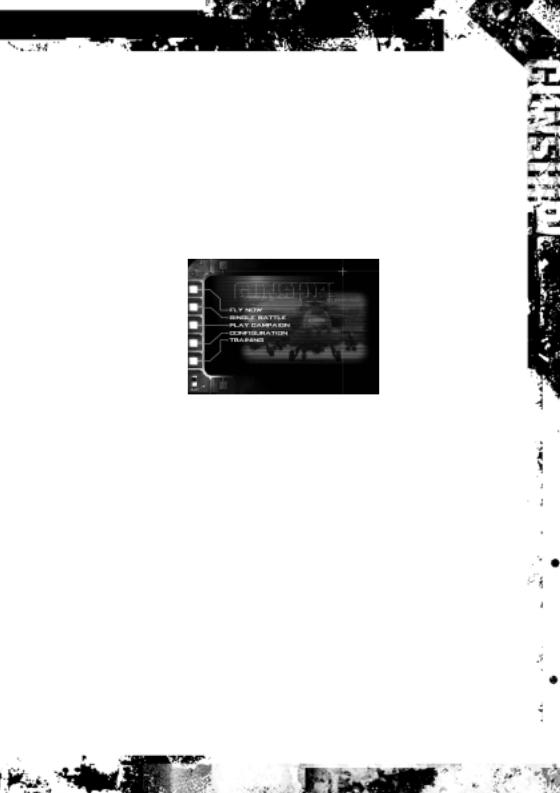
THE MAIN MENU
When you first fire up the game, you see the Main menu screen. Everything begins and ends here, so let’s briefly run through the available options, then move on to the action.
Fly Now |
|
|
|
Jump right in and fly one of five action oriented missions with the |
|||
|
current difficulty settings. |
||
Single Battle |
Fly an individual mission that is not part of a larger campaign. |
||
Play Campaign |
Fly and fight a number of missions for your chosen side as one part |
||
|
of a large, ongoing, military campaign. |
||
Configuration |
Modify the game difficulty settings and configure Gunship! to work |
||
|
well with your computer’s hardware. |
||
Training |
Fly training missions designed to help you learn the rudiments of |
||
|
flying a combat helicopter. |
||
One other thing you should know; there are a couple of useful features available on nearly every screen in the game:
•In most places, there is a Main button in the lower right corner of the screen.
Click this button to return directly to the Main menu (the first one you see when you start up Gunship!).
•There’s also a Quit button in the lower left corner. Clicking Quit takes you out of the game completely.
7

Terms We Use
Just to avoid confusion, here are the meanings of a few common terms that we use throughout this manual:
Click |
Click the left mouse button once. |
Select |
Click the named option. |
Double Click |
Click the left mouse button twice in quick succession. |
Right Click |
Click the right mouse button once. |
FLY NOW
The Fly Now option is for those folks who just want to jump right into a helicopter and fly. Select this option from the Main menu to start an action-oriented battle using the current difficulty settings.
After you click Fly Now, you go directly to the pre-flight briefing. You’ll be assigned at random to fly the AH-64D, the WAH-64, the Eurocopter Tiger, or the Mi-28. You can alter your flight path using the Mission Planning button and change your weapons loadout using the Arming button. (The details on how to do these things are in the Mission Planning and Loading Weapons portions of the Campaign section, respectively.) When you’ve configured your flight, click the Take Off button in the upper right corner.
TRAINING
For those of you whose attack helicopter skills are a little rusty, Gunship! provides training sessions to help you get back up to speed. Select Training from the Main menu to reach the Training Mission screen.
The training missions are designed to help you learn to fly and fight a helicopter from the pilot’s seat. The Gunship! Quick Start guide was written to compliment this training. It can be helpful to read the corresponding section while you’re flying each mission. Don’t worry about getting shot down; enemy fire doesn’t damage you during training.
Select a mission by clicking it, watch the training movies, read the basic briefing, then click the Take Off button to enter the mission and begin.
8

CUSTOM CONFIGURATION
The Configuration option on the Main menu lets you set up the game to work well with your computer’s hardware and adjust the overall difficulty of the game. There are three buttons along the lower edge of the Configuration screen, each of which illuminates when active.
Windowed/Full Screen
The first button, which is labelled Windowed, determines whether the game runs in a window or takes up the entire screen. When you click this button, the label changes to indicate the result of clicking the button again. That is, if the button "Windowed" is highlighted, you are currently in Windowed mode, and vice versa.
Battle Settings
The Battle Settings button calls up the Battle Settings screen, on which you control the difficulty and realism of the game. This rating affects the award, promotion, and experience points you receive for each campaign mission. The lower you set the difficulty rating, the more difficult it will be to earn promotions and medals. The options on this screen are:
Default Settings |
These three buttons let you quickly configure your difficulty to |
|
one of three pre-designed modes of play. |
|
Action sets all options to their easiest and least realistic modes. |
|
Average puts all the options in the middle. |
|
Simulation uses the most difficult and realistic settings. |
Flight Model |
This determines the realism of the physics of flight. |
|
Easy greatly simplifies the flight mode and removes external |
|
influences such as wind and rain. The flight controls are |
|
simplified: Collective controls only altitude and is not affected |
|
by airspeed; the cyclic controls only airspeed and direction; |
|
and the pedals are completely disconnected from torque and |
|
remain fully functional at all airspeeds. |
|
Enhanced attenuates the effects of outside influences, such as |
|
wind, without removing them altogether. The flight controls |
|
are realistically interconnected, but simplified. For example, |
|
changes in torque require co-ordinated pedal changes, but the |
|
effect is less pronounced than in real life. |
|
Realistic mode has all outside influences fully functional and |
|
all controls fully cross connected. This setting most closely |
|
approaches real life flight. |
9

Player Weapon Effects |
This setting controls the overall effectiveness of your weapons. |
|
In addition to damage bonuses, this includes plusses to |
|
armour penetration, blast radius, and tracking ability. |
|
Note: This affects only your weapons; it has no effect on any |
|
other weapons in the game. |
|
Exaggerated weapons are two to three times more deadly |
|
than normal. |
|
Enhanced weapons are roughly 50% more effective than usual. |
|
This setting makes weapons like rockets and the cannon more |
|
effective against heavily armoured targets and reinforced bunkers. |
|
Realistic weapons operate at their normal, real-world |
|
effectiveness. Soft weapons, such as anti-personnel |
|
rockets, will not be particularly effective against armour and |
|
reinforced bunkers. |
View Mode |
Which viewpoint you begin each mission in is under your |
|
control through this option. |
|
Outside has you start in a viewpoint flying behind |
|
your helicopter. |
|
Pilot Cockpit causes you to begin in the Pilot cockpit. |
|
Gunner Cockpit (no surprise) starts you in the Gunner cockpit. |
Player Vulnerability |
This setting determines how much punishment your helicopter |
|
can take before damage effects set in. |
|
Invulnerable makes your helicopter completely invincible. |
|
Resistant doubles the armour protection of your helicopter, |
|
letting it take roughly twice as much damage as usual. |
|
Realistic sets your helicopter’s armour protection to |
|
real-world levels. |
Ammunition |
This option controls whether your helicopter has realistically |
|
limited amounts of ammunition. |
|
Unlimited gives you unlimited weapons. |
|
Normal limits you to your helicopter’s realistic weapons load. |
Enemy Skill |
The setting you choose for this option determines the overall |
|
quality of your enemies (the strength of the artificial intelligence). |
|
There are four possibilities: Poor, Good, Veteran and Elite. |
|
|
10

IHADSS |
All of the weapons your helicopter carries have limited zones |
|
of fire, which are reflected on the IHADSS (Integrated Helmet |
|
And Display Sight System) display you see in the various |
|
cockpits. This setting determines just how firm the limits on |
|
those zones are. |
|
Action loosens the weapon firing constraints on the IHADSS, |
|
making all weapons easier to use. |
|
Realistic displays realistic weapon firing constraints on |
|
the IHADSS. |
Game Settings
The Game Settings button switches you over to the Game Configuration screen, where you can adjust the game according to your computer’s hardware and your preferences.
Music Volume |
Sets the volume of the in-game music. |
Master Sound Volume Controls the overall volume of all sounds in the game. |
|
Sound Effects Volume |
Determines the volume of special sounds, such as weapons |
|
fire and explosions. |
3D Object Density |
This controls the number of three dimensional objects |
|
displayed on the screen at any given time. The setting cycles |
|
between Software, Low, Medium, and High. Using the lower |
|
settings can result in the game running faster, though it might |
|
also reduce the graphic quality somewhat. |
Graphics Mode |
Cycles through the available display drivers. The options are |
|
Software (no 3D accelerator card), and Direct 3D HAL. |
Screen Resolution |
Controls what screen resolution you use in the game. Choose |
|
the resolution that works best for you. |
In Game Language |
This option gives you control over what languages the units in |
|
the game speak. Use the Local setting to have all in-game |
|
speech use your default language. For example, in the US or |
|
UK version of the game, everyone would speak English, while |
|
in the German version, all units would speak German. Actual |
|
allows the units to speak in their actual languages. Thus, |
|
German forces would speak German, Russian forces would |
|
speak Russian, and so on. |
11
INDIVIDUAL MISSIONS
Flying a campaign is great, but sometimes you don’t want to commit yourself to a long term project—or maybe you’re playing with friends. In both cases, what you want is to fly a single battle, one mission. That’s what the Single Battle option on the Main menu is all about. This mode lets you fly a pre-generated, individual mission completely separate from any campaign.
Starting Single-player
A single-player individual mission is similar to a Fly Now mission, except that the battle is set up entirely according to the current difficulty settings. (Fly Now missions are always action oriented.) To begin a single-player stand-alone mission:
•Select Single Battle from the Main menu.
•Choose a mission from the Battle List. Scroll up and down as necessary, and then select the name of the mission you wish to fly.
•Click the Single Player button to indicate that this is a one player mission, not a multiplayer session.
•Click the Play button to move on to the Mission Briefing.
Once you have familiarised yourself with the contents of your briefing, you might want to alter the flight path for your flight or any of the other flights in your unit. To do so, click the Mission Planning button on the pre-flight briefing screen. This takes you to the Mission Planning screen. Please refer to Mission Planning in the Campaigns section for the details on how to use the Mission Planning screen.
After the briefing and any changes to the flight plan, you have the opportunity to fix your weapons load-out before lifting off (use the Arming button).
Starting Multi-player
Single Battle mode also lets you fly pre-generated individual missions with friends over a modem, serial, LAN (Local Area Network) or Internet connection. One player must serve as the game "host"—the computer that manages the overall battle. Other players then join the hosted game session. The battle conforms to the current difficulty settings on the host’s computer. To begin a multi-player, stand-alone mission:
•All players select Single Battle from the Main menu.
•Only the host selects a mission from the Battle List, then clicks the Host button. (Generally, the player with the fastest computer should act as host. If multiple people plan to join an Internet-based session, the player with the fastest Internet connection should act as host.)
12

•The host then selects a provider type, enters a name for the battle, and enters a player name and a session name.
•The host can then click the Create button. This takes you to a chat screen. Once all of the players have joined, click Launch to send everyone to the Ready Room.
•Players wishing to join the battle click the Multi-player button on the Single Battle screen, then the Join button.
•Joiners then enter a player name for themselves and select a connection type.
•Joiners can then choose from a list of the battles available over the connection they chose. Select one, then click the Join button. This takes each joiner to the Ready Room.
In the multi-player Ready Room, players select the helicopters they will fly in the battle. They can also chat with each other until the mission begins. All players can and should view the mission briefing and make sure the weapons load-out of their individual helicopter is as they want it (use the Arming button).
Important Notice Regarding Chat
Hasbro Interactive does not monitor, control, endorse, or accept responsibility for the content of text or voice chat messages transmitted through the use of this product. Use of the chat function is at your own risk. Users are strongly encouraged not to give out personal information through chat transmissions.
Kids, check with your parent or guardian before using the chat function or if you are concerned about any chat you receive.
The player in the first helicopter on each side is the Flight Leader. Leaders can change the flight plan for their side. To do so, click the Mission Planning button. This takes you to the Mission Planning screen. Please refer to Mission Planning in the Campaigns section for the details on how to use the Mission Planning screen.
•Joiners, when they’re ready to fly, must click the Take Off button. This locks out all further changes and tells the host that that player is ready to go.
•The host, after all the players are locked in, should click the Take Off button to start the mission.
Loading Weapons
You can gain access to your weapons load-out by clicking the Arming button on the pre-flight Briefing screen. At the Load-out screen, you can change what weaponry your helicopter carries. Note, however, that your helicopter is always loaded with the maximum amount of 30mm ammunition (for the cannon) that that type of helicopter can carry.
13

AH-64 Apache Uses High-Explosive, Dual Purpose (HEDP) rounds. These are most useful against soft targets and moderately armoured vehicles. The Apache can carry 1,200 rounds in all settings.
Eurocopter Tiger Carries High-Explosive, Dual Purpose (HEDP) rounds. These are most useful against soft targets and moderately armoured vehicles. The number of rounds this copter can carry is determined by the Weapon Effects setting. Realistic mode loads 450 rounds; Enhanced loads 900 rounds; Exaggerated loads 1,200 rounds.
Mi-28 Havoc Fires Armour Piercing, High-Explosive (APHE) rounds, best used against soft targets and lightly armoured vehicles. The number of rounds is determined by the Weapon Effects setting. Realistic mode loads 250 rounds; Enhanced loads 500 rounds; Exaggerated loads 750 rounds.
First of all, use the Helicopter Select buttons (along the top of the Arming screen) to select which helicopter or helicopters your changes are to be applied to. Click the Select All button to make arming changes to all available helicopters.
The Configuration is a shortcut that lets you choose between three pre-defined weapons load-outs:
Std/Atk |
The Standard Attack load-out consists of anti-tank missiles on the |
|
outer hardpoints and rockets on the inner hardpoints. |
Anti-tank |
An Anti-tank configuration places anti-tank missiles on both the |
|
inner and outer hardpoints. Note: This option is not available for |
|
the Mi-28N. |
Reconnaissance |
This configuration trades off firepower to keep the helicopter |
|
light, fast, and agile. Rockets are loaded on both the inner and |
|
outer hardpoints. |
The AAM button adds air-to-air missiles to the selected helicopters.
The ATGM button (directly below the AAM button) cycles through the anti-tank missiles available for the nationality you are flying for. The possible load-outs are:
U.S. |
8 Hellfire K (laser guided) missiles, or |
|
|
8 |
Hellfire L (radar guided) missiles, or |
|
4 |
Hellfire K and 4 Hellfire L missiles |
UK |
8 Hellfire K (laser guided) missiles, or |
|
|
8 |
Hellfire L (radar guided) missiles, or |
|
4 |
Hellfire K and 4 Hellfire L missiles |
14

Germany |
8 |
HOT 3 (wire guided) missiles, or |
|
|
8 |
TRIGAT (infrared) missiles |
|
Russia |
16 |
AT-9 (laser guided) missiles, or |
|
|
16 |
AT-16 (laser guided) missiles |
|
Finally, the Rocket Selection buttons—A, B, and C—let you determine the type of rockets loaded at each of the three positions within the rocket pods.
•Selection A chooses the rocket type loaded in the outer ring of the rocket pod.
•Selection B chooses the rocket type loaded in the middle ring of the rocket pod.
•Selection C chooses the rockets loaded in the middle of the pod.
The available rocket types are:
HE |
The High Explosive warhead is best used against soft targets and |
|
lightly armoured vehicles. |
MPSM |
The Multi-Purpose Sub-Munition warhead carries a mix of nine |
|
anti-personnel and anti-tank sub-munitions. This is effective |
|
against unarmoured vehicles up through moderately armoured |
|
vehicles, as well as structures and enemy troops. |
FLECHETTE |
Flechette rockets carry 1,200 hardened steel flechettes (steel darts) |
|
which are expelled like a shotgun blast on detonation. This is |
|
extremely effective against troops. |
Creating a New Mission
Using the Gunship! Battle Builder, you can create your own, customised missions, add them to the Battle List, and play them—both as single-player battles and multi-player sessions. When you’re ready to begin designing your own missions:
•From the main menu, select Single Mission.
•Click on Battle Builder.
The Battle Builder presents you with a set of screens on which you choose settings according to your preferences. The buttons along the bottom of every screen allow you to jump in any order from one to another, changing settings at will. Whenever you are happy with all the settings on all the screens, click the Build button to have Gunship! generate the mission based on the selections you’ve made. The mission, once generated, is added to the Battle List. You return to the Single Battle screen, where you can immediately try out your new mission.
15

Setup
The first of the Battle Builder screens allows you to select where your battle will take place (a theatre map) and provide some of the basic parameters for the mission.
Theatre Map |
Use the buttons along the top of the screen to select which |
|
campaign map you want to use. The options are North Poland, |
|
Central Poland, Slovakia, Belarus, and the Ukraine. Once you have |
|
chosen an area, select the specific location of your battle by |
|
clicking that location on the displayed map. |
Nationality |
This determines which military force you’ll be flying for. |
|
The options are US (the default), UK, German and Russian. |
Weather |
You can choose the type of weather that will predominate during the |
|
mission. Select from Clear, Partly Cloudy, Overcast, Rain, and Storm. |
Time of Day |
This controls the time that the battle takes place. The options are |
|
Dawn, Day, Sunset, Twilight, and Night. |
Mission Name |
Enter the name by which you want your mission known. The name |
|
you enter appears in the Battle List. |
Enemy Nationality If you set your Nationality to Russian, you may choose to fight against the U.S. Army, the British Army, or the German Army. If you chose any other Nationality, the only possible enemy in Gunship! is the Russian forces.
Place Units
The Place Units screen is the one you use to determine the locations of both sides’ forces on the map.
•First of all, use the Nationality button to switch to the side for which you want to place units.
•Next, use the side buttons to select a unit. The first click activates the button and makes the current platoon in that button active. Additional clicks cycle through the unit types available through that button. Each button represents a different type of units:
Helicopters cycles through the different helicopter platoons.
Combat includes the various tank, armour, and infantry platoons.
Miscellaneous gives you the various Headquarters, supply, and emplacement platoons.
Air Defense is where you get air defense gun and missile platoons.
Support lets you place artillery and close support aircraft units.
•Left click in your selected location on the map to place a platoon of the type you’ve chosen. Right click on a platoon to remove it.
16

Unit Orders
Once you’ve put some units into place, you can use this screen to give those units waypoints and orders. The Next and Previous buttons cycle through the platoons in the mission. Whatever unit is selected is the one you can give orders to and set waypoints for. Note: On this screen you can give orders to Helicopter units and Ground units, no others.
To set waypoints, click on the map at each point where you want to place a navigation waypoint for the selected unit. For each unit, you may assign up to six waypoints.
(If you make a mistake, you can delete a waypoint by right-clicking on it.)
Once you’ve created the flight path, the unit has a route. Now, you can give the unit specific orders to follow at each waypoint along that route. You do this by configuring the waypoints. The buttons along the right side of the screen let you configure waypoints. First, select the waypoint you want to configure using the Waypoint Number button.
The two types of unit you can give orders to on this screen—Helicopter and Ground units—each has its own format for orders. Let’s take them one at a time.
Helicopters |
|
Waypoint Type |
This button cycles through the available types of waypoints. |
|
Each standard type has a default setting for all of the other entries. |
|
You can override these settings individually using the rest of |
|
the buttons. |
Speed |
This setting and the next (Flight Profile) are interconnected. |
|
With this, you control how quickly the pilot will fly to get to this |
|
waypoint. The actual speed varies, depending on the Flight Profile, |
|
because of the need to dodge terrain. There are three options: |
|
Slow is 30 to 50 kts. |
|
Tactical is 50 to 80 kts. |
|
Sprint is maximum possible speed at all times. |
Flight Profile |
This setting determines the altitude that the helicopter’s pilot |
|
should strive to maintain between the previous waypoint and this |
|
one. There are three options: |
|
Nap of the Earth orders the helicopter to maintain an altitude below |
|
60ft; 30ft is optimum. The pilot has permission to reduce speed as |
|
necessary to maintain this altitude. |
|
Contour tells the pilot to keep to an altitude below 100ft; 70ft |
|
is optimum. |
17

|
Cruise orders the altitude kept between 100 and 150ft, and the pilot |
|
can and should rise to 200ft if no enemies are present. |
Combat Mode |
This gives the helicopter its overall orders regarding its |
|
combat mission between the previous waypoint and this one. |
|
The options are: |
|
Search and Destroy orders are to open fire on and advance toward |
|
any enemy unit. The helicopter is to continue its mission once |
|
either all targets are destroyed or visual contact is lost. |
|
Suppression of Enemy Air Defenses (SEAD) tells the helicopter to |
|
open fire on and advance toward enemy air defense sites. |
|
Engage orders mean to open fire on any detected enemy only if |
|
doing so does not delay the mission for more than one minute. |
|
After one minute, the helicopter is to continue on its mission. |
|
Bypass orders the helicopter to seek cover, avoid contact, and |
|
continue toward the waypoint. |
Priority Target |
This determines what type of target the helicopter should attack |
|
first, if there is a choice. |
Ground Units |
|
Waypoint Type |
This button cycles through the available types of waypoints. |
|
Each standard type has a default setting for all of the other entries. |
|
You can override these settings individually using the rest of |
|
the buttons. |
Formation |
Use this to set what formation the platoon will use while travelling |
|
to the waypoint. The options are Line, Wedge, Vee, Echelon |
|
Right, Echelon Left, Column, Staggered Column, Extended Line, |
|
and Diamond. |
Speed |
This setting controls how quickly the platoon moves to |
|
the waypoint. |
|
Slow is 5mph or 9kph. |
|
Medium is 18mph or 30kph. |
|
Fast is maximum possible speed. |
Combat Mode |
This setting determines the action the unit should take when it sees |
|
the enemy. The options are: |
|
|
18

|
Assault orders the unit to open fire on and advance toward any |
|
enemy unit. The unit should then continue the mission once either |
|
all targets are destroyed or visual contact is lost. |
|
Attack by Fire tells the unit to find a hull down position if one is |
|
nearby and engage the enemy. The unit should then continue the |
|
mission once either all targets are destroyed or visual contact |
|
is lost. |
|
Engage orders the unit to open fire on any detected enemy while |
|
continuing to move to the waypoint. |
|
Bypass tells the unit to seek cover, avoid contact, and continue |
|
toward the waypoint. |
Orientation |
Orders the unit to face in a specific direction when it reaches the |
|
waypoint. This is critical if enemy contact is expected. |
Unit Timing
Unit Timing is the screen where you set delay times, assign call signs, and determine the target status of all the units in your battle.
Waypoint |
This button cycles through the waypoints you’ve set. Use this |
|
to choose one, then you can assign a delay time to the |
|
selected waypoint. |
Delay Time |
Using this, you can order a unit to pause for a set amount of time |
|
when it reaches the selected waypoint. Each click adds 30 seconds |
|
to the delay time of the selected waypoint. Right-click to subtract |
|
30 seconds. |
Callsign |
This button lets you cycle through the possible call signs for each |
|
type of unit. Choose one, and it will be used to identify the selected |
|
unit in all communications and identification in your mission. |
Objective Status |
Use this to determine how the player must treat specific units in |
|
order to achieve victory in the mission. That is, you are setting what |
|
someone playing your mission must do to win. Select each special |
|
or important unit in turn, and assign it one of the following roles: |
|
Primary Target is a unit that must be destroyed for the other side |
|
to win. |
|
Secondary Target is a unit that, if destroyed, gives bonus award |
|
points to the other side. |
|
Protection is a friendly unit that must live through the battle for its |
|
side to win. |
19

Objectives
Finally, you can set the objectives for the entire battle—the victory conditions. Use the Next and Previous buttons to toggle between the sides of the fight. You can set multiple objectives for any battle, but there is a limit of three objectives per side.
Objective Area Click on this repeatedly to cycle through the radius options: 1, 2, and 3km radii. When you’ve chosen a size for the objective area, click on the map to place the centre of a circular area with the indicated radius. (If you make a mistake, you can right-click on the are to remove the objective.) To win the mission, a player must ensure that there are no enemy units remaining in the objective area at the end of the battle.
Define Sector After you click this, you "draw" a sector box on the map by clicking to mark the upper left and lower right corners of a rectangular area. To win the mission, a player must ensure that there are no enemy units remaining in this rectangular defensive sector at the end of the battle.
Objective Line For this option, you click on the map to select the two end points of the line. This creates an objective line. A player must reach this line with ground units by the end of the battle in order to win.
Defensive Line As above, for this option you click on the map to select the two end points of the line. This sets a "rear area line" that the enemy must not be allowed to reach with ground units. A player must prevent the enemy from reaching this line in order to win.
CAMPAIGNS
There’s nothing wrong with Single Battles, but sometimes you want to sink your teeth into something more. For those times, Gunship! offers the Campaign mode, in which you take your place as part of a large, ongoing military situation. Through the course of the campaign, you’ll fly quite a number of missions, with varying objectives and different styles of action needed for success. To begin, select the Play Campaign option from the Main menu.
Starting a Campaign
When you select Play Campaign from the Main menu, you are presented with the Campaign Selection screen. Your first decision is to choose which unit you’ll be flying for; the buttons along the sides of the screen represent the available units. Your choice determines the type of helicopter you’ll be flying, what nationalities you’ll be flying for
20

and against, the available armament, and your forces’ starting positions. Your unit options include:
Russia |
20th Guards Army |
U.S. |
1st Cavalry Division |
|
1st Armour Division (US) |
UK |
1st Armour Division (UK) |
Germany |
5th Panzer Division |
Once you’ve selected a unit, pertinent information about that unit appears in the Information Sidebar. The sidebar displays the unit’s patch and the following data:
•Unit Name is the full name of the selected unit.
•Mission is the next mission to be flown by this unit in the current campaign. If you are just starting a new campaign, the Mission number is 0 (zero).
•Win/Loss notes the ratio of wins to losses in the campaign to date. When you succeed on a mission, it counts as a win. Any time you fail and have to re-fly a mission, it counts as a loss.
•The Fatigue rating provides an overall estimate of the unit’s battle readiness.
•Status describes the deployment status of the unit. "Ready" indicates that the unit has not been deployed to a campaign. "In Progress" means that this unit has already started a campaign. Joining a unit with "In Progress" status places you in the middle of that saved campaign. "Complete" tells you that the campaign has been finished.
The buttons along the bottom of the screen provide access to the campaigns. If you select a unit with "Ready" status (a unit not currently involved in a campaign), you only have one valid option:
Start Campaign Click this to begin a campaign with you assigned to the selected unit.
If the unit you select is currently involved in a campaign (its status is "In Progress" or "Complete"), there are two options:
Continue Campaign |
Click this to rejoin the saved campaign in progress, flying for the |
|
unit you selected. |
Reset Unit |
If you want to remove a unit from its current campaign so that |
|
you can use that unit, click this button. Note: This option clears |
|
all the campaign data associated with the specified unit, |
|
irrevocably deleting the campaign in progress. All forces return to |
|
their starting positions, and the unit’s status reverts to "Ready." |
21
Reading Intelligence Reports
Once you start a campaign, you’re taken to the Intelligence screen, and your campaign intelligence briefing begins running. You can watch it start to finish (a good idea),
or you can jump to specific sections using the buttons on the right.
•The NATO Forces button provides whatever information is known about the positioning of NATO (North Atlantic Treaty Organisation) forces. When you select this, the map shows the location of blue units and indicates the lines separating battlefield sectors. Note: Because the situation changes once the campaign is underway, this button is available only at the start of a campaign, not after you have begun the first mission.
•Likewise, the Russian Forces button provides any information known about Russian force locations, with the map similarly displaying red units and sector divisions. Note: Because the situation changes once the campaign is underway, this button is available only at the start of a campaign, not after you have begun the first mission.
•The Situation button details friendly and enemy movements. The description indicates which forces are moving, while the map uses red and blue arrows to graphically illustrate the progress of red and blue forces, respectively.
•The Sector Briefing button (the actual label changes based on your sector of operations) zooms the map in to display only the sector relevant to your actions. Force positions are displayed in greater detail, and a box highlights the Area of Operations (AOR) for your upcoming mission.
The Intelligence screen is the jumping-off point to all other pre-flight activities. Buttons along the bottom edge of the screen provide access to the Mission Briefing, Mission Planner, Arming screen, and Crew Assignments.
Reviewing the Pre-flight Briefing
After you’ve got the information you need from the Intelligence screen, you should proceed to your Mission Briefing (click the appropriate button near the bottom of the screen). The map zooms in to display only your Area of Operations (AOR), and your briefing begins automatically. Like the campaign intelligence briefing, you have the option of watching start to finish (a good idea) or jumping to specific sections using the buttons on the right. These five buttons provide information about your current assignment:
Mission |
The mission section of the briefing describes your objectives, |
|
identifies your flight’s call sign for this mission, and details your |
|
flight plan on the map. |
Operations |
This section lists any operational restrictions or warnings for your |
|
AOR. You might, for example, be instructed to remain within a |
|
certain zone or warned of enemy surface-to-air defenses. |
22

Friendly Forces |
This shows the last known positions of friendly forces operating |
|
within your AOR. |
Enemy Forces |
This displays the last known positions and headings of enemy |
|
forces within your AOR. |
Weather |
The weather section provides a forecast for the next 24 hours in |
|
your AOR. Poor weather reduces visibility and degrades laser and |
|
IR performance. Note: As with all weather forecasts, there is some |
|
margin for error. |
Assigning Pilots
By using the Crew Assign button, you can take control over the assignment of crews to helicopters for your mission. During a campaign, your unit has a limited number of flight crews. Each crew consists of a pilot and a CP/G (co-pilot/gunner), and every crewmember has varying skills and capabilities.
Flying is tough work to begin with, and flying combat sorties is doubly difficult. Action wears crews down, and they can become fatigued. Fatigued crew members are less effective, and their skills suffer temporary degradation. Flying increases crew fatigue, but when you allow them to skip a mission, a crew can rest and get over some or all of their fatigue.
You can modify the crew assignments for each mission. Your goal should be to ensure that the highest-skilled and best-rested crew is assigned to each task. This can be a balancing act. If a mission is particularly critical, you might wish to assign a higher-skilled crew, even though their fatigue rating is rising—as long as their skills haven’t suffered. Of course, this means the crew must rest even longer after the mission before they’ll be ready for combat again.
The Crew Assignment screen displays the available helicopters along the top and the available crews along the left side. Note: Only helicopters displayed in green can be assigned to the mission. Damaged aircraft are in red, and you cannot use those in this mission. The number of missions required to fix an aircraft is directly related to the severity of damage it sustained. Destroyed helicopters are dimmed out (and cannot be repaired). You have a limited number of replacement helicopters, so don’t waste them. If, during pre-flight, it turns out that there are fewer available aircraft than are required for the mission, the campaign is lost.
Select a helicopter, then click on the crew you want. This assigns that crew to the selected helicopter. If there was already a crew assigned to that helicopter, they are removed and the currently selected crew replace them. The centre display provides information about the selected crew:
23

Rank |
Indicates the current rank of the crew. Higher rank generally implies |
|
higher experience and better skill. |
Name |
Lists the names of the crew members. If you wish, you can edit |
|
your crew’s names as you see fit, using the Personnel screen. |
Position |
Notes whether each crew member is a Pilot or CP/G. |
Fatigue |
Tracks each crew member’s present fatigue rating. This scale runs |
|
from 1 to 10, with 10 being the worst fatigue. The higher this |
|
rating, the more skills suffer and the more rest the crew member |
|
needs to recover. As the fatigue rating rises, skill level temporarily |
|
decreases. |
Skill |
Describes this crew member’s overall capability, this scale runs |
|
from 1 to 10, with 10 being the best, highest skill rating. Skill |
|
ratings decrease temporarily as a crew member’s fatigue rises. |
|
Resting the crew member reduces the fatigue and returns the skill |
|
rating to normal. As the crew survives missions during a campaign, |
|
skill increases, reflecting combat experience gained. |
Awards |
Lists ribbons and medals awarded to this crew member. The small |
|
number adjacent to each ribbon indicates how many times the crew |
|
member has received that particular award. |
Note: Either the Company Commander’s crew or one of the two Platoon Leader crews must be assigned to each mission.
Loading Weapons
You can gain access to your weapons load-out by clicking the Arming button on the pre-flight Briefing screen. At the Load-out screen, you can change what weaponry your helicopter carries. Note, however, that your helicopter is always loaded with the maximum amount of 30mm ammunition (for the cannon) that that type of helicopter can carry.
AH-64 Apache Uses High-Explosive, Dual Purpose (HEDP) rounds. These are most useful against soft targets and moderately armoured vehicles.
The Apache can carry 1,200 rounds in all settings.
Eurocopter Tiger Carries High-Explosive, Dual Purpose (HEDP) rounds. These are most useful against soft targets and moderately armoured vehicles. The number of rounds this copter can carry is determined by the Weapon Effects setting. Realistic mode loads 450 rounds; Enhanced loads 900 rounds; Exaggerated loads 1,200 rounds.
24

Mi-28 Havoc Fires Armour Piercing, High-Explosive (APHE) rounds, best used against soft targets and lightly armoured vehicles. The number of rounds is determined by the Weapon Effects setting. Realistic mode loads 250 rounds; Enhanced loads 500 rounds; Exaggerated loads 750 rounds.
First of all, use the Helicopter Select buttons (along the top of the Arming screen) to select which helicopter or helicopters your changes are to be applied to. Click the Select All button to make arming changes to all available helicopters.
The Configuration is a shortcut that lets you choose between three pre-defined weapons load-outs:
Std/Atk |
The Standard Attack load-out consists of anti-tank missiles on the |
|
outer hardpoints and rockets on the inner hardpoints. |
Anti-tank |
An Anti-tank configuration places anti-tank missiles on both the |
|
inner and outer hardpoints. Note: This option is not available for |
|
the Mi-28N. |
Reconnaissance |
This configuration trades off firepower to keep the helicopter light, |
|
fast, and agile. Rockets are loaded on both the inner and |
|
outer hardpoints. |
The AAM button adds air-to-air missiles to the selected helicopters.
The ATGM button (directly below the AAM button) cycles through the anti-tank missiles available for the nationality you are flying for. The possible load-outs are:
U.S. |
8 Hellfire |
K (laser guided) missiles, or |
|
|
8 |
Hellfire |
L (radar guided) missiles, or |
|
4 |
Hellfire |
K and 4 Hellfire L missiles |
UK |
8 Hellfire |
K (laser guided) missiles, or |
|
|
8 |
Hellfire |
L (radar guided) missiles, or |
|
4 |
Hellfire |
K and 4 Hellfire L missiles |
Germany |
8 HOT 3 (wire guided) missiles, or |
||
|
8 |
TRIGAT (infrared) missiles |
|
Russia |
16 AT-9 (laser guided) missiles, or |
||
|
16 AT-16 |
(laser guided) missiles |
|
Finally, the Rocket Selection buttons—A, B, and C—let you determine the type of rockets loaded at each of the three positions within the rocket pods.
25

•Selection A chooses the rocket type loaded in the outer ring of the rocket pod.
•Selection B chooses the rocket type loaded in the middle ring of the rocket pod.
•Selection C chooses the rockets loaded in the middle of the pod.
The available rocket types are:
HE |
The High Explosive warhead is best used against soft targets and |
|
lightly armoured vehicles. |
MPSM |
The Multi-Purpose Sub-Munition warhead carries a mix of nine |
|
anti-personnel and anti-tank sub-munitions. This is effective against |
|
unarmoured vehicles up through moderately armoured vehicles, as |
|
well as structures and enemy troops. |
FLECHETTE |
Flechette rockets carry 1,200 hardened steel flechettes (steel darts) |
|
which are expelled like a shotgun blast on detonation. This is |
|
extremely effective against troops. |
Mission Planning
Click the Mission Planning button to call up the Mission Planning screen. Here, you can control your flight path and waypoint actions for the upcoming mission.
To begin creating your flight path, click on the map at each point where you want to place a navigation waypoint. You may assign up to six waypoints. (If you make a mistake and want to delete a waypoint, right-click on it.) Once you’ve created the flight path, the unit has a route. Now, you can give the unit specific orders to follow at each waypoint along that route. You do this by configuring the waypoints. The buttons along the right side of the screen let you configure waypoints.
First, select the waypoint you want to configure using the Waypoint Number button.
Waypoint Type This button cycles through the available types of waypoints. Each standard type has a default setting for the Speed, Flight Profile, Formation, Combat Mode, and Priority Target for the selected flight. You can override these settings individually using the rest of the buttons. The default settings are:
Checkpoint (CP): Fly to this point and continue forward without stopping.
Assembly Area (AA): Fly to this waypoint, avoiding combat, then loiter for 5 to 10 minutes or until the leader issues the "Go" command.
Battle Position (BP): Fly slow NOE to this waypoint and assume a
26

|
firing position. Engage enemy forces for 5 to 10 minutes or until |
|
the leader issues the "Go" command. |
|
Patrol Area (PA): Fly to this waypoint and patrol for 5 to 10 |
|
minutes or until the leader issues the "Go" command. |
|
SAR Landing Zone: Attack helicopters treat this as a PA waypoint. |
|
Transport helicopters fly to this waypoint, avoiding combat, then |
|
search for friendly troops, land, and pick them up. |
|
Landing Zone (LZ): Attack helicopters treat this as a PA waypoint. |
|
Transport helicopters fly to this waypoint, avoiding combat, then |
|
land and drop off troops. |
Speed |
This setting and the next (Flight Profile) are interconnected. |
|
With this, you control how quickly the pilot will fly to get to this |
|
waypoint. The actual speed varies, depending on the Flight Profile, |
|
because of the need to dodge terrain. There are three options: |
|
Slow is 30 to 50 kts. |
|
Tactical is 50 to 80 kts. |
|
Sprint is maximum possible speed at all times. |
Flight Profile |
This setting determines the altitude that the helicopter’s pilot |
|
should strive to maintain between the previous waypoint and this |
|
one. There are three options: |
|
Nap of the Earth orders the helicopter to maintain an altitude below |
|
60ft; 30ft is optimum. The pilot has permission to reduce speed as |
|
necessary to maintain this altitude. |
|
Contour tells the pilot to keep to an altitude below 100ft; 70ft |
|
is optimum. |
|
Cruise orders the altitude kept between 100 and 150ft, and the pilot |
|
can and should rise to 200ft if no enemies are present. |
Combat Mode |
This gives the helicopter its overall orders regarding its combat |
|
mission between the previous waypoint and this one. |
|
The options are: |
|
Search and Destroy orders are to open fire on and advance toward |
|
any enemy unit. The helicopter is to continue its mission once |
|
either all targets are destroyed or visual contact is lost. |
|
Suppression of Enemy Air Defenses (SEAD) tells the helicopter to |
|
open fire on and advance toward enemy air defense sites. |
|
|
27

Engage orders mean to open fire on any detected enemy only if doing so does not delay the mission for more than one minute. After one minute, the helicopter is to continue on its mission.
Bypass orders the helicopter to seek cover, avoid contact, and continue toward the waypoint.
Priority Target This determines what type of target the helicopter should attack first, if there is a choice.
The Post-flight Debriefing
When your mission is over, win or lose, you’re led immediately to the Debriefing after you exit the cockpit. Three status buttons along the right side of the screen give you access to the detailed report on the results of your efforts.
•The top button provides an overall summary of your mission, including your success or failure and the ramifications thereof. The updated map shows you the new positions of the friendly and enemy forces within your AOR.
•The middle button provides casualty statistics for the overall mission.
•The bottom button provides details on your specific performance, indicating your kills and awards.
When you’re finished here, click any of the available buttons at the bottom of the screen to use one of the post-flight options, as described in the next two sections.
Changing Crew Assignments
One of the post-flight options on the Debriefing screen provides access to your flight crews. Click the Personnel button to move to the Personnel screen. This is where you manage the crews in your unit.
Every unit is assigned eight crews to fly six helicopters; the extra crews allow you to rest battle-weary team members. Use the buttons along the right and left sides of the screen to select an individual crew. Statistics for the selected pilot and CP/G appear in the centre display. These include rank, skill level, fatigue, and awards. The buttons along the top of the screen provide these functions:
Move Pilot |
Use this to swap pilots between two crews. Click Move Pilot, select |
|
a pilot, and then click the pilot position in any other crew. If the |
|
move is valid, the two pilots (or the pilot and the empty position) |
|
will be swapped. |
28

Move Gunner |
This button lets you move gunners in the same fashion as the |
|
Move Pilot button lets you move pilots. |
Promotion |
This button lets you promote crew members to higher rank. Each |
|
crew member in the platoon has a starting rank and a maximum |
|
rank. In addition, every platoon has a limit on the number of crew |
|
members that can hold any particular rank. After a mission, you |
|
have a limited number of "promotion points" that you may use to |
|
promote team members as you see fit. To promote someone, |
|
select a crew, click the crew member of that crew you want to |
|
promote, then click Promotion. You’ll notice that as a crew |
|
member rises in rank, further promotions require more points. |
|
For example, promotion from Warrant Officer 1 to Warrant Officer |
|
2 is "cheaper" than promoting a 1st Lieutenant to a Captain. |
Medals |
The button that allows you to award medals to outstanding |
|
members of your team is similar in function to the Promotion |
|
button. You have a limited number of "award points" that you may |
|
use to give medals to your crew members. Select a crew, click the |
|
member of that crew to whom you want to give a medal, and click |
|
Medal. You are presented with a list of available medals; pick one. |
|
(Note: Only crew members who flew in the mission just finished |
|
are eligible for awards.) |
Rename |
This button lets you rename any crew member. Changing your |
|
crew members’ names (giving them nicknames, if you prefer to |
|
think of it that way) often helps you remember who’s who, so that |
|
you can better manage their skills and assignments. |
Flying the Next Mission
The Debriefing screen provides one of two options, depending on the outcome of the mission you just finished.
•If your mission was a success, you have access to the Next Mission button. Click this to move on to the briefings for the next mission in the campaign.
•If you failed the mission, you have the opportunity to Fly Again. Click this button to return to the briefings for the mission you just flew.
29
THE COCKPIT MFD DISPLAYS
The cockpit of a modern attack helicopter has changed drastically in the last decade. The analog dials and the banks of tape displays are mostly gone, and the few remaining non-digital instruments are relegated to the role of back-up instruments. In place of all this lost equipment is the Multi-Function Display—the MFD. This computer-like screen can not only show all of the information that was once shown by individual instruments, but also radar displays, maps, and views from the helicopter’s sensors. Where the cockpit was once crowded with dials, there is now room for ample window space. The new "glass cockpits" allow the crew much greater situational awareness, which makes it possible to engage targets faster.
There are two MFDs in most cockpits. You control what information each one displays by cycling through the possible options using [E] for the left MFD and [R] for the right MFD.
AND Display
The AND display is a small screen that constantly displays the helicopter’s grid location.
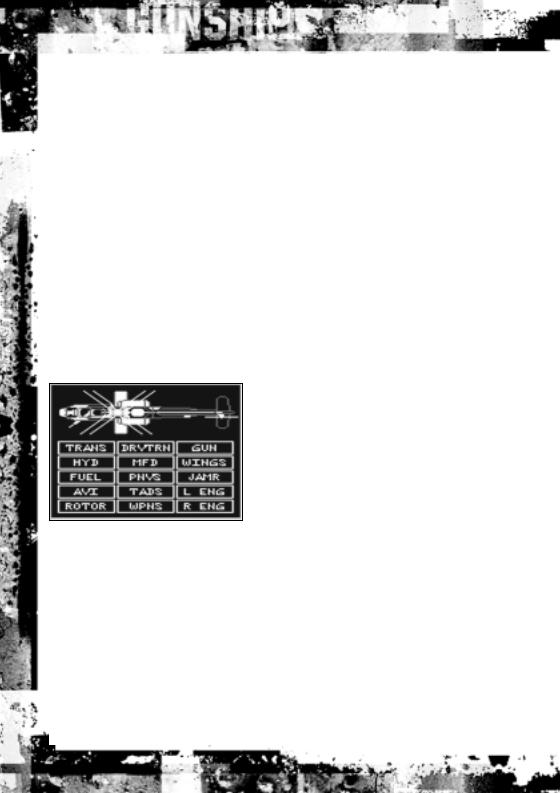
System Damage
This MFD display shows any damage taken by the helicopter during flight. It is broken into two areas. The top of the display is a top-down line drawing of the helicopter. The bottom contains 15 chip lights showing the status of the major systems. As systems are damaged or destroyed, the affected area will change colour from green to red. The corresponding chip lights will also change colour. Red coloured systems are damaged or destroyed.
The major systems are as follows:
Transmission |
The transmission transfers power from the engines to the rotor. |
|
Damage causes the rotor to lose power, lowers its maximum |
|
torque, and can cause the engines to overheat and catch fire. |
|
(Transmission damage is ignored in Easy flight mode.) |
Hydraulics |
A hydraulics failure results in slower response times and a stiffer |
|
stick. (Hydraulics damage is ignored in Easy flight mode.) |
Fuel |
A fuel hit results in a fuel leak that can shorten mission time. |
30

Avionics |
An Avionics hit results in losing the radar and some fire control |
|
equipment. You cannot fire missiles in LOBL FCR mode if you |
|
have avionics damage. |
Rotor |
Rotor damage causes the rotor to lose power, lowers its maximum |
|
torque, and can cause vibrations and eventual failure. |
|
(Rotor damage is ignored in Easy flight mode.) |
Drive Train |
The drive train affects the tail rotor and its ability to offset the |
|
main rotor torque. If damaged, it will require constant right pedal |
|
input to offset this torque. (Drive train damage is ignored in |
|
Easy flight mode.) |
MFD |
This means that one or both MFDs are damaged. A damaged MFD |
|
will go dark and display the word MALFUNCTION. Of course, |
|
if both MFDs are damaged, you can’t see the damage MFD. |
PNVS |
This is the Pilot’s Night Vision System. If it’s damaged, IHADSS |
|
mode, thermal mode, and zoom mode do not work in the Pilot’s |
|
Cockpit. The cannon is only able to fire fixed forward in LOS |
|
mode, but is not affected in TADS mode. |
TADS |
If the Target Acquisition and Designation System is damaged, |
|
IHADSS mode, thermal mode, and zoom mode do not work in the |
|
Gunner’s Cockpit or the ORT cockpit. Weapons cannot be placed |
|
in TADS mode. Additionally, the laser range finder and designator |
|
no longer function, preventing you from firing any laser |
|
guided missiles. |
Weapons |
This reports damage to the fire control system in the helicopter. |
|
Depending on the severity of the damage, the Air to Air Missiles, |
|
Anti-Tank Guided Missiles, or both can be unusable. If you try to |
|
use a damaged weapon, MALFUNCTION appears in your |
|
IHADSS display. |
Gun |
The cannon is disabled. If you try to use a damaged weapon, |
|
MALFUNCTION appears in your IHADSS display. |
Weapon Stub |
This message results from damage to the weapon pylons on one |
Wings |
of the stub wings. A damaged wing can prevent you from firing |
|
weapons mounted on that wing. |
Jammer |
This shows a malfunction in the jamming system, the counter- |
|
measures dispensers, or both. In addition, the RAWS MFD no |
|
longer functions. |
|
|
31
 Loading...