


EPILEPSY WARNING
Please read before using this video game or allowing your children to use it. Some people are susceptible to epileptic seizures or loss of consciousness when exposed to certain flashing lights or light patterns in everyday life. Such people may have a seizure while watching certain monitor images or playing certain video games. This may happen even if the person has no medical history of epilepsy or has never had any epileptic seizures. If you or anyone in your family has ever had symptoms related to epilepsy (seizures or loss of consciousness) when exposed to flashing lights, consult your doctor prior to playing. We advise that parents should monitor the use of video games by their children. If you or your child experience any of the following symptoms: dizziness, blurred vision, eye or muscle twitches, loss of consciousness, disorientation, any involuntary movement or convulsion, while playing a video game, IMMEDIATELY discontinue use and consult your doctor.
PRECAUTIONS TO TAKE DURING USE
•Do not stand too close to the screen. Sit a good distance away from the monitor.
•Avoid playing if you are tired or have not had much sleep.
•Make sure that the room in which you are playing is well lit.
•Rest for at least 10 to 15 minutes per hour while playing a video game.
2

CONTENTS
Technical . . . . . . . . . . . . . . . . . . . . . . . . . . . . . . |
.5 |
Gangster/ ‘Muscle’ Health . . |
.18 |
|
Specification . . . . . . . . . . . . . . . . . . . . . . . . . . |
.5 |
Gangster Activity . . . . . . . . . . |
18 |
|
Installation . . . . . . . . . . . . . . . . . . . . . . . . . . . . |
5 |
Nickname/Orders Panel . . . . . |
18 |
|
Loading . . . . . . . . . . . . . . . . . . . . . . . . . . . . . . . |
5 |
Message Box . . . . . . . . . . . . |
19 |
|
The Readme file . . . . . . . . . . . . . . . . . . . . . . . . |
5 |
How to Use a Gangster Window 19 |
||
Getting Started |
5 |
Minimise /Activity Button . . . . |
19 |
|
Help Button |
19 |
|||
The Quick Guide |
5 |
|||
The Side Panel |
20 |
|||
Joey Bane’s Story |
6 |
|||
Portrait |
20 |
|||
Episode 1 – The First Payback |
6 |
|||
Aggression Setting |
20 |
|||
Overhead Map Details |
7 |
|||
Weapon |
20 |
|||
Zooming-in (Key F11) |
8 |
|||
Gangster Skills |
20 |
|||
Building Windows |
8 |
|||
Active Pointers |
21 |
|||
Let’s go to work! |
9 |
|||
Vehicle Button |
21 |
|||
Active Pointers |
9 |
|||
Office Button |
21 |
|||
Gangster Windows |
9 |
|||
Muscle and Weapon Cache |
21 |
|||
Building up your ‘Muscle’ |
10 |
|||
Orders Buttons |
21 |
|||
Working out the Strategy |
10 |
|||
The Newspaper Button |
22 |
|||
War and Peace |
11 |
|||
The Advisor Button |
22 |
|||
Saving it |
11 |
|||
In-Game Menu |
23 |
|||
Killing Time |
11 |
|||
Game Controls |
24 |
|||
Combat |
11 |
|||
Map Views |
24 |
|||
The Hit |
11 |
|||
Gangster Windows |
24 |
|||
Failure |
12 |
|||
Middle Mouse Button |
24 |
|||
Success |
12 |
|||
Mouse Wheel |
24 |
|||
Family Tree |
12 |
|||
Control Keys |
24 |
|||
Episode 2: Under Fire |
12 |
|||
Game Screen Interface Controls |
25 |
|||
The Briefing |
12 |
|||
|
|
|||
The Family Tree . . . . . . . . . . . . . . . . . . . . |
12 |
The Playing Area . . . . . . . . . . . . . . . . . . . . . . . . |
25 |
|
New Blood . . . . . . . . . . . . . . . . . . . . . . . . |
13 |
City Views . . . . . . . . . . . . . . . . . . . . . . . . . . . . . |
25 |
|
Looking Through Windows . . . . . . . . . . . . |
13 |
Scrolling the Maps . . . . . . . . . . . . . . . . . . |
25 |
|
Episode 3: Building Power . . . . . . . . . . . . . . . . . |
14 |
Street View . . . . . . . . . . . . . . . . . . . . . . . |
25 |
|
Completing the Act . . . . . . . . . . . . . . . . . . |
15 |
Markers . . . . . . . . . . . . . . . . . . . . . |
25 |
|
Reference Section |
|
Key Buildings . . . . . . . . . . . . . . . . . |
26 |
|
|
Building Removal |
26 |
||
Main Menu |
16 |
|||
Overhead View |
26 |
|||
New Campaign |
16 |
|||
Spotting |
26 |
|||
Load Campaign |
16 |
|||
Schematic View |
26 |
|||
Multiplayer Game |
16 |
|||
The Towns and Cities |
26 |
|||
Hall Of Fame |
16 |
|||
The Buildings |
26 |
|||
Tutorial |
16 |
|||
Building Windows |
26 |
|||
Configuration |
16 |
|||
Site Bar |
27 |
|||
Credits |
16 |
|||
Panel Tabs |
27 |
|||
Exit |
16 |
|||
Character Details |
27 |
|||
|
|
|||
New Campaign . . . . . . . . . . . . . . . . . . . . . . . . . |
17 |
Information Panel . . . . . . . . . . . . . . |
27 |
|
Game Options Screen . . . . . . . . . . . . . . . . . . . . |
17 |
Site Options Buttons . . . . . . . . . . . . |
27 |
|
Nickname . . . . . . . . . . . . . . . . . . . . . . . . |
17 |
The Office . . . . . . . . . . . . . . . . . . . . . . . . |
27 |
|
Game Difficulty . . . . . . . . . . . . . . . . . . . . |
17 |
The Office Building Window . . . . . . . |
28 |
|
Temperance State Map . . . . . . . . . . . . . . . . . . . |
17 |
Panel Tabs . . . . . . . . . . . . . . |
28 |
|
The Game Interface . . . . . . . . . . . . . . . . . . . . . . |
17 |
The Hideaway . . . . . . . . . . . . . . . . . . . . . |
29 |
|
The Clock . . . . . . . . . . . . . . . . . . . . . . . . |
17 |
The Hideaway Building Window . . . . |
29 |
|
Money . . . . . . . . . . . . . . . . . . . . . . . . . . . |
18 |
Giving Orders |
29 |
|
Map View Buttons |
18 |
|||
Building Windows Orders |
29 |
|||
Gangster Windows |
18 |
|||
Active Pointers |
30 |
|||
|
|
|||
Patrol Waypoints and Booby-Traps . . . . . |
.30 |
The Family . . . . . . . . . . . . . . . . . . . . . . . . . . . . |
40 |
|
Ignoring Aggression Settings . . . . . . . . . . . |
30 |
Family Tree . . . . . . . . . . . . . . . . . . . . . . |
.40 |
|
Setting Up and Managing Your Empire |
31 |
Recruiting and Dismissing Family |
|
|
Members |
40 |
|||
Getting the Money |
31 |
|||
Distributing Experience Points |
40 |
|||
Income |
31 |
|||
Taking Family Members into Episodes |
.40 |
|||
Payments |
32 |
|||
The Gangs |
41 |
|||
Running out of Money |
32 |
|||
Territory |
41 |
|||
Laundering Money |
32 |
|||
Claiming and Viewing Territory |
41 |
|||
There’s No Business Like Mob Business |
32 |
|||
Security |
41 |
|||
Legal Businesses |
32 |
|||
Resources |
41 |
|||
Claiming Sites |
32 |
|||
Gang Leaders |
41 |
|||
Repairing Damaged Businesses 32 |
||||
Gangsters |
41 |
|||
Key Sites |
33 |
|||
The Business Specialists |
41 |
|||
Recruitment Sites |
33 |
|||
Muscle |
42 |
|||
Gunsmiths |
33 |
|||
Hitmen |
42 |
|||
Auto Dealers |
33 |
|||
Recruiting your Gang |
42 |
|||
Business Contacts |
33 |
|||
Gangsters and Business Specialists |
.42 |
|||
Illegal Businesses |
33 |
|||
Muscle |
42 |
|||
Setting up an Illegal Business |
33 |
|||
Hitmen |
43 |
|||
The Business Specialist |
33 |
|||
Combat |
43 |
|||
Beer and Liquor Supplies |
34 |
|||
Key Combat Factors |
43 |
|||
Stills and Breweries |
34 |
|||
Law Enforcers in Combat |
43 |
|||
Imports and Exports |
34 |
|||
After Combat |
43 |
|||
The FBI and Enemy Activity |
34 |
|||
Vehicles |
43 |
|||
Business Extras |
35 |
|||
Buying and Selling Vehicles |
43 |
|||
Types of Illegal Business |
35 |
|||
Stealing Vehicles |
43 |
|||
Under the Influence |
35 |
|||
Types of Vehicle |
44 |
|||
Persuasion and Bribery |
35 |
|||
Weapons |
44 |
|||
Important People to Influence . . . . .36 |
||||
Buying and Selling Weapons |
44 |
|||
Law and Order |
37 |
|||
Weapon Types |
44 |
|||
The Police |
37 |
|||
Multiplayer Games |
45 |
|||
Police Headquarters |
37 |
|||
Getting Started |
45 |
|||
The Police Chief |
37 |
|||
Network Game - TCP/IP |
45 |
|||
Police Lieutenants |
37 |
|||
Creating a Game |
45 |
|||
Police Detectives |
37 |
|||
Game Set Up |
45 |
|||
Police Officers |
37 |
|||
Multiplayer Game Options |
45 |
|||
Police Investigations |
37 |
|||
Joining a Game |
46 |
|||
Arresting Criminals |
37 |
|||
Modem Game |
46 |
|||
At the Police Building |
38 |
|||
Serial (Direct Connection) Game |
46 |
|||
The Courthouse |
38 |
|||
Create a Game |
47 |
|||
The Prison |
38 |
|||
Join a Game |
47 |
|||
Prison Governor |
38 |
|||
Game Site Play |
47 |
|||
Prison Guards |
38 |
|||
Hothouse Rankings |
47 |
|||
Prisoners |
38 |
|||
Chat Windows |
47 |
|||
The FBI |
39 |
|||
In-Game Menu |
48 |
|||
FBI Headquarters |
39 |
|||
Multiplayer Spawn |
48 |
|||
The District Commissioner |
39 |
|||
Installation |
48 |
|||
Special Agents |
39 |
|||
Host/Join |
48 |
|||
Agents |
39 |
|||
Connections |
48 |
|||
Attached Police |
39 |
|||
|
|
|||
The Army . . . . . . . . . . . . . . . . . . . . . . . . . |
39 |
Credits . . . . . . . . . . . . . . . . . . . . . . . . . . . . . . . . . |
49 |
|
Army Barracks . . . . . . . . . . . . . . . . |
39 |
Technical Support |
50 |
|
The Colonel |
39 |
|||
|
|
|||
Soldiers . . . . . . . . . . . . . . . . . . . . . |
39 |
|
|
|
The Church . . . . . . . . . . . . . . . . . . . . . . . |
39 |
|
|
|
THIS MANUAL
This manual is structured in such a way as to help all players get the most from Gangsters 2. If you’re a Gangsters: Organised Crime veteran don’t be a wise guy who knows it all - you will not be familiar with the game structure, screens, windows or controls. There are many differences between the two games so you’ll benefit from reading this short manual all the way through, then you can consult the Reference Section if you want to check on specific information as you play the game.
TECHNICAL
SPECIFICATION
Make sure the technical specification shown on the Gangsters 2 box matches that of your computer.
INSTALLATION
•Insert the Gangsters 2 CD into your CD-ROM drive.
If autorun is enabled, Gangsters 2 will take you to the Installation screen.
•Gangsters 2 will then perform a system check.
•Simply click on the ‘Install Game’ button and follow all on-screen directions.
•If autorun has not been enabled, you’ll have to double-click on the ‘My Computer’ icon on your Windows® Desktop, then on the CD-ROM icon, and then click on ‘Setup.now’.
The game will now install.
•Follow all on-screen instructions.
•Once Gangsters 2 is installed it will appear in the Program Group on the START Menu.
LOADING
•Select Start/Programs/Eidos Interactive/Hothouse Creations/Gangsters 2 The game will now load.
THE README FILE
This manual will take you through most aspects of Gangsters 2 but it might not contain the last minute stuff (hey, we’re all human – and even a gun on the printer’s head ain’t gonna speed up the printing process!). If you want the latest information check out the Readme file found on the CD (click on View Readme in the Program group).
GETTING STARTED
THE QUICK GUIDE
You’re ready to play but don’t know where to begin – right? Well, all wise guys gotta start somewhere, see? And this vendetta is the beginning of the road that might lead you to the big time or to a dismal death in a seedy back alley dumpster. This is your chance to learn your stuff before you go to it for real. So listen up!
This Quick Guide will introduce you to the first three episodes of Act 1 of the game (this first Act is made up of 5 Episodes) and take you through the basics to get you started on your mob career. Remember these are only the basics
– the game is far more complex the deeper you get into it. For full details take a look at the Reference Section in the second part of the manual.
In addition to this manual there’s an on-line Game Tutorial for interactive explanations and, if you want hyperlinked Help Text, just click on any Question Mark in the game screens or Windows.
5
JOEY BANE’S STORY
This is Joey Bane’s story. One man’s struggle to avenge the death of his father at the hands of the Mob in the early years of prohibition. Recently returned to his hometown (Buffalo Falls in Temperance State) after serving overseas in the US Army, Bane is devastated when he learns the news that his father has been gunned down while running liquor for one of the gangs in the town. Joey’s uncle is also hurt in the ‘hit’ but manages to survive.
With his uncle to advise him, Joey Bane begins the long struggle for vengeance. This is the vendetta that leads him, not only to the mobster who pulled the trigger, but also to the top gangster in the State. It’s a trail that takes Joey Bane clear across the State through many towns and cities and eventually to the State Capitol – New Temperance.
As Bane gets sucked into the mobster life, you’ll be there to help him build up a gangster ‘family’. You’ll guide him through a violent world of mob hits, vice, corruption, protection rackets and liquor running, as he tries to make enough cash to pay for the hoods, weapons, vehicles, and bribes necessary to make his way in an unforgiving criminal world.
EPISODE 1 – THE FIRST PAYBACK
After viewing the opening movie you’ll see the Main Menu.
•Select New Campaign and you will be taken to the Game Options screen.
•Click on the central panel, delete the default name and type in your choice of nickname for Joey Bane (press Enter).
•Select a difficulty level.
•Click the Start Game button and, after the Loading Screen, you will be shown the State Map with Buffalo Falls (Joey’s hometown and the start of the adventure) flashing in red. This is the chart of Joey’s progress across the State.
•Click the OK button and after a short animation you will see the Episode 1 title screen The First Payback.
•Click any button and you will enter the game.
At the bottom of the screen you will be given a briefing of your mission and guided through parts of the town where important events will occur. Read this briefing carefully. If you miss something click on the ‘replay’ button. If you want to continue with the game close the window by clicking on the X button.
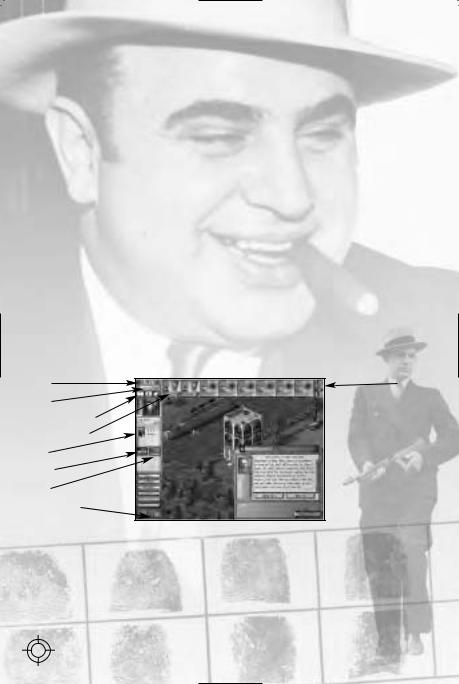
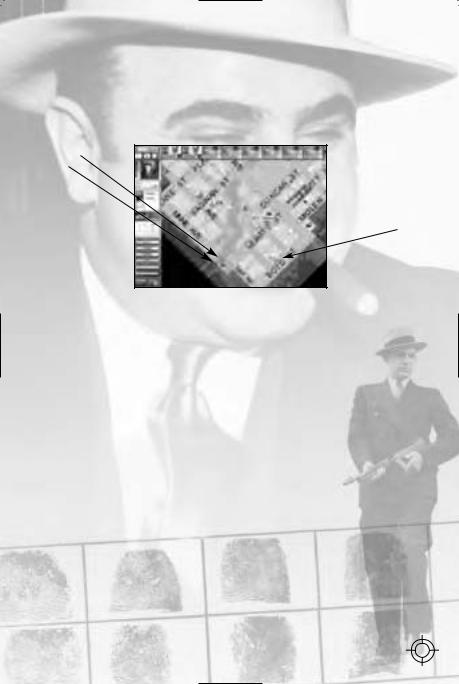
You will now enter the Main Game screen with the Advisor Window open.
Clock |
Help Text |
Money |
|
Map View Buttons |
|
Gangster Window |
|
Skills
Vehicle
Office
Advisor Button
•Check the message from your Advisor – and then click on the Objectives button.
•Your objective in this Episode is to kill Ward ‘Bullseye’ Coley – the gangster who actually shot your father.
Notice that the first Gangster Window from the left is Joey (YOU) but you also have one other gangster to help you: ‘Lightning’ Landucci.
•Close the Advisor Window (click on the X) – you can always open it again by clicking on the button at the bottom of the Side Panel.
•Click on Landucci’s Gangster Window – it will highlight in red and show all of his details in the Side Panel.
6
Note the real time Clock (top left) – this will only stop when you pause the game (by pressing the Spacebar) or when you open a Building Window. Also take note of your Cash, without money you’re going nowhere and this counter shows exactly how much you have to play with.
Now let’s look at the various Map views.
You begin the game on Street View. This is the game’s most detailed level and shows all characters and buildings.
Try scrolling around the view: hold down the right mouse button and move the mouse. Notice that buildings are removed as you scroll to let you see all the action on the streets.
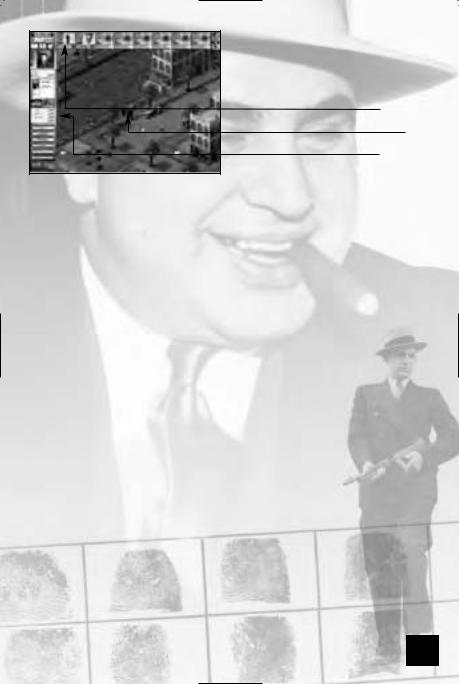
Click on the middle Map View button (top left), or press the minus - key on the numeric keypad to go to Overhead View.
Territory Colour
Your Office
Key Site
This view shows a zoomed-out, Overhead map that includes a lot of important detail, including key buildings, businesses, cars and characters. Other information can be overlaid on this map by opening the Advisor Window (in this view) and clicking on a number of overlay buttons.
If you have no details showing, open the Advisor Window (bottom left) and click on the Territory and Status buttons (and close it again).
Now pause the game for a moment (Spacebar) and look carefully at the Overhead map.
• Scroll around the map by holding down the right mouse button and moving the mouse.
OVERHEAD MAP DETAILS
The small green area (at the bottom of the map) is your Territory and the Door icon is your Office (this is ‘fronted’ by a normal Hotel business).
Remember Bane’s gang colour is Green and the bulk of the Territory in Buffalo Falls is under the control of Ward Coley (the Yellow gang).
You will not be able to see enemies in the Overhead Map view unless the event occurs in your territory or you have sent a gang member into a rival’s territory.
•Parked and moving cars are shown – the car close to your office with the green marker is the only vehicle you have at present.
•The gray squares moving around the city are ordinary citizens and workers.
As your territory grows (or you hire gangsters with spying skills) you will spot enemy gang members further from your office and hideaway, affording greater security to your main sites.
7

The other icons shown on this view are the key buildings in the city district. The available business mentioned in the introduction to this episode is shown as a silver cash register close to your office. Sites that can be purchased are shown in silver; gang owned businesses are displayed in gold.
Find the Scales icon and hover your mouse pointer over it – a tool tips message will appear showing ‘Courthouse’.
• Now check out the other icons.
You’ll notice that there are several ‘handshake’ icons – these are Recruitment Sites such as a Gym or a Pool Hall.
Hover the pointer over any building and you will be shown what it is on the pop up tool tips.
ZOOMING-IN (KEY F11)
If you hit Key ‘F11’ in Overhead View you will see a white box appear on the map. The 'F11' key can also be utilised in the schematic view. This can be placed over any map area and then, with a simple left-click of the mouse, you will jump to that part of the Street View. This is a very useful and speedy device to go to important game events from the Overhead View.
Now let’s go back to Bane’s Office.
•Stay in Overhead View and right mouse click on the Office button (or right click on the door in Joey Bane’s Gangster Window) and this will centre the map on your office.
•Left click on the Street View button (or press the plus + key on the numeric keypad once).
•The hotel/Bane’s office building will appear in the centre of the Street View screen. Your car, identified by green floor markers, is parked close by.
BUILDING WINDOWS
Now let’s have a quick look at the Building Window – this is an important feature in the game and all businesses/sites have Building Windows. Remember that the game is still paused (the clock is not running top left).
• Hover the mouse pointer over the hotel/office building, hold down the SHIFT key and left click.
The Window will open (initially with the Hotel details).
Tab
Office Bar
Buttons
Click on the Office bar (at the very top) to see what’s really happening at this site.
Note that in the ‘Details’ box it tells you that ‘Bane is here’. Notice the buttons at the bottom of the Window, with these you can give selected gangsters important instructions – these will change depending on events. We’ll look at full details of Building Windows later in the manual.
•Close the Building Window by clicking on the close button top right (the X).
Tabs
Office Bar
Close
8
LET’S GO TO WORK!
•Click on the Advisor button (bottom left) then click on the Objectives button.
•This will tell you that you must kill Ward Coley - your main objective in this first Episode.
•Close the Advisor Window.
•Unpause the game (Spacebar).
•Click on the middle Map View button (top left), or press the minus - key on the numeric keypad to go to Overhead View.
•Open the Building Window for the available business (the silver cash register) and select ‘Buy Site’ from the options at the bottom of the window. Confirm the purchase of the site when you are prompted.
•Close the window.
You have now bought the site (a tenement block), and in a few seconds you will see a green box appear in the territory overlay. This box represents the zone of influence for the site, and encompasses a recruitment site (the labour exchange) to the north of the river. You can recruit muscle from any recruitment sites in your territory, provided that the site contains muscle and the territory encompassing the site belongs to an operational business.
•Select Joey Bane by left clicking on the Gangster Window (top left).
•A red highlight will appear around the Window to show Bane is selected.
•Now hold down the CTRL key and select ‘Lightning’ – his Window will also highlight and you will now have two gangsters selected!
ACTIVE POINTERS
•Scroll the map (hold down right mouse button and move the mouse) until you can see Bane’s car: the one with the green floor markers and now take a moment to examine the mouse pointer.
If you hover the mouse pointer on the sidewalk (or on the road) it will show a ‘walking’ icon. If you hover it on the car it will show a car icon. This is another important feature of the game – the mouse pointer is ‘intelligent’; when a gangster is selected and you point to an object or building, the pointer will change to what that gangster can do in relation to that object/building (in this case walk to the sidewalk or get in the car).
If, by chance, Ward ‘Bullseye’ Coley passed by and you hovered the pointer over him it will turn into the ‘Kill’ icon. Note that a red pointer means that the action cannot be performed but a green pointer gives you the go-ahead. For a full list of Active Pointers see the section later in this manual.
Now we want our two selected gangsters to get into the car.
•They should still both be selected so hover the pointer over the car and left click the mouse.
•Bane and Landucci will come out of the building and get into the car.
GANGSTER WINDOWS
Notice while they do this that the Gangster Windows (at the top of the screen) show animations of what the gangsters are doing and once they get into the car they show the car itself. These Windows are also key features of the game and provide you with a lot of information (see later for details).
9
BUILDING UP YOUR ‘MUSCLE’
Now we want to recruit some muscle. Muscle act as extra firepower and defenses for your gangsters and businesses, so it’s always a good idea to recruit them whenever you can afford it.
•Click twice in Joey’s muscle panel in the side bar.
•Two names appear in the slots, and the two muscle join Joey in a short space of time.
•Look at Bane’s Gangster Window and you will see a number of small ‘green’ (100% health) faces.
•Next to the names of the muscle, you will see the guns they have received from Joey.
•Now we want to send the car into ‘Bullseye’ Coley territory.
•Click on the Overhead View button (or press the numeric – key) to go to the Overhead Map view.
•Scroll the map and look for ‘Bullseye’ Coley’s office (as shown in the briefing at the beginning of the episode).
•Now let’s drive to this part of town.
•Stay in Overhead View and, with the gangsters in the car still selected, hover the mouse pointer around the streets close to Coley’s office.
•When your mouse pointer shows a green arrow plus side on car icon , left click the mouse. The car will go to the location and select a parking position.
•Note that, if you want to order the car to park in an ‘exact’ spot then hover the pointer near to the curb; if you see the Park cursor left click and the vehicle will park in that position. Be careful when you order gangsters to move over great distances, as they may encounter rival gang members and come under fire.
•Centre the map on the car (right-click on it) and press the plus + key to return to Street View to look at where the car is parked.
•You’ll have to learn to switch quickly from one view to the other. Note that if you have a mouse wheel this is the quickest way to switch views. Also that there’s a third map view: a Schematic zoomed out view that’ll help you study the bigger city maps.
•Now click on Bane’s Gangster Window to select him and place the mouse pointer somewhere on the sidewalk close to the car (if you click somewhere too far away the gangster might decide it’s too far to walk and choose to drive there first).
•You will see the ‘Get out of car’ icon shown.
•Left click and Joey will get out of the vehicle and go to the spot you’ve chosen. Note that Joey’s green floor marker is ‘flashing’ to indicate that he is currently selected.
•Locate Coley’s Office and get Joey Bane to stand across the road from it and pause the game (Spacebar) once again.
WORKING OUT THE STRATEGY
‘Lightning’ is still in the car. Bane has two muscle with him, and is standing close to Coley’s Office. All gang members have weapons and perfect health (the green faces in their Gangster Windows) – so how do they manage to kill Coley?
This is where you begin to work out the strategy by observing the rival gangsters and their ‘muscle’ moving around their territory. You can get information about any character you see by holding down SHIFT and left clicking on him/her (if the character is ‘muscle’ accompanying a gangster, you will only get the details of the gangster). A Window will open with details. Coley is usually accompanied by his ‘muscle’ and has two other gangsters (Garfield ‘Slugs’ Bellows and Boyd ‘Razor’ Peterman) to call on. In Episode One he knows nothing of your vendetta so he won’t be looking out for your attack, but if you fail in your first ‘hit’ he’ll be extremely cautious and stay mob-handed.
As shown in the initial briefing, at certain times the gang members and their ‘muscle’ return to Coley’s Office and then split up and go to various illegal businesses alone: the Brothel, the Card Game or the Speakeasy (check the icons in the Overhead Map). Coley likes to go to the Speakeasy, which is very close to his Office; he’ll stay there for a while and then head back.
10
There are many enemy ‘muscle’ around the city – attacking them (not too many) will divert some of Coley’s gang and leave him exposed for a short period of time. He may even make the journey to a ‘hit’ site to investigate a killing himself. Or, you might catch him out on his own when he makes the short trips to and from the Speakeasy. When you do decide to attack try to use both of your gangsters and, if you want to get across the city quickly, remember to make use of the car.
Police presence is also an important aspect of the game, so try not to make the ‘hits’ in view of any police patrols. If they see you committing a crime they’ll come after you.
WAR AND PEACE
To Coley, the death of Joey Bane’s father was the end of that affair so he’ll have no idea that you’re after him and a ‘state of peace’ currently exists giving you a chance to follow the gang’s routine in plain sight. But, if and when you kill any of his gang a state of war will exist (and they’ll come after you).
A good approach is to use the state of peace to knock out the first of your opponents. Don’t waste this advantage by attacking enemy businesses; they are well defended, and you are not yet strong enough to claim enemy sites. Avoid these sites and concentrate on killing Coley, Bellows and Peterman.
SAVING IT
Before we do anything else, let’s save the game at this point.
•Press the Escape Key to go to the Options Menu.
•Click on Save Game, enter the name of the game to be saved and click on ‘Save’.
KILLING TIME
You’ve only got two days to kill Coley; after that he’ll bring in large numbers of mobsters who’ll make it impossible for you to operate. The game will continue through the night and you’ll see the town in night conditions (lights, streetlamps, car headlights etc.). The clock on the top left will continue to tick over and will only stop if you open a Building Window (or pause the game).
COMBAT
When it comes to the crunch you’ll have to shoot it out with Coley and his gangsters in open combat. Check what type of weapon Bane and Landucci are carrying (a shotgun is more effective than a pistol, a Tommy gun is best). The combat skill of Bane and Landucci (the number of stars) will also have an effect and so will the aggression rating (next to the portrait in the side panel). Remember that all gang leaders are far tougher to kill than their ‘muscle’.
THE HIT
These are just suggestions:
•Send Landucci by car to kill Peterman and Bellows (he could even try a drive-by shooting: look for the active pointer as you drive past Coley’s men).
•Get ‘Lightning’ in close (they won’t be expecting anything) and select a target.
•Place the mouse pointer over the target’s body and it will change to a target symbol with a green arrow (if it’s red, this is not a bona fide target!).
•Left click to begin firing – the target will flash to show he/she is selected and Landucci will shoot and continue to shoot until you give him another instructions. If the target runs, Landucci will follow. You don’t have to interfere but you can reposition him to best effect (or select another ‘target’).
•When Landucci has taken out Bellows and Peterman, get him back to the Office to heal his wounds. Once healed, drive Landucci back to join Bane. Get out of the car and wait there with Joey.
•The shooting will stir up Coley’s gang; they will go to see what happened, leaving Coley short of protection for a limited amount of time. Hit him in an ambush on his way to the Speakeasy or going back to his Office (alone). Use both gangsters in the attack and keep out of sight of any police (be careful because Police Headquarters is very close to the Speakeasy).
11
FAILURE
If you fail to kill Coley and lose Bane the episode will end. You must start again. Use all the information you’ve gathered about Coley’s movements and this time do it right!
SUCCESS
If you kill Coley the episode will end and you will be shown the Newspaper headlines, a debriefing that will confirm what’s happened, and a score for the episode.
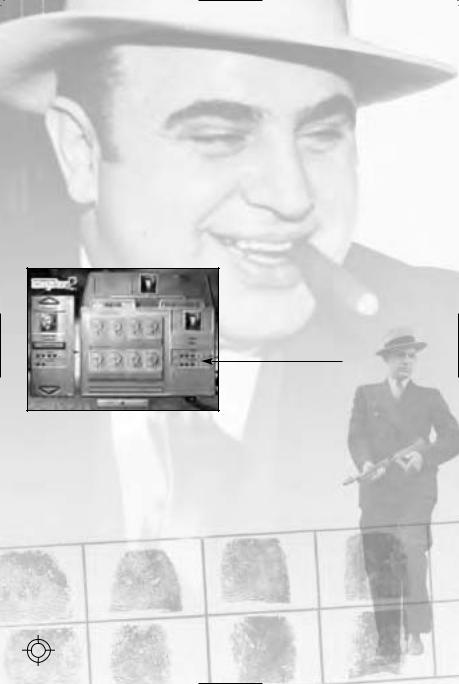
• Click on the button marked ‘Click to Continue’ to exit the Newspaper screen and you will be taken to the Family Tree
FAMILY TREE
The Family Tree allows you to move key people you’ve hired or who have worked for you in the episode in and out of your ‘family’. You’ll also be able to select which people to take into each town you visit as you progress across the State.
At this stage of the game, the advisor launders your money from the episode into a safe account and allocates appropriate funds for the next episode (the total money you manage to launder during the game is displayed in the Hall of Fame).
The Family Tree is also the means by which you distribute Experience Points gained during an Episode to ‘family’ members, improving their skills and their value over time. Assign Experience Points by selecting the gangster/specialist and clicking on the right hand arrow. You can also remove them (to character minimum) by clicking on the left hand arrow.
The ‘Family Tree’ can hold up to eight gangsters and eight business specialists. Select each group from a panel by clicking on a tab at the top of the screen. Each character is displayed with name and portrait. To check individual Skills, click on the portrait.
Assign Experience Points
When you’ve finished with the Family Tree screen you’ll be taken to Episode 2.
EPISODE 2 - UNDER FIRE
Episode 2 also takes place in Buffalo Falls, but this time Coley’s boss Langham has sent a large gang (and four explosives experts) to kill Joey Bane. The new gang led by Alec ‘Stretch’ McDowd has taken over all of Coley’s territory. You’ve got to hunt down and eliminate the bombers.
THE BRIEFING
Study the briefing session carefully and take note of any hints/map positions you might be given.
THE FAMILY TREE
You will see the Family Tree screen again. This time you’ll be bringing in ‘family’ members into the Episode – this is where you can check who you’ve got to help you.
• Click on OK to enter the Episode.
12
You begin the game in the same office building, with ‘Lightning’ Landucci (if he has survived Episode 1) and some ‘muscle’.
Make sure you are still in Street View.
Use the Active Pointer to order Bane to walk out of the Office to the sidewalk near his car.
Muscle Health
Muscle
Muscle Names
Note that the ‘muscle’ always stay close to Bane – that’s their job – and when Bane is selected, shown by a green flashing floor marker, so are all the ‘muscle’. If you give Joey an order (such as get in the car) they will all get in with him.
•Select the Overhead Map view (press numeric – minus key) and scroll around to check the layout of the town (it should be the same as the previous Episode).
There are four enemy bomber teams around but they won’t attack for a while; however, a state of war now exists and all other gangsters plus ‘muscle’ will be on the lookout for Bane’s gang. The bombers are highly skilled so you must try to draw out their ‘protection’ and get them alone where you can ‘hit’ them before they ‘hit’ you.
If you do kill one of the bombers your Advisor will let you know (look out for the flashing Advisor button – bottom left).
NEW BLOOD
After a period of time your Uncle will send another gangster to help you. This is Abe ‘Louisiana’ Caldbeck and he will arrive in Bane’s office ready to carry out orders. Check his rating (Combat, Stealth etc.) and the weapons he is carrying then order him out on the streets to attack likely targets. ‘Louisiana’ is a bomber, and comes equipped with two bombs that can be thrown at enemy gang members, buildings and vehicles. Note that one of your secondary objectives is to make sure ‘Louisiana’ survives into the next Episode.
The bombers will be found in familiar haunts from the previous Episode or out on the streets. The more of them you take out before they begin to attack the better for Bane. In this Episode you must begin to think about assigning ‘teams’ to flush them out.
LOOKING THROUGH WINDOWS
Remember to check important sites by opening their Building Windows and see just who is there. If you want to check out say, the Speakeasy, you can use SHIFT + LMB in any view to bring up the building menu. This will open on details about the ‘front’ – the legit business.
Select the right hand bar (at the top) to view the illegal business details (see Reference section for full details on Building Windows). Note that Alec ‘Stretch’ McDowd is around in this Episode but try not to mess with him here – he’s too tough at present.
As with the first episode, you are still unable to claim enemy sites, even if you damage the site and kill everyone around it. These sites are also heavily defended, so it is better to try and avoid them altogether.
Finally, remember that if any gang member is in danger of dying from wounds the best place for them is the office (or hideaway – see later). It’s here that they can recover over a period of time.
If you manage to take out all four bombers the Episode will finish and you will go to the Family Tree screen to make your decision about whom you take with you to the next Episode and to assign Experience Points.
13

EPISODE 3: BUILDING POWER
Now Bane is in serious ‘hot water’ with the rival gangs and the only way for him to survive is to get deeper into the gangster lifestyle. He’ll need much more money to survive. This Episode is an important introduction to the business side of the game. The map is the same (Bane is still in his home town, Buffalo Falls) but you’ll notice more legit businesses shown. Bane’s objective (as detailed in the Briefing) is to take control of a Liquor Still located deep in ‘Stretch’ McDowd’s territory and send a shipment of booze to a distant recipient on the eastern edge of the map; you must also try to kill McDowd by flushing him out of the safety of his well-protected office.
This is the first episode where you will be able to attack and claim enemy businesses at will. From this point in the game, seizing enemy territory and running the businesses for your own profit will be a key strategy to building your strength and wearing down your opponents.
•Check the Overhead View. The silver cash register icons are all legit businesses that are available for sale. Bane is going to need to fund the illicit liquor still once he’s got control of it so the first step is to build up some regular income.
•SHIFT + LMB click on the nearest available legit business in Overhead or Street View and its Building Window will open.
•Here you’ll see details of profit etc. You can ‘Go to’ the site, but your first priority (the button will show at the bottom of the panel) is to ‘Buy’ the site.
•Click the ‘Buy Site’ button (it will highlight in red), click ‘Yes’ to confirm the order, then close the Window by clicking on the X.
•Note that nothing will happen until you close a Window – this is a standard feature across the game. The money will come out of your Cash total instantly.
•Now look at the Overhead map again and notice that Bane’s territory (the green shaded parts) has expanded by the business’s sphere of influence.
•Open the newly acquired Business Window and you will see updated details such as ‘You own this place’. Notice that you now have the option button (lower left) to ‘Sell Site’.
•Close the Business Window and check the Overhead map again. Place the pointer over other nearby businesses and check the territory associated with each one (the grayed out area). See if you can find another business that has a Recruitment Site (the ‘handshake’ icon) in its influence and try buying it. This is important if you want to recruit new ‘muscle’; you must have a Recruitment Site in your territory (and of course there must be ‘muscle’ there waiting to be recruited – see the Reference Section for full details).
Now see if you can buy up two or three normal businesses and then return to Bane’s office. You can do this in two ways: right click on the Office button in the Side Bar and open the Office Window (SHIFT + LMB on the Building) or simply SHIFT + LMB on the Office button.
•Click on the Office bar (top right).
•Click on the fourth tab from the left (the Dollar Sign) to look at business details for the individual concerns.
•Click on the last tab (Balance Sheet) to look at your Income/Expenditure and hourly profit.
•Close the Window and look at the Overhead map again.
•Find the location of the still (the Briefing will have shown you where it is).
Tab
Income / Expenditure Tab
Business Tab
14

The enemy gang presence is high and you can expect to be attacked at any time – keep checking for ‘muscle’ at any of the Recruitment Sites in your territory and if there is anyone, click on the empty ‘muscle’ side panel to recruit them (the name will appear next to a weapon). All the while you must balance the amount of cash you have flowing in with the amount you need to hire the right people to do the job.
Once you feel strong enough (and rich enough), you can send a team to attack the liquor still site. This attack will also flush out McDowd and make him run to his hideaway (he’ll be vulnerable on the streets). Your ultimate aim is to send a booze shipment to the eastern edge of the map. McDowd, if he remains alive, will try to stop you making the shipment.
The still is well guarded so make sure your gangsters with the best combat ratings have the best weapons (a Tommy gun is ideal).
• To transfer a weapon, select the gangster and click on the weapon you want him to have from the cache.
If possible, approach the still site from an unexpected direction on foot and attack in two teams. If there are guards outside, hover your pointer over them (you will see the Combat icon) and left click. If there are no guards outside (or if you kill them all) hover the pointer over the building (you will see the ‘Attack’ Active Pointer) and left click to attack the site. However this may flush out other gangsters or ‘muscle’ on to the streets and you’ll have to fight them too.
When all defenders are out of the way, you can claim the site by placing the mouse pointer over the building and left clicking when you see the Claim Site pointer. Or you can open the site’s Building Window (SHIFT+LMB) and click on the ‘Claim Site’ button and close the Window.
•Now open the Window again and notice that the Site is now Bane’s (but unfortunately, it’s making a loss). Notice that the arrow icon showing the building entrance has now turned to green (Bane’s gang colour).
Once the still/legit business have been attacked they will be damaged and will need to be repaired (at a cost to you) before the site can support a still again. The repair will take a little time.
Before you can set up and run an illegal business you will need to hire a Business Specialist with a skill rating for that type of business.
•Click the Newspaper button (lower left) and look under the Recruiting section for the ‘Specialists’ button and left click on it.
•You will see Bert Moreau who’s available for hire. Moreau has a skill rating in distilling and can run a moonshine still.
•Hire Bert Moreau and close the Newspaper screen. He will appear in Bane’s office Building Window under the Specialists tab (third from the left).
•When the site is repaired you must select Moreau, click on the ‘Relocate button’ and select the illegal still from the list and Bert will make his way there. At the start of the next day or night the site will attempt to run a shipment out of town.
If you have not killed McDowd on the streets, locate his hideaway and attack it in force.
This Episode will end when you manage to send a shipment of liquor to the eastern edge of the map.
COMPLETING THE ACT
You’ve completed the first three Episodes of Act 1, now you’re on your own. The challenges in Episodes 4 and 5 are different and more and more complex but try to remember everything you’ve learnt so far and… good luck!
15
 Loading...