


Battlefield Operations: Falcon 4.0 Allied Force
BATTLEFIELD OPERATIONS FALCON 4.0 ALLIED FORCE
Page 1 of 716
Battlefield Operations: Falcon 4.0 Allied Force
Table Of Contents
THERE’S A HUGE WAR GOING ON.
ABOUT THIS MANUAL
CHAPTER 1: LEARNING HOW TO FLY
CHAPTER 2: LEARNING TO TURN
CHAPTER 3: LANDING AND NAVIGATION
CHAPTER 4: AIR-TO-AIR WEAPONS
CHAPTER 5: AIR-TO-GROUND WEAPONS
CHAPTER 6: AIR-TO-AIR REFUELING
CHAPTER 7: MISSILE THREAT REACTION
CHAPTER 8: BASIC FIGHTER MANEUVERS
CHAPTER 9: INSTANT ACTION
CHAPTER 10: DOGFIGHT
CHAPTER 11: TACTICAL ENGAGEMENT
CHAPTER 12: THE CAMPAIGN
CHAPTER 13: LOGBOOK
CHAPTER 14: ACMI
CHAPTER 15: TACTICAL REFERENCE
CHAPTER 16: SETUP
CHAPTER 17: THE CONSOLES
CHAPTER 18: THE HUD
CHAPTER 19: THE MFDS
CHAPTER 20: THE ICP AND DED
CHAPTER 21: THE RADAR
CHAPTER 22: THE VIEWS
CHAPTER 23: RADIO COMMANDS
CHAPTER 24: AIRPORT OPERATIONS
CHAPTER 25: AERODYNAMICS AND G FORCES
CHAPTER 26: ENEMY TACTICS
CHAPTER 27: MULTIPLAYER
CREDITS AND ACKNOWLEDGEMENTS
GLOSSARY
AIRBASE TERMINOLOGY
-3
-6
-7
-26
-55
-85
-117
-173
-179
-187
-205
-208
-215
-253
-284
-290
-295
-298
-316
-352
-384
-403
-418
-441
-452
-463
-470
-477
-494
-507
-509
-519
Page 2 of 716
Battlefield Operations: Falcon 4.0 Allied Force
"THERE’S A HUGE WAR GOING ON. SOMEONE PUT YOU IN CHARGE OF AN F-16."
There you have it in a nutshell. The quote came from a fan of the Falcon series of simulators and it perfectly sums up what this game is all about. We say "game" with a little caution. For hardened followers of Falcon 4.0, the franchise has come to represent the most advanced and immersive military flight simulator ever produced for the home PC. Battlefield Operations: Falcon 4.0 Allied Force
(FalconAF) builds upon that reputation to give the closest feeling yet of what it is like to fly one of the most important combat aircraft of the modern era.
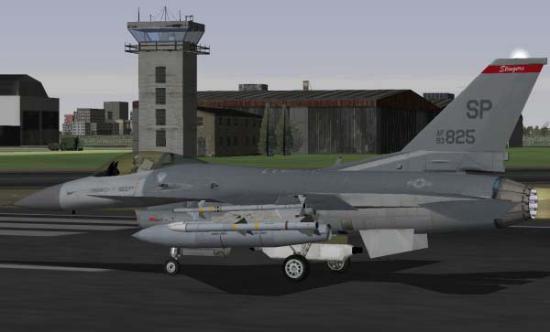
The F-16 Fighting Falcon, otherwise called the "Viper" by those that fly it, is the workhorse of the United States Air Force and many of her allies around the world. To date, more than 4,000 Vipers have rolled off the production line in various guises. The Viper's impressive combat record includes both Gulf conflicts and the war in the Balkans.
In FalconAF, you'll learn to fly realistic air and ground attack missions and feel part of a dynamic, realtime war environment. This manual will guide you through every aspect of operating the Viper. Not only will you become proficient inside the cockpit, but you will also gain an understanding of the way weapons systems operate in the war and the complexities of fighting in the high-tech battlefield.
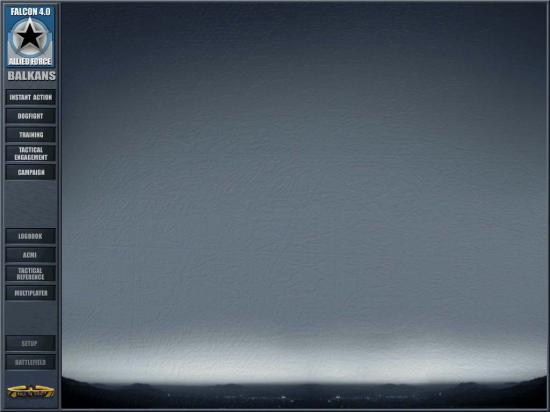
There are four main areas of play in FalconAF.
Instant Action
This is your first port of call if you are looking for an adrenaline rush. Jump straight into a jet that's already in the air and shoot down as many enemy aircraft as you can. You can also attack ground targets in the same arena. It’s no place for the faint hearted...the enemy will just keep on coming.
Page 3 of 716
Battlefield Operations: Falcon 4.0 Allied Force
Dogfight
Battle it out head-to-head against computer-controlled aircraft or your friends over the Internet or on a Local Area Network (LAN). Fly in teams to practice in-flight coordination and maneuvers against the enemy. There are a number of easily selected parameters so you can focus on the skills, alone or in team play, that you want to hone.
Training
A number of training missions are here to help get you up to speed with the complexities and challenges of flying the F-16. From takeoff to missile threat avoidance, these missions will help prepare you for combat in the virtual battlefield.
Tactical Engagement
Create your own missions or fly missions created by others. FalconAF comes with a complete and easy to use mission editor. Let your imagination wander to design and fly any type of missions, be it Close Air Support, Intercept, or a dozen other mission types, then engage any type of enemy you want. You are the one in control. You can import custom made missions from your friends, fly or modify them.
Campaign
This is the most demanding yet rewarding challenge. You assume the role of a veteran F-16 pilot assigned to a squadron taking part in a conflict in either the Balkans or Korea. Your success or failure to accomplish your missions plays a direct part in the progress of the war. Watch how the campaign evolves dynamically and in real-time. No two missions are ever the same. The campaign is unscripted, unpredictable and unmatched in its realistic depiction of a dynamic battlefield environment.
FalconAF accurately recreates the experience of operating an F-16 fighter. The principal version modeled in FalconAF is the Block 50/52. You will soon realize the immense depth of this simulation. The more you learn the more you begin to appreciate the amount of training and skill required by those pilots who do it "for real".
There are several "tools" in the simulation that can help you assess your progress and debrief your missions.
Logbook
Details about your pilot character, such as callsign, are contained in this section. Here you can keep track of the number of aircraft you have shot down and the number of enemy units destroyed. Medals and ranks are awarded according to a points system. You can simultaneously keep track of multiple pilots in your logbook.
ACMI
Air Combat Maneuvering Instrumentation. Probably the most useful tool for the fighter pilot. The ACMI lets you review every aspect of your completed mission. Use simple movie style controls to move back and forth along to any time in your mission, to whatever event you want to see, or watch the mission in its entirety from a variety of viewpoints. You can analyze the way you successfully evaded an SA-2 or see how those two SU-27 Flankers got onto your tail.
Page 4 of 716
Battlefield Operations: Falcon 4.0 Allied Force
Tactical Reference
The comprehensive reference guide for every aircraft, weapon and unit in the game. Here you can find out the radar warning signature of a Mig 21 for example, or the approximate range of a surface-to-air missile. A must for the discerning pilot.
Page 5 of 716

Battlefield Operations: Falcon 4.0 Allied Force
ABOUT THIS MANUAL
This is some basic information about the styles used within this manual.
Keyboard input is labelled like THIS. In this manual, the keystrokes relate to the US/UK keyboard
layout. Note that keyboard layouts from other countries are different, so you might need to press a different key than specified in the manual. If available, check the keystrokes chart of your country, which you can find in the DOCS folder of your FalconAF installation. The chart contains all standard keystrokes and key combinations.
Text that appears on the screen is labelled like this
Audio responses are labelled like this
For up to date information, you can visit Lead Pursuit at http://www.lead-pursuit.com/.
Copyright © 2005, Lead Pursuit. All rights reserved.
Page 6 of 716
Battlefield Operations: Falcon 4.0 Allied Force
CHAPTER 1: LEARNING HOW
TO FLY
Part 1 of this Flight Handbook consists of a number of training missions. The missions themselves are located in the Training section of the game, and the mission descriptions and instructions are contained here in the manual. The missions are task-oriented and teach very specific skills. They provide all the instruction you will need to complete each learning objective, but there is one caveat. The training missions use a building block approach. If you try to fly one of the advanced missions without first learning the skill sets from the earlier missions, you may have difficulty.
Overview
These training missions are designed to teach you how to fly the F-16 in the same way as a real F-16 pilot learns to fly his jet. FalconAF is the most realistic flight simulation ever built, and features scalable levels of difficulty to aid new pilots. The skills and knowledge required to use the F-16's systems are not easy to learn, and will take time and effort to master. For this reason, it's suggested you follow this step by step training regimen.
Training Mission Setup
Page 7 of 716
Battlefield Operations: Falcon 4.0 Allied Force
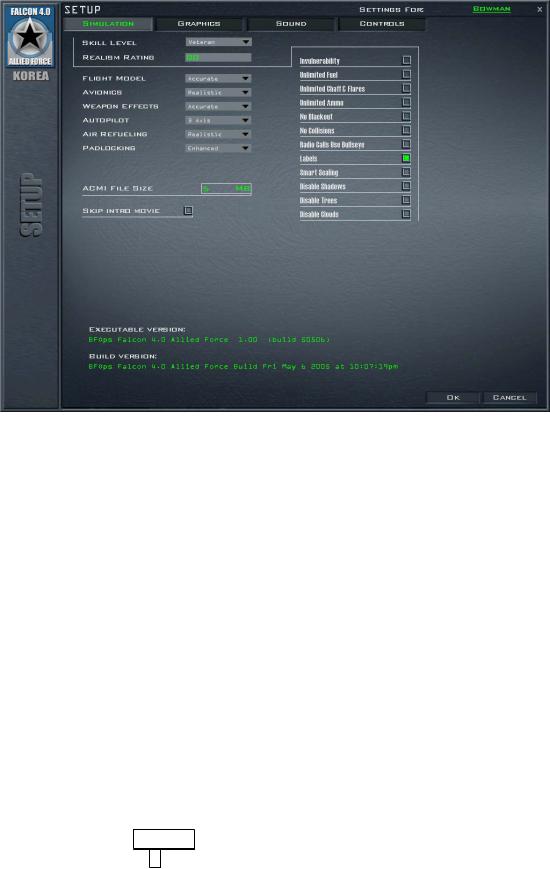
All of these training missions assume a specific setup. Please follow these instructions for all of the 30 training missions:
1.Select Setup from the main menu.
2.Click the Simulation tab at the top of the window.
3.Select "Ace" from the Skill Level option. This will set the Flight Model, Avionics, Weapons Effects, Autopilot, Air Refueling and Padlocking to the proper options.
4.On the right-hand side of the window, turn Labels on by clicking in the box. Note that the Skill Level changes to Veteran.
5.Click the Graphics tab at the top of the window.
6.Make your Graphics selections based on your processor, video card, available RAM, etc. See Chapter 16: Setup for recommended settings.
How To Load A Training Mission
To load a training mission, first click Training from the main menu. The list of training missions will then appear. Click on the training mission you want to start and click the Commit button in the bottom righthand corner. Under Mission Schedule on the next screen, the training mission will be selected and you will see the default name ("2nd Lt. Joe Pilot") next to an aircraft icon. If you have previously created a pilot in the Logbook, you will see the name you created instead. Click the Fly icon in the bottom righthand corner to start the training mission.
Freeze Mode
You can always press SHIFT-P at any time during the training mission to "freeze" the game. Unlike the regular pause mode (P key), freezing the game lets you operate all the F-16 avionics and
instruments, most notably the radar. Note that the mission clock keeps ticking in Freeze mode. If you are supposed to be at a specific location at a specific time, the time you spend in Freeze mode counts against you.
Page 8 of 716

Battlefield Operations: Falcon 4.0 Allied Force
Mission 1: Basic Aircraft
Handling
The objective of this mission is to learn how to control the F-16. When you complete this mission, you will have a feel how the fighter responds to controls, and what it can do. There is no point taking a multi-million dollar aircraft up against the bad guys if you can't control the jet. This mission is the first in a series of aircraft handling training missions patterned after the Air Force's real F-16 training syllabus. In the real syllabus, this sortie is called "TR-1" or "Transition Sortie 1." Keep in mind, however, that when a pilot first starts to fly the F-16, he or she already knows how to fly other jets. Since you may be an experienced real life pilot, or a 3 year old who has accidentally hit the wrong icon, we're going to take it slow and start with the very basics. If you feel you've seen all this before, move on to the next mission.
Controlling the plane in FalconAF and in the real F-16 is really not very difficult. Fighting in the jet, however, is another matter. Modern fighters like the F-16 are a dream to fly but devilishly hard to fight in. Today's fighters barrage the pilot with information which, when combined with increased speed, creates a tempo of air combat that is close to the limits of human capability. Along with the challenge of sensor fusion and tempo, modern fighters also feature a violent high-G environment. G force is the force that acts on the jet when it turns. It's like the old example of swinging a bucket of water on the end of a rope. The water stays in the bucket because of the force pressing the water towards the outside of the arc. The G force on an aircraft is essentially the same thing except greater in magnitude. The G forces of modern air combat would turn the fighters of old into kindling (or paper clips). The fighter pilots of yore, of course, faced challenges of their own. Their primary challenge was the sheer difficulty of just flying their aircraft. Older aircraft were simply a lot harder to fly than the F-16. Skills such as flying an F-86 close to its maneuvering limit, manual bombing in the F-105 and marksmanship in a P-51 demanded great flying skill.
The F-16, in contrast, has a flight control computer that limits Gs and other critical flight parameters to help keep the pilot out of trouble. In addition, the F-16 Fire Control Computer puts the bombs on the target. In general, the F-16 is just easier to fly. This doesn't mean the pilot has to sit back and just press a button occasionally. There are challenges a plenty, and like any aircraft landing is going to keep you busy.
Page 9 of 716
Battlefield Operations: Falcon 4.0 Allied Force
Since FalconAF flies like the real jet, it should be relatively easy to fly. Just because flying the jet is easy, however, does not mean that it is effortless or that there is no learning curve. This mission will help you master flying so you can go on to the more complex and demanding air combat tasks. We will also cover a few displays and instruments that are also shown in other parts of this manual. Everything you need to fly this mission will be presented here.
The HUD Basics
Begin the training mission by selecting 01 Basic Handling under the Training section. Press the COMMIT button, in the next screen press FLY. Once in 3D world, press SHIFT-P to freeze the game while you look around the cockpit.
FalconAF features several views, but we will start with the cockpit. Press 2 on the top row of the
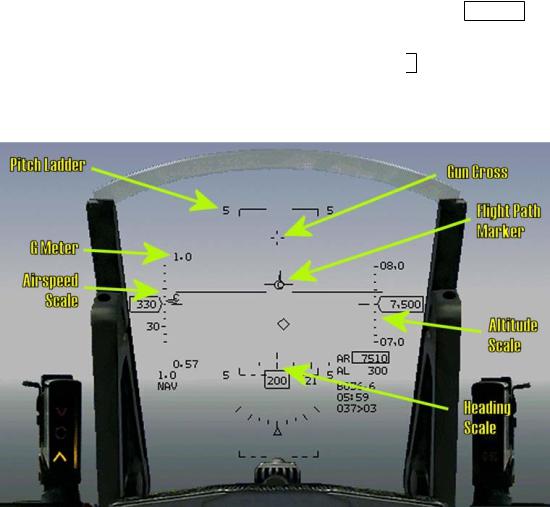
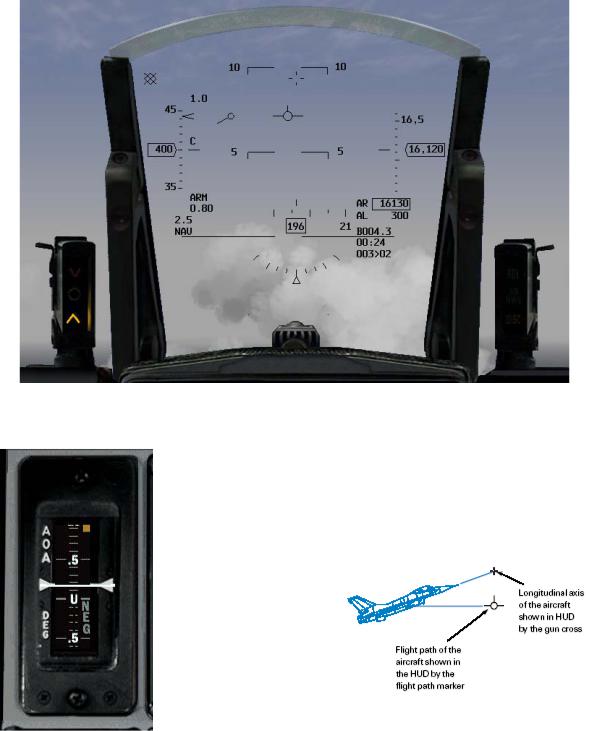
keyboard to make sure you are in the 2-D Cockpit view. This cockpit not only looks exactly like the real F-16 cockpit but also features the same functionality. The most obvious cockpit feature is the HUD (Head-Up Display). The HUD is located at the top of the cockpit and is by far the most useful of all cockpit displays. Here is a list of the parts labeled in Figure 1-1 and what they are used for in the HUD.
Figure 1-1
zThe flight path marker is the most important indicator on the HUD. This symbol shows the pilot the jet's flight path or vector. If you use your joystick to place the flight path marker on a point over the ground and hold it there, the jet will impact the ground on that exact spot. Hopefully, you won't be doing that very often. The flight path marker can be used in a very similar way to fly to a precise point on a runway. The F-16 can be flown in level flight or precise climbs and dives using the flight path marker.
zThe gun cross is the small cross symbol at the top of the HUD. This is an important reference since it represents where the nose of the aircraft is pointing. There is a difference in where the aircraft is pointing and the direction in which the aircraft is moving. The Angle of Attack (AOA) indicates the difference in vertical degrees (nose up or down) between gun cross (where the aircraft is pointing) and the flight path marker (where the aircraft is going). The difference between the gun cross (the nose of the aircraft) and the flight path marker is a measure of your current AOA.
zThe pitch ladder provides a level flight reference along with a reference for climbs and descents. The long solid horizontal line in the middle of the HUD is the 0° pitch line. It can be easily differentiated from the other pitch ladder lines because it has no number associated with
Page 10 of 716
Battlefield Operations: Falcon 4.0 Allied Force
it. The dashed pitch ladder lines show descents in 5° |
|
increments while the solid lines show climbs. |
|
z The airspeed scale is on the left side of the HUD. |
|
Since this scale shows airspeed, 400 means that |
|
you are going at 400 knots (nautical miles per hour). |
|
The airspeed scale has a C next to the tick mark, |
|
which stands for calibrated airspeed. |
|
z The altitude scale is on the right side of the HUD. |
|
This scale usually shows aircraft altitude in hundreds |
|
of feet above sea level, also called MSL (Mean Sea |
|
Level). The scale shows attitudes in thousands of |
|
feet normally, so if the scale shows 16,0, that is |
Figure 1-2 |
16,000 feet above sea level. When you get "down in |
the weeds", below 1,200 feet from the ground, the
altimeter changes to different altitude display in the HUD. This scale shows hundreds of feet, when the sliding bar is next to "2", you are 200 feet above the ground. Keep in mind that this is
the ground directly underneath your jet and not the ground that is in front of you. As you climb and get above 1,500 feet, the scale goes back to the normal sea level scale. There is an indicator next to the altitude readout, that shows B when the barometric altimeter is being used
(MSL display), and a R when the radar altimeter is in use (AGL display). Additionally, you will get the B when the radar altimeter is switched off, or when your jet is not reasonably parallel to the ground.
zThe heading scale at the bottom of the HUD shows aircraft heading. The scale simply shows aircraft heading in degrees. A heading of 270 would be 270°.
zThe HUD G meter in the top left corner of the HUD shows current G forces acting on the jet, whereas the G meter at the bottom left corner of the HUD, just above the NAV symbol, shows the maximum G force you have pulled so far during a given flight. See Chapter 25: Aerodynamics and G Forces for a detailed explanation of G Forces.
Hud Control Options
Figure 1-1 shows all the various indicators on the HUD display called up, which is the way you normally fly in both FalconAF and the real F-16. Not all fighter pilots use the HUD the same way. You can configure your HUD display to suit your needs just as the real pilots do.
Press H to change the scales of the HUD. The first time you press H, it will remove the analog scales,
leaving digital readouts of the altitude, speed and heading. The second time the analog scales come back, but left to the altitude scale you will see an AOA indicator. Additionally the readout of the heading scale changes. Press H a third time to return to the default HUD display.
Press SHIFT-CTRL-ALT+C to change the HUD color. Since the ground can be colored green, this option can be very useful. This option is not available in the real jet. Real F-16 HUDs are only green.
Press SHIFT-CTRL-ALT+S to modify the appearance of the heading scale.
SHIFT-CTRL-ALT+P changes the pitch ladder and flight path marker.
The HUD displays a lot of other information related to weapons usage and we will talk more about HUD displays like diamonds and timing cues in the training missions to come.
Basic Cockpit Instruments
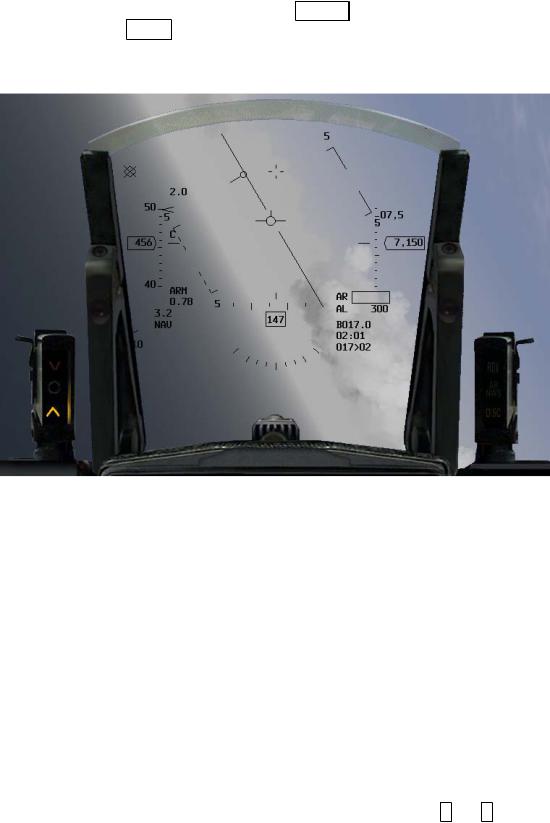
We should discuss a number of cockpit instruments and displays before getting airborne. Make sure you are in the 2-D Cockpit view, as shown in Figure 1-3.
Page 11 of 716

Battlefield Operations: Falcon 4.0 Allied Force
Figure 1-3
The ADI (Attitude Director Indicator) provides an artificial horizon and an aircraft symbol so you can tell the attitude or orientation of the aircraft relative to the earth. The airspeed indicator shows the aircraft's airspeed in hundreds of knots. When the needle is on the 4, you are going 400 knots. The altimeter
shows the MSL altitude (altitude above sea level) of the aircraft on the round dial. The digital readout on the inside of the dial shows the altitude in feet. The white needle on the dial displays the hundreds of feet of the current altitude. For example, when your aircraft is between 10,000 and 11,000 feet and the needle positioned on the 8, you are at 10,800 feet altitude MSL.
Page 12 of 716
Battlefield Operations: Falcon 4.0 Allied Force
Figure 1-4
The AOA indicator is a tape that shows the angle of attack of the aircraft. In order to generate lift, the jet needs to have a positive angle of attack or fly at a positive angle into the relative wind (airflow). The F-16 has a limiting AOA of 25° positive and 5° negative limit. Remember that the AOA is the angular difference between the gun cross and the flight path marker. Figure 1-4 and 1-4a shows AOA, both in the HUD and on the gauge. The HSI (Horizontal Situation Indicator) is a very complex gauge we will cover in Training
Mission 12. For now, all you need to know about the HSI is that it can be used to indicate aircraft heading. The round moving dial on the HSI shows N/S/E/W for north, south, east and west. When the aircraft turns, the dial moves to indicate the change in aircraft heading.
The RPM gauge on the right upper console shows the revolutions per minute of the turbine blades at the core of the engine. RPM is shown as
a percentage, with 100% being the fastest the engine can go and 0% being an engine that is not turning at all. 70% is idle power. RPM is directly tied to throttle position, which controls how much thrust the engine produces.
Training Mission Overview
This mission starts with the F-16 in the air. Your goal on this mission is to get used to flying the jet and using the keyboard to control your various views.
Initial Conditions
Page 13 of 716
Battlefield Operations: Falcon 4.0 Allied Force
zAirspeed: 400 knots
zAltitude: 7,500 MSL and level
zThrottle Setting: Mid-range
Mission Description
1.Press SHIFT-P to freeze the game. While we are frozen, let's go through the different view options. Access the views by pressing the number keys at the top of the keyboard. Press 1 to
switch to the HUD Only view. The Multi-Function Displays (MFDs) are the boxes visible at the bottom (or top) of the display. Change the MFD displays by pressing [ for the left MFD, ] for the right MFD, SHIFT-[ for the top left MFD and SHIFT-] for the top right MFD.
Press 2 to put you back in the default 2-D Cockpit view. This view is mouseable, which means
that you can use the mouse to flip switches, turn dials and move around the cockpit. There are three kinds of mouse pointers that are used in the 2-D cockpit. The red diamond indicates that you cannot interact with a cockpit control or dial. The green circle means that you can interact with a cockpit control or dial (by flipping a switch, etc.). The green arrow means that you can click to change your 2-D Cockpit view to look left, right, etc.
Press 3 to enter the 3D or Virtual Cockpit. In Virtual Cockpit, use the hat switch on your joystick
or press the arrow keys on the numeric keypad to move your view around the cockpit. Holding down right mouse button and moving the mouse pans the view smoothly as well. This view is very important because it is very useful in air combat and in maintaining your situational awareness (SA). Situational awareness is understanding where you are in relation to the world around you and, understanding where threats are in relation to you. Practice using the Virtual Cockpit while the simulation is in Freeze mode. If you hold down left or right arrows, notice that your view will stop near the ejection seat. Since you cannot see past the ejection seat in the real F-16, FalconAF has the same view limitation. You will hear a banging sound of your helmet hitting the headrest when you reach that limit. If you want to rotate your head (the view) to the other side of the cockpit, press left or right on the numeric keypad again and you will move the view to the other side of the cockpit.
Press ALT-` to access the Satellite view, which is an overhead view of the world. To get a closer look at the world, press L. Press L again to return to normal view. You can also press 1 and 7 on the numeric keypad to zoom the view closer in or further out.
FalconAF has additional views, but they will not be needed in this mission.
2.Bring up the 2-D Cockpit by pressing 2. Press SHIFT-P again to unfreeze the game.
3.Set the RPM gauge on the right console to 85% by using the throttle on your joystick or press + or - to set the throttle.
4.
Figure 1-5
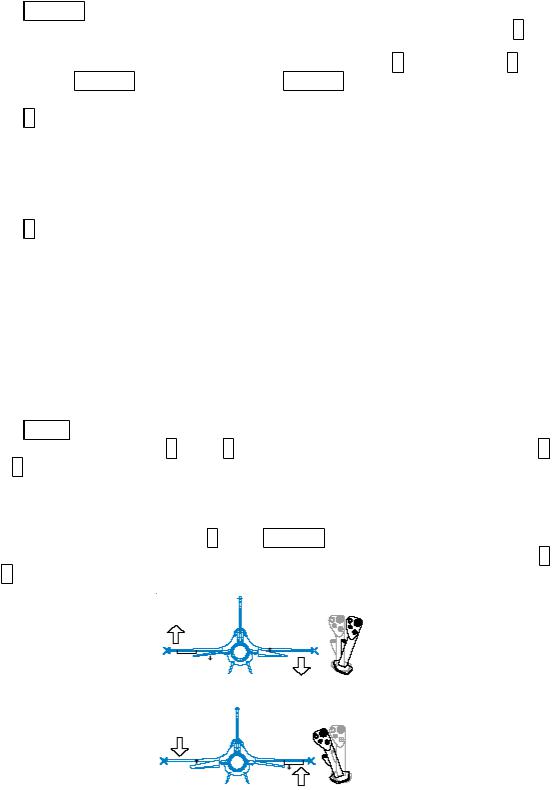
5.Move your joystick left to start an easy left turn. Bank the wings to tilt the world about 60° and then pull back on the stick until your G meter reads 2.0. Figure 1-5 shows how to move your
Page 14 of 716
Battlefield Operations: Falcon 4.0 Allied Force
joystick and get the turn started. Notice that when the wings are banked, the jet will turn or change heading. In the 2-D Cockpit view, you can watch the HUD heading scale move and you will see the aircraft banked on the ADI.
6.To keep the aircraft in level flight, ensure that the flight path marker is on the 0° pitch line of the HUD. Do this by gently pulling back on the joystick until you get the flight path marker where you want it.
Figure 1-6 shows the flight path marker on the level or 0° pitch line. Practice making level turns to the right and left. Turn on the smoke by pressing CTRL-S to trace your path through the sky. Use the Satellite view (ALT-` key) to watch your turns from outside the aircraft. When you are
done, return to straight and level flight. Bank opposite to the direction you are turning until the HUD 0° line is horizontal. Then move the flight path marker until the horizontal lines of the flight path marker align with the 0° line on the HUD.
Figure 1-6
7.Next, we will practice climbs and descents. To climb, align the HUD flight path marker with the 5° pitch line. Notice that the aircraft starts to climb and that both the cockpit and HUD altimeters show increasing numbers and that your airspeed decreases (if you're not climbing, add more power). In addition, the movement of your flight path marker lags slightly behind your control inputs. After climbing 1,000 feet, level off for a few seconds by aligning your flight path marker with the level line. Notice that your altitude remains constant with the flight path marker on the 0° pitch or level line.
8.Practice a descent by pushing the joystick gently forward. Do so until the flight path marker is aligned with the -5° pitch line. Your altitude will now decrease and your airspeed will increase. You must always manage your energy when flying. Climbs trade airspeed for altitude, whereas descents trade altitude for airspeed. After descending 1,000 feet, level off by placing the flight path marker on the HUD level line.
9.After accomplishing level turns and some straight ahead climbs, start combining turns and climbs together. For example, make a level turn until you are flying due west, or 270 on your
HUD heading tape. When you are heading west, start a climbing turn until you are flying due east or 090 on the HUD heading tape. Try to climb 2,000 feet precisely. Set up parameters of your own to practice maneuvering the jet precisely.
10.Next, try doing level turns at low altitude, which is flying below 1,000 feet AGL. During these maneuvers, experiment with different HUD altitude options (Auto, Bar and Radar). Switch between these modes by switching to the lower right console (press 2 times 6 and 2 once) in
the 2-D Cockpit view. The HUD control panel on this console next to the control stick is a 3-way toggle switch that selects the HUD altitude options. Make sure you know which way your aircraft
Page 15 of 716
Battlefield Operations: Falcon 4.0 Allied Force
is going while you're looking down in your cockpit. It's easy to crash when you're close to the ground and not looking outside.
Slow Speed Awareness
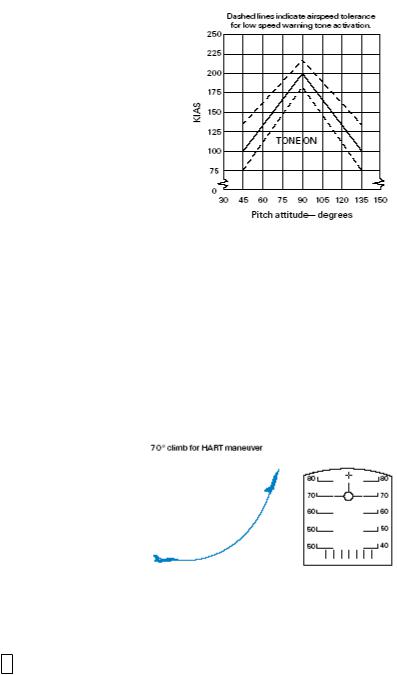
The next series of maneuvers we are going to practice are called HARTs, which stands for "Horn Awareness Recovery Training." These maneuvers are used to train the pilot to recognize and recover from a nose high attitude. When the jet is above 45° nose high and the airspeed goes below 170 knots, the low speed horn comes on. Actually, it is a combination of high pitch (nose relative to the horizon) and airspeed. Figure 1-7 shows the low speed warning horn chart used by the F-16. You don't have to memorize the chart. Just be aware that if you get nose high and slow, the horn will come on.
Figure 1-7
Use the following steps to practice HART maneuvers:
1.Climb to 15,000 feet and level off. Set the throttle to 85%.
2.Pull hard back on the stick and start an easy 5 G to 7 G pull-up straight ahead, to set the flight path marker 70° nose high using the HUD pitch ladder. Since the flight path marker will lag the gun cross, use the gun cross initially to set your pitch. The flight path marker will catch up with the gun cross when the AOA is reduced. The AOA initially will be high because you are pulling Gs, but it will come back down as you ease the pull to set your pitch angle at 70°. Figure 1-8 shows the climb.
3.The horn will come on at about 170 knots. When you hear the horn, start a roll to inverted flight. Make sure you roll the aircraft slowly to avoid losing control. Stop the roll when you are upside down. You can tell you are upside down by looking at the HUD pitch scales. When the vertical legs connected to the ends of the pitch bars are pointed up, then you are inverted.
4.Once the jet is inverted, start a smooth pull back on the joystick to get your nose down below the horizon. Once the nose of the jet is below the
horizon, stop pulling on the joystick and let the nose fall through the horizon. Keep the jet inverted (upside-down).
Figure 1-8
5.When the airspeed gets to 150-200 knots, roll the jet upright and start a 3 G to 4 G pull to level flight (with the flight path marker on the 0° pitch line).
6.Try the exact same procedures except this time pull the nose of the jet up to 90° nose high. Use the Orbit view (number key 0) to watch how the aircraft performs at very low airspeeds.
This first training mission will help you practice controlling the jet using basic cockpit and HUD symbology. When you have turns, climbs and the HART maneuvers down pat, move on to the next mission.
Page 16 of 716
Battlefield Operations: Falcon 4.0 Allied Force
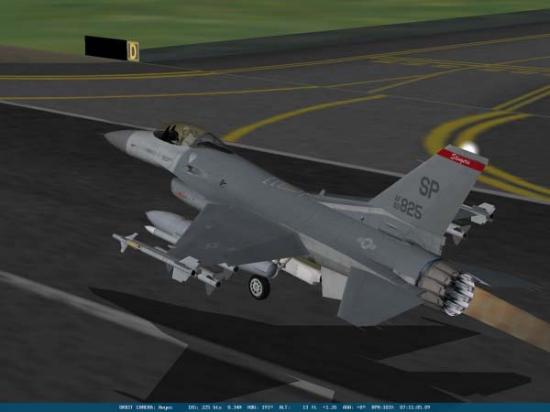
Mission 2: Takeoff
In this training mission, you will learn to fly the jet off the ground. Taking off in the F-16 is simple, and you only have to follow a few procedures. First, be aware that in FalconAF you are part of a realistic runway environment that includes an active ground taxiway environment. You must constantly be aware of air traffic control and other flights. All the runways in the Balkans and Korea are busy launching and recovering aircraft, so you must listen up for ATC (Air Traffic Control) radio calls directed at your flight. For this training mission however, it is just you and your flight wingman. When taking off, you are not required to ask the tower for permission to take off. As you move down the taxiway, the tower will clear you for takeoff. When you take off, you are generally combat configured, with bombs or missiles beneath your wings. Combat configurations are heavy. Because of the weight, you should accomplish all of your takeoffs with maximum afterburner. Things happen fast when you are taking off in full afterburner--and that is both good and bad news. The good news is that you don't have much time to get creative and mess up the procedures. The bad news is that if you don't use the correct takeoff procedures, bad things will start happening very fast.
Training Mission Overview
Load training mission "02 Takeoff" from the Training section and click the Commit button. Make
sure you are placed in the lead, upper left-hand aircraft (the #1 plane). Do so by clicking on the plane icon.
Page 17 of 716

Battlefield Operations: Falcon 4.0 Allied Force
Next, determine the callsign of your flight. Click the Briefing icon on the bottom of the screen. The third section, labeled "Package Elements," shows the name of your flight. In this case, your flight is Cowboy 1. In the section labeled "Ordnance," your aircraft is highlighted in green. In this case, your aircraft is Cowboy 12 (One-Two). Listen out for this call-sign, as ATC will be talking directly to you! Close the Briefing window by clicking the "X" in the upper right-hand corner. Then click on the Fly icon in the lower right-hand corner. While you are waiting for the simulation to load, make sure that the throttle on your joystick is in the idle position
Initial Conditions
zAirspeed: 60 (which is the lowest reading in Realistic Avionics and will change once your airspeed is above 60 knots)
zAltitude: On the runway
zThrottle Setting: Idle
zConfiguration: Gear down
zAvionics: NAV
Mission Description
In this training mission, you can choose where to start. If you just want to get on with the action, choose the TakeOff option. This will start the mission at the point where your aircraft is positioned on the runway, ready to take-off. If you choose this option, jump forward to the Take-off section.
Alternatively you could choose Taxi. This positions the aircraft just off the runway waiting for permission to move to the takeoff position. If you choose this option, jump forward to the Taxi part of this section.
If you want the full realism of climbing into a cold jet and bringing it to life yourself, choose a ramp start.
Page 18 of 716
Battlefield Operations: Falcon 4.0 Allied Force
This involves an extensive checklist of commands that need to be run through to bring this hunk of iron into life.
If this is your first run through, try starting with take-off and jump forward to the section marked take-off.
Ramp Start
The ramp start - picture this scene - you have just walked up to your F-16. You've been around doing an external check. You've kicked the tires and chatted with the crew chief, who has now helped you climb into the cockpit and strapped you in. Its time to get this show on the road.
Its a little more involved than just turning the key, and some of it depends on what your mission is for this hop. It will probably take a good 10-15 minutes to complete the full cold start procedure. Some of it will go quicker as you learn where the various switches are, but no matter how practiced you are, it takes a while. We will just go through the basics here that gets you started. Watch out, because your lead will be starting his aircraft, too. You will probably hear that power up first, as he will likely be a bit quicker than you.
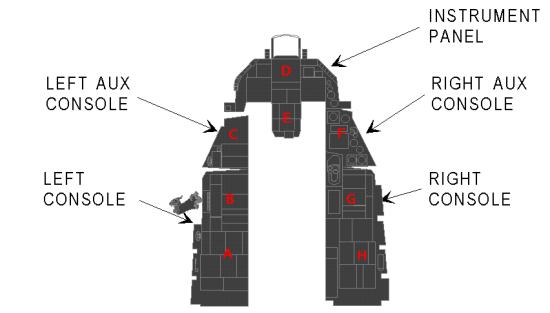
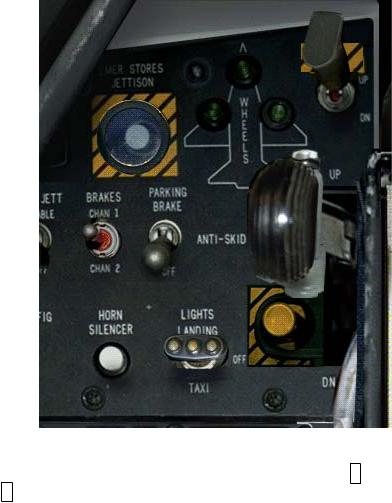
To guide you in finding the switches, we will be referring to the following diagram to show you where to find the vital parts. These will be given in brackets like this (C).
Figure 2-1
1.Set the parking brake - we don't want the jet to roll off once the engine is running! (C) The parking brake means you don't have to keep your feet on the toe-breaks, and can concentrate on the rest of the procedure. Beware though, the parking break will disengage automatically above around 85% RPM.
2.Set the switch on the ELEC panel (B) to MAIN PWR to power the systems. This takes two clicks to achieve. The first gets you to battery power, and the second to main power, although as yet you have no main generator running. You will be running on batteries until the engine is up to speed, so while you have plenty of time, equally don't take too long. This will activate various warning lights on panel (D) including ELEC SYS, SEC ON and SEAT NOT ARMED on the warning panel (F). You should also get HYD OIL on the right eyebrow panel, to your right. This is all perfectly normal, these lights should extinguish themselves as the relevant systems come on line.
3.Go to the external lights panel (B), and set the master switch to NORM and turn anti-collision lights to ON. Switch the position lights on Wing Trail and Fuselage to BRT and set them to FLASH. This lets those around you know that the aircraft is becoming activated. There are few
Page 19 of 716

Battlefield Operations: Falcon 4.0 Allied Force
worse ways of starting a mission than by sucking your crew chief into your engine inlet.
4.Next, we are going to need some fuel. Set MASTER FUEL to ON and ENG FEED to NORM on panel (B).
5.Check that the Emergency Power Unit (EPU) switch is set to NORMAL (B). You may be needing the EPU if things go bad in the air, as this is your backup for electrics and hydraulics.
6.Check that the Fuel Readout Switch (FUEL QTY SEL) is set to NORM (E).
7.Set the AIR SOURCE to NORM. (G) This helps get fuel moved around the aircraft.
Now we are ready to attempt to start the engine. The engine is a big old thing, and it has to be spinning quite fast before it will actually light off. To get it up to a speed where fuel can be introduced and lit, it will need some help. To achieve this you will make use of a much smaller jet engine, called a Jet Fuel Starter (JFS). This engine is easily started by hydraulic pressure, and once running can be used to bootstrap the main engine.
1.First, we don't want any suprises, so ensure your throttle is at idle.
2.Set the JFS on panel (B) to START2. It clicks over and should drop back on its own eventually. This causes stored hydraulic pressure to start spinning the JFS, which in turn starts to spin up the main engine. The JFS alone will probably get the engine up to a maximum of 25% RPM.
3.The RPM needle begins to move (D) as the main engine starts to spin up. As soon as RPM indicates over 20%, advance the throttle to mid way.
4.Next toggle the idle detent switch on the throttle (C) (or Shift-I). The engine RPM will start to increase. Once the RPM gets above about 30% return the throttle to idle. The engine should continue to spool up to its idle speed of about 70% RPM.
5.Check that the JFS has switched itself OFF (B). If not - switch it off manually.
6.The HYD OIL warning light should have gone off somewhere between 25% and 70% RPM. Verify the lights are off. (D)
Now you should have a functioning engine, and you can start with the other parts of bringing the aircraft to life starting with the avionics power.
1.Using the switches on panel(G), turn on Fire Control Computer (FCC), Stores Management System (SMS), Up Front Controls (UFC), Multi Function Display (MFD), Global Positioning System (GPS) and Data Link (DL).
2.Set the Intertial Navigation System (INS) to ALIGN NORM on panel (G). The gyroscopes will begin to spin up. The INS will be fully aligned after about 8 minutes. We will describe the INS in detail in a later lesson.
3.From panel F, power on the left and right hardpoints, turn on the Fire Control Radar (FCR) and set Radar Altimeter (RDR ALT) to Standby (STBY). The RDR ALT takes a few minutes to warm up so its good to get that going.
4.On panel F enable the flight path marker by setting the ATT/FPM switch from OFF to FPM.
5.Use the SYM knob on panel D to turn on the HUD (press multiple times to increase brightness).
6.Check panel D for the INS status in the DED and/or HUD. The first line shows status and remaining time. For example it may read starting at "0.0/99". The INS will be fully aligned when the status reaches "10.0".
7.Look at panel F to check that no flags are shown anymore on the ADI, VVI or AOA displays.
8.Check panel A that trim is reset.
9.Adjust audio volumes on panel B for COMM1, COMM2, MSL and THREAT audio as desired.
10.On Panel C power on the Electronic Warfare System (EWS): Set THREAT WARN AUX, EWS PWR, EWS JMR, EWS CHAFF, EWS FLARES to ON. Then switch EWS MODE to MAN. Arm the ejection seat.
11.Once INS is fully aligned, enable it by switching to NAV on the avionics power panel G. The alignment takes a while. You may use the CAPS LOCK key to speed things up a little. Don't let it run at accelerated time for long or you may miss your take-off time!
12.Set RDR ALT to ON on panel F so that you get some altitude information when in the air.
13.On panel C switch the landing lights ON and the PARKING BRAKE to OFF.
14.From panel D, enable Nose Wheel Steering (NWS) to taxi [Shift-/ (hold shift and the key left of the right Shift key)].
There - nothing to it really is there! Finally, you must request permission from ATC to taxi to the runway. Press T and select the option "Request Taxi", and within a few moments ATC will respond
with taxi instructions. To navigate to the assigned runway, it can be helpful to check the airbase maps or use the satellite view to zoom out a little until you gain familiarity with the layout. Once on the go, maneuver and stop your aircraft just before moving onto the runway and read the next section titled
Page 20 of 716
Battlefield Operations: Falcon 4.0 Allied Force
Taxi.
Taxi
If you choose the Taxi option, you should be positioned on the taxiway, just a little way off from the runway. Soon after the cockpit view has appeared, ATC will conveniently remind you of your taxi instructions. Maneuver and stop your aircraft just before moving onto the runway. It is important that you do not venture onto the runway just yet, as ATC will be sure to penalise you in your mission summary for reckless control of your aircraft on the ground.
Once positioned, press T and choose the option "Request Takeoff." During this exercise, ATC will
always give you clearance since there is nothing else waiting to use the runway. But once in the campaign, listen carefully to the instructions ATC read out to you. If they call a "Hold Short"
order, another aircraft is about to land and moving onto the runway at this time could be career limiting in a number of ways! The correct action is to simply wait until the path is clear and ATC gives you order to "position and hold." Don't worry about your flight leaders when you are flying as wingman, they will orbit above allowing you time to takeoff.
Following the "position and hold" order, taxi onto the runway, position your aircraft just
behind and on the other side of the runway to your leader and apply the wheel brake to stop the aircraft. At this point ATC will grant takeoff clearance and you are on your way.
Note that when requesting take-off permission, ATC gives you instructions to "Taxi", then you are
in the wrong place - probably at the wrong end of the runway - a good time to turn around and try somewhere else!
Take-Off
You should now be on the runway. When the mission starts, you will be #2 in a two-ship formation with your flight leader on the runway ready for takeoff.
1.Your callsign for this mission is Cowboy 11. Listen for Cowboy 11 to be cleared for takeoff by ATC. The next radio call will be similar to "Cowboy 11 cleared for takeoff,
depart heading 360". Flying the assigned departure heading moves your aircraft safely out of the busy airbase environment in campaign.
Page 21 of 716
Battlefield Operations: Falcon 4.0 Allied Force
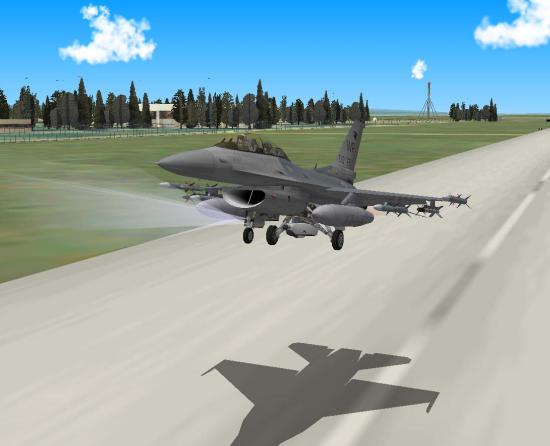
Figure 2-2
2.Increase your throttle to full afterburner by pressing SHIFT-+.
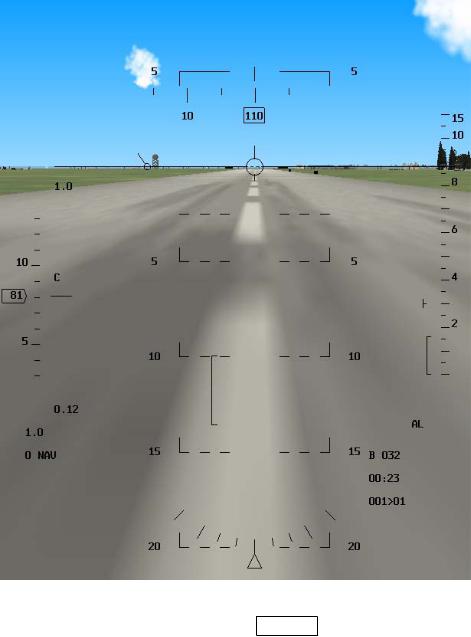
3.Fly the jet straight down the runway using the joystick or rudder pedals to steer. It requires very small changes to the nose wheel steering to effect the jet's direction, don't over steer the jet. Pay attention to both the centerline of the runway and the airspeed gauge in the HUD.
Page 22 of 716
Battlefield Operations: Falcon 4.0 Allied Force
Figure 2-3
4.When the airspeed gets to 150 knots, pull the gun cross up to the 10° line in the HUD. Hold this pitch attitude until the jet flies off the runway. Warning: do not exceed a 14° pitch angle or you will scrape the afterburner nozzle on the runway.
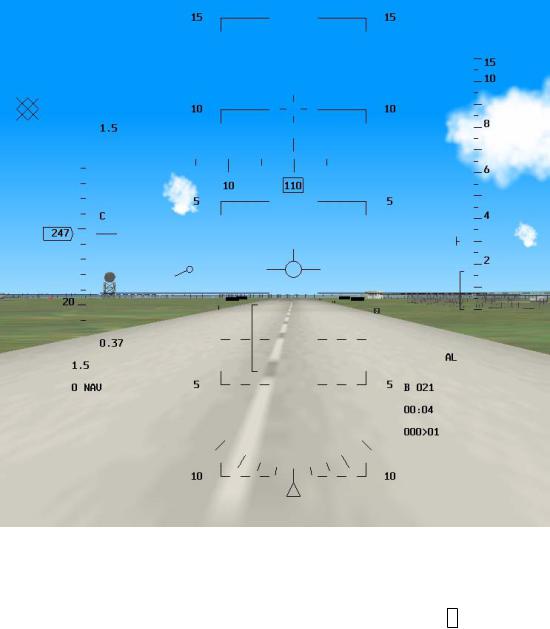
5.As soon as you are airborne and climbing, raise the landing gear by pressing G. This will
happen quickly, so be ready to raise the gear as soon as you get airborne. Warning: do not exceed 300 knots with the gear down while flying or you will damage the landing gear.
Page 23 of 716
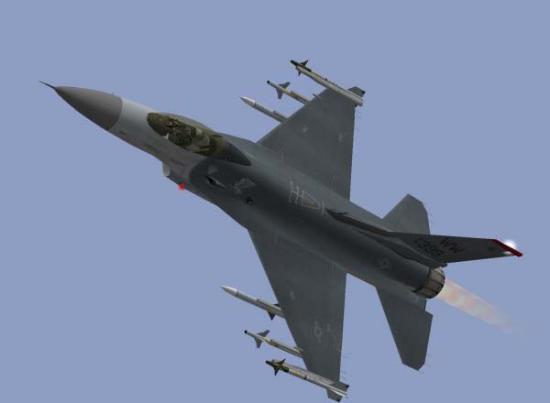
Battlefield Operations: Falcon 4.0 Allied Force
Figure 2-4
6.Confirm the gear are up by switching to the lower left console D (press 4 on the numeric keypad followed by 2 on the numeric keypad). When the gear are in transit either up or down, the red
light will be illuminated in the gear handle. When the gear are down and locked, you will see three green gear lights and the red light will go out in the gear handle. When the gear are safely up, the gear handle will be in the up position and the lights in the gear handle and on the panel above it will be extinguished.
Page 24 of 716
Battlefield Operations: Falcon 4.0 Allied Force
Figure 2-5
Page 25 of 716

Battlefield Operations: Falcon 4.0 Allied Force
CHAPTER 2: LEARNING TO
TURN
In this chapter, you'll start by learning how to make basic turns and then advance to more complicated maneuvers at a variety of airspeeds.
Page 26 of 716
Battlefield Operations: Falcon 4.0 Allied Force
Mission 3: Max G Turn At Corner
Airspeed
The objective of this training mission is to practice maneuvering the jet in a tight turn. Turning the jet is a very important combat skill. Fighter aircraft like the F-16 Fighting Falcon are designed and built for one purpose: to close with the enemy and shoot them down.
To do this, you must be able to turn your jet in the sky and point your missiles and guns at the enemy. Conversely, you must also be able to turn your jet and keep enemy aircraft from pointing their guns and missiles at you. Turns have two basic defining characteristics which are important to understand. The first is turn rate (measured in degrees per second) or how fast the nose of the jet is moving across the sky.
The next time you exit a circular highway offramp, note how fast the front of the car is moving past the surrounding terrain. That is your turn rate. The second characteristic of a turn is radius. Turn radius is simply how tight you are turning. In our example above, as you exit the offramp, the road sets the turn radius. In an aircraft, however, there are no roads to follow, so the pilot sets the turn radius.
Two factors affect both turn radius and turn rate: aircraft G and airspeed. Aircraft G is how hard you are turning the aircraft, which is determined by how much you are pulling back on the joystick. The more you pull back on the joystick, the more G you are commanding. This increased G will lead to a tighter turn radius and a faster turn rate--most of the time. Fighter aircraft have a limit to how much G you can pull. If you pull Gs beyond this limit, you will cause the aircraft to fail structurally or you will black out. The maximum G you can pull without breaking the jet is called max G. In older fighter jets, if the pilot pulled beyond max G, the jet might break apart. F-4 Phantom engines have been pulled from their mounting bolts and dropped into the engine bay due to "over G." In the F-16, the aircraft is automatically limited to 9 Gs (max G) by a G-limiter built into the flight control system.
The other factor affecting turn rate and radius is airspeed. There is a direct relationship between airspeed and G and, in combination, they affect turn rate and radius. Simply put, the F-16 has an optimum airspeed range for making the quickest (best turn rate), tightest (smallest turn radius) turn. This airspeed range is called corner velocity. At 330 knots and above in your F-16, you can pull 9 Gs (the structural limit of the aircraft). Below 330 knots, you do not have enough air going over the wings
Page 27 of 716
Battlefield Operations: Falcon 4.0 Allied Force
to get 9 Gs. As airspeed drops off below 330 knots, so does your ability to pull Gs. Above 330 knots, you can always pull 9 Gs.
This sounds great at first, because it appears that all we have to do to optimally turn the jet is to fly faster than 330 knots. This is not true. Above 440 knots, you can still pull 9 Gs, but your turn radius increases dramatically while your turn rate actually goes down. This is because above 440 knots, the jet's flight control system does not allow you to pull any more than 9 Gs. The extra airspeed then only hurts your ability to turn the aircraft. The equations for turn rate and turn radius illustrate why this is the case. Why is not as important as knowing that there is an optimum airspeed for turning the jet. This airspeed is called corner velocity, and it is 330-440 knots in the F-16.
There is one other maneuvering concept that I will address before we blast off. This concept is called Specific Energy or PS (pronounced "P sub S"). PS is a concept that describes the energy or potential
maneuverability of a fighter. FalconAF was developed using the PS curves of the F-16.
These curves describe how well the F-16 will maneuver in terms of turn rate, turn radius and G.
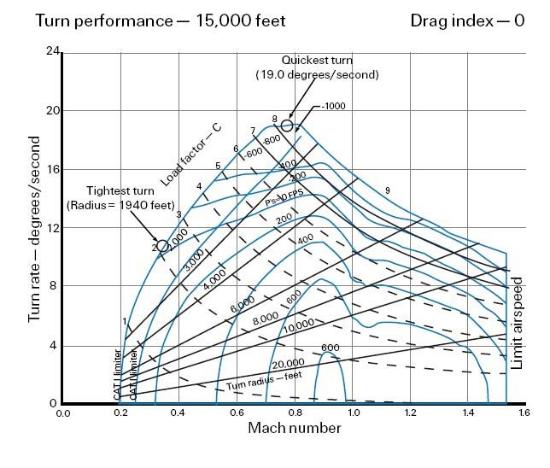
Figure 3-1
The PS chart shows a series of fluid lines that represent specific energy states of the F-16 at an altitude
of 15,000 feet and a drag index of zero. The drag index is determined by what is loaded externally on the jet. The zero PS line is the area of the chart where the jet can maintain airspeed and altitude for a
specific G load. The PS lines that have negative values represent a flight regime in which the jet will lose either airspeed or altitude. The PS lines with positive numbers represent where the aircraft has the potential to gain altitude or airspeed.
These charts are often called "doghouse" charts or graphs, supposedly because they look a little like a dogs kennel. Who says aeronautical engineers have no sense of humor!
Page 28 of 716
Battlefield Operations: Falcon 4.0 Allied Force
The next three training missions are designed to teach you how to turn the jet at, above and below corner velocity. They will also show you what will happen to your turn rate and radius if you do not turn at the proper airspeed.
Training Mission Overview
This mission allows you to practice a max G turn starting at corner airspeed and note the effects of airspeed and G on turn rate and radius. This mission will be easier to do with blackout disabled. Turn it off by selecting "No Blackout" in the Simulation setup screen.
Initial Conditions
zAirspeed: 400 knots
zAltitude: 20,000 MSL (Mean Sea Level)
zThrottle Setting: Mid-range
zConfiguration: Clean (landing gear up, flaps up and no brakes)
Mission Description
In this training mission, your jet starts at 400 knots (within the corner airspeed range of 330-440 knots). Follow these steps to perform this maneuver:
1. Load training mission "03 Max Turn at Corner" from the Training Section.
2.Press 1 on the top of the keyboard to bring up the HUD Only view.
3.Press F to record your flight using the ACMI feature. You should see "Recording" in red at
the top of the screen to confirm that the recorder is on. You will use the recording later to review your flight.
4.Fly straight ahead for about 10 seconds. Note your heading before turning.
5.After about 10 seconds, go to full AB (Afterburner) by pushing the throttle all the way forward or by pressing SHIFT-+. Note that the goal is to stay at the corner velocity of 330-440 knots. This may require you to reduce the Gs by easing off the joystick.
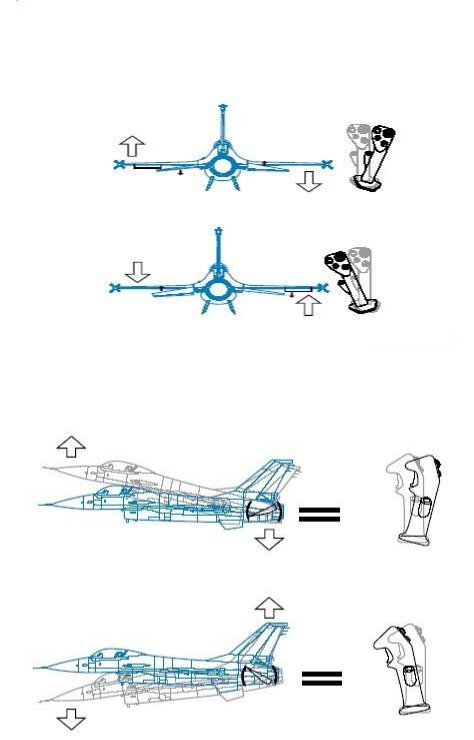
6.Roll the jet either right or left and set the wings between 75°-85° of bank. Figure 3-2 shows the proper movement of the joystick and the corresponding response of the aircraft wings. The side- to-side movement of the joystick controls aircraft roll.
7.Pull all the way back on the stick to command the maximum G possible. Forward and backward movement of the joystick controls aircraft pitch as shown in Figure 3-3. Pitch essentially equates to aircraft Gs.
Page 29 of 716
Battlefield Operations: Falcon 4.0 Allied Force
Figure 3-2
Notice that you cannot pull max Gs at 20,000 feet and maintain corner velocity. If you pull more than 7 Gs in this turn, you will lose airspeed.
Figure 3-3
8.Keep pulling around the turn, trying to maintain 330-440 knots, until you are back to your original heading (thereby making a full 360° turn). Since this is a canned maneuver, you have the luxury of using the HUD to help you make this level turn. Figure 3-4 shows the HUD flight path marker, the HUD level line and your airspeed and altitude scales.
Page 30 of 716
 Loading...