


FABLE
0605 Part No. X11-35541
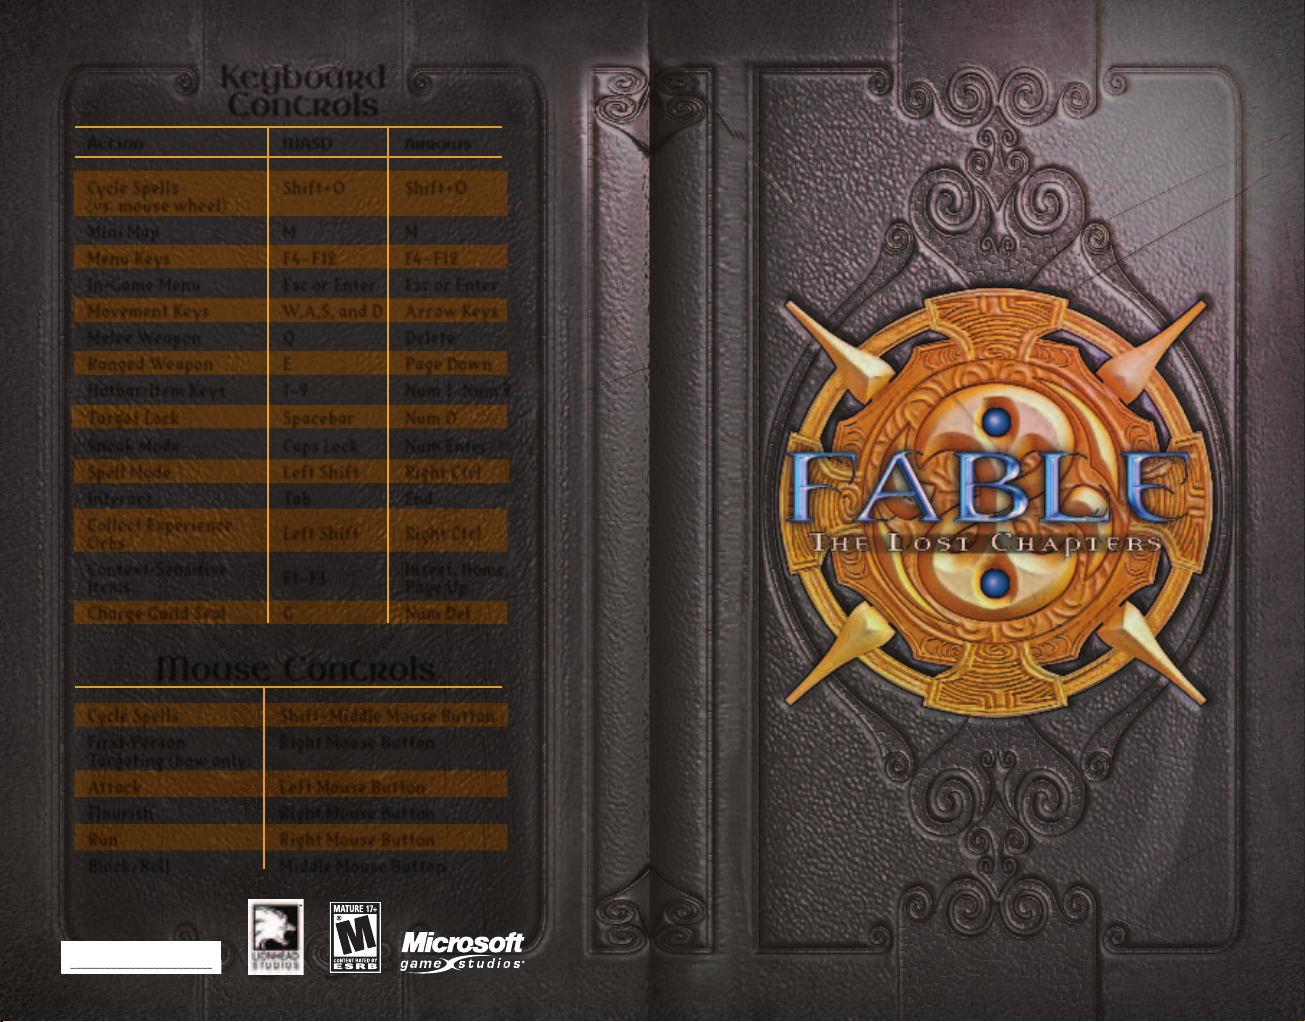
Keyboard
Controls
Action WASD Arrows
Cycle Spells
(vs. mouse wheel)
Shift+O Shift+O
Mini Map
M M
Menu Keys F4–F12 F4–F12
In-Game Menu Esc or Enter Esc or Enter
Movement Keys W,A,S, and D Arrow Keys
Melee Weapon
Q Delete
Ranged Weapon
E Page Down
Hotbar-Item Keys 1–9 Num 1–Num 9
Target Lock Spacebar Num 0
Sneak Mode Caps Lock Num Enter
Spell Mode Left Shift Right Ctrl
Interact Tab End
Collect Experience
Orbs
Left Shift Right Ctrl
Context-Sensitive
Items
F1–F3
Insert, Home,
Page Up
Charge Guild Seal
G Num Del
Mouse Controls
Cycle Spells Shift+Middle Mouse Button
First-Person
Targeting (bow only)
Right Mouse Button
Attack Left Mouse Button
Flourish Right Mouse Button
Run Right Mouse Button
Block/Roll Middle Mouse Button
I
S
C
afety
Information
About Photosensitive Seizures
A very small percentage of people may
experience a seizure when exposed to certain
visual images, including flashing lights or
patterns that may appear in video games. Even people who have no history
of seizures or epilepsy may have an undiagnosed condition that can cause
these "photosensitive epileptic seizures" while watching video games.
These seizures may have a variety of symptoms, including lightheadedness,
altered vision, eye or face twitching, jerking or shaking of arms or legs,
disorientation, confusion, or momentary loss of awareness. Seizures may
also cause loss of consciousness or convulsions that can lead to injury from
falling down or striking nearby objects.
Immediately stop playing and consult a doctor if you experience any of
these symptoms. Parents should watch for or ask their children about the
above symptoms—children and teenagers are more likely than adults to
experience these seizures.
The risk of photosensitive epileptic seizures may be reduced by taking the
following precautions:
Play in a well-lit room.
Do not play when you are drowsy or fatigued.
If you or any of your relatives have a history of seizures or epilepsy,
consult a doctor before playing.
Information in this document, including URL and other Internet Web site references,
is subject to change without notice. Unless otherwise noted, the example companies,
organizations, products, domain names, e-mail addresses, logos, people, places, and
events depicted herein are fictitious, and no association with any real company,
organization, product, domain name, e-mail address, logo, person, place, or event is
intended or should be inferred. Complying with all applicable copyright laws is the
responsibility of the user. Without limiting the rights under copyright, no part of
this document may be reproduced, stored in or introduced into a retrieval system,
or transmitted in any form or by any means (electronic, mechanical, photocopying,
recording, or otherwise), or for any purpose, without the express written permission of
Microsoft Corporation.
Microsoft may have patents, patent applications, trademarks, copyrights, or other
intellectual property rights covering subject matter in this document. Except as
expressly provided in any written license agreement from Microsoft, the furnishing of
this document does not give you any license to these patents, trademarks, copyrights, or
other intellectual property.
Fable: The Lost Chapters © 2005 Lionhead Studios Limited. Lionhead, the Lionhead logo,
and Fable are registered trademarks owned by Lionhead Studios Limited. All rights
reserved. Published and distributed by Microsoft Corporation. Microsoft, the Microsoft
Game Studios logo, and Windows are either registered trademarks or trademarks of
Microsoft Corporation in the U.S. and/or other countries. All rights reserved. All other
trademarks and trade names are the property of their respective owners.
ontents
II
A Word from the Guildmaster
IV
Installation and Setup
V
Game Screen
VI
At Your Command
X
About the Guild
XIV
The Hero’s Apprenticeship
XVI
WASD Controls
XVIII
Arrow Key Controls
XX
The Way of a Hero
XXIV
Buying and Selling Inventory
XXIX
Enhancing Abilities and Weapons
II
III
greatness has no bearing with regard to perceived good
or evil. No, it has more to do with the Renown one
achieves through actions, regardless of morality. Be
forewarned that the work necessary to become a Hero is
not to be taken half-heartedly. On the contrary, this will
be a most gruelling and arduous training, encompassing
all aspects of mind, body, and spirit. I say this without a
wisp of doubt. We require that you apply yourself as
never before, but having done that, the rewards and
Renown you may achieve are unimaginable.
This said, if you do finally graduate from this Heroes’
Guild, you may even one day be acknowledged as the
greatest Hero ever to stride the cobbled paths of Albion.
Statues have been erected all over the land in honour of
those few Great Ones who came before you, those laid to
rest and permanently entombed at the Guild. We may
only hope our success in training you will one day flame
your successes throughout Albion, coarse a place as it is.
Go now, and seek your destiny!
Word from the
Guildmaster
Congratulations are in store for you.
The fact you have been provided
with the
Book of the Guild
means you
must be one of a lucky few with
enough potential to be invited here
as a Hero apprentice.
We consider this text sacred and
even, I would say, magical. You
would be wise to study it carefully
from cover to cover in order to
unveil its many secrets.
The task ahead of you will not be an easy one.
Only through years of hard work can you hope to
unleash your latent powers. During its long
history the Guild has seen many apprentices
fail through idleness and overconfidence, and I
would be sorry to see one with potential such as
you throw it all away. Albion needs its Heroes
now more than ever.
Becoming a Hero of Renown means achieving
great things, and to accomplish less than
greatness is to have done next to nothing at
all. You must understand that, for the Guild,
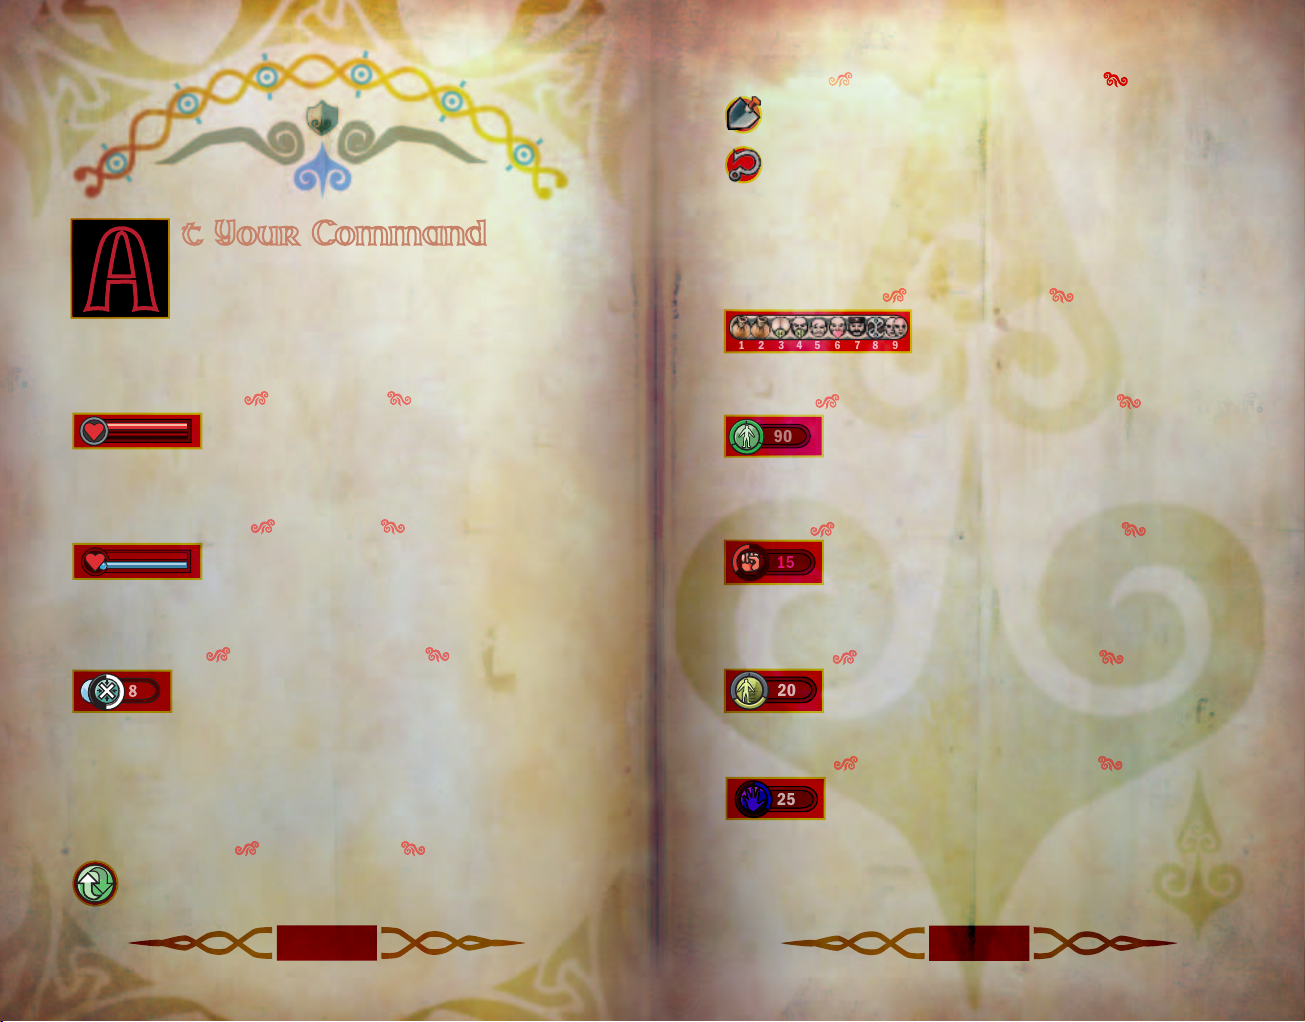
A
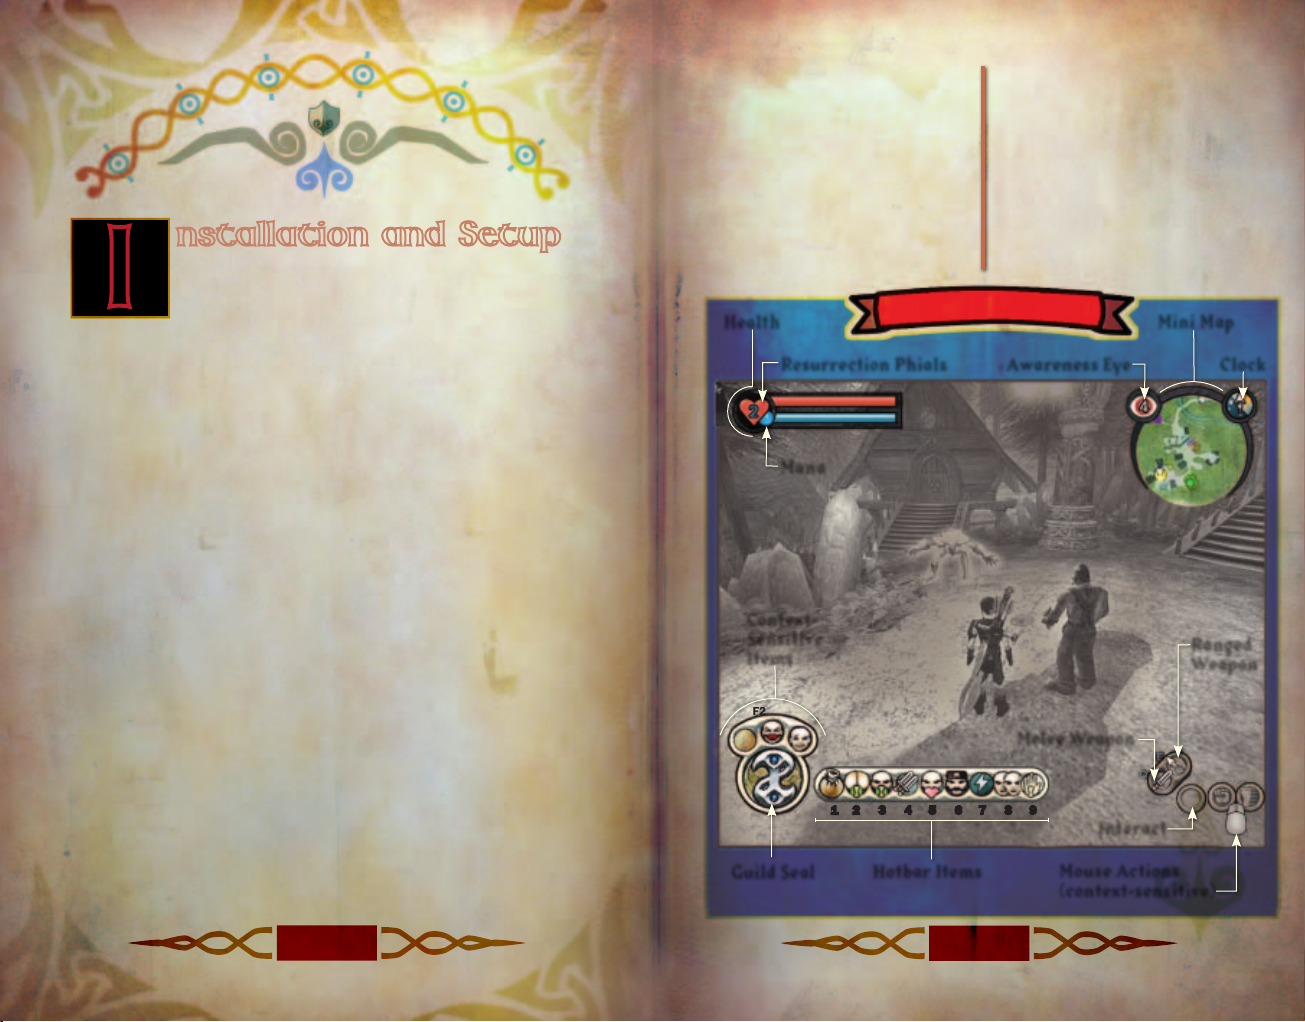
Health
Resurrection Phials
Mana
Awareness Eye
Clock
Hotbar Items
Melee Weapon
Ranged
Weapon
Context-
Sensitive
Items
Mouse Actions
(context-sensitive)
Mini Map
Guild Seal
Interact
IV
V
I
nstallation and Setup
To install
Fable: The Lost Chapters
, insert Disc 1 into
your CD-ROM drive and click Install. Follow the
on-screen instructions to complete the setup process.
If installation does not start automatically, follow these steps:
1. From the Start menu, click
Run and type D:\setup.exe (where
D: is your CD-ROM drive).
2. Read the on-screen instructions, then click Next.
3. If you want to use the default settings for installing
Fable: The
Lost Chapters
, click Next. For more advanced installation
options, click Custom Installation.
4. Enter your
Fable: The Lost Chapters
Product Key, then click OK.
5. Insert the appropriate CD-ROMs when prompted.
6. To start a new game, type a profile name or use the default
profile. On the same screen, you can choose the optional Arrow
keys control scheme instead of the default WASD control scheme.
7. Click OK, then click New Game to start playing.
Saving a Game
To save a game in progress:
1. Press
Esc or Enter to display the In-Game menu.
2. Click Options to display the Options menu.
3. Click World Save
.
4. Click the slot in which you want to save the game.
Note: During a Quest, you can choose Hero Save from the Options
menu. This saves the statistics you’ve accumulated, but not your
place in the Quest. On your next Quest, you can take advantage of
gold or other items you saved on previous Quests.
5. Click Yes.
Loading a Saved Game
To load a previously saved game:
1. Start
Fable: The Lost Chapters
.
2. Click Continue Game
.
3. Click the saved game you want
to load.
If you are currently playing
Fable: The Lost Chapters
and
you want to load a saved game:
1. Press
Esc or Enter to
display the In-Game menu.
2. Click
Options.
3. Click Load.
4. Click the saved game you
want to load.
Game Screen
1 2 3 4 5 6 7 8 9
F2
F3
G
VI
VII
90
15
20
25
1 2 3 4 5 6 7 8 9
Context-Sensitive Items
Context-sensitive icons appear in the lower-left portion of
your view and temporarily replace other icons. Two of the
most helpful icons to be aware of are the Digging and
Fishing icons. Health, Mana, and Expressions also appear
just when you need them. Press F1, F2, or F3 to use the
item you need—the shovel, fishing rod, or whatever else makes
itself available. Pay close attention to these, and you never know
what you might discover.
Hotbar Items
You can drag up to nine items,
expressions, and spells to the Hotbar.
Press 1–9 to use them as the need arises.
General Experience Points
The General Experience Points notification appears
momentarily to indicate an increase in General
Experience points. These are accumulated by gathering
Experience Orbs.
Strength Experience Points
The Strength Experience Points notification
appears momentarily to indicate an increase in
Strength Experience points. These are accumulated by using your
fists or melee weapons in close combat.
Skill Experience Points
The Skill Experience Points notification appears
momentarily to indicate an increase in Skill
Experience points. These are accumulated by using the bow.
Will Experience Points
The Will Experience Points notification appears
momentarily to indicate an increase in Will
Experience points. These are accumulated by using magic.
t Your Command
The following information describes the primary
items that appear in your view. Key commands
shown below are based on WASD key mapping. We
are unable, apprentice, to describe every possible option
but have focused on those you will encounter most often.
Health Bar
The red bar in the upper-left portion of your
view is the Health bar. Each time you receive a
hit from an enemy, it impacts your health. Replenish your health
by eating some food or drinking a potion.
Mana Bar
The blue bar in the upper-left portion of your
view is the Mana bar. Mana depletes when you
use magical powers of the Will. It replenishes with time, but
returns more quickly when you drink blue potions.
Combat Multiplier
The Combat Multiplier indicates how much
Experience of all types you gain when you inflict
blows upon your enemies. The higher the number, the more
Experience points gained when you absorb Experience Orbs left in
the wake of their deaths. For this reason, it is prudent to wait
until you have your way with an entire group of enemies before
absorbing the Experience Orbs.
Interact Icon
This Interact icon reveals interactive objects, which emit a
blue or purple glow. Press Tab to interact with them.
A
200
VIII
IX
Gold Notification
The Gold notification appears momentarily
to indicate how much gold you have as well as
how much you just gained or lost.
Teleport Icon/Guild Seal
Select the Teleport icon by pressing G. Continue pressing
and holding G until the Guild Seal completely charges
before you teleport to the Guild or an active Cullis Gate.
In-Game Menu
The In-Game menu appears when you press Esc or Enter.
Use the left mouse button to select menu items. Use the
right mouse button to go to a previous screen in the menu.
Press Esc or Enter again to exit the menu completely. If you
select Map from the In-Game menu, the In-Game map appears
with a legend beneath it. Use the mouse pointer to hover over
each map symbol and see a description for each.
Mini Map
The Mini Map is located in the upper-right corner of your view. To
determine your location, press M to zoom in on the map.
Awareness Eye
Attached to the Mini Map, the Awareness Eye indicates how
many individuals are aware of you. A red Awareness Eye
reveals to you that enemies are present.
Clock
Also attached to the Mini Map, the Clock is split in half
between night and day to mark the passing of time. This
allows you to know the approximate time of day or night
depending on where the arrow is pointing.
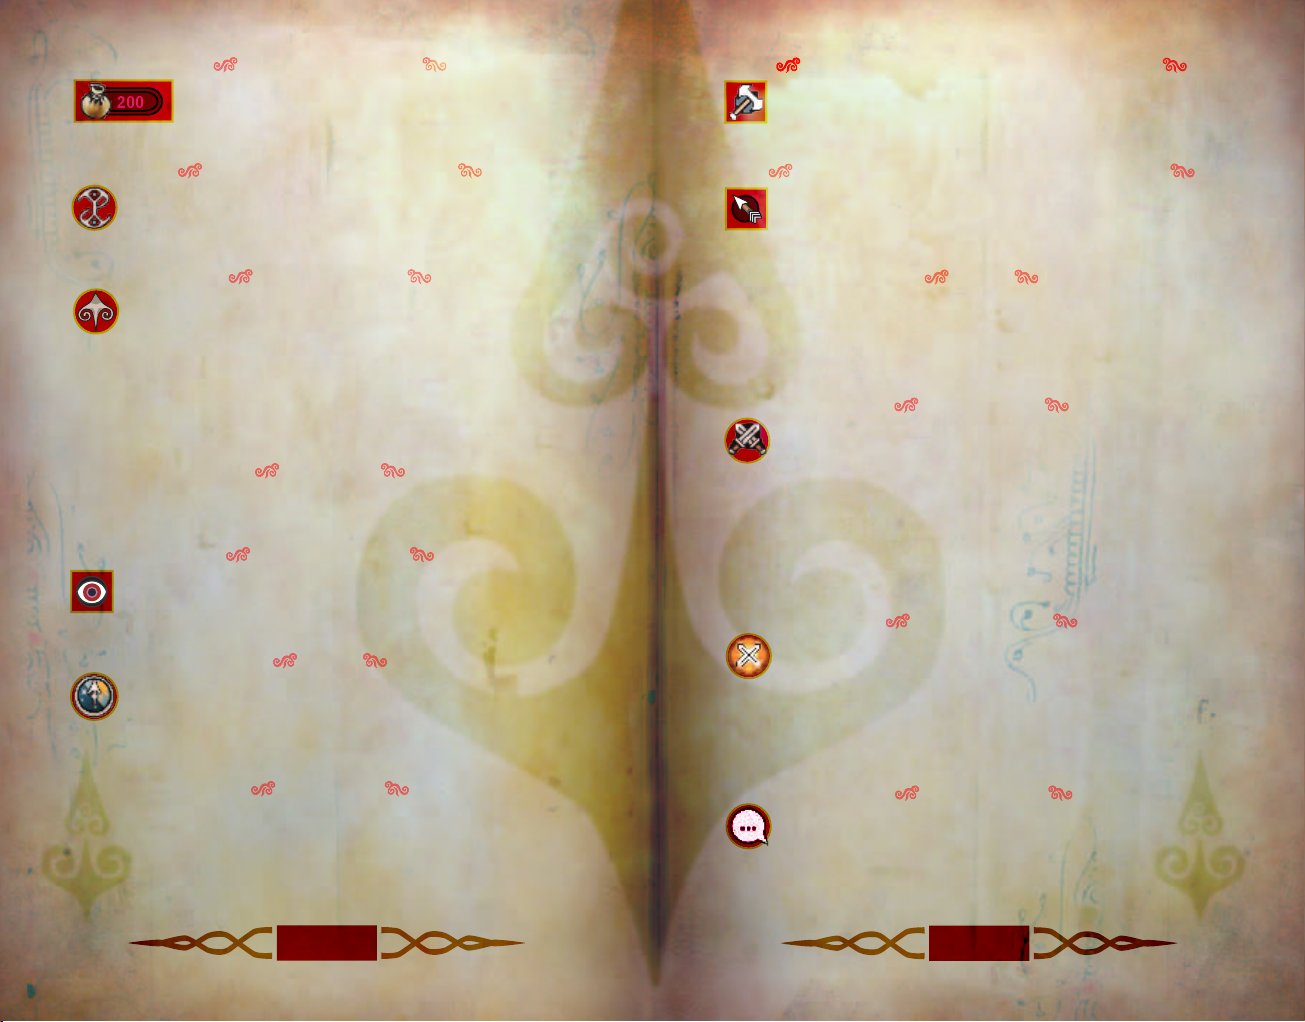
Inventory
Press Esc or Enter to display the In-Game menu, then click
Inventory to display the Inventory menu. Left-click your
preferred category (Items, Weapons, or Clothing). Press Esc or
Enter again to exit the Inventory. Alternatively, you can quickly
display your Items, Weapons, or Clothing Inventories by pressing
F4, F5, or F7.
Unsheathe/Sheathe Melee Weapon
Press Q to unsheathe or sheathe your current melee
weapon. To wield a different weapon, select it from
Equipment/Weapons in your Inventory.
Unsheathe/Sheathe Ranged Weapon
When you press E, you wield or sheathe the bow. To wield a
different type of bow, select it from Equipment/Weapons in
your Inventory.
Block
Use the middle mouse button (you can reassign this from the
Options menu) to block an opponent’s attack. Also, while holding
down the middle mouse button, use the direction (W, A, S, and
D) keys to roll and block at the same time.
Attack Icon
Use the left mouse button to attack an enemy, whether
with hand-to-hand combat or a weapon. When using the
bow, click the left mouse button to shoot an arrow. The longer
you hold down the button, the more powerful the force of the
arrow, although accuracy might decrease. While charging your
shot, click the right mouse button to display and zoom the
crosshair. Rotate the middle mouse button to increase or
decrease the zoom.
Flourish Icon
The Flourish icon appears when you successfully land
several blows without reply on an enemy. When it appears,
click the right mouse button to unleash a vicious, unblockable
attack on the enemy. Direct the Flourish with the direction keys
(W, A, S, and D). String together multiple Flourish attacks by
continuing to make contact without missing.
Speech Icon
The Speech icon indicates there is someone to interact with
by pressing Tab. A green highlight indicates someone with
information for you. Purple indicates neutral characters. Red
highlighting indicates people hostile toward you.
 Loading...