


TABLE OF CONTENTS |
|
|||
Installation |
1 |
Crafting |
36 |
|
EverQuestIIAccount Key |
1 |
TradeskillArts |
36 |
|
|
|
Your Recipe Book |
36 |
|
Welcome to EverQuest® II |
1 |
The Crafting Process |
36 |
|
Creating Your Character |
1 |
Workshops |
37 |
|
|
|
|||
ChooseYour Race & Gender |
2 |
CharacterAdvancement |
38 |
|
ChooseYourAlignment |
2 |
Gaining Experience & Leveling Up |
38 |
|
ChooseYour Class |
2 |
Improving Skills |
38 |
|
CustomizeYourAppearance |
2 |
Advanced Training |
38 |
|
ChooseYour Name & Server |
2 |
AlternateAchievement |
39 |
|
|
|
Titles |
41 |
|
Character Basics |
3 |
ArtisanAdvancement |
41 |
|
Attributes |
3 |
|
|
|
Character Classes |
4 |
PvP(Player Versus Player) |
42 |
|
|
|
Gameplay on PvPservers |
42 |
|
User Interface |
9 |
PvPRules |
42 |
|
Character Selection Screen |
9 |
Player Communication |
43 |
|
Main Game Screen |
10 |
PvPCombat |
43 |
|
Hotkeys |
11 |
City PvP |
44 |
|
EQII Menu |
12 |
PvPDeath |
44 |
|
|
|
PvPRewards |
44 |
|
Gameplay Basics |
13 |
The Kill List |
45 |
|
Starting Cities: Freeport, Qeynos & Kelethin |
13 |
|
|
|
Right-Click Context Menus |
13 |
Community |
45 |
|
MovingAround |
13 |
Guilds |
45 |
|
Exiting the Game |
15 |
Station Players™ |
47 |
|
Inventory & Equipment |
16 |
|
|
|
Persona |
17 |
EverQuest® II Echoes of Faydwer™ |
48 |
|
Chat Windows & Commands |
19 |
|
|
|
In-Game Mail System |
20 |
EverQuest® II Kingdom of Sky™ |
55 |
|
Banking |
21 |
|
|
|
Trading with Other Players |
22 |
EverQuest® II Desert of Flames™ |
57 |
|
Buying & Selling |
22 |
|
|
|
The Open Market |
22 |
Customer Support |
59 |
|
Grouping with Other Players |
25 |
Using the Knowledge Base |
59 |
|
Housing |
26 |
Creating a Customer Service Ticket |
59 |
|
Spells, CombatArts & OtherAbilities |
26 |
Technical & Billing Support |
60 |
|
Recovering Health & Power |
29 |
Credits |
61 |
|
Combat |
29 |
|||
|
|
|||
Considering Enemy Reaction & Strength |
29 |
UserAgreement and Software License |
68 |
|
Attacking |
31 |
|
|
|
Heroic Opportunities |
32 |
|
|
|
Death |
33 |
|
|
|
Questing |
33 |
|
|
|
The Quest Journal |
33 |
|
|
|
The Quest Helper |
34 |
|
|
|
Acquiring Quests |
34 |
|
|
|
Collection Quests |
35 |
|
|
|
Betrayal Quests |
35 |
|
|
|
Completing Quests |
35 |
|
|
|
1

INSTALLATION
Insert the EverQuest II Disc 1 into your DVD-ROM drive. If your computer is set up to auto play discs, the installation should begin on its own within a minute.
Otherwise you can start the installation by opening My Computer, double-clicking on the DVD-ROM drive where the disc is located, and then double-clicking on the EverQuest II icon. Follow the instructions given by the setup program to complete the installation.
EverQuest II can help you register an account during installation. To do so, you must have an active Internet connection. You may receive a popup warning before the connection if you use firewall software or have certain Internet settings. Dialup users may be prompted to enter the telephone number of their ISP for connection. If the Internet connection fails, registration will be skipped, but can be completed the first time you start the game.
When installation is finished, double-click the EverQuest II icon on your desktop to start the game. You will be prompted for a Station.com account login. If you do not have an account, create one by clicking the New Account button and registering.
EverQuest II Account Key
The first time you log into EverQuest II you will be prompted for an account key. This is printed inside your disc holder.
WELCOME TO EVERQUEST II
Welcome to a brand new experience in online gaming. Whether you’re a newcomer or you’re familiar with the original EverQuest, prepare to have your assumptions challenged and your imagination entertained!
EverQuest II is an enormous and unique world rich with sights, sounds, and adventures. Thousands of players from all around the world will join you in this world, known to inhabitants as Norrath, to explore, quest for treasure, grow in renown, and participate in the battle between darkness and light for an experience unlike any other.
But first you must create who you will be in Norrath!
CREATING YOUR CHARACTER
The first step on your journey through EverQuest II is creating your character. This will be your avatar in the vast world, and it will be through this character that you will become known.
At the entry screen, click the Create Character button in the lower right of the screen.
Choose Your Race & Gender
Your first choices for your character are race and gender. There are 17 choices available for your race, each of which appears as a portrait. Click the portrait of the race you wish to be; the character image to the left will change to that race. Read the description that appears at the top of the window to learn the selected race’s unique abilities and advantages.
Above the portraits click either the Male or the Female button to pick your gender. Gender only affects your character’s appearance, not attributes or abilities. You will have the opportunity to customize your character’s appearance later in the creation process.
When you are satisfied with your choices of race and gender, click “Next” in the lower right corner of the screen.
2

Customize YourAppearance
After you select your race, you will be able to customize the appearance of your character. Click on the buttons inside the box on the left for general areas you would like to customize, such as eyes, head, and body. Some races may have additional areas for customization, like the iksar crest. Below the buttons is a list of specific features within the general area you selected. Click the feature you would like to adjust. On the right side of the screen, under the close-up view of your face, slider bars allow you to alter the feature. Color palettes are used to select the color of certain features.
You may lock settings so they cannot accidentally be changed by clicking on the padlock icon. To unlock the setting click on the padlock icon again. Unlock all settings by clicking the Unlock All button.
Randomizing Your Character’s Appearance
You can randomly generate your character’s appearance by using the randomize buttons. Click the Randomize All button to change all features (except those you have locked). Individual features may also be selectively randomized by clicking the Randomize button at the bottom of the box.
Saving and Loading Customizations
You may save the work you’ve done customizing your character’s appearance by clicking “Save” at the bottom of the screen. Enter a filename for the customization in the field and click OK to save. The character customization file will be saved with the
.ccf extension in a folder called “saved_customizations” in your EverQuest II directory.
You may load a saved customization by clicking “Load” at the bottom of the screen. Select the filename of the customization you want to load and click OK.
When you are satisfied with your character’s appearance, click “Next” in the lower right corner of the screen.
Choose Your Starting City
Your choice of starting city will influence your alignment, either good or evil. Good characters will begin in Qeynos or Kelethin, depending on race, while evil characters begin in the city of Freeport.
Note: Certain races are inherently good (such as high elves), or evil (such as trolls). These characters will not have free choice of starting city, but will make their home in the city or cities appropriate to their inherent alignment. Additionally, only certain races historically native to Faydwer may start in Kelethin: Fae, Wood Elves, High Elves, Half Elves, Dwarves and Gnomes.
Choose Your Class
Your class is your character’s profession, which will determine the ways in which your character will handle the challenges of the world and the role he or she will fill when playing with friends. Remember that some classes have an inherent alignment and may be race restricted. For instance, Dark Elves are evil, and cannot choose a good class such as Paladin. Classes available to your chosen race will be visible, while others will be grayed out.
Click on the portrait of the class you would like to play. A description of the class will appear at the top of the window.
When you have selected the class you wish to play, click “Next” to continue.
Choose Your Name & Server
The last stage of character creation allows you to pick a name and a server on which to play.
3
Selecting a Character Name
Enter the name you want your character to be known by in the field. This is the name all other players will know you by in the world. If you’re stumped for a name, click the Get Random Name button and one will be generated for you. Please do not pick offensive or otherwise inappropriate names, as these will be rejected. Review the Sony Online Entertainment naming policy on EverQuest2.com for rules on names. If the name you have chosen is already in use by another player, or your chosen name is not allowed for other reasons, you will be notified and given the opportunity to pick a different name.
Selecting a Server
Servers are the worlds in which you will play. Each server is the same basic world, but through the actions of the players and the communities that develop on them, each server is singular in its own way. Also, certain servers may have special rules or designations in place that differentiate them from others, such as these:
Antonia Bayle, Lucan D’Lere, Venekor |
Roleplaying Preferred Servers |
Vox, The Bazaar |
Station Exchange™ Servers |
Innovation, Valor, Talendor |
German Servers |
Runnyeye, Splitpaw, Darathar |
European English Servers |
Sebilis |
Japanese Server |
Storms, Gorenaire |
French Servers |
If you have friends in EverQuest II that you would like to play with, find out which server they are on and choose it as your play server.
CHARACTER BASICS
Attributes
Your character has five attributes that define his or her physical and mental abilities. Depending on your race, these attributes will vary to reflect innate strengths and weaknesses.
Strength represents your character’s physical strength. It affects your character’s ability to deliver physical damage, and his or her carrying capacity. Strength also affects Power for Guardians, Berserkers, Monks, Bruisers, Paladins Brigands, Swashbucklers, Rangers, Assassins and Shadowknights.
Agility is a measure of your character’s nimbleness and dexterity – increased agility makes your character harder to hit. For Brigands, Swashbucklers, Dirges, Troubadors, Rangers, and Assassins, Agility also affects Power.
Stamina is your character’s fortitude. It affects maximum Health and how much damage an unconscious character can take before dying.
Intelligence represents your character’s powers of reasoning and overall intellect. It can influence magic use, affecting magical damage. For Wizards, Warlocks, Conjurors, Necromancers, Illusionists, Coercers, Troubadors, Shadowknights and Dirges, it also affects Power.
Wisdom is a measure of your character’s spiritual strength and willpower. It can affect your character’s ability to resist magical attacks. For Templars, Inquisitors, Wardens, Furies, Mystics, Defilers and Paladins, Wisdom also affects Power.
Your character’s Power and Health pools are perhaps the most important to monitor when adventuring.
4
Health represents your character’s resilience, especially in battle. As your character takes damage, Health is reduced. It will regenerate with time and rest; however, if your Health is depleted, your character will die.
Power allows your character to perform spells and combat arts. These are often draining, and using them reduces your Power. It will regenerate with time and rest. You will not be able to use spells and abilities that require more Power than you currently have available.
Your character also has resistances to a variety of attacks he or she may encounter. The higher your resistance to a particular type of attack (such as heat, magic, or physical attacks), the less that attack will harm you.
Character Classes
There are 24 classes to pick from for your character. Some, however, are only available to characters of a particular alignment. For example, only evil characters from Freeport can choose to be a Shadowknights, while only good characters from Qeynos can be Paladins.
Guardian
Those who seek up-close combat will find the melee-driven style of the Guardian to be to their liking. The Guardian is the front-line force in a party. Combining the power of armored protection and physical prowess, the Guardian can take large amounts of physical damage from enemies and remain standing. This style of combat requires the Guardian to be in close range with his target at all times. The
Guardian’s role allows the less resilient members of his party to perform their roles more effectively. The Guardian can wear all forms of armor and may choose from all forms of weaponry.
Berserker
Those who seek to devastate their foes through an expertise in martial weaponry will find the Berserker to be an exciting profession. The Berserker’s skills in melee combat consume the entirety of his role and abilities. The Berserker is the personification of unbridled rage and fury, making him a powerful combatant. The Berserker serves his party on the frontlines of battle where he can best vent his rage upon
his enemies in melee combat. The Berserker shows neither mercy nor apprehension in combat. The Berserker can wear all forms of armor and may choose from all forms of weaponry.
Monk (Good Only)
Those who desire to engage in graceful, hand-to-hand martial combat will find the Monk profession to be an exciting path. The Monk
is a spiritual combatant who practices philosophies of mind-over- body. The Monk is best served on the frontlines where her advanced physical skills are most effective against her foe. The Monk can wear leather armor and may choose from hand-to-hand or blunt weapons.
Bruiser (Evil Only)
The Bruiser profession is ideal for those who want to pummel their enemies hand-to-hand. The Bruiser is a juggernaut of physical pain, having transformed his body into a vicious tool for inflicting suffering on his foes. The honing of the Bruiser’s physical body conveys offensive as well as defensive advantages. The Bruiser is most effective on the frontlines of combat. The Bruiser can wear leather
armor and use hand-to-hand or blunt weapons.
5
Paladin (Good Only)
Those who desire to fulfill a role of nobility, honor, and virtue will find the Paladin profession to be ideal. The Paladin excels in martial combat and possesses divine magical abilities to enhance her skills in combat. As a true martial combatant, the Paladin is most efficient on the frontlines where she is able to engage the enemy in close combat. By invoking her protective magic, the Paladin may temporarily
augment her martial skills, increasing her capabilities for both defense and healing during a fight. The Paladin can wear plate armor and may use most oneand twohanded weapons.
Shadowknight (Evil Only)
The Shadowknight profession is ideal for those who seek personal power through physical force and live to spread fear, hate, and despair. The Shadowknight is trained in martial skills and has the ability to conjure dark magic to enhance his abilities in combat. This combination of offensive and defensive capabilities makes the Shadowknight a very effective frontline combatant. The
Shadowknight can wear plate armor and use most oneand two-handed weapons.
Warden
The Warden profession is ideal for those who desire to use harmonious magic provided by nature to fulfill a protective role in the world. The Warden serves her party by invoking her druidic powers to mend wounds and purge the effects of disease and poison that afflict her allies. The Warden may also invoke powers to bestow temporary protective effects on and enhance the attributes of her allies, as well as
hinder or harm her foes. The Warden can wear leather armor and may use hammers, staves, maces, and swords as weapons.
Fury
Those who seek to harness the feral and destructive forces of nature will find the Fury to be a suitable profession. Although the Fury conjures his power from nature’s ferocity and is a druid of predation and vengeance, he can play a vital support role in the party by providing magical healing and protection. The Fury can enhance his allies’ physical attributes and abilities in combat, and bring down
destructive forces upon his enemies. The Fury can wear leather armor and use weapons such as hammers, staves, maces, and swords.
Templar (Good Only)
The Templar profession is ideal for those who desire to excel in a role of support by conjuring powerful restorative and protective magic to benefit allies. The Templar serves her party by mending the wounded and purging illness and suffering from the afflicted. The Templar may also use her powers to bestow temporary augmentations to her allies’ defenses and attributes. As a secondary application of her
divine powers, the Templar may invoke offensive powers that will hinder or harm adversaries. The Templar can wear plate armor and use hammers, staves, and maces as weapons.
Inquisitor (Evil Only)
The Inquisitor fulfills a militant support role by providing restorative and protective benefits to her allies. The Inquisitor is able to mend wounds and purge ailments of all sorts, while striking opponents with divine power. The Inquisitor can wear plate armor and use hammers, staves, and maces as weapons.
6
Mystic (Good Only)
Those who seek a symbiotic connection with the spirit world in order to fulfill a supportive role will find the Mystic to be to their liking. The Mystic is a shaman of spiritual preservation and enlightenment, offering magical healing and relief from disease and poison. The Mystic can also use her powers to grant brief enhancements to her allies’ attributes and provide magical protection in combat, as well as
weaken and harm enemies. The Mystic can wear chain armor and may use hammers, staves, spears, and maces as weapons.
Defiler (Evil Only)
Those who crave power through the corruption and enslavement of the spirit world will find the Defiler class to be an ideal profession. The Defiler best serves as a first line of defense for the party, being able to heal wounds and remove ailments that afflict allies. The Defiler is also able to augment his allies’ attributes or enhance their abilities in combat. In addition, the Defiler can weaken and harm enemies with
magical attacks. The Defiler can wear chain armor and use hammers, staves, spears, and maces as weapons.
Wizard
The Wizard profession is ideal for those who seek to unleash the purest forms of destruction through the arcane magic of fire and ice. Wielding these powerful elemental energies, the Wizard serves her party by devastating opponents from afar with damaging magic. The Wizard can wear cloth armor and use staves, wands, and daggers as weapons.
Warlock
Those who desire to wield the destructive forces of poison and decay in order to obliterate their foes will find the Warlock profession to be ideal. The Warlock serves his group best from behind the frontlines where he can better avoid a physical confrontation and ravage opponents with poison and disease. The Warlock can wear cloth armor and use staves, wands, and daggers as weapons.
Conjuror (Good Only)
The Conjuror suits those who wish to summon powerful minions to perform their bidding in combat. The Conjuror’s minion can be a creature native to Norrath or a manifestation of an elemental force. The Conjuror works best behind the frontlines of combat, directing his minion and wielding arcane elemental spells. These spells can strike down opponents or weaken their abilities. The Conjuror can wear
cloth armor and may use staves, wands, and daggers as weapons.
Necromancer (Evil Only)
The Necromancer is ideal for any who are intrigued by the mastery of death and the commanding of undead servants. The Necromancer is able to summon a wretched undead servant to attack his enemies, and use the powers of death to weaken and destroy his enemies.
The Necromancer can wear cloth armor and use staves, wands, and daggers as weapons.
Illusionist (Good Only)
The Illusionist profession is an ideal choice for those who seek to fill a role of support and control through the magic of illusions. The Illusionist supports her party, using illusions to confuse, misdirect, and damage opponents. These illusions require little maintenance by
7
the Illusionist, freeing her to concentrate on helping bring order to chaotic combat situations. The Illusionist can also bestow temporary augmentations to her allies’ attributes, as well as offensive and defensive capabilities. The Illusionist can wear cloth armor and use staves, wands, and daggers as weapons.
Coercer (Evil Only)
Those who seek to dominate their foes, subjugating an enemy’s will to her own, will find the Coercer to their liking. The Coercer serves a party best behind the frontlines. She can subdue multiple opponents, send enemies fleeing in induced unbridled terror, and even seize control of minds. A Coercer can also mentally augment her allies, improving their abilities in combat. The Coercer can wear cloth armor
and use staves, wands, and daggers as weapons.
Troubador
The Troubador is ideal for those who desire to inspire and protect their allies through the unique magic generated by their songs of bravery and heroism. The Troubador best serves her party from behind the frontlines of combat. Through her music, the Troubador inspires allies to perform outstanding feats of skill and courage. The Troubador may also use her songs to demoralize her enemies. The Troubador can wear
chain armor and use dual-wield and one-handed weapons.
Dirge
The Dirge is an ideal profession for those who desire to use songs of misery and sorrow to inspire intense battle rage in their allies and despair in their enemies. The Dirge best serves his party behind the frontlines where he can play mournful songs behind the protection of his allies. The Dirge’s songs inspire bold feats in allies, boosting their attributes and skills, and demoralize enemies, diminishing their
strength in battle. The Dirge can wear chain armor and use dual-wield and onehanded weapons.
Ranger (Good Only)
The Ranger is an ideal profession for those who seek mastery of the wilderness. Unrivaled in her abilities to hunt foes and locate dangers in the wilds of Norrath, the Ranger best serves her party in the midst of combat. Using stealth, perception, and cunning, the Ranger flushes out the enemy and initiates combat. The Ranger can then drop back from the frontlines where she can attack with ranged weapons. The
Ranger can wear chain armor and use dual-wield and one-handed weapons.
Assassin (Evil Only)
The Assassin profession is ideal for those who wish to master sinister strikes and hidden attacks. The Assassin serves his party best in the frontlines of combat. He surveys the battle for potential prey and attacks of opportunity, striking from the shadows to inflict massive damage. The Assassin can wear chain armor and use most dual-wield and one-handed weapons.
Swashbuckler (Good Only)
Those who seek to engage in combat with grace and panache while crippling opponents with strategic attacks will find the Swashbuckler profession to their liking. The Swashbuckler is a rogue who prefers to perform flamboyant acts of skill and daring, striking suddenly and using shadows to confuse opponents. The Swashbuckler best serves a party as a secondary line of physical offense, inflicting damage on
8
opponents—particularly in devastating first strikes. The Swashbuckler can wear chain armor and use most dual-wield and one-handed weapons.
Brigand (Evil Only)
Those who enjoy a tough and unpredictable scrapper that works the dark corners of the world for gain through intimidation will find the Brigand to their liking. He serves his group best as an unseen element in the chaos of battle, positioning himself just behind the frontlines and dealing powerful strikes of opportunity against the enemy. The Brigand can wear chain armor and use most dual-wield and one-handed weapons.
USER INTERFACE
Character Selection Screen
When you have more than one character in EverQuest II, you can select which one you want to play from the Character Selection Screen. Your characters are displayed along with their names, current level, the servers they are on, and the zone they are camped in.
EXAMPLE:
On the left of the screen is a list of your characters. Click on the one you would like to play. When your selected character appears, click Play in the lower right of the screen to enter the world.
You can also select the character you wish to play from the patcher screen, from the pull-down menu that appears on the left.
Deleting Characters
You may delete a character by selecting him or her and clicking the Delete button in the lower right of the screen. Please be certain you want to do this! You will be prompted to type in the character’s name to confirm the deletion.
Resetting Appearance
You can change your character’s appearance once by clicking the Set Appearance button in the lower right of the screen. This will return you to the character
9
customization screen where you may alter your character’s appearance.
Note that you may only do this once, and once you reset your appearance and click “Finish” the button will no longer appear on the Character Selection Screen.
Set Alternate Model Appearance
U.S. and European players can now use unique Asian-styled characters that were developed for the EverQuest II East project created by SOGA, a joint-venture with SOE’s development studio based in Taiwan. These alternate models can be seen ingame by players who set their Options to display them.
Click the AlternateAppearance button to enter character customization and set your alternate model appearance. This will not change your original character appearance, but will set your character’s appearance for those who have alternate models turned on.
Main Game Screen
These are the basic elements you will find in main screen user interface. The EverQuest II user interface is highly customizable to suit the individual. All windows can be resized and moved to your liking.
1.EQII Menu Button. Click this button to get access to menus, controls, and other actions. If you’re not sure how to do something, you can find it through this menu.
2.Hotkey Bar. Place spells, combat arts, and other actions in this bar for quick and easy use.
3.Experience Meter. This meter tracks your progress toward your next level. The gold bar tracks total experience and is divided into 10 blocks; when all blocks are filled you will level up. The blue bar tracks progress toward the next full block in the gold bar.
4.Compass. Displays your heading.
5.Clock. Displays the day and night cycles in the game and shows the time when you move your mouse over it.
10
6.Chat Window. Displays conversations and game text.
7.Dialog Bubble. When characters speak using the /say command, their text is displayed in a dialog bubble.
8.Spell Effects. Displays effects that are currently affecting your character, such as spells, diseases, combat arts, poisons, and others.
9.Group Window. Health and Power meters for other members of your group are displayed here. In addition, there are two buttons in this box that will help you find groups.
10.Character Condition Meters. This displays your character’s current Health, Power, and Concentration.
11.Target Window. Displays information about your current target, such as condition and relative strength to you.
12.Implied Target Window. This window appears when the character or creature you have targeted has another being targeted. For example, if you target a group member that is targeting an opponent, any beneficial spells you cast will land on your group mate while hostile spells will land on the opponent.
13.Maintained Effects. Displays the spell or combat art effects you are currently maintaining on yourself, friends, or enemies.
14.Quest Helper. Displays the currently selected quest in your Quest Journal and the next goal to be completed in the quest.
Hotkeys
Hotkeys allow you to perform actions quickly. Each hotkey slot corresponds to a number key, and the action in that slot will be executed when the key is pressed.
To assign an action to a hotkey, open your Knowledge Book by pressing the [K] key and drag-and-drop the icon to a slot on the hotkey bar. If there is an action already assigned to the slot, the new action will replace the previous action. The old action will be attached to your mouse pointer for placement in another hotkey slot, or you may delete it by clicking anywhere in the main world view area.
You may also create hotkeys from your inventory window by dragging-and-dropping an item slot into a hotkey slot. This can allow for quick changes of weapons or quick activation of equipped items with special usable effects, such as poisons and potions.
You may open and use additional hotkey banks. Right-click on the hotkey bar and select “Open New Hot Bar.” These hotkey slots can be activated quickly using the [Alt] key and the number for the secondary bank, and the [Ctrl] key plus the number for the tertiary bank.
Changing the Size of Hotkey Icons
You can alter the size of your hotkey bars and icons by right-clicking on the hotkey bar and selecting “Set Icon Size” from the context menu. Adjust the slider bar to change the size of your icons.
11
Custom Hotkeys: Macros
Macros allow you to define your own hotkeys. You can create and edit macros from the Macros tab of the Socials window (press the [O] key). Click one of the open slots; this will open the Edit Macro window.
You can set the macro’s name, icon, and up to three commands to perform when the macro is executed. Enter commands in the three text fields. These fields take only one command per text field (any more will be ignored). Click the Test button to check that the macro functions as you intend.
Once created, you can execute a macro by clicking the button in the Socials window, or dragging-and-dropping the icon into a hotkey slot. You can change an existing macro by right-clicking on it and selecting “Edit.”
EQII Menu
The EQII Menu will help you navigate to any option, setting, or action you might need in the game. If you’re not sure where to find something, check here.
Achievements. Opens up your class achievements UI window (default [L] key).
Inventory. Opens your inventory screen (default [I] key).
Persona. Opens your persona screen (default [P] key).
Knowledge. Opens your Knowledge Book, which lists all spells, combat arts, tradeskills, and abilities (default [K] key).
Recipes. Opens the tradeskill window listing recipes your character knows (default [N] key).
Quest Journal. Opens your Quest Journal where all your quests are tracked (default [J] key).
Waypoints. Displays a list of locations or group members in your area. Select one to see a light trail that will lead you to the target (default [Alt] +[W] key).
Map. Displays a map of your current location, if one is available (default [M] key). Societies. Displays a list of tradeskill societies, their levels, members in each, and other information. Societies you are a member of are highlighted in green.
Guild. Displays the guild window, if you are a member of a guild (default [U] key).
Socials. Displays a list of social actions and custom macros (default [O] key).
Community. Opens your Friends and Ignore lists (default [Y] key).
Options. Opens a window listing all options for adjusting the game settings, such as graphics, sound, and key mappings. Explore the many ways that you can fine tune user interface settings to suit your unique play style.
Claim Rewards. If you have special gifts awaiting you, such as veteran rewards, check here to see what is available for you to claim.
Help. Opens the help window where you can find quick answers to your questions ingame and access Customer Service.
Report a Bug. Use this to report any game bugs.
12

Camp (Logout). Use this when you want to exit EverQuest II. Camping takes 20 seconds to complete. Make sure you are in a safe location when you exit the game.
GAMEPLAY BASICS
This section will explain the basics of making your way through Norrath and building your fame and fortune.
Starting Cities: Freeport, Qeynos & Kelethin
The devastation that followed the Shattering left three centers of civilization intact: the cities of Qeynos and Freeport, and the recently rediscovered treetop citadel of Kelethin. Each harbors citizens of differing philosophical outlooks.
Qeynos is a kingdom founded on order and valor. Populated by the surviving good races and those who believe in a better future, the citizens of Qeynos seek to restore prosperity to Norrath. The city is guided by the benevolent and influential Antonia Bayle, descended from the great house that ruled the Kingdom of Qeynos in the past. She regards herself not as a queen, but as a representative of her people’s will, and is responsive to their needs. Her good nature and charisma inspire Qeynos’ residents to greater achievements.
Freeport is ruled by the will of just one individual, the Overlord Lucan D’Lere. His history is obscure, his power great, and his rule of Freeport uncontested. He is merciless in maintaining and expanding his power. The Overlord’s influence permeates all of Freeport, its citizens held in thrall through fear and their leader’s self-aggrandizing manipulation of history. Many of the citizens of Freeport live in squalor, and they are constantly reminded that the only reason they have survived Norrath’s devastation is through the strong hand of the Overlord.
Kelethin was long forgotten and thought lost by most Norrathians after the Shattering. The Fier’Dal left hundreds of years ago, and the once shy Fae folk moved in and made the city their own. Here they continued to grow, change and develop a unique culture, true to their origin as the children of Tunare, Mother of All. Queen Amree rules the Fae with great wisdom and compassion born of the trials her peoples have faced. Now at last new folk are coming to the verdant forest of the Faydark. They are warmly welcomed by the Fae; Allies will be needed in the upcoming struggles.
Right-Click Context Menus
In any situation you find yourself, whether dealing with non-player characters, doors, objects, abilities, and more, you can always find a list of actions and information by right-clicking on them. This will open a context menu listing the commands you can issue.
Moving Around
You control your character in two ways, using the keyboard or the mouse. You may also use them in conjunction. The default keyboard commands for movement are the [W], [A], [S], and [D] keys:
•[W] moves you forward
•[A] turns you to the left
•[D] turns you to the right
•[S] moves you backward
•[Page Up] tilts your view up
•[Page Down] tilts your view down
•The number pad will also direct your character using the [8], [4], [6], and [2] keys, as will the directional arrow keys.
Mouselook
“Mouselook” allows you to use your mouse to look around your character and move
13

through the world. It is particularly useful underwater, where up and down movement is needed.
To move the camera view. Hold down the right mouse button and move the mouse. The camera will circle around your character. Look up and down by moving the mouse vertically.
To move. Hold the right mouse button, and press the left mouse button to move in the direction the camera is facing.
To zoom camera view. On a mouse with a scroll wheel, roll the wheel toward you to zoom out from your character. Roll the wheel forward to zoom in close to your character. Rolling the wheel forward will eventually put you into the first-person camera view. Pressing the default [F9] key will toggle between first-and-third person camera views.
Auto-Follow
When grouped you can auto-follow another group member by right-clicking the member and selecting “Follow” or typing /fol. Use of auto-follow is not recommended in areas with narrow, twisting hallways, or near steep cliffs, water or lava.
Auto-Run
Auto-run keeps your character running without having to hold down the direction keys. This is useful when traveling long distances on foot.
To toggle auto-run on, press the [Numlock] key. Press it again to stop, or press the forward [W] or back [S] key.
While auto-running, you can change direction without stopping by pressing the left or right turn keys, when using mouselook, hold down the right mouse button and move the mouse right or left to turn.
Climbable Walls
In EverQuest II, you can scale some walls in the Desert of Flames, Kingdom of Sky and Echoes of Faydwer zones. Watch for subtle visual clues such as climbing spikes, a heavily scarred wall surface, or the flattened trunk of a tree.
You will automatically enter the stance necessary to traverse these special types of terrain when you encounter them. Mounts will be dismissed when you start to climb.
When climbing walls, you move similarly to normal movement. For example, moving forward will cause you to climb up, while moving back will make you climb down.
Jumping will disengage you from the vertical surface. You will fall when doing this, so be sure you’re not too far from the ground!
You will be unable to fight while climbing. You may, however, still maintain spells and be healed. Encounter lock will be broken if you begin a vertical climb during a battle.
Mariner’s Bells
You can get around cities and some outlying areas by using mariner’s bells. Ring a mariner’s bell by right-clicking on it. A window will open with a list of places to which you can travel. Select your destination and click the “Zone” button.
Walking Between Zones
When traveling to different locales on foot, you may come to gates or other portals. Move your mouse pointer over them to see the name of the place (or “zone”) beyond
14

it. Click on the portal to travel to your destination. Some outdoor zones have no distinctive entries, and will automatically transport you as you cross the border.
Mounts
Mounts such as horses and flying carpets are available for purchase in some cities and allow you to travel the world more quickly. The cost can be in coin or status points, or possibly both depending on the quality of the mount. Mounts may also be rewards for completed quests. When you acquire a mount, you will receive an item (such as a horse whistle) that will call your mount. You may cast spells and fight while mounted. Mounts will disappear when you cross water. Once you climb out on the other side, the mount will reappear. Mounts cannot be used in most dungeons.
Griffin Towers, Carpets & Ships
There are many modes of travel in the world, such as griffin towers and flying carpets. These can carry you quickly to locations within a zone, or even transport you to other zones. Some griffin routes require the traveler to complete a short quest to gain access the first time.
With the EverQuest® II Echoes of Faydwer™ expansion, a ship route has been established between the Thundering Steppes, Nektulos Forest and Butcherblock Mountains. The ship docks at each of these ports at regular intervals; simply board the ship, and it will transport you.
Teleportation Spires and Cloud Transport
Spires (found in several zones in Norrath) can transport you to various places in the EverQuest® II Kingdom of Sky™ expansion. You must have the expansion enabled and hail the nearby Gate Caller Scion to receive a teleportation shard in order to use the spires. Just remember that the Overrealm is dangerous for characters under Level 50. Kingdom of Sky also features unique cloud transports between floating isles. To use one, right-click on the cloud at the station, and choose your destination from the context menu.
Sprinting
Your character can run faster in short bursts using the Sprint ability. If you are forced to flee a fight and yell for help, Sprint can help you put some distance between yourself and a pursuing enemy. Sprinting consumes Power; if you run out of Power you will slow down to your normal running speed.
Swimming
Your character can wade in shallow water, but when you enter deeper water, you will automatically begin to swim. While underwater, a breath meter will appear on your screen.
This measures how long you can stay underwater, holding your breath. Swim to the surface to replenish your breath by looking up (using mouselook, or [Page Up] on the keyboard) and moving forward. You will eventually break the surface of the water and take a breath of air. Don’t wait too long to replenish your breath if you are deep underwater — you may run out of air before reaching the surface and face death by drowning.
Falling
Falling long distances hurts. If your character falls from a high position, he or she will take damage. Some classes have a Safe Fall skill that allows them to minimize or even negate falling damage. The Fae have a unique Feather Fall skill that works similarly.
Exiting the Game
To leave EverQuest II, you should “camp” your character. This safely logs your
15

character out of the game world, and he or she will be in the same place when you next return. The camping process takes 20 seconds.
To camp, click the EQII button and select “Camp” from the menu. You may also use the /camp command. Camping will return you to the Character Selection screen. If you want to completely exit the game, select “Camp to Desktop” or use the /camp desktop command.
You may also instantly quit EverQuest II without the 20-second camping process; however, your character will remain in the game world for a period of time after you log out. Use the /quit command to exit the game in this way.
Note that when quitting without camping, because your character remains in the game world for a period of time after you log out, your character is still vulnerable to attack. Only quit when you are in a safe location.
Inventory & Equipment
The inventory screen displays what your character carries and wears. Open your inventory screen by pressing the [I] key. In the center of the window is an image of your character, surrounded by equipment slots. Items placed in these slots will be worn by your character in the indicated location.
Equipping Items
Equipment slots are located around your character portrait. To equip an item, drag-and-drop it on your portrait, or double-click the item to have it placed in an appropriate open slot. You may also right-click on the item and select “Equip” from the context menu. The item will be equipped in the proper slot (if you cannot equip the item, it will return to an inventory slot).
To unequip an item drag-and-drop it back into a general inventory slot,
double-click on it, or right-click it and select “Unequip” from the context menu.
At the bottom of the inventory window is your encumbrance. The number on the left is how much weight you currently carry, while the number on the right is the maximum you can carry without slowing down.
General Inventory
Beneath your character’s equipment slots is a line of six slots that are your inventory slots. These are items that your character carries on his or her person but has not equipped. Containers such as bags or backpacks are kept here and expand your character’s inventory space. To automatically open all containers in your inventory, press the [B] key.
16

You can have items automatically placed into your inventory in an available slot by dragging and dropping the item on the space labeled “Drop items here to add to inventory” near the bottom of the inventory window.
Item Overflow
There may be times when you receive an item, such as a quest reward, but do not have space in your inventory to hold it. The item will go into an “overflow” slot, appearing in the lower left corner of your character’s inventory image. You cannot place items in this slot yourself. Overflow items should be moved to your inventory when you have space by dragging and dropping them into open slots. You will see a warning message on the main screen alerting you that you have items in your overflow.
Carried Money
Your character’s carried money is shown in four denominations beneath the inventory slots: platinum, gold, silver, and copper. To move money, click and hold a coin denomination while dragging. If you wish to move just a single coin, hold the [Ctrl] key while clicking and dragging. To move a specific portion of the coin carried, hold the [Shift] key while clicking and dragging; a window will open in which you may specify how much money you want to pick up.
In EverQuest II, currencies have the following values:
1 platinum = 100 gold = 10,000 silver = 1,000,000 copper
Weight Allowance
At the bottom of the inventory screen is your carried weight allowance and encumbrance. It is displayed as a ration, with the number before the slash representing the weight of what you currently carry, and the number after the slash representing the maximum amount of weight your character can carry without movement being hindered.
Attuning Items
Certain items you find as you adventure will require you to “attune” them before equipping them. Attuning an item allows you, and only you, to use it. Once attuned, an item can never be sold or given to another player character. Before attuning an item, you will be prompted to confirm the process. Once an item is attuned, the only way to dispose of it is to sell it to an NPC merchant or destroy it.
Mending Items
The wear-and-tear of dying takes a toll on your character’s equipment. Without repairs, equipment can become unusable and will be automatically unequipped at 0% durability. If you do not have room in your inventory for these items, they will be stacked in your overflow inventory. Fortunately, items are never permanently broken.
Menders are located throughout the world and can repair your equipment for a fee. Click on a mender and select the Repair tab. Your damaged items will be displayed, as well as the cost to repair them.
To repair an item, select it and click the Repair button. You can also click the Repair All button to repair everything at once. The amount for the repair will be deducted from the money your character carries.
Persona
The persona window shows important statistics about your character, his or her relationship to elements in the world, and allows you to set certain options and flags for your character.
17
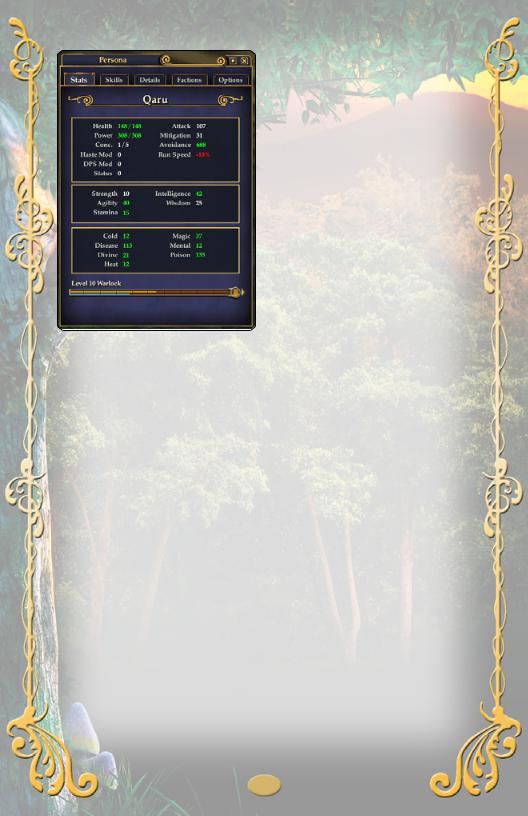
Stats
This tab displays vital information about your character, such as physical attributes, status points, and resistances. Stats in green are being augmented by spells, abilities, or equipment in some fashion. Stats in red have been reduced for some of the same reasons.
Skills
Your skills page includes your combat proficiencies with different weapons, as well as your avoidance ratings. Casting classes also display their abilities in various schools of magic.
Details
Here you can see and set details for your character, such as the zone where your house is and titles your character has earned and can display. Your surname may be set or changed from this tab. You may also customize the voiceover sounds your character makes when performing emotes and while in combat.
Factions
Factions are organized groups or creatures in the world that you will encounter. The Faction tab under Persona will show you how members of these factions will react to you.
Options
Checkboxes allow you to turn on or off these options for your character:
Character Flags
Anonymous. When checked, your character’s level and class will not appear on lists using the /who command.
Roleplaying. When checked, this shows other players that you are roleplaying your character. Your level and class will not appear on lists using the /who command.
Away From Keyboard. When checked, this lets other players know when you are currently away from your keyboard and not able to respond. If you wish to leave a message for players who send you tells, type /afk <message>.
Looking For Group. When checked, this lets other players know you are available to join a group.
Looking For Work. When checked, this lets other players know you are available for crafting/tradeskill tasks.
Graphics
Head Cover. Select display options for head covering from this menu.
Hide My Illusion Form. When checked, this will keep your character’s true form visible even while under a spell effect that changes your character’s form.
Display Heraldry On Cloak. When checked, your guild’s heraldry will be displayed on your cloak. When unchecked, the default appearance of your cloak is displayed.
18
Privacy
Decline Invitations to Duel. When checked, requests from other players to duel will automatically be rejected.
Decline Invitations to Trade. When checked, attempts to initiate a trade with your character will automatically be rejected. This will also prevent unwanted tradeskill commission invitations.
Decline Invitations to Join Groups. When checked, invitations to join groups will automatically be rejected.
Decline Invitations to Join Raids. When checked, invitations to join in raids will automatically be rejected.
Decline Invitations to Join Guilds. When checked, guild invitations will automatically be rejected.
Chat Windows & Commands
The chat window displays descriptions of events in the game, communications from other players, and non-player character dialogue. You can also issue commands through the chat window.
To issue a chat command, press the [/] key or the [Enter] key to activate the command line. You can customize your chat window and messages by right-clicking on the chat window for a context menu of options:
Chat Options. Allows you to customize what messages appear in the window, the font size, and more.
New Chat Window. Opens another customizable chat window.
Open Existing Chat Window. Opens the current chat window.
Add New Tab. Creates a new tabbed chat window within your window instead of creating a new separate chat window.
Detach Current Tab. Separates a tabbed chat window, turning it into a separate chat window.
Remove Current Tab. Deletes the current tabbed chat window.
Clear Chat Text. Clears the current chat window of all text.
Always Chat Here. Sets the current chat window as the default location your chat commands will be issued through.
Window Settings. Allows you to set the appearance of the window, such as its opacity, and lock it in its current location. The “Click through enabled” check box will lock the window in place and allow you to click through it, onto objects behind it.
Lock Window. Locks the current window into place so it can’t be moved accidentally.
Chat Options
You can tailor your incoming chat by turning on and off different types of chat channels and assigning specific channels to additional chat windows and tabs. Rightclick on your chat window and select “Chat Options.” Uncheck the channels and types of messages you do not wish to receive in this window. Do the same for other
19

chat windows or tabs to tailor what each window displays. For example, you can create a chat window that only displays /tell messages sent directly to you.
The button in the lower left of the chat window that appears as a dialog bubble, directly below the scroll bar, allows you to set your default communication channel:
Say (/say <message>). Broadcasts your message to all those nearby, within earshot. A simple /s will also work. Say is the default chat setting when you begin. Unless you change it, all messages you type after hitting [Enter] will see seen as /say.
Group (/gsay <message>). Messages are sent only to those who are currently in your group. The command /g will also work.
Guild (/guildsay <message> <message>). Broadcasts your message only to guild members. You only need type in /gu
Officer (/of <message>). Broadcasts your message to all officers in your guild. Raid (/r <message>). Broadcasts your message to all members of your raid group. Reply (r <message>). Sends your message to the last character who sent you a /tell.
Out of Character (/ooc <message>). Broadcasts your message to those who have the Out of Character (OOC) channel toggled on. This channel is used for general chatting with other characters in the same zone.
Additional Chat Commands
Auction (/au <message>). Broadcasts your message to all those who have the Auction channel on.
Shout (/sh <message>). As the name implies, this broadcasts your message to all characters in the same zone.
Chat Channels
Chat channels are custom, often temporary channels. Each channel is numbered sequentially in the order that you joined it. To speak in a chat channel, type /<#> <message>.
World Channels are permanent channels, automatically joined by your character when you qualify. These include the city, class, tradeskill and level channels.
Regular chat channels are created by players and may be used for general chat or to facilitate communications (for example) within guild alliances. To create or join such a channel, type /join <nameofchannel>. It will be assigned a number in your list.
You cannot re-number your custom chat channels at this time. However, you can leave them all, and then rejoin them in the order you wish to have them numbered.
You may leave a channel at any time by typing /leavechannel <#> or merely disable it via Chat Options, by removing the checkmark by the channel name.
In-Game Mail System
You can send messages, and even coins and items, to other players in the game using the Norrathian Express in-game mail system.
You can access the mail system by using the kiosks throughout the world. Right-click the kiosk to open the mail window. The Inbox tab will display any messages you have received. Click on a message to open the letter. If there are gifts attached to the letter, click the Receive Gifts button to claim them; they will appear in your inventory. You can reply to the sender by clicking the Reply button.
20
Note: Messages are only stored for up to 30 realtime days, so be sure to check your mail. Messages older than 30 days will automatically be deleted.
Click the Send tab to create a new message. Enter the name of the character you wish to send the message to in the “To:” field. You may also enter the subject of the message in the “Subject:” field. Click in the blank space and type your message.
If you wish to send an item with the message, drag- and-drop the item into the space at the bottom of the message. Only one item or stack of items may be attached to each message. If you wish to send coin, click the Give Coin… button and enter the amount. Click the “Send” button when you are ready to send the message.
Note that it does cost money to send messages, and messages bearing gifts are more expensive to send. Also, mail delivery is not instantaneous; it takes approximately one half-hour for your message to reach the recipient.
Mail travels freely between good and evil characters. Items designated as “Lore” cannot be mailed.
Banking
Banks allow you to store money and items safely. Bankers are usually located within cities. Click on the banker NPC to open your bank window, or right-click and select “Bank.”
To move items into and out of your bank, simply drag-and-drop them into open slots. If you wish to move an a specific number of items from a stack, hold the [Shift] key while dragging-and-dropping; enter the amount of the item you wish to move in the window that opens. You can move one unit of a stack by holding the [Ctrl] button while dragging- and-dropping.
To open all containers in your bank vault, press [Shift][B].
Items can be automatically placed in open slots in your bank by dropping them on the space in the bank window labeled “Drop items here to auto-bank.”
You can deposit coins in your bank by dragging-
and-dropping in the same way.
Shared Bank Slots
The shared bank slots allow you to transfer some items and coins between your characters on the same account. Items placed in these slots will appear in your other characters’ shared bank slots, with limitations: Shared bank slots of characters of one alignment are restricted to only those of the same alignment; for example, items your evil character in Freeport places in shared bank slots will not appear in your
21

good Qeynos character’s shared bank slots, and vice versa. Also, items that cannot be dropped or traded, or are designated as LORE, cannot be placed in shared bank slots.
Trading with Other Players
You can trade items and coins with other characters by right-clicking on them and selecting “Trade” from the context menu. This will open a trade window.
Offer items to trade by dragging them into the top set of slots; offer coins by dragging them into the upper row of coins. Beneath this area are displayed any items or coins the other character is offering to trade to you.
Use:
click+drag to access all of the money of a given denomination [Shift]+click+drag to choose a specific amount of coin [Control]+click+drag to choose a single coin.
To finish a trade, press the Accept button. When both characters involved in the trade click the Accept button, the trade is completed. If either side wishes to make a change to the offer the trade must be canceled and reinitiated. You may cancel a trade at any time by pressing the Reject button.
Always examine the items the other party is offering in the trade window, to ensure you are getting exactly what you want, BEFORE you press “Accept”.
Buying & Selling
You can find merchants who buy and sell goods throughout cities and even in the wilderness. To engage a merchant, click on him or her, or right-click and select “Merchant” from the context menu. This will open the merchant window. The money you carry is displayed at the bottom of the window. Money kept in the bank cannot be used in merchant transactions. You must first withdraw the coin from the bank in order to spend it.
Click the Buy tab to see what the merchant has for sale. You can learn more about an item for sale by right-clicking it and selecting “Examine” from the context menu. To buy an item, select it and click the Buy button at the bottom of the window.
Items that you can use are listed in white text. Items that you cannot use due to level, class, race or faction are listed in red text.
Click the Sell tab to see what items you may sell from your own inventory and the amount of money the merchant is willing to pay you for each item. Items you have equipped are not shown. If there are items that you don’t want to sell by accident, select the item from the list and click on the “Not for sale” checkbox at the bottom of the merchant window.
To sell an item, select it and click the Sell button. Some merchants are choosey about the items they are willing to buy. You may need to look around to find a buyer for certain items. Also keep in mind that not all merchants pay the same prices for goods, and may offer different sums for the goods you are selling.
The Open Market
Once you own a living space of any type, you may open a store to sell items. To open a store, first acquire a Market Bulletin Board. These are available from merchants in your home town. Place it on the wall of your house. Right-click on it and select “browse market” from the context menu. This opens the store window.
You can also access your store from any Broker in Norrath that is of the same
22
 Loading...