


DESCENT-FREESPACE 2

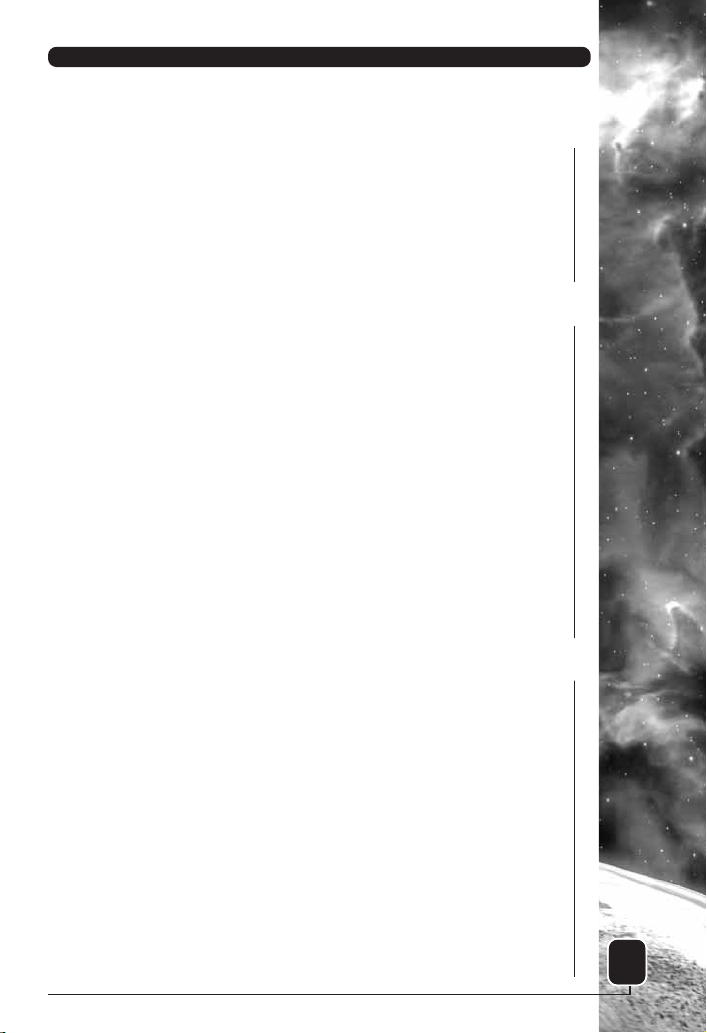
TABLE OF CONTENTS
STARTING FREESPACE 2 . . . . . . . . . . . . . . . . . . . . . . . . . . 3
Installing FreeSpace 2 3
Creating a Pilot 4
The Flight Deck 5
Training Missions 6
Debriefing 7
Combat Ready! 8
THE FLIGHT DECK . . . . . . . . . . . . . . . . . . . . . . . . . . . . . . 9
Options 9
Multiplayer Options 11
Detail Options 11
Control Config 13
HUD Config 15
Barracks 17
Statistics 18
Medals 19
Tech Room 20
Technical Database 20
Mission Simulator 21
View Cutscenes 22
Credits 22
Campaign Room 22
Ready Room 23
GAME MISSIONS . . . . . . . . . . . . . . . . . . . . . . . . . . . . . . 24
Command Briefing 24
Mission Briefing 24
Ship Selection 26
Weapon Loadout 28
In-Game Screens 30
The HUD (Heads-Up Display) 30
Messages 35
Recipient 36
Select Ship or Wing 36
Send the Message 36
Rearming & Repairing 38
Missile Firing 39
Missile Types 39
1
FREESPACE
™
2

Countermeasures 40
Advanced Targeting 40
Matching Speed 41
Ending a Mission 41
Energy Transfer System (ETS) 42
Weapons Selection & Linking 43
Hotkeys 44
Hotkey Usage 44
Defining Hotkeys 45
MULTIPLAYER FREESPACE 2 . . . . . . . . . . . . . . . . . . . . . . . 46
Parallax Online (PXO) 46
Multiplayer Basics 46
Creating a Pilot 47
Joining a Game 47
Starting a New Game 50
Host Setup 50
Standalone (Dedicated) Servers 53
Starting a Standalone Server 54
Standalone Servers & Mission Files 56
Server Listing Additions 56
Briefing 56
Ship Selection and Weapon Loadout 56
In-Mission 58
Debriefing 59
Network/Multiplayer Options 59
General Options 60
Voice Options 61
Messages 61
In-Mission Messaging Keys 62
Observer Mode 62
SquadWar 63
FRED2 . . . . . . . . . . . . . . . . . . . . . . . . . . . . . . . . . . . . . 63
CREDITS. . . . . . . . . . . . . . . . . . . . . . . . . . . . . . . . . . . . 64
TECHNICAL SUPPORT . . . . . . . . . . . . . . . . . . . . . . . . . . . 67
LIMITED WARRANTY. . . . . . . . . . . . . . . . . . . . . . . . . . . . 69
INTERPLAY WEBSITE . . . . . . . . . . . . . . . . . . . . . . . . . . . 71
STARTING FREESPACE 2
INSTALLING FREESPACE 2
Please see the Installation Instructions insert found in your
FreeSpace 2 box.
If you have a problem installing FreeSpace 2, please consult the
README.TXT file. If you don’t see the solution to the problem,
please check our FreeSpace 2 support page at www.interplay.com/
support/freespace2.
Once FreeSpace 2 is installed, the Launcher menu appears on your
screen.
The first time you start the Launcher, the Setup window will
appear automatically. This enables you to optimize FreeSpace 2 for
your system. Go through each tab (Video, Audio, Joystick, etc.) to
ensure that the device settings are correct. If the device listed in
the drop-down text box is not the one you want FreeSpace 2 to
use, click on the “Detect” button to have the Setup program find
the proper device. During Video setup, when FreeSpace 2 detects
your 3D accelerator, it also determines the available resolution
and color depth options from which you can select.
2 3
FREESPACE
™
2FREESPACE
™
2
THE FLIGHT DECK
The Flight Deck screen is the main menu for FreeSpace 2. From
here, you can access the Ready Room, Barracks, Campaign Room,
Tech Room, Options screen, or Exit (to Windows). Repeatedly
clicking the right mouse button cycles through the various
hotspots in the Flight Deck.
Press to bring up a Help Overlay that outlines the locations of
the various rooms in the Flight Deck. Hitting anywhere else in
FreeSpace 2 brings up context-sensitive Help screens.
For now, use the mouse to choose the Ready Room to begin your
first training mission.
NOTE: It is strongly recommended that new pilots play the
training missions offered during the FreeSpace 2 Campaign. These
missions teach the basics of flight control, targeting, weapons
management, and communication in the game. If you’re an
experienced FreeSpace player, you may want to skip the first
group of training missions.
F1
F1
5
FREESPACE
™
2
Once you’ve set up things the way you’d like, click on the
button.
Once back at the Launcher, click the “Play” button and FreeSpace 2
will start.
CREATING A PILOT
The first screen you see is the Pilot Selection screen. The first
time you play FreeSpace 2, you’re prompted for your pilot’s
Callsign. This is your pilot’s nickname for FreeSpace 2. After you
type in your pilot’s
Callsign, press .
Once in the game,
you can also manage
your pilots from the
Barracks room off the
Flight Deck.
ENTER
OK
4
FREESPACE
™
2
For help with flight and combat controls, press during a
mission. Screens listing the current control keys will appear. You
may also use the Reference Card in the FreeSpace 2 box for lists of
the default control keys.
Follow the instructor’s commands during training missions. He will
help you learn the basics of fighter control and combat. Watch the
onscreen messages to see the keys needed to follow his orders.
Instructions given to you also appear in the Directives Display
found on the left side of your HUD (Heads-Up Display).
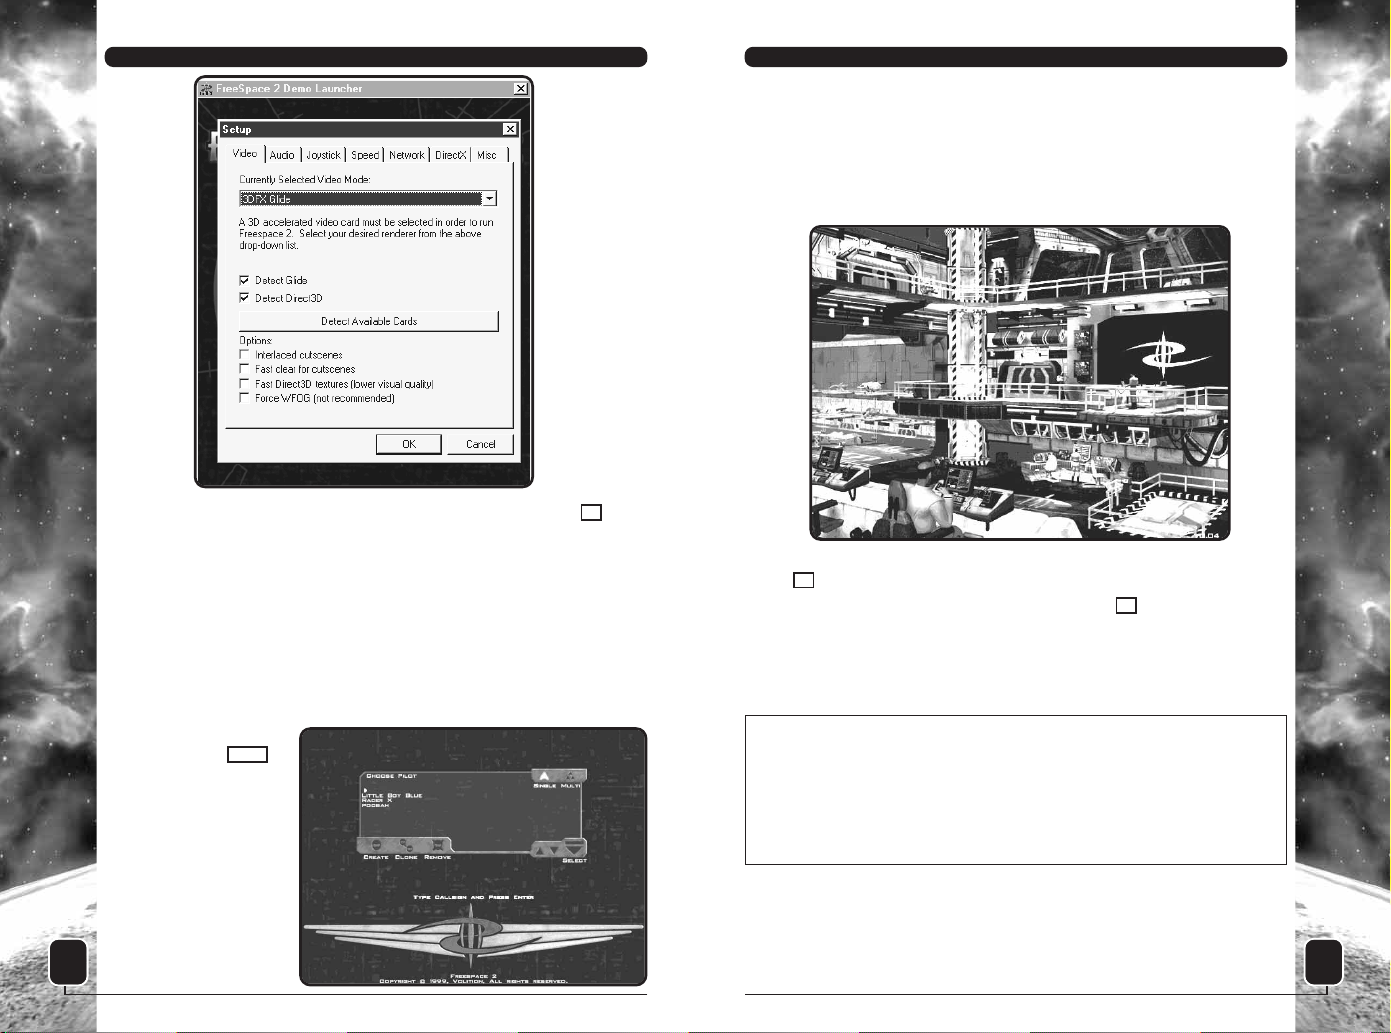
DEBRIEFING
After each mission, including training missions, you are shown the
Debriefing screen.
During the Debriefing, your commanding officer gives a breakdown
of the mission and evaluates your performance. If you performed
exceedingly well during a combat situation, you may be granted a
medal or promotion during the Debriefing. If you failed one or
more of your Primary Objectives, you may be forced to replay the
mission.
F1
7
FREESPACE
™
2
TRAINING MISSIONS
When you create a new pilot and enter the Ready Room, you’re
placed in the first training mission’s Briefing screen.
Here you receive a brief overview of the upcoming training
mission, including instructions on your objectives and how to
meet them.
To the upper left are choices for Briefing, Ship Selection, and
Weapon Loadout. In later missions, you’ll use these buttons to
move to the different pre-mission screens. For this first training
mission, “Briefing” is all you need.
To the lower right are buttons for Help, Options, and Commit.
“Help” is the same as pressing and brings up a screen-specific
overlay that briefly explains the on-screen options. “Options”
brings you to a screen of game options, if you wish to customize
the game’s settings. “Commit” accepts your mission orders and
sends you into the mission.
In the center of the Briefing screen is the mission map. This is a
graphical representation of what you can expect in the mission.
You may click on any map icon to see a more detailed view of it.
Below the mission map is the briefing text. If you have voice
enabled in the game, the briefing is read to you, one stage at a
time. To navigate through the briefing stages, use the arrow
buttons on the top edge of the mission map (or use the cursor
keys on your keyboard).
F1
6
FREESPACE
™
2
THE FLIGHT DECK
The Flight Deck serves as the main menu for FreeSpace 2. From
this screen, you can access the Options, Ready Room, Barracks,
Tech Room, and Campaign Room. You can also Exit to Windows.
Clicking the right mouse button cycles through the different
hotspots on the Flight Deck screen.
NOTE: Pressing from anywhere in FreeSpace 2 brings up
screen-specific help. If you’re in a pre-mission interface screen,
such as the Flight Deck, you see a Help Overlay that highlights
hotspots and gives brief descriptions of each.
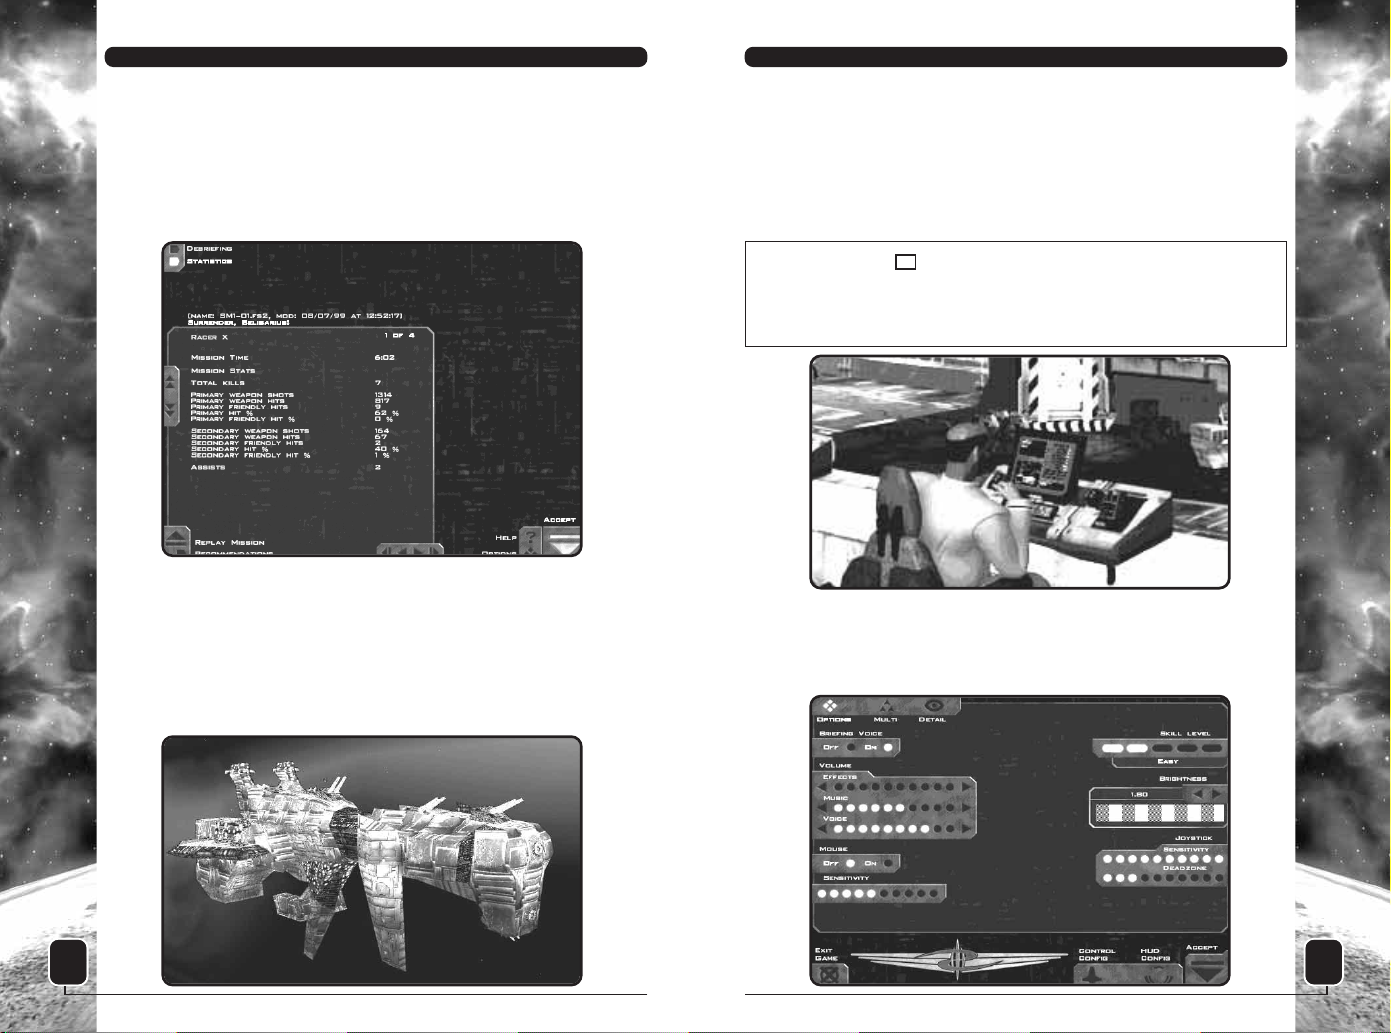
OPTIONS
The Options area off the Flight Deck enables you to change many
of the game’s settings (this screen can be brought up at any time
F1
9
FREESPACE
™
2
By pressing the “Recommendations” button, you can see specific
tips on how to meet all outlined objectives.
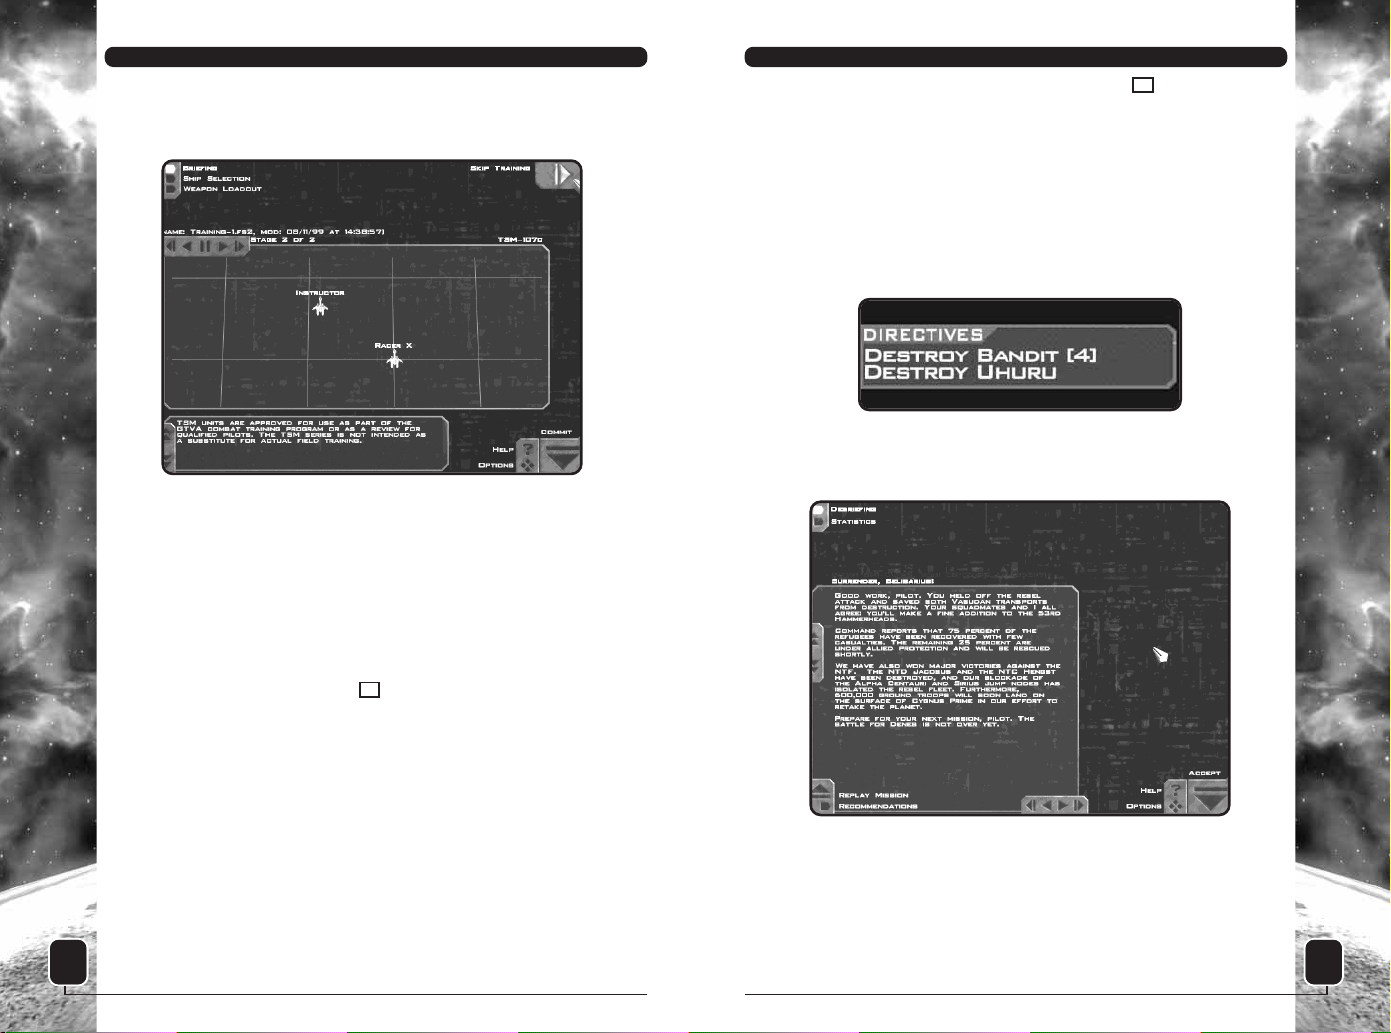
You may also view your pilot’s mission statistics from the
Debriefing screen. To the upper left of the screen, you see the
“Statistics” button. Clicking on it enables you to view Statistics
for the mission you’ve just flown. Reviewing mission statistics is a
good way to evaluate your performance.
If you followed the first training mission’s instructions, you should
now be ready for the remaining training missions. Press “Accept”
to continue.
COMBAT READY!
Once you’ve completed training, you’re ready to begin your tour of
duty aboard the GTD Aquitaine. Good luck, pilot!
8
FREESPACE
™
2
Accept: Clicking this button enters all the changes you’ve made
to the configuration settings, closes down the Options screen,
and returns you to the screen from which you came.
The remaining buttons on the Options screen (Multi, Detail,
Control Config, and HUD Config) take you to different sub-screens,
described on the following pages.
MULTIPLAYER OPTIONS
The Multi screen presents all the configuration options you’ll need
to play multiplayer games of FreeSpace 2 over the Internet or a
LAN (Local Area Network). These options are discussed in detail in
the “Multiplayer FreeSpace 2” section, beginning on page 46.
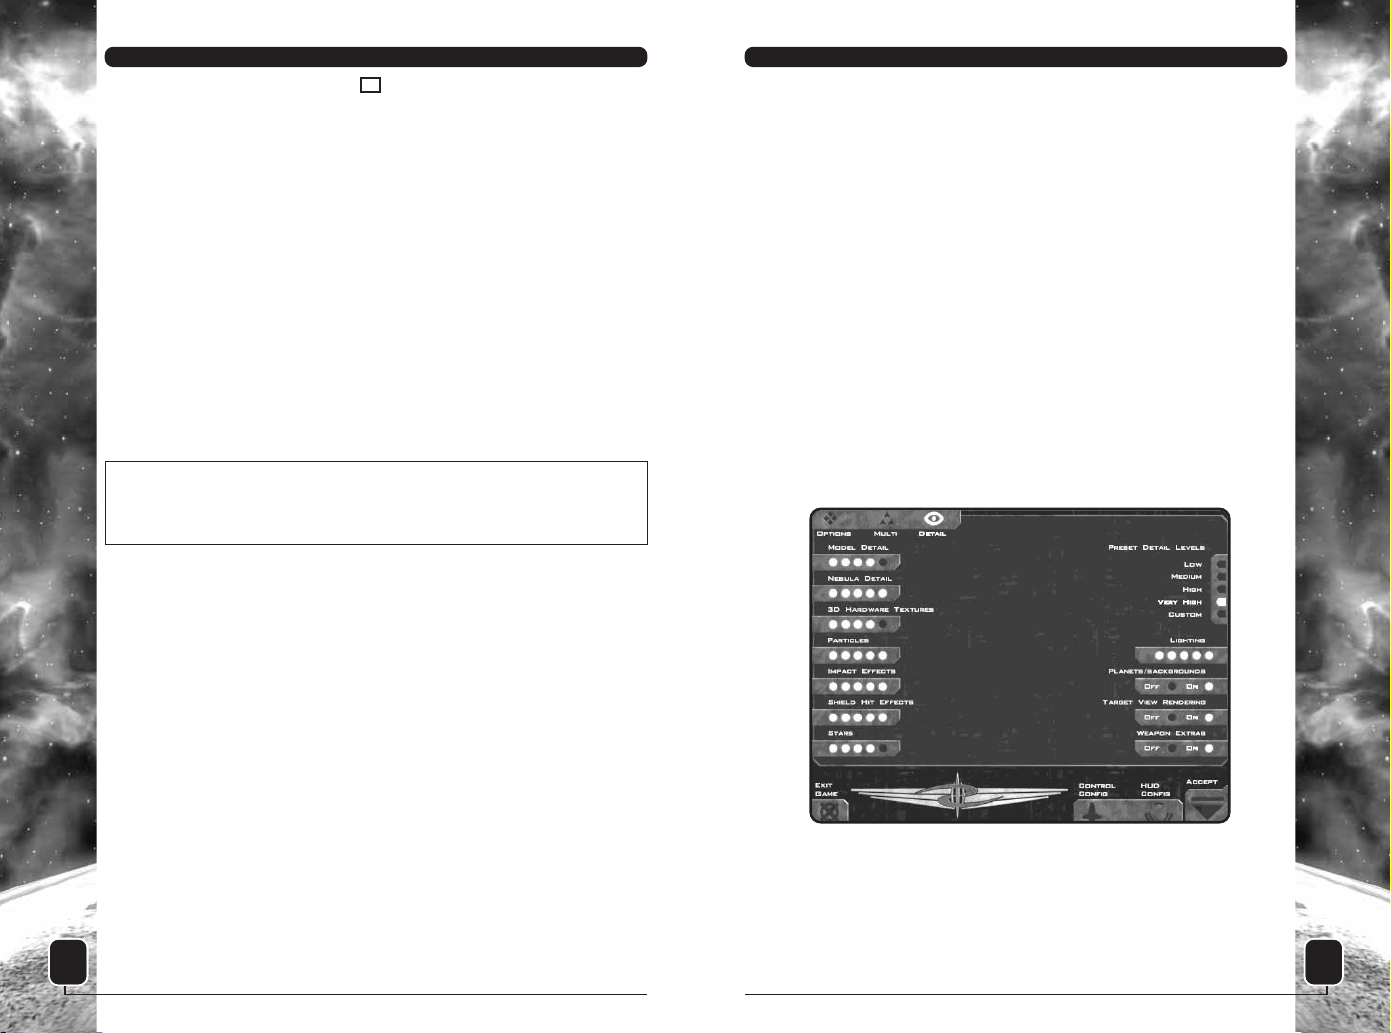
DETAIL OPTIONS
The Detail screen enables you to change the various levels of
detail used in FreeSpace 2. Since the game is designed to run on a
wide range of computer types and speeds, you can set these
values to match the performance of your hardware.
On the right side of the screen is a list of Preset Detail Levels.
When FreeSpace 2 was installed, a default Detail Level was chosen
for your computer based on its speed, RAM, and other hardware. If
you notice slowdowns in single-player mode, you may want to
change this to a lower level to speed up the framerate. Setting it
higher makes objects and effects look better, but it may cause the
game to run slower.
11
FREESPACE
™
2
in FreeSpace 2 by pressing the key). From here, you can
change the sound volume, skill level, detail settings, controls
configuration, and other items.
Volume: This section has three separate controls for the volume
levels for sound effects, music, and voices.
Voice Effects: This enables you to turn on or off the voice
reading the mission briefing text.
Mouse: Turn this option “On” if you use a mouse to control your
ship during missions. The “Sensitivity” setting determines how
much your ship responds to movement of the mouse. The more
lights, the more pronounced is the ship’s response to the
mouse’s movement.
Skill Level: This alters the current skill/difficulty level used in
FreeSpace 2 missions, from Very Easy all the way to Insane.
When you create a pilot, it is set by default to Easy.
NOTE: Once a mission has begun, your Skill Level setting is
locked in. You must wait until the mission is complete before
changing it again.
Brightness: All computer monitors handle darkening colors
differently. To compensate for this, the Brightness setting helps
adjust your visuals to the ideal range for your monitor. To set
your brightness correctly, use the arrow buttons to adjust the
value until the striped areas appear to be uniform patches of
gray. Once you have set this value, you should use your
monitor’s brightness and contrast controls if you need to make
further changes to the game’s appearance.
Joystick: If you use a joystick to control your ship in FreeSpace
2, these settings help fine-tune your ship’s responses. The
“Sensitivity” setting determines how dramatically your ship
turns in response to movement of the joystick. The “Deadzone”
setting establishes how far you have to move the joystick before
the ship begins to turn. If you’re having trouble keeping targets
near the center of your HUD screen, you may want to lower your
joystick’s Sensitivity setting and/or raise the Deadzone setting.
Exit Game: Clicking this button shuts down FreeSpace 2 and
returns you to Windows.
F2
10
FREESPACE
™
2
this gauge much, turning this off causes a small improvement to
framerate.
Weapon Extras: This enables (or disables) the missile trails and
laser glows in the game.
At the top and bottom of the Detail Options screen are the
buttons that take you to the Options, Multi, Control Config, and
HUD Config sub-screens. As in the main Options screen, the Exit
button takes you out of FreeSpace 2 and the Accept button puts
you back into the game.
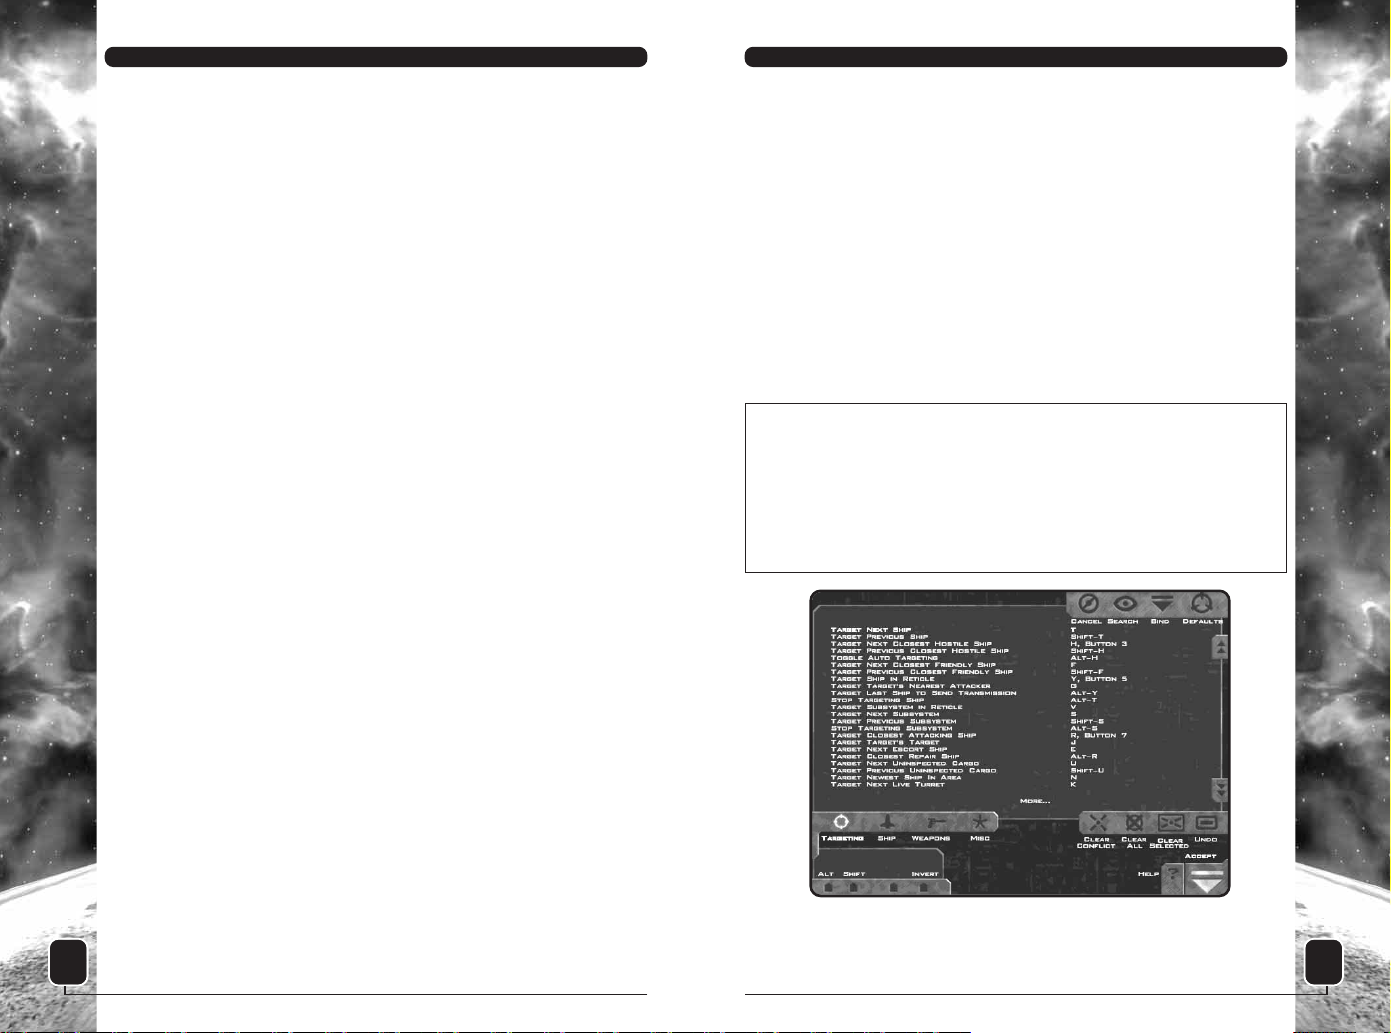
CONTROL CONFIG
This screen enables you to customize your controls setup and
change your key bindings.
NOTE: Settings found in the Control Config screen are stored in
your pilot’s file, so you may have different control setups for
different pilots. If you wish to take your pilot to another
computer that has FreeSpace 2 installed, simply copy your pilot
file to a diskette and take it with you. Your pilot files end with
.PLR filename extensions and can be found in your
\FreeSpace2\players\ directory.
Control functions are divided into four categories:
Targeting: All targeting-related functions
Ship: Flight controls and other ship functions
13
FREESPACE
™
2
By using the “Custom” setting, you can change each of the
individual detail settings (the column of settings on the left side
of the screen) separately. This is useful if you find a particular
detail setting more important than others. Changing any one of
these individual settings automatically changes the Preset Detail
Level to “Custom.”
Individual detail settings include the following:
Model Detail: As a ship or object gets farther away, it changes
to a simpler 3D model. This setting alters the distances at which
those changes occur. Higher values put those distances farther
away, giving you more detail at the cost of framerate speed. To
improve framerate, set this to a lower value.
Nebula Detail: This setting controls the amount of graphical
detail you see in the nebula missions. Setting this to a lower
value improves your framerate in the nebulae.
3D Hardware Textures: The higher this setting, the more texture
RAM FreeSpace 2 uses. This means that everything looks nicer,
but the game slows down. Tweak this setting until you’re happy
with the game’s framerate.
Particles: This alters the number of particles that are spewed
when a ship suffers damage.
Impact Effects: This setting changes the number of weapon
impact effects rendered.
Shield Hit Effects: This determines what you see when a ship’s
shield is hit. At its lowest setting, this completely turns off the
shield-hit effect. At medium settings, this causes shield hits to
render as 2D bitmaps. At higher settings, they appear as 3D-
mesh objects surrounding each shield-capable ship.
Stars: This alters the number of visible stars.
Lighting: This alters the lighting model used during missions.
At the highest setting, all explosions and other effects use full
static and dynamic lighting. At lower settings, less lighting is
done, and on fewer objects.
Planets/Backgrounds: This toggles the backgrounds and planets
on or off.
Target View Rendering: When on, this displays a 3D view of
your current target in the Target View gauge. If you do not use
12
FREESPACE
™
2
If you press the “Clear Conflict” button, the older binding is
removed and the current one takes effect.
Clicking the “Accept” button saves your changes to the Control
Config and takes you back to Options.
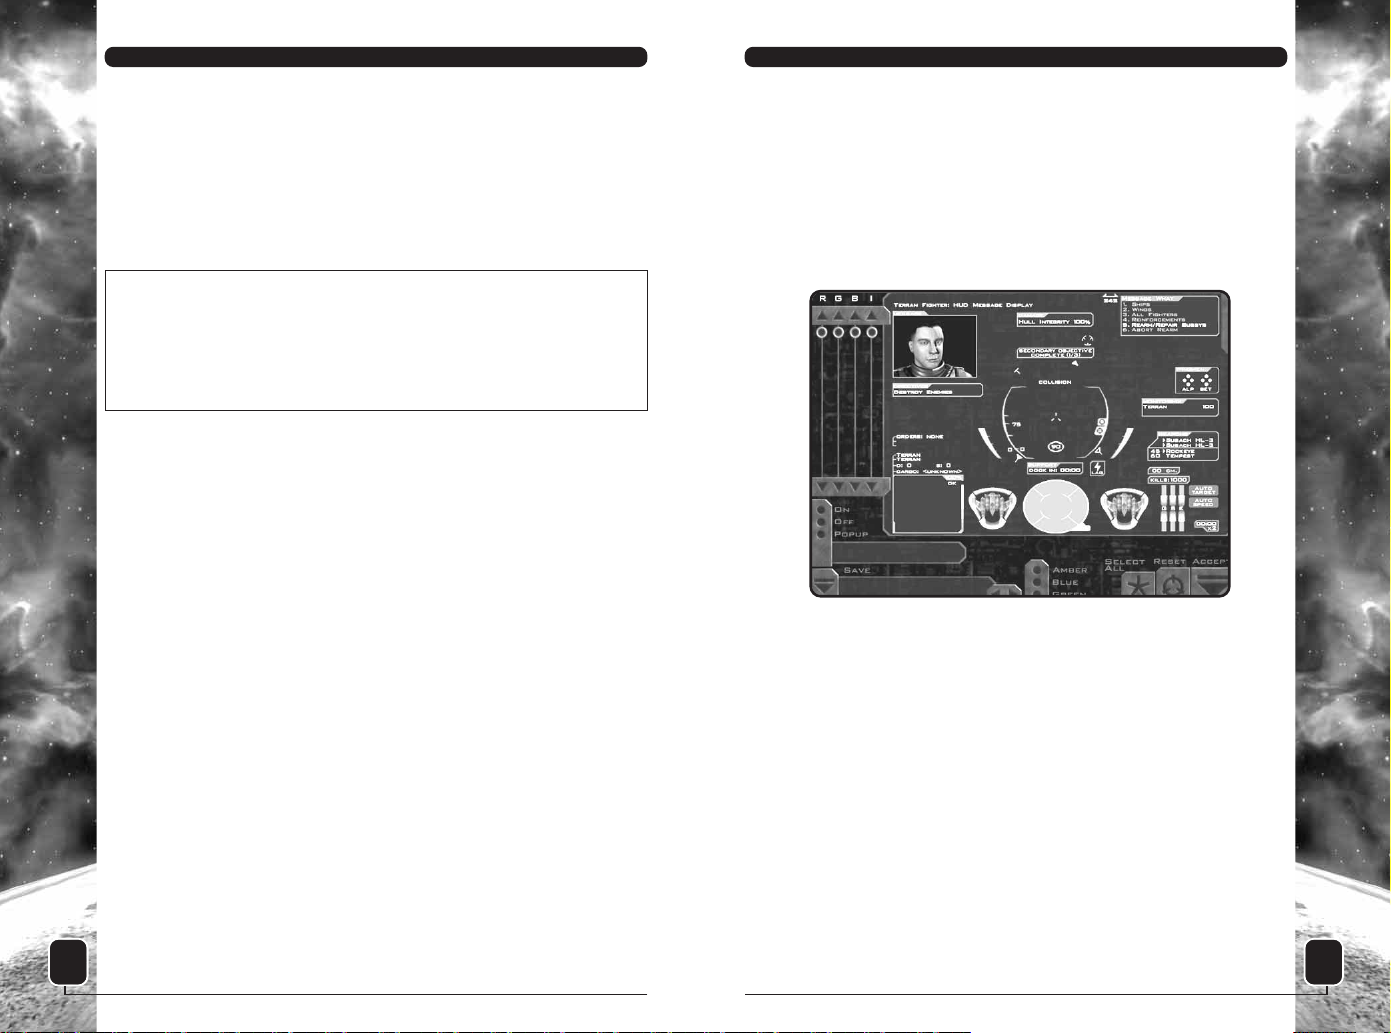
HUD CONFIG
This screen enables you to customize various aspects of your
fighter’s Heads-Up Display (HUD). For detailed information on the
HUD gauges and how they work in the game, please see page 30.
Most of the screen is taken up by an image containing all the
HUD’s gauges and indicators.
To the upper left of the screen are sliders that control the relative
intensities of the RGB (Red, Green, Blue) values of a particular
gauge (click on a gauge in the HUD and adjust its color with the
sliders).
The “I” Slider controls how distinctly the HUD shows up against
the game’s backgrounds.
At the bottom middle of the screen are three buttons that set the
general HUD color scheme as either Amber, Blue, or Green.
To the lower left of the screen are three buttons labeled “On,”
“Off,” and “Popup.” Each gauge or indicator on the HUD display
can be set to “On” or “Off.” Simply click on that gauge or indicator
and choose its new mode using the buttons in the lower left.
15
FREESPACE
™
2
Weapons: Weapon control functions, including countermeasures
Misc.: Other functions, such as wingman command shortcuts,
energy management, and multiplayer messaging
Each category contains a list of functions to the left and the
current key or controller bindings to the right. For the Targeting
and Misc. categories, use the scroll arrows or slider to the far
right, as those lists are too long to fit on a single screen.
TIP: There are many different targeting functions available to
you under Control Config/Targeting. Many of these are not
covered in the training missions. Once you have some combat
experience under your belt, you may wish to try some of the more
advanced targeting controls. Check through the Targeting list to
see all the functions available.
Bindings
To change the binding for a given function, simply double-click on
the function to enter Bind Mode. With Bind Mode on, press the
new key or controller button you want to assign to that function.
(You may press the “Undo” button to undo your last binding.)
Each function can have one keyboard key and one joystick button
bound to it at the same time.
You can also use the “Alt” and “Shift” buttons to the lower left to
assign Alt and/or Shift modifiers to your selected binding.
Clearing Bindings
If you wish to clear the bindings for a given function, simply use
your mouse to select that line and press “Clear Selected.” All key
and controller bindings are then removed for that item. Pressing
“Clear All” removes all bindings for the current category.
Conflicts
If you assign a key or controller button that is already assigned to
another function, a “Conflict” warning flashes at the bottom of
the screen. The conflicting keys are shown in red. If the duplicate
binding appears in another category, that category button is
shown in red at the top of the screen.
You must resolve all conflicts before leaving the Control Config
screen.
14
FREESPACE
™
2
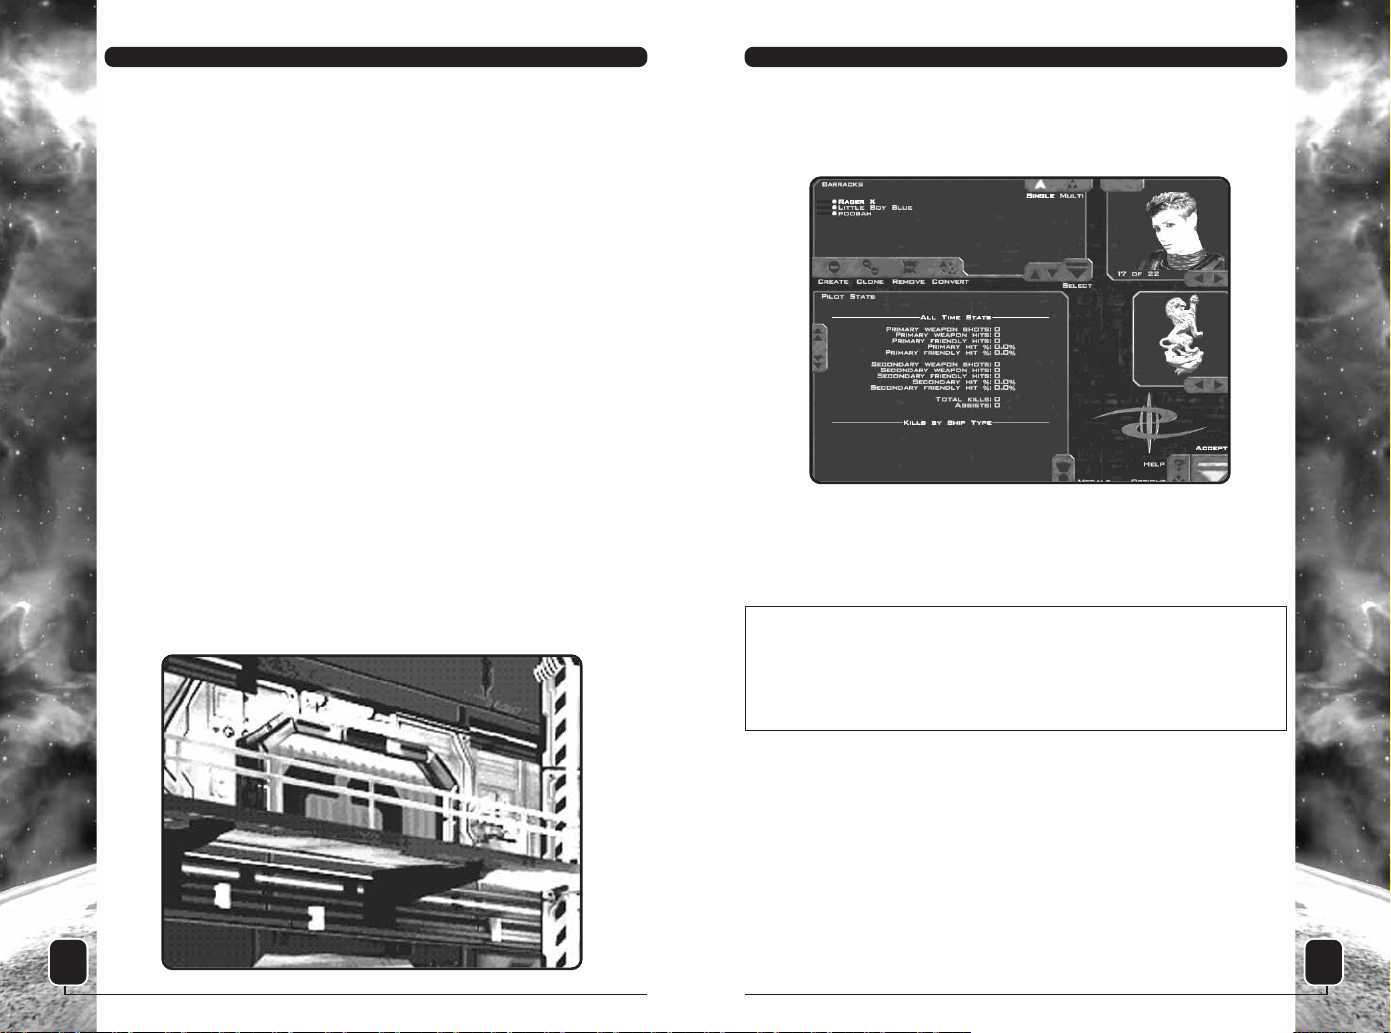
BARRACKS
You can manage your FreeSpace 2 pilots in the Barracks screen.
From here, you can create and delete pilots, as well as view their
combat statistics and medals.
In the upper left is a list of pilots. If this is your first time
playing FreeSpace 2, only one pilot is listed.
If multiple pilots are displayed, you may change your current pilot
by highlighting the name and clicking the “Select” button.
NOTE: Single-player pilots are stored separately from multiplayer
pilots. Use the “Single” and “Multi” buttons in the upper right of
the pilot list to change the type of pilot displayed. By leaving the
Barracks with a multiplayer pilot selected, the game is placed in
multiplayer mode (see page 46 for details).
There are four buttons beneath the list of pilots:
Create: This creates a new pilot. This pilot is either single-
player or multiplayer, depending on which mode is currently
active.
Clone: This duplicates your currently selected pilot and prompts
you for a new name (pilot names must be unique). This cloned
pilot has all the same Control Config settings as the original
pilot.
Remove: This deletes the selected pilot. If you delete the only
17
FREESPACE
™
2
When set to “Off,” a gauge or indicator is drawn in gray on this
screen (it won’t appear at all on the in-game screens). Otherwise,
it displays in either the general HUD color you select or its own
custom color, if you assigned one to it with the RGB sliders.
Many gauges enable you to set a third mode, called “Popup.” In
Popup mode, the gauge appears onscreen only when its status
changes. If no further change occurs, it disappears within a few
seconds.
For example: If you set the Weapons Display to Popup mode, it
appears only when you change your armed or linked weapons. It
remains onscreen for a short time, then disappears, unless you
make additional changes.
The “Select All” button at the bottom enables you to select all
gauges whose color does not change with your target. You can
then change colors or settings for a large number of gauges all at
once.
When you have the HUD configured the way you’d like, you can
save the configuration by clicking on the text box under “Save”
and typing in a name. Then click on the down arrow to the left of
the box. If you have more than one saved configuration, you can
use the left and right arrows beneath the text box to cycle
through them.
In the lower right are buttons for Resetting to the defaults or
Accepting your changes (and returning to the Options screen).
16
FREESPACE
™
2
The statistics are self-explanatory, with these possible exceptions:
Kills: When a hostile ship is destroyed, the ship that inflicts the
most damage to it gets credit for the kill, as long as that ship
causes at least 20% of the total damage. If no single ship
inflicts more than 20% damage to a hostile ship, no one
receives the kill.
Assists: You receive an assist for inflicting 15% or more damage
to any ship that is destroyed. Thus several different players may
receive an assist for the same downed enemy craft.
You do not get kills or assists for destroying asteroids and other
non-combative targets.
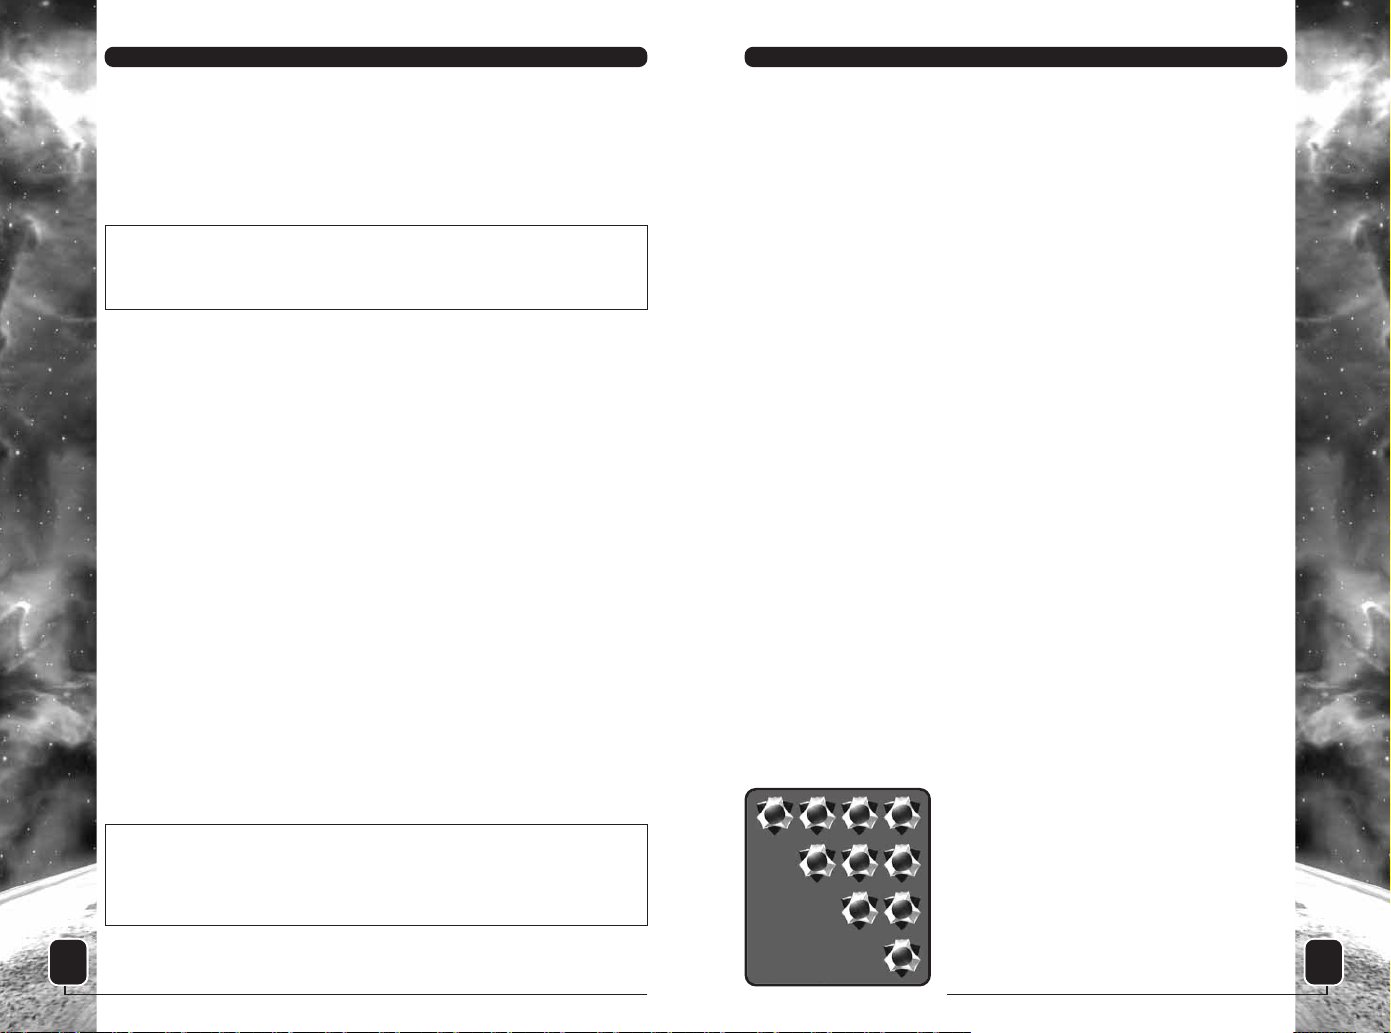
MEDALS
In your tours of duty as a GTVA Pilot, you are occasionally granted
medals for outstanding achievements. The Medals screen is
reached by clicking on the “Medals” button near the bottom of the
Barracks screen. This shows your currently selected pilot’s
accumulated service medals. You see the name of a granted medal
when you place the cursor over it.
Some medals are granted for superior dogfighting skills. Others are
granted for exceptional performances in certain combat situations.
It takes an extraordinarily skilled pilot to acquire every GTVA
service medal.
Each new pilot begins at Ensign rank. During the course of a
Campaign, as your pilot’s skills improve, he will be periodically
promoted and granted more responsibility. Eventually, your pilot
will have full control over his flight wings’ ships and weapon
loadouts. The rank section of the Medals screen displays your
pilot’s current rank symbol.
GTVA ranks are as follows:
Admiral
Vice Admiral
Rear Admiral
Commodore
19
FREESPACE
™
2
pilot in a given player mode, you must create another before
leaving the Barracks.
Convert: This copies the current pilot but places the new pilot
in the opposite player mode (Single or Multi). Example: If you
Convert a single-player pilot, this creates a multiplayer version,
complete with the same Control Config and Option settings.
NOTE: Clone and Convert do not copy your pilot’s statistics, only
the Options and Control settings. Please see “Statistics”
(following section) for more info.
In the upper right of the Barracks screen is the picture associated
with the currently selected pilot. You can change your pilot’s
picture with the arrow buttons beneath the images. Each newly
created pilot is randomly assigned a picture.
FreeSpace 2 allows you to import your own pilot pictures! Create a
256-color PCX image at 160x120 resolution and place it in the
\FreeSpace2\data\players\images directory. It will appear in the
Barracks the next time you run FreeSpace 2.
You can also make your own squadron insignia, but only for
multiplayer pilots. Create a 256-color PCX image at 128x128
resolution and place it in the \FreeSpace2\data\players\squads
directory. Your new insignia will appear in the Barracks the next
time you run FreeSpace 2.
In multiplayer games, your pilot’s picture and squadron insignia
are automatically uploaded to the other players who fly missions
with you.
STATISTICS
In the center of the Barracks screen is a section devoted to your
pilot’s stats. These are an ongoing record of your performance
while using that pilot.
NOTE: Permanent statistics are kept only for Campaign missions.
If you fly a mission in the Tech Room Simulator, you receive a
statistics report at Debriefing, but your pilot’s all-time statistics
do not change.
18
FREESPACE
™
2
MISSION SIMULATOR
The Mission Simulator enables you to replay single missions that
you have completed during your Campaign.
Simply choose the mission you wish to replay from the displayed
list and click on the “Commit” button.
Two filters at the bottom enable you to switch between stand-
alone missions and Campaign missions that have been previously
flown by your current pilot.
NOTE: Replaying a Campaign mission in this manner does not
replace the result you achieved while playing it in Campaign
mode. This is only a simulation. Once you have accepted a
mission’s outcome in Campaign mode, you cannot change the
results unless you restart the Campaign.
The Mission Simulator also enables you to fly single missions that
are not part of a Campaign. These may be add-on missions from
Volition, Inc., or home-brewed missions you or your friends made
using FRED2, the FreeSpace 2 mission editor. In order for such
missions to appear on this screen, they must be placed in your
FreeSpace2\data\missions subdirectory.
21
FREESPACE
™
2
Captain
Commander
Lieutenant Commander
Lieutenant
Lieutenant Junior Grade
Ensign
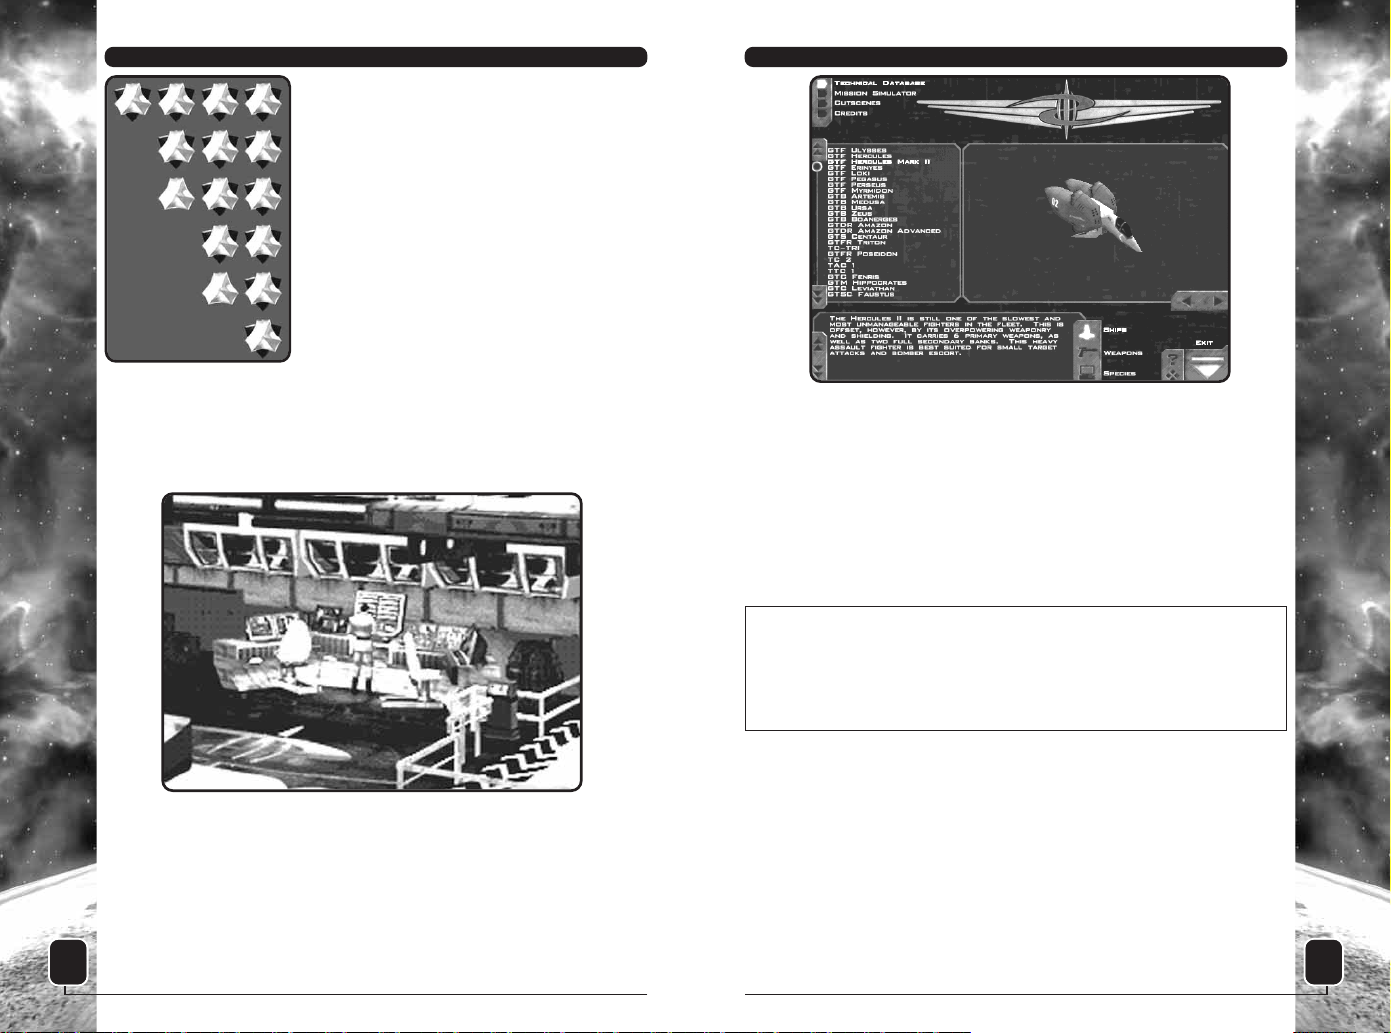
TECH ROOM
In the Tech Room, you can view Database information, fly
missions in the Simulator, view previously seen cutscenes, and see
the list of game credits.
TECHNICAL DATABASE
The Technical Database sub-screen gives information on the ships,
weapons, species, and history of FreeSpace 2. Click on the buttons
toward the bottom of the screen to view the various databases of
information. For the Ships and Weapons databases, use the scroll
bars on the left side of the screen to see the range of topics
available. To peruse the Intelligence database, use the left and
right arrow buttons on the right side of the screen.
20
FREESPACE
™
2
The default Campaign when you first install FreeSpace 2 is called
“FreeSpace 2.” More Campaigns appear here if you have created
your own using FRED2 (the FreeSpace 2 mission editor), or if you
have downloaded others from the Internet.
READY ROOM
Entering the Ready Room with a single-player pilot takes you to
the Briefing for the next mission in that pilot’s current Campaign.
Entering the Ready Room with a multiplayer pilot yields
something very different; see page 47 for more info.
23
FREESPACE
™
2
VIEW CUTSCENES
This screen enables you to view cutscenes you have seen
previously while playing a FreeSpace 2 Campaign. Your current
pilot must have seen a cutscene during Campaign play for it to
appear on this list.
CREDITS
This screen lists the people (and organizations) who contributed
to the development of FreeSpace 2.
CAMPAIGN ROOM
FreeSpace 2 missions are generally arranged into Campaigns. Each
Campaign connects missions into a series in which the story
progresses as the player proceeds from one mission to the next.
Each single-player FreeSpace 2 pilot you create can have only one
Campaign in progress (or “open”) at a time. Between Campaign
missions, progress in a Campaign is automatically saved, and you
may continue it later by returning to the Ready Room.
WARNING: If you choose to restart or change a pilot’s Campaign
before his current one is completed, he loses all progress and
statistics achieved during that Campaign. Only when a Campaign
is completed, from start to finish, do your pilot’s accumulated
statistics, promotions, and medals become permanent.
22
FREESPACE
™
2
 Loading...