


 Loading...
OWNER,S MANUAL
LOADING
The “CE” mark certifies that this product satisfies the requirements of the EU (European Union) regarding safety, public health, environment and consumer protection. (“CE” is the abbreviation of Conformité Euroéepnne.)
This product conforms with Directive 89/336/EEC.

This manual will show you how to use your |
|
camera correctly. Please follow the instructions |
|
carefully. |
|
CONTENTS |
|
Special features . . . . . . . . . . . . . . . . . . . . . . . |
2 |
Names of parts . . . . . . . . . . . . . . . . . . . . . . . . |
3 |
I. BASIC PROCEDURE . . . . . . . . . . . . . . . . . . |
4 |
Load the battery . . . . . . . . . . . . . . . . . . . . . . |
4 |
Using the date (or time) printing unit |
|
(for the dating model only) . . . . . . . . . . . . . . |
5 |
Attach the strap . . . . . . . . . . . . . . . . . . . . . . . |
7 |
Load the film . . . . . . . . . . . . . . . . . . . . . . . . . |
8 |
Taking pictures . . . . . . . . . . . . . . . . . . . . . . . |
10 |
End of film . . . . . . . . . . . . . . . . . . . . . . . . . . . |
14 |
II. ADVANCED TECHNIQUES . . . . . . . . . . . . . |
16 |
Using the Autofocus Lock . . . . . . . . . . . . . . . |
16 |
Selecting the exposure mode . . . . . . . . . . . . |
17 |
Using the self-timer . . . . . . . . . . . . . . . . . . . . |
21 |
Using the remote control switch . . . . . . . . . . |
22 |
Camera faults, possible causes, and remedies . . |
25 |
Print faults, possible causes, and remedies . . . . |
27 |
Camera care and cautions . . . . . . . . . . . . . . . |
29 |
Specifications . . . . . . . . . . . . . . . . . . . . . . . . . |
30 |
SPECIAL FEATURES
● A fully automatic 35 mm compact zoom camera
1.High Quality 38-90mm Autofocus zoom.
2.Drop-in Film Loading.
3.Film Pre-winding.
4.Red-eye Reduction
5.Automatic Flash.
6.Large Viewfinder.
7.Date or Time Printing Capability (for the dating model only).
2
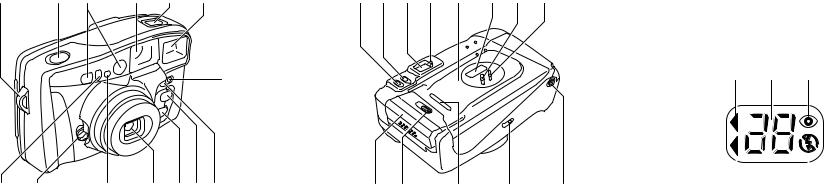
NAMES OF PARTS |
|
(When reading this manual, leave this page open for quick reference) |
||
|
|
|||
q w e r t y |
|
!5 !6 !7 !8 !9 @0 @1 @2 |
|
|
|
|
Liquid Crystal Display |
||
|
!4 |
@8 |
@9 |
#0 |
|
|
|
|
|
u i o !0 !1!2!3 |
|
|
|
|
|
|
|
|
|
@3 @4 @5 @6 @7 |
|
#1 |
#2 |
|
q Strap Lug |
!7Finder Eyepiece |
|
|
|
w Shutter Release |
!8Autofocus Lamp |
|
|
|
e Autofocus Windows |
!9Camera Back |
|
|
|
r Finder Window |
@0Date display Window (for the dating model only) |
|
||
t Liquid Crystal Display |
@1Date Mode/Select Button (for the dating model only) |
|
||
y Flash Lampface |
@2Date Set Button (for the dating model only) |
|
|
|
u Red-eye Reducting Lamp |
@3Battery Compartment Cover |
|
|
|
i Lens Cover Button (Power Switch) |
@4Camera Back Lock |
|
|
|
o AE Light Sensor |
@5Film Confirmation Window |
|
|
|
!0Lens |
@6Mid-roll Rewind Button |
|
|
|
!1Zoom Button (wide) |
@7Tripod Socket |
|
|
|
!2Zoom Button (tele) |
@8Self-timer Mode Sing |
|
|
|
!3Remote Control Sensor |
@9Exposure Counter Number |
|
|
|
!4Self-timer/Remote Control Lamp |
#0Red-eye Reducing Flash Mode Sign |
|
|
|
!5Self-timer/Remote Control Button |
#1Remote Control Mode Sign |
|
|
|
!6Exposure Mode Button |
#2Flash Mode Sign |
|
|
|
3
I. BASIC PROCEDURE
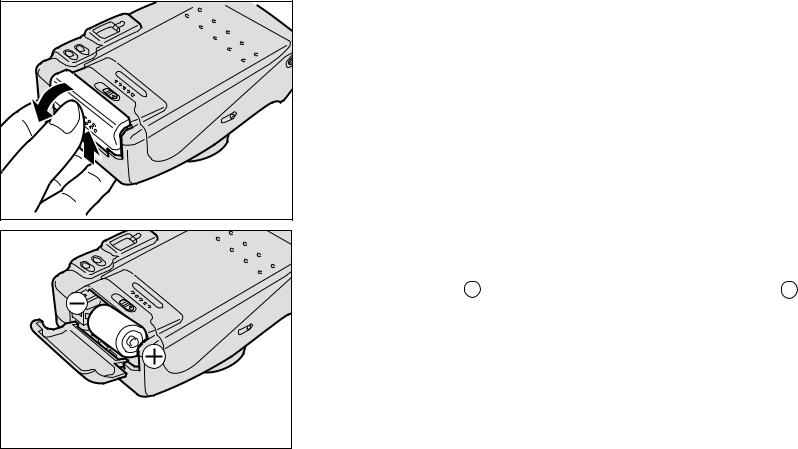
LOAD THE BATTERY
|
● |
Use one 3V CR123A lithium battery. |
|
● A new lithium battery will provide power for taking |
|
|
|
about 400 pictures, including 200 with flash (as |
Fig. 1 |
|
tested according to Fujifilm’s battery testing |
|
|
procedure). |
1. |
Open the battery compartment cover (Fig. 1) |
|
Push the Cover’s grained part up (toward the camera back) and open the Cover toward you.
Fig. 2 |
2. Insert the battery (Fig. 2) |
|
Insert the battery in the Battery Compartment, minus |
|
|
|
– end first, then press in the plus + end and close |
|
the Battery Compartment Cover. |
4
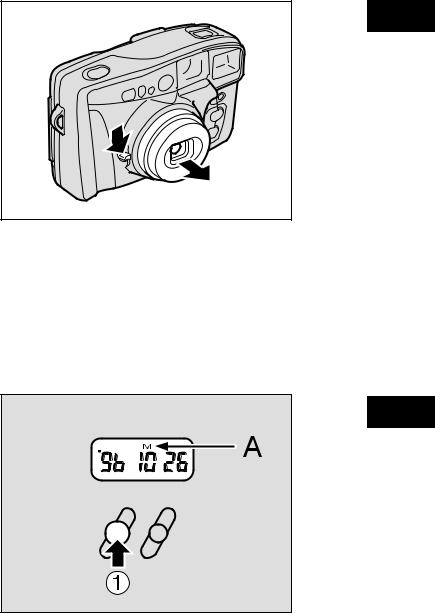
Fig. 3
Fig. 4
3. Check the loaded battery (Fig. 3)
Push the Lens Cover Button downward. If the Lens Cover opens and the lens barrel moves out into shooting position (wideangle), the battery is loaded correctly.
●If the Flash Sign ( c ) in the LCD blinks for 12 seconds or more after taking a flash picture, the battery is spent. Change the battery with a new one as soon as possible.
●Always reset the date after changing the battery (for the dating model only)
●If you are going on a trip or are planning to take lots of pictures, take a spare battery along with you just in case you might need it. This is especially true if you are travelling abroad because in some countries you may not be able to obtain the type of battery you want.
USING THE DATA (OR TIME) PRINTING UNIT
This section applies only to the model with a dating unit.
1.Printing dates (or time) on your pictures (Fig. 4)
M... Stands for month (Fig. 4 - A)
5
↓
Year Month Day
↓
Month Day Year
↓
Day Month Year
↓
Day Hour Minute
↓
To change the order of the year, month, and day, press in the Date Mode/Select Button q. The order will change as shown above. The date Showing in the Date Display Window is the date that will be printed in the bottom right of your picture.
If you don’t want dates on your pictures, bring out the Dating Unit Off sign (-- -- --) in the Date Display Window.
lAfter changing the Camera battery, always check and reset the date (or time).
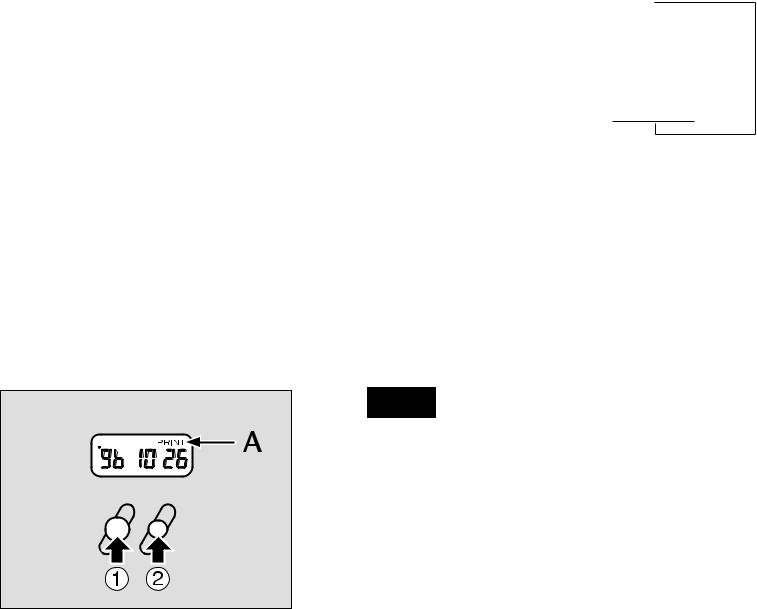
Fig. 5
2. Correcting the date (Fig. 5)
PRINT... Printing Mark (Fig. 5 - A)
(1)Make the number for the year blink by pressing in the Date Mode/Select Button q.
(2)Change the blinking number to the one you want by pressing in the Date Set Button w.
(3)Make the next number (the number for the month) blink by pressing in the Date Mode/
6
Select Button again then correct the number with the Date Set Button.
(4)After correcting the number for the “minute”, press in the Date Mode/Select Button to bring out the “PRINT” sign in the Date Display Window. The Dating Unit is now ready for printing.
●Your camera’s quartz date-printing unit has an auto-calendar that is designed to function up through the year 2020. The Dates (or time) are represented by the following numbers:
Year: |
89 - 20 |
Hour: |
0 - 23 |
Month: |
1 - 12 |
Minute: |
00 - 59 |
Day: |
1 - 31 |
|
|
● The year, month, and day are interlocked with the
|
|
hour and minute. |
|
|
● |
When the shutter is released to take your picture, |
|
Fig. 6 |
|||
|
the “PRINT” sign in the Date Display Window will |
||
|
|
||
|
|
||
|
|
blink for about two seconds to tell you the date |
|
|
|
has been printed on it. |
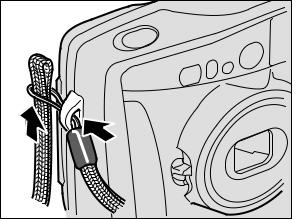
ATTACH THE STRAP (Fig. 6)
Pass the looped end of the strap through the camera’s Strap Lug, then pass the other end of the strap through the loop and pull it firmly.
7
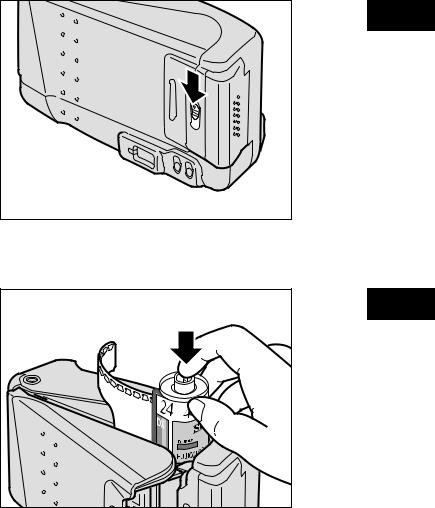
Fig. 7 LOAD THE FILM
1. Open the camera back (Fig. 7)
To open, hold the camera bottom side up and push the Camera Back Lock downward.
Fig. 8
2. Insert the film (Fig. 8)
Just push the film gently into the Film Chamber.
●Do not open the Camera Back all the way. It is normally set to open about 15° or just enough to drop the film in smoothly and surely.
●Film with a  mark (Advanced photo sytem) on it cannot be used.
●Always use your film before the expiration date printed on the film box.
8
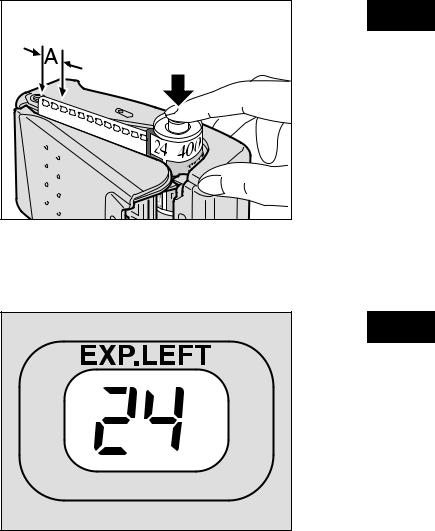
Fig. 9
Fig. 10
3. Check the film tip position (Fig. 9)
Make sure the film tip falls within the Film Tip Mark (green lines in the far end of the film track).
4. Close the camera back (Fig. 10)
As soon as you close the Camera Back, the Exposure Counter will run though rapidly and the film will prewind itself up to the very end. (If the film is a 24-exposure roll, it will prewind itself in about 20 seconds and the Exposure Counter will stop at the number “24”).
●If the film leader (the length of film protruding from the cartridge) is too short or too long, however, you’ll have to adjust it before dropping the cartridge into the camera. To adjust, pull the film out or wind it in so that the film tip will fall within the camera’s Film Tip Mark (green lines).
●The Film Confirmation Window will show the type and speed of the loaded film and the number of exposures it contains.
9
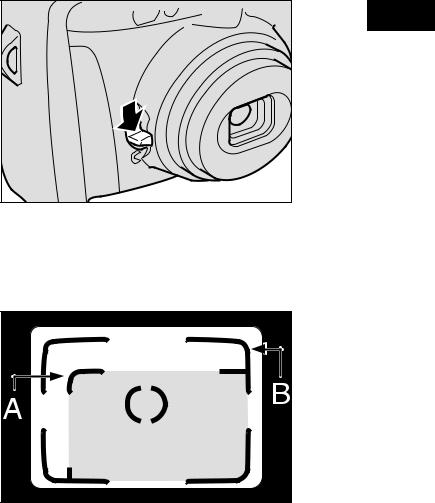
Fig. 11 TAKING PICTURES
1. Turn on the power (Fig. 11)
To turn it on, press the Power Switch downward. The Lens Cover will automatically open and the Lens will move out into shooting position. If the Lens is in retracted position, the shutter won’t trip.
|
2. Standard 35 mm size covering area (Fig. 12) |
|
Fig. 12 |
||
|
||
|
● Parallax Correction Mark (Fig. 12 - A) |
|
|
||
|
● Bright Frame (Fig. 12 - B) |
|
|
You’ll get in your picture everything you see within |
|
|
the Bright Frame. But if you are shooting your |
|
|
subject form about 1.2 meters away or closer, you’ll |
|
|
get in your picture only the area falling within the |
|
|
Parallax Correction Mark. |
10
Loading...