


DRYER OPERATING INSTRUCTIONS
Before Operating Your Dryer
Read your dryer Owner’s Guide. It has important safety and warranty information. It also has many suggestions for best drying results.
 To reduce the risk of fire, electric shock or injury to persons, read the IMPORTANT SAFETY INSTRUCTIONS in your dryer Owner’s Guide before operating this appliance.
Operating Steps
Read “Drying Procedures” in your Owner’s Guide. It explains these operating steps in detail.
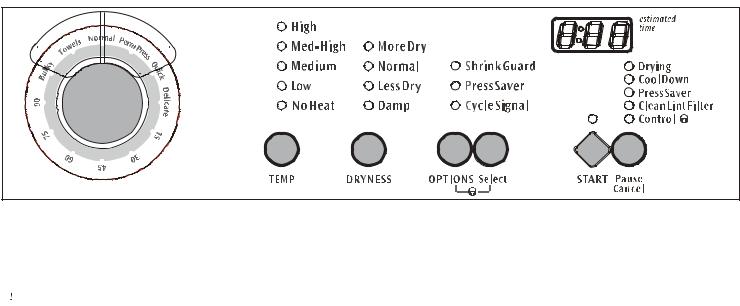
1.Prepare items for drying.
2.Check that lint filter is clean and in place.
3.Load the dryer. If desired, add a dryer fabric softener sheet. Close the door.
4. Select the appropriate cycle and settings for each load.
•Turn the Cycle Selector knob to select the cycle.The estimated drying time will be displayed.
•Suitable drying temperature, dryness level and options will
automatically be indicated for each cycle. To change the temperature and dryness level, press TEMP and DRYNESS until the desired selections are made.
•To select an option, press OPTIONS until the indicator for a desired option flashes and press Select. Follow the same steps to delete an option.
•If a dryness level or option is not available for a cycle, it will not light.
•Changes made to the cycle will automatically be remembered the next time that cycle is selected.
•See the “Dryer Settings Chart” for more details.
5.Press START to begin the cycle.
•To pause the cycle or change settings, press Pause/Cancel once. “PAU” will be displayed alternately with the estimated drying time. To resume the cycle, press START.
•To stop or change the cycle, press Pause/Cancel twice.
6.A signal will sound at the end of the cycle and periodically during Press Saver when the Cycle Signal option is selected. When the cycle ends, remove items immediately and hang or fold.
7.Clean the lint filter after every load. The Clean Lint Filter indicator will light at the end of the cycle as a reminder.
Cycle Selection
Turn the Cycle Selector knob to the desired cycle. For best results, follow the fabric care label instructions on items to be dried. To change the selection after the cycle has begun, press Pause/Cancel twice, select a new cycle and press START. Just turning the knob to another selection will not change the cycle.
The signal will beep and the status lights will flash, but the original cycle will continue.
Auto Dry
Auto Dry cycles take the guesswork out of drying time. Loads dried using the Towels, Normal, Perm Press and Delicate cycles will dry automatically at the selected temperature to the desired dryness level. The dryer uses sensing bars to sense the moisture level of the load as it tumbles through heated air. Auto Dry cycles save time and energy and protects fabrics. The estimated drying time will be displayed for about 5 minutes. Then the outside of the display will light up in a circular track to indicate the drying time is automatically being determined by the sensors. When the load has reached the selected dryness level, it will continue to tumble, unheated, during a Cool Down period. This helps reduce wrinkling and makes items easier to handle during unloading. The estimated Cool Down time will be displayed.
Drying time varies depending on size and dampness of load and fabric type. If the load is too small or almost dry, the sensing bars may not detect enough moisture to continue the cycle and the cycle may end after a few minutes. Select a Timed Dry setting to dry such loads.
Room temperature and humidity, type of installation and electrical voltage or gas pressure can also affect drying time.
Towels
Select this Auto Dry cycle for towel loads.
Normal
Select this Auto Dry cycle for cotton items.
Perm Press
Select this Auto Dry cycle for cottons and blends with a no-iron finish.
Delicate
Select this Auto Dry cycle for knits and delicate items.
Quick
Select this cycle to quickly dry a small load made up of just a few items. It provides approximately 20 minutes of tumbling followed by a 10-minute cool down period.
Bulky
Select this cycle to dry a comforter, blanket, sleeping bag or similar item.Cool Down is approximately 10 minutes.
Timed Dry
To manually select the drying time for any load, turn the knob to a numbered setting. Drying times from 15 to 90 minutes are available in 15-minute increments. You will not be able to select a cycle or dryness level. Timed Dry is recommended when using the No Heat option.
Note: To change cycles, press Pause/Cancel twice.


 To avoid fire hazard, do not use heat to dry items containing feathers or down, foam rubber, plastic, or similarly textured, rubber-like materials. Use the No Heat setting only.
137102600 (0806)

Cycle Selection (Con’t) |
|
To increase drying time for similar loads in the future, select |
||
Drying Temperature |
|
More Dry. For loads requiring less drying time, select Less Dry. |
||
|
Select Damp Dry for items you wish to partially dry before hang- |
|||
For best results, follow the fabric care label instructions on items |
ing or ironing. |
|||
to be dried. To change the drying temperature, press TEMP to |
|
Note: To prevent over-drying, not every dryness level is |
||
scroll to the desired heat. To protect your wardrobe, not all |
|
|||
|
available with every cycle. |
|||
temperatures are available with every cycle. |
|
|
||
|
Options |
|||
High heat is recommended for sturdy fabrics. |
|
|||
|
To select an option, press OPTIONS until the indicator for the |
|||
Medium High heat is recommended for most cotton fabrics. |
||||
desired option flashes, then press Select. If an option is not |
||||
Medium heat is recommended for wrinkle free, permanent press |
available for a cycle, the indicator will not light. Follow the same |
|||
and lightweight fabrics. |
|
steps to delete an option. |
||
Low heat is recommended for delicate fabrics. |
|
The Cycle Signal will sound at the end of the cycle and periodi- |
||
No Heat should only be used with a Timed Dry |
setting to dry |
cally during Press Saver. |
||
items containing feathers, down, foam rubber, plastics or rub- |
Select Shrink Guard to lower the initial drying temperature to |
|||
ber-like materials; to freshen clothing, pillows or blankets; or to |
protect fabrics from overdrying. |
|||
dust draperies. |
|
Select Press Saver if the dried load might not be removed |
||
Note: Using No Heat in any Auto Dry cycle will |
result in |
promptly at the end of the cycle. The dry load will continue to |
||
long drying times and /or wet loads at the end of the cycle. |
tumbling without heat for 30 minutes to help reduce wrinkling. |
|||
|
|
When the Cycle Signal is selected, a beep will be heard |
||
Cycle Settings |
|
periodically. The load may be removed any time during Press |
||
Appropriate drying temperature, dryness level and options will |
Saver. |
|||
automatically be indicated for each cycle. The TEMP, DRYNESS |
Dryer Features |
|||
and OPTIONS settings can be changed before the cycle is |
||||
started. Those adjustments will automatically be remembered |
|
(Control Lock) |
||
each time that cycle is selected. If a temperature, dryness level |
To avoid having someone accidentally start or stop the washer, |
|||
or option is not recommended for a cycle, the indicator will not |
press OPTIONS and Select at the same time and hold for about |
|||
light. |
|
10 seconds until the (Control Lock) lights up. “LOC” will be |
||
If changes are attempted after the cycle starts, the status lights |
displayed alternately with the estimated cycle time. Turning |
|||
will blink, the signal will beep and “Err” will be displayed. To |
the Cycle Selector knob or pressing any button will produce |
|||
change a setting after the cycle starts, press Pause/Cancel once, |
flashing indicator lights and/or beeping. To unlock the controls, |
|||
adjust the setting and press START to resume the cycle. See |
press and hold OPTIONS and Select for about 10 seconds. |
|||
the “Dryer Settings Chart” for more details. |
|
Status Lights |
||
Dryness Level |
|
The following indicators may be lighted during the cycle: |
||
To change the dryness level, press DRYNESS until the desired |
• |
Drying |
||
selection is made. Select Normal for most loads. |
• |
Cool Down |
||
Occasionally a load may seem too damp or over-dried at the end |
• |
Press Saver |
||
of the cycle. |
|
• |
Clean Lint Filter |
|
DRYER• SETTINGS CHART |
||||
|
|
|
(Control Lock) |
|
These temperatures,AVAILABLE CYCLEdrynessSETTINGSlevels- Th se temperatures,and optionsdrynessarel velsavailablend optionswithare availablethe followingwith the followingcycles:cycles:
*Factory setting
Available settings
**Timed Dry
Cycle Only
***Estimated cycle duration is based on normal dryness level and factory settings.
|
Towels |
Normal |
Perm Press |
Delicate |
Quick |
Bulky |
|
Timed Dry |
|
|
Estimated |
60 minutes |
50 minutes |
40 minutes |
20 minutes |
30 minutes |
45 minutes |
15 to 90 |
|
||
drying time *** |
minutes |
|
||||||||
|
|
|
|
|
|
|
|
|||
|
|
|
|
|
|
|
|
|
|
|
Temperatures |
|
|
|
|
|
|
|
|
|
|
High |
* |
|
|
|
|
|
|
|
|
|
Medium-High |
|
* |
|
|
|
|
|
* |
|
|
Medium |
|
|
* |
|
* |
* |
|
|
|
|
Low |
|
|
|
* |
|
|
|
|
|
|
No Heat |
** |
** |
** |
** |
|
|
|
|
|
|
Dryness Level |
|
|
|
|
|
|
|
|
|
|
More Dry |
|
|
|
|
|
|
|
|
|
|
Normal Dry |
* |
* |
* |
|
|
|
|
|
|
|
Less Dry |
|
|
|
* |
|
|
|
|
|
|
Damp Dry |
|
|
|
|
|
|
|
|
|
|
Options |
|
|
|
|
|
|
|
|
|
|
Shrink Guard |
|
|
|
* |
|
|
|
|
|
|
Press Saver |
|
|
* |
* |
|
|
|
|
|
|
Cycle Signal |
* |
* |
* |
* |
* |
* |
|
* |
|
|
* Factory |
Available |
** Not |
|
*** Estimated |
cycle duration is based on normal |
(0806) |
||||
setting |
settings |
recommended |
dryness level and factory settings. |
137102600 |
||||||
|
|
|
|
|||||||
CONSIGNES D’UTILISATION DE SECHEUSE
Avant d’utiliser votre sécheuse
Lisez le guide d’utilisation du propriétaire.
Il contient des informations importantes relatives à la sécurité et à la garantie, ainsi que plusieurs
suggestions pour obtenir un séchage optimal.
 Pour réduire les risques d’incendie, d’électrocution ou de blessure, lisez les MESURES DE SÉCURITÉ IMPORTANTES contenues dans le guide d’utilisation du propriétaire avant de faire fonctionner cet appareil.
Lisez « les directives » de séchage dans le guide d’utilisation du propriétaire. Les étapes d’utilisation y sont expliquées en détail.
1.Préparez les articles à faire sécher.
2.Vérifiez que le filtre à charpie est propre et bien en place.
3.Chargez la sécheuse. Si vous le désirez, vous pouvez également ajouter un assouplisseur à tissu en feuilles. Fermez la porte.
4.Sélectionnez le cycle approprié et les réglages pour chacune des charges.
•Tournez le bouton du sélecteur de cycle pour sélectionner le cycle. La durée estimée de séchage s’affichera.
•La température appropriée de séchage, le niveau d’humidité et les options seront automatiquement affichés pour chaque cycle. Pour changer la température et le niveau d’humidité, appuyez sur TEMPÈRATURE (TEMP) et HUMIDITE (DRYNESS) jusqu’à ce que les sélections désirées soient faites.
•Pour sélectionner une option, appuyez sur OPTIONS jusqu’à ce que l’indicateur de l’option désirée clignote et appuyez sur SÉLECTIONNER (SELECT). Suivez les mêmes étapes pour supprimer une option.
•Si un niveau d’humidité ou une option n’est pas disponible pour un cycle, il ne s’illuminera pas.
•Les changements effectués au cycle seront automatiquement mémorisés pour la prochaine fois où ce cycle sera sélectionné
•Voir le Tableau de réglage de la sécheuse pour obtenir de plus amples détails.
5. Appuyez sur DÉMARRER (START) pour démarrer le cycle.
•Pour arrêter le cycle ou changer les réglages, appuyez sur Pause/Annuler (Pause/Cancel) une fois. « PAU » s’affichera en alternance avec la durée estimée de séchage. Pour redémarrer le cycle, appuyez sur DÉMARRER (START).
•Pour arrêter ou changer le cycle, appuyez sur Pause/Annuler (Pause/Cancel) deux fois.
6.Un signal sonore retentit à la fin du cycle et périodiquement durant sauvegarder cycle Pressage Permanent (Press Saver) lorsque l’option Signal de Cycle (Cycle Signal) est sélectionné.
7.Nettoyez le filtre à charpie après chaque charge. L’indicateur Nettoyer Filtre à Charpie (Clean Lint Filter) s’allume à la fin du cycle à titre de rappel.
Sélection des cycles
Pour obtenir des résultats optimaux, suivez les guides d’entretien du fabricant sur les articles à sécher.Pour changer la sélection une fois le cycle démarré, appuyez sur Pause/Annuler (Pause/ Cancel) deux fois, sélectionnez un nouveau cycle et appuyez sur DÉMARRER (START). Le fait de tourner le bouton à une autre sélection ne changera pas le cycle. Le signal sonore retentit et les voyants lumineux d’état clignoteront, mais le cycle original continuera. La sécheuse utilise des barres de captage pour mesurer le niveau d’humidité de la charge pendant qu’elle bascule dans l’air chaud. Les cycles Séchage Automatique (Auto Dry) épargnent du temps et de l’énergie et protègent les tissus.
La durée estimée de séchage s’affiche durant environ 5 minutes. Alors le cercle extérieur de l’indicateur numérique encendera circulairement, pour indiquer que le temps de de séché est automatiquement calculé par les capteurs. Lorsque la charge a atteint le niveau d’humidité sélectionné, elle continue à basculer, sans chaleur, durant la période de refroidissement. Ceci contribue à réduire le froissement et rend les articles plus faciles à manipuler lors du déchargement. La durée estimée du refroidissement s’affichera.
Le temps de séchage varie en fonction de la grosseur et de l’humidité de la charge, de son poids et du type de tissu.Si la charge est trop petite ou sèche presque, les barres de sensation peuvent ne pas détecter assez d’humidité pour continuer le cycle et le cycle peut finir après quelques minutes. Choisissez un arrangement sec synchronisé pour sécher de telles charges.
La température de la pièce et l’humidité ambiante, le type d’installation, la tension de l’alimentation ou la pression du gaz peuvent aussi influer sur le temps de séchage.
Serviettes (Towels)
Sélectionnez ce cycle Séchage Automatique (Auto Dry) pour les serviettes.
Normal
Sélectionnez ce cycle Séchage Automatique (Auto Dry) pour les articles en coton.
Repassage Permanente (Perm Press)
Sélectionnez ce cycle Séchage Automatique (Auto Dry) pour faire sécher les articles en coton et les tissus mélangés dont le repassage est inutile.
Séchage automatique (Auto Dry)
Les cycles de séchage automatique éliminent le besoin d’estimer la durée de séchage. Les charges séchées à l’aide des cycles Serviettes (Towels), Normal, Pressage Permanent (Perm Press) et Délicat (Delicate) sécheront automatiquement à la température sélectionnée au degré d’humidité désiré.
Délicat (Delicate)
Sélectionnez ce cycle Séchage Automatique (Auto Dry) pour les tricots et articles délicats.
137102600 (0806)
 Loading...