


Istruzioni per l’uso e l’installazione
Forno da incasso multifunzione con 5 programmi |
1 |
Instructions for use and installation
Built-in multi-function oven with 5 cooking modes |
14 |
Mode d'emploi et installation
Four à encastrer multifonction 5 programmes |
27 |
Gebrauchsund Installationsanweisungen
Einbau-Multifunktionsofen mit 5 Programmen |
40 |
Instructies voor het gebruik en installeren
Inbouwoven met 5 programma's |
53 |
Instrucciones para el uso y la instalación
Horno empotrable multifunción con 5 programas |
66 |
Instruções para o uso e a instalação
Forno de encaixar multifuncional com 5 programas |
80 |
Οδηγίες χρήσης και εγκατάστασης
Πολυλειτουργικός εντοιχιζόµενος φούρνος µε 5 προγράµµατα |
93 |
Kullanım ve montaj talimatları
5 programlı çok fonksiyonlu ankastre fırın |
106 |
Руководство по установке и эксплуатации
Встраиваемая многофункциональная духовка |
123 |
с 5 программами |
Használati és üzembe helyezési útmutató
Multifunkciós beépíthető sütő 5 programmal |
136 |
Instrukcje obsługi i instalacji
Wielofunkcyjny piekarnik do zabudowy z 5 programami |
149 |
CA 52M
SM 52M
SM 56M
FLAT 603
FLAT 604
Sommario
Introduzione................................................................................................. |
1 |
Prima accensione ......................................................................................... |
1 |
Suggerimenti ................................................................................................ |
1 |
Visto da vicino .............................................................................................. |
2 |
Come utilizzarlo........................................................................................... |
3 |
Tabella indicativa di cottura.......................................................................... |
6 |
Pulizia e manutenzione del forno................................................................. |
7 |
Assistenza..................................................................................................... |
9 |
Avvertenze per la sicurezza ......................................................................... |
9 |
Installazione................................................................................................ |
11 |
Istruzioni di montaggio............................................................................... |
12 |
Collegamento alla rete elettrica................................................................. |
12 |
Dati tecnici ................................................................................................. |
13 |
Introduzione
La ringraziamo per aver scelto un prodotto Franke.
Prima di utilizzare l’apparecchio Le consigliamo di leggere attentamente le avvertenze ed i consigli contenuti nel presente manuale. Sarà così più facile utilizzarlo e mantenerlo efficiente più a lungo. Conservare con cura questo libretto per ogni ulteriore consultazione.
Prima accensione
Quando si usa il forno per la prima volta, è necessario far funzionare l’apparecchio a vuoto con la manopola regolazione temperatura posizionata al massimo per almeno 40 minuti tenendo la porta aperta ed aerando bene il locale.
L’odore che si avverte durante questa operazione è dovuto all’evaporazione delle sostanze utilizzate per proteggere il forno durante l’intervallo di tempo che intercorre tra la produzione e l’installazione del prodotto. Trascorso questo tempo il forno è pronto per l’uso.
Suggerimenti
È buona norma, per la riuscita dei vostri piatti, non introdurre mai le vostre pietanze nel forno freddo, bensì attendere che esso abbia raggiunto la temperatura da voi prescelta.
Durante la cottura, non appoggiare mai direttamente sul fondo del forno, pentole o contenitori che vanno sempre posizionati sopra le griglie o le leccarde in dotazione in uno dei 5 ripiani disponibili; la mancata osservanza di questa indicazione provocherebbe il danneggiamento dello smalto del forno.
Non rivestire mai le pareti del forno con fogli di alluminio, soprattutto la parte inferiore del vano di cottura.
Eventuali riparazioni devono essere effettuate dal personale specializzato e patentato. Contattare il nostro centro di assistenza più vicino e richiedere solo ricambi originali.
Il vostro forno Franke utilizza smalto speciale, facile da pulire, comunque è buona norma pulirlo spesso evitando di cuocere più volte lo sporco ed i residui delle cotture precedenti.
Eventuali pannelli autopulenti (qualora il forno ne fosse provvisto) devono essere puliti con acqua e sapone (vedi istruzioni per la pulizia).
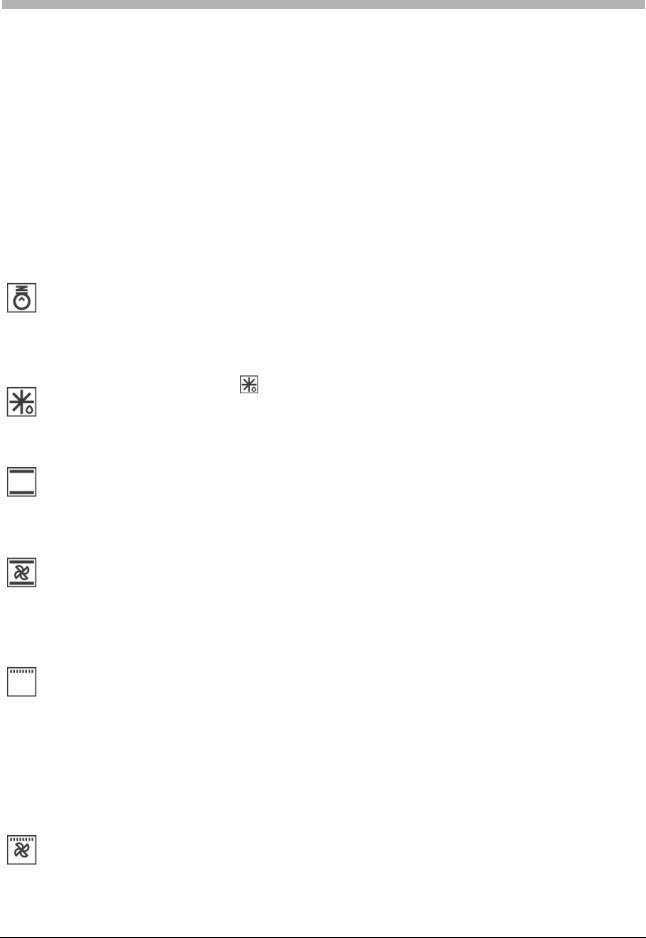
N.B: - prima di procedere all’accensione del forno, leggere le istruzioni relative l’uso del timer (vedi pag. 4).
-se il forno è equipaggiato con un programmatore automatico di cottura o di spegnimento, per utilizzare il forno in modo manuale è necessario selezionare l’opzione “manuale” contraddistinta dal simbolo  .
.
1
Visto da vicino
A Cruscotto Comandi
B |
C |
F |
|
B |
D |
F |
A |
|
E |
|
A |
|
E |
|
|
|
|
|
||
|
|
|
|
|
|
|
CA/SM 52 - FLAT 603 |
|
|
|
|
||
|
|
|
CA/SM 52 - FLAT 604 |
|
|
|
|
|
|
|
|
|
|
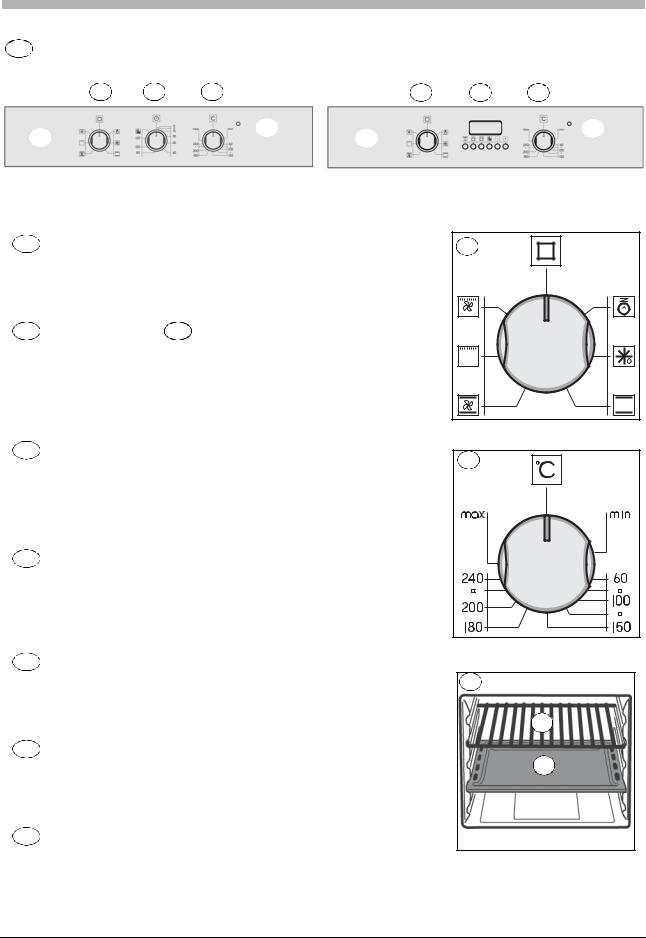
B Manopola selezione programmi
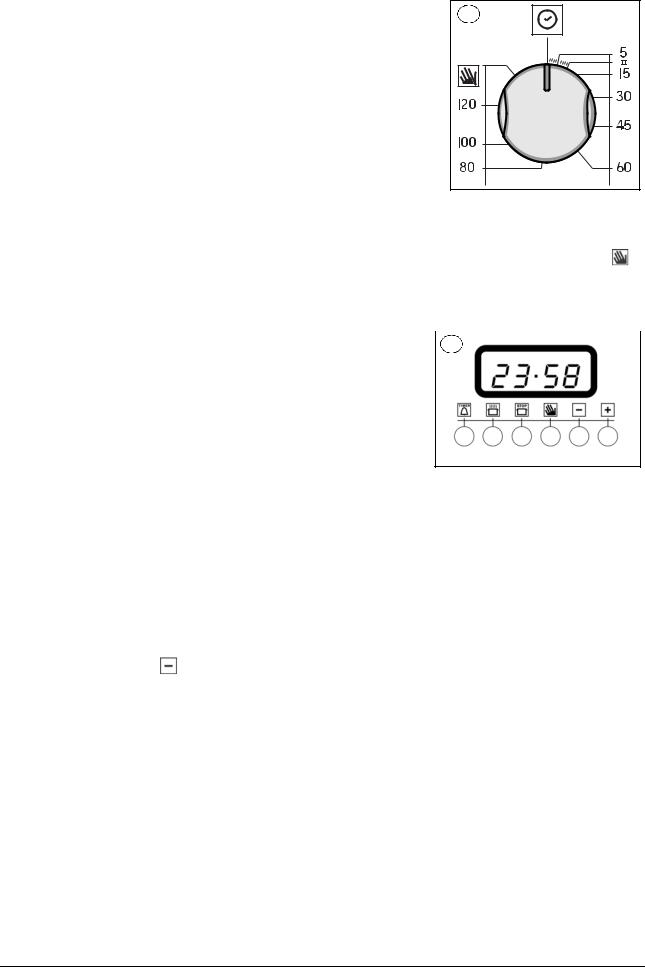
Serve a selezionare il modo di funzionamento del forno a seconda del tipo di cottura da effettuare. Posizionando la manopola su qualsiasi programma, si accende l’illuminazione interna del forno, indice che il forno è acceso.
C Contaminuti / D Programmatore
(vedi pag. 4)
Nella gamma dei forni Franke sono previsti diversi sistemi di controllo e gestione del tempo di cottura, a pag. 4 potrà trovare le istruzioni dettagliate di ciascuno; sarà sufficiente individuare il tipo di controllo di cui il suo forno dispone per essere guidata ad un corretto utilizzo della funzione
E Luce spia termostato
Evidenziata dal simbolo  avverte che gli elementi riscaldanti del forno sono in funzione. Essa si spegne quando la temperatura impostata è stata raggiunta, riaccendendosi ogni qualvolta il forno ritorna in fase di riscaldamento. E’ utile per verificare il raggiungimento della temperatura prima di infornare gli alimenti.
F Manopola regolazione temperatura (Termostato)
Permette di selezionare la temperatura idonea al tipo di pietanza prescelta, mantenendola costante per tutta la durata della cottura. Per selezionare la temperatura desiderata, si deve ruotare la manopola in senso orario, portando l’indice di riferimento al numero corrispondente. La temperatura massima è di circa 260°C.
B |
F |
G |
Guide di scorrimento di leccarde e griglie |
|
Servono a posizionare correttamente le griglie e le leccarde in 5 posizioni |
G |
|
prestabilite (da 1 a 5 partendo dal basso); nella tabella indicativa di cottura |
|
|
(pag. 6) troverete l’indicazione della posizione ideale per ciascun utilizzo |
|
|
del forno. |
|
|
H Leccarda
Viene normalmente usata per raccogliere i sughi delle grigliate o per cuocere direttamente i cibi; se non utilizzata, durante la cottura la leccarda deve essere tolta dal forno. La leccarda è in acciaio smaltato di tipo “AA” per uso alimentare.
I Griglia
Viene usata come supporto alle vostre teglie, agli stampini da pasticceria, ed a tutti i contenitori diversi dalle leccarde in dotazione, o per cuocere prevalentemente nelle funzioni grill e grill ventilato carne e pesce da grigliare, pane da tostare ecc.
I
H
2
Come utilizzarlo
In questo forno sono riuniti i pregi dei tradizionali forni a convezione naturale “statici” con quelli dei moderni forni a convezione forzata “ventilati”. E’ un apparecchio molto versatile che, in modo facile e sicuro, permette di scegliere fra 5 diversi metodi di cottura. Agendo sulle manopole (B) ed (F) presenti sul cruscotto, si ottiene la selezione dei diversi programmi e la temperatura desiderata. Per utilizzare al meglio il vostro forno Franke, consultare la tabella indicativa di cottura a pag. 6.
Ventilazione di raffreddamento
Al fine di ottenere una riduzione delle temperature di porta, cruscotto e fianchi, il forno Franke è dotato di una ventola di raffreddamento che si attiva automaticamente a forno caldo. Quando la ventola è in funzione è possibile avvertire un getto d’aria che esce tra frontalino e porta forno, una particolare attenzione è stata posta affinché la velocità dell’aria in uscita non disturbi l’ambiente cucina e i rumori siano abbattuti al massimo.
A completa salvaguardia dei mobili, a fine cottura la ventilazione rimane attiva finchè il forno non sarà sufficientemente freddo.
La luce forno
A questo simbolo corrisponde l’accensione dell’illuminazione interna del forno senza inserire nessun tipo di riscaldamento. Tale funzione è utile per facilitare le operazioni di pulizia a forno spento visualizzando il vano cottura.
Programmi di cottura
Scongelamento
Posizionando la manopola sul simbolo ( |
), si ottiene la funzione di scongelamento. |
In questo caso l’aria forzata dal motore interno al forno lambisce il cibo accelerandone il processo di scongelamento naturale.
Cottura statica naturale
La manopola del termostato (F) deve essere posizionata tra 50°C e Max (260°C).
Il riscaldamento avviene sia dall’alto (resistenza cielo) sia dal basso (resistenza suola). Questa è la funzione di cottura tradizionale che permette di cuocere uniformemente le vostre pietanze, utilizzando un solo ripiano.
Cottura ventilata
La manopola del termostato (F) deve essere posizionata tra 50°C e Max (260°C).
Si inseriscono la resistenza superiore (cielo), la resistenza inferiore (suola) e la ventola interna al forno.
Il calore costante ed uniforme cuoce e rosola il cibo in tutti i punti. Si possono cuocere anche pietanze diverse tra loro utilizzando un massimo di 2 ripiani contemporaneamente.
Cottura grill
La manopola del termostato (F) deve normalmente trovarsi alla posizione Max (260°C), è tuttavia possibile scegliere una temperatura inferiore, in questo caso la grigliatura sarà più lenta.
Si inserisce la resistenza grill posta nella parte superiore del forno. In questo caso la veloce cottura superficiale a raggi infrarossi mantiene morbida la parte interna delle carni; è anche possibile utilizzare la cottura al grill per tostare velocemente fino a 9 fette di pane. Il forno Franke, per la sua sicurezza, è studiato per grigliare con la porta del forno completamente chiusa.
Avvertenza: la resistenza del grill, durante il funzionamento è molto calda; evitare di toccarla accidentalmente durante le manipolazioni degli alimenti da grigliare; comunque Franke ha studiato una forma della bocca del forno che protegge il più possibile le mani di chi lo usa.
Cottura grill ventilata
La manopola del termostato (F) deve normalmente trovarsi alla posizione Max (260°C), è tuttavia possibile scegliere una temperatura inferiore, in questo caso la grigliatura sarà più lenta.
3
Si inserisce la resistenza grill posta nella parte superiore del forno e si mette in funzione la ventola. Unisce all’irradiazione termica unidirezionale la circolazione forzata dell’aria all’interno del forno. Ciò impedisce la bruciatura superficiale degli alimenti aumentando il potere di penetrazione del calore. Risultati eccellenti si ottengono utilizzando il grill ventilato per spiedini misti di carne e verdura, salsicce, costine di maiale, costolette di agnello, pollo alla diavola, quaglie alla salvia, filetto di maiale etc...
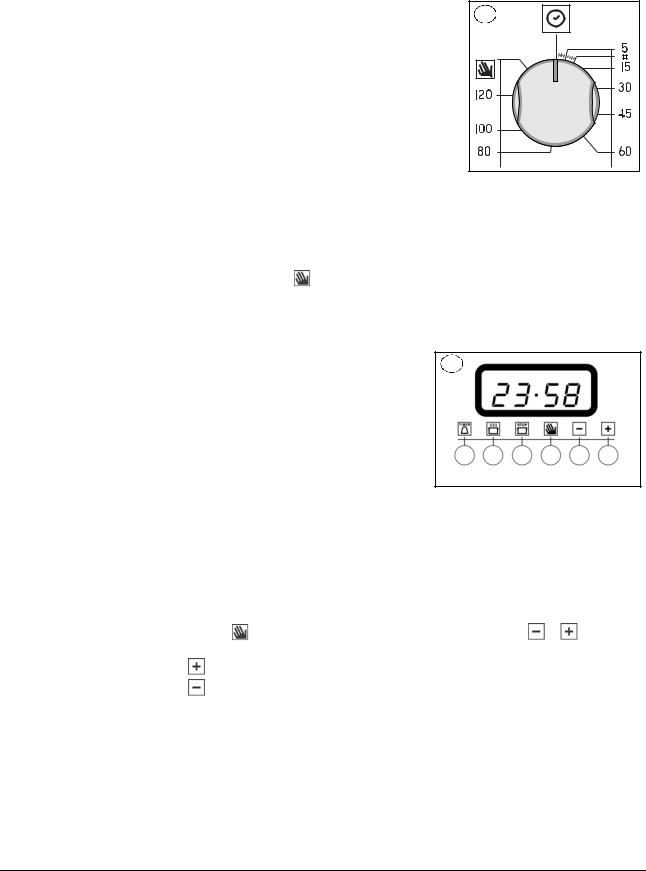
La manopola del contaminuti di fine cottura
Il contaminuti di fine cottura è un utile dispositivo che spegne automaticamente il forno al raggiungimento del tempo prescelto in un intervallo tra uno e 120 minuti. Per utilizzare il contaminuti di fine cottura occorre caricare la suoneria ruotando la manopola (C) di un giro quasi completo in senso orario; quindi, tornando indietro, impostare il tempo desiderato facendo coincidere con il riferimento fisso del frontalino il numero corrispondente ai minuti prefissati. Al termine del tempo impostato, oltre all’intervento della suoneria, si ha lo spegnimento automatico del forno.
C |
N.B. Subito dopo lo spegnimento e per lungo tempo,
l’interno del forno mantiene una temperatura vicina a quella impostata per la cottura; quindi per evitare sovracotture o bruciature degli alimenti, è opportuno rimuoverli dal forno.
Attenzione: per utilizzare il forno in funzionamento manuale, escludendo cioè il programmatore di fine cottura, occorre far coincidere l’indice della manopola con il simbolo fisso sul frontalino. Quando il forno è spento, il programmatore di fine cottura può essere usato come un normale contaminuti.
Il programmatore di cottura elettronico
Consente di programmare il forno nei D funzionamenti:
•inizio cottura ritardato con durata stabilita;
•inizio immediato con durata stabilita;
•contaminuti.
Funzione dei tasti :
 : contaminuti ore, minuti
 : durata cottura
 : fine cottura
 : commutazione manuale
 : impostazione tempi indietro
 : impostazione tempi avanti
Come impostare l’orologio digitale
Dopo l’allacciamento alla rete o dopo una mancanza di corrente il display lampeggia su:
“0.00” |
|
|
|
|
• Premere il tasto |
e successivamente (entro 4 secondi) con i tasti |
e |
impostare |
|
l’ora esatta. |
|
|
|
|
Con il tasto |
il tempo aumenta. |
|
|
|
Con il tasto |
il tempo diminuisce. |
|
|
|
Eventuali aggiornamenti dell’ora possono essere effettuati ripetendo la fase sopra descritta:
Funzionamento manuale del forno
Dopo aver impostato l’ora, il programmatore va automaticamente in posizione manuale. Nota: Per ripristinare il funzionamento manuale dopo ogni cottura “Automatica” premere
il tasto  .
.
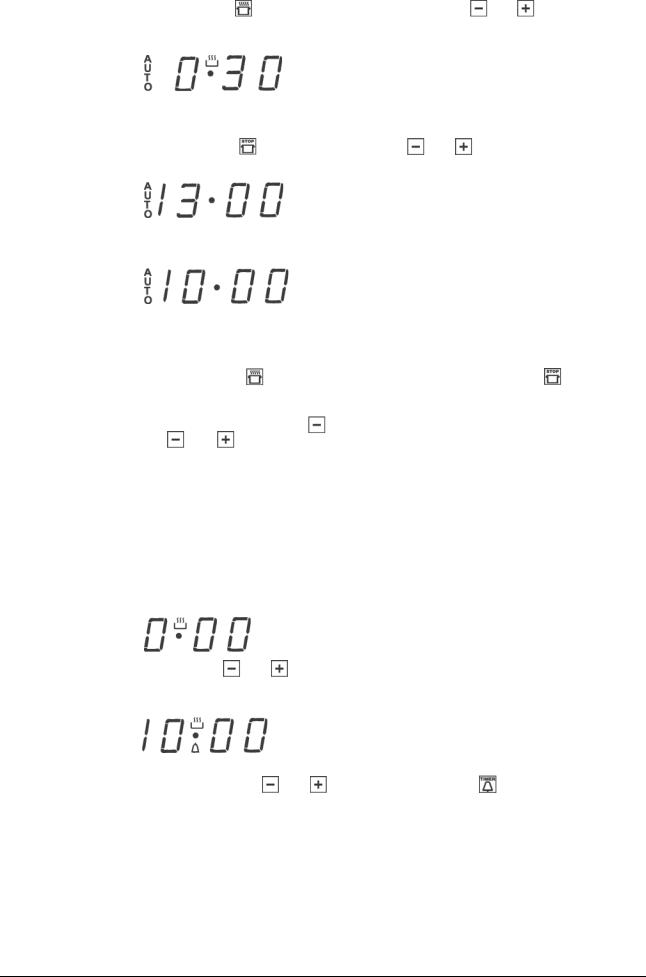
Inizio cottura ritardato con durata stabilita
Va impostata la durata della cottura e l’ora di fine cottura. Supponiamo che il display indichi le ore 10,00 e che desideriamo effettuare una cottura di 30 minuti che terminerà alle ore 13,00.
4
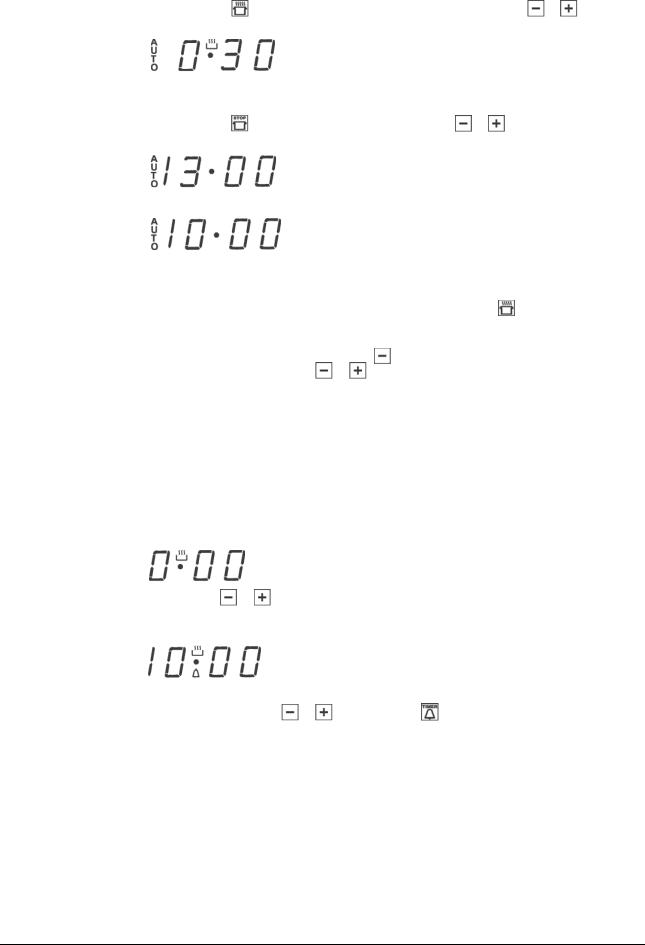
1.Ruotare le manopole di comando del forno sul programma e temperatura desiderata (esempio: forno statico, 200°C)
2. Premere il tasto |
e successivamente (entro 4 secondi) con i tasti |
e |
impostare |
la durata desiderata. Supponiamo di impostare una cottura di 30 minuti; compare:
Rilasciando il tasto, dopo 4 secondi, ricompare l’ora corrente con il simbolo  e la scritta
“AUTO”.
3. Premere il tasto |
e successivamente premere i tasti |
e |
fino ad impostare l’ora |
di fine cottura desiderata, supponiamo le 13,00 |
|
|
|
4. Rilasciando il tasto sul display dopo 4 secondi compare l’ora corrente:
La scritta “AUTO” accesa ricorda l’avvenuta programmazione di durata e di fine cottura nella funzione automatica. A questo punto il forno si accende automaticamente alle ore 12,30 in modo da terminare dopo 30 minuti. Quando il forno è acceso compare la pentolina  per tutta la durata della cottura. In qualsiasi momento premendo il tasto è possibile visualizzare la durata impostata, premendo il tasto
  si visualizza l’ora di fine cottura.
A fine cottura suona il segnale acustico; l’intensità del suono può essere modificata
durante l’emissione premendo il tasto |
. Per interromperlo premere un tasto |
|
qualsiasi ad eccezione dei tasti |
e . |
|
Inizio immediato con durata stabilita
Programmando solo la durata (punti 1 e 2 del paragrafo “Inizio cottura ritardato con durata stabilita”) si ha l’inizio di cottura immediato.
Per annullare una cottura già programmata
Premere il tasto  .
.
Funzione contaminuti
Nel funzionamento contaminuti viene impostato un tempo dal quale comincia un conto alla rovescia. Questa funzione non controlla l’accensione e lo spegnimento del forno, emette solamente un allarme acustico a tempo scaduto.
Premere il tasto  compare:
Quindi con i tasti |
e |
impostare il tempo desiderato |
Rilasciando il tasto il tempo parte esattamente al minuto secondo, nel display compare l’ora corrente.
A fine tempo viene emesso un segnale acustico che può essere arrestato premendo un
tasto qualsiasi (esclusi i tasti |
e |
) ed il simbolo |
si spegne. |
Correzione cancellazione dei dati |
|
||
•I dati impostati possono essere cambiati in qualsiasi momento, premendo il tasto corrispondente e premendo il tasto  o
o  .
.
•Cancellando la durata di cottura si ha la cancellazione automatica anche della fine del funzionamento e viceversa.
•Nel caso di funzionamento programmato, l’apparecchio non accetta tempi di fine cottura antecedenti a quelli di inizio cottura proposti dall’apparecchio stesso.
N.B. Subito dopo lo spegnimento e per lungo tempo l’interno del forno mantiene una temperatura vicina a quella impostata per la cottura; quindi per evitare sovracotture o bruciature degli alimenti, è opportuno rimuoverli dal forno.
5
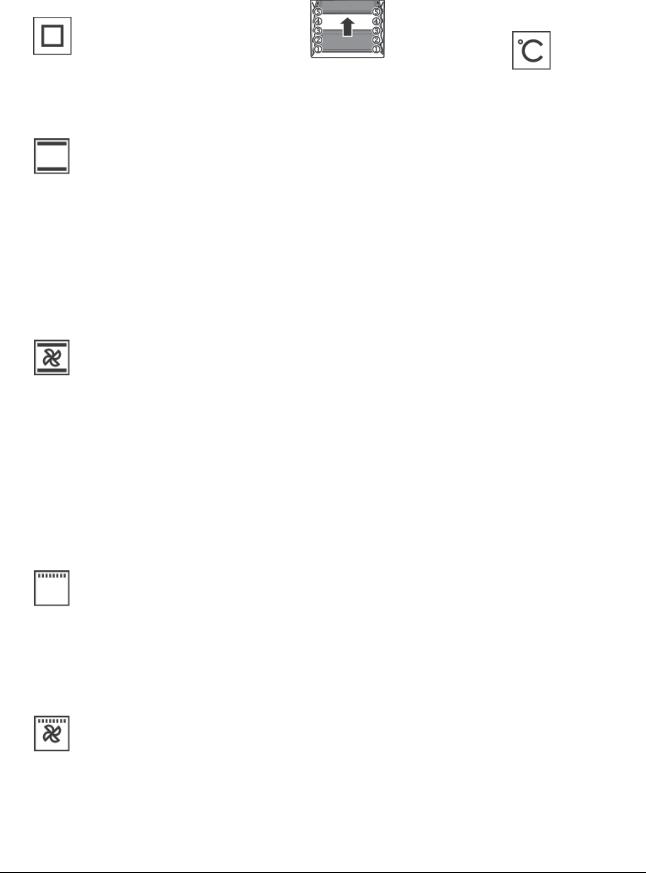
Tabella indicativa di cottura
|
|
|
|
|
|
|
|
|
|
|
|
|
|
Impostazione |
Tipo di cibo |
Peso |
Posizione |
Tempo di |
Impostazione |
Durata |
manopola di |
|
(Kg) |
ripiani |
preriscalda- |
manopola del |
della |
selezione |
|
|
|
mento |
termostato |
cottura |
|
|
|
|
(min.) |
C° |
(min.) |
|
|
|
|
|
|
|
Cottura |
Agnello |
1 |
3 |
9,5 |
180 |
95-100 |
statica |
Arrosti di Maiale |
1 |
3 |
9,5 |
180 |
70-80 |
naturale |
Arrosti di Vitello |
1 |
3 |
10,5 |
200 |
140-150 |
|
Frittate |
1 |
2 |
10,5 |
200 |
25-30 |
|
Frutta |
1 |
3 |
9,5 |
180 |
25-30 |
|
Merluzzo-Orata-Rombo |
1 |
3 |
9,5 |
180 |
20-25 |
|
Pane Comune |
1 |
2-4 cont. |
9,5 |
175 |
25-30 |
|
Pasticci |
1 |
2 |
10,5 |
200 |
35-40 |
|
Pesce acqua dolce |
1 |
3 |
10,5 |
200 |
30 |
|
Polenta condita |
1 |
2 |
9,5 |
180 |
25-30 |
|
Torte ai Frutti di Bosco |
0,5 |
4 |
9,5 |
180 |
25-30 |
|
Torte alla Ricotta |
1 |
2 |
9,5 |
180 |
25-30 |
|
Torte da Farcire |
0,5 |
4 |
9,5 |
180 |
60 |
|
Verdure |
0,5 |
2 |
9,5 |
180 |
35-40 |
|
|
|
|
|
|
|
Cottura |
Arista di Maiale |
1 |
3 |
9 |
180 |
75-80 |
ventilata |
Arrosto di Vitello |
1 |
2 |
10 |
200 |
80 |
|
Coniglio al forno |
1 |
2 |
9,5 |
190 |
55-65 |
|
Crescia Marchigiana |
1 |
2 |
10 |
200 |
25-30 |
|
Frittate |
0,5 |
3 |
10 |
200 |
25 |
|
Gamberi al Forno |
0,5 |
3 |
10 |
200 |
20-25 |
|
Merluzzo-Orata-Rombo |
1 |
2-4 cont. |
7,5 |
150 |
25-30 |
|
Pane Comune |
1 |
2-4 cont. |
9 |
180 |
25-30 |
|
Pane di Patate |
1 |
3 |
9 |
180 |
20-25 |
|
Pane Giallo Zafferano |
1 |
2 |
10 |
200 |
30-35 |
|
Pesce acqua dolce |
0,5 |
2 |
8,5 |
170 |
25-30 |
|
Sfornati di Verdure |
1 |
2-4 cont. |
10 |
200 |
25-30 |
|
Tonno |
1 |
2 |
9 |
175 |
20 |
|
Torte alla Frutta |
1,5 |
2 |
9 |
175 |
30-35 |
|
Torte Salate |
1 |
3-5 cont. |
9 |
180 |
30-35 |
|
Verdure al Forno |
1 |
3-5 cont. |
9 |
180 |
40 |
|
|
|
|
|
|
|
Cottura grill |
Alette di Pollo |
1 |
4-5 cont. |
7 |
Max |
25-30 |
|
Braciole |
0,8 |
3 |
7 |
Max |
20-25 |
|
Capesante |
0,5 |
3 oppure 4 |
7 |
Max |
14-16 |
|
Patate al Forno |
1 |
3 |
7 |
Max |
20-25 |
|
Pesce acqua dolce |
1 |
3 oppure 4 |
7 |
Max |
25-30 |
|
Pomodori Gratinat |
0,5 |
2 oppure 3 |
7 |
Max |
20 |
|
Spiedini di Anguilla |
0,5 |
3 |
7 |
Max |
20-25 |
|
Spiedini di Tacchino |
0,5 |
4 |
7 |
Max |
20-25 |
|
|
|
|
|
|
|
Cottura grill |
Coscette di Pollo |
1 |
4 oppure 5 |
11 |
220 |
20-25 |
ventilata |
Costine di Maiale |
0,5 |
4 |
15 |
Max |
40-45 |
|
Faraona |
1,2 |
4 |
15 |
Max |
30-35 |
|
Orata al Cartoccio |
1 |
3 |
8,5 |
200 |
20 |
|
Pollo |
1,5 |
3 |
15 |
Max |
35-40 |
|
Quaglie |
0,8 |
4 |
15 |
Max |
30-35 |
|
Salamelle |
1 |
4 |
15 |
Max |
20-25 |
|
Verdure |
1 |
4 oppure 5 |
15 |
Max |
10-15 |
|
|
|
|
|
|
|
N.B: le indicazioni riportate in tabella sono il risultato di prove di cottura eseguite da un team di cuochi professionisti. In ogni caso esse sono indicative e possono essere modificate in base ai propri gusti personali.
6
Pulizia e manutenzione del forno
Importante
Prima di procedere alla manutenzione del forno occorre staccare sempre la spina dalla presa di corrente o togliere la corrente dalla linea di alimentazione a mezzo dell’interruttore generale dell’impianto elettrico.
–Le parti in acciaio inox e smaltate rimarranno sempre nuove, se si avrà cura di pulirle con acqua o usando prodotti specifici, asciugandole accuratamente.
–Bisogna evitare nel modo più assoluto l’uso della paglietta o lana d’acciaio, acido muriatico o altro che possa graffiare o smerigliare. Evitare inoltre l'uso di pulitori a vapore.
–Macchie che possono comparire sul fondo del forno, di composizione varia (sughi, zuccheri, albumine e grassi) hanno sempre origine da schizzi o da traboccamenti di cibi. Gli schizzi si determinano durante la cottura e sono dovuti all’uso di una temperatura troppo elevata, mentre i traboccamenti sono dovuti all’uso di recipienti troppo piccoli o a una valutazione errata degli aumenti di volume durante la cottura. Questi due inconvenienti possono essere ovviati con l’utilizzo di recipienti con bordo alto o utilizzando la leccarda in dotazione al forno. Per quanto riguarda la pulizia della parte inferiore del forno vi consigliamo di pulire le eventuali macchie presenti a forno tiepido; più si attende per la pulizia, più sarà difficile togliere le macchie.
Pulizia della porta forno
–La pulizia della porta, sia interna che esterna, deve essere effettuata a forno completamente raffreddato con acqua calda evitando l’uso di panni ruvidi .Pulire i vetri con appositi detergenti.
–Per le parti smaltate, così come per l’interno del forno, usate acqua calda e detergenti non abrasivi.
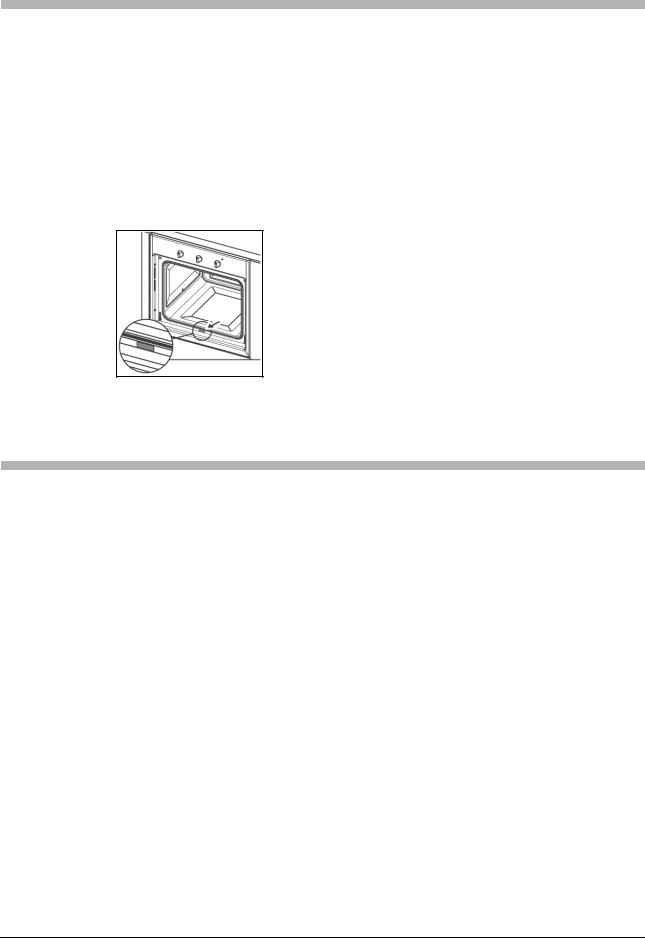
Sostituzione della lampada forno
I Forni Franke sono equipaggiati da una lampada circolare posizionata nella parte posteriore della cavità in alto a sx.
Nel caso si renda necessaria la sostituzione della lampada interna del forno, si deve operare come segue:
-Togliere l’alimentazione all’apparecchio tramite l’interruttore omnipolare utilizzato per il collegamento dell’apparecchio all’impianto elettrico, o scollegare la spina, se accessibile.
-Svitare la calottina di protezione di vetro (A).
-Svitare la lampada e sostituirla con una resistente ad alta temperatura (300°C) con le seguenti caratteristiche:
Tensione: 220/230V - 50Hz
Potenza: 15W
Attacco: (E14) mignon
-Rimontare la calottina di protezione di vetro (A) e ridate alimentazione all’apparecchio.
A
7
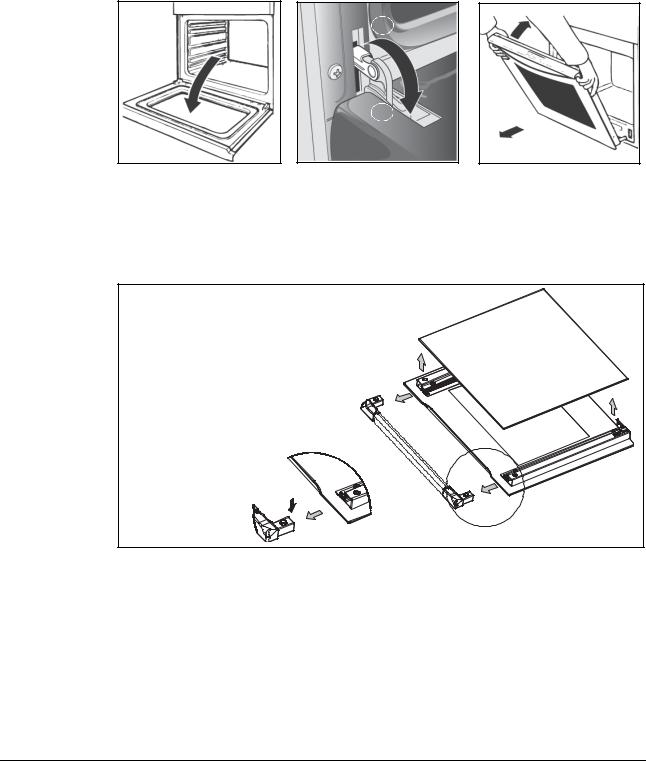
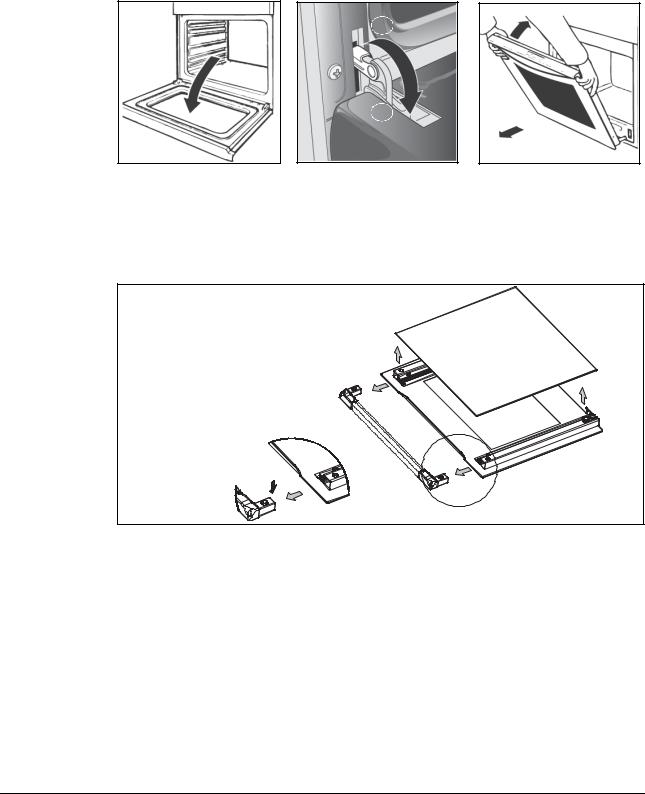
Smontaggio della porta forno
Per facilitare la pulizia del forno è possibile smontare la porta, agendo sulle cerniere come segue:
–Le cerniere (A) sono provviste di due cavallotti mobili (B). Sollevando il cavallotto (B) la cerniera si sblocca dalla sua sede.
–Fatto questo bisogna sollevare la porta verso l’alto ed estrarla verso l’esterno; per compiere queste operazioni fare presa sui fianchi della porta in prossimità delle cerniere.
–Per rimontare la porta infilare prima di tutto le cerniere nelle apposite scanalature.
–Infine, prima di chiudere la porta, non bisogna dimenticare di far ruotare i due cavallotti mobili (B) che sono serviti per agganciare le due cerniere.
B
A
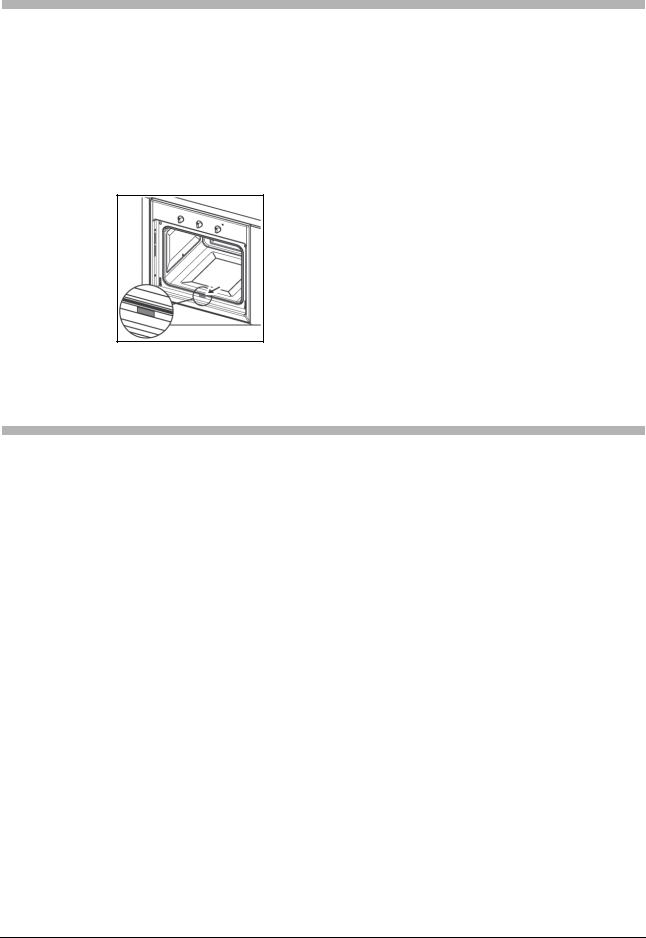
E’ possibile rimuovere il vetro interno della porta forno per permetterne la pulizia completa procedendo come segue:
–Aprire la porta alla sua massima escursione.
–Estrarre i due terminali negli angoli superiori della porta agendo sui rispettivi pulsanti (vedi dettaglio C).
–Rimuovere il vetro interno.
DETTAGLIO C
Una volta completata la pulizia rimontare il vetro interno della porta forno facendo attenzione che la sua parte inferiore si infili sotto le linguette poste nella parte bassa della porta e adagiandolo sugli appositi piedini in gomma. Quindi reinserire i due terminali fino allo scatto del pulsante.
ATTENZIONE
–Non lavare le parti rimosse (terminali e vetro) in lavastoviglie.
–Durante il rimontaggio del vetro interno assicurarsi che il lato serigrafato (verniciatura opaca) del vetro sia rivolto verso il basso.
Non utilizzare mai l’apparecchio senza prima aver completamente reinserito il vetro interno.
8
Assistenza
Nel caso si verifichino eventuali problemi di funzionamento, contattare il Centro di Assistenza Tecnica come da elenco allegato.
Non ricorrere mai a tecnici non autorizzati.
Comunicare:
–Il tipo di anomalia;
–Il modello dell’apparecchio (Art.);
–Il numero di serie (S.N.);
Queste ultime informazioni si trovano sulla targhetta caratteristiche riportata sul certificato di garanzia.
Avvertenze per la sicurezza
Rivolgersi assolutamente a personale qualificato nei seguenti casi:
Per garantire l’efficienza e la sicurezza di questo elettrodomestico:
•rivolgetevi esclusivamente a centri di assistenza tecnica autorizzati
•richiedete sempre l’utilizzo di parti di ricambio originali
•L’apparecchio è concepito per uso non professionale in abitazioni; non modificatene le caratteristiche.
•Sulla targa matricola figurano i simboli dei paesi di destinazione per cui le istruzioni sono valide.
•Soltanto quando l’apparecchio è correttamente collegato ad un efficiente impianto di messa a terra, come previsto dalle norme vigenti, viene garantita la sicurezza elettrica.
•Fare attenzione a non toccare gli elementi riscaldanti e alcune parti della porta forno durante l’uso, in quanto diventano molto calde, ed in particolar modo tenere i bambini a distanza.
Evitate che i bambini abbiano contatti con:
-i comandi e l’apparecchio in genere;
-i componenti dell’imballo (sacchetti, polistirolo, punti metallici, ecc.);
-l’apparecchio, durante e subito dopo il funzionamento del forno, visto il surriscaldamento;
-l’apparecchio inutilizzato (in tal caso vanno rese inoffensive le parti che potrebbero risultare pericolose).
9
Evitate le seguenti operazioni:
-toccare l’apparecchio con parti del corpo umide;
-usare l’apparecchio quando si è a piedi nudi;
-tirare l’apparecchio o il cavo di alimentazione per staccarli dalla presa di corrente;
-operazioni improprie e pericolose;
-ostruire le aperture di ventilazione o smaltimento calore;
-lasciare il cavo di alimentazione di altri elettrodomestici su parti calde dell’apparecchio;
-l’esposizione ad agenti atmosferici (pioggia, sole);
-l’utilizzo del forno come ripostiglio di oggetti vari;
-l’utilizzo di liquidi infiammabili in prossimità dell’apparecchio;
-l’impiego di adattatori, prese multiple e/o prolunghe;
-installazione o riparazione senza l’intervento di personale qualificato.
Rivolgersi assolutamente a personale qualificato nei seguenti casi:
-installazione (secondo le istruzioni del costruttore);
-nel caso di dubbi sul funzionamento;
-sostituzione della presa in caso di incompatibilità con la spina dell’apparecchio.
Rivolgersi a centri di assistenza autorizzati dal costruttore nei seguenti casi:
-subito dopo aver tolto l’imballaggio, in caso di dubbio sull’integrità dell’apparecchio;
-sostituzione o danneggiamento del cavo di alimentazione;
-guasto o cattivo funzionamento, richiedendo i ricambi originali.
Èopportuno effettuare le seguenti operazioni:
-la sola cottura dei cibi evitando altre operazioni;
-prima di qualsiasi operazione di pulizia e manutenzione o in caso di cattivo funzionamento, disconnettere l’apparecchio dalla rete di alimentazione elettrica;
-per inserire o estrarre recipienti utilizzare guanti da forno;
-dato che all’estremità potrebbe essere più calda a causa di eventuali uscite d’aria, impugnare sempre la maniglia della porta al centro;
-controllare sempre che le manopole siano nella posizione di arresto quando l’apparecchio non è utilizzato;
-quando si decide di non utilizzare più l’apparecchio, disconnetterlo dalla rete elettrica.
•Il costruttore non può essere considerato responsabile per eventuali danni derivanti da: errata installazione, usi impropri, erronei ed irragionevoli.
10
Installazione
Importante: l’installazione deve avvenire in conformità alle norme e in accordo alle prescrizioni in vigore. Deve essere eseguita esclusivamente da personale specializzato e patentato.
Note caratteristiche del mobile
|
|
|
|
|
m |
|
|
|
|
|
|
|
|
|
|
m |
|
|
|
|
|
|
|
|
|
|
5 |
|
|
|
|
m |
|
||
|
|
54 |
|
|
|
|
|
|
|||
|
|
|
|
|
|
|
|
m |
|
||
|
|
|
|
|
|
|
0 |
|
|
mm |
|
|
|
|
|
|
|
|
55 |
|
|
. |
|
|
|
|
|
|
|
|
|
|
n |
||
|
|
|
|
|
|
|
|
|
i |
|
|
|
|
|
|
|
|
|
m |
|
|||
|
|
|
|
|
|
|
|
|
|
|
595 |
mm |
|
|
|
|
|
mm |
|
|
|
|
|
595 |
|
|
|
|
|
569 |
|
|
560 mm |
||
|
|
|
|
|
|
|
|
||||
|
|
|
|
|
|
|
|
|
|||
|
|
|
m |
5 |
|
|
|
|
|
|
|
|
|
|
|
|
|
|
|
|
|
||
|
|
m |
|
m |
|
|
|
|
|
|
|
|
5 |
|
|
|
|
|
|
|
|
||
59 |
2 |
|
|
|
m |
|
|
|
|
|
|
5 mm |
|
|
|
|
|
|
|
|
|
||
|
|
|
|
|
|
|
|
|
|
|
|
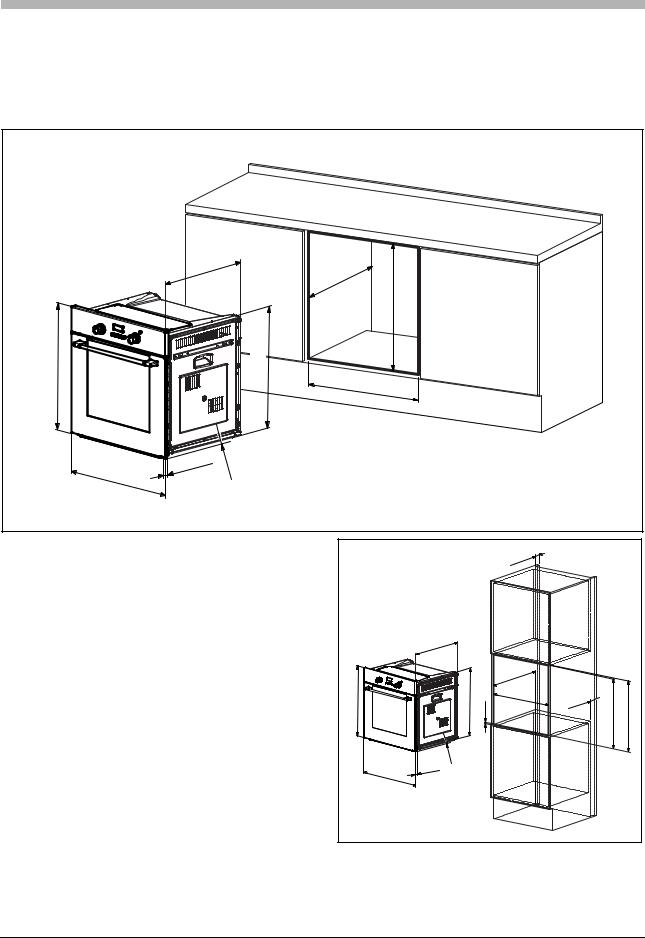
Nei mobili da incasso i componenti (materiali plastici e legno impiallacciato) devono essere tenuti insieme da collanti resistenti al calore (max 100°C): materiali e collanti non adatti possono causare deformazioni e scollature. Il mobile deve consentire il libero passaggio dei collegamenti elettrici. Il mobile in cui viene inserito il forno deve essere sufficientemente robusto da sopportare il peso dell’apparecchiatura.
Il forno deve essere montato in maniera sicura nella nicchia prevista. Il forno può essere inserito dentro un mobile a colonna o sotto il piano di un mobile componibile, garantendo comunque una sufficiente aerazione.
|
|
|
|
|
|
|
|
|
|
|
|
m |
|
|
|
|
|
|
|
|
|
|
|
|
|
|
m |
|
|
|
|
||
|
|
|
|
|
|
|
|
|
5 |
|
|
|
|
|
|
|
|
|
|
|
|
|
|
|
5 |
|
|
|
|
|
|
|
|
|
|
|
|
|
m |
|
|
|
|
|
|
|
|
|
|
|
|
|
|
|
m |
|
|
|
|
|
|
|
|
|
|
|
|
|
|
|
5 |
|
|
|
|
|
|
|
|
|
|
|
|
|
|
|
4 |
|
|
|
|
|
|
|
|
|
|
|
|
|
|
|
|
5 |
|
|
|
|
|
|
|
|
|
|
|
|
|
|
|
|
|
|
|
|
|
|
|
|
|
|
m |
|
|
|
|
|
|
|
|
|
|
|
|
|
|
|
m |
|
|
|
|
|
|
|
|
|
|
|
|
|
|
5 |
|
|
|
|
|
||
|
|
|
|
|
|
|
|
4 |
|
|
|
|
|
|
|
|
|
|
|
|
|
|
mm |
|
5 |
|
|
|
|
|
|
|
|
|
|
|
|
|
|
|
560 mm |
|
|
m |
|
|||||
|
|
|
|
|
|
|
|
|
|
|
|
|
|
m |
|
|
mm595 |
|
|
|
|
|
569 |
mm10 |
|
|
|
|
|
5 |
575-mm585 |
595mm |
|
|
|
|
|
|
|
|
|
|
|
5 |
|
|||||
|
|
|
|
|
|
|
|
|
|
|
|
|||||
|
|
|
|
|
|
|
|
|
|
|
|
|
||||
|
|
|
|
|
5 |
|
|
|
|
|
|
|
|
|
|
|
|
|
|
|
|
|
m |
|
|
|
|
|
|
|
|
|
|
|
|
|
|
|
m |
|
|
|
|
|
|
|
|
|
|
|
595 |
mm |
25 |
m |
m |
|
|
|
|
|
|
|
|
|
|
||
|
|
|
|
|
|
|
|
|
|
|
|
|
||||
|
|
|
|
|
|
|
|
|
|
|
|
|
|
|
||
|
|
|
|
|
|
|
|
|
|
|
|
|
|
|
|
|
11
Istruzioni di montaggio
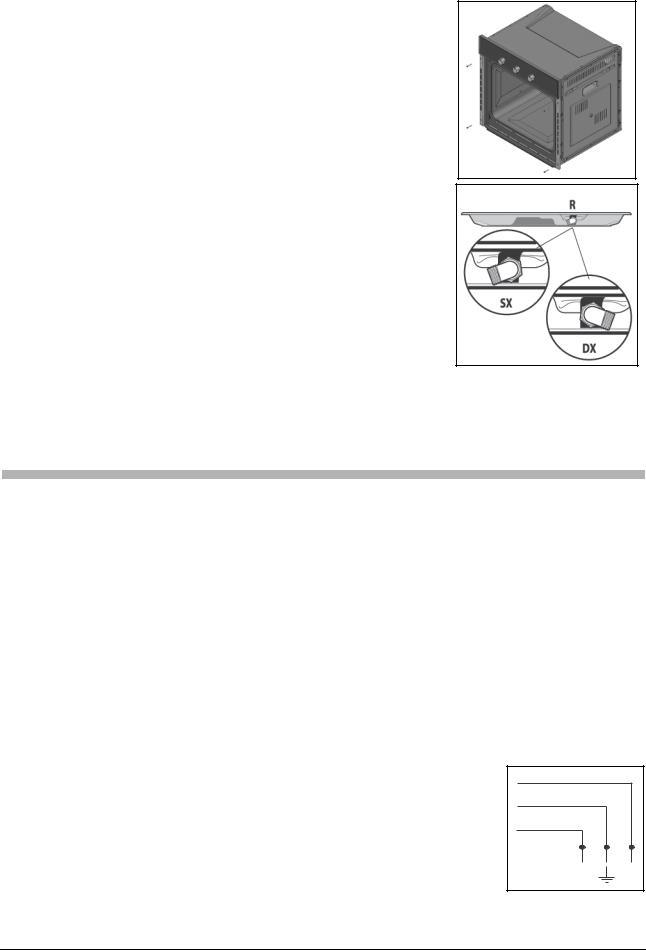
Inserire l’apparecchio nel vano; fissare il corpo al mobile con le 4 viti in dotazione utilizzando i fori realizzati sui fianchi laterali.
Nel caso di inserimento sotto un piano di cottura ruotare preventivamente verso Dx o verso Sx il raccordo del piano (R) per consentire il corretto inserimento del forno.
Collegamento alla rete elettrica
Il forno FRANKE è fornito di un cavo di alimentazione tripolare con terminali liberi.
Se il forno viene connesso permanentemente alla rete di alimentazione, predisporre un dispositivo che assicuri la disconnessione dalla rete, con una distanza di apertura dei contatti (di almeno 3 mm) che consenta la disconnessione completa nelle condizioni della categoria di sovratensione III. Accertarsi che:
a. la spina e la presa siano adatte per una corrente di 16A
b)entrambe siano facilmente raggiungibili e poste in modo che nessuna parte in tensione possa essere accessibile durante l’introduzione o rimozione della spina stessa
c)la spina possa essere introdotta senza difficoltà
d)una volta introdotta la spina, il forno non si appoggi su di essa quando viene installato nel mobile
e)non siano collegati i terminali di due apparecchi alla stessa spina
f)nel caso si sostituisca il cavo di alimentazione ne venga utilizzato unocon specifiche 3 x 1.5 m2 di tipo H05VV-F
g)è fondamentale che vengano rispettate le polarità di aggancio dei terminali liberi
(Marrone=Fase – Blu=Neutro – GialloVerde=Terra)
N.B: assicuratevi che le caratterstiche della vostra linea elettrica domestica (tensione, potenza massima e corrente), siano compatibili con quelle del vostro forno FRANKE.
BLU
BLUE
GIALLO-VERDE
YELLOW-GREEN
MARRONE
BROWN
L N
12
Dati tecnici
Dimensioni utili del forno: larghezza mm. 440 profondità mm. 415
altezza mm. 312
Volume utile del forno:
litri 57
Consumi (funzione statica):
per raggiungere i 175°C: kWh 0,32 per mantenere i 175°C: kWh 0,62 consumo totale: kWh 0,94
Consumi (funzione ventilata): per raggiungere i 200°C: kWh 0,42 per mantenere i 200°C: kWh 0,77
consumo totale: kWh 1,19
Tensione e frequenza di alimentazione:
230V ~ 50Hz |
|
|
|
|
||
|
|
|
|
|
||
Potenza totale e portata fusibile: |
|
|
|
|
|
|
2,300kW - 16A |
Questa apparecchiatura è |
|||||
|
|
|||||
|
|
conforme alle seguenti Direttive |
||||
Potenza resistenza: |
|
Comunitarie: |
|
|
||
cielo W 1.000 |
|
|
|
|
||
suola W 1.250 |
– |
90/396/CEE (Gas); |
|
|||
grill W 2.250 |
|
|||||
– |
73/23/CEE |
del |
19/02/73 |
|||
motoventilatore W 30 |
||||||
|
(Bassa Tensione); |
|
||||
lampada illuminazione forno W 15 x 1 |
|
|
||||
ventilatore tangenziale W 15 |
– |
89/336/CEE |
del |
03/05/89 |
||
|
|
|
(Compatibilità |
|
|
|
|
|
|
Elettromagnetica); |
|
||
|
|
|
|
|||
|
|
– |
93/68/CEE del 22/07/93. |
|||
INFORMAZIONE AGLI UTENTI
ai sensi dell’articolo del decreto legislativo 25 luglio, n. 15 “Attuazione delle Direttive 2002/95/CE, 2002/96/CE e 2003/108/CE, relative alla riduzione dell’uso di sostanze pericolose nelle apparecchiature elettriche ed elettroniche, nonchè allo smaltimento dei rifiuti”
Il simbolo del cassonetto barrato riportato sull’apparecchio indica che il prodotto, alla fine della propria vita utile deve essere raccolto separatemente dagli altri rifiuti.
L’utente dovrà, pertanto, conferire l’apparecchiatura giunta a fine vita agli idonei centri di raccolta differenziata dei rifiuti elettronici ed elettrotecnici, oppure riconsegnarla al rivenditore al momento dell’acquisto di una nuova apparecchiatura di tipo equivalente, in ragione di uno a uno.
L’adeguata raccolta differenziata per l’avvio successivo dell’apparecchiatura dismessa al riciclaggio, al trattamento e allo smaltimento ambientale compatibile contribuisce ad evitare possibili effetti negativi sull’ambiente e sulla salute e favorisce il riciclo dei materiali di cui è composta l’apparecchiatura.
Lo smaltimento abusivo da parte dell’utente comporta l’applicazione delle sanzioni amministrative di cui al dlgs. n. 22/1997” (articolo 50 e seguenti del dlgs. n. 22/1997).
13

Contents
Introduction ............................................................................................... |
14 |
Switching on the first time ......................................................................... |
14 |
Suggestions................................................................................................. |
14 |
A close look................................................................................................ |
15 |
Use............................................................................................................. |
16 |
Cooking table............................................................................................. |
19 |
Cleaning and maintaining the oven............................................................. |
20 |
Service........................................................................................................ |
22 |
Safety warnings .......................................................................................... |
22 |
Installation .................................................................................................. |
24 |
Installation instructions............................................................................... |
25 |
Connection to power mains ...................................................................... |
25 |
Technical data............................................................................................. |
26 |
Introduction
Thank you for choosing a Franke product.
Before using the appliance, please read the warnings and instructions in this manual. This will make it easier to operate and also prolong its service life. Keep this booklet for further reference.
Switching on the first time
When using the oven for the first time, run it empty with the temperature knob set to maximum and the door open for at least 40 minutes – make sure the room is well ventilated during this procedure.
The odour produced during this procedure is produced by the evaporation of the substance used to protect the oven during the period between manufacture and installation. The oven can be used normally once this first procedure has been completed.
Suggestions
When cooking food, do not place it in the oven when the oven is cold; rather, allow it to reach the set temperature before placing the food in it.
During cooking, never place pans or containers directly on the oven floor; place them on the provided grills or drip trays in one of the five provided shelves; Failure to observe this precaution can damage the oven's internal enamelling.
Do not cover the walls of the oven with aluminium foil, especially in the lower part of the cooking compartment.
Any repairs must be done by specialised, licensed repair personnel.
In case of need, contact our local service centre and use only original spare parts.
Your Franke oven uses a special enamel which is easy to keep clean; make sure to clean it frequently to avoid baking on dirt and cooking residue.
Self-cleaning panes (if any) can be cleaned with soap and water (see cleaning instructions). Note: - before switching on the oven, read the timer instructions (see pag. 17).
-if the oven is equipped with an automatic cooking or switching off programmer, select the “manual” option indicated by the symbol to use the oven manually  .
.
14

A close look
A Control Panel
B |
C |
F |
|
B |
D |
F |
A |
|
E |
|
A |
|
E |
|
|
|
|
|
||
|
|
|
|
|
|
|
CA/SM 52 - FLAT 603 |
|
|
|
|
||
|
|
|
CA/SM 52 - FLAT 604 |
|
|
|
|
|
|
|
|
|
|
B Program selector knob
Selects the mode of operation of the oven depending on the type of cooking desired. When the knob is set to a program, the oven's internal light lights up to show that the oven is on.
C Timer / D Programmer
(vedi pag. 17)
Franke ovens have a variety of methods of monitoring and controlling cooking times, consult pag. 17 for specific detailed instructions; after you have identified the type of control provided by your oven, you will find full instructions on how to use it
E Thermostat indicator light
Highlighted by the symbol  this indicates that the electrical heating elements are on. The indicator light turns off when the set temperature has been reached, and turns back on again when the heating elements are switched on again. Use this light to check that the oven is at the correct temperature before inserting the food.
F Temperature regulator knob (Thermostat)
Sets the temperature required for the type of food being cooked, and ensures that it is kept constant throughout the cooking cycle. To select the temperature, turn the knob clockwise so that the index mark indicates the temperature in question. Maximum temperature is around 260°C.
G Drip tray and grille guides
Used for locating the grilles and drip trays in the five available positions (1 to 5 starting from the bottom); the cooking table (pag. 19) indicates which position gives best results for each type of cooking.
H Drip tray
Normally used for collecting juice from roasts or for cooking food directly; the drip tray can be removed from the oven if not required. The drip trays are constructed in AA enamelled food safe steel.
I Grid
Used for supporting pans, pastry moulds, and any containers other than the provided drip trays, and especially for cooking with the meat and fish grill and fan grill functions, toasting bread, etc.
B |
F |
G
I
H
15
Use
This oven combines the advantages of traditional “static” natural convection ovens with those of modern “fan ovens”. It is an extremely versatile appliance which allows for easy and safe selection of 5 different cooking methods. Use knobs (B) and (F) on the control panel to select the program and temperature. For best results from your Franke oven, consult the cooking table pag. 19.
Cooling fan
In order to reduce the temperature at the front of the oven, the control panel and side panels, Franke ovens are equipped with a cooling fan which automatically turns on when the oven is hot. When the fan is running, you will notice hot air blowing from the front of the oven between the front panel and the oven door; Franke has made sure that the air jet does not disturb the kitchen environment and that noise is kept to a minimum.
To protect the surrounding kitchen units, the fan keeps running after cooking until the oven has cooled down.
Oven light
This symbol means that the oven's internal light has turned on without any heating function. This option is used for cleaning the oven when it is switched off, to allow better visibility inside the cooking compartment.
Cooking programmes
Defrosting
Set the knob to the ( |
) defrosting symbol. |
In this case, the air driven by the fan inside the oven concentrates around the food, thus speeding up the natural defrosting process.
Natural static cooking
Set the thermostat knob (F) to between 50°C and Max (260°C).
The heat source is both above the food (roof heating element) and below it (floor heating element). This is the traditional cooking method which results in uniform cooking on a single shelf.
Fan cooking
Set the thermostat knob (F) to between 50°C and Max (260°C).
This turns on the top (roof) element, the bottom (floor) element and the fan.
The resulting constant, even heat cooks and browns the food uniformly. With this mode, you can also cook various dishes at the same time, on up to a maximum of 2 different rack heights.
Grill
The thermostat knob (F) should normally be set to Max (260°C), although a lower temperature can be set, in which case grilling will be slower.
The grill heating element at the top of the oven turns on. In this case the fast surface cooking due to infrared radiation keeps the interior of the meat tender; the grill can also be used quickly toasting up to 9 slices of bread. Franke ovens, for safety reasons, are intended to grill food with the oven door completely closed.
Warning: the grill heating element is very hot when in use; take care not to touch it accidentally when handling the food; Franke has designed the opening of the oven compartment in such a way as to protect your hands.
Fan grill cooking
The thermostat knob (F) should normally be set to Max (260°C), although a lower temperature can be set, in which case grilling will be slower.
The grill heating element at the top of the oven turns on, as well as the fan. This combines unidirectional heating with fan driven distribution of the air throughout the oven. It thus prevents burning the surface of the food and increases penetration of the heat. This function gives excellent results for mixed meat and vegetable kebabs, sausages, pork ribs and lamb chops, devilled chicken, quail with sage, pork fillets, etc...
16
End Cooking Timer Knob
The end cooking timer is a practical device that turns the oven off automatically at a set time, ranging from one to 120 minutes. To use the end cooking timer, the ringer must be wound up by turning knob (C) almost one full turn clockwise; now turn back to the time setting you require (align the index mark on the front panel with the corresponding number on the knob). When the cooking time has expired, in addition to the timer ringing, the oven is automatically turned off.
N.B. The oven will stay hot at around the set temperature for a considerable period of time after it has been switched off; to avoid overcooking or burning the food, remove it from the oven immediately.
C |
Warning: to use the oven in manual mode, i.e. without using the end cooking timer, you should align the symbol on the knob with the reference mark on the control panel. When the oven is turned off, the end cooking timer can be used just like a normal minute minder.
The electronic cooking timer
Enables programming of the oven in the following |
|
|
D |
||
modes: |
||
|
•delayed cooking with set duration;
•immediate cooking with set duration;
•minute counter.
Button functions :
 : hour, minute counter
 : cooking duration
 : end of cooking
 : manual switches
 : time setting (back)
 : time setting (forwards)
Setting the digital clock
After the appliance has been connected to the mains or a power failure, the display will flash on: “0.00”
• Press the button  and then (within 4 seconds) buttons
  and
and  to set the correct time. Button
  increases the time setting.
Button |
decreases the time setting. |
To adjust the clock, proceed as described above:
Manual operation
Once the correct time has been set, the programmer automatically switches to manual mode.
Note: To reset the manual mode after each “Automatic” cooking, press the button  .
.
Starting delayed cooking with set duration
You must set the cooking duration and the time at which it is to end. Let us suppose that the display indicates 10:00 a.m. and that we wish to cook something for 30 minutes and we want cooking to end at 13:00.
1.Turn the oven control knob to the desired cooking mode and temperature (for example: convection mode at 200°C)
17
2. Press the button |
and then (within 4 seconds) buttons |
and |
to set the desired |
cooking duration. Let us suppose that we set the cooking time to 30 minutes; the display will read as follows:
Release the button and after 4 seconds the correct time will reappear along with the symbol  and the writing “AUTO”.
3. Press the button |
followed by the buttons |
and |
to set desired end cooking |
time. Let us suppose this time to be 13:00 |
|
|
|
4.Release the button and the current time will be displayed after approximately 4 seconds:
The word “AUTO” will light up reminding you that the cooking time and end cooking time have been programmed in automatic mode. Now the oven will turn on automatically at 12:30 and then turn off after 30 minutes. When the oven is turned on, the symbol of a hot pan  will be displayed for the entire cooking time. At any time during the cooking process, press button to display the set cooking duration, and button to display the end cooking time.
At the end of cooking time the buzzer rings; volume can be changed during
emission by pressing button |
. To turn it off, simply press any of the buttons |
||
except |
and |
. |
|
Immediate cooking with set duration
By programming the cooking time only (points 1 and 2 of the “Delayed start with set cooking time” section), cooking will start up immediately.
To cancel a scheduled cooking process
Press the button  .
.
Minute minder function
The minute minder allows you to set a given amount of time from which the countdown begins. This feature does not turn the oven on or off; it merely sounds when the time has elapsed.
Press button  to display:
Then use buttons and to set the desired time
After the button has been released, the countdown begins and the current time is displayed.
When the time is up, a buzzer sounds, which can be turned off by pressing any of the
buttons (except buttons |
and |
) at this point the symbol |
will also be turned off. |
Modifying and cancelling data |
|
|
|
•The data entered can be changed at any time by pressing the corresponding button and button  or
or  .
.
•When the data for the cooking time is cancelled, the data for the end cooking time is also cancelled automatically, and vice versa.
•If the oven has been programmed, it will not accept end cooking times which come before the start of the cooking process.
N.B. The oven will stay hot around the set temperature for a considerable period of time after it has been switched off; to avoid overcooking or burning the food, remove it from the oven immediately.
18

Cooking table
|
|
|
|
|
|
|
|
|
|
|
|
|
|
Setting the |
Type of food |
Weight |
Shelf |
Pre- |
Setting the |
Cooking |
selector |
|
(Kg) |
position |
heatingtime |
C° |
duration |
knob |
|
|
|
(min.) |
thermostat |
(min.) |
|
|
|
|
|
knob |
|
|
|
|
|
|
|
|
Natural |
Lamb |
1 |
3 |
9.5 |
180 |
95-100 |
static |
Roast Pork |
1 |
3 |
9.5 |
180 |
70-80 |
cooking |
Roast Veal |
1 |
3 |
10.5 |
200 |
140-150 |
|
Omelette |
1 |
2 |
10.5 |
200 |
25-30 |
|
Fruit |
1 |
3 |
9.5 |
180 |
25-30 |
|
Hake-Sea bream-Turbot |
1 |
3 |
9.5 |
180 |
20-25 |
|
Ordinary bread |
1 |
2-4 cont. |
9.5 |
175 |
25-30 |
|
Pies |
1 |
2 |
10.5 |
200 |
35-40 |
|
Freshwater fish |
1 |
3 |
10.5 |
200 |
30 |
|
Polenta with sauce |
1 |
2 |
9.5 |
180 |
25-30 |
|
Soft Fruit Pies |
0.5 |
4 |
9.5 |
180 |
25-30 |
|
Ricotta Cakes |
1 |
2 |
9.5 |
180 |
25-30 |
|
Plain Cakes |
0.5 |
4 |
9.5 |
180 |
60 |
|
Vegetables |
0.5 |
2 |
9.5 |
180 |
35-40 |
|
|
|
|
|
|
|
Fan cooking |
Saddle of pork |
1 |
3 |
9 |
180 |
75-80 |
|
Roast Veal |
1 |
2 |
10 |
200 |
80 |
|
Baked rabbit |
1 |
2 |
9.5 |
190 |
55-65 |
|
Crescia Marchigiana |
1 |
2 |
10 |
200 |
25-30 |
|
(quick flat bread) |
0.5 |
3 |
10 |
200 |
25 |
|
Omelettes |
0.5 |
3 |
10 |
200 |
20-25 |
|
Baked Lobsters |
1 |
2-4 cont. |
7.5 |
150 |
25-30 |
|
Hake-Sea Bream-Trout |
1 |
2-4 cont. |
9 |
180 |
25-30 |
|
Ordinary Bread |
1 |
3 |
9 |
180 |
20-25 |
|
Potato Bread |
1 |
2 |
10 |
200 |
30-35 |
|
Yellow Saffron Bread |
0.5 |
2 |
8.5 |
170 |
25-30 |
|
Freshwater fish |
1 |
2-4 cont. |
10 |
200 |
25-30 |
|
Baked Vegetable Dishes |
1 |
2 |
9 |
175 |
20 |
|
Tuna |
1.5 |
2 |
9 |
175 |
30-35 |
|
Fruit Pies |
1 |
3-5 cont. |
9 |
180 |
30-35 |
|
Savoury Pies |
1 |
3-5 cont. |
9 |
180 |
40 |
|
Baked Vegetables |
|
|
|
|
|
|
|
|
|
|
|
|
Grill |
Chicken Wings |
1 |
4-5 cont. |
7 |
Max |
25-30 |
|
Chops |
0.8 |
3 |
7 |
Max |
20-25 |
|
Scallops |
0.5 |
3 or 4 |
7 |
Max |
14-16 |
|
Roast Potatoes |
1 |
3 |
7 |
Max |
20-25 |
|
Freshwater fish |
1 |
3 or 4 |
7 |
Max |
25-30 |
|
Tomatoes au Gratin |
0.5 |
2 or 3 |
7 |
Max |
20 |
|
Eel kebabs |
0.5 |
3 |
7 |
Max |
20-25 |
|
Turkey kebabs |
0.5 |
4 |
7 |
Max |
20-25 |
|
|
|
|
|
|
|
Fan grill |
Chicken legs |
1 |
4 or 5 |
11 |
220 |
20-25 |
cooking |
Pork Ribs |
0.5 |
4 |
15 |
Max |
40-45 |
|
Guinea Fowl |
1.2 |
4 |
15 |
Max |
30-35 |
|
Sea bream en papillote |
1 |
3 |
8.5 |
200 |
20 |
|
Chicken |
1.5 |
3 |
15 |
Max |
35-40 |
|
Quails |
0.8 |
4 |
15 |
Max |
30-35 |
|
Sausages |
1 |
4 |
15 |
Max |
20-25 |
|
Vegetables |
1 |
4 or 5 |
15 |
Max |
10-15 |
|
|
|
|
|
|
|
Note: the instructions in the table below result from cooking tests carried out by a team of professional chefs. They are only given as a guideline and can be changed according to personal tastes.
19
Cleaning and maintaining the oven
Important
Before maintaining the oven, always remove the power plug from its mains socket or switch off power with the master power switch.
–The stainless steel and enamelled parts of the oven will stay as good as new if regularly cleaned with water or special detergents, make sure to dry them carefully after cleaning.
–Never use scouring pads, steel wool, muriatic acid or other products which could scratch or mark the surface. Do not use steam cleaners.
–Stains on the base of the oven, due to various cooking products (sauces, sugar, egg white and fats) are always produced by spills and splashes. Splashes occur during cooking and the result of cooking at too high a temperature, while spills are due to the use of insufficiently capacious cooking vessels or an incorrect estimate of increases in volume during cooking. These two problems can be solved by using cooking vessels with high borders or by using the provided drip tray. As regards cleaning the lower part of the oven, clean off any stains when the oven is still slightly warm; the longer you delay cleaning them off, the harder it is to remove them.
Cleaning the oven door
–The oven door must be cleaned, both inside and out, when the oven is completely cold using hot water. Do not use abrasive cloths. Clean the glass with special detergent.
–Clean the enamelled surfaces, and the oven interior, with hot water and non-abrasive detergent.
Replacing the oven light
Franke ovens are equipped with a circular lamp positioned on the top left at the back of the compartment.
Replace the oven light as follows:
-Switch off power to the appliance with the master power switch used in connecting the oven to the mains supply, or by removing the plug from the mains socket, if it can be reached.
-Unscrew the glass cover (A).
-Unscrew the bulb and replace with a high temperature resistant bulb (300°C) of the following type:
Voltage: 220/230V - 50Hz
Power: 15W
Fitting: (E14) small
-Refit the glass cover (A) and reconnect the power supply.
A
20
Removing the oven door
To facilitate cleaning the oven, the oven door can be removed as follows:
–The hinges (A) are equipped with two moveable locks (B). Lift the lock (B) to release the hinge.
–Now raise the door upwards and pull it out; to do this, hold the door at its sides next to the hinges.
–To refit the door, first slide the hinges into their grooves.
–Finally, before closing the door, remember to turn the two moving locks (B) previously used to release the hinges.
B
A
The internal glass panel of the oven door can be removed to enable thorough cleaning, as follows:
–Open the door completely.
–Remove the two terminals at the top corners of the door using the corresponding buttons (see detail C).
–Remove the internal glass panel.
DETAIL C
After cleaning, refit the internal glass panel, taking care that the lower edge fits below the tabs at the lower section of the door and ensure correct fixture by means of the rubber elements. Then insert the two upper terminals until the buttons click into place.
WARNING
–Do not wash any removed parts (terminals and glass) in the dishwasher.
–When refitting the internal glass panel ensure that the screen printed face (opaque side) of the panel is facing downwards.
Never use the appliance before the internal glass panel has been refitted completely.
21
Service
In case of malfunction, contact a Franke Technical Service Centre (see attached list).
Do not call in unauthorised technicians.
When contacting the Service Centre, quote the following information:
–Type of fault;
–Appliance model (Art.);
–Serial number (S.N.);
This information is given on the appliance dataplate on the warranty certificate.
Safety warnings
Always contact a qualified technician in the following conditions:
To ensure safe, efficient operation of the appliance:
•always have the appliance serviced by a Franke Authorised Service Centre
•always insist on the use of original spare parts
•The appliance is designed for non-professional, domestic use; do not attempt to modify its specifications.
•The dataplate is marked with symbols indicating the countries for which the instructions apply
•The electrical safety of the oven is only guaranteed when the appliance is effectively earthed, as required by established legislation.
•Do not touch the heating elements or the door when the oven is on, as they reach very high temperatures. Keep children away from the oven when it is in use.
Do not allow children to touch:
-the controls or the appliance itself;
-the packing elements (bags, polystyrene, staples, etc.);
-the oven in use, and immediately after use, while it is still hot;
-the appliance when not in use (at which time the otherwise hazardous components are no longer a source of risk).
22

Do not:
-touch the appliance with wet hands or other parts of the body;
-use the appliance when barefoot;
-pull the appliance or power cable to remove the plug from the power socket;
-use the appliance in an unsuitable or hazardous manner;
-block the ventilation and cooling vents;
-route the power cables of other appliances across the hot parts of the appliance;
-expose the oven to atmospheric agents (rain, sun);
-use the oven to store objects of any kind;
-use flammable fluids in the proximity of the appliance;
-use adapters, multiple-sockets and/or extension leads;
-install or repair the appliance without the aid of an authorised technician.
Always contact a qualified technician in the following conditions:
-installation (to the manufacturer's instructions);
-doubt regarding the operation of the appliance;
-replacement of the power socket if incompatible with the appliance's plug.
Contact a Franke Authorised Service Centre in the following cases:
-immediately after having removed the packaging, if you have doubts about the condition of the appliance;
-replacement of or damage to the power cable;
-malfunction or poor operation; always insist on original spare parts.
Observe the following precautions:
-only use the appliance for cooking food, and for no other purposes;
-before cleaning or servicing the oven or in case of malfunction, disconnect the appliance from the electrical power supply;
-use oven gloves for placing cooking dishes in the oven or removing them;
-since the ends of the door handle may be hotter due to jets of hot air, always grasp it at its centre;
-always check that the control knobs are in the off position when the oven is not in use;
-should you decide to stop using the oven, disconnect it from the mains.
•The manufacturer is not liable for damages resulting from: incorrect installation, improper, incorrect or unreasonable use.
23

Installation
Important: installation must be done in compliance with established standards and regulations. It must be done exclusively by a specialised and licensed technician.
Kitchen unit requirements
|
|
|
|
|
m |
|
|
|
|
|
|
|
|
|
|
m |
|
|
|
|
|
|
|
|
|
|
5 |
|
|
|
|
|
m |
|
|
|
|
54 |
|
|
|
|
|
|
|
||
|
|
|
|
|
|
|
|
|
m |
|
|
|
|
|
|
|
|
|
|
0 |
|
mm |
|
|
|
|
|
|
|
|
5 |
|
|
||
|
|
|
|
|
|
|
5 |
|
|
. |
|
|
|
|
|
|
|
|
|
min |
|||
|
|
|
|
|
|
|
|
|
|
|
595 |
mm |
|
|
|
|
|
mm |
|
|
|
|
|
595 |
|
|
|
|
|
569 |
|
|
|
560 mm |
|
|
|
|
|
|
|
|
|
|
|||
|
|
|
|
|
|
|
|
|
|
||
|
|
|
m |
5 |
|
|
|
|
|
|
|
|
|
|
|
|
|
|
|
|
|
||
|
|
m |
|
m |
|
|
|
|
|
|
|
|
5 |
|
|
|
|
|
|
|
|
||
595 |
2 |
|
|
|
m |
|
|
|
|
|
|
mm |
|
|
|
|
|
|
|
|
|
||
|
|
|
|
|
|
|
|
|
|
||
|
|
|
|
|
|
|
|
|
|
|
|
For built-in units, the components (plastic materials and wooden veneer) must be assembled with heat resistant adhesive (max 100°C): unsuitable materials and adhesives can result in warping and failure of the adhesive. The unit must allow sufficient room for the electrical cabling. The unit must be robust enough to support the weight of the appliance.
The oven must be securely installed in the compartment. The oven may be installed in a column unit or underneath the top of a modular unit, so long as sufficient ventilation is provided.
|
|
|
|
|
|
|
|
|
|
|
m |
|
|
|
|
|
|
|
|
|
|
|
|
|
|
m |
|
|
|
|
|
|
|
|
|
|
|
|
|
|
5 |
|
|
|
|
|
|
|
|
|
|
|
|
|
|
5 |
|
|
|
|
|
|
|
|
|
|
|
|
m |
|
|
|
|
|
|
|
|
|
|
|
|
|
|
m |
|
|
|
|
|
|
|
|
|
|
|
|
|
|
5 |
|
|
|
|
|
|
|
|
|
|
|
|
|
|
4 |
|
|
|
|
|
|
|
|
|
|
|
|
|
|
|
5 |
|
|
|
|
|
|
|
|
|
|
|
|
|
|
|
|
|
|
|
|
|
|
|
|
m |
|
|
|
|
|
|
|
|
|
|
|
|
|
|
m |
|
|
|
|
|
|
|
|
|
|
|
|
|
|
5 |
|
|
|
|
|
|
|
|
|
|
|
|
|
|
4 |
|
|
|
|
|
|
|
|
|
|
|
|
|
mm |
|
5 |
|
|
|
|
|
|
|
|
|
|
|
|
|
|
560 |
m |
|
|
m |
|
|||
|
|
|
|
|
|
|
|
|
|
|
m |
|
|
|
|
|
|
|
|
|
|
|
|
|
|
|
|
|
m |
|
|
mm595 |
|
|
|
|
|
569 |
mm10 |
|
|
|
|
5 |
575-mm585 |
595mm |
|
|
|
|
|
|
|
|
|
|
5 |
|
|||||
|
|
|
|
|
|
|
|
|
|
|
|||||
|
|
|
|
|
|
|
|
|
|
|
|
||||
|
|
|
|
|
5 |
|
|
|
|
|
|
|
|
|
|
|
|
|
|
|
|
m |
|
|
|
|
|
|
|
|
|
|
|
|
|
|
m |
|
|
|
|
|
|
|
|
|
|
59 |
|
5m |
m |
|
|
|
|
|
|
|
|
|
|||
5 mm |
2 |
|
|
|
|
|
|
|
|
|
|
|
|
|
|
|
|
|
|
|
|
|
|
|
|
|
|
|
|
|
|
24
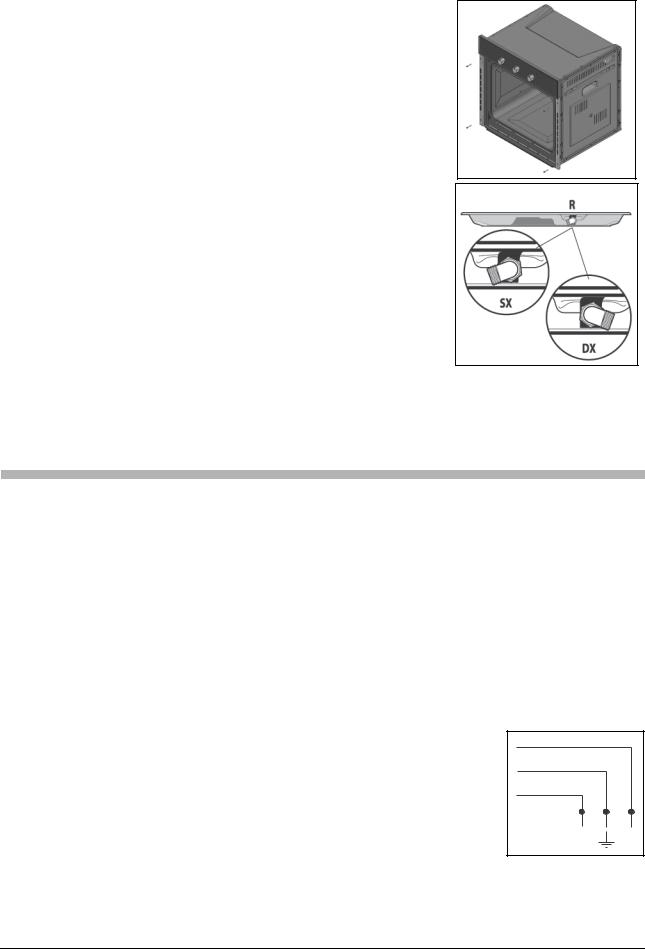
Installation instructions
Place the appliance in the compartment; secure the oven to the unit with the 4 screws provided, through the holes in its side panels.
If the oven is to be fitted underneath a cooktop, first turn the cooktop assembly (R) to the right or left so that the oven fits properly.
Connection to power mains
FRANKE ovens are equipped with a three pole power cable with free terminals.
If the oven is permanently connected to the power supply, install a device to ensure that it is disconnected from the power supply, with a contacts opening distance (of at least 3 mm) to ensure total disconnection in conditions of category III overvoltage. Make sure:
a)the plug and socket are suitable for a 16A current
b)both are easily accessible and positioned so that no live part can be accessed when inserting or removing the plug
c)the plug can be easily inserted
d)when plugged in, the oven doesn't rest against the plug when installed in the cabinet
e)the same socket must not be used for two plugs
f)a 3 x 1.5 mm2 cable type H05VV-F should be used to replace the power cable
g)the polarity of connection of the free terminals must be respected
(Brown=Phase – Blue=Neutral – YellowGreen=Earth)
N.B: make sure that the characteristics of your power system (voltage, maximum power and current), are compatible with those of your FRANKE oven.
BLU
BLUE
GIALLO-VERDE
YELLOW-GREEN
MARRONE
BROWN
L N
25
Technical data
Useable dimensions of the oven:
440 mm. wide
415 mm. deep
312 mm. high
Useable volume of the oven:
57 litres
Consumption (static operation): to reach 175°C: 0.32 kWh
to maintain 175°C: 0.62 kWh total consumption: 0.94 kWh
Consumption (fan operation):
to reach 200°C: 0.42 kWh to maintain 200°C: 0.77 kWh total consumption: 1.19 kWh
Power voltage and frequency:
230V ~ 50Hz
Total power and fuse rating:
2,300kW - 16A
Heating element power:
roof 1000 W floor 1250 W grill 2250 W fan 30 W
oven light 1 x 15 W tangential fan 15 W
The appliance complies with the following EU Directives:
–90/396/EEC (Gas);
–73/23/EEC of 19/02/73 (Low Voltage);
–89/336/EEC of 03/05/89 (Electromagnetic Compatibility);
–93/68/EEC of 22/07/93.
INFORMATION FOR USERS
pursuant to the article of Legislative Decree n. 15, of 25th July, “Actuation of Directives 2002/95/ EC, 2002/96/EC and 2003/108/EC, concerning a reduction in the use of dangerous substances in electric and electronic appliances, as well as waste disposal”
The symbol of the barred dustbin shown on the appliance indicates that at the end of its useful life it must be collected separately from other waste.
The user must therefore contact a waste sorting company specialized in the collection of electronic and electrical appliances, or return it to the retailer on purchasing a new appliance of the same type, as a trade-in.
Proper waste sorting for subsequent recycling of parts and materials, and disposal compatible with the environment contributes to prevent possible negative effects on public health and the environment and facilitates the reuse of the materials used to produce the appliance.
Improper disposal may subject the user to the fines indicated in the Legislative Decree. n. 22/1997” (article 50 and thereafter of Leg. Decree n. 22/1997).
26
Table des matières
Introduction ............................................................................................... |
27 |
Première mise en service........................................................................... |
27 |
Conseils...................................................................................................... |
27 |
Vue détaillée............................................................................................... |
28 |
Utilisation ................................................................................................... |
29 |
Tableau indicatif de cuisson ........................................................................ |
32 |
Nettoyage et entretien du four.................................................................. |
33 |
Assistance technique .................................................................................. |
35 |
Consignes de sécurité ................................................................................ |
35 |
Installation .................................................................................................. |
37 |
Conseils de montage.................................................................................. |
38 |
Branchement au secteur ............................................................................ |
38 |
Données techniques................................................................................... |
39 |
Introduction
Nous vous remercions d’avoir choisi un produit Franke.
Avant d’utiliser votre four, nous vous conseillons de lire attentivement les avertissements et les conseils donnés dans ce manuel. Vous pourrez ainsi l’utiliser et la conserver en parfait état plus longtemps. Conservez soigneusement ce manuel pour toute consultation future.
Première mise en service
Si vous utilisez votre four pour la première fois, faites fonctionner l’appareil à vide en positionnant la commande de réglage de la température au maximum pendant au moins 40 minutes. Laissez la porte ouverte et aérez bien la pièce.
L’odeur dégagée pendant cette opération est due à l’évaporation des substances utilisées pour protéger le four jusqu’au moment de son installation. Le four est maintenant prêt à être utilisé.
Conseils
Nous vous conseillons, pour bien réussir vos plats, de ne pas les mettre dans le four froid mais d’attendre qu’il ait atteint la température sélectionnée.
Pendant la cuisson, ne posez pas directement les casseroles ou les récipients sur le fond du four. Placez-les sur les grilles ou sur la lèchefrite fournies avec l’appareil, à l’un des 5 niveaux possibles ; la non-observation de cette consigne pourrait endommager l’émail du four.
Ne recouvrez jamais les parois du four avec des feuilles d’aluminium, surtout la partie inférieure du compartiment de cuisson.
Les réparations nécessaires devront être effectuées par du personnel spécialisé et agréé. Contactez notre service après-vente le plus proche et exigez des pièces détachées d’origine.
Votre four Franke est revêtu d’un émail spécial, facile à entretenir. Toutefois, nous vous conseillons de le nettoyer régulièrement de façon à éviter de brûler les traces et les résidus des cuissons précédentes.
Les parois autonettoyantes (le cas échéant) doivent être lavées avec de l’eau et du savon (suivre les conseils pour le nettoyage).
Remarque :
-avant d’allumer le four, lisez les conseils d’utilisation du minuteur (voir page 30).
-si le four est équipé d’un programmateur automatique de cuisson et d’arrêt, pour l’utiliser en mode manuel, sélectionnez l’option «manuel» signalée par le symbole  .
.
27
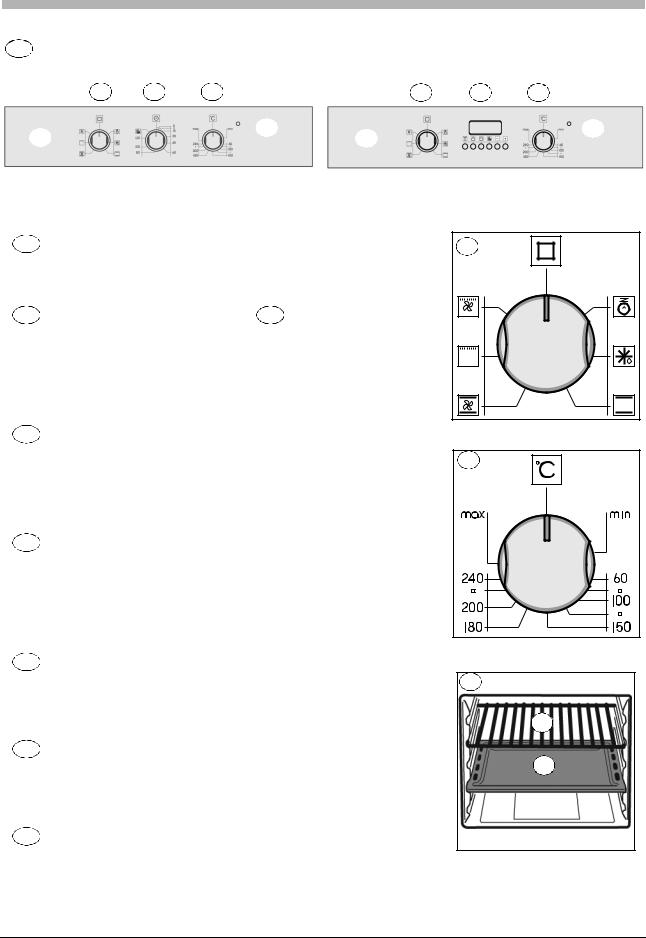
Vue détaillée
A Bandeau de commandes
B |
C |
F |
|
B |
D |
F |
A |
|
E |
|
A |
|
E |
|
|
|
|
|
||
|
|
|
|
|
|
|
CA/SM 52 - FLAT 603 |
|
|
|
|
||
|
|
|
CA/SM 52 - FLAT 604 |
|
|
|
|
|
|
|
|
|
|
B Bouton de réglage des programmes
Sélection du mode de fonctionnement du four suivant le type de cuisson à effectuer. Lorsque le bouton est placé sur un programme, l’éclairage intérieur s’allume pour indiquer que le four est allumé.
C Minuteur / Programmateur D
(voir page 30)
La gamme des fours Franke dispose de plusieurs systèmes de commande et de gestion de la durée de cuisson. Vous trouverez des conseils d’utilisation détaillés pour chacun d’entre eux page page 30. Il vous suffit de déterminer le type de contrôle correspondant à votre four et de vous laisser guider par le manuel pour utiliser correctement cette fonction.
E Voyant du thermostat
Signalé par le symbole  , ce voyant indique que les résistances du four sont en marche. Il s’éteint quand la température sélectionnée est atteinte et se rallume quand le four se remet à chauffer. Cette fonction permet de contrôler que le four a atteint la température désirée avant l’introduction des aliments.
F Bouton de réglage de la température (thermostat)
Il permet de sélectionner la température qui correspond au type de plat sélectionné et de la maintenir à un niveau constant pendant toute la durée de la cuisson. Pour sélectionner la température désirée, tournez le sélecteur dans le sens des aiguilles d’une montre jusqu’à ce que le repère soit en face du chiffre correspondant. La température maximum est d’environ 260°C.
B |
F |
G |
Glissières de la lèchefrite et grilles |
|
Elles permettent de positionner correctement les grilles et les lèchefrites |
G |
|
sur les 5 positions préétablies (de 1 à 5 en partant du bas) ; le tableau |
|
|
indicatif de cuisson (page 32) vous indiquera la position idéale pour |
|
|
chaque utilisation du four. |
|
|
H Lèchefrite
Elle sert habituellement à recueillir le jus des grillades ou à cuire directement les aliments ; si vous ne l’utilisez pas, sortez-la du four pendant la cuisson. La lèchefrite est en acier émaillé de type “AA” pour usage alimentaire.
I Grille
Elles servent de support à vos plats, aux moules à pâtisserie et aux récipients divers autres que les lèchefrites fournies avec le four. Elles sont utilisées pour cuire, surtout avec les fonctions grill et grill ventilé, la viande et le poisson, le pain grillé etc.
I
H
28

Utilisation
Ce four cumule les qualités des fours traditionnels à convection naturelle “statiques” et celles des fours modernes à convection forcée “ventilés”. C’est un appareil performant qui vous permet de choisir très facilement sans vous tromper entre 5 modes de cuisson. Vous pouvez sélectionner les programmes et la température à l’aide des sélecteurs (B) et
(F) situés sur le bandeau de commande. Pour que votre four Franke soit le plus performant possible, consultez le tableau indicatif des cuissons page 32.
Ventilation de refroidissement
Pour pouvoir diminuer la température de la porte, du bandeau de commandes et des parois latérales, le four Franke dispose d’un ventilateur de refroidissement qui s’active automatiquement lorsque le four est allumé. Lorsque le ventilateur fonctionne, il est possible de sentir un filet d’air qui s’échappe entre le bandeau et la porte du four; cette solution technique est le résultat d’une étude de dynamique des flux poussée pour permettre à la fois que la vitesse de l’air ne puisse pas perturber l’ambiance cuisine et d’atténuer les bruits au maximum.
Pour une protection parfaite des meubles, la ventilation continue à fonctionner pendant un certain temps jusqu’à ce que le four ait suffisamment refroidi.
La lampe du four
Ce symbole indique que l’éclairage intérieur est allumé, mais que le four ne chauffe pas. Cette fonction facilite les opérations de nettoyage four éteint, en permettant une bonne visibilité du compartiment de cuisson.
Programmes de cuisson
Décongélation
Pour activer la fonction de décongélation, réglez le sélecteur sur le symbole ( |
). |
L’air entraîné par le moteur interne du four enveloppe alors les aliments, accélérant ainsi le processus de décongélation naturelle.
Cuisson statique naturelle
Le sélecteur de température (F) doit être positionné entre 50°C et Max (260°C).
Le chauffage se fait par le haut (résistance supérieure) et par le bas (résistance de la lèchefrite). La fonction de cuisson traditionnelle permet de cuisiner uniformément vos repas, en utilisant un seul niveau.
Cuisson ventilée
Le sélecteur de température (F) doit être positionné entre 50°C et Max (260°C).
La résistance supérieure (voûte), la résistance inférieure (sole) et la turbine interne du four fonctionnement en même temps.
La chaleur constante et uniforme permet de cuire et dorer parfaitement les aliments. Vous pouvez cuire en même temps des plats différents en enfournant simultanément sur deux niveaux maximum.
Cuisson au grill
Le sélecteur du thermostat (F) doit se trouver sur Max (260°C). Il est possible de choisir une température inférieure : la cuisson au grill sera plus lente.
La résistance grill supérieure du four se met en marche. La vitesse de cuisson superficielle aux rayons infrarouges permet à la viande de rester tendre à l’intérieur ; le grill peut aussi servir à faire rôtir rapidement jusqu’à 9 tranches de pain. Le four Franke, pour des raisons de sécurité, est conçu pour griller avec la porte complètement fermée.
Avertissement : la résistance du grill est très chaude pendant le fonctionnement ; évitez de toucher accidentellement les aliments à cuire au grill ; Franke a étudié la forme du four pour protéger vos mains au maximum.
Cuisson grill ventilé
Le sélecteur du thermostat (F) doit se trouver sur Max (260°C). Il est possible de choisir une température inférieure : la cuisson au grill sera plus lente.
La résistance grill supérieure du four et le ventilateur se mettent en marche. Elle allie l’irradiation thermique unidirectionnelle à la circulation forcée de l’air dans l’enceinte du
29
 Loading...