


 Loading...
I N S T A L L G U I D E
FortiGate-310B
FortiOS 3.0 MR6
www.fortinet.com

FortiGate-310B Install Guide
FortiOS 3.0 MR6
15 August 2008
01-30006-0472-20080815
© Copyright 2008 Fortinet, Inc. All rights reserved. No part of this publication including text, examples, diagrams or illustrations may be reproduced, transmitted, or translated in any form or by any means, electronic, mechanical, manual, optical or otherwise, for any purpose, without prior written permission of Fortinet, Inc.
Trademarks
Fortinet, FortiGate and FortiGuard are registered trademarks and Dynamic Threat Prevention System (DTPS), APSecure, FortiASIC, FortiBIOS, FortiBridge, FortiClient, FortiGate, FortiGate Unified Threat Management System, FortiGuard-Antispam, FortiGuard-Antivirus, FortiGuard-Intrusion, FortiGuard-Web, FortiLog, FortiAnalyzer, FortiManager, FortiOS, FortiPartner, FortiProtect, FortiReporter, FortiResponse, FortiShield, and FortiVoIP, are trademarks of Fortinet, Inc. in the United States and/or other countries. The names of actual companies and products mentioned herein may be the trademarks of their respective owners.
Regulatory compliance
FCC Class A Part 15 CSA/CUS
.
! Caution: Risk of Explosion if Battery is replaced by an Incorrect Type. Dispose of Used Batteries According to the Instructions.

Contents
Contents
Register your FortiGate unit............................................................................. |
7 |
About the FortiGate-310B ................................................................................. |
8 |
LACP configuration ....................................................................................... |
8 |
About this document......................................................................................... |
8 |
Document conventions.................................................................................. |
9 |
Typographic conventions .............................................................................. |
9 |
Further Reading................................................................................................. |
9 |
Fortinet Knowledge Center ......................................................................... |
10 |
Comments on Fortinet technical documentation......................................... |
11 |
Customer service and technical support ...................................................... |
11 |
Environmental specifications......................................................................... |
13 |
Cautions and warnings ................................................................................... |
14 |
Grounding ................................................................................................... |
14 |
Rack mount instructions.............................................................................. |
14 |
Mounting ..................................................................................................... |
14 |
Plugging in the FortiGate................................................................................ |
16 |
Connecting to the network .......................................................................... |
16 |
Turning off the FortiGate unit......................................................................... |
16 |
NAT vs. Transparent mode............................................................................. |
17 |
NAT mode ................................................................................................... |
17 |
Transparent mode....................................................................................... |
18 |
Connecting to the FortiGate unit.................................................................... |
18 |
Connecting to the web-based manager ...................................................... |
18 |
Connecting to the CLI ................................................................................. |
19 |
Configuring NAT mode ................................................................................... |
20 |
Using the web-based manager ................................................................... |
20 |
Configure the interfaces........................................................................ |
20 |
Configure a DNS server........................................................................ |
21 |
Adding a default route and gateway ..................................................... |
21 |
Adding firewall policies ......................................................................... |
22 |
Using the CLI .............................................................................................. |
23 |
Configure the interfaces........................................................................ |
23 |
Configure a DNS server........................................................................ |
24 |
Adding a default route and gateway ..................................................... |
24 |
Adding firewall policies ......................................................................... |
25 |
FortiGate-310B FortiOS 3.0 MR6 Install Guide |
|
01-30006-0472-20080815 |
3 |

Contents
Configuring Transparent mode...................................................................... |
26 |
Using the web-based manager ................................................................... |
26 |
Switching to Transparent mode............................................................ |
26 |
Configure a DNS server ....................................................................... |
26 |
Adding firewall policies ......................................................................... |
26 |
Using the CLI .............................................................................................. |
27 |
Switching to Transparent mode............................................................ |
27 |
Configure a DNS server ....................................................................... |
28 |
Adding firewall policies ......................................................................... |
28 |
Verify the configuration .................................................................................. |
29 |
Backing up the configuration......................................................................... |
29 |
Restoring a configuration............................................................................... |
30 |
Additional configuration................................................................................. |
30 |
Set the time and date.................................................................................. |
30 |
Set the Administrator password .................................................................. |
30 |
Configure FortiGuard .................................................................................. |
31 |
Updating antivirus and IPS signatures ................................................. |
31 |
Protection profiles........................................................................................... |
33 |
Firewall policies............................................................................................... |
34 |
Configuring firewall policies ........................................................................ |
35 |
Antivirus options............................................................................................. |
35 |
AntiSpam options............................................................................................ |
36 |
Web filtering..................................................................................................... |
37 |
Logging ............................................................................................................ |
38 |
Installing AMC filler units ............................................................................... |
39 |
Installing modules........................................................................................... |
39 |
Removing modules ......................................................................................... |
40 |
Using the AMC modules ................................................................................. |
40 |
Hard disk module ........................................................................................ |
40 |
Formatting the hard disk....................................................................... |
41 |
Log configuration using the web-based manager................................. |
41 |
Log configuration using the CLI............................................................ |
42 |
Viewing logs ......................................................................................... |
42 |
ASM-FB4 and ADM-XB2 modules.............................................................. |
42 |
Changing interfaces to operate in SGMII or SerDes mode .................. |
42 |
Configure the speed ............................................................................. |
43 |
Downloading firmware.................................................................................... |
45 |
|
|
|
FortiGate-310B FortiOS 3.0 MR6 Install Guide |
|
|
|
|
|
|
|
|
|
|
|
|
|
|
|
|
|
|
|
|
4 |
01-30006-0472-20080815 |
||

Contents
Using the web-based manager....................................................................... |
46 |
Upgrading the firmware............................................................................... |
46 |
Reverting to a previous version................................................................... |
46 |
Backup and Restore from a USB key ......................................................... |
47 |
Using the USB Auto-Install.......................................................................... |
47 |
Using the CLI.................................................................................................... |
48 |
Reverting to a previous version................................................................... |
49 |
Installing firmware from a system reboot using the CLI.............................. |
50 |
Restoring the previous configuration........................................................... |
52 |
Backup and Restore from a USB key ......................................................... |
52 |
Using the USB Auto-Install.......................................................................... |
53 |
Additional CLI Commands for a USB key ................................................... |
53 |
Testing new firmware before installing ......................................................... |
54 |
FortiGate-310B FortiOS 3.0 MR6 Install Guide |
|
01-30006-0472-20080815 |
5 |

Contents
|
|
|
FortiGate-310B FortiOS 3.0 MR6 Install Guide |
|
|
|
|
|
|
|
|
|
|
|
|
|
|
|
|
|
|
|
|
6 |
01-30006-0472-20080815 |
||

|
|
|
Introduction |
Register your FortiGate unit |
Introduction
Welcome and thank you for selecting Fortinet products for your real-time network protection.
The FortiGate Unified Threat Management System improves network security, reduces network misuse and abuse, and helps you use communications resources more efficiently without compromising the performance of your network. The FortiGate Unified Threat Management System are ICSA-certified for firewall, IPSec, and antivirus services.
The FortiGate Unified Threat Management Systemis a dedicated, easily managed security device that delivers a full suite of capabilities, which include:
•application-level services such as virus protection and content filtering
•network-level services such as firewall, intrusion detection, VPN and traffic shaping
The FortiGate Unified Threat Management System uses Fortinet’s Dynamic Threat Prevention System (DTPS™) technology, which leverages breakthroughs in chip design, networking, security and content analysis. The unique ASIC-based architecture analyzes content and behavior in real-time, enabling key applications to be deployed right at the network edge where they are most effective at protecting your networks.
Register your FortiGate unit
Register the FortiGate unit by visiting http://support.fortinet.com and select Product Registration.
To register, enter your contact information and the serial numbers of the FortiGate units that you or your organization have purchased. You can register multiple FortiGate units in a single session without re-entering your contact information.
By registering your FortiGate unit, you will receive updates to threat detection and prevention databases (Antivirus, Intrusion Detection, etc.) and will also ensure your access to technical support.
For more information, see the Fortinet Knowledge Centre article “Registration Frequently Asked Questions” (http://kc.forticare.com/default.asp?id=2071).
FortiGate-310B FortiOS 3.0 MR6 Install Guide |
|
01-30006-0472-20080815 |
7 |

About the FortiGate-310B |
Introduction |
About the FortiGate-310B
The FortiGate-310B is designed to raise the expectations of mid-range security devices. Incorporating FortiASIC network processors for firewall/VPN acceleration and the FortiASIC Content Processor for content inspection acceleration, the FortiGate-310B yields unmatched multi-threat performance metrics. AMC module options offer both flexibility and the highest port density of any product in its class. The FortiGate-310B's accelerated security throughput and high port density relieves medium sized organizations of the restraints that have historically prevented internal network security segmentation.
Figure 1: FortiGate-310B
NP2 Powered
|
STATUS |
|
|
|
|
|
|
|
|
|
|
|
|
|
|
|
|
|
|
|
|
|
|
|
|
|
|
|
|
|
|
|
|
|
|
|
|
|
POWER |
ALARM |
|
|
|
|
|
|
|
|
|
|
|
HA |
|
|
|
|
|
|
|
|
|
|
ASM |
|
|
|
1/2 |
3/4 |
5/6 |
7/8 |
9/10 |
|
USB |
CONSOLE |
|
|
|
|
|
|
|
|
The FortiGate-310B includes:
•8 Gbps firewall, 6 Gbps VPN as a base model
•12 Gbps firewall, 9 Gbps VPN with optional AMC module
•SSL hardware acceleration
•Link aggregation
•Customizable expansion options
•Facilitates LAN security segmentation.
LACP configuration
You can aggregate (combine) two or more physical interfaces to increase bandwidth and provide some link redundancy.
The FortiGate-310B has two NP2 acceleration processors; four ports for each. When creating hardware acceleration of LACP on the FortiGate-310B, the members of the LACP must be within the same NP2 set. For example, you must select ports 1 to 4 or ports 5 to 8. Mixing ports between these to port sets, for example port 1 and port 5, will not function as desired.
About this document
This document explains how to install and configure your FortiGate unit onto your network. This document also includes how to install and upgrade new firmware versions on your FortiGate unit.
This document contains the following chapters:
•Installing – Describes setting up and powering on a FortiGate unit.
•Configuring – Provides an overview of the operating modes of the FortiGate unit and how to integrate the FortiGate unit into your network.
•Advanced configuration – Describes additional configuration you can perform on the FortiGate unit to enhance network protection, including antivirus, antispam, firewall configuration and logging.
|
FortiGate-310B FortiOS 3.0 MR6 Install Guide |
8 |
01-30006-0472-20080815 |

|
|
|
Introduction |
Further Reading |
•FortiGate Firmware – Describes how to install, update, restore and test firmware for the FortiGate device.
•AMC modules – Describes inserting, removing and using Fortinet AMC singlewidth modules in the FortiGate unit.
Document conventions
The following document conventions are used in this guide:
•In the examples, private IP addresses are used for both private and public IP addresses.
•Notes and Cautions are used to provide important information:
Note: Highlights useful additional information.
Caution: Warns you about commands or procedures that could have unexpected or ! undesirable results including loss of data or damage to equipment.
Typographic conventions
FortiGate documentation uses the following typographical conventions:
Convention |
Example |
|
|
Keyboard input |
In the Gateway Name field, type a name for the remote VPN |
|
peer or client (for example, Central_Office_1). |
Code examples |
config sys global |
|
set ips-open enable |
|
end |
CLI command syntax |
config firewall policy |
|
edit id_integer |
|
set http_retry_count <retry_integer> |
|
set natip <address_ipv4mask> |
|
end |
Document names |
FortiGate Administration Guide |
|
|
Menu commands |
Go to VPN > IPSEC > Phase 1 and select Create New. |
|
|
Program output |
Welcome! |
Variables |
<address_ipv4> |
Further Reading
The most up-to-date publications and previous releases of Fortinet product documentation are available from the Fortinet Technical Documentation web site at http://docs.forticare.com.
The following FortiGate product documentation is available:
•FortiGate QuickStart Guide
Provides basic information about connecting and installing a FortiGate unit.
FortiGate-310B FortiOS 3.0 MR6 Install Guide |
|
01-30006-0472-20080815 |
9 |

Further Reading |
Introduction |
•FortiGate Administration Guide
Provides basic information about how to configure a FortiGate unit, including how to define FortiGate protection profiles and firewall policies; how to apply intrusion prevention, antivirus protection, web content filtering, and spam filtering; and how to configure a VPN.
•FortiGate online help
Provides a context-sensitive and searchable version of the Administration Guide in HTML format. You can access online help from the web-based manager as you work.
•FortiGate CLI Reference
Describes how to use the FortiGate CLI and contains a reference to all FortiGate CLI commands.
•FortiGate Log Message Reference
Available exclusively from the Fortinet Knowledge Center, the FortiGate Log Message Reference describes the structure of FortiGate log messages and provides information about the log messages that are generated by FortiGate units.
•FortiGate High Availability User Guide
Contains in-depth information about the high availability feature and the clustering protocol.
•FortiGate IPS User Guide
Describes how to configure the FortiGate Intrusion Prevention System settings and how the FortiGate IPS deals with some common attacks.
•FortiGate IPSec VPN User Guide
Provides step-by-step instructions for configuring IPSec VPNs using the web-based manager.
•FortiGate SSL VPN User Guide
Compares FortiGate IPSec VPN and FortiGate SSL VPN technology, and describes how to configure web-only mode and tunnel-mode SSL VPN access for remote users through the web-based manager.
•FortiGate PPTP VPN User Guide
Explains how to configure a PPTP VPN using the web-based manager.
•FortiGate Certificate Management User Guide
Contains procedures for managing digital certificates including generating certificate requests, installing signed certificates, importing CA root certificates and certificate revocation lists, and backing up and restoring installed certificates and private keys.
•FortiGate VLANs and VDOMs User Guide
•Describes how to configure VLANs and VDOMS in both NAT/Route and Transparent mode. Includes detailed examples.
Fortinet Knowledge Center
The Knowledge Center contains troubleshooting and how-to articles, FAQs, technical notes, and more. Visit the Fortinet Knowledge Center at http://kc.forticare.com.
|
|
FortiGate-310B FortiOS 3.0 MR6 Install Guide |
|
|
|
|
|
|
|
|
|
|
|
|
|
|
|
10 |
01-30006-0472-20080815 |
|
|
|
Introduction |
Customer service and technical support |
Comments on Fortinet technical documentation
Please send information about any errors or omissions in this document, or any Fortinet technical documentation, to techdoc@fortinet.com.
Customer service and technical support
Fortinet Technical Support provides services designed to make sure that your Fortinet systems install quickly, configure easily, and operate reliably in your network.
Please visit the Fortinet Technical Support web site at http://support.fortinet.com to learn about the technical support services that Fortinet provides.
FortiGate-310B FortiOS 3.0 MR6 Install Guide |
|
01-30006-0472-20080815 |
11 |

Customer service and technical support |
Introduction |
|||
|
|
|
|
|
|
|
|
|
|
|
|
|
|
|
|
|
|
|
|
|
|
|
|
|
|
|
|
|
|
|
FortiGate-310B FortiOS 3.0 MR6 Install Guide |
12 |
01-30006-0472-20080815 |

|
|
Installing |
Environmental specifications |
Installing
This chapter describes installing your FortiGate unit in your server room, environmental specifications and how to mount the FortiGate in a rack if applicable.
This chapter contains the following topics:
•Environmental specifications
•Cautions and warnings
•Plugging in the FortiGate
•Plugging in the FortiGate
•Turning off the FortiGate unit
Environmental specifications
•Operating temperature: 32 to 104°F (0 to 40°C)
If you install the FortiGate unit in a closed or multi-unit rack assembly, the operating ambient temperature of the rack environment may be greater than room ambient temperature. Therefore, make sure to install the equipment in an environment compatible with the manufacturer's maximum rated ambient temperature.
•Storage temperature: -13 to 158°F (-25 to 70°C)
•Humidity: 5 to 90% non-condensing
•Air flow - For rack installation, make sure that the amount of air flow required for safe operation of the equipment is not compromised.
•For free-standing installation, make sure that the appliance has at least 1.5 in. (3.75 cm) of clearance on each side to allow for adequate air flow and cooling.
This device complies with part FCC Class A, Part 15, UL/CUL, C Tick, CE and VCCI. Operation is subject to the following two conditions:
•This device may not cause harmful interference, and
•This device must accept any interference received, including interference that may cause undesired operation.
This equipment has been tested and found to comply with the limits for a Class B digital device, pursuant to part 15 of the FCC Rules. These limits are designed to provide reasonable protection against harmful interference in a residential installation. This equipment generates, uses and can radiate radio frequency energy and, if not installed and used in accordance with the instructions, may cause harmful interference to radio communications. However, there is no guarantee that interference will not occur in a particular installation. If this equipment does cause harmful interference to radio or television reception, which can be determined by turning the equipment off and on, the user is encouraged to try to correct the interference by one or more of the following measures:
•Reorient or relocate the receiving antenna.
•Increase the separation between the equipment and receiver.
FortiGate-310B FortiOS 3.0 MR6 Install Guide |
|
01-30006-0472-20080815 |
13 |

Cautions and warnings |
Installing |
•Connect the equipment into an outlet on a circuit different from that to which the receiver is connected.
•Consult the dealer or an experienced radio/TV technician for help.
The equipment compliance with FCC radiation exposure limit set forth for uncontrolled Environment.
Cautions and warnings
Review the following cautions before installing your FortiGate unit.
Grounding
•Ensure the FortiGate unit is connected and properly grounded to a lightning and surge protector. WAN or LAN connections that enter the premises from outside the building should be connected to an Ethernet CAT5 (10/100 Mb/s) surge protector.
•Shielded Twisted Pair (STP) Ethernet cables should be used whenever possible rather than Unshielded Twisted Pair (UTP).
•Do not connect or disconnect cables during lightning activity to avoid damage to the FortiGate unit or personal injury.
Rack mount instructions
Elevated Operating Ambient - If installed in a closed or multi-unit rack assembly, the operating ambient temperature of the rack environment may be greater than room ambient. Therefore, consideration should be given to installing the equipment in an environment compatible with the maximum ambient temperature (Tma) specified by the manufacturer.
Reduced Air Flow - Installation of the equipment in a rack should be such that the amount of air flow required for safe operation of the equipment is not compromised.
Mechanical Loading - Mounting of the equipment in the rack should be such that a hazardous condition is not achieved due to uneven mechanical loading.
Circuit Overloading - Consideration should be given to the connection of the equipment to the supply circuit and the effect that overloading of the circuits might have on overcurrent protection and supply wiring. Appropriate consideration of equipment nameplate ratings should be used when addressing this concern.
Reliable Earthing - Reliable earthing of rack-mounted equipment should be maintained.
Particular attention should be given to supply connections other than direct connections to the branch circuit (e.g. use of power strips).
Mounting
If required to fit into a rack unit, remove the rubber feet from the bottom of the FortiGate unit.
The FortiGate unit can be placed on any flat surface, or mounted in a standard 19inch rack unit.
|
|
|
FortiGate-310B FortiOS 3.0 MR6 Install Guide |
|
|
|
|
|
|
|
|
|
|
|
|
14 |
01-30006-0472-20080815 |
||
|
|
Installing |
Cautions and warnings |
!
1
2
3
4
5
When placing the FortiGate unit on any flat, stable surface, ensure the unit has at least 1.5 inches (3.75 cm) of clearance on each side to ensure adequate airflow for cooling.
For rack mounting, use the mounting brackets and screws included with the FortiGate unit.
Caution: Depending on the size of your FortiGate unit, avoid personal injury, you may require two or more people to install the unit in the rack.
To install the FortiGate unit into a rack
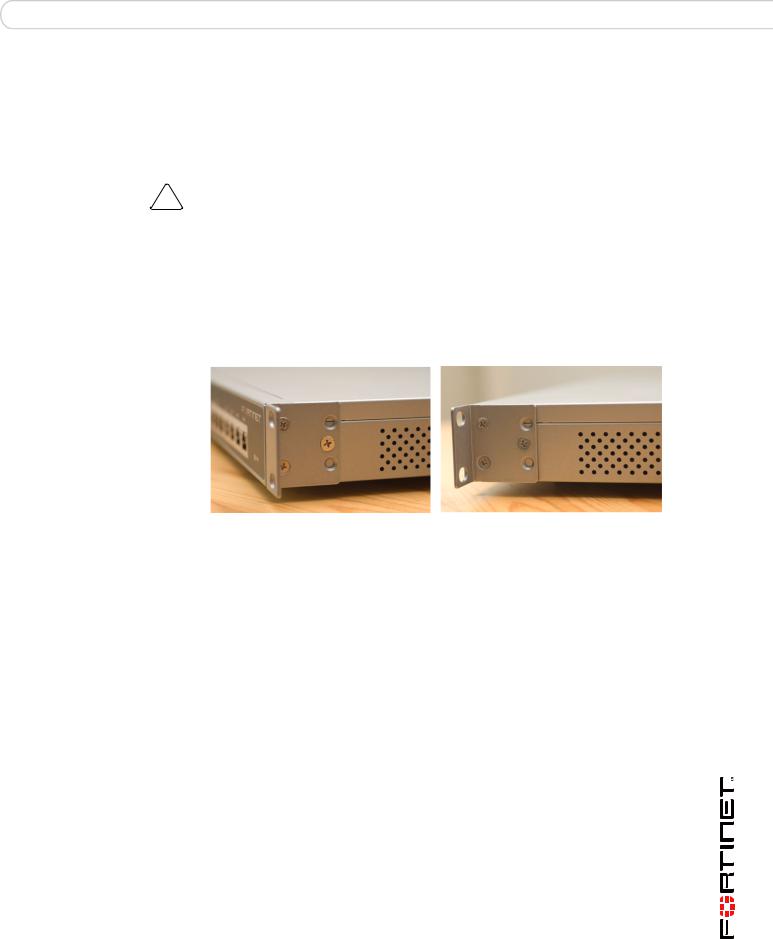
Attach the mounting brackets to the side to the unit so that the brackets are on the front portion of the FortiGate unit. Ensure that the screws are tight and not loose.
The following photos illustrate how the brackets should be mounted. Note that the screw configuration may vary depending on your FortiGate unit.
Figure 2: Installed mounting brackets
Position the FortiGate unit in the rack to allow for sufficient air flow.
Line up the mounting bracket holes to the holes on the rack, ensuring the FortiGate unit is level.
Finger tighten the screws to attach the FortiGate unit to the rack.
Once you verify the spacing of the FortiGate unit and that it is level, tighten the screws with a screwdriver. Ensure that the screws are tight and not loose.
The following photos illustrate how the mounting brackets and FortiGate unit should be attached to the rack.
FortiGate-310B FortiOS 3.0 MR6 Install Guide |
|
01-30006-0472-20080815 |
15 |

Plugging in the FortiGate |
Installing |
Figure 3: Mounting in a rack
Plugging in the FortiGate
Use the following steps to connect the power supply to the FortiGate unit.
To power on the FortiGate unit
1Ensure the power switch, located at the back of the FortiGate unit is in the off position, indicated by the “O”.
2Connect the power cord at the back of the FotiGate unit.
3Connect the power cable to a power outlet.
4Set the power switch on the back left of the FortiGate to the on position indicated by the “I”.
Connecting to the network
Using the supplied Ethernet cable, connect one end of the cable to your router or modem, whatever the connection is to the Internet. Connect the other end to the FortiGate unit. Connect to either the External, WAN port, or port 1. Connect additional cable to the Internal port or port 2 and your internal hub or switch.
Turning off the FortiGate unit
Always shut down the FortiGate operating system properly before turning off the power switch to avoid potential hardware problems.
To power off the FortiGate unit
1From the web-based manager, go to System > Status.
2In the Unit Operation display, select Shutdown, or from the CLI enter: execute shutdown
3Disconnect the power cables from the power supply.
|
FortiGate-310B FortiOS 3.0 MR6 Install Guide |
16 |
01-30006-0472-20080815 |
|
|
Configuring |
NAT vs. Transparent mode |
Configuring
This section provides an overview of the operating modes of the FortiGate unit, NAT/Route and Transparent, and how to configure the FortiGate unit for each mode. There are two ways you can configure the FortiGate unit, using the web-based manager or the command line interface (CLI). This section will step through using both methods. Use whichever you are most comfortable with.
This section includes the following topics:
•NAT vs. Transparent mode
•Connecting to the FortiGate unit
•Verify the configuration
•Backing up the configuration
•Additional configuration
NAT vs. Transparent mode
The FortiGate unit can run in two different modes, depending on your network infrastructure and requirements. You have a choice between NAT/Route mode and Transparent mode. Both include the same robust network security features such as antispam, antivirus, VPN and firewall policies.
NAT mode
In NAT/Route mode, the FortiGate unit is visible to the network. Like a router, all its interfaces are on different subnets.
In NAT mode, each port is on a different subnet, enabling you to have a single IP address available to the public Internet. The FortiGate unit performs network address translation before it sends and receives the packet to the destination network.
In Route mode, there is no address translation.
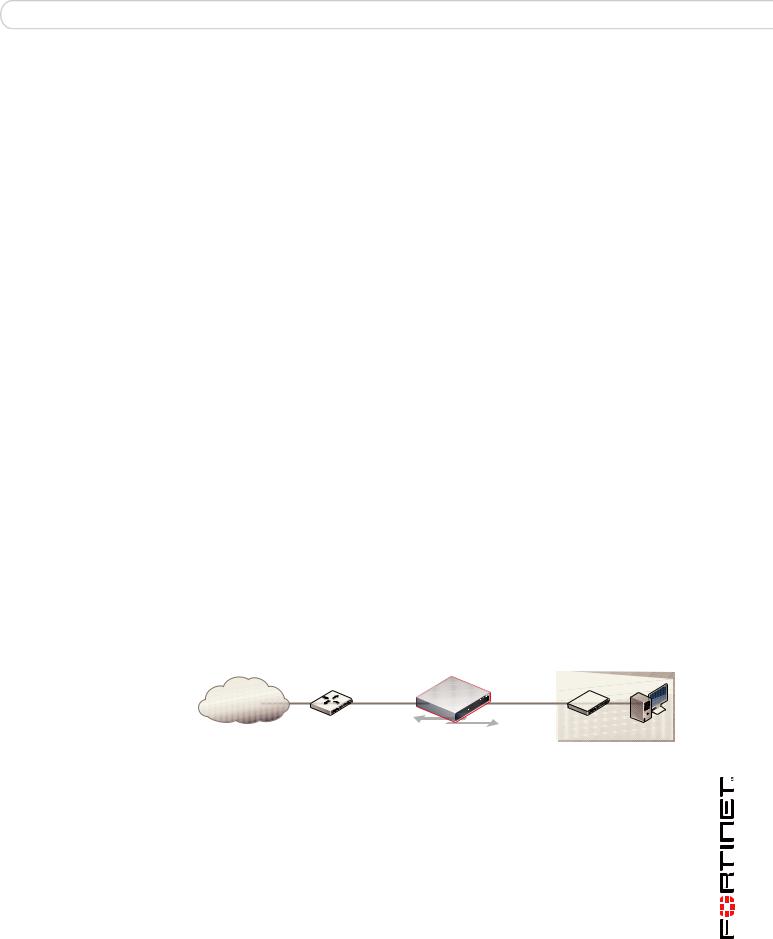
Figure 4: FortiGate unit in NAT mode
Internet |
204.23.1.5 |
192.168.1.99 |
|
|
Router
NAT mode policies controlling traffic between internal and external networks.
Internal network
192.168.1.20
You typically use NAT/Route mode when the FortiGate unit is operating as a gateway between private and public networks. In this configuration, you would create NAT mode firewall policies to control traffic flowing between the internal, private network and the external, public network, usually the Internet.
FortiGate-310B FortiOS 3.0 MR6 Install Guide |
|
01-30006-0472-20080815 |
17 |

Connecting to the FortiGate unit |
Configuring |
Transparent mode
In Transparent mode, the FortiGate unit is invisible to the network. Similar to a network bridge, all FortiGate interfaces must be on the same subnet. You only have to configure a management IP address to make configuration changes. The management IP address is also used for antivirus and attack definition updates.
Figure 5: FortiGate unit in Transparent mode
|
|
|
|
10.10.10.1 |
|
|
|
|
Management IP |
|
Gateway to public network |
|
Internal Network |
|
|
|
|
||
Internet |
204.23.1.2 |
10.10.10.2 |
External |
Internal |
|
|
Router |
|
10.10.10.3 |
|
|
|
Transparent mode policies |
|
|
|
|
controlling traffic between |
|
|
|
|
internal and external networks. |
|
You typically use the FortiGate unit in Transparent mode on a private network behind an existing firewall or behind a router. The FortiGate unit performs firewall functions, IPSec VPN, virus scanning, IPS web filtering, and Spam filtering.
Connecting to the FortiGate unit
To configure, maintain and administer the FortiGate unit, you need to connect to it. There are two methods for these tasks:
•using the web-based manger, a GUI interface using a current web browser such as FireFox or Internet Explorer.
•using the command line interface (CLI), a command line interface similar to DOS or UNIX commands using an SSH terminal or Telnet terminal.
Connecting to the web-based manager
To connect to the web-based manager, you require:
•a computer with an Ethernet connection
•Microsoft Internet Explorer version 6.0 or higher or any recent version of the most popular web browser
•an Ethernet cable.
To connect to the web-based manager
1Set the IP address of the management computer to the static IP address 192.168.1.2 with a netmask of 255.255.255.0.
2Using the Ethernet cable, connect the internal interface of the FortiGate unit to the computer Ethernet connection.
3Start your browser and enter the address https://192.168.1.99. (remember to include the “s” in https://).
|
|
|
FortiGate-310B FortiOS 3.0 MR6 Install Guide |
|
|
|
|
|
|
|
|
|
|
|
|
|
|
|
|
|
|
|
|
18 |
01-30006-0472-20080815 |
||

|
|
Configuring |
Connecting to the FortiGate unit |
To support a secure HTTPS authentication method, the FortiGate unit ships with a self-signed security certificate, which is offered to remote clients whenever they initiate a HTTPS connection to the FortiGate unit. When you connect, the FortiGate unit displays two security warnings in a browser.
The first warning prompts you to accept and optionally install the FortiGate unit’s self-signed security certificate. If you do not accept the certificate, the FortiGate unit refuses the connection. If you accept the certificate, the FortiGate login page appears. The credentials entered are encrypted before they are sent to the FortiGate unit. If you choose to accept the certificate permanently, the warning is not displayed again.
Just before the FortiGate login page is displayed, a second warning informs you that the FortiGate certificate distinguished name differs from the original request. This warning occurs because the FortiGate unit redirects the connection. This is an informational message. Select OK to continue logging in.
4 Type admin in the Name field and select Login.
Connecting to the CLI
To connect to the FortiGate CLI you require:
•a computer with an available communications port
•a serial cable, either a RJ-45 to DB-9 or null modem cable, whichever was included in your FortiGate package
•terminal emulation software such as HyperTerminal for Microsoft Windows
Note: The following procedure uses Microsoft Windows HypterTerminal software. You can apply these steps to any terminal emulation program.
To connect to the CLI
1Connect the serial cable to the communications port of your computer and to the FortiGate console port.
2Start HyperTerminal, enter a name for the connection and select OK.
3Configure HyperTerminal to connect directly to the communications port on your computer and select OK.
4Select the following port settings and select OK:
Bits per second |
9600 |
Data bits |
8 |
Parity |
None |
Stop bits |
1 |
Flow control |
None |
5Press Enter to connect to the FortiGate CLI.
6When the login prompt appears, type admin and press Enter twice.
Type ? to list available commands. For information about how to use the CLI, see the FortiGate CLI Reference.
FortiGate-310B FortiOS 3.0 MR6 Install Guide |
|
01-30006-0472-20080815 |
19 |
Loading...