


1266-X & 1266-XB
Deep Search Metal Detector
Operating Manual
F I S H E R R E S E A R C H L A B O R A T O R Y

CONTENTS
|
|
|
|
.................................................................About Your 1266-X |
pg. 1 |
|
|
Condensed Operating Instructions ..................................... |
pg. 2 |
|
|
Setting Up................................................................................ |
pg. 3 |
|
|
Control Housing ..................................................................... |
pg. 5 |
|
|
Discrimination Points ............................................................. |
pg. 6 |
|
|
Dual Discrimination ............................................................... |
pg. 9 |
|
|
Searching ............................................................................... |
pg. 10 |
|
|
Pinpointing.............................................................................. |
pg. 12 |
|
|
Target Recovery .................................................................... |
pg. 13 |
|
|
Recovery Tools ...................................................................... |
pg. 14 |
|
|
Operating Tips ........................................................................ |
pg. 14 |
|
|
False Signals ........................................................................... |
pg. 16 |
|
|
Battery Replacement ............................................................ |
pg. 18 |
|
|
Battery Recharging ............................................................... |
pg. 18 |
|
|
Maintenance ......................................................................... |
pg. 20 |
|
|
Treasure Hunter’s Code of Ethics ......................................... |
pg. 20 |
|
|
Where to Hunt in the U.S........................................................ |
pg. 21 |
|
|
Specifications ........................................................................ |
pg. 22 |
|
|
|
|
|
|
|
|
|
|

ABOUT YOUR DETECTOR
The 1266-X was designed to excel in three ways: depth, discrimination and simplicity. It offers a better combination of these three characteristics than any other metal detector we’ve ever built. And we’ve been building metal detectors since 1931.
Depth. Engineered to go deep in mineralized soil at high levels of discrimination. If you’re an experienced detector operator, you’ll find yourself recovering good targets at depths you never reached before. And you’ll really appreciate the loud, clear audio response you get from those deep targets.
Discrimination. Detect all metals or ignore trash as you detect valuable targets. Twin discrimination modes allow you to switch instantly back and forth between any two levels of discrimination. If you’ve found target ID meters confusing or inaccurate, you’ll like this quick and simple way to help tell the cash from the trash.
Simplicity. This is the kind of uncomplicated detector you would expect from the company that pioneered automatic turn-on-and-go metal detectors. No meter, no tuner, no ground adjust. Just pick it up, set your controls once and start searching. It’s light, balanced, comfortable and the open center Spider coil makes pinpointing a snap.
Read this instruction manual from cover to cover and treat your 1266-X as you would any expensive, high quality precision instrument. Drop us a line if you have any questions, comments, or exciting 1266-X stories. In the meantime...
Happy Hunting!
Fisher Research Laboratory
1 |

CONDENSED OPERATING INSTRUCTIONS
The 1266-X is basically a turn-on-and-go metal detector. It doesn’t take an engineer to operate it but you’ll have more fun and a better chance of making that BIG find if you have a complete understanding of what you’re doing. That’s why we strongly recommend that you read the entire manual. But if you just can’t wait any longer and you’ve already used a Fisher “X” detector, here’s some quick instructions to get you going.
1. Set the controls as follows:
DISC 1 = 4 (small nail discrimination) DISC 2 = 7 (Pull tab discrimination) SENSITIVITY = Pull and turn 3/4 clockwise OFF/VOL = Full clockwise1
2.As soon as you turn the detector on, it is automatically tuned and ground adjusted in the DISC 1 search mode.
3.DISC 1 and DISC 2 are motion modes. The search coil must be at least slightly in motion to detect a target.
4.When you locate a target, push and hold the TRIGGER SWITCH for further target identification in DISC 2. If your target still sounds good, dig it.
5.With practice, you should be able to pinpoint in either of the DISC modes by moving the coil slowly backwards and forwards and left to right and finally stopping over the area of the strongest target response. The target should be approximately centered beneath the search coil.
6.To use the Zero-Motion Pinpointing mode, simply place the coil on the ground (away from the target), pull and hold the trigger, lift the coil about a half inch and bring it back over the target area as you would in a DISC mode. The differences being that you don’t have to keep the coil in motion to get a response.
7.HAPPY HUNTING!
1.If you’re using headphones, reduce the volume of the headphones to a comfortable level when passing the search coil over a large,
shallow target.
2 |
SETTING UP
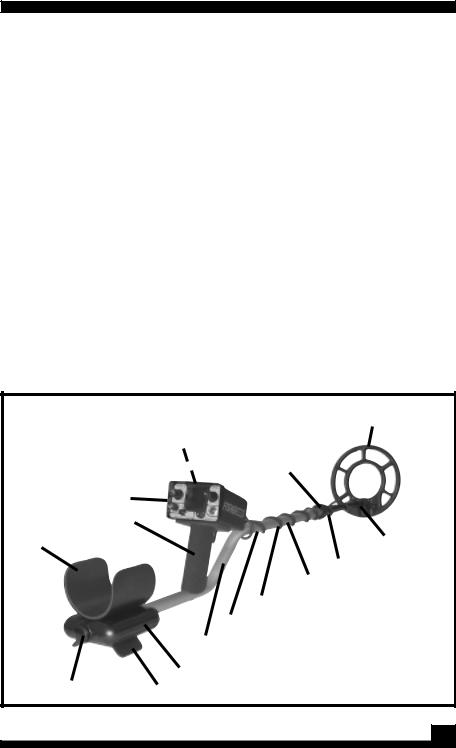
Your 1266-X is just about ready to use. The only adjustment required is the angle of the search coil and the length of the stem. Take a look at Figure 1 and familiarize yourself with the parts of the 1266-X before proceeding.
1.Unpack it carefully. You may want to save the carton and inserts for future storage or shipment.
2.Depress the spring lock on the lower stem and slip the lower stem into the upper stem. Connect the search coil cable to the control housing.
3.The stem length is adjusted by loosening the lock nut and allowing the spring lock to snap into one of the holes in the upper stem.
4.The search coil angle is adjusted by loosening the nylon wing nut on top of the search coil.
5.Adjust the stem length and the coil angle so the search coil rests flat on the ground about 6 inches in front of, and slightly to the right of your right foot (to the left of your left foot for left handers). Your arm should be straight and relaxed, the grip held loosely.
Search-Coil Cable Connector |
Open-Center 8-inch Spider Coil |
||
and Battery Recharge Jack on |
|||
|
|||
|
Rear of Housing |
|
|
|
Injection-Molded |
||
|
Lower Stem |
||
Control Housing |
|
|
|
Foam Hand Grip |
|
||
Padded Arm Rest |
|
Wing Nut |
|
|
|
Lower Lock Nut |
|
|
|
Spring Lock |
|
|
Search Coil Cable |
||
|
Upper Lock Nut |
||
|
Upper Stem |
|
|
|
Battery Housing |
|
|
Battery End Cap |
Built-In Detector Stand |
|
|
Figure 1. Fisher M-Scope 1266-X.
3 |

SETTING UP
REMEMBER • THE LONGER THE SHAFT, THE MORE YOU WILL HAVE TO BEND YOUR ELBOW AND THE SOONER YOUR ARM WILL GET TIRED. THE 1266-X IS BALANCED FOR COMFORTABLE SEARCHING IN A TIGHT SEMICIRCLE AROUND THE FRONT OF THE OPERATOR.
6.With the stem length properly adjusted, tighten the lock nut and search coil wing nut. CAUTION: Never use a pliers or anything other than your hand to tighten the lock nut or wing nut.
7.Disconnect the search coil cable from the control housing and wrap it around the stem. A loose cable near the search coil may cause false signals, but don’t wrap it so tight that it pulls against the housing or the coil. Reconnect the loop cable to the housing.
8.With the shaft length and coil angle properly adjusted, you should be able to move into your “search” position by leaning forward very slightly raising your arm (still straight) until the search coil is about 1 inch above the ground and 12 inches in front of your foot. The search coil should be parallel to the ground and may have to be
slightly readjusted at this point.
9.If the armrest is too wide or too narrow, you may bend it slightly inward or outward to meet your exact requirements.
Figure 2.
Search Position
4 |

CONTROL HOUSING
1.DISC 1: DISCRIMINATE 1 is the search mode. The 1266-X automatically operates in DISC 1 unless the TRIGGER-SWITCH is pushed and held or pulled and held. DISC 1 is a full range discrimination mode. All types of metal are detected at the zero level and most small pieces of trash are rejected at the maximum level of ten.
2.DISC 2: DISCRIMINATE 2 is similar to DISC 1 except that it operates only when the TRIGGER SWITCH is pushed and held. DISC 2 is used for target identification and/or pinpointing.
3.STEREO HEADPHONE JACK: Accepts most stereo and mono headphones with one-quarter inch diameter plugs. When used, the speaker is automatically disconnected. A headphone can be very helpful when hunting in noisy areas or detecting faint signals.
4.SENSITIVITY: This is a dual range, push-pull knob that controls sensitivity to targets and soil minerals. Pull and rotate clockwise for normal operation in mineralized soil. Push and rotate clockwise for even more sensitivity in non-mineralized, non-conductive soil. It should be noted that faint erratic circuit noise is audible at the full clockwise position.
5.BATTERY CHECK: Fully charged batteries will give a loud tone when this button is pushed. Weak batteries will give a weak signal and dead
1 |
6 |
2 |
3 |
5 |
4 |
5 |

CONROL HOUSING
or weak batteries will give no tone. Batteries do not have to be replaced as long as you can hear a tone. As a general rule, you’ll be able to operate your 1266-X for an hour or two after the tone goes silent.
6.OFF/VOL: Power on-off and volume control. This control turns the power off at the full counter clockwise position and adjusts volume to maximum at full clockwise.
7.TRIGGER SWITCH: This spring loaded trigger has three-positions:
1.Relaxed position: Maintains the 1266-X in the DISC 1 search mode.
2.Forward position: When pushed and held, the 1266-X automatically switches into the DISC
2mode.
3.Rear position: When pulled and held the 1266-X automatically switches into the ZeroMotion Pinpointing mode.
8.RECHARGE JACK: Located on the rear of the control housing, this jack is to be used only with the optional 1266-X recharge kit. Nicad batteries may be recharged from a 110-volt wall outlet or an auto cigarette lighter socket (12 volt, negative ground) without removing the batteries from the control housing.
DISCRIMINATION POINTS
By adjusting DISC 1 and DISC 2 you will be able to ignore (or “reject”) small pieces of metallic trash and ground minerals while detecting valuable targets. The lowest setting at which an object is rejected is referred to as the object’s “discrimination point”. Discrimination points are determined by such factors as size, shape, depth, type of metal and ground mineralization.
1. Scatter some sample targets such as coins, pulltabs and small pieces of foil on the ground 1 to 2 feet apart.
6 |
 Loading...