


GWL11
Clothes Washer
Installation instructions and User guide EN
Lave-linge
Instructions d’installation et mode d’emploi FR
New Zealand |
Australia |
USA |
Canada |
Europe |
Asia |
Pacific |

 WARNING
Electric Shock Hazard
Read and follow the IMPORTANT SAFETY INSTRUCTIONS outlined in this User Guide before operating this appliance, pages 11–13.
Failure to do so can result in death, electric shock, fire or injury to persons.
Please Note: To obtain maximum efficiency, your Ecosmart washer has the ability to learn and adapt to the local environment. This may take several wash cycles, therefore maximum energy efficiency may not be achieved until a number of wash cycles have been completed. This usually takes about 5 cycles.
English |
Page 2 – 38 |
|
|
|
|
Français |
Page 40 – 67 |
|
|
|
|
|
|
|
|
|
|
As an ENERGY STAR® Partner Fisher & Paykel Limited has determined that this product meets ENERGY STAR® guidelines for energy efficiency.
2
Contents |
|
EN |
Installation Instructions |
5 |
|
Important Safety Instructions |
11 |
|
How to get Started |
14 |
|
About your Ecosmart |
|
|
How your Ecosmart Works |
16 |
|
Lid Lock |
17 |
|
Wash Cycles and Options |
|
|
|
|
|
The Wash Progress Lights |
17 |
|
The Wash Cycles, Wash Options |
18 |
|
Softener Rinse, Soak, Time Saver |
19 |
|
Water Levels |
20 |
|
Spin Hold, Delay Start, Clothes Care Safeguards |
21 |
|
Customizing the Wash Cycle, Favorite Cycle |
22 |
|
Washing Bulky Items, Washing Woollens, Cold Water Washing |
23 |
|
Before You Wash |
|
|
Sorting and Loading |
24 |
|
Bleach |
25 |
|
Fabric Softener |
25 |
|
Scrud |
25 |
|
Changing Pre-Set Options |
|
|
Option Adjustment Mode |
26 |
|
Out of Balance Recovery Routine |
28 |
|
Auto Water Fill Level |
28 |
|
End of Cycle Beeps |
29 |
|
Default Rinse Options |
29 |
|
Volume of Water used in the Shower Rinse |
29 |
|
Controlled Cold |
29 |
|
Caring for your Ecosmart |
|
|
Care and Cleaning |
30 |
|
Products that might Damage your Ecosmart |
31 |
|
Ecosmart Sounds and Beeps |
31 |
|
Automatic Lint System |
31 |
|
If your Ecosmart Beeps for Help |
32 |
|
Service |
33 |
|
Operating Problems |
34 |
|
Wash Problems |
35 |
|
Limited Warranty |
36 |
|
3
Congratulations on purchasing a new Fisher & Paykel washing machine. We are very proud of our washers and trust they will serve you well for many years.
At Fisher & Paykel we aim to provide innovative products that are simple to use, ergonomic and energy efficient. Thousands of tonnes of washing and 70 years of laundry experience have been programmed into your washing machine to help give you the best possible performance.
We hope you enjoy your new washing machine, we have certainly enjoyed designing it.
Important!
It is important that the User Guide should be retained with the appliance for future reference. Should the appliance be sold or transferred to another owner, always ensure that the User Guide is left with the appliance in order that the new owner can familiarize themselves with the appliance and the relevant warnings.
4

Installation Instructions
EN
Before you begin – read these instructions completely and carefully.
 WARNING
Electric Shock Hazard
Read and follow the IMPORTANT SAFETY INSTRUCTIONS outlined in this User Guide before operating this appliance, pages 11–13.
Failure to do so can result in death, electric shock, fire or injury to persons.
Important!
Observe all governing codes and ordinances.
Installation requirements
Location
Your washer must be installed on firm flooring to minimize vibration during spin cycles. Concrete flooring is best, but wood base is sufficient providing the floor support meets FHA standards.
Your washer should not be installed on rugs or exposed to the weather.
Plumbing
Water Temperature
Your cold water should not exceed 95˚F (35˚C) or your hot water exceed 150˚F (65˚C). Temperatures above this may damage your washer.
Shut Off Valves
Both hot and cold shut-off valves (faucets) should be available in the laundry area.
Drain
Water may be drained into a standpipe or set tub. The standpipe must be 11/2” (38mm) minimum interior diameter and must be open to the atmosphere.
Electrical
This appliance must be supplied with 110V – 120V, 60Hz electrical supply and connected to an individual, properly grounded branch circuit, protected by a 15 or 20 amp circuit breaker or time delay fuse.
5

Installation Instructions
Washer end of hose
Specifications
Lid Clearance
Faucet end of hose
Height
Standpipe Height 33 1/2” to 78”
Allow for adjustable feet
Width
Depth
Inlet water pressure
Max 150 psi (1MPa)
Min 5 psi (34kPa )
Dimensions
Model |
All models |
Depth |
251/2” (650mm) |
Width |
251/2” (650mm) |
Height to top of console |
40”- 413/4” (1020-1060mm) |
Height lid open |
55”- 563/4” (1400-1440mm) |
6
Installation Instructions
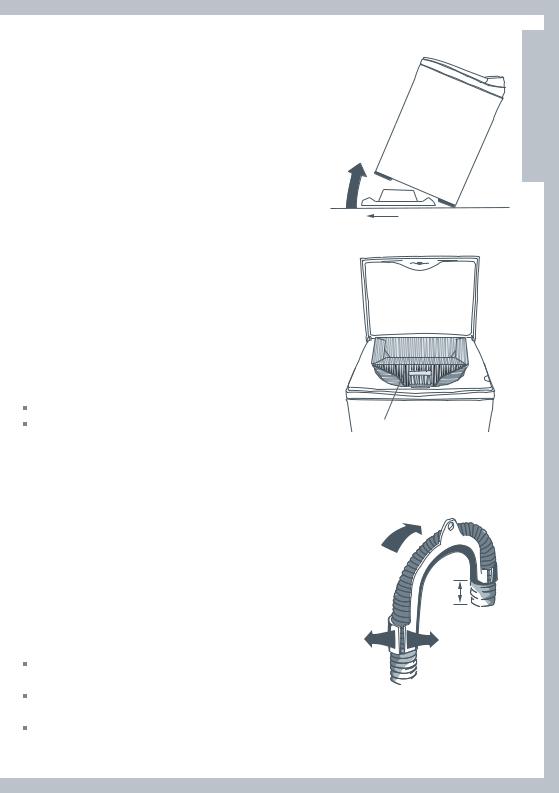
Step 1
Remove Bottom Packer
1.Remove outer packaging.
2.Tilt the machine backwards and walk the machine off the bottom packer. The plastic bottom packer can now be removed.
 CAUTION!
Operating the machine when the bottom packer is in place can result in damage to the machine.
Step 2
Removing Basket Packer and Accessories
1.Lift the lid and remove cardboard basket packer from the top of the washer basket.
2.Keep the bottom packer and basket packer in case they are required for future transit.
3.Remove hoses, accessories and installation pack.
The installation pack contains the following:
4 rubber inserts for the leveling feet
1 drain hose guide
Step 3
Drain Hose
1.Carefully pull the drain hose out from the back of the washer by pulling the exposed part of the hose downwards and then out.
2.The hose guide is used to guide the drain hose over the tub or standpipe. It MUST be fitted to the drain hose. To prevent siphoning the drain hose should not extend more than 3/4” (20mm) from the end of the guide.
If necessary, the drain hose can be trimmed to length.
3.Place the drain hose in the laundry tub or standpipe.
Note:
In multi-storey apartments or any upper floor installation, the machine should be installed on a drained floor.
Check that the tub or standpipe is free from lint or other obstructions before operating the washer.
In basement installation do not exceed a standpipe height of (78”).
EN
Basket packer
Pull hose through guide
3/4”
(20mm)
7
Installation Instructions
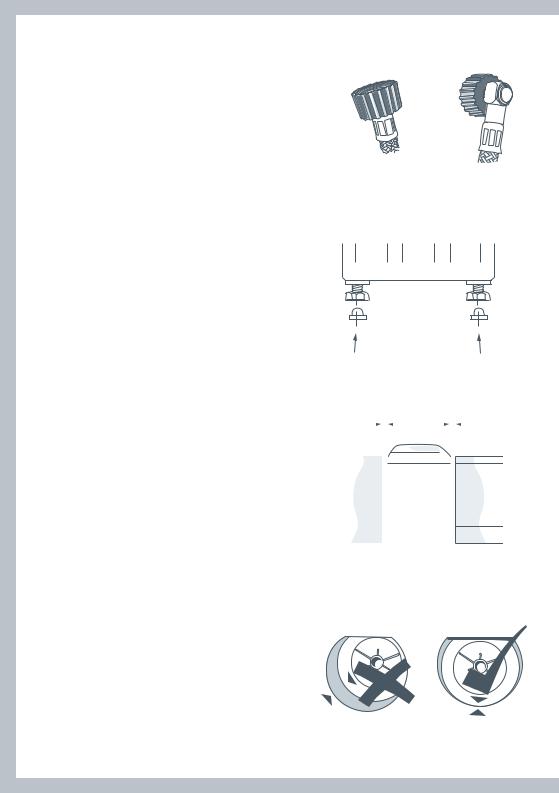
Step 4
Inlet Hoses
1.Install hoses with the straight end (with filters) fitted to the faucets.
2.Install elbow ends onto washing machine (inlet valves are marked on the back of the machine H=hot, C=cold)
Note: If there is a cold water supply only, an inlet valve cap (available from Fisher & Paykel) MUST be connected to the hot valve. The cap prevents water leaking from the hot valve.
1. Faucet |
2. Washer |
end of |
end of |
hose |
hose |
Step 5
Leveling the Washer
1.Insert the four rubber leveling feet inserts into the feet on the base of the washer. (See diagram 1).
2.Move the washer into its final position. We suggest a minimum clearance of 1” (25mm) on each side for ease of installation. (See diagram 2).
3.Turn on water and check hose connections for leaks. Check that there are no kinks in the hoses.
4.It is IMPORTANT to level the washer to ensure proper performance during spin.
Adjustable feet
Rubber insert
Diagram 1
1” (25mm) |
1” (25mm) |
||||||||||
|
|
|
|
|
|
|
|
|
|
|
|
|
|
|
|
|
|
|
|
|
|
|
|
|
|
|
|
|
|
|
|
|
|
|
|
|
|
|
|
|
|
|
|
|
|
|
|
|
|
|
|
|
|
|
|
|
|
|
|
|
|
|
|
|
|
|
|
|
|
|
|
|
|
|
|
|
|
|
|
|
|
|
|
|
|
|
|
|
|
|
|
|
|
|
|
Diagram 2
Adjust the feet by unscrewing/screwing to make sure the washer is level and cannot rock.
5.Use the walls and adjacent counter tops as a sight guide to check to see if washer appears level. Readjust the feet if necessary.
6.Open the lid and check the washer basket to see that it sits slightly forward of centre. (See diagram 3).
Incorrect |
Correct |
adjustment |
adjustment |
|
Diagram 3 |
8
Installation Instructions
EN
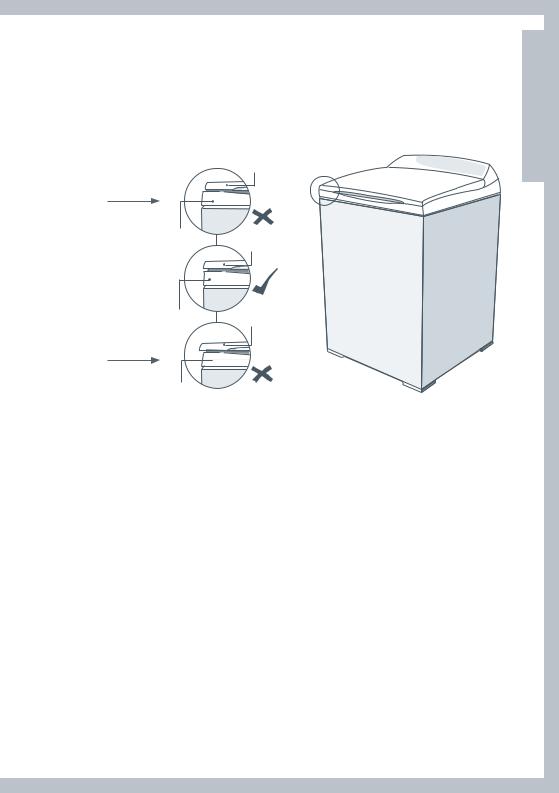
8.Close the lid. Visually check that the lid and topdeck are aligned. If not aligned, adjust the feet again until the lid and topdeck match.
Lid Alignment
Lid
Wind left foot down (out) to correct
Topdeck
Lid
Topdeck Lid
Wind right foot down (out) to correct
Topdeck
Step 6
Operation
1.Turn faucets on. Check for leaks, noise, vibration, correct water temperatures and proper operation in spin. Check that the lid locks during spin.
2.Turn hot and cold water faucets off when washer is not in use.
Special Instructions
1.The washer may give warning signals when low water pressure, or drain problems are encountered. See ‘If your Ecosmart beeps for help’ (page 32).
If further help is needed concerning this appliance, refer to Service, page 33.
9
Installation Instructions
Special Requirements for Alcove or Closet Installation
The minimum ventilation clearance between the washer and adjacent walls or other surfaces is:
1” (25mm) minimum either side and front 3” (75mm) minimum rear
Consideration must be given to providing adequate clearance for installation and servicing.
The minimum vertical space required from floor to overhead shelves, cabinets, ceilings etc is 59” (1500mm).
Closet doors must be louvered or otherwise ventilated and have at least 60 square inches open area for a washer only, or if the closet contains both a washer and dryer, doors must contain at least 120 square inches of open area equally distributed.
 CAUTION!
Do not install this appliance in a closet with a solid door.
Mobile Home Installation
Louvered door Washer & Dryer
60 Sq. In
(388 Sq. cm)
60 Sq. In
(388 Sq. cm)
Installation must conform to the STANDARD FOR MOBILE HOMES, ANSI A119.1 and NATIONAL MOBILE HOME CONSTRUCTION & SAFETY STANDARDS ACT OF 1974 (PL93-383).
Grounding Instructions
This appliance must be grounded. In the event of malfunction or break down, grounding will reduce the risk of electric shock by providing a path of least resistance for electric current. This appliance is equipped with a cord that has an equipment-grounding conductor and a grounding plug. The plug must be plugged into an appropriate outlet that is properly installed and grounded in accordance with all local codes and ordinances.
 WARNING!
Improper connection of an equipment-grounding conductor can result in a risk of electric shock. Check with a qualified electrician or serviceman if you are in doubt as to whether the appliance is properly grounded.
Do not modify the plug provided with the appliance – if it will not fit the outlet, have a proper outlet installed by a qualified electrician.
Specification subject to change without notice.
10
Important Safety Instructions
EN
Read all safety information before using
Many washers are located near a gas dryer or a water heater in the home.
 WARNING
Fire Hazard
For your safety the information in this manual must be followed to minimize the risk of fire or explosion or to prevent property damage, personal injury or loss of life.
Do not store or use gasoline or other flammable vapors and liquids in the vicinity of this or any other appliance.
Installation and service must be performed by a qualified installer, service agency or the gas supplier.
What to do if you smell gas
DO NOT try to light any appliance.
DO NOT touch an electrical switch; do not use any phone in your building.
Clear the room, building or area of all occupants.
Immediately call your gas supplier from your neighbor’s phone. Follow the gas suppliers instructions.
If you cannot reach your gas supplier, call the fire department.
Water Heater Safety
Under certain conditions Hydrogen gas may be produced in a water heater that has not been used for two weeks or more.
HYDROGEN GAS CAN BE EXPLOSIVE UNDER THESE CIRCUMSTANCES.
If the hot water has not been used for two weeks or more, prevent the possibility of damage or injury by turning on all hot water faucets and allowing them to run for several minutes before using any electrical appliance which is connected to the hot water system. This will allow any hydrogen gas to escape. Since the gas is flammable, do not smoke or use an open flame or appliance during this process.
11

Important Safety Instructions
 WARNING
Electric Shock Hazard
Follow the safety precautions outlined in this User Guide.
Failure to do so can result in death, electric shock, fire or injury to persons.
Safety Precautions:
Read all instructions before using the appliance.
Use this appliance only for its intended purpose as described in this User Guide.
This washer must be properly installed and located in accordance with the Installation Instructions before it is used.
Properly ground to conform with all governing codes and ordinances. Follow details in the Installation Instructions.
Do not install or store washer where it will be exposed to temperatures below freezing or exposed to the weather.
Connect to a properly rated, protected and sized power supply circuit to avoid electrical overload.
Connect to adequate plumbing and drain facilities as described in the Installation Instructions.
Turn off water faucets when the washer is not in use to relieve pressure on hoses and valves and to minimize leakages if a hose or valve should break or rupture.
Do not repair or replace any part of the appliance or attempt any servicing unless specifically recommended in this User Guide or in published user repair instructions that you understand, and have skills to carry out.
When disconnecting the appliance pull by the plug rather than the cord or junction of cord to avoid damage to the cord or junction of the cord and plug.
Make sure that the cord is located so that it will not be stepped on, tripped over or otherwise subject to damage or stress.
Keep all laundry aids (such as detergents, bleach, fabric softener, etc.) out of the reach of children, preferably in a locked cabinet. Observe all warnings on container labels to avoid personal injury.
Do not tamper with the controls.
Keep the area around/underneath your appliance free from the accumulation of combustible materials, such as lint, paper, rags, chemicals, etc.
Keep the floor around your appliance clean and dry to reduce the possibility of slipping. Never reach into the washer if the basket or agitator is moving.
12

Important Safety Instructions |
EN |
Before loading, unloading or adding clothes, press START/PAUSE and wait until the machine has completely stopped before opening the lid.
Close supervision is necessary if this appliance is used by or near children. Do not allow children to play inside, or with this appliance or any discarded appliance.
Dispose of discarded appliances and shipping/packing materials properly. Before discarding a washer, or removing from service, remove the washer lid.
Do not leave the washer lid up during the cycle. This will stop the spin action and prevent completion of the cycle. To restart, close lid and press START/PAUSE.
Do not wash or dry articles that have been cleaned in, washed in, soaked in, or spotted with combustible or explosive substances (such as wax, oil, paint, gasoline, degreasers, dry-cleaning solvents, kerosene, etc.) which may ignite or explode. Do not add these substances to the wash water. Do not use these substances around your washer and/or dryer during operation, as they give off vapors that could ignite or explode.
The laundry process can reduce the flame retardancy of fabrics. To avoid such a result, the garment manufacturer’s care instructions should be followed very carefully.
Do not mix chlorine bleach with ammonia or acid such as vinegar and/or rust remover. Mixing can produce a toxic gas which may cause death.
Never climb on or stand on the washer top or lid.
Do not wash fibreglass articles in your washer. Skin irritation could result from the remaining particles that may be picked up by clothing during subsequent washer use.
To minimize the possibility of electric shock, unplug this appliance from the power supply or disconnect the washer at the household distribution panel by removing the fuse or switching off the circuit breaker before attempting any maintenance or cleaning.
Note: Pressing the POWER button does NOT disconnect the appliance from the power supply, even though the lights are out.
Do not operate this appliance if it is damaged, malfunctioning, partially disassembled or has missing or broken parts, including a damaged cord or plug.
Do not operate this appliance if the lid has been incorrectly fitted.
If you are using an extension cord or a portable electrical outlet device (eg mulit-socket outlet box), ensure that it is positioned so that it does not come into contact with water or moisture.
SAVE THESE INSTRUCTIONS
13

How To Get Started
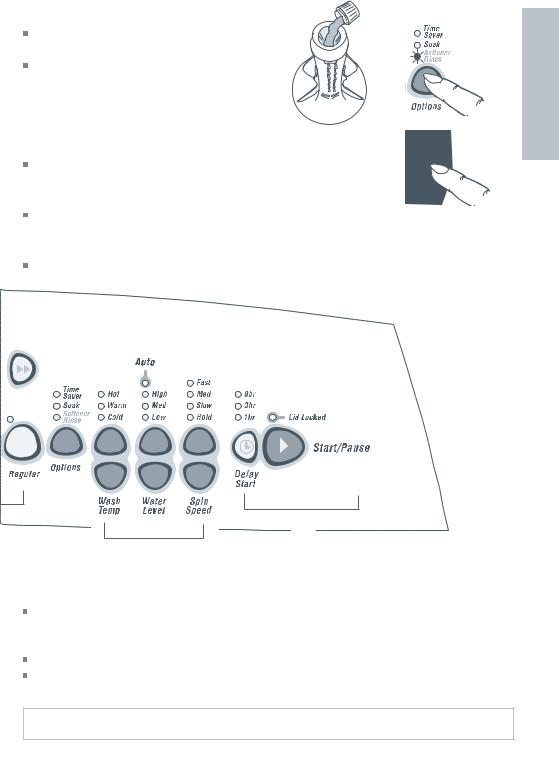
Remove the fabric softener dispenser.
Place load evenly around the agitator.
A. Detergent
Follow the instructions on the detergent package.
Use the mark on the agitator, nearest to the top of the clothes, as a guide to the correct amount of detergent to use.
Pour the detergent down the center of the agitator stem.
Replace the fabric softener dispenser, as this stops articles falling down the center of the agitator.
D
E
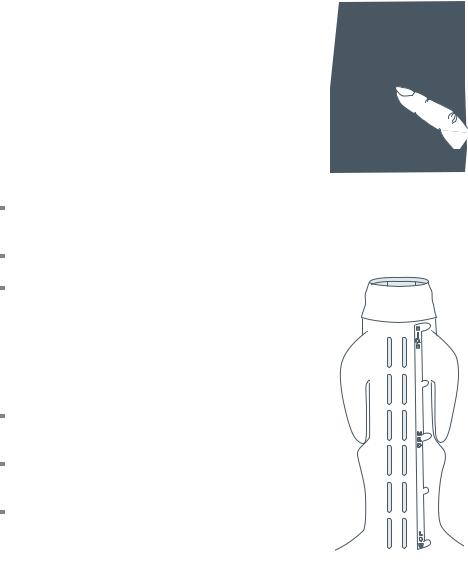
B. Bleach
If you wish to use bleach:
Use half the recommended dose of bleach. Dilute bleach and pour carefully down the inner surface of the agitator stem, in-line with the fins. (Refer to Bleach page 25).
Select the Softener Rinse Option. This will ensure that any residual bleach is well cleared out of your washer.
14
C. Fabric Softener |
EN |
If you wish to use fabric softener, place it in the dispenser on the top of the agitator. Select the Softener Rinse option so that the softener will be dispensed correctly into the final rinse. (Refer to fabric softener page 19 and 25).
D. Power
Turn your Ecosmart on by pressing the POWER button.
E. Wash Cycle
Close the lid and press your chosen wash cycle.
F. Wash Options
Select the wash temperature and other wash options. (Refer to pages 18–23).
G
F
G. Start
Press START/PAUSE to start the machine.
If you wish to stop your Ecosmart
Press START/PAUSE.
Wait until the machine has fully stopped, and the lid lock light is off, before opening the lid.
For best fabric and color care remove your clothes as soon as the cycle has finished
15
About Your Ecosmart
How Ecosmart Works
The Fisher & Paykel Ecosmart’s ‘2 in 1’ wash system gives you the best of both worlds. Using a combination of front loader and top loader wash systems, the Ecosmart gives exceptional wash results while using up to 50% less hot water*, and, at the same time, taking better care of your clothes than a conventional top load washer.
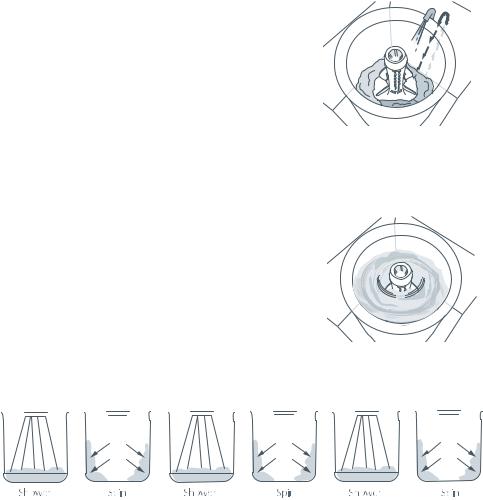
Phase 1 – Eco Active Wash
Front Loader Type Wash
The Ecosmart fills the bowl, at the selected temperature, with just enough water so that the clothes are 100% saturated.
This small amount of sudsy water is circulated through the clothes, up the specially designed portal and back onto the clothes with a waterfall effect.
The chemical action provided by a small amount of water, combined with detergent, rapidly targets soil and stains at fiber level, boosting soil removal and accelerating the wash process.
Phase 2 – Top Loader Type Wash
After 4 minutes, your Ecosmart will fill with just enough cooler water to suspend the soil in solution. Agitation will then begin, moving soil away from the clothes. Because of its head-start, the wash requires less agitation than a conventional top loader wash.
Unique Fisher & Paykel Shower Rinse
*CEE, March 2002
16

About your Ecosmart
EN
Lid Lock
Your Ecosmart has a lid lock. This ensures the lid cannot be opened during hazardous parts of the cycle, providing added safety for you and your family.
The lid lock light (above the start/pause button) comes on when the lid is locked to tell you when you cannot open the lid.
If the lid lock light is flashing the lid lock is in the process of locking or unlocking (i.e. while the machine coasts down or start/pause has been pressed). During this stage the lid still cannot be lifted.
Keep children away from the machine during the fill and agitate stage of the cycle, especially when using hot water, as the lid can be opened and the machine will not stop.
If the lid is left open, the machine will be unable to lock and the cycle will be halted. The machine will beep and the lid lock light will flash until the lid is closed and the START/PAUSE button is pressed
Do not put anything down the slot in the top deck of your machine.
Do not try to disable the lid lock..
Wash Cycles and Options
The Wash Progress Lights
The wash progress lights show all the tasks your Ecosmart will complete during the wash cycle. As each task is completed a light goes out, so you can tell at a glance how far the cycle has to go.
Advancing the Wash Cycle
To shorten the wash time, to rinse and spin only, or to spin only:
1. Select the wash cycle.
2. Press ADVANCE repeatedly until only the right number of lights remain on.
3. Press START/PAUSE.
Note: The wash consists of two parts. The first amber light is essential for all washes except Permanent Press, therefore, you can only advance through the green lights, not the amber.
17

Wash Cycles and Options
|
|
|
Heavy Duty |
Regular |
Delicate |
Wool |
Permanent |
||
|
|
|
Washables |
Press |
|||||
|
|
|
|
|
|
|
|
||
|
|
|
|
|
|
|
|||
Eco Active Wash* |
|
4 min |
4 min |
|
4 min |
4 min |
- |
||
|
|
|
|
|
|
|
|
||
Agitate Time* |
|
12 min |
9 min |
|
6 min |
3 min |
9 min |
||
|
|
|
|
|
|
|
|
||
Wash Action |
|
Heavy Duty |
Regular |
|
Delicate |
Delicate |
Regular |
||
|
|
|
|
|
|
|
|
||
Wash Temp |
|
warm |
warm |
|
warm/cold |
warm/cold |
warm/cold |
||
|
|
|
|
|
|
|
|
||
Rinse |
|
cold |
cold |
|
spray rinse |
spray rinse |
spray rinse |
||
|
|
|
|
shower |
shower |
|
+ |
+ |
+ |
|
|
|
|
rinse |
rinse |
|
cold |
warm/cold |
cold |
|
|
|
|
|
|
|
deep rinse |
deep rinse |
deep rinse |
|
|
|
|
|
|
|
|
||
Spin Speed |
|
Fast |
Fast |
|
Slow |
Medium |
Slow |
||
|
|
|
|
|
|
|
|
||
Spin Time |
|
6 min |
6 min |
|
4 min |
6 min |
2 min |
||
* Does not include fill times. |
|
|
|
|
|
||||
The Wash Cycles |
|
|
|
|
|
|
|||
|
|
|
|
||||||
HEAVY DUTY |
For heavily soiled and heavy duty fabrics. |
|
|
||||||
|
|
||||||||
REGULAR |
For medium to lightly soiled cottons, linens, work and play clothes. |
||||||||
|
|
|
|||||||
DELICATE |
For lingerie and special-care fabrics with light soil. |
|
|||||||
|
|
||||||||
WOOL WASHABLES |
Specially designed for normally soiled knits and machine washable woollens. |
||||||||
|
|
|
|
|
|||||
PERMANENT PRESS |
A more traditional wash for synthetics, blends, and/or delicate fabrics with |
||||||||
normal soil and clothes which wrinkle easily. |
|
|
|||||||
|
|
|
|
|
|
||||
Wash Options |
|
|
|
|
|
|
|||
When you press POWER to turn on your Ecosmart, it wil automatically select a: |
|
||||||||
REGULAR wash cycle |
|
|
|
|
|
|
|||
WARM wash temperature |
|
|
|
|
|
||||
AUTO water level |
|
|
|
|
|
|
|||
FAST spin speed |
|
|
|
|
|
|
|||
Each of these wash options can be altered to suit |
|
|
|
||||||
your wash needs. The following pages explain each |
|
|
|
||||||
of the wash options and how to use them. |
|
|
|
||||||
In the following diagrams: |
|
|
|
|
|
||||
( |
) |
= light is on |
|
|
|
|
|
|
|
( |
) |
= light is off |
|
|
|
|
|
|
|
To select Wash Options
1.Select wash cycle.
2.Use the up or down arrows, or the options button, to select the wash options you want to use.
3.Press START/PAUSE.
Note: Two lights are used to show warm/hot and warm/cold wash temperatures.
18

Wash Cycles and Options
EN
Softener Rinse
We recommend the use of softener dryer sheets because liquid fabric softener has been known to cause an unpleasant build-up inside washing machines. (Refer to Scrud page 25).
Use the SOFTENER RINSE option:
If you use liquid fabric softener
If you use bleach
This option changes the rinse to include a spray and deep rinse, so that the fabric softener will be dispensed correctly, and the machine sump will be thoroughly cleaned of bleach.
Some wash loads are better washed using a cycle with a deep rinse. For instance, garments that have a lot of sand or sawdust in them, or garments where the color still runs. For these loads select the SOFTENER RINSE option, as this will change the rinse to include a deep rinse.
Soak
When you select SOAK your Ecosmart will stop at the end of wash and soak for 2 hours before completing the rinse and spin. During soak your washer will agitate for a few seconds every minute.
Time Saver
TIME SAVER allows you to shorten the wash cycle for lightly soiled clothes. Selecting this option reduces the wash and spin times.
Time Saver can be turned on or off at any time during the cycle.
19
Wash Cycles and Options
Water Levels
Auto Water Level
Your Ecosmart can automatically select the appropriate water level for the load.
1.Place your clothes in the machine, and press Power.
2.Select wash cycle (select Auto water level if not automatically selected)
3.Press START/PAUSE
During fill the machine will pause occasionally to sense the water level. The machine will check if the water level is correct by using a series of two different agitate strokes. (This may take over a minute). If it detects that the water level is not enough, it will fill with more water and re-check the level.
When washing an unusual load eg. large bulky garments, pillows, we recommend you manually select the water level and select the Delicate cycle.
Manually select the water level if there is already water in the machine.
For a large bulky load, or large single item (eg. comforter) push the load down after the first fill.
Manual Water Level Selection
The agitator has five levels marked on its stem that can be used to help you select the correct water levels. Select the correct water level by using the mark nearest to the top of the clothes.
The levels marked on the agitator do not correspond exactly to the level of water. They indicate the level of dry clothes suitable for the water level.
Your Ecosmart may occasionally add water during agitation. This is to maintain the water level due to the release of air trapped in the garments.
Out of balance loads, tangling or splashover can be caused by selecting a water level that is too high.
20
Wash Cycles and Options
EN
Spin Hold
Use the SPIN HOLD option to:
Remove drip dry garments from a mixed load before the wash goes into spin.
Minimize wrinkling that is caused when clothes are left sitting in the machine at the end of the cycle.
When SPIN HOLD is selected, your Ecosmart will pause at the end of rinse, beep and the spin light will flash to tell you that it is waiting for another instruction. Press START/ PAUSE to begin the spin.
Delay Start
Delay Start will delay the start of the wash cycle for 1, 3 or 9 hours.
Press DELAY START once for a delay of 1 hour. Press again for 3 hours, a third time for 9 hours (and again to return to normal).
Once you press Delay Start your Ecosmart will begin the delay period, you do not have to press Start/Pause.
Be careful if using Delay Start for non-colorfast clothes as dyes may run if the clothes are damp.
Your Ecosmart will not beep at the end of the cycle if Delay Start is selected.
Clothes Care Safeguards
To avoid accidentally damaging your clothes, there are a few options that your Ecosmart will not accept. For example, you cannot select a hot wash on Delicate, Permanent Press or Wool cycles.
21
 Loading...