


CT MINI
456 134_003
Instruction manual Vacuum cleaner
IMPORTANT:
Page 2 - 5 Read and understand all instructions before
using.
Guide d’utilisation
IMPORTANT:
Page 6 - 10 Lire et comprendre toutes les instructions
avant de démarrer les travaux.
Manual de instrucciones
Página 12 - 16 Lea y comprende todas las instrucciones
IMPORTANTE: antes de usar.
Aspirateur
Aspirador
1

SAFETY INSTRUCTIONS
READ ALL INSTRUCTIONS BEFORE USING THIS APPLIANCE !
To reduce the risk of fire, electric shock, or injury:
1 Do not leave this appliance unattended when plugged in. Unplug from outlet when not in use and before servicing.
2 To reduce the risk of electric shock – Do not expose to rain. Store indoors.
3 Do not allow to be used as a toy. Close attention is necessary when used by or near children or animals.
4 Use only as described in this manual. Use only manufacturer’s recommended attachments.
5 Do not use with damaged power cord or plug. If the appliance is not working as it should, has been dropped, damaged, left outdoors, or immersed in or dropped into water, return it to a service center.
6 Do not – pull or carry by the power cord, use power cord as a handle, close a door on power cord, or pull power cord around sharp edges or comers. Do not run appliance over power cord. Keep power cord away from heated surfaces.
7 Do not unplug by pulling on power cord.
To unplug, grasp the plug, not the cord.
8 Do not handle plug or appliance with wet hands.
9 Do not put any object into the appliance openings. Do not use the appliance with any opening blocked; keep openings free of dust, lint, hair, and anything that may impede airflow.
10 Keep hair, loose clothing, fingers, and all parts of body away from openings and moving parts.
11 Turn off all controls before unplugging.
12 Use extra care when cleaning on stairs.
13 Do not use this appliance to vacuum flammable or combustible liquids such as gasoline, or vacuum in areas where these may be present.
14 Connect to a properly grounded outlet only. See Grounding Instructions.
15 Do not vacuum anything that is burning or smoking, such as cigarettes, matches, or hot ashes. Do not use this appliance to extract flammable or explosive dusts (such as magnesium, aluminum, etc.). Risk of explosion!
16 Do not use without dust bag and/or filters in place.
17 Do not use to vacuum up caustic or aggressive liquids (e.g. acids, alkalis, solvents).
18Protect the power cord against heat, oil and sharp edges.
19Check the plug and power cord regularly and have them replaced by a qualified technician if damaged.
20Do not lift or carry the appliance by its handles using a crane hook or lifting gear.
21Use only accessories approved by Festool
(see the Festool Catalog).
Various dust created by power sanding, sawing, grinding, drilling and other construction activities contains chemicals known (to the State of California) to cause cancer, birth defects or other reproductive harm. Some examples of these chemicals are:
• lead from lead-based paints,
• crystalline silica from bricks and cement and other masonry products, and
• arsenic and chromium from chemically-treated lumber.
The risk from these exposures varies, depending on how often you do this type of work. To reduce your exposure to these
chemicals: work in a well ventilated area, and work with approved safety equipment, such as dust masks that are specially designed to filter out microscopic particles.
GROUNDING INSTRUCTIONS
This appliance must be grounded. If it should malfunction or break down while in use, grounding provides a path of least resistance for the electric current and reduces the risk of electric shock to the operator. This appliance has a power cord with equipment-grounding conductor and grounding plug. The plug must be inserted into an appropriate outlet that is properly installed and grounded in accordance with all local codes and ordinances.Improper connection of the equipment-grounding conductor can result in a risk of electric shock. Check with a qualified electrician or service person if you are in doubt as to whether the outlet is properly grounded.
Do not modify the plug provided with the appliance – if it will not fit the outlet, have a proper outlet installed by a qualified electrician.
This appliance is rated more than 15 amperes and is for use on a circuit having a nominal rating of 120 volts, and is factoryequipped with a specific electric cord and plug to permit connection to a proper electric circuit. Make sure that the appliance is connected to an outlet having the same configuration as the plug.
2
No adapter should be used with this appliance. If the appliance must be reconnected for use on a different type of electric circuit, the
reconnection must be made by qualified service personnel.
SAVE THESE INSTRUCTIONS
Technical data
Power consumption
Max. connected load to tool plug socket
Total connected load max. (vacuum cleaner and plug socket)
Max. airflow volume, turbine
Max. vacuum, turbine
Filter surface
Suction hose, diameter x length
Tank capacity
Dimensions L x W x H
Weight
Power cord length
Protection type
Intended use
This dust extractor is designed for the aspiration and evacuation of non-toxic, non-hazardous dusts, dirt, sand, shavings etc., and for vacuuming water.
This dust extractor is designed in accordance with IEC 60 335-1 and IEC 60 335-2-69 for a higher loading in industrial use.
The user is solely responsible for any damage or accident caused by using this machine for other than its intended purpose.
Getting started
Electrical connection
The operating voltage shown on the specification plate must be the same as the mains power voltage (wall socket).
Make sure that the dust extractor is switched off when you plug in the power cord.
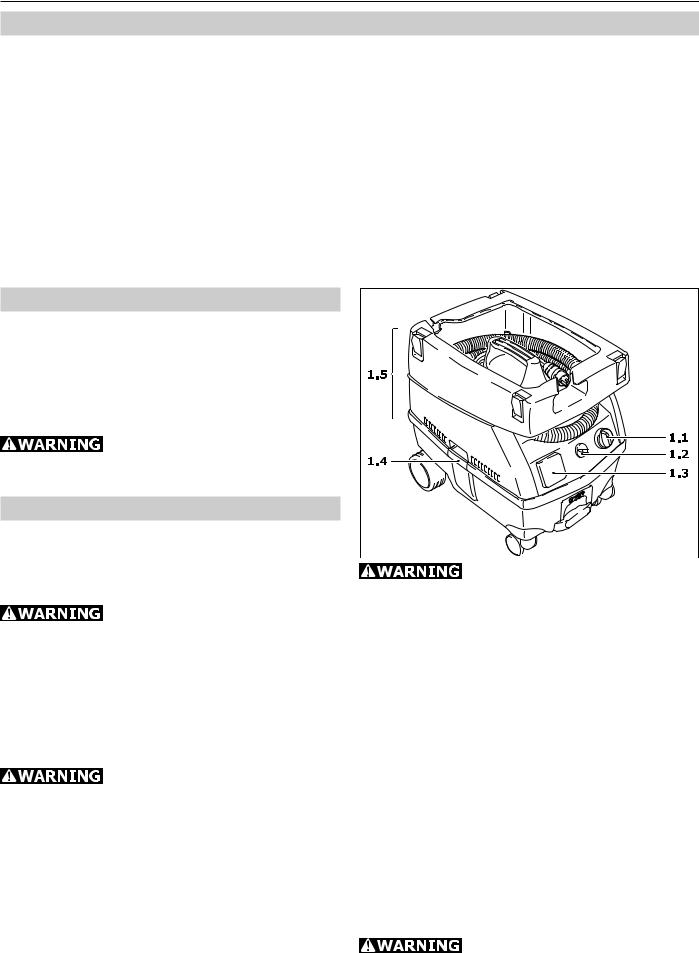
On/off switch (1.1)
In position O the dust extractor is switched off and the tool plug socket (1.3) is dead.
Two modes of operation are possible:
a) Switch at “MAN” (manual control):
The tool plug socket is live.
Before turning the switch to the “MAN” position, make sure that the tool connected to the tool plug socket is switched off. When you turn the switch to “MAN” the extractor motor will start immediately and will stay on as long as the switch is at this position.
You can also use this mode of operation without a tool connected to the tool plug socket.
b) Switch at “Auto” (automatic tooltriggered operation):
The tool plug socket is live.
CT MINI
400 - 1,200 W
1,200 W
2,400 W
168 m3/h (6,04 cu.ft./h)
20,000 Pa
5,000 cm2 (775 sq. in.)
22 mm x 3,5 m (0.87 in. x 11.48 ft.) 10 l (2.6 gal.)
440 x 340 x 420 mm (17.3 x 13.4 x 16.5 in.) 9.5 kg (21 lbs)
7.5 m (24.6 ft.) IP X4
Before turning the switch to the “Auto” position, make sure that the tool connected to the tool plug socket is switched off. When you turn the switch to “Auto” the dust extractor will not come on until you turn on the tool connected to the tool plug socket. When you turn off the tool, the dust extractor will automatically switch off. When you turn the tool back on, the dust extractor will automatically start.
Suction force regulator (1.2)
The suction force regulator lets you set the suction force that works best for the material to be vacuumed up.
Connecting an electric tool
Observe the maximum connected load on the tool plug socket (see “Technical Data”). The tool’s rated power consumption must not exceed this! Plug the tool power cord to the tool plug socket (1.3).
Make sure the tool is switched off 3 when you plug or unplug it!

Use
During the following procedures, take care not to raise unnecessary dust.
Changing the filter bag
- Open locking clips (1.4), remove top section (1.5).
- Change filter bag (2.1) – see instructions printed on filter bag.
- Replace top section, close locking clips. Note: A replacement filter bag can be stored in the storage compartment (5.4).
Changing the filter
Do not operate this dust extractor without a filter, as doing so may damage the motor.
- Open locking clips (1.4), remove top section (1.5).
- Fold over handle (3.1) and remove holder (3.2). - Remove used filter (3.3) and replace with a new one.
- Replace holder and fold over handle until it latches into place.
- Replace top section, close locking clips.
Emptying the dirt trap
The dirt trap (2.2) can be emptied after removing the top section.
Stand
Extending the stand (4.5) keeps the dust extractor from rolling.
To do this, lift the front end of the dust extractor slightly and push the stand downwards until it latches into place.
Press the button (4.4) to release the stand.
Application
The extractor hose (4.2) is connected to the extractor opening by the angle tube (4.1). During operation, the extractor hose goes through the hose opening (4.3).
A Systainer can be attached to the top of the storage area (5.6) via the four locking clips (5.5). Note: If this is done, the power cord must run through opening (5.3).
Vacuuming dry materials
Do not do any dry vacuuming or dust extraction of dry substances without a filter bag in the tank! This protects the motor, and lets you dispose of the evacuated material easily.
The filter becomes damp after evacuating liquids. A damp filter will suffer accelerated wear if it is used for dry materials. Accordingly, allow the filter to dry or replace it with a dry one before dry operation.
Vacuuming liquids
If foam or liquid escapes, stop immediately and empty the tank.
The filter bag must be removed before evacuating liquids. We recommend using a special wet filter for wet vacuuming.
When the maximum fill level is reached, a level stop (3.4) will automatically interrupt extraction.
4

The antistatic system (AS)
The friction of material running through the suction hose causes electrostatic charges, which can result in unpleasant electric shocks for the operator.
In order to prevent this, this dust extractor has an integrated antistatic system which conducts these static charges to ground. This requires the use of antistatic hoses and accessories.
Temperature control
A heat-triggered limit switch turns off the dust extractor if it reaches a critical temperature, to protect against overheating. If this happens, switch the dust extractor off and let it cool for around 5 minutes. If the dust extractor still cannot be switched back on, consult a Festool service center.
After finishing work
- Switch off the dust extractor and unplug the power cord.
- Empty filter bag and tank.
- Place the suction hose (5.1) and the power cord (5.2) in the top section.
- Clean the dust extractor inside and outside by vacuuming and wiping.
- Leave the dust extractor in a dry area out of reach of unauthorized persons.
Filters and accessories
The accessory and filter order number can be found in your Festool catalog or on the Internet at www.festool-usa.com.
Maintenance and care
Always unplug the power cord from the plug socket before doing any maintenance! Do not attempt any maintenance or repairs involving opening the motor housing. This may be carried out only by an authorized customer service center.
A safety test must be performed at least once a year by the manufacturer or a qualified person, to check for possible leaks and damage to the filter, and to ensure that the control devices are functioning.
Warranty
Conditions of 1+2 Warranty
You are entitled to a free extended warranty (1 year + 2 years = 3 years) for your Festool power tool. Festool shall be responsible for all shipping costs during the first year of the warranty. During the second and third year of the warranty the customer is responsible for shipping the tool to Festool. Festool will pay for return shipping to the customer using UPS Ground Service. All
warranty service is valid 3 years from the date of purchase on your receipt or invoice.
Festool Limited Warranty
This warranty is valid on the pre-condition that the tool is used and operated in compliance with the Festool operating instructions. Festool warrants, only to the original consumer purchaser, that the specified tool will be free from defects in materials and workmanship for a term of one year from the date of procurement. Festool makes no other warranty, express or implied, for Festool portable power tools. No agent, representative, distributor, dealer or employee of Festool has the authority to increase or otherwise change the obligations or limitations of this warranty. The obligations of Festool in its sole discretion under this warranty shall be limited to the repair or replacement of any Festool portable power tool that is found to be defective as packaged with the User Manual.
Excluded from coverage under this warranty are: normal wear and tear; damages caused by misuse, abuse or neglect; damage caused by anything other than defects in material and workmanship. This warranty does not apply to accessory items such as circular saw blades, drill bits, router bits, jigsaw blades, sanding belts, and grinding wheels. Also excluded are “wearing parts”, such as carbon brushes, lamellas of air tools, rubber collars and seals, sanding discs and pads, and batteries.
Festool portable power tools requiring replacement or repair are to be returned with the receipt of purchase to Festool (call 800-554- 8741 for address details).
IN NO EVENT SHALL FESTOOL BE LIABLE FOR ANY CONSEQUENTIAL OR INCIDENTAL DAMAGES FOR BREACH OF THIS OR ANY OTHER WARRANTY, EXPRESSED OR IMPLIED WHATSOEVER. ALL WARRANTIES IMPLIED BY STATE LAW, INCLUDING THE IMPLIED WARRANTIES OF MERCHANTABILITY AND FITNESS FOR A PARTICULAR PURPOSE, ARE HEREBY LIMITED TO THE DURATION OF THREE YEARS.
Some states in the U.S. and some Canadian provinces do not allow the limitations on how long an implied warranty lasts, so the above limitation may not apply to you. With the exception of any warranties implied by state or province law as hereby limited, the foregoing express limited warranty is exclusive and in lieu of all other warranties, guarantees, agreements and similar obligations of Festool.
This warranty gives you specific legal rights and you may also have other rights which vary from state to state in the U.S. and province to province in Canada.
5
 Loading...