


2 |
G-DEC 3O |
Important Safety Instructions
This symbol warns the user of dangerous voltage levels localized within the enclosure of the unit.
Thissymboladvisestheusertoreadallaccompanying literature for safe operation of the unit.
•Read, retain, and follow all instructions. Heed all warnings.
•Only connect the electric line cord to an earth grounded AC receptacle in accordance with the voltage and frequency ratings listed under INPUT POWER on the rear panel of this product.
•WARNING: To prevent damage, fire or shock hazard, do not expose this unit to rain or moisture.
•Unplug the AC power line cord before cleaning the unit exterior (use a damp cloth only). Wait until the unit is completely dry before reconnecting it to power.
•Maintain at least 6 inches of unobstructed air space behind the unit to allow for proper ventilation and cooling of the unit.
•This product should be located away from heat sources such as radiators, heat registers, or other products that produce heat.
•This product may be equipped with a polarized plug (one blade wider than the other). This is a safety feature. If you are unable to insert the plug into the outlet, contact an electrician to replace your obsolete outlet. Do not defeat the safety purpose of this plug.
•Protect the power cord from being pinched or abraded.
•Thisproductshouldbeservicedbyqualifiedservicepersonnel when: the power supply cord or the plug has been damaged; or objects have fallen, or liquid has been spilled onto the product; or the product has been exposed to rain; or the product does not appear to operate normally or exhibits a marked change in performance; or the product has been dropped, or the enclosure damaged.
•Onlyuseacartorstandwiththisproductthatisrecommended by this product’s manufacturer.
•The power supply cord of this product should be unplugged from the outlet when left unused for a long period of time, or during electrical storms.
•Donotdripnorsplashliquids,norplaceliquidfilledcontainers on the unit.
•CAUTION: No user serviceable parts inside, refer servicing to qualified personnel only.
•Fender® amplifiers and loudspeaker systems are capable of producing very high sound pressure levels which may cause temporary or permanent hearing damage. Use care when setting and adjusting volume levels during use.
FCC COMPLIANCE NOTICE
This equipment has been tested and found to comply within the limits for a Class B digital device, pursuant to Part 15 of the FCC rules. These limits are designed to provide a reasonable protection against harmful interference in a residential installation. This equipment generates, uses and can radiate radio frequency energy and if not used in accordance with the instructions, may cause harmful interference to radio communications and there is no guarantee that interference will not occur in a particular installation. If this equipment does cause harmful interference to radio or television reception, which can be determined by turning the equipment off and on, the user is encouraged to try to correct the interference by one or more of the following measures: reorient or relocate the receiving antenna, increase the separation between the equipment and receiver, connect the equipment into an outlet on a circuit different from that of the receiver. Consult the dealer or an experienced radio/TV technician if help is needed.
A PRODUCT OF:
FENDER MUSICAL INSTRUMENTS CORPORATION
CORONA, CALIFORNIA USA
Trademarks:
Fender®, G–DEC® , Blackface™ and Dyna–Touch™ are trademarks of FMIC. Other trademarks are property of their respective owners.
Copyright © 2006 FMIC. All rights reserved.
fender .com
.com
G-DEC 3O |
3 |
Introduction
G–DEC® 30 Guitar Digital Entertainment Center is an upgraded version of the award-winning, mega-popular original G–DEC®. Like the original, it includes everybody in the band but you! Inside G–DEC 30 you will find a versatile drummer, skilled bass player and flexible accompanist for virtually any style of music. And for you, the guitarist: G–DEC 30 is a warehouse of amplifiers and effects, and what’s better—these are ready for your sound check!
Turn the G–DEC 30 Data Wheel to access a diverse collection of band setups. 50 permanent Presets furnish a diverse collection always available to you. Another 50 rewritable Presets store the bands that you create for your music and playing style.
G–DEC 30 is the ultimate practice tool whether you are just starting out or playing professionally. As a beginner,
you can have an instructor plug into the rear input. To learn a new song you can plug your CD or MP3 player into the G–DEC 30 and play along. For difficult licks you can record a phrase and play it in a continuous loop—at halfspeedif necessary! Seasoned players enjoy G–DEC 30 as a songwriting partner or jamming buddy.
G–DEC 30 also has MIDI ports which allow you to link up with other G–DEC 30 players to trade Presets. Connect G–DEC 30 to your computer* to backup Presets, play General MIDI files, or store MIDI songs in the G–DEC 30!
It’s time to jam—with G–DEC 30—your new band...
*MIDI capable sound card (or MIDI-to-USB device) and MIDI software required.
Features
Each G–DEC 30 Preset is a complete “band!” Modify any component or select another from the G–DEC 30 arsenal:
•17 Guitar Amplifiers, each with Gain, Volume, Tone, Compressor, Timbre and Noise Gate parameters
•29 studio-quality Effects (many in stereo), each with 4 adjustable parameters
•10 Reverbs with adjustable levels
•84 Drum Patterns (including 4 Metronome patterns) with Tempo, Key, Drum Level, Bass Level and Accompaniment Level parameters
G–DEC 30 MIDI ports provide expanded functionality with your computer and other G–DEC 30 players!
•Trade and backup Presets
•Store & Play MIDI files
•Update G–DEC 30 software if necessary
•Rear panel MIDI IN and MIDI OUT ports
G–DEC 30 delivers world-class Fender tone and world-standard Fender quality!
•Second input jack for a friend or instructor
•On–board digital chromatic tuner
•Phones jack can be used with stereo headphones or as a stereo line out jack
•Stereo Line Outs can be configured as All or Synth (and Aux)
•28-second Phrase Sampler
• On-board General MIDI synthesizer
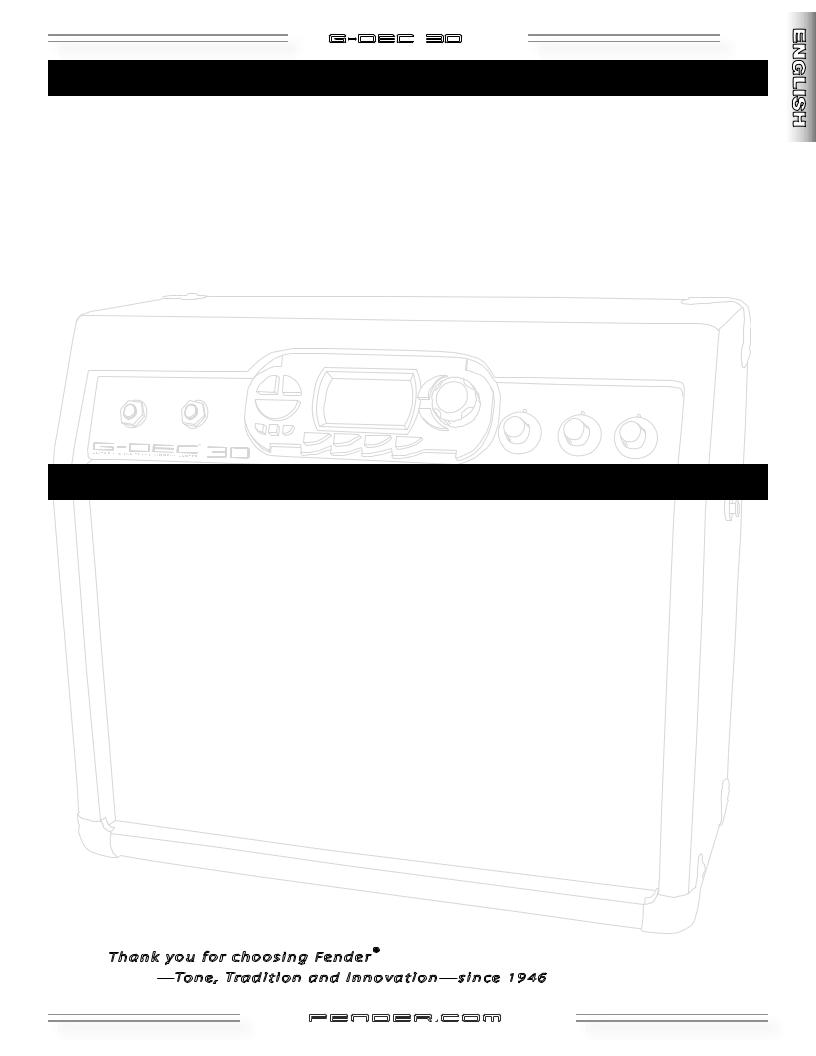
Thank you for choosing Fender®
—Tone, Tradition and Innovation—since 1946
fender .com
.com

4 |
G-DEC 3O |
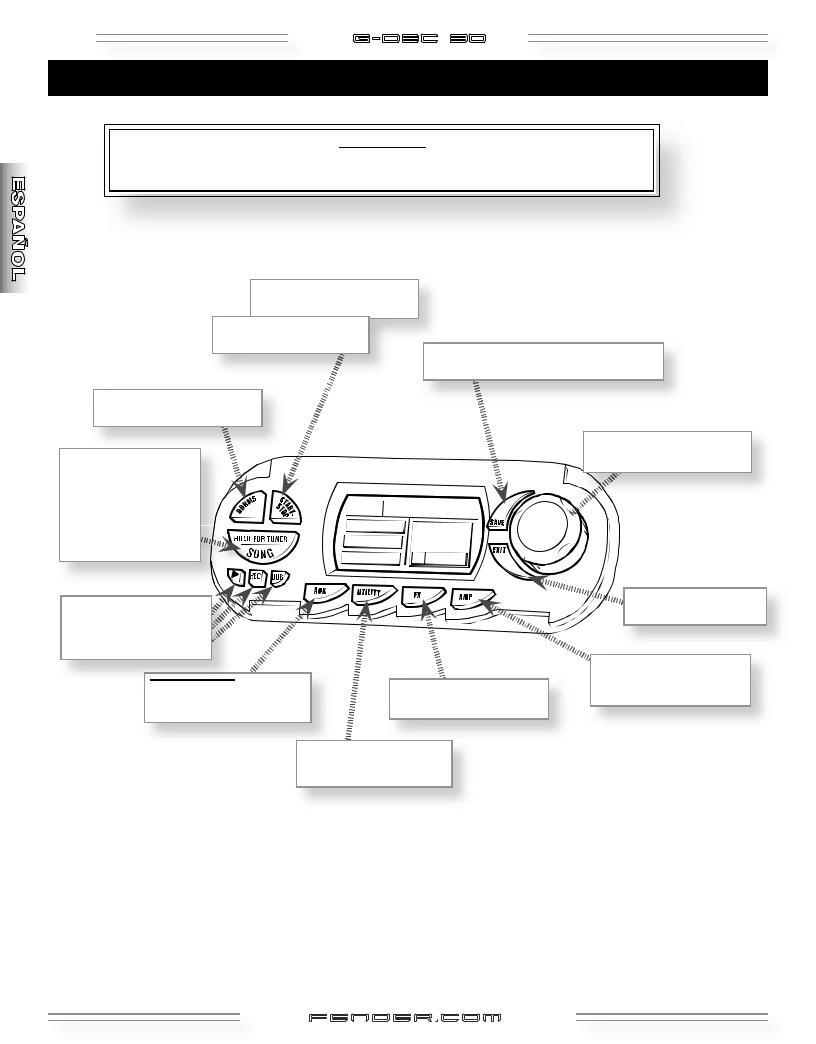
Control Panel Overview
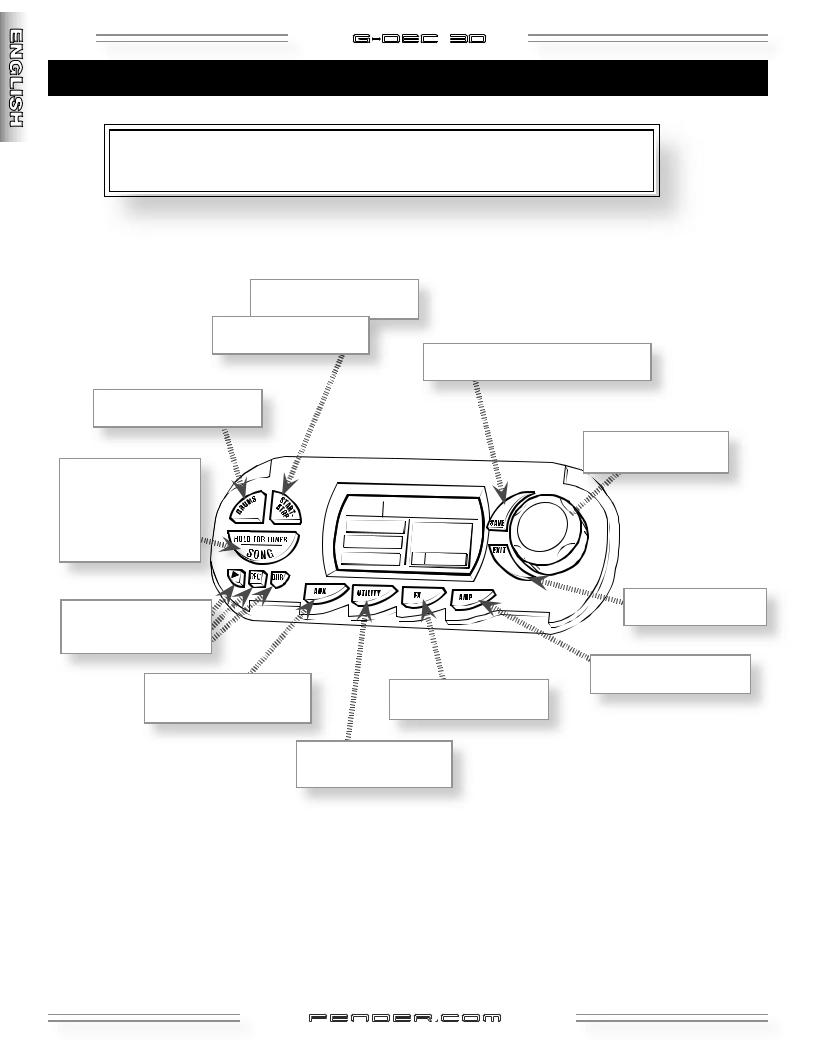
A.INPUT—Plug your guitar in here.
B.PHONES—Plug in headphones for privacy or connect a pair of powered speakers (such as commonly used with computers); the G–DEC 30 speaker mutes automatically. Enjoy the G–DEC 30’s many stereo effects through this jack. You can also run a cable from PHONES to “Audio In” on your computer to record with your favorite recording software. NOTE: Optional cables, adapters and equipment are required for these connections.
C.DRUMS—Press for Drums Mode menus (see page 11).
D.START-STOP—Press to start and stop the Drum Loop. The START-STOP button flashes in time with the tempo. Set Tempo Shortcuts!
Shortcut 1—Hold START-STOP and turn the Data Wheel
Shortcut 2—Hold DRUMS and tap START-STOP in time with the beat
E.SONG / HOLD FOR TUNER—Press for Song Mode (see page 8) OR Hold to activate the Tuner.
F.PHRASE SAMPLER—Use the Phrase Sampler to record up to 28 seconds of G–DEC 30 audio for a variety of playback and overdubbing functions (see page 12).
G.DISPLAY—Hold EXIT and turn the Data Wheel (in Play Mode) to adjust screen contrast.
H.AUX / UTILITY / FX / AMP—Press for the corresponding Mode menus (see pages 8-12).
I.SAVE—Saves the current G–DEC 30 settings to a user preset (U00-U49).
J.EXIT—Press to return to Play Mode.
K.DATA WHEEL—Selects presets, songs and settings depending on the current Mode.
L.VOLUME—Adjusts the overall loudness of the G–DEC 30.
M.GUITAR TONE—Adjusts the tone characteristics of your guitar. This control does not affect the Drum section or the Auxiliary Input sound.
N.BACKING LVL—Adjusts the volume level of MIDI accompaniment.
Press: To start/stop...
4 Playback (replay) of a sampled phrase REC Sampling (recording) a new phrase
DUB Overdubbing (adding layers) to previous phrase
fender .com
.com
G-DEC 3O |
5 |
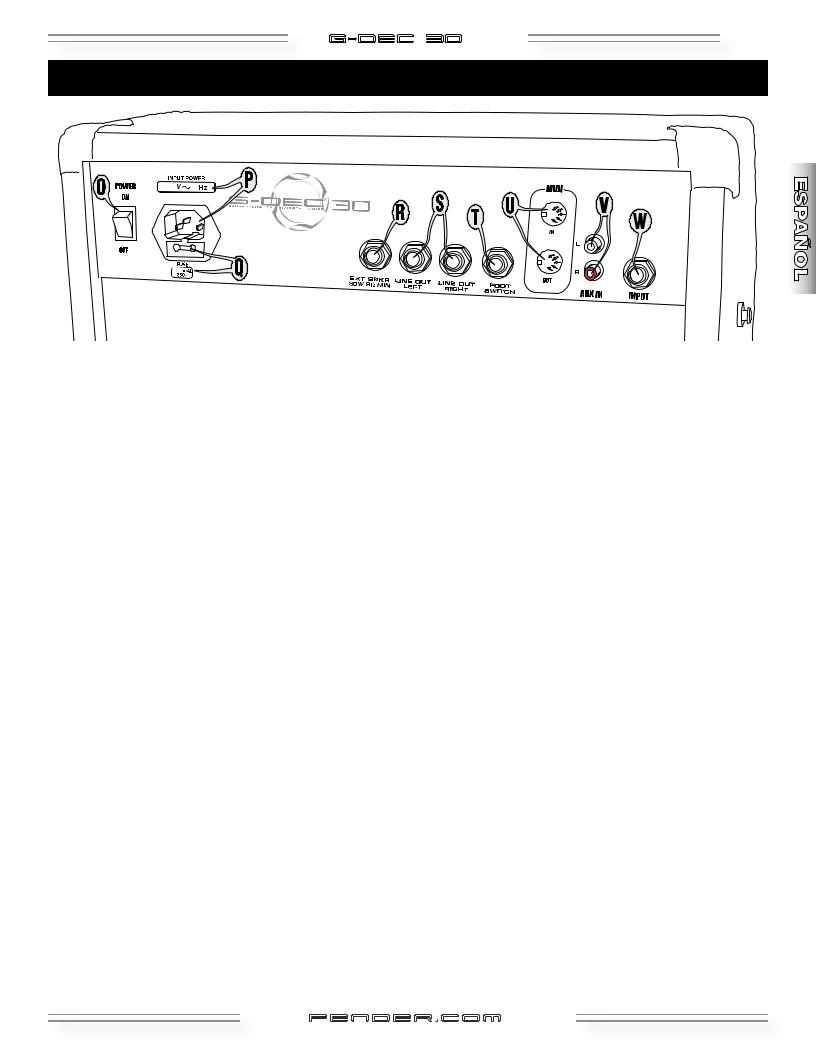
Rear Panel
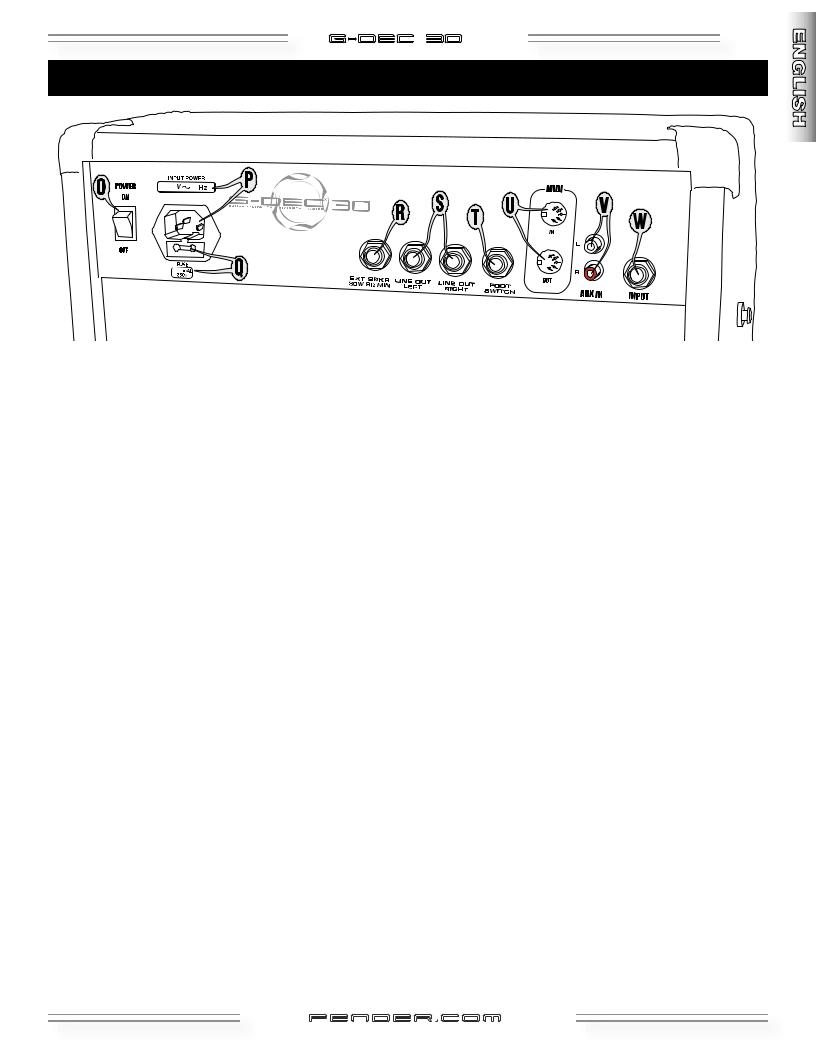
O.POWER—Switches the G–DEC 30 on-off.
P.POWER CORD SOCKET—Connect your G–DEC 30 to a grounded A/C outlet using the included power cord.
Q.FUSE—Protects your G–DEC 30 from electrical faults. Replace a blown fuse only with the type and rating specified below the fuse holder. To remove the fuse holder: Unplug the G–DEC 30 power cord from the socket to expose the fuse holder. Use a small screwdriver to pry out the fuse holder using the notch on top.
R.EXT SPKR—Auxiliary output for an external speaker cabinet. Your speaker should be rated for 30 watts, 8 ohms minimum.
S.LINEOUTLEFT/RIGHT—Linelevelstereooutputssuitable for connection to recording or sound reinforcement equipment.
T.FOOTSWITCH—Connect the (optional) 4-button footswitch (p/n 0994070000) here for remote functions (see page 13).
U.MIDI IN / OUT—The G–DEC 30 is well equipped to handle a number of useful MIDI functions. MIDI stands for “Musical Instrument Digital Interface” which is a language that lets multiple digital musical items (keyboards, effects, synthesizers, computers, etc.) communicate with each other. This manual can’t possibly cover all the MIDI possibilities you may encounter. If you desire more information, visit http://www.midi.org online or search for “MIDI” using your favorite search engine. See page 14 for basic G–DEC 30 MIDI functions. Log on to fender.com for additional MIDI resources.
R.AUX IN—Auxiliary input for your CD or MP3 player. PlaybackmusicthroughyourG–DEC30foraccompaniment or to learn songs. Connect the (headphones) output on your player to the AUX IN “RCA” jacks using the proper cable or adapter. You can select an auxiliary mix and adjust the auxiliary input level through the Aux Mode menus (see page 11).
S.INPUT—An extra input for an instructor or a friend to plug into.
fender .com
.com
6 |
G-DEC 3O |
How Do I...?
Ø
Ø
DATA 
WHEEL
Ø
Ø
ØShortcuts—Press and hold this button while rotating the Data Wheel to make a quick adjustment without leaving Play Mode (except in "S" bank)
fender .com
.com
G-DEC 3O |
7 |
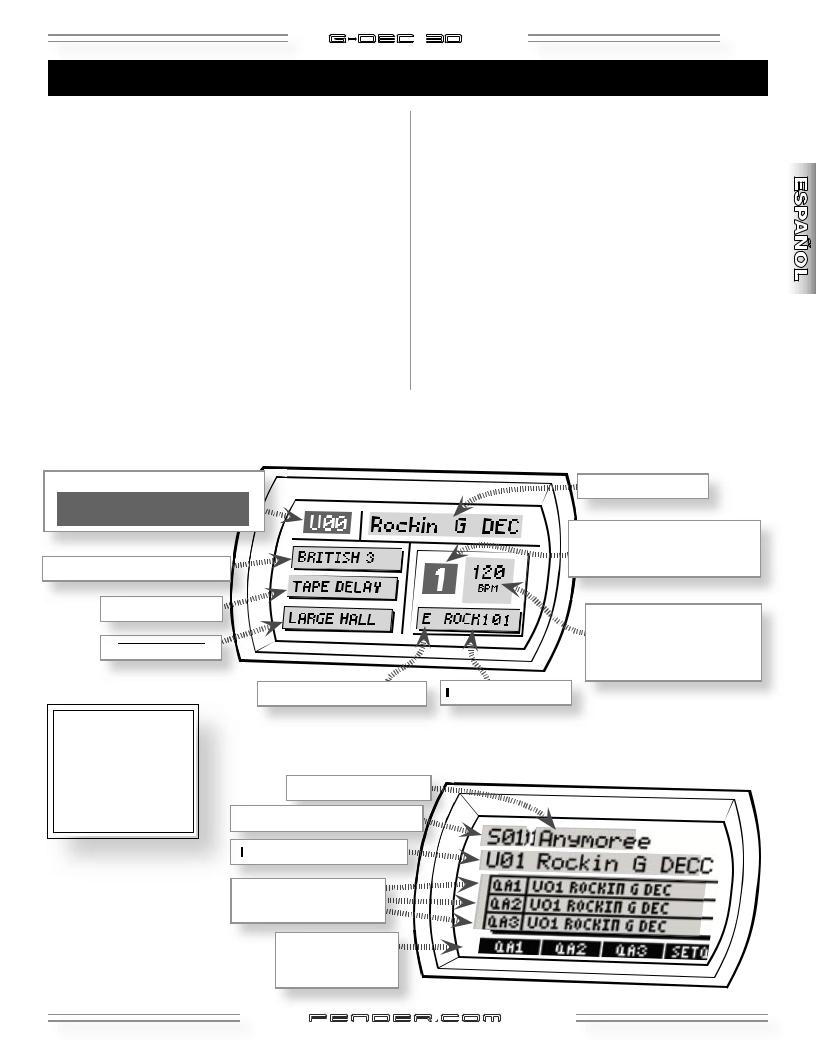
Play Mode
Play Mode is the default Mode, active when you turn the G–DEC 30 on and also after 60 seconds of inactivity in other Modes. Press EXIT to return to Play Mode from other Modes.
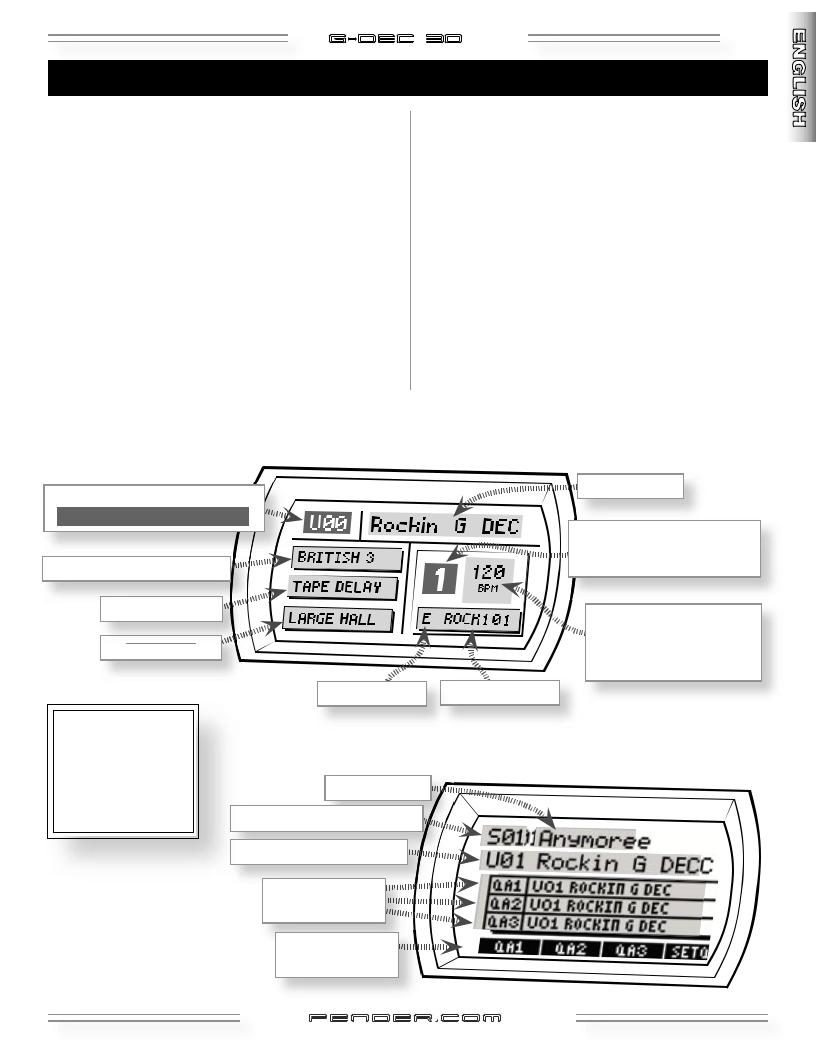
Turn the Data Wheel to select presets in Play Mode. There are 3 banks of presets, P (permanent), U (user) and S (song)—each bank is indicated by the first character (P, U or S ) in the upper left corner of the display.
P and U bank presets (see illustration below) both include everything in your "band:" your guitar amp and effects, bass player, drummer and occasionally an accompannist.
S bank (see bottom illustration) includes MIDI songs (up to 62 songs, depending on file size) and stores the songs in the order of performance. Press START-STOP for song playback. To change the order of your songs, press SONG and turn the Data Wheel to reorder (see page 8).
Each S bank preset displays a song number and name on the top line. The next line shows the current guitar preset (which always starts as QA1 in the box below). The QA box shows three (quick access) guitar presets. These QA presets are your personal favorites that you want to use with that particular song. Activate any QA preset using the buttons below the quick access labels, QA1, QA2, QA3 at the bottom of the display (or the corresponding footswitch button). Change the QA order by pressing the button below SET QA, then turn the Data Wheel to reorder.
You can play guitar, select presets and play the Drum Loop or the Phrase Sampler in Play Mode. To modify components of a preset (Amp Type, Effects, Bass line, etc.) use the Mode menus (see next page, Menu Navigation).
6"P"and"U"BankPresets
(Highlighted if preset is modified.)
"S"BankPresets4
fender .com
.com
8 |
G-DEC 3O |
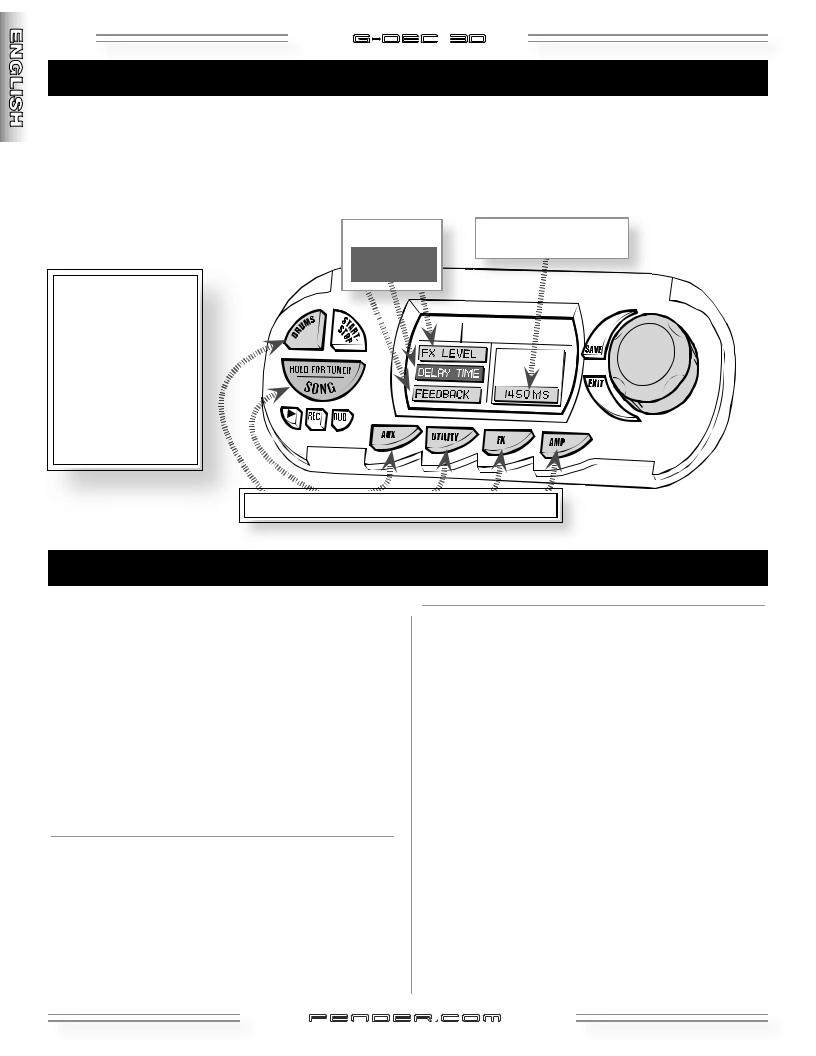
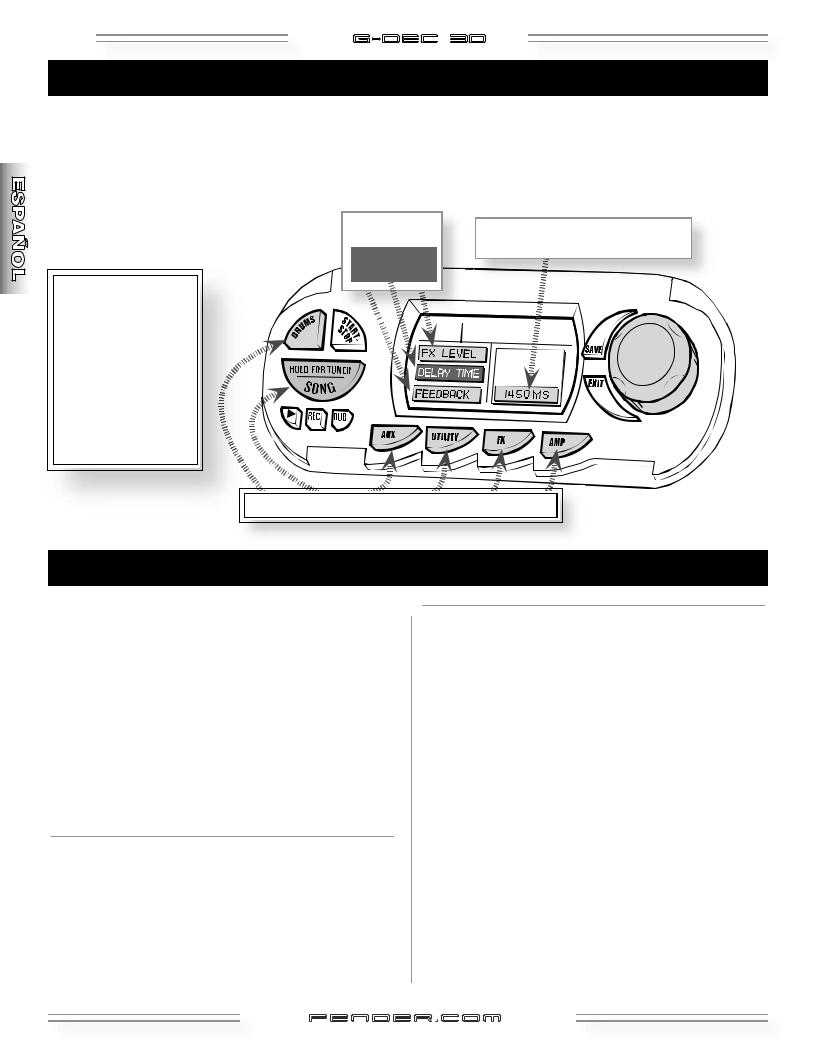
Mode Menu Navigation
Use the G–DEC 30 Mode menus to access your Preset settings (the presets you're selecting from Play Mode). Press a Mode button (repeatedly) for menus, then turn the Data Wheel to adjust the settings for the highlighted menu item. NOTE: Only Song Mode may be entered when an S preset is selected.
MENU SHORTCUT: After entering a Mode, press and hold the same Mode button while turning the Data Wheel (in either direction) rather than pressing the Mode button repeatedly!
Current selection is highlighted.
DATA
WHEEL
Song Mode 
Song Mode enables you to compose songs and prepare the G–DEC 30 for performance. Press the SONG button (repeatedly) to display each of the menus:
•SONG ORDER
•COMPOSE (Global / Measure)
•DELETE SONG
•MEM USAGE
Menus may display instructions, button labels and settings that you can edit using the Data Wheel.
You can audition songs while in Song Mode by pressing START-STOP. To select a different song, hold down the START-STOP button while turning the Data Wheel.
To start, first compose a song by selecting drums, bass, guitar preset, etc. for the whole song, or any range of measures using the Compose Global and Compose Measure menus. Then, after saving your songs, you can rearrange them in the order of your performance using the SongOrder menu. When ready, press START-STOP from any S bank preset in Play Mode to perform!

 SONGORDERMENU
SONG ORDER is the first menu in Song Mode. It allows you to rearrange the order of the S bank presets (songs) for performance.
Press SONG, then turn the Data Wheel while SONG ORDER is highlighted to start rearranging the S bank.
6SongOrderMenu
Press either key below PREV SONG (AUX / UTILITY) or NEXT SONG (FX / AMP) to highlight different songs, turn the Data Wheel to move the selected song.
fender .com
.com
G-DEC 3O |
9 |
Song Mode |
(continued) |

 COMPOSE MENUS
COMPOSE is the second menu in Song Mode. It allows you to compose songs in two screens: Global and Measure:
4 Global—these settings affect the whole song. Turn the Data Wheel while COMPOSE is highlighted to enter the Global Menu. Here you can edit:
•SONG NAME
•TEMPO •DRUM LEVEL •BASS TYPE •BASS LEVEL
Press SONG to highlight the next menu item, then turn Data Wheel to edit. In the NAME menu, use the buttons below the arrows f / g (FX / AMP) to highlight each character for editing.
Pressing START/STOP will start or stop a preview of your composition. During playback the top portion of the screen will change to show the current measure number.
6Global Menu
4 Measure—these settings can affect any number of measures from one, to every measure in a song. Press the button below MEAS (which is "AUX") from the Global Menu to enter the Measure Menu. Here you can select:
•MEASURE NUMBER
•GUITAR PRESET
•DRUM PATTERN
•BASS PATTERN •BASS KEY
Press SONG to highlight the next menu item, then turn Data Wheel to edit. With any Measure Menu item highlighted, you can select a different measure by pressing the buttons below –MEAS / +MEAS (FX / AMP).
6Measure Menu
Pressing START-STOP from the Measure Menu will start or stop a preview of the current measure. Pressing the button below BACK (AUX) will return the Global Menu. Pressing the button below COPY (UTILITY) will copy the current measure to the next measure. Hold COPY and turn the Data Wheel to copy through multiple measures (until COPY is released). If you select END OF SONG for the Drum Pattern the song will end on the previous measure.
Press EXIT to get out of songwriting and return to Play Mode. Your song data will automatically be stored for recall, even after the amp has restarted. Press SAVE while in the Compose Menus to save the song in the S bank. Once saved, it can be treated as if the song were downloaded from the PC for performance. The new song will be last in the S bank and the 3 song QA’s will be the defaults assigned in the utility menu.
If a song or measure us auditioned by pressing STARTSTOP or if the MIDI file is saved, any contents in the Phrase Sampler will be erased (due to system requirements).

 SONG DELETE MENU
SONG DELETE is the third menu in Song Mode. It allows you to delete songs from the S bank. Turn the Data Wheel while DELETE SONG is highlighted to enter Song Delete Menu. Turn again to select a Song then press SONG to confirm the song to be deleted.

 MEMORY USAGE MENU
MEM USAGE is the fourth and last menu in Song Mode. It displays the percentage of memory used for song storage.
fender .com
.com
10  G-DEC 3O
Amp Mode 
Use Amp Mode to select an Amplifier type (first menu), then modify that amplifier’s settings in menus 2–9.
FX/Reverb Mode 
Use FX/Reverb Mode to select an Effect type (first menu), then modify that effect’s settings in menus 2–6.
(FX/Reverb Menus 7 and 8 continued on next page.)
fender .com
.com
G-DEC 3O |
11 |
FX/Reverb Mode (continued) 
Use FX/Reverb Mode to select a Reverb type (menu 7), and adjust reverb level (menu 8).
Drums Mode
Use Drums Mode to select a Drum pattern (first menu), then modify that drum pattern’s settings in menus 2–6.
Auxiliary/Phrase Mode 
Use AUX/Phrase Mode to adjust the AUX IN jack settings (menus 1–2).
Use AUX/Phrase Mode to adjust the Phrase Sampler settings (menus 3–7).
fender .com
.com
12 |
G-DEC 3O |
Utility Mode 
Use Utility Mode to rename presets, lock memory, transfer presets (MIDI) and manage the system.
Phrase Sampler 


GENERAL NOTES: (Phrase Sampler behavior that you should know about)
DUB: This button is ignored if the amp is set to half speed playback.
OVRDUB FBCK: The Overdub Feedback setting (found in the AUX menu) controls the level of decay (fade out) of the previously recorded signal when overdubbing (10.0 = no decay). Overdubbing only records the guitar signals. MIDI patterns stop when overdubbing starts and they cannot be restarted until overdubbing is complete.
Phrase Sampler—States and Controls (how the current state affects what each of the buttons do)
OFF (If you start with the Phrase Sampler "OFF," pressing PLAY, REC or DUB will cause this to happen)...
PLAY: Start playback if a loop has been previously recorded, ignore otherwise. RECORD: Enter record mode and start recording.
OVERDUB: Start overdubbing if a loop has been previously recorded, otherwise start recording.
PLAYING (If you start with the Phrase Sampler "PLAYING," pressing PLAY, REC or DUB will cause this to happen)...
PLAY: |
Stop playback. |
RECORD: |
Enter record mode and start recording. |
OVERDUB: |
Start overdubbing on next pass through (tapping again, prior to the overdubbing starting, cancels |
|
overdubbing before it starts and continues playback). |
RECORDING (If you start with the Phrase Sampler "RECORDING," pressing PLAY, REC or DUB will cause this to happen)...
PLAY: Exit record mode and begin playback (truncates loop to nearest measure if the amp is set to 4 beat lead in mode).
RECORD: Stop the recording process.
OVERDUB: Exit record mode and begin playback and begin overdubbing (truncates loop to nearest measure if the amp is set to 4 beat lead in mode).
OVERDUBING (If you start with the Phrase Sampler "DUBBING," pressing PLAY, REC or DUB will cause this to happen)...
PLAY: Stop overdubbing and continue playback on next pass through. RECORD: Enter record mode and start recording.
OVERDUB: Stop overdubbing and playback on next pass through.
fender .com
.com
G-DEC 3O |
13 |
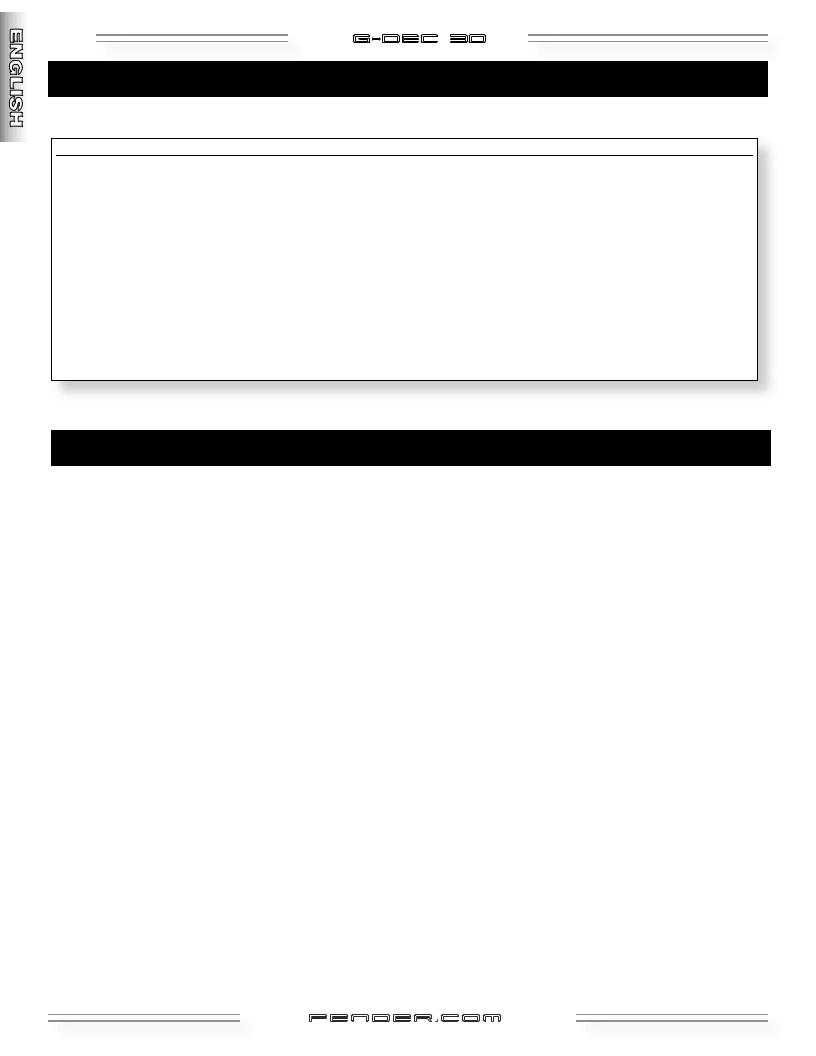
Footswitch (optional equipment)
Button 1 |
Button 2 |
|
Button 3 |
Button 4 |
|
|
|
|
|
|
|
|
|
|
|
|
|
|
|
|
|
|
|
|
|
|
|
|
|
|||
|
|
|
|||
|
|
|
|||
|
|
|
|
||
|
|
|
|
|
|
The footswitch (p/n 0994070000) has four modes indicated by the three LEDs on the left side of the footswitch (no LEDs lit indicates the fourth mode—Tuner Mode). Press the MODE/TUNER button repeatedly to cycle through the modes (press and hold for a shortcut to Tuner Mode). The footswitch will only control the amp if the G–DEC 30 is in Play Mode or Tuner Mode. In Modes 1, 2 or 3 the display will show the current Preset or Song number that is loaded on the amp, and in Tuner Mode the display will show the current note. You cannot change footswitch modes while the Phrase Sampler is recording or overdubbing.
MODE 1—Quick Access Mode:
Button 1: Hold for Tuner, Press and release for Mode 2
Button 2: Loads Song QA1 or Default QA1 if no song is currently loaded. Also turns on the LED above the button.
Button 3: Loads Song QA2 or Default QA2 if no song is currently loaded. Also turns on the LED above the button.
Button 4: Loads Song QA3 or Default QA3 if no song is currently loaded. Also turns on the LED above the button.
MODE 2—Down/Up/Start Stop Mode:
Button 1: Hold for Tuner, press and release for Mode 3 Button 2: Decrements to the next preset (U or P) or Song. Button 3: Increments to the next preset (U or P) or Song.
Button 4: Starts or Stops a pattern if the user is on a U or P preset. If the user is on a S preset the song starts and the footswitch switches to QA mode so that the user can access the 3 QA presets associated with that song during playback. Upon completion of the song the footswitch will automatically return to mode to so that the user can select the next song
MODE 3—Phrase Sampler Mode:
Button 1: Hold for Tuner, Press and release for Mode 1
Button 2: Starts/stops Phrase Sampler playback. LED will blink if the amp is finishing overdubbing a loop and will turn on once playback begins or off when playback has halted.
Button 3: Starts/stops Phrase Sampler recording. LED will turn on once recording begins and off when playback has halted.
Button 4: Starts/stops Phrase Sampler overdubbing. LED will blink if the amp is waiting to overdub on the next pass or stop at the end of the current pass and will turn on once overdubbing has begun or off when overdubbing has finished.
TUNER MODE: NOTE: The four red LEDS on the top of the footswitch, along with the green LED in the middle will be used to indicate whether the note is sharp, flat, or in tune.
Any Button: |
Press any button to return to the previous footswitch mode. |
fender .com
.com
14 |
G-DEC 3O |
G–DEC 30 MIDI Guide
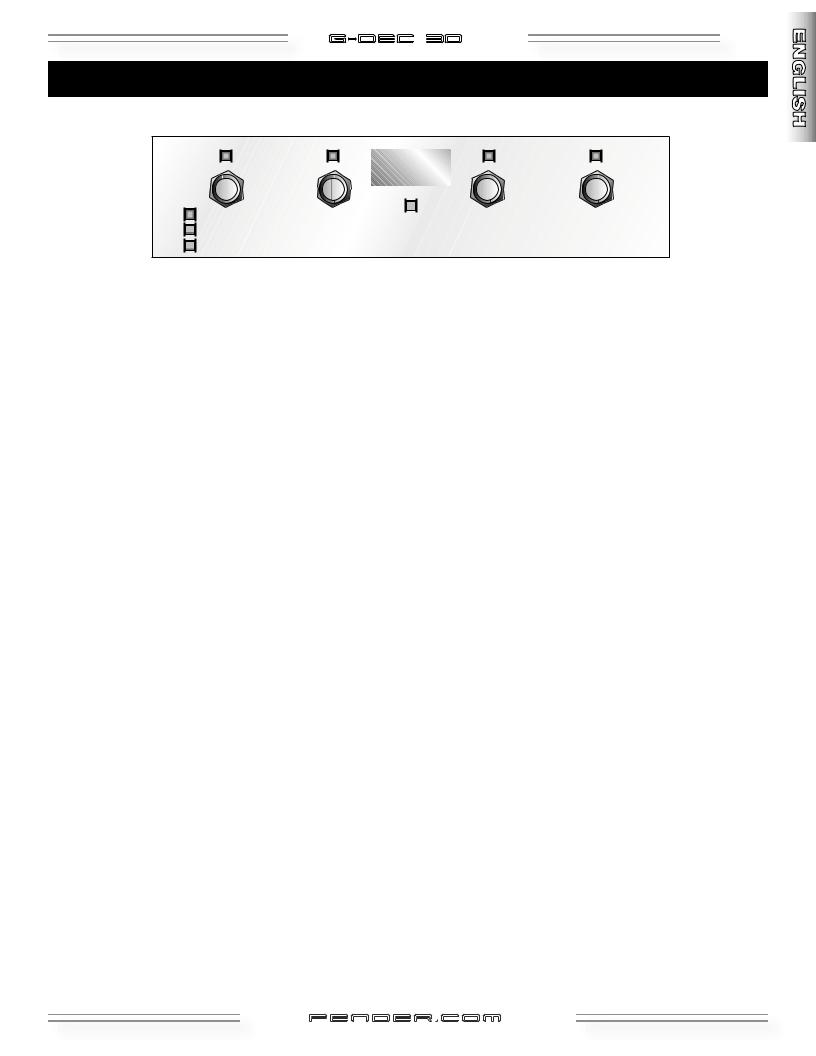
Basic MIDI Setup
The most basic MIDI operations on the G–DEC 30 require use of a MIDI interface device connected to a personal computer. Most MIDI interface devices will use USB or the game port on older PCs and are available at most musical instrument retailers. Refer to the interface manufacturer for proper device setup. To get the most out of the G–DEC 30 MIDI capability, connect the MIDI In port on the G–DEC 30 to the MIDI Out port on your MIDI interface with a standard MIDI cable. Also connect the MIDI Out port on the G–DEC 30 to the MIDI In port on your MIDI interface. See figure for connections.
MIDI-to-Computer
Interface
Dumping and Loading Presets
The above configuration will allow you to dump and load presets to and from the computer. To dump any one or all presets (see Utility Mode page 12) you will need third party software running on the PC. Search for a MIDI librarian utility or SYSEX utility from your favorite search engine online that works with your specific computer. You will need an application that accepts SYSEX dumps from external devices. Within your selected software package, you will need to configure MIDI ports and tell the application to wait to receive a SYSEX dump. Consult the documentation for your specific SYSEX application on how to perform these tasks. Once configured, you can then dump presets to a “.SYX” file which then can be posted or emailed to share with other G–DEC 30 users.
To load a preset into the G–DEC 30 you will also need third party software running on the PC. The same application used for receiving SYSEX dumps will most likely be able to send SYSEX data as well. Load a G–DEC 30 preset file (ending in
.SYX) into your configured SYSEX application and send the preset. The G–DEC 30 is always ready to receive these files. Once a valid preset file is received by the G–DEC 30, it will bring you to the Save prompt (see How Do I...? on page 6 for the Save function).
Updating the G–DEC 30 Software
The above MIDI configuration will also allow you to update your G–DEC 30 software if and when an update becomes availablefromFender,downloadablefromhttp://www.fender. com. G–DEC 30 update information will be made available from the download site. In general, to perform this operation, access the “Amp Update” item in the Utility Menu (see Utility Mode, page 12) and follow the on-screen instructions. Press Save to start the process. When the G–DEC 30 states it is ready to receive a MIDI Update, use your selected SYSEX application (the same used for preset dumps and loads) to send the G–DEC 30 update file to the amp. Other important instructions may be included with the update package.
Computer—USB or Game Port
UsingtheOn-BoardSynthesizerwithanExternal Controller
The G–DEC 30 has a full General MIDI compatible synthesizer on board that may be triggered using an external MIDI controller. Simply connect the MIDI Out port of your MIDI controller device (typically a keyboard or PC) to the MIDI In port on the G–DEC 30. Set your MIDI controller device onto any channel other than 10 and it will control the onboard G–DEC 30 synthesizer (channel 10 is used for a drum kit). To change voices, use the appropriate program change message on your MIDI controller. Consult the MIDI controller device documentation on how to perform this function on your specific controller. Refer to the Appendix for channels of General MIDI voicings.
fender .com
.com
G-DEC 3O |
15 |
Streaming MIDI Files to the G–DEC 30
If you wish to play any available General MIDI file from your PC through the G–DEC 30, you will need a third party PC application that is able to play MIDI files to an external MIDI port. Search for a MIDI player or MIDI sequence utility from yourfavoritesearchengineonlinethatworkswithyourspecific computer. Consult the documentation for your application on proper configuration. Once properly configured, play any MIDI file (typically a file with the .MID extension) from your MIDI player or sequence application. The MIDI Out port of your MIDI interface device must be connected to the MIDI In port on the G–DEC 30. Note that if the song is playing but sounds cluttered, make sure any MIDI thru function in your application is disabled, or simply unplug the MIDI cable from the MIDI Out port on the G–DEC 30. The G–DEC 30 always outputs any MIDI information received on the MIDI In port on the MIDI Out port which may result in a repeated loop if your application has MIDI throughput enabled.
Advanced MIDI sequence applications will allow you to create your own MIDI songs for playback on the G–DEC 30. Note that although the G–DEC 30 can store MIDI music, G–DEC 30 will onlyplaystreamedaudiofromaPCandwillnotstorestreamed audio directly. Storing MIDI music is accomplished through a different mechanism. To store audio to the G–DEC 30, see section “Storing MIDI Files to the G–DEC 30” below.
If you would like to construct a MIDI song of your own using some of the patterns onboard the G–DEC 30 simply play the pattern you would like and record as much MIDI Out data from the G–DEC 30 as you desire using your MIDI sequence utility application on the PC. Note this will not record any guitar audio, simply MIDI data from the patterns. You can then modify and arrange patterns into songs using your MIDI sequencer software application and stream the resulting file back to the G–DEC 30 as mentioned above. Refer to the Appendix for channels of General MIDI voicings.
Another fun thing to try with two G–DEC 30s is to connect them with a MIDI cable as described above for a synchronized jam session or lesson! On the G–DEC 30 with the MIDI Out port connected, select a desired preset to jam along with. On the other G–DEC 30 select any guitar tone desired. Then press Start/Stop on the first G–DEC 30 to start the drum pattern. The MIDI data is then sent from the first G–DEC 30 to the second and is synchronized. Now you are both able to jam along to the same synchronized drum pattern with two different guitar tones!
Storing MIDI Files to the G–DEC 30
Download the G–DEC 30 MIDI file utility available at: http://www.fender.com/support/downloads/index.php Follow the instructions included with the application.
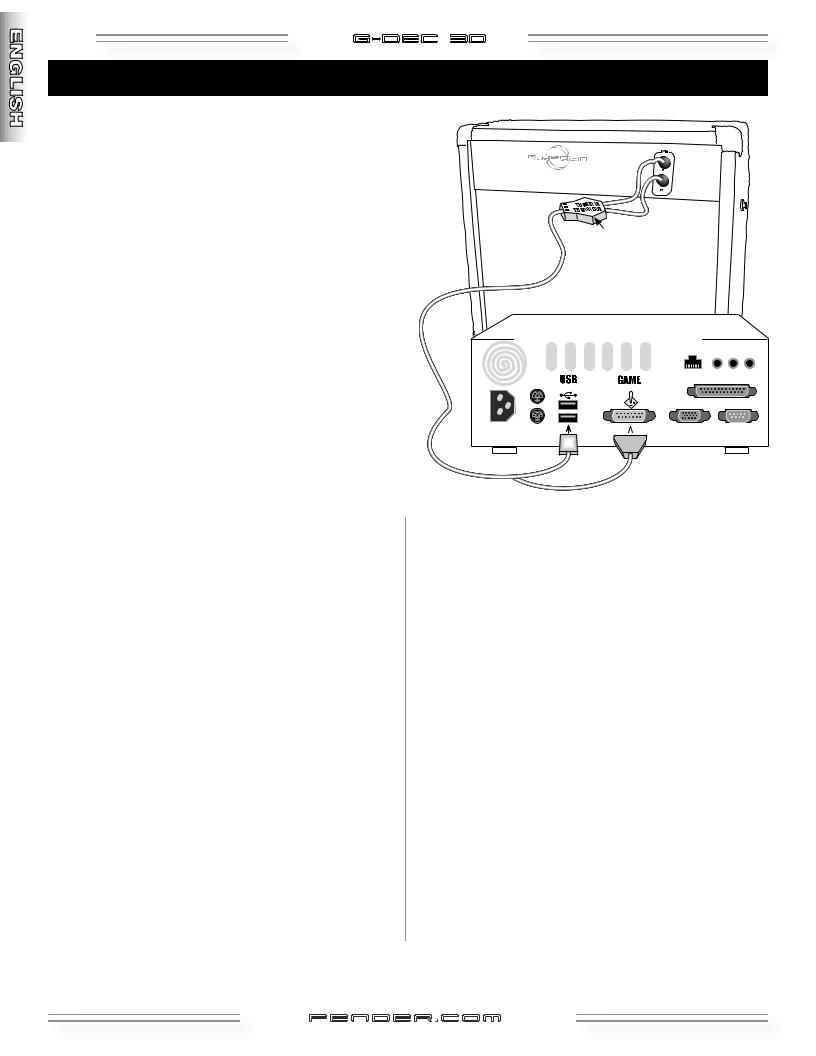
Connecting Two G–DEC 30s Together
You may also share presets directly from one G–DEC 30 to another by simply connecting the two G–DEC 30s with a standard MIDI cable. Connect the MIDI cable to the MIDI Out port of the G–DEC 30 that holds the preset you want to share. Then connect the other end of that MIDI cable to the MIDI In port on the G–DEC 30 into which you wish to load the preset. Then follow the Dump preset procedure (see Utility Mode, page 12) on the G–DEC 30 that holds the preset you want to share.
Receiving
MIDI
Sending
MIDI
fender .com
.com

16 |
G-DEC 3O |
G–DEC 30 MIDI Configuration
In Utility Mode you can set MIDI CONTROL (menu 9) to SYNTH or AMP. If set to AMP, data sent on MIDI channel 16 will control the amp, and channels 1-15 will be routed to the synth. This will present a problem if a normal MIDI song is played with music on channel 16 (which could affect the amp settings in unexpected ways). In this case you can either delete channel 16 or move it to a different channel. If MIDI CONTROL is set to SYNTH, all MIDI data will be routed to the synth. When
songs are created in the COMPOSE Mode, program changes will be saved in the song on channel 16 regardless of the MIDI Amp Control setting, but the program changes will only work during playback if the amp is set to AMP. MIDI on channel 16 is also passed from the MIDI input jack to the DSP during playback of songs or patterns if the MIDI CONTROL is set to AMP.
GDEC30 MIDI Controls
If the MIDI CONTROL is set to AMP the following commands can be used (on CH 16).
Amp Control |
Control Type |
Value Range |
Preset Num |
Program Change |
0-99,127=Tuner |
Amp Volume |
CC#07 |
0-127 |
Synth Volume |
CC#11 |
0-127 |
Start/Stop MIDI |
CC#85 |
Don’t care |
Play |
CC#86 |
Don’t care (Ignored if the |
|
|
amp is busy playing a |
|
|
pattern or song) |
Record |
CC#87 |
Don’t care (Ignored if the |
|
|
amp is busy playing a |
|
|
pattern or song) |
Overdub |
CC#88 |
Don’t care (Ignored if the |
|
|
amp is busy playing a |
|
|
pattern or song) |
Data Increment |
CC#96 |
Don’t care |
Data Decrement |
CC#97 |
Don’t care |
Amp Gain |
CC#102 |
0-127 |
RVB Level |
CC#108 |
0-127 |
FX Level |
CC#110 |
0-127 |
FX Param1 |
CC#111 |
0-127 |
FX Param2 |
CC#112 |
0-127 |
FX Param3 |
CC#113 |
0-127 |
FX Param4 |
CC#114 |
0-127 |
Select Song |
CC#119 |
0-63 (Ignored if the amp |
|
|
is busy playing a pattern |
|
|
or song) |
fender .com
.com
|
|
G-DEC 3O |
17 |
|
APPENDIX: MIDI CHANNEL – (Any except Channel 10) |
||
PROGRAM CHANGE |
GENERAL MIDI |
PROGRAM CHANGE |
GENERAL MIDI |
1 |
(Grand) Piano 1 |
33 |
Acoustic Bass |
2 |
(Bright) Piano 2 |
34 |
Finger Bass |
3 |
(Electric Grand) Piano 3 |
35 |
Picked Bass |
4 |
Honky-Tonk Piano |
36 |
Fretless Bass |
5 |
Electric Piano 1 |
37 |
Slap Bass 1 |
6 |
Electric Piano 2 |
38 |
Slap Bass 2 |
7 |
Harpsichord |
39 |
Synth Bass 1 |
8 |
Clavi |
40 |
Synth Bass 2 |
9 |
Celesta |
41 |
Violin |
10 |
Glockenspiel |
42 |
Viola |
11 |
Music Box |
43 |
Cello |
12 |
Vibraphone |
44 |
Contrabass |
13 |
Marimba |
45 |
Tremolo Strings |
14 |
Xylophone |
46 |
Pizzicato Strings |
15 |
Tubular Bells |
47 |
Orchestral Harp |
16 |
Santur |
48 |
Timpani |
17 |
Drawbar Organ |
49 |
String Ensemble 1 |
18 |
Percussive Organ |
50 |
String Ensemble 2 |
19 |
Rock Organ |
51 |
Synth Strings 1 |
20 |
Church Organ |
52 |
Synth Strings 2 |
21 |
Reed Organ |
53 |
Choir Aahs |
22 |
Accordian (French) |
54 |
Voice Oohs |
23 |
Harmonica |
55 |
Synth Voice |
24 |
Tango Accordian |
56 |
Orchestra Hit |
25 |
Acoustic Guitar (Nylon) |
57 |
Trumpet |
26 |
Acoustic Guitar (Steel) |
58 |
Trombone |
27 |
Electric Guitar (Jazz) |
59 |
Tuba |
28 |
Electric Guitar (Clean) |
60 |
Muted Trumpet |
29 |
Electric Guitar (Muted) |
61 |
French Horn |
30 |
Overdriven Guitar |
62 |
Brass Section |
31 |
Distortion Guitar |
63 |
Synth Brass 1 |
32 |
Guitar Harmonics |
64 |
Synth Brass 2 |
(continued on next page)
fender .
. com
com

18 |
G-DEC 3O |
APPENDIX (continuation): MIDI CHANNEL – (Any except Channel 10)
PROGRAM CHANGE |
GENERAL MIDI |
PROGRAM CHANGE |
GENERAL MIDI |
65 |
Soprano Sax |
97 |
FX 1 (Rain) |
66 |
Alto Sax |
98 |
FX 2 (Soundtrack) |
67 |
Tenor Sax |
99 |
FX 3 (Crystal) |
68 |
Baritone Sax |
100 |
FX 4 (Atmosphere) |
69 |
Oboe |
101 |
FX 5 (Brightness) |
70 |
English Horn |
102 |
FX 6 (Goblins) |
71 |
Bassoon |
103 |
FX 7 (Echoes) |
72 |
Clarinet |
104 |
FX 8 (Sci-Fi) |
73 |
Piccolo |
105 |
Sitar |
74 |
Flute |
106 |
Banjo |
75 |
Recorder |
107 |
Shamisen |
76 |
Pan Flute |
108 |
Koto |
77 |
Blown Bottle |
109 |
Kalimba |
78 |
Shakuhachi |
110 |
Bag Pipe |
79 |
Whistle |
111 |
Fiddle |
80 |
Ocarina |
112 |
Shanai |
81 |
Lead 1 (Square) |
113 |
Tinkle Bell |
82 |
Lead 2 (Sawtooth) |
114 |
Agogo |
83 |
Lead 3 (Calliope) |
115 |
Steel Drums |
84 |
Lead 4 (Chiff) |
116 |
Woodblock |
85 |
Lead 5 (Charang) |
117 |
Taiko Drum |
86 |
Lead 6 (Voice) |
118 |
Melodic Tom |
87 |
Lead 7 (Fifths) |
119 |
Synth Drum |
88 |
Lead 8 (Bass + Lead) |
120 |
Reverse Cymbal |
89 |
Pad 1 (Fantasia) |
121 |
Guitar Fret Noise |
90 |
Pad 2 (Warm) |
122 |
Breath Noise |
91 |
Pad 3 (Polysynth) |
123 |
Seashore |
92 |
Pad 4 (Choir) |
124 |
Bird Tweet |
93 |
Pad 5 (Bowed) |
125 |
Telephone Ring |
94 |
Pad 6 (Metallic) |
126 |
Helicopter |
95 |
Pad 7 (Halo) |
127 |
Applause |
96 |
Pad 8 (Sweep) |
128 |
Gunshot |
Access G–DEC 30 Drums from an External Controller
The G-DEC synthesizer also contains a standard drum kit accessible using MIDI channel 10 using a program change
value of 1 (which may be set on most MIDI controller devices). Most MIDI notes on the keyboard correspond to a different instrument within the standard drum kit (not all notes are used). Other drum kits are available on MIDI channel 10 using program change values 9, 17, 25, 26, 33, 41, 49, 57, or 127.
fender .com
.com
|
|
|
G-DEC 3O |
19 |
Specifications |
|
|
||
TYPE: |
|
PR695 |
|
|
PARTNUMBER: |
|
235-0500-000(120V,60Hz) |
235-0500-900(120V,60Hz)DS |
|
|
|
235-0501-900(110V,60Hz)TWDS |
235-0503-900(240V,50Hz)AUSDS |
|
|
|
235-0504-900(230V,50Hz)UKDS |
235-0505-900(220V,50Hz)ARGDS |
|
|
|
235-0506-900(230V,50Hz)EURDS |
235-0507-900(100V,50Hz)JPNDS |
|
|
|
235-0509-900(220V,60Hz)ROKDS |
|
|
POWERREQUIREMENTS: |
|
75W |
|
|
POWEROUTPUT: |
|
30WRMSinto8Ω@5%THD |
|
|
POWERAMPINPUTIMPEDANCE: |
|
1MΩ |
|
|
FOOTSWITCH(OPTIONAL) |
|
P/N0994070000 |
|
|
FUSES: |
|
1A,250Vfor100/110/120Vversions |
|
|
|
|
500mA,250Vfor220V/230V/240Vversions |
|
|
DIMENSIONS |
HEIGHT: |
15.5in |
(40cm) |
|
|
WIDTH: |
16.75in |
(43cm) |
|
|
DEPTH: |
8.125in |
(21cm) |
|
WEIGHT: |
|
21lb |
(9.6kg) |
|
Productspecificationsaresubjecttochangewithoutnotice.
fender .com
.com
20 |
G-DEC 3O |
Instrucciones importantes de seguridad
Este símbolo alerta al usuario de la presencia de niveles de voltaje peligrosos dentro de la carcasa de esta unidad.
Este símbolo advierte de la necesidad de que el usuario lea la documentación adjunta.
•Lea, conserve y cumpla con lo indicado en estas instrucciones. Haga caso a todas las advertencias.
•Conecteelcabledealimentaciónsoloaunasalidadecorriente alterna con toma de tierra del voltaje y amperaje indicados debajo del conector INPUT POWER del panel trasero.
•PRECAUCION: Para evitar el riesgo de incendios, daños o descargas eléctricas, no permita que este aparato quede expuesto a la lluvia o la humedad.
•Desenchufe este aparato de la corriente antes de limpiar su superficie (use para ello solo un trapo ligeramente humedecido).Esperehastaquelaunidadestécompletamente seca antes de volver a enchufarla a la corriente.
•Deje un espacio de 15 cm como mínimo detrás de la unidad para permitir su correcta refrigeración.
•Coloque este aparato lejos de fuentes de calor como radiadores, hornos u otros aparatos que generen calor.
•Este aparato es posible que esté equipado con un enchufe polarizado (un borne más ancho que el otro). Esto es una medida de seguridad. Si este enchufe no encaja en su salida de corriente, haga que un electricista sustituya su salida anticuada. Nunca anule el sistema de seguridad que supone este tipo de enchufe.
•Evite que el cable de alimentación quede retorcido o aplastado.
•Este aparato deberá ser reparado en un servicio técnico oficial cuando: el cable de alimentación o el enchufe estén rotos o dañados; se hayan introducido o objetos o se hayan derramado líquidos dentro del aparato; si este aparato ha quedado expuesto a la lluvia; si da muestras de no funcionar correctamente o se observa un cambio claro en su rendimiento; si el aparato ha caído al suelo o si la carcasa está dañada.
•Utilice con este aparato solo un soporte o bastidor recomendado exclusivamente para ello.
•Desenchufe este aparato de la corriente cuando no lo vaya a usar durante un periodo de tiempo largo o durante las tormentas eléctricas.
•No derrame líquidos, ni coloque objetos que los contengan sobre la unidad.
•ATENCION: Dentro de este aparato no hay ninguna pieza susceptible de ser reparada por el usuario. Dirija cualquier reparación solo al servicio técnico oficial.
•Los amplificadores y sistemas de altavoces Fender® son capaces de producir niveles de presión sonora muy elevados que pueden dar lugar a daños temporales o permanentes en la capacidad de audición. Tenga cuidado durante la configuración y el ajuste del volumen de este aparato.
NOTA DE CUMPLIMIENTO DE NORMAS FCC
Se ha verificado que este aparato cumple con los límites impuestos para dispositivos digitales de clase B, de acuerdo a lo indicado en la sección 15 de las normas FCC. Estos límites han sido diseñados para ofrecer una protección razonable contra las interferencias molestas en una instalación no profesional. Este aparato genera, usa y puede irradiar energía de radiofrecuencia y, si no es usado de acuerdo con estas instrucciones, puede dar lugar a interferencias molestas en las comunicaciones de radio, sin que podamos garantizar que estas interferencias no se produzcan en una instalación concreta. Si este aparato produce tal tipo de interferencias en la recepción de la radio o TV, lo que podrá ser determinando encendiendo y apagando la unidad, el usuario será el responsable de tratar de corregir el problema por medio de una o más de las medidas siguientes: reorientar o reubicar la antena receptora, aumentar la separación entre este aparato y el receptor, enchufar este aparato a una regleta o circuito distinto al del receptor. Si necesita más información o ayuda, póngase en contacto con un técnico especialista en radio/TV.
UN PRODUCTO DE:
FENDER MUSICAL INSTRUMENTS CORPORATION
CORONA, CALIFORNIA USA
Marcas:
Fender®, G–DEC® , Blackface™ y Dyna–Touch™ son marcas comerciales de FMIC. El resto de marcas que aparecen aquí son propiedad de sus respectivos propietarios.
Copyright © 2006 FMIC. Reservados todos los derechos.
fender .com
.com
G-DEC 3O |
21 |
Introducción
El G–DEC® 30 Guitar Digital Entertainment Center es una versión actualizada de nuestro superfamoso G–DEC®. ¡Al igual que el original, incluye todos los músicos excepto usted! Dentro del G–DEC 30 encontrará un versátil batería, un consumado bajista y una flexible sección de acompañamiento prácticamente para cualquier estilo musical. Y para usted, el guitarrista, el G–DEC 30 representa un auténtico almacén de amplificadores y efectos, y lo que es mejor aún—¡listos directamente para su prueba de sonido!
Gire la rueda Data del G–DEC 30 para acceder a una amplia gama de configuraciones de banda. 50 presets fijos le ofrecen una completa colección disponible en todo momento. Otros 50 presets regrabables le permiten almacenar los grupos que cree para su música y estilo de interpretación.
El G–DEC 30 es la herramienta definitiva para ensayos, tanto si usted es un principiante o un profesional. Como principiante, puede hacer que su profesor se conecte en
Características
la entrada del panel trasero. Para aprender una nueva canción puede conectar su reproductor de CD o MP3 al G–DEC 30 y ensayar con ellos; y para secciones de gran dificultad, puede grabar una frase musical y reproducirla en un bucle continuo—¡a la mitad de la velocidad normal si es necesario! Para los músicos más experimentados el G–DEC 30 será un compañero perfecto para componer o hacer jam sessions.
El G–DEC 30 también dispone de puertos MIDI que le permitirán compartir presets con otros usuarios de G–DEC 30. Conecte el G–DEC 30 a su ordenador* para hacer copias de seguridad de presets, reproducir ficheros General MIDI o almacenar canciones MIDI en el G–DEC 30!
Ha llegado el momento de actuar—con el G–DEC 30—
con su nuevo grupo...
*Es necesario disponer de una tarjeta de sonido con capacidad MIDI (o dispositivo MIDI-a-USB) y un programa MIDI.
¡Cada preset del G–DEC 30 es una "banda" completa!” Modifique cualquiera de sus componentes o elija otro de los presets del arsenal del G–DEC 30:
•17 amplificadores, cada uno con parámetros de ganancia, volumen, tono, compresor, timbre y puerta de ruidos
•29 efectos con calidad de estudio (muchos en stereo), con 4 parámetros ajustables cada uno
•10 reverbs con niveles ajustables
•84 patrones de batería (incluyendo 4 patrones de metrónomo) con parámetros de tempo, tono y niveles de batería, bajo y acompañamiento
¡Los puertos MIDI del G–DEC 30 le ofrecen mayores posibilidades si lo une con su ordenador y otros músicos G–DEC 30!
•Intercambio y copia de seguridad de presets
•Almacenamiento y reproducción de ficheros MIDI
•Actualización del software del G–DEC 30 (cuando sea necesario)
•Puertos MIDI IN y MIDI OUT en el panel trasero
¡El G–DEC 30 produce el auténtico sonido y la calidad inigualable de Fender!
•Conector de entrada secundario para un amigo/profesor
•Afinador cromático digital interno
•Conector Phones que puede usar con auriculares stereo o como una salida de línea stereo
•Salidas de línea stereo que pueden ser configuradas como All o Synth (y Aux)
• Sampler de frase musical de 28 segundos
• Sintetizador General MIDI interno
Gracias por escoger un Fender®
—Sonido, tradición e innovación—desde 1946
fender .com
.com
22 |
G-DEC 3O |
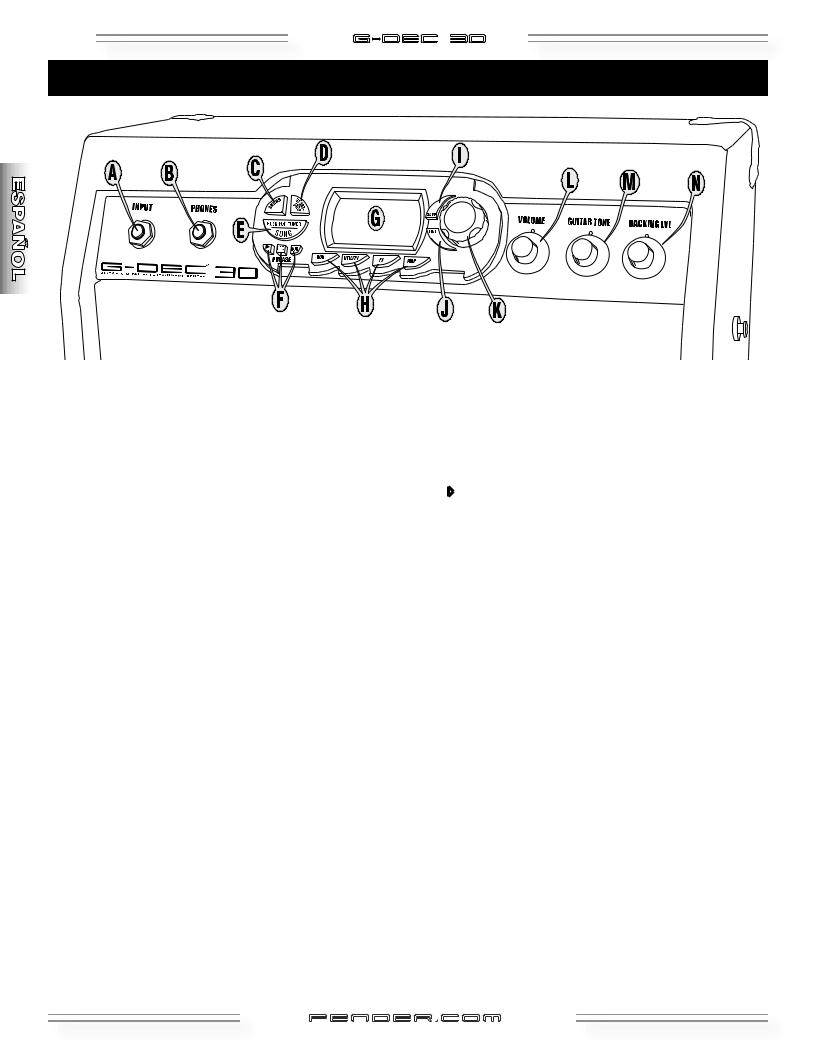
Resumen del panel de control
A.INPUT—Conecte aquí su guitarra.
B.PHONES—Conecte aquí unos auriculares para ensayar en privdado o conecte un par de altavoces autoamplificados (como los que se suelen usar con los ordenadores); el altavoz del G–DEC 30 quedará anulado automáticamente. Disfrute de la amplia gama de efectos stereo del G–DEC 30 a través de esta toma. También puede conectar un cable desde esta salida PHONES a la toma “Audio In” de su ordenador para realizar una grabación con su programa favorito.NOTA:Esposiblequenecesitecables,adaptadores y dispositivos adicionales para estas conexiones.
C.DRUMS—Pulse aquí para acceder al menú Modo Drums (vea página 29).
D.START-STOP—Pulse en este botón para iniciar o detener el bucle de batería. El botón parpadeará rítmicamente con el tempo.
Atajos para el ajuste del tempo!
Atajo 1—Mantenga pulsado START-STOP y gire la rueda Data Atajo 2—Mantenga pulsado el botón DRUMS y pulse
rítmicamente START-STOP con el tempo que quiera
E.SONG / HOLD FOR TUNER—Pulse aquí para acceder al Modo Song (vea página 26) O manténgalo pulsado para activar el afinador.
F.PHRASE SAMPLER—Use esta función para grabar hasta 28 segundos del audio del G–DEC 30 que podrá usar después para una amplia gama de opciones de sobredoblaje o reproducción (vea página 30).
Pulse: Para iniciar/detener...
4Playback (reproducción) de un frase musical
grabada
REC Sampling (grabación) de una nueva frase
DUB Overdubbing (añade capas o estratos) a la frase musical grabada previamente
G.PANTALLA - Mantenga pulsado el botón "EXIT" y gire la rueda Data (en el Modo Play) para ajustar el contraste de la pantalla.
H.AUX / UTILITY / FX / AMP—Púlselo para activar los menús de Modo correspondientes (vea páginas 26-30).
I.SAVE—Le permite memorizar la configuración actual del G–DEC 30 en un preset de usuario (U00-U49).
J.EXIT—Pulse en él para volver al Modo Play.
K.RUEDA DATA - Le permite elegir presets, canciones y ajustes, dependiendo del modo activo.
L.VOLUME—Ajusta el volumen global del G–DEC 30.
M.GUITAR TONE—Ajusta las características tonales de su guitarra. Este control no afecta a la sección de batería ni al sonido de la entrada auxiliar.
N.BACKING LVL—Ajusta el nivel de volumen de la sección de acompañamiento MIDI.
fender .com
.com
G-DEC 3O |
23 |
Panel trasero
O.POWER—Este interruptor le permite encender y apagar el G–DEC 30.
P.RECEPTACULO PARA EL ENCHUFE - Use el cable de alimentación incluido para conectar su G–DEC 30 a una salida de corriente alterna con toma de tierra.
Q.FUSIBLE - Protege su G–DEC 30 contra cualquier avería eléctrica. Sustituya este fusible cuando salte solo por otro de las características que aparecen indicadas debajo del receptáculo del fusible. Para extraer el receptáculo. Desconecte el cable de alimentación del G–DEC 30 de la corriente para dejar a la vista el receptáculo del fusible. Utilice un destornillador pequeño para extraer el receptáculo tirando de la muesca de la parte superior.
R.EXT SPKR—Salida auxiliar para un recinto acústico exterior. Dicho altavoz debe tener unos valores mínimos de 30 watios, 8 ohmios.
S.LINE OUT LEFT / RIGHT—Salidas stereo de nivel de línea adecuadas para la conexión de un equipo de refuerzo de sonido o sistema de grabación.
T.FOOTSWITCH— Conecte aquí la pedalera de 4 botones (opcional) (referencia 0994070000) para el control remoto de diversas funciones (vea página 31).
U.MIDI IN / OUT - El G–DEC 30 le permite usar una gran cantidad de funciones MIDI. El término MIDI es el acrónimo de la expresión inglesa de "Interconexión Digital de Instrumentos Musicales" , que es el protocolo que permite a distintos elementos musicales digitales (teclados, unidades de efectos, sintetizadores, ordenadores, etc.) comunicarse entre sí. Es imposible cubrir en este manual todas las posibilidades que le ofrece este sistema. Si quiere saber más sobre esto, visite la página web http://www. midi.org o busque el término “MIDI” en su navegador preferido. Vea en la página 32 las funciones MIDI básicas del G–DEC 30 MIDI.
R.AUX IN—Entrada auxiliar para un reproductor de CD o MP3. Reproduzca música a través de su G–DEC 30 para que le sirva de acompañamiento o para aprender nuevas canciones. Conecte la salida de su reproductor (salida de línea, de auriculares, etc.) a estas tomas RCA AUX IN usando el cable o adaptador adecudos. Puede ajustar el nivel de entrada auxiliar a través del menú Modo Aux (vea página 29).
S.INPUT—Una entrada extra para que se conecte su profesor o un amigo.
fender .com
.com
24 |
G-DEC 3O |
¿Cómo puedo hacer...?
Ø
Ø
RUEDA
DATA
Ø
Ø
ØAtajo—Mantenga pulsado este botón mientras gira la rueda Data para realizar un ajuste rápido sin dejar el Modo Play (excepto en el banco "S")
fender .com
.com
Modo Play
G-DEC 3O |
25 |
El ModoPlayes el modo que se activa por defecto al encender la unidad y tras 60 segundos de inactividad en el resto de modos. Pulse "EXIT" para volver a este modo desde los otros.
En el Modo Play gire la rueda Data para elegir los presets. Dispone de 3 bancos de presets; P (permanente), U (usuario) y S (canciones)—cada uno de ellos es indicado por el primer carácter (P, U o S ) en la esquina superior izquierda de la pantalla.
Presets de bancos P y U (vea la ilustración de abajo) incluyen todos los ajustes de su "banda"; amplificador y efectos, bajista, batería y en ocasiones un acompañamiento.
Banco S (vea la ilustración de abajo) incluye canciones MIDI (hasta 62, dependiendo del tamaño del fichero) y las almacena en el orden de ejecución. Pulse "START-STOP" para que se reproduzca la canción. Para cambiar su orden, pulse "SONG" y gire la rueda Data para modificar el orden (vea página 26).
Cada uno de los presets del banco S indica el número y el nombre de la canción en la línea superior. la siguiente línea le muestra el preset de guitarra activo, que siempre empieza en QA1 en el recuadro de debajo. El recuadro QA le indica tres presets de guitarra (de acceso rápido). Los presets QA son los que corresponderán a sus elecciones personales para esa canción en concreto. Active cualquier preset QA pulsando el botón que hay debajo de las etiquetas de acceso rápido (QA1, QA2, QA3) o con el pedal de disparo correspondiente. Cambie el order de estos QA pulsando el botón que hay debajo de SET QA y girando la rueda Data.
En el ModoPlaypuede tocar el bajo, elegir presets y reproducir el bucle de batería o la grabación del sampler de frases. Para modificar los componentes de un preset (tipo de amplificador, efectos, pistas de bajo, etc.) use los menús de modo (vea la página siguiente, Navegación por los menús).
6Presetsdebancos"P"y"U"
(en vídeo inverso si el preset ha sido modificado).
Presetsdebanco"S"4
fender .com
.com
26 |
G-DEC 3O |
Navegación por los menús
Use los menús de Modo del G–DEC 30 para acceder a la configuracióndelospresets(quehayaelegidopreviamenteen el Modo Play). Pulse repetidamente un botón de modo para acceder a los distintos menús y gire después la rueda Data para modificar los ajustes de menú que estén resaltados o en vídeo inverso. NOTA: Cuando elija un preset S solo podrá acceder al Modo Song.
ATAJO PARA ACCEDER A LOS MENUS: Una vez que haya accedido a un modo, mantenga pulsado el botón de dicho modo mientras gira la rueda Data (en cualquier dirección) para acceder a los menús en lugar de tener que ir pulsando el botón de modo varias veces hasta llegar al menú que quiera.
Selección activa en vídeo inverso
RUEDA
DATA
Modo Song 
El Modo Song le permite componer canciones y preparar al G–DEC 30 para una actuación. Pulse repetidamente el botón SONG para hacer que aparezca cada uno de este menús:
•SONG ORDER
•COMPOSE (Global / Measure)
•DELETE SONG
•MEM USAGE
Los menús le muestran instrucciones, etiquetas de botones y ajustes que puede editar con la rueda Data.
Mientras esté en el Modo Song podrá escuchar canciones pulsando el botón START-STOP. Para elegir otra canción, mantenga pulsado START-STOP mientras gira la rueda Data.
Para empezar, primero componga una canción eligiendo la batería, bajo, preset de guitarra, etc. para toda la canción, o para un rango de compases por medio de los menús
Compose Global y Compose Measure. Luego, una vez que haya grabado sus canciones podrá redistribuirlas en el orden de su actuación usando el menú Song Order. Cuando esté listo, pulse START-STOP desde cualquier preset del banco S en el Modo Play para que comience la reproducción!

 MENUSONGORDER
SONG ORDER es el primer menú del Modo Song. Este menú le permite redistribuir el orden de los presets del banco S (canciones) para su ejecución.
Pulse "SONG" y gire después la rueda Data mientras el texto SONG ORDER aparece en vídeo inverso en la pantalla para comenzar con la redistribución del banco S.
6MenúSongOrder
Prulse la tecla de debajo de PREV SONG (AUX / UTILITY) o NEXT SONG (FX / AMP) para resaltar las canciones y gire la rueda Data para desplazar la canción elegida.
fender .com
.com
Modo Song
G-DEC 3O |
27 |
(continuación)

 MENUS COMPOSE
COMPOSE es el segundo menú del Modo Song. Le permite componer canciones en dos pantallas: Global y Measure:
4 Global—estos ajustes afectan a la canción completa. Gire la rueda Data con COMPOSE en vídeo inverso para acceder al menú Global. En él podrá editar lo siguiente:
•SONG NAME (nombre de la canción)
•TEMPO
•DRUM LEVEL (nivel de la batería) •BASS TYPE (tipo de bajo)
•BASS LEVEL (nivel del bajo)
Pulse SONG para resaltar el siguiente elemento del menú y gire la rueda Data para editar el valor. En el menú NAME utilice los botones que están debajo de las flechas f / g (FX / AMP) para colocar en vídeo inverso los caracteres que vaya a editar.
El pulsar START/STOP iniciará o detendrá una prueba de su composición. Durante la reproducción, la parte superior de la pantalla cambiará para irle mostrando el número de compás activo.
6Menú Global
4 Measure—estos ajustes afectarán a la cantidad de compases que elija entre uno y todos los compases de la canción. Pulse el botón que está debajo de MEAS (que es "AUX") desde el menú Global para acceder a este otro menú Measure. En él podrá elegir lo siguiente:
•MEASURE NUMBER (número de compás)
•GUITAR PRESET (preset de guitarra) •DRUM PATTERN (patrón de batería) •BASS PATTERN (patrón de bajo)
•BASS KEY (clave o tono de bajo)
Pulse SONG para colocar en vídeo inverso el siguiente elemento del menú y gire la rueda Data para editar el valor. Con cualquiera de los elementos del menú Measure resaltado, podrá elegir un compás distinto con solo pulsar los botones que están debajo de –MEAS / +MEAS (FX / AMP).
6Menú Measure
El pulsar START-STOP desde el menú Measure hará que se inicie o se detenga una prueba o previsualización del compás activo. El pulsar el botón que está debajo de BACK (AUX) hará que vuelva al menú Global. Pulse el botón que está debajo de COPY (UTILITY) para copiar el compás activo en el siguiente compás. Mantenga pulsado el botón COPY y gire la rueda Data para realizar la copia de varios compases (serán copiados todos los compases hasta que deje de pulsar COPY). Si elige el valor END OF SONG para el patrón de batería, la canción terminará en el compás anterior.
Pulse EXIT para salir de la opción de composición y volver al Modo Play. Los datos de su canción serán grabados automáticamente para que pueda recargarlos de nuevo, quedando en memoria incluso cuando apague el aparato. Pulse SAVE mientras está en estos menús Compose para grabar la canción en el banco S. Una vez grabada, podrá trabajar con esta canción como si la hubiese descargado desde un PC para su reproducción. La nueva canción será la última del banco S y los 3 QA de canción serán las asignaciones por defecto del menú de utilidades.
Cuando realice una escucha de una canción o compás pulsando el botón START-STOP o si graba un fichero MIDI, el contenido que pueda haber en el sampler de frases musicales será borrado (debido a la estructura del sistema).

 MENU SONG DELETE
SONG DELETE es el tercer menú del Modo Song. Con él puede eliminar canciones del banco S. Gire la rueda Data mientras en pantalla está resaltado DELETE SONG para acceder a este menú. Gire de nuevo la rueda para elegir la canción a eliminar y pulse después SONG para confirmar el proceso de borrado.

 MENU MEMORY USAGE
MEM USAGE es el cuarto y último menú del Modo Song y le muestra el porcentaje de memoria usado para el almacenamiento de las canciones.
fender .com
.com
28 |
G-DEC 3O |
Modo Amp
Use el menú 1 del Modo Amp para elegir un tipo de amplificador y los menús 2-9 para modificar sus ajustes.
Modo FX/Reverb 
Use el Modo FX/Reverb para elegir un tipo de efecto (menú 1) y modificar después sus ajustes (menús 2–6).
(Los menús FX/Reverb 7 y 8 aparecen en la página siguiente)
fender .com
.com
G-DEC 3O |
29 |
Modo FX/Reverb (continuación) 
Use el Modo FX/Reverb para elegir un tipo de reverb (menú 7) y ajustar su nivel (menú 8).
Modo Drums
Use este modo para elegir un patrón de batería (primer menú) y modificar los ajustes de ese patrón en los menús 2–6.
Modo Auxiliary/Phrase 
Use el Modo AUX/Phrase para ajustar las opciones de la conexión AUX IN (menús 1–2).
Use los menús 3-7 del Modo Aux /Phrase para ajustar el sampler de frases musicales.
fender .com
.com
30 |
G-DEC 3O |
Modo Utility 
Use el Modo Utility para renombrar los presets, bloquear la memoria, transferir presets (MIDI) y gestionar el sistema.
Sampler de frases musicales 


NOTAS GENERALES: (Comportamiento general del sampler a tener en cuenta)
DUB: Este botón será ignorado si el amplificador está ajustado a media velocidad de reproducción. OVRDUB FBCK: El ajuste de realimentación de sobregrabación (que encontrará en el menú Aux) controla el nivel de
decaimiento (fundido de salida) de la señal grabada previamente durante la sobregrabación (10.0 = no hay decaimiento). La sobregrabación solo graba las señales de bajo. Los patrones MIDI se detienen antes de la sobregrabación y no puede reiniciarlos hasta que no haya terminado.
Estados y controles del sampler (forma en que afecta cada estado a lo que hacen los botones)
OFF (Si comienza con el sampler en "OFF" , el pulsar "PLAY", "REC" o "DUB" hará que ocurra esto)...
PLAY: |
Comienza la reproducción si ha grabado un bucle previamente, y es ignorado en caso contrario. |
RECORD: |
Da acceso al Modo Record y pone en marcha la grabación. |
OVERDUB: |
Comienza la sobregrabación si ha grabado previamente un bucle y en caso contrario inicia la grabación. |
REPRODUCCION (Si empieza con el sampler así, el pulsar "PLAY", "REC" o "DUB" producirá lo siguiente)... |
|
PLAY: |
La reproducción se detiene. |
RECORD: |
Da acceso al Modo Record y pone en marcha la grabación. |
OVERDUB: |
Inicia la sobregrabación en la siguiente pasada (el pulsarlo de nuevo antes de que comience la |
|
sobregrabación hará que ese proceso sea cancelado antes de empezar y seguirá la reproducción). |
GRABACION (Si el sampler ya está en "GRABACION", el pulsar "PLAY", "REC" o "DUB" producirá lo siguiente)...
PLAY: Sale del Modo Record y hace que comience la reproducción (trunca el bucle al siguiente compás si el amplificador está ajustado al modo 4 beat lead in).
RECORD: Detiene el proceso de grabación.
OVERDUB: Sale del Modo Record y hace que comience la sobregrabación (trunca el bucle al siguiente compás si el amplificador está ajustado al modo 4 beat lead in).
SOBREGRABACION (Si el sampler ya está realizando ese proceso, el pulsar "PLAY", "REC" o "DUB" hará que ocurra esto)...
PLAY: Detiene la sobregrabación y hace que continue la reproducción en la siguiente pasada. RECORD: Da acceso al Modo Record y pone en marcha la grabación.
OVERDUB: Detiene la sobregrabación y hace que continue la reproducción en la siguiente pasada.
fender .com
.com
 Loading...