


User Guide
Architectural Connectivity
Cable Cubby® 300C
Cable Cubby® 300S
Cable Cubby® 600
Cable Cubby® 800
Cable Access Enclosures
68-1558-01 Rev. A
10 12

Safety Instructions
Safety Instructions • English
WARNING: This symbol,  , when used on the product, is intended to alert the user of the presence of uninsulated dangerous voltage within the product’s enclosure that may present a risk of electric shock.
ATTENTION: This symbol,  , when used on the product, is intended to alert the user of important operating and maintenance (servicing) instructions in the literature provided with the equipment.
For information on safety guidelines, regulatory compliances, EMI/EMF compatibility, accessibility, and related topics, see the Extron Safety and Regulatory Compliance Guide, part number 68-290-01, on the Extron website, www.extron.com.
Instructions de sécurité • Français
AVERTISSEMENT: Ce pictogramme,  , lorsqu’il est utilisé sur le produit, signale à l’utilisateur la présence à l’intérieur du boîtier du produit d’une tension électrique dangereuse susceptible de provoquer un choc électrique.
ATTENTION: Ce pictogramme,  , lorsqu’il est utilisé sur le produit, signale à l’utilisateur des instructions d’utilisation ou de maintenance importantes qui se trouvent dans la documentation fournie avec le matériel.
Pour en savoir plus sur les règles de sécurité, la conformité à la réglementation, la compatibilité EMI/EMF, l’accessibilité, et autres sujets connexes, lisez les informations de sécurité et de conformité Extron, réf. 68-290-01, sur le site Extron, www.extron.fr.
Sicherheitsanweisungen • Deutsch
WARNUNG: Dieses Symbol  auf dem Produkt soll den Benutzer darauf aufmerksam machen, dass im Inneren des Gehäuses dieses Produktes gefährliche Spannungen herrschen, die nicht isoliert sind und die einen elektrischen Schlag verursachen können.
VORSICHT: Dieses Symbol auf dem Produkt soll dem Benutzer in der im Lieferumfang enthaltenen Dokumentation besonders wichtige Hinweise zur Bedienung und Wartung (Instandhaltung) geben.
Weitere Informationen über die Sicherheitsrichtlinien, Produkthandhabung, EMI/EMF-Kompatibilität, Zugänglichkeit und verwandte Themen finden Sie in den Extron-Richtlinien für Sicherheit und Handhabung (Artikelnummer 68-290-01) auf der Extron-Website, www.extron.de.
Instrucciones de seguridad • Español
ADVERTENCIA: Este símbolo,  , cuando se utiliza en el producto, avisa al usuario de la presencia de voltaje peligroso sin aislar dentro del producto, lo que puede representar un riesgo de descarga eléctrica.
ATENCIÓN: Este símbolo,  , cuando se utiliza en el producto, avisa al usuario de la presencia de importantes instrucciones de uso y mantenimiento recogidas en la documentación proporcionada con el equipo.
Para obtener información sobre directrices de seguridad, cumplimiento de normativas, compatibilidad electromagnética, accesibilidad y temas relacionados, consulte la Guía de cumplimiento de normativas y seguridad de Extron, referencia 68-290-01, en el sitio Web de Extron, www.extron.es.
Chinese Simplified

 (
(
EMI/EMFExtron www.extron.com Extron68-290-01
Chinese Traditional
: 

EMI/EMFExtron www.extron.com Extron
68-290-01
Japanese
: 
:  ( )
( )
EMI/EMFwww.extron.com
Extron Safety and Regulatory Compliance Guide (P/N 68-290-01)
Korean
:  , ,.
, ,.
:  , ,( ) .
, , EMI/EMF , ,Extron (www.extron.com) Extron , 68-290-01 .

Conventions Used in this Guide
The following notifications are used:
CAUTION: A caution indicates a situation that may result in minor injury.
ATTENTION: Attention indicates a situation that may damage or destroy the product or associated equipment.
NOTE: A note draws attention to important information.
Specifications Availability:
Product specifications are available on the Extron website, www.extron.com.
Copyright
© 2012 Extron Electronics. All rights reserved.
Trademarks
All trademarks mentioned in this guide are the properties of their respective owners.

Contents
Introduction............................................................ |
1 |
About the Cable Cubby 300, 600, and 800......... |
1 |
Features.............................................................. |
3 |
Installation.............................................................. |
4 |
Installation Overview............................................ |
4 |
Preparing the Routing Template.......................... |
4 |
Preparing the Table............................................. |
5 |
Preparing the Table with a Router.................... |
6 |
Preparing the Table with a Hole Saw |
|
(Cable Cubby 300C only)............................... |
7 |
Installing the Cables and AAPs............................ |
7 |
AAP Shelf Brackets......................................... |
7 |
Installing the Power Module............................. |
8 |
Installing the Cables........................................ |
9 |
Installing the AAPs......................................... |
10 |
Installing the Shelf Assembly......................... |
10 |
Mounting the Cable Cubby............................... |
10 |
Maintenance and Modifications...................... |
12 |
Removing and Replacing the Cable Cubby....... |
12 |
Replacing Cables or an AAP............................. |
14 |
Adding an Additional Power Module |
|
(CC 600 and CC 800)...................................... |
14 |
Reference Information....................................... |
18 |
Cable Cubby Part Numbers.............................. |
18 |
Included Parts................................................... |
19 |
Replacement/Modification Part Numbers.......... |
19 |
Routing Template Part Numbers........................ |
19 |
Top Plate Dimensions........................................ |
20 |
Extron Warranty |
|
Cable Cubby 300/600/800 • Contents |
v |

Introduction
This section covers the following topics:
•About the Cable Cubby® 300, 600, and 800
•Features
About the Cable Cubby 300, 600, and 800
Extron Cable Cubby products are furniture-mounted, architectural solutions that provide inconspicuous cable access and connection points. When cables are not in use, they can be stored out of the way while remaining connected to the presentation system.
Most US/domestic Cable Cubby models provide two unswitched USA AC power outlets. For international markets, several different types of power receptacles are available, including universal, UK, French, Australian, and European receptacles.
NOTE: The universal AC outlet is fully compatible with various plug types. See the
Universal AC Outlet Compatibility Guide on the Extron website, www.extron.com, for compatibility details on all plug types.
The four different sizes of Cable Cubby provide room for the indicated number of
Architectural Adapter Plates (AAPs):
•Cable Cubby 800 USA/domestic model — Eight single space (single height) AAPs
•Cable Cubby 800 (AC module optional) — Ten single space (single height) AAPs
•Cable Cubby 600 USA/domestic model — Six single space AAPs
•Cable Cubby 600 (AC module optional) — Eight single space AAPs
•Cable Cubby 300 USA/domestic model — Three single space AAPs
•Cable Cubby 300S — Square cover (see figure 1)
•Cable Cubby 300C — Circular (round) cover
•Cable Cubby 300 (AC module optional) — Five single-space AAPs
•Cable Cubby 300S — Square cover
•Cable Cubby 300C — Circular (round) cover
Cable Cubby 300/600/800 • Introduction |
1 |
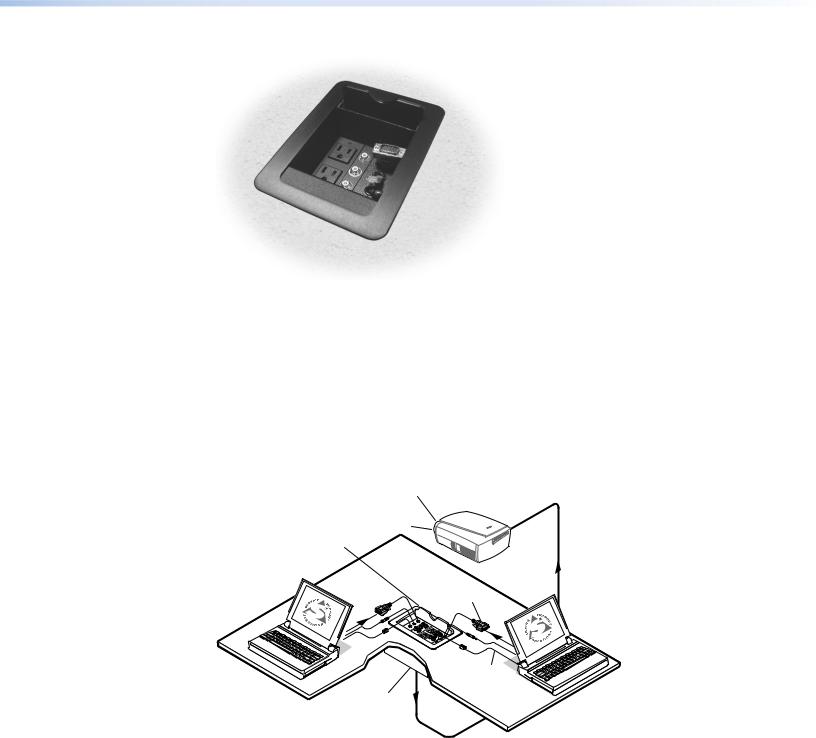
Figure 1. Cable Cubby 300S US/domestic Enclosure
The AAP spaces inside the Cable Cubby allow you to customize the enclosure to meet your unique needs. The split AAPs (included) can store almost any type of cable you might encounter. The Extron line of passive AAPs allows you to customize the AAP with almost any kind of pass-through connectivity you may need.
The elevation of the AAPs inside the cubby and the arrangement of the AAPs and the power outlets are adjustable to suit cable lengths and connector types.
The installed Cable Cubby fits nearly flush within a table or podium top, storing the AAPs and cables out of the way and out of sight. To access the AAPs and connectors, lift the lid (see figure 2). Half-moon cutouts in the lid allow you to run cables in or out and then close the lid. The lid can also be lowered into its recessed position.
Extron
Cable Cubby 800
Hideaway Cable
Access Enclosure
15-pin HD Cable
Audio Cable,
Network Cable
Figure 2. Typical Cable Cubby 800 Application
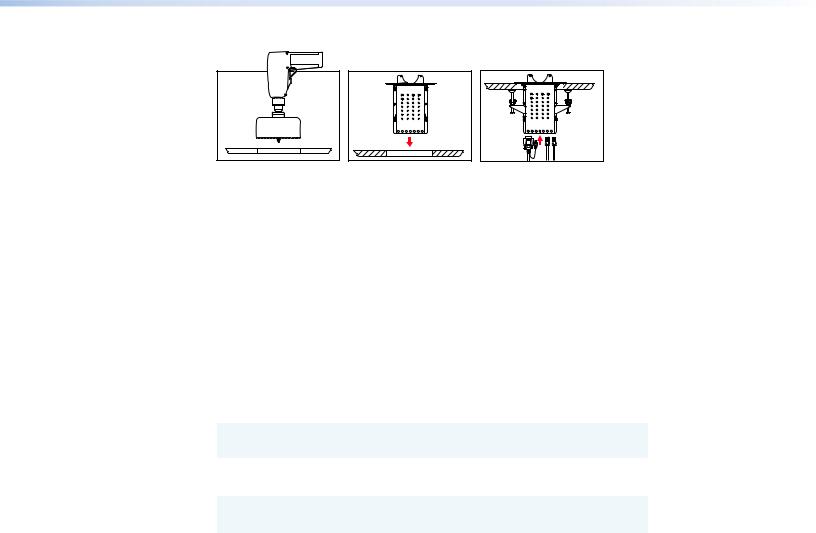
The Cable Cubby 300 is available with either a round or a rectangular top. The other Cable Cubby models all have rectangular tops only. Preparing the table to install a Cable Cubby 300C (round) requires drilling a hole in the table with a 6-inch hole saw (see figure 3). Preparing the table to install a square cubby requires routing a square hole in the table top. Sheet metal routing templates are available (see “Routing Template Part Numbers” on page 19 for part numbers).
Cable Cubby 300/600/800 • Introduction |
2 |
1 |
2 |
Figure 3. Cable Cubby 300C Mounting
3 |
Features
•Easy access to cables and AAPs
•Compatible with several available AAP modules
•Optional retractor available
•Compact size
•Flexible installation of Extron passive AAPs
•Available universal AC outlet is compatible with a variety of AC plug types
•UL/c-UL listed and CE compliant
•Fits in a range of surface thicknesses. See the table below:
Enclosure |
Minimum Table |
Maximum Table |
|
Thickness |
Thickness |
|
|
|
Cable Cubby 300 |
0.571 inch (≈19/32 inch) |
3.23 inch (≈3-1/4 inch) |
|
[14.5 mm] |
[82.0 mm] |
|
|
|
Cable Cubby 600 |
0.75 inch (3/4 inch) |
3.41 inch (≈3-13/32 inch) |
|
[19.05 mm] |
[86.6 mm] |
|
|
|
Cable Cubby 800 |
0.75 inch (3/4 inch) |
3.41 inch (≈3-13/32 inch) |
|
[19.05 mm] |
[86.6 mm] |
|
|
|
Cable Cubby 300/600/800 • Introduction |
3 |

Installation
This section covers the following topics:
•Installation Overview
•Preparing the Routing Template
•Preparing the Table
•Installing the Cables and AAPs
•Mounting the Cable Cubby
Installation Overview
Install and set up the Cable Cubby enclosures as follows:
1.If you plan to use a mounting template that has not been prepared, prepare the template (see “Preparing the Routing Template” below).
2.Cut a hole in the surface where the enclosure will be installed (see “Preparing the Table” on the next page).
3.Run all cables necessary to support the AC connector, the cables stored in the cubby, and all planned AAP connectors. Leave enough slack in the cables to connect or route them before the cubby is installed in the table.
4.If applicable, install the power module. If your location requires electrical conduit, install an Extron flexible conduit kit. Refer to the Flexible Conduit Kit Installation Guide, Extron part number 68-734-01.
5.Install all desired cables into the cable pass-through (split) AAPs and install the AAPs into the Cable Cubby (see “Installing the Cables and AAPs” on page 7).
6.If applicable, connect cables to the rear connectors on the passive AAPs and install the AAPs in the cubby (see “Installing the AAPs” on page 10).
7.Mount the Cable Cubby in the table (see “Mounting the Cable Cubby” on page 10).
8.Peel the protective film from the top surface.
9.Connect the Cable Cubby power cord.
Preparing the Routing Template
Extron offers metal templates for each Cable Cubby model; see “Routing Template Part Numbers” on page 19 for part numbers. Extron recommends using this template as a guide to cut the hole in the table where the cubby will be installed.
NOTE: The metal routing template is reusable. Do not discard this template when the installation is complete. Save it for installing Cable Cubby models of the same size.
1.Cut 1/2 inch x 4 inch strips of soft, finished lumber to a length that is long enough to span the distance between the desired installation location on the mounting surface and the edges of the mounting surface (see figure 4).
Cable Cubby 300/600/800 • Installation |
4 |
 Loading...