


ULTRA VAC® QDS
LAZER Z® HP MODELS
For Ultra Vac Serial Nos.
790,000 & Higher
Part No. 4500-420 Rev. A

Exmark reserves the right to make changes or add improvements to its products at any time without incurring any obligation to make such changes to products manufactured previously. Exmark, or its distributors and dealers, accept no responsibility for variations which may be evident in the actual specifications of its products and the statements and descriptions contained in this publication.
© 2008—Exmark Mfg. Co., Inc. |
|
Contact us at www.Exmark.com. |
|
Industrial Park Box 808 |
|
Printed in the USA |
|
2 |
|||
Beatrice, NE 68310 |
All Rights Reserved |
Introduction
CONGRATULATIONS on the purchase of your Exmark Ultra Vac QDS. This product has been carefully designed and manufactured to give you a maximum amount of dependability and years of trouble-free operation.
This manual contains operating, maintenance, adjustment, and safety instructions for your Exmark Ultra Vac QDS.
BEFORE OPERATING YOUR MOWER, CAREFULLY READ THIS MANUAL IN ITS ENTIRETY.
By following the operating, maintenance, and safety instructions, you will prolong the life of your Ultra Vac QDS, maintain its maximum efficiency, and promote safe operation.
If additional information is needed, or should you require trained mechanic service, contact your authorized Exmark equipment dealer or distributor.
All Exmark equipment dealers and distributors are kept informed of the latest methods of servicing and are equipped to provide prompt and efficient service in the field or at their service stations. They carry ample stock of service parts or can secure them promptly for you from the factory.
All Exmark parts are thoroughly tested and inspected before leaving the factory, however, attention is required on your part if you are to obtain the fullest measure of satisfaction and performance.
Whenever you need service, genuine Exmark parts, or additional information, contact an Authorized Service Dealer or Exmark Customer Service and have the model and serial numbers of your product ready.
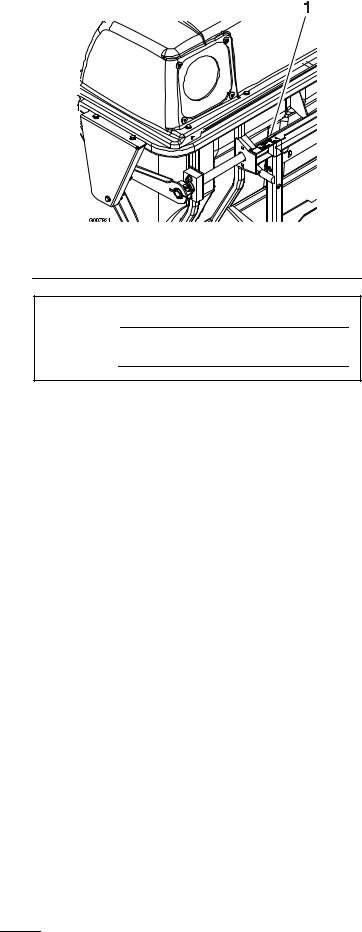
Figure 1 identifies the location of the model and serial numbers on the product. Write the numbers in the space provided.
Figure 1
1. Model and serial number location
Model No.
Serial No.
3

Contents |
|
Introduction ........................................................... |
3 |
Safety ..................................................................... |
5 |
Safety Alert Symbol......................................... |
5 |
SafeOperatingPractices.................................. |
5 |
SafetyandInstructionalDecals ....................... |
8 |
Specifications ....................................................... |
10 |
Model Numbers............................................ |
10 |
Systems......................................................... |
10 |
Dimensions................................................... |
10 |
TorqueRequirements .................................... |
10 |
Product Overview ................................................ |
11 |
Operation ............................................................. |
11 |
Pre-Start........................................................ |
11 |
OperatingInstructions .................................. |
11 |
Transporting ................................................. |
14 |
Maintenance ......................................................... |
16 |
RecommendedMaintenanceSchedule(s) ........... |
16 |
Periodic Maintenance ....................................... |
16 |
CheckBlowerHousing/Impeller................... |
16 |
CheckDoorClothMesh................................ |
16 |
LubricateGreaseFittings............................... |
17 |
CheckConditionofBelt................................ |
17 |
Adjustments ..................................................... |
18 |
Cleaning ........................................................... |
19 |
CleanMufflerandRearFrameArea................ |
19 |
CleanRearScreenInHood............................ |
19 |
Clean Blower................................................. |
19 |
Troubleshooting ................................................... |
20 |
4

Safety
Safety
Safety Alert Symbol
This Safety Alert Symbol (Figure 2) is used both in this manual and on the machine to identify important safety messages which must be followed to avoid accidents
This symbol means: ATTENTION! BECOME
ALERT! YOUR SAFETY IS INVOLVED!
Figure 2
1.Safety alert symbol
The safety alert symbol appears above information which alerts you to unsafe actions or situations and will be followed by the word DANGER,
WARNING, or CAUTION.
DANGER: White lettering / Red background. Indicates an imminently hazardous situation which, if not avoided, Will result in death or serious injury.
WARNING: Black lettering / Orange background. Indicates a potentially hazardous situation which, if not avoided, Could result in death or serious injury.
CAUTION: Black lettering / Yellow background. Indicates a potentially hazardous situation which, if not avoided, May result in minor or moderate injury.
This manual uses two other words to highlight information. Important calls attention to special mechanical information and Note emphasizes general information worthy of special attention.
Safe Operating Practices
Training
•Read the tractor and Ultra Vac QDS Operator’s Manuals and other training material. If the operator(s) or mechanic(s) can not read English it is the owner’s responsibility to explain this material to them.
•Become familiar with the safe operation of the equipment, operator controls, and safety signs.
•All operators and mechanics should be trained. The owner is responsible for training the users.
•Never let children or untrained people operate or service the equipment. Local regulations may restrict the age of the operator.
•The owner/user can prevent and is responsible for accidents or injuries occurring to himself or herself, other people or property.
Preparation
•Evaluate the terrain to determine what accessories and attachments are needed to properly and safely perform the job. Only use on machines approved by Exmark.
•Wear appropriate clothing including safety glasses, substantial footwear, long trousers, and hearing protection. Do Not operate when barefoot or when wearing open sandals.
 CAUTION
This machine produces sound levels in excess of 85 dBA at the operator’s ear and can cause hearing loss through extended periods of exposure.
Wear hearing protection when operating this machine.
•Inspect the area where the equipment is to be used and remove all rocks, toys, sticks, wires, bones, and other foreign objects which can be thrown by the machine and may cause personal injury to the operator or bystanders.
Operation
•Operate only in daylight or good artificial light, keeping away from holes and hidden hazards.
•Never mow with the discharge deflector raised, removed or altered unless there is a grass collection system or mulch kit in place and working properly.
5

Safety
 DANGER
There are rotating blades in the blower and under the mower deck. Blade contact can cause serious operator or bystander injury or even death.
•Do Not reach into blower unless rotation indicator has stopped. Disengage PTO, stop engine, remove key, wait for all moving parts to stop. Engage parking brake.
•Never operate mower unless discharge deflector, entire grass collection system, or mulch kit is installed.
•Stop engine, wait for all moving parts to stop, remove key and engage parking brake:
–Before checking, cleaning or working on the mower.
–After striking a foreign object or abnormal vibration occurs (inspect the mower for damage and make repairs before restarting and operating the mower).
–Before clearing blockages.
–Whenever you leave the mower.
 WARNING
Hands, feet, hair, clothing, or accessories can become entangled in rotating parts. Contact with the rotating parts can cause traumatic amputation or severe lacerations.
•Do Not operate the machine without guards, shields, and safety devices in place and working properly.
•Keep hands, feet, hair, jewelry, or clothing away from rotating parts.
•Stop the blades, slow down, and use caution when crossing surfaces other than grass and when transporting the mower to and from the area to be mowed.
•Be aware of the mower discharge path and direct discharge away from others.
Slope Operation
Use Extreme caution when mowing and/or turning on slopes as loss of traction and/or tip-over could occur. The operator is responsible for safe operation on slopes.
 DANGER
Operating on wet grass or steep slopes can cause sliding and loss of control. Wheels dropping over edges, ditches, steep banks, or water can cause rollovers, which may result in serious injury, death or drowning.
•Do Not mow slopes when grass is wet.
•Do Not mow near drop-offs or near water.
•Do Not mow slopes greater than 15 degrees.
•Reduce speed and use extreme caution on slopes.
•Avoid sudden turns or rapid speed changes.
•Keep the roll bar in the raised and locked position and use seat belt.
•See inside the back cover to determine the approximate slope angle of the area to be mowed.
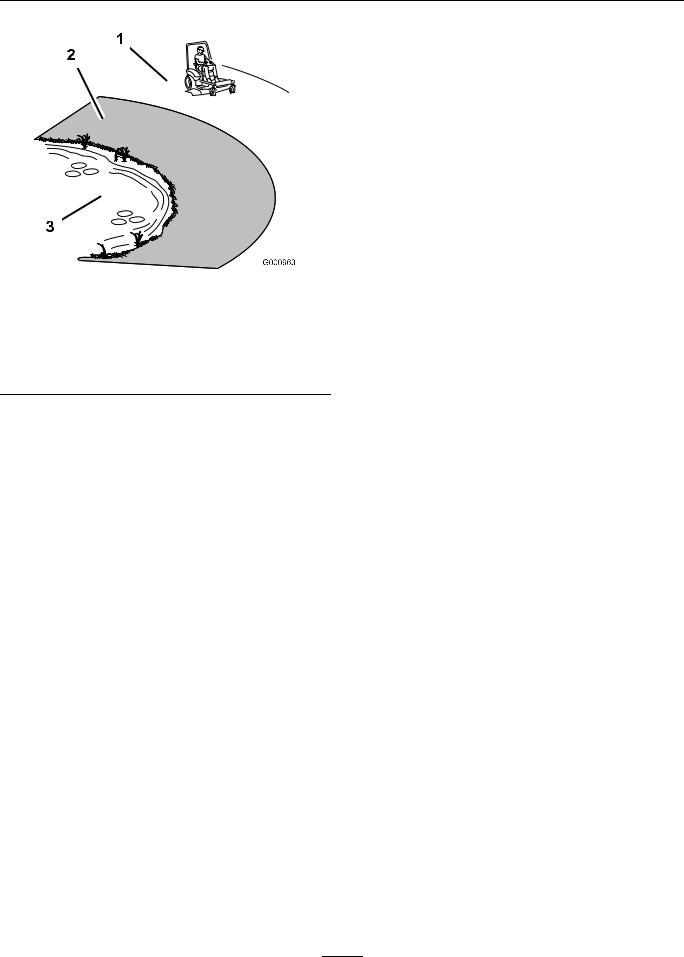
•Use a walk behind mower and/or a hand trimmer near drop-offs, ditches, steep banks or water. (Figure 3).
6
Safety
Figure 3
1.Safe Zone-Use the mower here on slopes less than 15 degrees
2.Danger Zone-Use a walk behind mower and/or hand trimmer on slopes greater than 15 degrees, near drop-offs and water.
3.Water
•Remove or mark obstacles such as rocks, tree limbs, etc. from the mowing area. Tall grass can hide obstacles.
•Watch for ditches, holes, rocks, dips and rises that change the operating angle, as rough terrain could overturn the machine.
•Avoid sudden starts when mowing uphill because the mower may tip backwards.
•Be aware that operating on wet grass, across steep slopes or downhill may cause the mower to lose traction. Loss of traction to the drive wheels may result in sliding and a loss of braking and steering.
•Always avoid sudden starting or stopping on a slope. If tires lose traction, disengage the blades and proceed slowly off the slope.
•Follow the manufacturer’s recommendations for counter weights to improve stability. Always install and remove the Ultra Vac QDS, including counter weights, as instructed. Failure to do so will cause a reduction in stability or traction. Do Not operate the mower with only a portion of the Ultra Vac QDS installed.
•Use extreme care with grass catchers or attachments. These can change the stability of the machine and cause loss of control. The stability and traction of the machine will change as the Ultra Vac QDS hopper fills with grass clippings.
Use progressively greater care on slopes as the hopper fills.
Maintenance and Storage
•Disengage drives, set parking brake, stop engine and remove key or disconnect spark plug wire. Wait for all movement to stop before adjusting, cleaning or repairing.
•Use care when checking blades. Wrap the blade(s) or wear gloves, and use caution when servicing them. Only replace damaged blades. Never straighten or weld them.
•Keep all guards, shields and all safety devices in place and in safe working condition.
•Check all bolts frequently to maintain proper tightness.
•Frequently check for worn or deteriorating components that could create a hazard.
•All replacement parts must be the same as or equivalent to the parts supplied as original equipment.
7
Safety
Safety and Instructional Decals
•Keep all safety signs legible. Remove all grease, dirt and debris from safety signs and instructional labels.
•Replace all worn, damaged, or missing safety signs.
•When replacement components are installed, be sure that current safety signs are affixed to the replaced components.
•If an attachment or accessory has been installed, make sure current safety signs are visible.
•New safety signs may be obtained from your authorized Exmark equipment dealer or distributor or from Exmark Mfg. Co. Inc.
•Safety signs may be affixed by peeling off the backing to expose the adhesive surface. Apply only to a clean, dry surface. Smooth to remove any air bubbles.
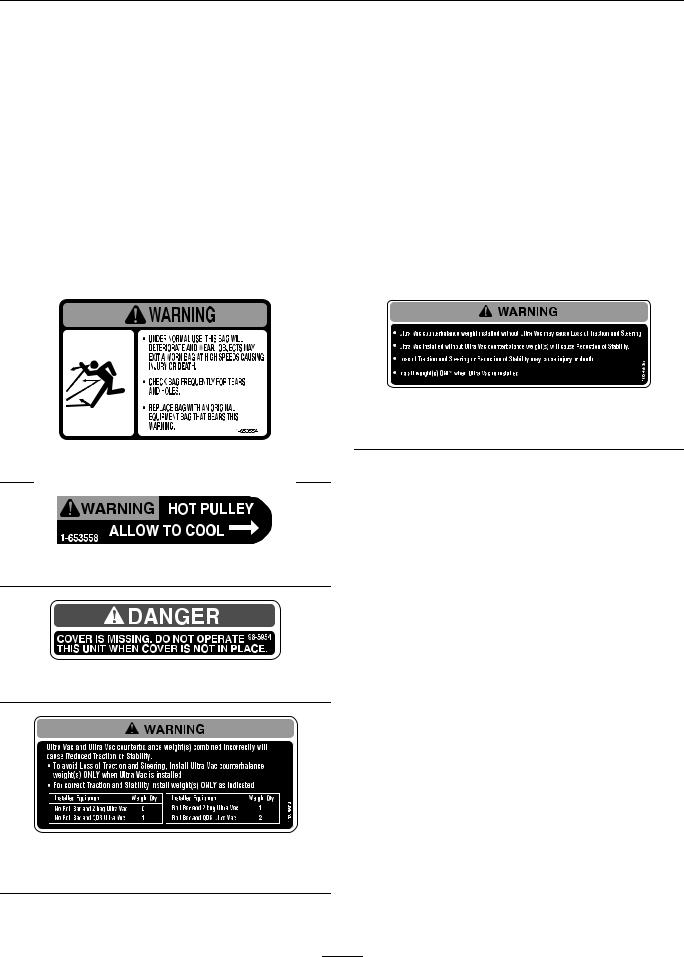
•Familiarize yourself with the following safety signs and instruction labels. They are critical to the safe operation of your Exmark commercial mower.
103-6605
For Units with a Two-Post ROPS Only
1-653554
1-653558
98-5954
103-6604
For Units with a Two-Post ROPS Only
8
 Loading...