


Instruction Manual
CyberScan pH 1500
Bench pH/mV Meter
Technology Made Easy ...
68X292327 Rev 0 12/02
PREFACE
Thank you for selecting the Eutech Instruments CyberScan pH 1500 bench meter.
The instruction manual serves to explain the use of the CyberScan pH 1500 bench meter as a step-by-step operational guide to help you familiarize with the meter’s features and functions. It is structured sequentially with illustration of diagrams that explains the various functions and setup menus available.
This manual is written to cover as many anticipated applications and uses of the CyberScan pH 1500 bench meter as possible. If there are doubts in the use of the meter, please do not hesitate to contact the nearest Eutech Instruments’ Authorised Distributors or call us at (65) 6778-6876 for Eutech Instruments’ Customer Service Dept. for assistance.
Kindly remember to complete the warranty card and mail it back to your Authorized Distributors or Eutech Instruments Pte Ltd.
Eutech Instruments reserve the rights to change, make improvement and modify specifications without prior notice and cannot accept any responsibility for damage or malfunction to the instrument caused by improper use.
Copyright © 2002 Eutech Instruments Pte. Ltd.
All rights reserved. Draft, August 2002.
TABLE OF CONTENTS
1 |
INTRODUCTION |
2 |
|||
|
1.1 |
Introducing the CyberScan Series |
2 |
||
2 |
GETTING STARTED |
3 |
|||
|
2.1 |
Meter Overview |
3 |
||
|
2.2 |
CONNECTORS |
4 |
||
3 |
USING THE METER |
6 |
|||
|
3.1 |
Electrodes |
|
6 |
|
|
3.2 |
Temperature Probe |
8 |
||
|
3.3 |
Display / Keys |
9 |
||
|
3.4 |
Screen Display |
10 |
||
4 |
SETUP MENUS |
|
11 |
||
|
4.1 |
Using the Meter |
11 |
||
|
4.1.1 |
P1.0 View pH Electrode Offset |
13 |
||
|
4.1.2 |
P2.0 View pH Electrode Slope |
14 |
||
|
4.1.3 |
P3.0 pH Buffer Group |
15 |
||
|
4.1.4 |
P4.0 |
pH Resolution |
17 |
|
|
4.1.5 |
P5.0 |
Temperature Unit |
19 |
|
|
4.1.6 |
P6.0 Stability Indicator |
21 |
||
|
4.1.7 |
P7.0 Baud Rate |
22 |
||
|
4.1.8 |
P8.0 |
Parity Bit |
24 |
|
|
4.1.9 |
P9.0 |
Stop Bit |
26 |
|
|
4.1.10 |
P10.0 Print Data |
28 |
||
|
4.1.11 |
P11.0 Clear Stored Data |
29 |
||
|
4.1.12 |
P12.0 Clear Buffer Values |
31 |
||
|
4.1.13 |
P13.0 View mV offset |
32 |
||
|
4.1.14 |
P14.0 Clear mV offset |
33 |
||
5 |
PH OPERATION |
34 |
|||
|
5.1 |
Standardization |
34 |
||
|
5.2 |
pH Electrode Diagnosis Indicator |
39 |
||
6 mV OR RELATIVE mV OPERATION |
40 |
||||
|
6.1 |
Absolute mV |
40 |
||
|
6.2 |
Relative mV |
41 |
||
|
6.3 |
Temperature Calibration |
42 |
||
7 |
MEASUREMENT |
43 |
|||
8 |
MEMORY |
|
|
44 |
|
|
8.1 |
Store Value Into Memory |
44 |
||
|
8.2 |
Recall Value From Memory |
44 |
||
9 |
PRINT DATA |
|
45 |
||
|
9.1 |
Printing Data |
45 |
||
10 pH THEORY |
|
46 |
|||
|
10.1 |
Measuring pH |
47 |
||
11 CLEANING |
|
48 |
|||
12 TROUBLESHOOTING |
48 |
||||
13 METER SPECIFICATIONS |
49 |
||||
14 ACCESSORIES |
|
50 |
|||
15 WARRANTY |
|
52 |
|||
16 NOTICE OF COMPLIANCE |
53 |
||||

Instruction Manual |
CyberScan pH1500 |
1 INTRODUCTION
1.1 Introducing the CyberScan Series
Thank you for selecting the Eutech Instruments CyberScan pH1500 bench-top meter. This instruction manual describes the operation of the meter. The state-of-art meter that you have purchased is easy to operate and will guide you through the various functions by displaying easy to understand prompts. This manual should answer any questions that might arise in operating your meter, however, do not hesitate to call our Technical Support at (65) 6778 6876 (ext 839) or fax at (65) 6773 0836.
This instruction manual is designed to provide all the information necessary to guide you through the process of measuring pH or mV with a series of prompts on the screen.
)
You will find this symbol appearing in this manual; it indicates useful tips that ease your meter operation.
The CyberScan pH1500 meter provides microprocessor precision in a compact benchtop design that is easy to use. This metre allows you:
Measure pH, absolute mV or relative mV
Select one of three sets of standard buffer groups
Standardise with up to five buffers
It all adds up to rapid, completely automatic, intuitive operation.
2
Instruction Manual |
CyberScan pH1500 |
2 GETTING STARTED
2.1 Meter Overview
3
Instruction Manual |
CyberScan pH1500 |
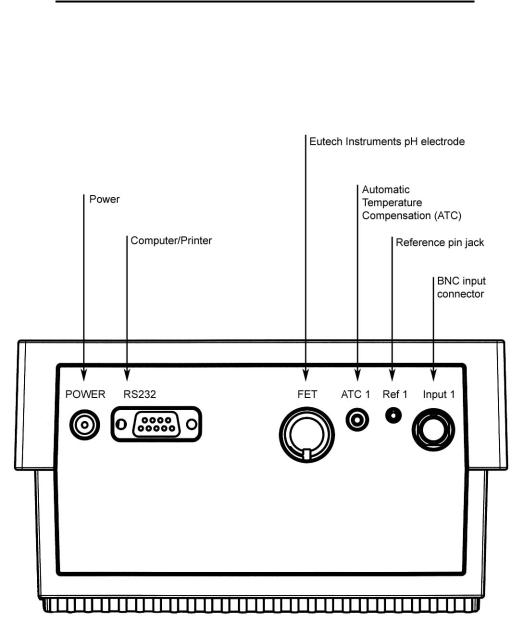
2.2 CONNECTORS
1. Review the layout and arrangement of the rear connector panel.
4
Instruction Manual |
CyberScan pH1500 |
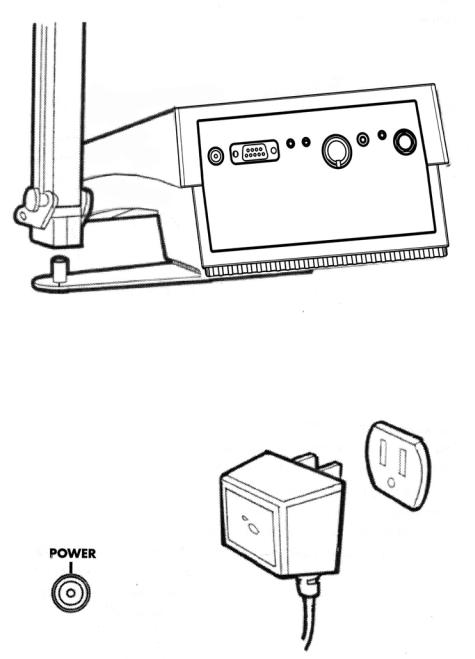
2. Connect the electrode arm to the base.
3. Connect the power cable to the connector cable to the rear connector panel power jack and to a power source.
5
Instruction Manual |
CyberScan pH1500 |
3 USING THE METER
3.1 Electrodes
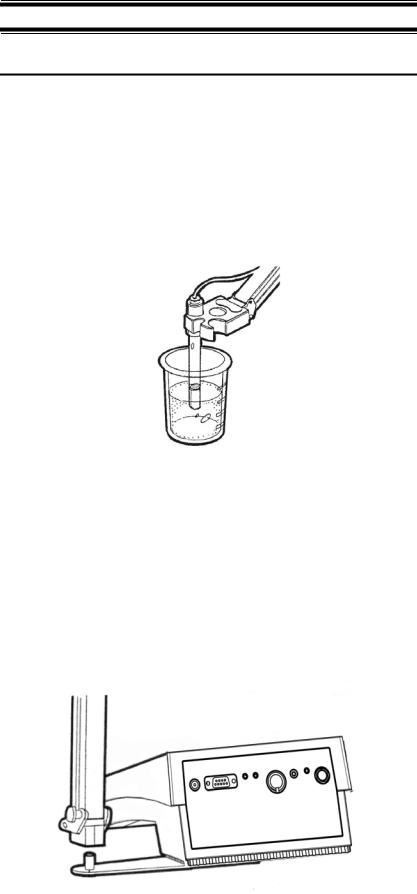
This meter allows you to use two types of electrodes: the conventional glass pH electrode and the Eutech Instruments field effect transistor (FET) pH electrode. If both types of pH electrodes are connected, the meter will read the FET electrode.
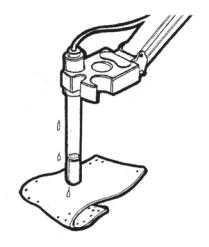
1. Carefully remove the protective cover from the end of the electrode. Before first using your glass pH electrode, or whenever the pH electrode is dry, soak it 2-4 hours in electrode storage solution, pH 4 buffer, or KCI solution.
2. Remove the shorting cap on BNC connector. Install the combination pH electrode by plugging it into the BNC input connector (Twisting to lock in place).
If a combination electrode isn’t used, install the indicating pH electrode into the BNC input connector. Plug the reference electrode into the reference pin jack. Also, install the ATC probe into the ATC jack.
Option: install the optional FET electrode by plugging it into the FET jack on the back meter panel. Allow the Eutech Instruments electrode to warm up five minutes before use.
6
Instruction Manual |
CyberScan pH1500 |
)Do not discard the BNC shorting cap.
3. Rinse and blot-dry (don’t wipe) electrodes between each measurement. Rinse electrodes with distilled or deionised water, or a portion of the next solution to be measured.
4.
)
Between measurements, store conventional pH electrodes storage solution, pH 4 buffer, or KCI solution. Always leave the filling hole of liquid filled combination electrodes open. Refill when the level of solution gets below the manufacturer’s recommended level.
Proper electrode care is fundamental for obtaining reliable pH
measurements. Improper care of the electrode may cause the meter reading to drift, respond slowly, or produce erroneous readings. For this reason, the electrode should always be conditioned and used in accordance with manufacturer’s instructions.
7

Instruction Manual |
CyberScan pH1500 |
3.2 Temperature Probe
For more accurate pH measurement, a temperature probe (supplied with the meter) is used for Automatic Temperature Compensation (ATC). Once the temperature probe is connected into its socket (located at the back of meter), the ATC icon is displayed on the screen to indicate that the meter is in ATC Measure mode. If the temperature probe is not connected the meter displays 25.0 oC or 77 oF as the default temperature value. When in ATC mode, the meter allows fine offset temperature adjustment of ±5.0 oC (±9.0 oF) from mV mode by pressing the std key. Use ▲ or ▼ key to set the desired value and press enter key to confirm. The meter returns to the Measure mode.
8
Instruction Manual |
CyberScan pH1500 |
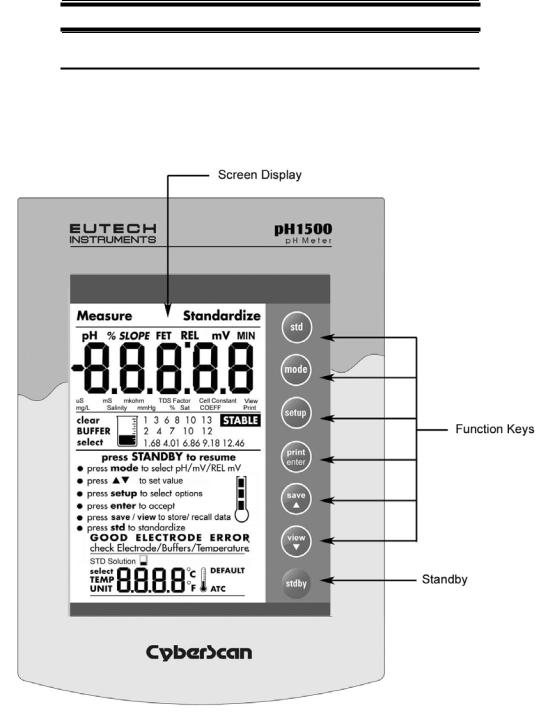
3.3 Display / Keys
Overview of the meter screen display and function key layout.
Press std key to initiate standardization. Or press std key at the Standardize mode allows you to exit and return to Measure mode.
Press mode to select pH, mV and Relative mV.
Press setup key to access setup for configuration of meter setting.
Press print key to print stored data from memory or current reading to a PC or printer (depending on meter setup).
Press enter key to confirm selection or change being made.
Press ▲ key to increment value or scroll up selection.
Press ▼ key to decrement value or scroll down selection.
Press save key to store displayed data into memory
Press view key to recall and select memory location of stored data
Press stdby key to start up or put the meter in standby mode.
9

Instruction Manual |
CyberScan pH1500 |
3.4 Screen Display
Familiarise yourself with the layout of the digital screen display.
10
Instruction Manual |
CyberScan pH1500 |
4 SETUP MENUS
4.1 Using the Meter
The setup button brings you to the setup menus of the various parameters. Press setup while in measurement OR standardization to access to the setup menus. The ▲ and ▼ keys allow you to change several operating parameters. While in the setup mode you may:
std
setup
print enter
save
view
Press the std key at any time to return to the Measure screen without making a change or selection in the setup mode. Note new change will not be effected as no confirmation is done.
Press the setup key anytime to access the setup mode in the measurement mode. The menu displays the first setup menu P1.0.
Press the enter key to accept a change or selection of desired option in the displayed parameter. The meter will then return to the next setup
Press the ▲ and ▼ keys to scroll through (increment and decrement setup menu respectively) the remaining selection options available.
11
Instruction Manual |
CyberScan pH1500 |
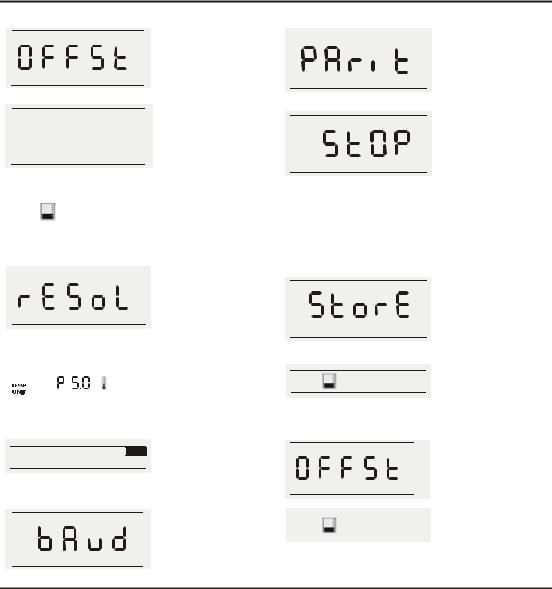
In the setup mode, there are 12 setup menus for you to change the operating parameters to suit your individual preference as well as to configure RS232 communication interface protocol for printing.
While you are in each parameter Measure mode, pressing setup key allows you to access all 12 setup menus (P1.0 to P12.0) in the pH mode and other setup menus for mV and Relative mV modes. Refer to Overview of Setup Menus below.
Mode |
Setup Menus Accessible |
pH |
P1.0 to P12.0 |
mV |
P5.0 to P11.0 |
REL mV |
P5.0 to P11.0, P13.0 & P14.0 |
)If you do not wish to make a selection or change the option, pressing std key at any point of time allows you to abort the setup menu and return to the Measure mode.
pH
View
pH % SLOPE
View
P1.0
View pH electrode offset
-Allows you to view pH electrode offset in mV after 1-point standardization.
P2.0
View pH electrode slope
-View the pH electrode slope in % after 2-point standardization is successfully done.
|
|
|
P3.0 |
|
BUFFER |
|
pH buffer group |
|
- Select from 3 different buffer |
||
|
select |
||
|
groups, each containing 5-6 |
||
|
|
|
|
|
|
|
buffers, for auto buffer |
|
|
|
recognition. |
|
|
|
|
|
P4.0 |
pH |
|
|
pH resolution |
|
- Select various pH resolution |
|
either 0.1, 0.01 or 0.001. |
P8.0
Parity Bit
- Set the parity bit of the
|
communication protocol |
interface. |
P9.0
Stop Bit
- Set the stop bit of the communication protocol
interface.
|
|
|
P10.0 |
|
|
|
Print Data |
|
|
|
- To print current displayed |
|
|
|
data or data stored in the |
|
meter’s memory to a |
||
|
Data |
computer or printer via |
|
|
|
|
Rs232. |
P11.0
Clear Stored Data
- To clear all stored data sets for new data to be stored.
Data
|
|
|
P5.0 |
|
|
|
Temperature Unit |
|
sel ect |
- Select unit of measure for |
|
|
|
|
Temperature either in °C or °F. |
|
|
|
|
clear BUFFER
P12.0
Clear Buffer Values
-To clear the standardized buffer values.
STABLE |
P6.0 |
mV |
|
Stability Indicator |
|
|
-Set the stability indicator to be |
|
|
displayed on the screen. |
|
|
|
View |
P13.0
View mV offset
P7.0 |
|
|
P14.0 |
|
clear |
||
Baud Rate |
|
Clear mV offset |
|
- To set the baud rate |
|
-Select to clear of retain mV |
|
|
|||
(bits of second) of the |
|
offset stored earlier. |
|
communication protocol |
|
|
|
interface. |
|
|
|
Overview of Setup menus
12
Instruction Manual |
CyberScan pH1500 |
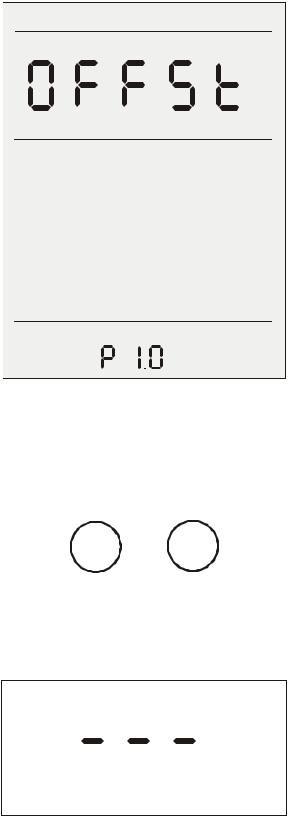
4.1.1P1.0 View pH Electrode Offset
This setup menu allows you to view the pH electrode offset in mV after 1-point standardization is successfully done.
pH
View
press to set value press enter to accept
ELECTRODE
To view pH electrode offset
1.Access View the pH electrode offset menu from pH measurement screen by pressing setup key
2.Press ▲ and ▼ keys to scroll until display shown as above.
save view
3.Press enter to view the offset. A series of dashes “- - -“ will be displayed if the unit has not been standardized.
|
|
|
|
|
pH |
mV |
|
|
|
|
|
|
|
|
|
13

Instruction Manual |
CyberScan pH1500 |
4.1.2P2.0 View pH Electrode Slope
This setup menu allows you to view the pH electrode slope in % after 2-point standardization is successfully done.
pH % SLOPE
View
press to set value press enter to accept
ELECTRODE
To View pH Electrode Slope
1.Access the View pH Electrode Slope menu from the pH Measure screen by pressing the setup key.
2.Press ▲ and ▼ keys to scroll until display shown as above.
save view
3.Press enter to view the offset. A series of dashes “- - -“ will be displayed if the unit has not been standardized
pH % SLOPE
14
Instruction Manual |
CyberScan pH1500 |
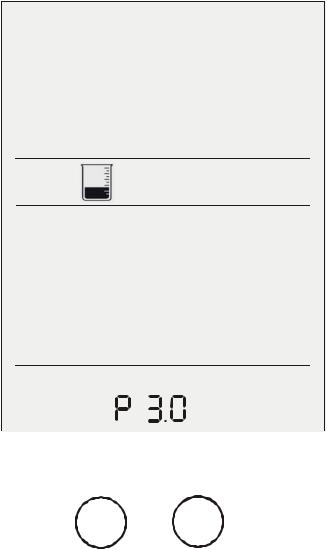
4.1.3P3.0 pH Buffer Group
This setup option allows you to select from 3 different buffer groups, each containing 5 buffers, for auto buffer recognition.
The 3 buffer groups are: |
|
|
|
USA buffers: |
2, 4, 7, |
10 and 12 |
|
European buffers: |
1, 3, 6, |
8 and 10 |
|
NIST buffers: |
1.68, 4.01, 6.86, |
9.18 and 12.46 |
|
To Set pH Buffer Group
1.Access the Select Buffer menu from the pH Setup Screen by pressing the setup key.
BUFFER select
press to set value press enter to accept
ELECTRODE
2. Press ▲ and ▼ keys to scroll until display shown as above.
save view
.
15
 Loading...