


 Loading...
WorkForce®
WF-7510/WF-7520
Quick Guide
Your WorkForce WF-7510/WF-7520 . . . . . . . . . . . . . . . . . . . . . . . . . . . . . . . . 2 Using Special Papers . . . . . . . . . . . . . . . . . . . . . . . . . . . . . . . . . . . . . . . . . . . . 4 Placing Originals for Copying, Scanning, or Faxing. . . . . . . . . . . . . . . . . . . . . . 7 Copying a Document . . . . . . . . . . . . . . . . . . . . . . . . . . . . . . . . . . . . . . . . . . . . 9 Printing From a Memory Card . . . . . . . . . . . . . . . . . . . . . . . . . . . . . . . . . . . . 11 Printing From Your Computer. . . . . . . . . . . . . . . . . . . . . . . . . . . . . . . . . . . . . 13 Faxing a Document. . . . . . . . . . . . . . . . . . . . . . . . . . . . . . . . . . . . . . . . . . . . . 17 Maintaining Your Product . . . . . . . . . . . . . . . . . . . . . . . . . . . . . . . . . . . . . . . . 22 Scanning a Document or Photo . . . . . . . . . . . . . . . . . . . . . . . . . . . . . . . . . . . 27 Solving Problems . . . . . . . . . . . . . . . . . . . . . . . . . . . . . . . . . . . . . . . . . . . . . . 30 Notices . . . . . . . . . . . . . . . . . . . . . . . . . . . . . . . . . . . . . . . . . . . . . . . . . . . . . . 35
Guide rapide
Votre WorkForce WF-7510/WF-7520 . . . . . . . . . . . . . . . . . . . . . . . . . . . . . . . 44 Utilisation de supports spéciaux. . . . . . . . . . . . . . . . . . . . . . . . . . . . . . . . . . . 46 Positionnement des originaux . . . . . . . . . . . . . . . . . . . . . . . . . . . . . . . . . . . . 49 Copie d’un document . . . . . . . . . . . . . . . . . . . . . . . . . . . . . . . . . . . . . . . . . . . 51 Impression depuis une carte mémoire. . . . . . . . . . . . . . . . . . . . . . . . . . . . . . 53 Impression depuis un ordinateur . . . . . . . . . . . . . . . . . . . . . . . . . . . . . . . . . . 55 Télécopie d’un document . . . . . . . . . . . . . . . . . . . . . . . . . . . . . . . . . . . . . . . . 59 Numérisation d’un document ou d’une photo . . . . . . . . . . . . . . . . . . . . . . . . 65 Entretien de l’imprimante . . . . . . . . . . . . . . . . . . . . . . . . . . . . . . . . . . . . . . . . 68 Résolution des problèmes . . . . . . . . . . . . . . . . . . . . . . . . . . . . . . . . . . . . . . . 73 Avis. . . . . . . . . . . . . . . . . . . . . . . . . . . . . . . . . . . . . . . . . . . . . . . . . . . . . . . . . 79
1
English
Your WorkForce WF-7510/
WF-7520
After you set up your WorkForce® WF-7510/WF-7520 (see the Start Here sheet), turn to this Quick Guide and your online User’s Guide for instructions on using your product.
Note: The illustrations in this manual show the WorkForce WF-7520. The instructions apply to both the WF-7510 and WF-7520 unless otherwise noted.
Features |
Where to find information |
Copy, scan, and fax from the easy-to-use |
See this Quick Guide for the basics. |
control panel |
See the online User’s Guide for details. |
|
|
Easy networking—Wi-Fi and Ethernet |
See the online User’s Guide. |
|
|
Extra-high capacity ink cartridges |
See this Quick Guide for installation |
|
instructions. |
|
|
Advanced paper handling with Automatic |
See the Start Here sheet and the online |
Document Feeder and 250-sheet, wide-format |
User’s Guide for paper loading instructions. |
cassette |
|
|
|
Wireless printing from mobile devices with |
See www.epson.com/connect. |
Epson Connect |
|
|
|
Adjusting the Control Panel
The control panel is adjustable. Squeeze the release bar underneath to raise or lower it as shown.
2 Your WorkForce WF-7510/WF-7520
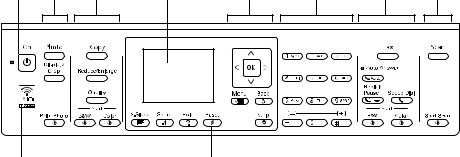
Using the Control Panel
The control panel makes it easy to use all the features of your product. To save energy, the screen goes dark after several minutes of inactivity. Press any button to wake it up.
1 |
2 |
3 |
4 |
5 |
6 |
7 |
8 |
9 |
10 |
Tip: To turn off the “beep” heard when you press a button on the screen, press Setup, select Printer Setup, select Sound, and select Off. If you turn off the sound, the dialing sound made when you transmit a fax is also turned off.
Number |
Description |
1 |
Turns product on/off |
|
|
2 |
Press Photo to access the Print Photos menu |
|
|
3 |
Press Copy to access your product’s Copy mode |
|
|
4 |
View menus and status on the LCD Screen |
|
|
5 |
Use the arrow keys and OK button to navigate menus |
|
|
6 |
Enter numbers, letters, and symbols |
|
|
7 |
Press Fax to access your product’s Fax mode |
|
|
8 |
Press Scan to access your product’s Scan mode |
|
|
9 |
Shows wireless network status |
|
|
10 |
Resets the active menu selection to its default value |
|
|
Using the Control Panel 3
Using Special Papers
Epson offers a wide array of high quality papers, making it easy to maximize the impact of your photos, presentations, and creative projects.
You can purchase genuine Epson ink and paper at Epson Supplies Central® at www.epson.com/ink3 (U.S. sales) or www.epson.ca (Canadian sales). You can also purchase supplies from an Epson authorized reseller. To find the nearest one, call 800-GO-EPSON (800-463-7766).
|
|
Part |
Sheet |
|
Paper name |
Size |
number |
count |
|
Epson Bright White Paper |
Letter (8.5 × 11 inches |
S041586 |
500 |
|
|
[216 × 279 mm]) |
|
|
|
|
|
|
|
|
Epson Brochure & Flyer Paper Matte |
Letter (8.5 × 11 inches |
S042384 |
150 |
|
Double-sided |
[216 × 279 mm]) |
|
|
|
|
|
|
|
|
Epson Premium Presentation Paper |
8 × 10 inches (203 × 254 mm) |
S041467 |
50 |
|
Matte |
|
|
|
|
Letter (8.5 × 11 inches |
S041257 |
50 |
||
|
||||
|
[216 × 279 mm]) |
S042180 |
100 |
|
|
|
|
|
|
|
A3+ (13 x 19 inches |
S041263 |
50 |
|
|
[330 x 483 mm]) |
|
|
|
|
|
|
|
|
|
A3 (11.7 x 16.5 inches |
S041260 |
50 |
|
|
[297 x 420 mm]) |
|
|
|
|
|
|
|
|
|
11 x 14 inches |
S041468 |
50 |
|
|
(279.5 x 355.6 mm) |
|
|
|
|
|
|
|
|
Epson Premium Presentation Paper |
Letter (8.5 × 11 inches |
S041568 |
50 |
|
Matte Double-sided |
[216 × 279 mm]) |
|
|
|
|
|
|
|
|
Epson Presentation Paper Matte |
Letter (8.5 × 11 inches |
S041062 |
100 |
|
|
[216 × 279 mm]) |
|
|
|
|
|
|
|
|
|
Legal (8.5 × 14 inches |
S041067 |
100 |
|
|
[216 × 356 mm]) |
|
|
|
|
|
|
|
|
|
A3+ (13 × 19 inches |
S041069 |
100 |
|
|
[330 × 483 mm]) |
|
|
|
|
|
|
|
|
|
11 × 17 inches |
S041070 |
100 |
|
|
(279 × 432 mm) |
|
|
|
|
|
|
|
4 Using Special Papers
|
|
Part |
Sheet |
|
Paper name |
Size |
number |
count |
|
Epson Ultra Premium Photo Paper |
4 × 6 inches (102 × 152 mm) |
S042181 |
60 |
|
Glossy |
|
S042174 |
100 |
|
|
|
|
|
|
|
5 × 7 inches (127 × 178 mm) |
S041945 |
20 |
|
|
|
|
|
|
|
8 × 10 inches (203 × 254 mm) |
S041946 |
20 |
|
|
|
|
|
|
|
Letter (8.5 × 11 inches |
S042182 |
25 |
|
|
[216 × 279 mm]) |
S042175 |
50 |
|
|
|
|
|
|
|
11 × 14 inches |
S041466 |
20 |
|
|
(279.5 ×355.6 mm) |
|
|
|
|
|
|
|
|
|
11 × 17 inches |
S041290 |
20 |
|
|
(279 × 432 mm) |
|
|
|
|
|
|
|
|
|
A3 (11.7 × 16.5 inches |
S041288 |
20 |
|
|
[297 × 420 mm]) |
|
|
|
|
|
|
|
|
|
A3+ (13 × 19 inches |
S041289 |
20 |
|
|
[330 × 483 mm]) |
|
|
|
|
|
|
|
|
Epson Premium Photo Paper Semi- |
4 × 6 inches (102 × 152 mm) |
S041982 |
40 |
|
gloss |
|
|
|
|
Letter (8.5 × 11 inches |
S041331 |
20 |
||
|
||||
|
[216 × 279 mm]) |
|
|
|
|
|
|
|
|
|
A3+ (13 x 19 inches |
S041327 |
20 |
|
|
[330 x 483 mm]) |
|
|
|
|
|
|
|
|
Epson Premium Photo Paper Glossy |
4 × 6 inches (102 × 152 mm) |
S041808 |
40 |
|
|
|
S041727 |
100 |
|
|
|
|
|
|
|
5 × 7 inches (127 × 178 mm) |
S041464 |
20 |
|
|
|
|
|
|
|
8 × 10 inches (203 × 254 mm) |
S041465 |
20 |
|
|
|
|
|
|
|
Letter (8.5 × 11 inches |
S042183 |
25 |
|
|
[216 × 279 mm]) |
S041667 |
50 |
|
|
|
|
|
|
|
11 x 17 inches (279 x 432 mm) |
S041290 |
20 |
|
|
|
|
|
|
|
A3+ (13 x 19 inches |
S0441289 |
20 |
|
|
[330 x 483 mm]) |
|
|
|
|
|
|
|
|
Epson Photo Paper Glossy |
4 × 6 inches (102 × 152 mm) |
S041809 |
50 |
|
|
|
S042038 |
100 |
|
|
|
|
|
|
|
Letter (8.5 × 11 inches |
S041141 |
20 |
|
|
[216 × 279 mm]) |
S041649 |
50 |
|
|
|
S041271 |
100 |
|
|
|
|
|
|
Epson Photo Quality Self-adhesive |
A4 (8.3 × 11.7 inches |
S041106 |
10 |
|
Sheets |
[210 × 297 mm]) |
|
|
|
|
|
|
|
|
Epson Iron-on Cool Peel Transfer |
Letter (8.5 × 11 inches |
S041153 |
10 |
|
paper |
[216 × 279 mm]) |
|
|
|
|
|
|
|
Note: Media availability varies by country.
Using Special Papers 5
For detailed paper loading instructions, see the Start Here sheet or online User’s Guide.
For best results:
■Fan paper before loading.
■Load paper printable side down; it is usually whiter or brighter.
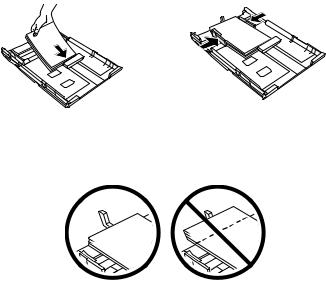
■Always load paper short edge first and make sure the edge guides are against the paper.
■Make sure the paper is loaded against the edge guide and not sticking out from the end of the cassette. The paper may slide forward slightly as you insert the cassette. This is normal.
■Do not use paper with binder holes.
6 Using Special Papers

Placing Originals for Copying, Scanning, or Faxing
Before you copy, scan, or fax, place your documents on the scanner glass or in the Automatic Document Feeder (ADF). Place photos on the scanner glass only.
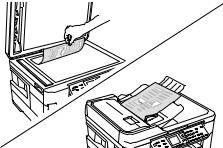
Using the Scanner Glass
You can place a photo or a document up to A3 on the scanner glass.
1.Open the document cover.
2.Place your original facedown on the scanner glass, with the top against the back left corner.
3. Close the cover gently to keep your original in place.
Using the Automatic Document Feeder
You can place up to 30 letterto A3-size sheets (11.69 × 16.54 inches) in the ADF. For double-sided scanning, use letteror A4-size paper only.
1.Open the ADF paper support, and then move the edge guide outward.
2.Fan the originals, then tap them on a flat surface to even the edges.
Placing Originals for Copying, Scanning, or Faxing 7

3.Insert the originals faceup, top edge first. The ADF icon appears on the screen.
Note: If you’re using the 2-up Copy layout, make sure the originals are loaded as shown below.
4.Slide the edge guide against the originals, but not too tight.
8 Using the Automatic Document Feeder
Copying a Document
Follow the steps in this section to copy black-and-white or color documents.
Note: You can use the Copy/Restore Photos option to copy photos onto 4 × 6-inch (102 × 152 mm) and 5 × 7-inch (127 × 178 mm) Epson photo paper (various types available) for instant photo reprints. See the online User’s Guide for details.
You can copy documents onto plain paper, Epson Bright White Paper, or Epson Presentation Paper Matte. If you use the Automatic Document Feeder (ADF), you can copy up to 30 sheets at a time.
1.Load paper in the sheet feeder (see page 6).
2.Place your original document on the scanner glass, or load your documents in the ADF (see page 7).
3.Press the Copy button.
4.Press u or d or use the numeric keypad to select the number of copies you want (up to 99).
5.Press l or r to change the copy density (lightness or darkness).
6.To copy your original(s) onto a different size paper, press the Reduce/Enlarge button and select one of the preset options or a custom paper size.
7.To change the print quality, press the Quality button and choose Draft, Best or
Standard Quality.
8.To change other print settings, press x Menu, then select Paper and Copy Settings.
■To make double-sided copies (WorkForce WF-7520 only), select 2-Sided Copying. Then select the desired option and press OK.
Copying a Document 9
■To reduce your originals so that pages print side-by-side, two per sheet, select 2-up Copy as the Layout setting. This is for use only with single-sided originals; be sure to load them as shown on page 8.
■You can also change the paper type, paper size, and other print settings. Press u or d to select the setting, then press OK. Press u or d to select an option, then press OK.
Note: Not all Paper Type, Paper Size, Layout, and Quality settings may be available depending on the options you choose. See the online User’s Guide for details.
9.After you finish selecting settings, press x Menu to exit the settings menu.
10.Press the B&W or Color x Start button to begin copying. To cancel copying, press y Stop.
Note: When printing two-sided, if ink on the front of the paper smears, select a longer Dry Time in the Paper and Copy Settings menu (WorkForce WF-7520 only).
10 Copying a Document
Printing From a Memory Card
Your product lets you print photos directly from your digital camera’s memory card; just insert it into the memory card slot and you’re ready to print.
See the online User’s Guide for a list of compatible memory cards and instructions on copying memory card files between your product and a computer, and printing photos directly from your camera.
Inserting the Card
1.Make sure your printer is turned on.
2. Insert your card as shown.
Note: Do not force the card into the slot; it won’t go in all the way.
The memory card access light flashes, then stays lit. Now you can view your photos on the LCD screen and print them (see page 12).
Memory card access light
Removing the Card
After you finish printing your photos, follow these steps to remove the card:
1.Make sure the memory card access light is not flashing.
Caution: Do not remove the card or turn off your printer while the memory card access light is flashing; you may lose data on the card.
2.If the product is connected to your computer with a USB cable, do one of the following before removing the memory card or turning off the printer:
■Windows®: Right-click the name of your card (removable disk) in My Computer or Windows Explorer, and select Eject.
■Mac OS® X: Drag the  removable disk icon from your desktop into the trash, then remove the card.
3.Pull the card straight out of its slot.
Printing From a Memory Card 11
Printing Photos From the LCD Screen
You can select individual photos for printing as you view them on the LCD screen.
1.Load several sheets of Epson photo paper (various types available; see page 4).
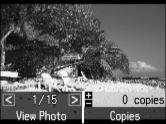
2.Press the Photo button, then select View and Print Photos. You see this screen:
3.Press l or r to scroll through your photos and display one that you want to print.
Note: To crop the photo, press the Display/Crop button. Press + or – to frame the image; use the arrow buttons to move the frame. Press OK twice when done.
4.Press u or d to select the number of copies you want of that photo.
5.Repeat steps 3 and 4 to select more photos.
6.Press the x Menu button, then select Print Settings.
7.Select the Paper Size and Paper Type of the paper you’ve loaded.
8.If desired, press the y Back button and select Photo Adjustments to turn on red-eye reduction or other photo-enhancing features.
9.When you’re done selecting settings, press the x Menu button.
10.When you’re ready to print, press x Print Photo. To cancel printing, press y Stop.
12 Printing Photos From the LCD Screen
Printing From Your Computer
This section describes the basic steps for printing from a Windows or Mac® computer. For detailed instructions on printing, see the online User’s Guide.
Printing in Windows
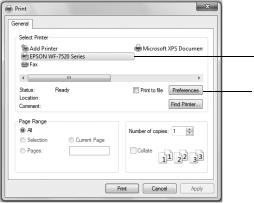
1.Select the print command in your application.
Select your Epson printer
Click here to open your printer software
2.Make sure your Epson printer is selected, then click the Preferences or Properties button.
(If you see a Setup, Printer, or Options button, click it. Then click Preferences or Properties on the next screen.)
Printing From Your Computer 13
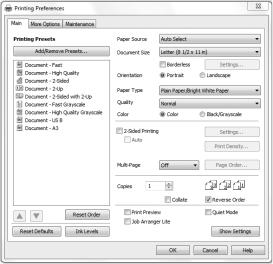
3.On the Main tab, select the basic print settings. Make sure you choose the correct Paper Type setting for the paper you are using (see page 15 for details).
|
|
|
|
|
Select your |
|
|
|
|
|
Document Size |
Click here |
|
|
|
|
Select your |
|
|
|
|
Paper Type |
|
for quick |
|
|
|
|
|
|
|
|
|
|
|
access to |
|
|
|
|
Click here for |
settings |
|
|
|
|
|
|
|
|
|
2-Sided Printing |
|
|
|
|
|
|
Note: For quick access to the most common settings, select one of the Printing Presets on the left side of the screen. You can delete these presets or create your own by clicking the Add/Remove Presets button.
4.For more printing options, click the More Options tab.
Note: For more information about print settings, click Help or see your online
User’s Guide.
5.Click OK to save your settings.
6.Click OK or Print to start printing.
Printing With a Mac
Follow the steps below to print from Mac OS X 10.5 to 10.6. If you’re printing from Mac OS X 10.4, see your online User’s Guide for instructions.
1.Open a photo or document in an application.
2.Open the File menu and select Print.
14 Printing With a Mac
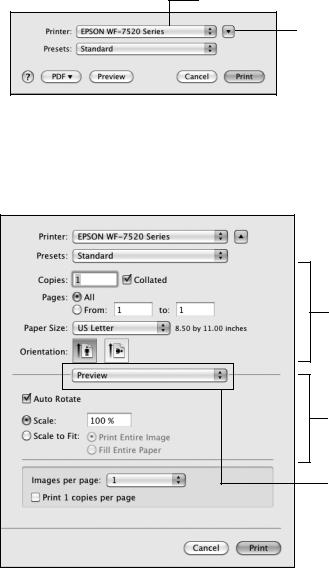
3.Select your Epson printer as the Printer setting.
Select your Epson printer
Click to expand, if necessary
4.Select basic copy and page settings. For borderless printing, choose a Paper Size setting with a Borderless option by clicking on a paper size and selecting the borderless option.
Note: If the setting you want isn’t shown (for example, Scale), check for it in your application before printing or check for it at the bottom of this window.
Copy and page settings
Application settings
Pop-up menu
5.Choose Print Settings from the pop-up menu, and select your Media Type, Print Quality and other print settings.
6.Choose any other printing options you may need from the pop-up menu. See the online User’s Guide for details.
Printing With a Mac 15
7.Click Print.
8.To monitor your print job, click the  printer icon in the Dock.
Selecting the Correct Paper Type
Select the correct Paper Type (Windows) or Media Type (Mac OS X) setting in your printer software so the ink coverage can be adjusted accordingly.
For this paper/media |
Select this setting |
Plain paper |
Plain Paper/Bright White Paper |
Epson Bright White Paper |
|
Epson Presentation Paper Matte |
|
Epson Photo Quality Self-adhesive Sheets |
|
Epson Iron-on Cool Peel Transfer paper |
|
|
|
Epson Ultra Premium Photo Paper Glossy |
Ultra Premium Photo Paper Glossy |
|
|
Epson Premium Photo Paper Glossy |
Premium Photo Paper Glossy |
|
|
Epson Photo Paper Glossy |
Photo Paper Glossy |
|
|
Epson Premium Photo Paper Semi-gloss |
Premium Photo Paper Semi-Gloss |
|
|
Epson Premium Presentation Paper Matte |
Premium Presentation Paper Matte |
|
|
Epson Brochure & Flyer Paper Matte Double-sided |
|
|
|
Envelopes |
Envelope |
|
|
16 Selecting the Correct Paper Type
Faxing a Document
Your product lets you send faxes by entering fax numbers, selecting entries from a speed dial or group dial list, or using the one-touch dial buttons. Using the Automatic Document Feeder (ADF), you can fax up to 30 pages at a time.
Note: You can also send or receive a fax from your computer using the Epson FAX Utility. For more information, see the online User’s Guide.
Breakdown or repair of this product may cause loss of fax data and settings. Epson is not responsible for backing up or recovering data and settings during or after the warranty period. We recommend that you make your own backup or print out your fax data and settings.
This product allows you to store names, telephone numbers, and fax data in its memory even when the power is turned off. Use the following procedure to erase the memory if you give away or dispose of the product: Select F Setup > Restore Default Settings > All Settings. This procedure will erase all of your network settings and fax data.
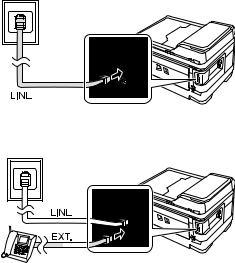
Connecting a Phone or Answering Machine
1.Connect the phone cable from the wall jack to the LINE port on the back of the product.
Note: If you’re connecting the product to a DSL phone line, you must plug a DSL filter into the wall jack or you won’t be able to use the fax or telephone equipment. Contact your DSL provider for the necessary filter.
2.To use a telephone or answering machine, you need a second phone cable. Connect one end of the cable to the telephone or answering machine, and connect the other end to the EXT. port on the back of the product.
Telephone wall jack
Telephone wall jack
Faxing a Document 17

In Auto Answer mode, if the incoming call is a fax and you pick up the phone or the answering machine answers, the product automatically begins receiving the fax. If the other party is a caller, the phone can be used as normal or a message can be left on the answering machine.
Note: Any phone or answering machine must be connected to the EXT. port for your product to detect an incoming fax call when the phone is picked up. Epson cannot guarantee compatibility with VoIP, cable phone systems, or fiberoptic digital services such as FiOS™.
Setting Up Fax Features
Before sending or receiving faxes, you should create a fax header and select the number of rings before the fax answers.
Note: To select other settings or use the Epson FAX Utility, see the online
User’s Guide.
Entering Fax Header Information
You should enter your name and phone number in the fax header before sending faxes so that recipients can identify the origin of the fax.
Note: If you leave your product unplugged for a long period of time, the date and time settings may get lost. See the online User’s Guide for instructions on resetting them.
Entering Your Sender Name
1.Press the Fax button, then press x Menu.
2.Press u or d to select Header, then press OK.
3.Press OK to select Fax Header.
4.Use the keypad to enter your sender name (see “Using the Keypad to Enter Numbers and Characters” on page 19). You can enter up to 40 digits.
5.When you’re done, use the arrow buttons to select Done, then press OK to return to the Header screen.
18 Setting Up Fax Features
Entering Your Phone Number
1.From the Header screen, press u or d to select Your Phone Number, then press OK. You see the phone number input screen.
2.Use the numeric keypad to enter your phone number (up to 20 digits).
3.When you’re done, press OK.
4.Press x Menu to exit the Fax Menu.
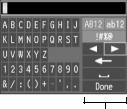
Using the Keypad to Enter Numbers and Characters
When entering phone numbers and text in Fax mode, follow these guidelines:
■To enter a fax number, use the numeric keypad. Press the # button to insert the
+ symbol for international phone numbers. Press r to enter a space or l to delete a character.
■To enter characters, use the l, r, u, or d arrow buttons to highlight a letter on the screen. Press OK to select it.
Use the on-screen function buttons to select uppercase (AB12), lowercase (ab12), symbols (!#%@), or spaces ( ), or to delete characters (
 ).
).
When you’re finished, highlight Done and press OK.
Function buttons
Selecting the Number of Rings to Answer
If you connected an answering machine and it is set to pick up on the fourth ring, you should set the product to pick up on the fifth ring or later:
1.Press the Fax button, then press x Menu.
2.Press u or d to select Communication, then press OK.
3.Press u or d to select Rings to Answer, then press OK.
4.Press u or d or use the numeric keypad to select the number of rings, then press OK. Select more rings than you use for the answering machine.
5.Press x Menu to exit the Fax Menu.
Setting Up Fax Features 19
Sending a Fax From the Control Panel
You can send a fax by manually entering a fax number, as described below.
Note: To dial the number using a telephone, by redialing, or by selecting from your speed dial list, see the next section. To send a fax from your computer using the Epson FAX Utility, see your online User’s Guide.
1.Press the Fax button.
2.Place your original(s) for faxing (see page 7).
3.Use the numeric keypad to enter the fax number. You can enter up to 64 digits.
4.To change fax settings, press x Menu and select settings as necessary.
5.Press the B&W or Color x Start button to send your fax.
Note: If the recipient’s fax machine prints only in black and white, your fax is automatically sent in black and white even if you select color.
■If you are scanning with the ADF, your document is automatically scanned and faxed.
■If you place your document on the scanner glass, you can scan additional pages after the first one is sent.
■If the fax number is busy, you see a redialing message and the product redials after one minute. To redial immediately, press 
 Redial/Pause.
To cancel faxing, press y Stop at any time.
Other Ways to Dial a Fax Number
Here are some other ways you can dial a fax number:
■Redial/Pause: Redial the last fax number you used.
■Speed Dial: Select or type the number of the speed dial entry and press OK. To use a group dial entry, press the  Speed Dial button twice.
■If you’ve connected a telephone to the product, dial the number from the phone. Select Send, then press the B&W or Color x Start button.
Note: Don’t hang up the phone until you begin transmitting the fax.
If you turn off the product, the following data stored in the product’s temporary memory will be lost: received faxes that haven’t yet been printed, faxes scheduled to be sent later, and faxes being retransmitted automatically.
20 Sending a Fax From the Control Panel
Receiving Faxes
Before receiving faxes, make sure you load plain paper and select the correct settings for the paper you’ve loaded.
1.Press the Fax button.
2.Press x Menu and select Receive Settings.
3.Select Paper Size and make sure the setting matches the size of paper you loaded.
Note: If the incoming fax is larger than the paper you loaded, it is reduced to fit or printed on multiple pages, depending on the Auto Reduction setting you select.
4.Press x Menu when done.
To receive faxes automatically, press the Auto button to turn |
|
Auto Answer light |
|
||
on the Auto light. |
|
|
Note: To change the number of rings before the product answers, see page 19.
If you run out of paper during printing, you see an error message. Load more paper and press the B&W or Color x Start button to continue.
To receive faxes manually, turn off the Auto light and follow these steps:
1.When your telephone rings, lift the phone off the hook.
2.Select Receive, then press the B&W or Color x Start button.
3.After all the pages are received, replace the phone on the hook.
4.Press OK to print the fax.
Receiving Faxes 21

Maintaining Your Product
Follow the instructions in this chapter to check and clean the print head nozzles, check ink levels, and replace ink cartridges. If you need to align the print head, see the online
User’s Guide.
Caution: To keep your product looking like new, don’t place anything on top of the cover or use it as a writing surface, If you need to clean the cover, use only a soft, nonabrasive microfiber-type cloth.
Checking the Print Head Nozzles
If your printouts are faint or have gaps in them, some of the nozzles in the print head may be clogged or ink may be running low in one or more of the ink cartridges. Follow the steps below to check the print head nozzles.
1.Load a few sheets of plain paper.
2.Press F Setup.
3.Press u or d to select Maintenance, then press OK.
4.Select Nozzle Check, then press OK.
5.Press the Color x Start button.
6.Check the nozzle check pattern that prints to see if there are gaps in the lines.
Nozzles are clean |
Nozzles need cleaning |
7.If there are no gaps, the print head is clean. Select Finish Nozzle Check, and then press y Back to continue printing.
If there are gaps or the pattern is faint, select Head Cleaning to clean the print head (see page 23).
22 Maintaining Your Product

Cleaning the Print Head
If print quality has declined and the nozzle check indicates clogged nozzles, you can clean the print head. Print head cleaning uses ink, so clean it only if necessary.
Note: You cannot clean the print head if an ink cartridge is expended, and may not be able to clean it when a cartridge is low. You must replace the cartridge first (see page 25).
1.Load a few sheets of letteror A4-size paper.
2.Press F Setup.
3.Press u or d to select Maintenance, then press OK.
4.Press u or d to select Head Cleaning, press OK, then press OK again.
5.Choose the colors you want to clean.
Tip: Use the nozzle check pattern to determine which colors need cleaning. You can save ink by cleaning only selected colors.
Cleaning lasts around 2 1/2 minutes. When it’s finished, you see a message on the LCD screen.
Caution: Never turn off the product during head cleaning or you may damage it.
6.Press 2 to run a nozzle check and confirm that the print head is clean.
Note: If you don’t see any improvement after cleaning the print head four times, leave the product on and wait at least six hours to let any dried ink soften. Then try cleaning the print head again. If quality does not improve, one of the ink cartridges may need to be replaced. If that doesn’t help, contact Epson as described on page 34.
If you do not use your product often, it is a good idea to print a few pages at least once a month to maintain good print quality.
Cleaning the Print Head 23
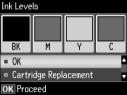
Checking Ink Levels
You can check the ink levels anytime right on the LCD screen. To check the ink levels with your Windows or Macintosh software, see the instructions in your online User’s Guide.
Note: Printing stops when an ink cartridge is expended. If a color cartridge is expended, you may be able to continue printing temporarily with black ink; see the online User’s Guide for more information. If the black cartridge is expended, you must replace it to continue printing.
1.Press F Setup.
2.Press OK to select Ink Levels.
3.The ink cartridge status is displayed. See page 25 to replace a cartridge, if necessary.
4.Press y Back to exit.
In Windows, a window may appear on your computer screen if you try to print when ink is low. This window can optionally display ink offers and other updates from Epson.
Note: To disable checking for ink offers or updates from Epson, see the instructions in your online User’s Guide.
Purchasing Epson Ink Cartridges
You can purchase genuine Epson ink and paper at Epson Supplies Central at www.epson.com/ink3 (U.S. sales) or www.epson.ca (Canadian sales). You can also purchase supplies from an Epson authorized reseller. To find the nearest one, call 800-GO-EPSON (800-463-7766).
Use the following list when you order or purchase new ink cartridges:
Ink color |
High-capacity |
Extra High-capacity |
Black |
126 |
127 |
|
|
|
Cyan |
126 |
127 |
|
|
|
Magenta |
126 |
127 |
|
|
|
Yellow |
126 |
127 |
|
|
|
24 Checking Ink Levels

Note: We recommend that you use genuine Epson cartridges and do not refill them. The use of other products may affect your print quality and could result in product damage.
Yields vary considerably based on images printed, print settings, paper type, frequency of use, and temperature. For print quality, a small amount of ink remains in the cartridge after the “replace cartridge” indicator comes on. The product ships with full cartridges and part of the ink from the first cartridges is used for priming the product.
For best printing results, use up a cartridge within six months of opening the package and before the expiration date on the cartridge box.
Store ink cartridges in a cool, dark place. If cartridges have been exposed to cold temperatures, allow them to warm up to room temperature for at least 3 hours before using them.
Replacing Ink Cartridges
Make sure you have a new ink cartridge before you begin.
Caution: Do not open ink cartridge packages until you are ready to install the ink. Cartridges are vacuum packed to maintain reliability.
Leave the expended cartridge installed until you have obtained a replacement, or the ink remaining in the print head nozzles may dry out.
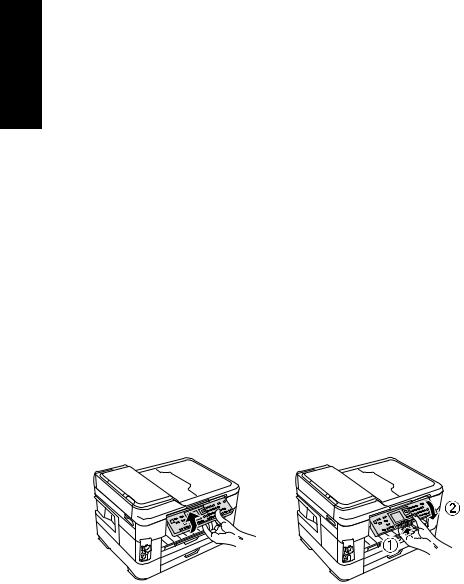
1.Turn on the product.
2.If an ink cartridge is low or expended, you see a message on the LCD screen indicating which color to replace. Press
OK.
If you’re replacing a cartridge before you see a message on the LCD screen, press F Setup, select Maintenance, then select Ink Cartridge Replacement.
3.Open the scanner, then open the cartridge cover.
Replacing Ink Cartridges 25
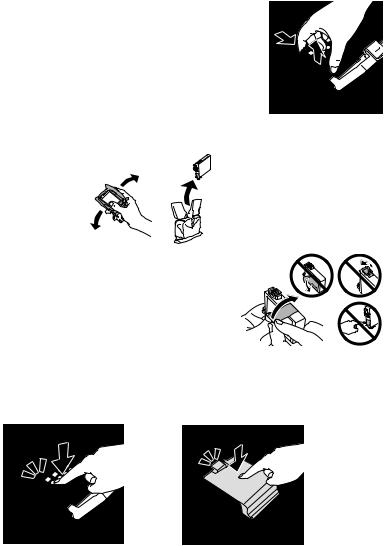
4.Squeeze the tab on the cartridge and lift it up. Dispose of it
carefully. Do not take the used cartridge apart or try to refill it.
Warning: If ink gets on your hands, wash them thoroughly with soap and water. If ink gets into your eyes, flush them immediately with water. Keep ink cartridges out of the reach of children and don’t drink the ink.
5.Before you open the new cartridge package, shake it gently four or five times. Then remove it from the package.
6.Remove the yellow tape from the bottom of the ink
cartridge.
Caution: Do not remove any other labels or seals, or ink will leak. Do not touch the green chip on the front of the cartridge. This can damage the ink cartridge.
7.Insert the new ink cartridge into the holder and push it down until it clicks into place.
8.Once you replace all the cartridges that need replacing, close the cartridge cover and push it down until it clicks into place.
9.Close the scanner to begin charging the ink. This takes about 2 1/2 minutes. When you see a completion message on the LCD screen, ink charging is finished.
Caution: Never turn off the product while ink is charging or you’ll waste ink. If you see an ink replacement message on the LCD screen, press OK and press down all the cartridges securely. Then press OK again. If you remove a low or expended ink cartridge, you cannot reinstall and use the cartridge.
26 Replacing Ink Cartridges
Scanning a Document or Photo
You can use your product to scan original documents and photos and save them on your computer.
Quick Scanning With the Scan Button
Use the Scan button to quickly scan a photo or document and save it on your computer. You can even scan a photo and have it automatically included in an email message.
Note: For Mac OS X 10.6, see “Scanning With Mac OS X 10.6” on page 29.
1.Place your original document or photo as shown on page 7.
2.Press the Scan button.
3.Press u or d to select one of the following options:
■Scan to Memory Card automatically creates a JPG image or PDF and saves it to an inserted memory card.
■Scan to PC automatically creates a JPG image and saves it to your computer; ideal for scanning photos.
■Scan to PC (PDF) automatically creates a PDF file and saves it to your computer; ideal for scanning documents.
■Scan to PC (Email) automatically scans a photo, resizes it, launches your email application, and attaches a JPG image to a new outgoing message. This works with MAPI-type email such as Microsoft® Outlook or Windows Live Mail, but not web-based email such as Gmail.
■Scan to PC (WSD) lets you manage wireless scanning in Windows 7 or Windows Vista (English only). To use this feature, you must first set up WSD (Web Services for Devices) on the computer you want to scan to.
4.If you’re scanning to a memory card, select your scan settings and then press x Start Scan to begin scanning.
If you’re scanning to your computer, select USB Connection if your product is connected by a USB cable, or select the name of your computer if your product is connected over a network. Press OK to begin scanning.
Once your image is scanned, you see its icon in Windows Explorer or Mac Finder®, or as an attachment in your email application.
Scanning a Document or Photo 27
Loading...