


Untitled Document
Novelty 8™, Mural 8™, and Novelty Pro 8™
User's Manual (rev. 4.29.04) © CTP Imaging Solutions 2004
Press Ctrl-P to print this manual
Click here to register your product
Table of Contents |
Trouble Shooting |
(click on a topic to view details) Introduction
New Features and Enhancements Compatibility
Minimum System Requirements Overview
Software Installation
(click on a topic to view details) Scan Failed
Printing Problems Acquiring Technical Support
Topics
Activating Your Software
Adding Images (Layering Images) Adding Text
Adding Text - Advanced Features Additional Setup Notes
Adjusting Images with Templates
Color Correction for Powerdriver Pro Users Color Correction for Windows Color Profile Users Combining Different Images on One Sheet Configuring your system for Optimal Performance Cropping Images - Overview
Cropping an Image
Cropping an Image for Murals
Custom Murals - Creating (Novelty Pro 8 and Mural 8 only)
Custom Product - Creating
Custom Product - Saving
Custom Templates - Creating a Custom Template
file:///C|/Program%20Files/CTP,%20Inc/Novelty%20Pro%208%20Demo/V8Manual.htm (1 of 39)7/19/2004 11:09:31 AM
Untitled Document
Custom Templates - Using a Custom Template Display Settings - Configuring
Edge Fades
Editing Your Font Colors
Fonts - Accessing your System Fonts Image Adjustments
Importing an Image Interactive Multimedia Tutorial Mirror Image
Murals - Creating (Novelty Pro 8 and Mural 8 only)
Untitled Document
New Features and Enhancements
Novelty 8, Mural 8, and Novelty Pro 8 include a host of new features and improvements: 1- Expanded product baseover 150 supported products (Novelty 8 and Novelty Pro 8 only)
2- Supports multiple monitor resolutions800x600, 1024x768, & 1280x960 3- New product preview feature
4- Custom template support (Novelty 8 and Novelty Pro 8 only)
5- Improved HTML manual with color graphics
6- Multimedia interactive tutorial
7- Add-on tutorial support
8- Multi-line text feature
9- Text alignment & line spacing controls
10- RGB adjustment tool
11- Brightness, contrast, and sharpness adjustment tools
12- Black & White conversion tool
13- Print Multiple tiles/sheet when printing Murals (Novelty Pro 8 and Mural 8 only) 14- Production Report Tool
15- Improved guide printing resolution for Murals (Novelty Pro 8 and Mural 8 only)
16Increased Font Colors
17Increased Fonts
18Font color guide feature
19- Exciting New Interface
Compatibility
Novelty 8, Mural 8, and Novelty Pro 8 software is compatible with Windows 98, ME, NT, 2000, & XP and is compatible with any Windows-based printer and any Windows-based, TWAIN compatible scanner. Since
Novelty 8, Mural 8, and Novelty Pro 8 are graphics oriented programs, it is vital to understand that low-end or older PCs are not ideal for graphics production and can cause system crashes and instability. Please carefully read through this manual and use the following Minimum Requirements in order to insure that the software functions properly and provides you maximum productivity.
Minimum System requirements
Windows 98, ME, NT, 2000 or XP 1 Ghz Processor
128 MB RAM
200 MB Hard Drive Space
24 Bit Video Color Depth 800x600 minimum resolution CD-ROM Drive
Mouse or Touch Screen
Overview
Novelty 8, Mural 8, and Novelty Pro 8 software utilizes a simple, point-&-click, graphic interface. Navigating throughout Novelty 8, Mural 8, and Novelty Pro 8 is as simple as clicking on a desired button, word, or option. Every screen of Novelty 8, Mural 8, and Novelty Pro 8 is titled at the top to keep you informed as to your every step in the design process. For an interactive tutorial on the software's basic functions, simply click the Teach Me button at the bottom of the main screen. At the bottom of every screen is a Help button which displays specific instructions related to the screen being viewed.
file:///C|/Program%20Files/CTP,%20Inc/Novelty%20Pro%208%20Demo/V8Manual.htm (3 of 39)7/19/2004 11:09:31 AM
Untitled Document
Novelty 8, Mural 8, and Novelty Pro 8 software allows you to quickly and easily create designs ready for transfer through 4 basic steps:
1- Selecting a Product
2- Importing an Image
3- Cropping the Image
4- Printing
Outside of these 4 basic steps, you have the option of utilizing numerous other features which are outlined in this manual.
Configuring your scanner settings
Make sure your scanner's TWAIN driver is installed and selected as your default scanner (see your scanner documentation for instructions). This is required in order for Novelty 8, Mural 8, and Novelty Pro 8 software to "see" the scanner. Within Novelty 8, Mural 8, and Novelty Pro 8 you must also select the scanner you would like to use. Click here to jump to scanner selection instructions.
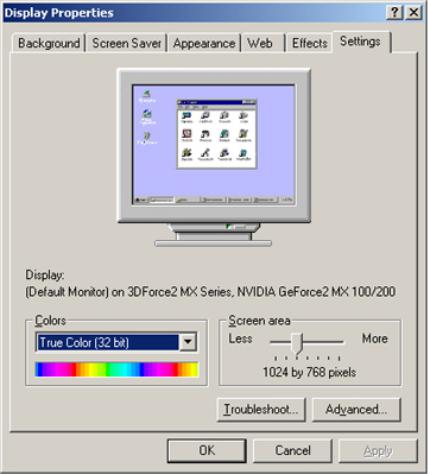
Configuring your display settings
Novelty 8, Mural 8, and Novelty Pro 8 support multiple monitor resolutions. Right-click anywhere on your desktop and select Properties from the drop-down menu. Click the Settings tab. Adjust your display settings to either 800x600, 1024x768, or 1280x960 pixels and set your color setting to at least 24 bit color.
file:///C|/Program%20Files/CTP,%20Inc/Novelty%20Pro%208%20Demo/V8Manual.htm (4 of 39)7/19/2004 11:09:31 AM
Untitled Document
Additional setup notesConfiguring your system for optimal performance
Virtual Memory- You may want to increase the Windows Virtual Memory settings to approximately 1 GB. This will provide more system stability when working with large image files.
System Resources- Close all programs which you don’t need open. This will also provide more system stability when working with large image files.
Update Your Video Drivers- This will also provide more system stability. Check with your video card’s manufacturer for newer software drivers and updates.
Update Your Printer and Scanner Drivers- Check with your printer and scanner manufacturer for newer software drivers and install if available. (Clickhere to visit Epson on the web).
Mirror Image Printing- Mirror image printing is required when creating heat transfer prints. Either enable mirror image in your printer driver or enable mirror image in the Options screen of Novelty 8, Mural 8, or Novelty Pro 8. If
you have both enabled the printed image will be mirrored twice resulting in a non-mirrored image!
Color Correction Powerdriver Pro Users-
1. Install the latest version of Powerdriver Pro and insure that it is selected as your default printer driver. Under the
Advanced Color Options tab select High Speed.
file:///C|/Program%20Files/CTP,%20Inc/Novelty%20Pro%208%20Demo/V8Manual.htm (5 of 39)7/19/2004 11:09:31 AM

Untitled Document
2. Turn Off the Color Profile button In the Options screen of Novelty 8, Mural 8, and Novelty Pro 8. Click here for instructions.
Windows Color Profiles (ICC) users-
1.Install the color profile.
2.Under the Color Management tab of your EPSON printer driver click Add and select the new profile. Remove any other default profiles and click Apply.
file:///C|/Program%20Files/CTP,%20Inc/Novelty%20Pro%208%20Demo/V8Manual.htm (6 of 39)7/19/2004 11:09:31 AM

Untitled Document
3. Turn On the Color Profile button In the Options screen of Novelty 8, Mural 8, and Novelty Pro 8. Click here for instructions.
Software Installation
Insert your Novelty 8, Mural 8, or Novelty Pro 8 CD into your CD-ROM drive and installation will begin automatically. To manually install, from the Run command type “D:\Setup.exe” (where ‘D’ is the letter of your CDROM drive). Follow the on-screen prompts to complete installation.
Activation
Novelty 8, Mural 8, and Novelty Pro 8 software functions in demo mode as long as it is not activated. In demo mode, printing or saving images is not permitted, however, all of the remaining functions and features can be explored. Launch the Novelty 8, Mural 8, or Novelty Pro 8 application by clicking on its icon located on the desktop.
file:///C|/Program%20Files/CTP,%20Inc/Novelty%20Pro%208%20Demo/V8Manual.htm (7 of 39)7/19/2004 11:09:31 AM

Untitled Document
When the activation screen appears, call your distributor to receive an “activation key” (required for printing). Type in the activation key. The OK button will become enabled. Click OK to activate the software. The software has now been set to full use mode.
Interactive Multimedia Tutorial
Novelty 8, Mural 8, and Novelty Pro 8 contains a built-in, interactive, multimedia training tutorial. The tutorial requires speakers be attached to your computer for audio instruction. To start the tutorial, simply click on the Teach Me button at the bottom of the main screen. The tutorial covers the basics of operating Novelty 8, Mural 8, and Novelty Pro 8 software and provides an interactive learning experience.
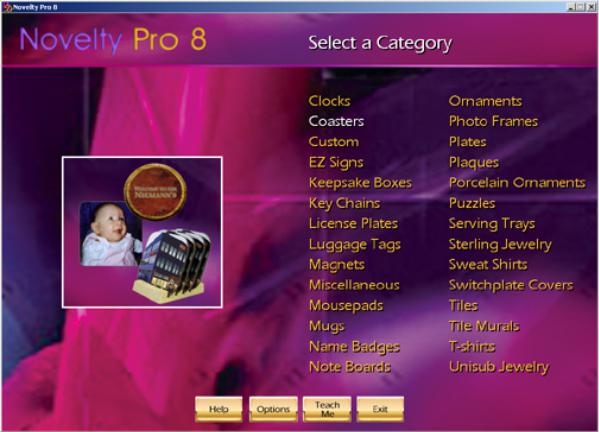
Selecting a Product Category
To create a product you must first select a product category by clicking on the desired category name from the list on the main screen. When moving your mouse cursor over a category name, the category name will highlight and a category photo will appear.
file:///C|/Program%20Files/CTP,%20Inc/Novelty%20Pro%208%20Demo/V8Manual.htm (8 of 39)7/19/2004 11:09:31 AM

Untitled Document
Selecting a Product
Select a specific product by clicking on the desired product name from the product list. When moving your mouse cursor over a product name, the product name will highlight and a product photo will appear.
file:///C|/Program%20Files/CTP,%20Inc/Novelty%20Pro%208%20Demo/V8Manual.htm (9 of 39)7/19/2004 11:09:31 AM
Untitled Document
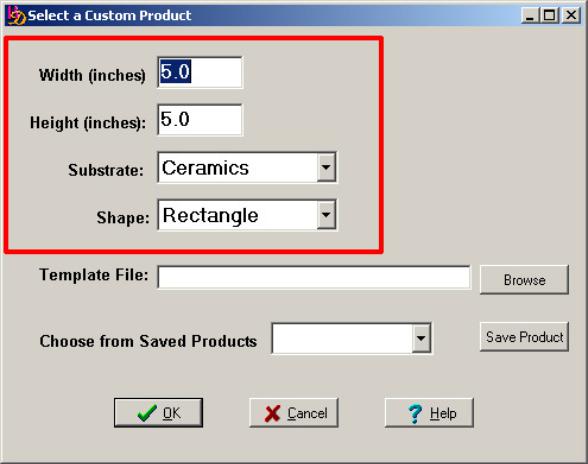
Creating a custom product
If the product you desire is not listed, click the CUSTOM button. Enter the Width and Height of the image you would like to print (to the nearest thousandth of an inch). Select the desired Substrate and Shape.
Click the Save Product button to save all of the product specifications for future use. If the product does not require using a custom template, click OK to proceed.
Using a Custom Template
Novelty 8, Mural 8, and Novelty Pro 8 allow you to utilize custom templates. If the custom product requires using a custom template, click the Browse button next to Template File to locate and select the desired template. The Open dialogue box will appear. Click on the template's name and click the Open button.
file:///C|/Program%20Files/CTP,%20Inc/Novelty%20Pro%208%20Demo/V8Manual.htm (10 of 39)7/19/2004 11:09:31 AM
Untitled Document
The selected template's name will appear in the Template File box. Click the Save Product button to save all of the product specifications and template for future use. Click the OK button to continue to the next step.
Creating a Custom Template
Using any other program such as Microsoft's Paint™, create your custom template using the following 5 guidelines:
1.Create only Windows Bitmap images.
2.Use only 2 colors (no anti-aliasing) such as black and white.
3.Use a good resolution for your template (example300 dpi).
4.Note the exact Width and Height (outer dimensions) of the template to the nearest thousandth of an inch. This way the correct values can be input when creating a custom product. You must make sure that the Width and
file:///C|/Program%20Files/CTP,%20Inc/Novelty%20Pro%208%20Demo/V8Manual.htm (11 of 39)7/19/2004 11:09:31 AM
Untitled Document
Height values match that of your custom template's outer dimensions.
5. The upperl eft corner pixel and lower left corner pixel color specify the invisible color. In the example below the upper left corner pixel and lower left corner pixel are black (figure A.). Therefore any part off the template which contains black will be invisible allowing any imported image to be seen through the template (figure B.)
Figure A. 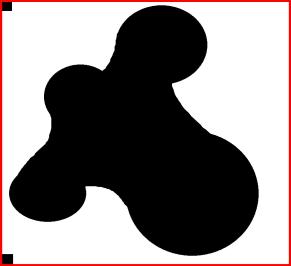 Figure B.
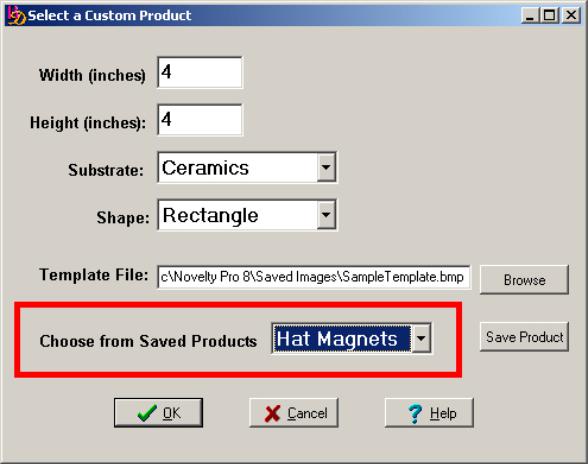
Using a Saved Product
Any previously saved custom product (including it's template) can be used simply by clicking the Choose from Saved Products arrow. Click on the saved product name and click OK.
Creating a Mural (Mural 8, and Novelty Pro 8 only)
file:///C|/Program%20Files/CTP,%20Inc/Novelty%20Pro%208%20Demo/V8Manual.htm (12 of 39)7/19/2004 11:09:31 AM
 Loading...