


 Loading...
Epson EB-905, EB-95, EB-96W, EB-915W, EB-900 User Manual
...User’s Guide

Notations Used in This Guide
•Safety indications
The documentation and the projector use graphical symbols to show how to use the projector safely. Please understand and respect these caution symbols in order to avoid injury to persons or property.
|
Warning |
This symbol indicates information that, if ignored, could possibly result in personal injury or even death due to incorrect handling. |
|
|
|
|
Caution |
This symbol indicates information that, if ignored, could possibly result in personal injury or physical damage due to incorrect handling. |
|
|
|
• General information indications |
|
|
|
|
|
|
Attention |
Indicates procedures which may result in damage or injury if sufficient care is not taken. |
|
|
|
|
a |
Indicates additional information and points which may be useful to know regarding a topic. |
|
|
|
|
s |
Indicates a page where detailed information regarding a topic can be found. |
|
|
|
|
g |
Indicates that an explanation of the underlined word or words in front of this symbol appears in the glossary of terms. See the "Glossary" |
|
|
section of the "Appendix". |
|
|
s "Glossary" p.136 |
|
|
|
|
[Name] |
Indicates the name of the buttons on the remote control or the control panel. |
|
|
Example: [Esc] button |
|
|
|
|
Menu Name |
Indicates Configuration menu items. |
|
|
Example: |
|
|
Select Brightness from Image. |
|
|
Image - Brightness |
|
|
|

Contents |
|
3 |
|
|
|
Notations Used in This Guide . . . . . . . . . . . . . . . . . . . . . . . . 2
Introduction
Projector Features . . . . . . . . . . . . . . . . . . . . . . . . . . . . . . . . . . . . . . . . . . 7
List of Functions by Model . . . . . . . . . . . . . . . . . . . . . . . . . . . . . . . . . . . . . . . . 7 Quick and Easy Set up, Projection, and Storage . . . . . . . . . . . . . . . . . . . . . . . . . . 8 Easy writing on a whiteboard or blackboard using the pattern function . . . . . . . . 8 Connecting with a USB cable and projecting (USB Display) . . . . . . . . . . . . . . . . 8
Detecting projector movements and automatically correcting image distortion
. . . . . . . . . . . . . . . . . . . . . . . . . . . . . . . . . . . . . . . . . . . . . . . . . . . . . . . . . 8 Useful Functions for Projecting Images . . . . . . . . . . . . . . . . . . . . . . . . . . . . . . . . 8
Increasing projection content in wide (WXGA) screen (EB-915W/EB-910W/EB-96W only) . . . . . . . . . . . . . . . . . . . . . . . . . . . . . . . . . . . . . . . . . . . . . . . . . . . . . 8
Connecting to a network and projecting images from the computer's screen
. . . . . . . . . . . . . . . . . . . . . . . . . . . . . . . . . . . . . . . . . . . . . . . . . . . . . . . . . 8 Easy connection to a computer with Quick Wireless . . . . . . . . . . . . . . . . . . . . . 9 Making the most of the remote control . . . . . . . . . . . . . . . . . . . . . . . . . . . . . 9 Enlarge and project your files with the Document Camera . . . . . . . . . . . . . . . . . 9 Enhanced security functions . . . . . . . . . . . . . . . . . . . . . . . . . . . . . . . . . . . . . 9
Part Names and Functions . . . . . . . . . . . . . . . . . . . . . . . . . . . . . . . . . . 10
Front/Top . . . . . . . . . . . . . . . . . . . . . . . . . . . . . . . . . . . . . . . . . . . . . . . . . . . 10
Rear . . . . . . . . . . . . . . . . . . . . . . . . . . . . . . . . . . . . . . . . . . . . . . . . . . . . . . . 11
Base . . . . . . . . . . . . . . . . . . . . . . . . . . . . . . . . . . . . . . . . . . . . . . . . . . . . . . 12
Control Panel . . . . . . . . . . . . . . . . . . . . . . . . . . . . . . . . . . . . . . . . . . . . . . . . 13
Remote Control . . . . . . . . . . . . . . . . . . . . . . . . . . . . . . . . . . . . . . . . . . . . . . . 14
Replacing the remote control batteries . . . . . . . . . . . . . . . . . . . . . . . . . . . . . 16
Remote control operating range . . . . . . . . . . . . . . . . . . . . . . . . . . . . . . . . . 17
Preparing the Projector
Installing the Projector . . . . . . . . . . . . . . . . . . . . . . . . . . . . . . . . . . . . . 19
Installation Methods . . . . . . . . . . . . . . . . . . . . . . . . . . . . . . . . . . . . . . . . . . . 19 Installation methods . . . . . . . . . . . . . . . . . . . . . . . . . . . . . . . . . . . . . . . . . 19 Screen Size and Approximate Projection Distance . . . . . . . . . . . . . . . . . . . . . . . 20
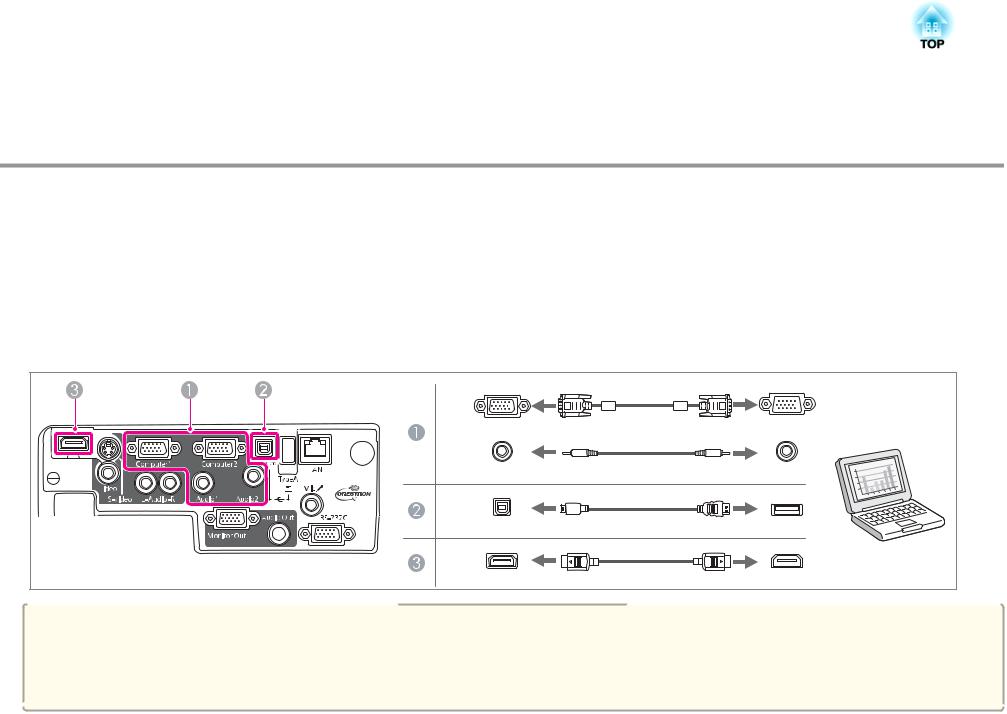
Connecting Equipment . . . . . . . . . . . . . . . . . . . . . . . . . . . . . . . . . . . . . 22
Connecting a Computer . . . . . . . . . . . . . . . . . . . . . . . . . . . . . . . . . . . . . . . . . 22 Connecting Image Sources . . . . . . . . . . . . . . . . . . . . . . . . . . . . . . . . . . . . . . . 23 Connecting USB Devices . . . . . . . . . . . . . . . . . . . . . . . . . . . . . . . . . . . . . . . . . 25 Connecting External Equipment . . . . . . . . . . . . . . . . . . . . . . . . . . . . . . . . . . . 26 Connecting a LAN Cable (EB-925/EB-915W/EB-905/EB-96W/EB-95 only) . . . . . . . . 27 Installing the Wireless LAN Unit . . . . . . . . . . . . . . . . . . . . . . . . . . . . . . . . . . . . 28
Basic Usage
Projecting Images . . . . . . . . . . . . . . . . . . . . . . . . . . . . . . . . . . . . . . . . . 30
From Installation to Projection . . . . . . . . . . . . . . . . . . . . . . . . . . . . . . . . . . . . . 30
Automatically Detect Input Signals and Change the Projected Image (Source Search)
. . . . . . . . . . . . . . . . . . . . . . . . . . . . . . . . . . . . . . . . . . . . . . . . . . . . . . . . . . 31 Switching to the Target Image by Remote Control . . . . . . . . . . . . . . . . . . . . . . . 32 Projecting with USB Display . . . . . . . . . . . . . . . . . . . . . . . . . . . . . . . . . . . . . . 32 System requirements . . . . . . . . . . . . . . . . . . . . . . . . . . . . . . . . . . . . . . . . . 32 Connecting for the first time . . . . . . . . . . . . . . . . . . . . . . . . . . . . . . . . . . . . 33 Uninstalling . . . . . . . . . . . . . . . . . . . . . . . . . . . . . . . . . . . . . . . . . . . . . . . 34
Adjusting Projected Images . . . . . . . . . . . . . . . . . . . . . . . . . . . . . . . . 36
Correcting Keystone Distortion . . . . . . . . . . . . . . . . . . . . . . . . . . . . . . . . . . . . 36 Correcting automatically (Auto V-Keystone) . . . . . . . . . . . . . . . . . . . . . . . . . 36 Correcting manually (manual H/V-Keystone) . . . . . . . . . . . . . . . . . . . . . . . . . 36 Correcting manually (Quick Corner) . . . . . . . . . . . . . . . . . . . . . . . . . . . . . . . 37 Adjusting the Image Size . . . . . . . . . . . . . . . . . . . . . . . . . . . . . . . . . . . . . . . . 39 Adjusting the Image Position . . . . . . . . . . . . . . . . . . . . . . . . . . . . . . . . . . . . . 39 Adjusting the Horizontal Tilt . . . . . . . . . . . . . . . . . . . . . . . . . . . . . . . . . . . . . . 39 Correcting the Focus . . . . . . . . . . . . . . . . . . . . . . . . . . . . . . . . . . . . . . . . . . . 40 Adjusting the Volume . . . . . . . . . . . . . . . . . . . . . . . . . . . . . . . . . . . . . . . . . . 40 Selecting the Projection Quality (Selecting Color Mode) . . . . . . . . . . . . . . . . . . . 40 Setting Auto Iris . . . . . . . . . . . . . . . . . . . . . . . . . . . . . . . . . . . . . . . . . . . . . . 41 Changing the Aspect Ratio of the Projected Image . . . . . . . . . . . . . . . . . . . . . . 42 Changing methods . . . . . . . . . . . . . . . . . . . . . . . . . . . . . . . . . . . . . . . . . . 42 Changing the aspect mode (EB-915W/EB-910W/EB-96W only) . . . . . . . . . . . . . 42 Changing the aspect mode (EB-925/EB-905/EB-900/EB-95 only) . . . . . . . . . . . . 43

Contents |
|
4 |
|
|
|
Useful Functions
Projection Functions . . . . . . . . . . . . . . . . . . . . . . . . . . . . . . . . . . . . . . . 46
Projecting Without a Computer (Slideshow) . . . . . . . . . . . . . . . . . . . . . . . . . . . 46 Specifications for files that can be projected using Slideshow . . . . . . . . . . . . . . 46 Slideshow examples . . . . . . . . . . . . . . . . . . . . . . . . . . . . . . . . . . . . . . . . . 46 Slideshow operating methods . . . . . . . . . . . . . . . . . . . . . . . . . . . . . . . . . . . 46 Projecting the selected image . . . . . . . . . . . . . . . . . . . . . . . . . . . . . . . . . . . 48 Projecting image files in a folder in sequence (Slideshow) . . . . . . . . . . . . . . . . 49 Image file display settings and Slideshow operation settings . . . . . . . . . . . . . . 50
Hiding the Image and Sound Temporarily (A/V Mute) . . . . . . . . . . . . . . . . . . . . . 51 Freezing the Image (Freeze) . . . . . . . . . . . . . . . . . . . . . . . . . . . . . . . . . . . . . . 51 Pointer Function (Pointer) . . . . . . . . . . . . . . . . . . . . . . . . . . . . . . . . . . . . . . . . 52 Enlarging Part of the Image (E-Zoom) . . . . . . . . . . . . . . . . . . . . . . . . . . . . . . . . 53 Using the Remote Control to Operate the Mouse Pointer (Wireless Mouse) . . . . . . 54 Saving a User's Logo . . . . . . . . . . . . . . . . . . . . . . . . . . . . . . . . . . . . . . . . . . . 55 Saving User Pattern . . . . . . . . . . . . . . . . . . . . . . . . . . . . . . . . . . . . . . . . . . . . 57
Security Functions . . . . . . . . . . . . . . . . . . . . . . . . . . . . . . . . . . . . . . . . . 59
Managing Users (Password Protect) . . . . . . . . . . . . . . . . . . . . . . . . . . . . . . . . . 59 Kinds of Password Protect . . . . . . . . . . . . . . . . . . . . . . . . . . . . . . . . . . . . . . 59 Setting Password Protect . . . . . . . . . . . . . . . . . . . . . . . . . . . . . . . . . . . . . . 59 Entering the Password . . . . . . . . . . . . . . . . . . . . . . . . . . . . . . . . . . . . . . . . 60 Restricting Operation (Control Panel Lock) . . . . . . . . . . . . . . . . . . . . . . . . . . . . 61 Anti-Theft Lock . . . . . . . . . . . . . . . . . . . . . . . . . . . . . . . . . . . . . . . . . . . . . . . 62 Installing the wire lock . . . . . . . . . . . . . . . . . . . . . . . . . . . . . . . . . . . . . . . . 62
Monitoring and Controlling . . . . . . . . . . . . . . . . . . . . . . . . . . . . . . . . 63
About EasyMP Monitor . . . . . . . . . . . . . . . . . . . . . . . . . . . . . . . . . . . . . . . . . . 63 Changing Settings Using a Web Browser (Web Control) . . . . . . . . . . . . . . . . . . . . 63 Projector setup . . . . . . . . . . . . . . . . . . . . . . . . . . . . . . . . . . . . . . . . . . . . . 63 Displaying the Web Control screen . . . . . . . . . . . . . . . . . . . . . . . . . . . . . . . 64 Displaying the Web Remote screen . . . . . . . . . . . . . . . . . . . . . . . . . . . . . . . 64 Using the Mail Notification Function to Report Problems . . . . . . . . . . . . . . . . . . . 66 Reading Error Notification Mail . . . . . . . . . . . . . . . . . . . . . . . . . . . . . . . . . . 66 Management Using SNMP . . . . . . . . . . . . . . . . . . . . . . . . . . . . . . . . . . . . . . . 66 ESC/VP21 Commands . . . . . . . . . . . . . . . . . . . . . . . . . . . . . . . . . . . . . . . . . . . 67 Command list . . . . . . . . . . . . . . . . . . . . . . . . . . . . . . . . . . . . . . . . . . . . . . 67
Cable layouts . . . . . . . . . . . . . . . . . . . . . . . . . . . . . . . . . . . . . . . . . . . . . . 67 About PJLink . . . . . . . . . . . . . . . . . . . . . . . . . . . . . . . . . . . . . . . . . . . . . . . . 68 About Crestron RoomView® . . . . . . . . . . . . . . . . . . . . . . . . . . . . . . . . . . . . . . 69 Operating a projector from your computer . . . . . . . . . . . . . . . . . . . . . . . . . . 69
Configuration Menu
Using the Configuration Menu . . . . . . . . . . . . . . . . . . . . . . . . . . . . . . 74
List of Functions . . . . . . . . . . . . . . . . . . . . . . . . . . . . . . . . . . . . . . . . . . . 75
Configuration Menu Table . . . . . . . . . . . . . . . . . . . . . . . . . . . . . . . . . . . . . . . 75 Network menu . . . . . . . . . . . . . . . . . . . . . . . . . . . . . . . . . . . . . . . . . . . . . 76 Image Menu . . . . . . . . . . . . . . . . . . . . . . . . . . . . . . . . . . . . . . . . . . . . . . . . . 77 Signal Menu . . . . . . . . . . . . . . . . . . . . . . . . . . . . . . . . . . . . . . . . . . . . . . . . . 78 Settings Menu . . . . . . . . . . . . . . . . . . . . . . . . . . . . . . . . . . . . . . . . . . . . . . . . 80 Extended Menu . . . . . . . . . . . . . . . . . . . . . . . . . . . . . . . . . . . . . . . . . . . . . . . 81 Network Menu . . . . . . . . . . . . . . . . . . . . . . . . . . . . . . . . . . . . . . . . . . . . . . . 83 Notes on operating the Network menu . . . . . . . . . . . . . . . . . . . . . . . . . . . . . 84 Soft keyboard operations . . . . . . . . . . . . . . . . . . . . . . . . . . . . . . . . . . . . . . 84 Basic menu . . . . . . . . . . . . . . . . . . . . . . . . . . . . . . . . . . . . . . . . . . . . . . . . 85 Wireless LAN menu . . . . . . . . . . . . . . . . . . . . . . . . . . . . . . . . . . . . . . . . . . 85 Security menu . . . . . . . . . . . . . . . . . . . . . . . . . . . . . . . . . . . . . . . . . . . . . . 87 Wired LAN menu (EB-925/EB-915W/EB-905/EB-96W/EB-95 only) . . . . . . . . . . . . 88 Mail menu . . . . . . . . . . . . . . . . . . . . . . . . . . . . . . . . . . . . . . . . . . . . . . . . 89 Others menu . . . . . . . . . . . . . . . . . . . . . . . . . . . . . . . . . . . . . . . . . . . . . . 90 Reset menu . . . . . . . . . . . . . . . . . . . . . . . . . . . . . . . . . . . . . . . . . . . . . . . 91 Info Menu (Display Only) . . . . . . . . . . . . . . . . . . . . . . . . . . . . . . . . . . . . . . . . 91 Reset Menu . . . . . . . . . . . . . . . . . . . . . . . . . . . . . . . . . . . . . . . . . . . . . . . . . 92
Troubleshooting
Using the Help . . . . . . . . . . . . . . . . . . . . . . . . . . . . . . . . . . . . . . . . . . . . . 94
Problem Solving . . . . . . . . . . . . . . . . . . . . . . . . . . . . . . . . . . . . . . . . . . . 95
Reading the Indicators . . . . . . . . . . . . . . . . . . . . . . . . . . . . . . . . . . . . . . . . . . 95 When the Indicators Provide No Help . . . . . . . . . . . . . . . . . . . . . . . . . . . . . . . . 98

Contents |
|
5 |
|
|
|
Problems Relating to Images . . . . . . . . . . . . . . . . . . . . . . . . . . . . . . . . . . . . . . 99 No images appear . . . . . . . . . . . . . . . . . . . . . . . . . . . . . . . . . . . . . . . . . . . 99
Moving images are not displayed (only the moving image portion turns black)
. . . . . . . . . . . . . . . . . . . . . . . . . . . . . . . . . . . . . . . . . . . . . . . . . . . . . . . . 100 Projection stops automatically . . . . . . . . . . . . . . . . . . . . . . . . . . . . . . . . . . 100 "Not supported" is displayed . . . . . . . . . . . . . . . . . . . . . . . . . . . . . . . . . . . 100 "No Signal" is displayed . . . . . . . . . . . . . . . . . . . . . . . . . . . . . . . . . . . . . . 100 Images are fuzzy, out of focus, or distorted . . . . . . . . . . . . . . . . . . . . . . . . . 101 Interference or distortion appear in images . . . . . . . . . . . . . . . . . . . . . . . . . 102 The image is truncated (large) or small, or the aspect is not suitable . . . . . . . . 102 Image colors are not right . . . . . . . . . . . . . . . . . . . . . . . . . . . . . . . . . . . . . 103 Images appear dark . . . . . . . . . . . . . . . . . . . . . . . . . . . . . . . . . . . . . . . . . 104
Problems when Projection Starts . . . . . . . . . . . . . . . . . . . . . . . . . . . . . . . . . . 104 The projector does not turn on . . . . . . . . . . . . . . . . . . . . . . . . . . . . . . . . . 104 Other Problems . . . . . . . . . . . . . . . . . . . . . . . . . . . . . . . . . . . . . . . . . . . . . . 105 No sound can be heard or the sound is faint . . . . . . . . . . . . . . . . . . . . . . . . 105 No sound can be heard from the microphone . . . . . . . . . . . . . . . . . . . . . . . 105 The remote control does not work . . . . . . . . . . . . . . . . . . . . . . . . . . . . . . . 106 I want to change the language for messages and menus . . . . . . . . . . . . . . . . 106 Mail is not received even if an error occurs with the projector . . . . . . . . . . . . . 106
About Event ID . . . . . . . . . . . . . . . . . . . . . . . . . . . . . . . . . . . . . . . . . . . 108
Maintenance
Cleaning . . . . . . . . . . . . . . . . . . . . . . . . . . . . . . . . . . . . . . . . . . . . . . . . . 110
Cleaning the Projector's Surface . . . . . . . . . . . . . . . . . . . . . . . . . . . . . . . . . . . 110 Cleaning the Lens . . . . . . . . . . . . . . . . . . . . . . . . . . . . . . . . . . . . . . . . . . . . 110 Cleaning the Air Filter . . . . . . . . . . . . . . . . . . . . . . . . . . . . . . . . . . . . . . . . . . 110
Replacing Consumables . . . . . . . . . . . . . . . . . . . . . . . . . . . . . . . . . . . 112
Replacing the Lamp . . . . . . . . . . . . . . . . . . . . . . . . . . . . . . . . . . . . . . . . . . . 112 Lamp replacement period . . . . . . . . . . . . . . . . . . . . . . . . . . . . . . . . . . . . . 112 How to replace the lamp . . . . . . . . . . . . . . . . . . . . . . . . . . . . . . . . . . . . . . 113 Resetting the lamp hours . . . . . . . . . . . . . . . . . . . . . . . . . . . . . . . . . . . . . 115 Replacing the Air Filter . . . . . . . . . . . . . . . . . . . . . . . . . . . . . . . . . . . . . . . . . 116 Air filter replacement period . . . . . . . . . . . . . . . . . . . . . . . . . . . . . . . . . . . 116
How to replace the air filter . . . . . . . . . . . . . . . . . . . . . . . . . . . . . . . . . . . . |
116 |
Appendix
Optional Accessories and Consumables . . . . . . . . . . . . . . . . . . . . 118
Optional Accessories . . . . . . . . . . . . . . . . . . . . . . . . . . . . . . . . . . . . . . . . . . 118
Consumables . . . . . . . . . . . . . . . . . . . . . . . . . . . . . . . . . . . . . . . . . . . . . . . 118
Screen Size and Projection Distance . . . . . . . . . . . . . . . . . . . . . . . . 119
Projection Distance (For EB-925/EB-905) . . . . . . . . . . . . . . . . . . . . . . . . . . . . . 119 Projection Distance (For EB-915W) . . . . . . . . . . . . . . . . . . . . . . . . . . . . . . . . . 120 Projection Distance (For EB-910W) . . . . . . . . . . . . . . . . . . . . . . . . . . . . . . . . . 121 Projection Distance (For EB-900) . . . . . . . . . . . . . . . . . . . . . . . . . . . . . . . . . . 123 Projection Distance (For EB-96W) . . . . . . . . . . . . . . . . . . . . . . . . . . . . . . . . . . 124 Projection Distance (For EB-95) . . . . . . . . . . . . . . . . . . . . . . . . . . . . . . . . . . . 125
Supported Monitor Displays . . . . . . . . . . . . . . . . . . . . . . . . . . . . . . . 127
Supported Resolutions . . . . . . . . . . . . . . . . . . . . . . . . . . . . . . . . . . . . . . . . . |
127 |
Computer signals (analog RGB) . . . . . . . . . . . . . . . . . . . . . . . . . . . . . . . . . |
127 |
Component Video . . . . . . . . . . . . . . . . . . . . . . . . . . . . . . . . . . . . . . . . . . |
127 |
Composite video . . . . . . . . . . . . . . . . . . . . . . . . . . . . . . . . . . . . . . . . . . . |
127 |
Input signal from the HDMI port . . . . . . . . . . . . . . . . . . . . . . . . . . . . . . . . |
127 |
Specifications . . . . . . . . . . . . . . . . . . . . . . . . . . . . . . . . . . . . . . . . . . . . 129
Projector General Specifications . . . . . . . . . . . . . . . . . . . . . . . . . . . . . . . . . . . |
129 |
Appearance . . . . . . . . . . . . . . . . . . . . . . . . . . . . . . . . . . . . . . . . . . . . . . 134
Glossary . . . . . . . . . . . . . . . . . . . . . . . . . . . . . . . . . . . . . . . . . . . . . . . . . 136
General Notes . . . . . . . . . . . . . . . . . . . . . . . . . . . . . . . . . . . . . . . . . . . . 138
About Notations . . . . . . . . . . . . . . . . . . . . . . . . . . . . . . . . . . . . . . . . . . . . . 138
General Notice: . . . . . . . . . . . . . . . . . . . . . . . . . . . . . . . . . . . . . . . . . . . . . . 138
Index . . . . . . . . . . . . . . . . . . . . . . . . . . . . . . . . . . . . . . . . . . . . . . . . . . . . 156

Introduction
This chapter explains the projector's features and the part names.

Projector Features |
|
7 |
|
|
|
List of Functions by Model
Available functions differ depending on the model being used. See the table below for a list of the functions available for each model.
Function |
EB-925 |
EB-915W |
EB-910W |
EB-905 |
EB-900 |
EB-96W |
EB-95 |
|
|
|
|
|
|
|
|
USB Display*1
HDMI Connection*2
Auto V-Keystone
WXGA Resolutions |
- |
- |
- |
- |
|
|
|
|
|
Quick Wireless |
|
|
|
|
Connection*3 |
|
|
|
|
Wired LAN Connection |
|
- |
- |
|
Wireless LAN
Connection*4
Network Settings
Slideshow
*1 The USB display requires a commercially available USB cable.
*2 The HDMI connection requires a commercially available HDMI cable.
*3 The Quick Wireless Connection requires a Quick Wireless Connection USB Key. *4 The wireless LAN connection requires a Wireless LAN unit.
Projector Features |
|
8 |
|
|
|
Quick and Easy Set up, Projection, and Storage
• Turn the projector |
on and |
off by simply plugging in or unplugging. |
• Project onto large |
screens |
from a short distance. |
•Make easy height adjustments with one lever.
•No cool down delay makes it easy to put away.
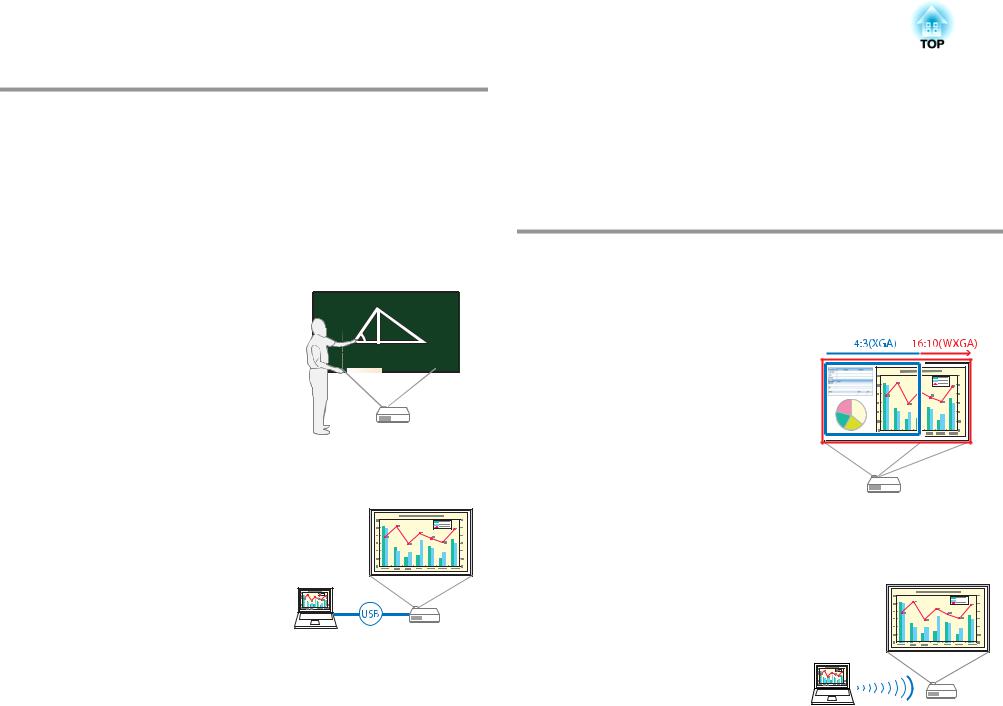
Easy writing on a whiteboard or blackboard using the pattern function
You can project ruled lines and grid patterns. This is useful when drawing diagrams on a whiteboard or blackboard.
s Settings - Pattern p.80
Detecting projector movements and automatically correcting image distortion
This projector automatically corrects keystone distortion which occurs when positioning or moving the projector.
s "Correcting automatically (Auto V-Keystone)" p.36
Useful Functions for Projecting Images
Increasing projection content in wide (WXGA) screen (EB-915W/ EB-910W/EB-96W only)
With a computer that has a 16:10 WXGA wide LCD display, the image can be projected in the same aspect. You can use whiteboards and other landscape format screens.
s"Changing the Aspect Ratio of the Projected Image " p.42
Connecting with a USB cable and projecting (USB Display)
By simply connecting a commercially available USB cable, you can project images from a computer's screen without a computer cable. s "Projecting with USB Display" p.32
Connecting to a network and projecting images from the computer's screen
You can connect the projector to a computer on a network and project the computer's screen using the supplied EasyMP Network Projection (application software).
s EasyMP Network Projection Operation Guide

Projector Features
Easy connection to a computer with Quick Wireless
By simply connecting the optional Quick Wireless Connection USB Key to a computer, you can project the computer's screen. (Windows computers only)
Making the most of the remote control
You can use the remote control to perform operations such as enlarging part of the image. You can also use the remote control as a pointer during presentations or as a mouse for the computer.
s "Pointer Function (Pointer)" p.52
s "Enlarging Part of the Image (E-Zoom)" p.53
s "Using the Remote Control to Operate the Mouse Pointer (Wireless Mouse)" p.54
Enlarge and project your files with the Document Camera
You can project paper documents and objects using the optional Document Camera. Image focus is automatically adjusted using the auto focus function. You can also enlarge images using digital zoom.
s "Optional Accessories" p.118
Enhanced security functions
•Password Protect to restrict and manage users
By setting a Password you can restrict who can use the projector. s "Managing Users (Password Protect)" p.59
9
•Control Panel Lock restricts button operation on the control panel
You can use this to prevent people changing projector settings without permission at events, in schools, and so on.
s "Restricting Operation (Control Panel Lock)" p.61
•Equipped with various anti-theft devices
The projector is equipped with the following types of anti-theft security devices.
•Security slot
•Security cable installation point
s "Anti-Theft Lock" p.62
Part Names and Functions |
|
10 |
|
|
|
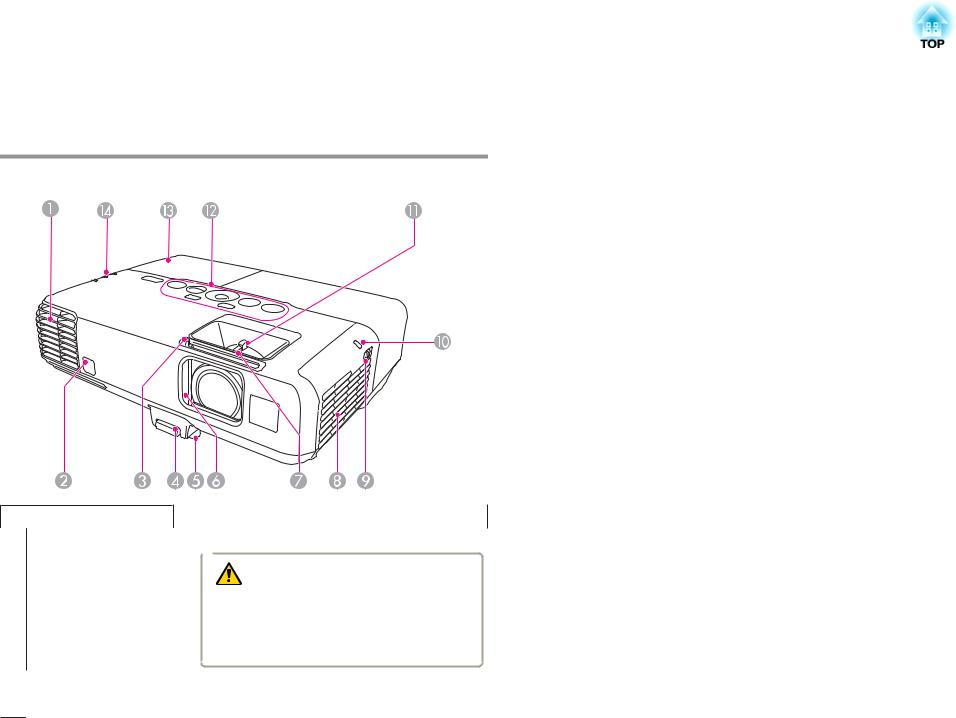
All of the features in this guide are explained using illustrations of EB-925 unless otherwise mentioned.
Front/Top
Name |
Function |
A Air exhaust vent |
Exhaust vent for air used to cool the projector internally. |
|
|
Caution |
|
|
|
While projecting, do not put your face or hands |
|
|
|
near the air exhaust vent, and do not place objects |
|
|
|
that may become warped or damaged by heat near |
|
|
|
the vent. |
|
|
|
|
|
|
|
|
|
B Remote receiver |
Receives signals from the remote control. |
|
|
|
|
|
|
C A/V mute slide knob |
Slide the knob to open and close the A/V mute slide. |
|
|
|
Name |
Function |
D |
Foot adjust lever |
Press the foot lever to extend and retract the front foot. |
|
|
s "Adjusting the Image Position" p.39 |
|
|
|
E |
Front adjustable foot |
When setup on a surface such as a desk, extend the foot to |
|
|
adjust the position of the image. |
|
|
s "Adjusting the Image Position" p.39 |
|
|
|
F |
A/V mute slide |
Close when not using the projector to protect the lens. By |
|
|
closing during projection you can hide the image and the |
|
|
sound. |
|
|
s "Hiding the Image and Sound Temporarily (A/V |
|
|
Mute)" p.51 |
|
|
|
G |
Focus ring |
Adjusts the image focus. |
|
|
s "Correcting the Focus" p.40 |
|
|
|
H |
Air intake vent |
Takes in air to cool the projector internally. |
|
(air filter) |
s "Cleaning the Air Filter" p.110 |
|
|
|
I |
Air filter cover open/ |
Opens and closes the air filter cover. |
|
close switch |
Open this cover when installing the optional wireless LAN |
|
|
unit. |
|
|
s "Replacing the Air Filter" p.116 |
|
|
|
J |
Wireless LAN indicator |
Displays the access status of the optional Wireless LAN |
|
|
unit. |
|
|
|
K |
Zoom ring |
Adjusts the image size. |
|
|
s "Adjusting the Image Size" p.39 |
|
|
|
L |
Control panel |
Operates the projector. |
|
|
s "Control Panel" p.13 |
|
|
|
M |
Lamp cover |
Open when replacing the projector's lamp. |
|
|
s "Replacing the Lamp" p.112 |
|
|
|
N |
Indicators |
Indicates the projector's status. |
|
|
s "Reading the Indicators" p.95 |
|
|
|
Part Names and Functions |
|
11 |
|
|
|
Rear
|
Name |
|
|
Function |
A |
HDMI port |
Inputs video signals from HDMI compatible video |
||
|
|
equipment and computers. This projector is compatible |
||
|
|
with HDCPg. |
||
|
|
|
|
|
|
|
s "Connecting Equipment" p.22 |
||
|
|
|
||
B |
Power inlet |
Connects the power cable to the projector. |
||
|
|
s "From Installation to Projection" p.30 |
||
|
|
|
||
C |
S-Video port |
For S-video signals from video sources. |
||
|
|
|
||
D |
Video port |
Inputs composite video signals from video sources. |
||
|
|
|
||
E |
Audio-L/R port |
Inputs audio from equipment connected to the S-Video |
||
|
|
port or the Video port. |
||
|
|
|
||
F |
Audio1 port |
Inputs audio from equipment connected to the |
||
|
|
Computer1 port. |
||
|
|
|
||
G |
Monitor Out port |
Outputs analog RGB signals input from the Computer1 |
||
|
|
port to an external monitor. You cannot output signals |
||
|
|
input from other ports or component video signals. |
||
|
|
|
||
H |
Audio Out port |
Outputs audio from the currently projected image or the |
||
|
|
Mic port to an external speaker. |
||
|
|
|
||
I |
Audio2 port |
Inputs audio from equipment connected to the |
||
|
|
Computer2 port. |
||
|
|
|
|
|
|
Name |
Function |
|
J |
RS-232C port |
When controlling the projector from a computer, connect |
|
|
|
it to the computer with an RS-232C cable. This port is for |
|
|
|
control use and should not normally be used. |
|
|
|
s "ESC/VP21 Commands" p.67 |
|
|
|
|
|
K |
Mic port |
Inputs audio from the microphone. |
|
|
|
|
|
L |
Security slot |
The security slot is compatible with the Microsaver |
|
|
|
Security System manufactured by Kensington. |
|
|
|
s "Anti-Theft Lock" p.62 |
|
|
|
|
|
M |
Speaker |
Plays back audio. |
|
|
|
|
|
N |
Remote receiver |
Receives signals from the remote control. |
|
|
|
|
|
O |
LAN port |
Connects a LAN cable to connect to a network. |
|
|
(EB-925/EB-915W/ |
|
|
|
EB-905/EB-96W/EB-95 |
|
|
|
only) |
|
|
|
|
|
|
P |
USB(TypeA) port |
• Connects a USB memory device or a digital camera, and |
|
|
|
projects images as a Slideshow. |
|
|
|
s "Projecting Without a Computer (Slideshow)" |
|
|
|
p.46 |
|
|
|
• Connects the optional Document Camera. |
|
|
|
|
|
Q |
USB(TypeB) port |
• Connects the projector to a computer via a |
|
|
|
commercially available USB cable, and projects the |
|
|
|
images on the computer. |
|
|
|
s "Projecting with USB Display" p.32 |
|
|
|
• Connects the projector to a computer via the |
|
|
|
commercially available USB cable to use the Wireless |
|
|
|
Mouse function. |
|
|
|
s "Using the Remote Control to Operate the |
|
|
|
Mouse Pointer (Wireless Mouse)" p.54 |
|
|
|
|
|
R |
Computer2 port |
Inputs image signals from a computer and component |
|
|
|
video signals from other video sources. |
|
S |
Computer1 port |
||
|
|||
|
|
|
Part Names and Functions |
|
12 |
|
|
|
Base |
|
|
Name |
Function |
|
D |
Security cable |
Pass a commercially available wire lock through here and |
|||
|
|
||||
|
|
|
installation point |
lock it in place. |
|
|
|
|
|
s "Installing the wire lock" p.62 |
|
|
|
|
|
|
|
Name |
Function |
A |
Ceiling mount fixing |
Attach the optional Ceiling Mount here when suspending |
|
points (three points) |
the projector from a ceiling. |
|
|
s "Installing the Projector" p.19 |
|
|
s "Optional Accessories" p.118 |
|
|
|
B |
Rear feet |
When setup on a surface such as a desk, turn to extend and |
|
|
retract to adjust the horizontal tilt. |
|
|
s "Adjusting the Horizontal Tilt" p.39 |
|
|
|
C |
Front adjustable foot |
When setup on a surface such as a desk, extend the foot to |
|
|
adjust the position of the image. |
|
|
s "Adjusting the Image Position" p.39 |
|
|
|
Part Names and Functions |
|
13 |
|
|
|
Control Panel
|
Name |
Function |
A |
[t] button |
Turns the projector power on or off. |
|
|
s "From Installation to Projection" p.30 |
|
|
|
B |
[Source Search] |
Changes to the next input source that is sending an image. |
|
button |
s "Automatically Detect Input Signals and Change the |
|
|
Projected Image (Source Search)" p.31 |
|
|
|
C |
[Enter] button |
• When the Configuration menu or the Help screen is |
|
|
displayed, it accepts and enters the current selection and |
|
|
moves to the next level. |
|
|
• If pressed while projecting analog RGB signals from the |
|
|
Computer1 port or Computer2 port, you can |
|
|
automatically optimize Tracking, Sync., and Display |
|
|
Position. |
|
|
|
|
Name |
Function |
D |
[w][v] buttons |
• Performs vertical keystone correction. |
|
|
s "Correcting keystone distortion in vertical |
|
|
directions" p.36 |
|
|
• If pressed when the Configuration menu or the Help |
|
|
screen is displayed, these buttons select menu items and |
|
|
setting values. |
|
|
s "Using the Configuration Menu" p.74 |
|
|
s "Using the Help" p.94 |
|
|
|
E |
[a][b] button |
[a] Decreases the volume. |
|
|
[b] Increases the volume. |
|
|
s "Adjusting the Volume" p.40 |
|
|
|
F |
[Help] button |
Displays and closes the Help screen which shows you how |
|
|
to deal with problems if they occur. |
|
|
s "Using the Help" p.94 |
|
|
|
G |
[Esc] button |
• Stops the current function. |
|
|
• If pressed when the Configuration menu is displayed, it |
|
|
moves to the previous menu level. |
|
|
s "Using the Configuration Menu" p.74 |
|
|
|
H |
[<][>] buttons |
• Performs horizontal keystone correction. |
|
|
s "Correcting keystone distortion in horizontal |
|
|
directions" p.37 |
|
|
• If pressed when the Configuration menu or the Help |
|
|
screen is displayed, these buttons select menu items and |
|
|
setting values. |
|
|
s "Using the Configuration Menu" p.74 |
|
|
s "Using the Help" p.94 |
|
|
|
I |
[Menu] button |
Displays and closes the Configuration menu. |
|
|
s "Using the Configuration Menu" p.74 |
|
|
|

Part Names and Functions
Remote Control
14
|
Name |
Function |
A |
[t] button |
Turns the projector power on or off. |
|
|
s "From Installation to Projection" p.30 |
|
|
|
B |
[Computer] button |
Each time you press the button, the input changes between |
|
|
images from the Computer1 port and the Computer2 |
|
|
port. |
|
|
|
C |
[Video] button |
Each time the button is pressed, the image cycles through |
|
|
the S-Video, Video, and HDMI ports. |
|
|
|
D |
Numeric buttons |
• Enter the Password. |
|
|
s "Setting Password Protect" p.59 |
|
|
• Use this button to enter numbers in Network settings |
|
|
from the Configuration menu. |
|
|
|
E |
[A/V Mute] button |
Turns the video and audio on or off. |
|
|
s "Hiding the Image and Sound Temporarily (A/V |
|
|
Mute)" p.51 |
|
|
|
F |
[Freeze] button |
Images are paused or unpaused. |
|
|
s "Freezing the Image (Freeze)" p.51 |
|
|
|
G |
[Auto] button |
If pressed while projecting analog RGB signals from |
|
|
Computer1 port or Computer2 port, you can |
|
|
automatically optimize Tracking, Sync., and Display |
|
|
Position. |
|
|
|
H |
[Aspect] button |
Each time the button is pressed, the aspect mode changes. |
|
|
s "Changing the Aspect Ratio of the Projected Image " |
|
|
p.42 |
|
|
|
I |
[Page] buttons |
Changes pages in files such as PowerPoint files when using |
|
[Up] [Down] |
the following projection methods. |
|
|
• When using the Wireless Mouse function |
|
|
s "Using the Remote Control to Operate the |
|
|
Mouse Pointer (Wireless Mouse)" p.54 |
|
|
• When using USB Display |
|
|
s "Projecting with USB Display" p.32 |
|
|
• When connecting to a network |
|
|
When projecting images using Slideshow, pressing these |
|
|
buttons displays the previous/next screen. |
|
|
|

Part Names and Functions |
|
15 |
|
|
|
|
Name |
|
Function |
J [E-Zoom] buttons |
|
Enlarges or reduces the image without changing the |
|
[z][x] |
|
projection size. |
|
|
|
|
s "Enlarging Part of the Image (E-Zoom)" p.53 |
|
|
|
|
K [Menu] button |
|
Displays and closes the Configuration menu. |
|
|
|
|
s "Using the Configuration Menu" p.74 |
|
|
|
|
L [ |
][ |
] |
• When the Configuration menu or the Help screen is |
[ ][ |
] buttons |
|
displayed, pressing these buttons selects menu items |
|
and setting values. |
||
|
|
|
|
|
|
|
s "Using the Configuration Menu" p.74 |
•When projecting a Slideshow, pressing these buttons displays the previous/next image, rotates the image, and so on.
s "Slideshow operating methods" p.46
•During Wireless Mouse function, the mouse pointer moves in the direction of the button that was pushed. s "Using the Remote Control to Operate the Mouse Pointer (Wireless Mouse)" p.54
M [Enter] button |
• When the Configuration menu or the Help screen is |
|
displayed, it accepts and enters the current selection and |
|
moves to the next level. |
|
s "Using the Configuration Menu" p.74 |
|
• Acts as a mouse's left button when using the Wireless |
|
Mouse function. |
|
s "Using the Remote Control to Operate the |
|
Mouse Pointer (Wireless Mouse)" p.54 |
|
|
N [Esc] button |
• Stops the current function. |
|
• If pressed when the Configuration menu is displayed, it |
|
moves to the previous level. |
|
s "Using the Configuration Menu" p.74 |
|
• Acts as a mouse's right button when using the Wireless |
|
Mouse function. |
|
s "Using the Remote Control to Operate the |
|
Mouse Pointer (Wireless Mouse)" p.54 |
|
Name |
Function |
O |
[Volume] buttons |
[a] Decreases the volume. |
|
[a][b] |
[b] Increases the volume. |
|
|
s "Adjusting the Volume" p.40 |
|
|
|
P |
[Pointer] button |
Displays the on-screen pointer. |
|
|
s "Pointer Function (Pointer)" p.52 |
|
|
|
Q |
[Help] button |
Displays and closes the Help screen which shows you how |
|
|
to deal with problems if they occur. |
|
|
s "Using the Help" p.94 |
|
|
|
R |
[Color Mode] button |
Each time the button is pressed, the Color Mode changes. |
|
|
s "Selecting the Projection Quality (Selecting Color |
|
|
Mode)" p.40 |
|
|
|
S |
[Num] button |
Hold down this button and press the numeric buttons to |
|
|
enter passwords and numbers. |
|
|
s "Setting Password Protect" p.59 |
|
|
|
T |
[User] button |
Select any frequently used item from the seven available |
|
|
Configuration menu items, and assign it to this button. By |
|
|
pressing the [User] button, the assigned menu item |
|
|
selection/adjustment screen is displayed, allowing you to |
|
|
make one-touch settings/adjustments. |
|
|
s "Settings Menu" p.80 |
|
|
Power Consumption is assigned as the default setting. |
|
|
|
U |
[USB] button |
Each time the button is pressed, it cycles through the |
|
|
following images: |
|
|
• USB Display |
|
|
• Images from the device connected to the USB(TypeA) |
|
|
port |
|
|
|
V |
[LAN] button |
Changes to the image projected with EasyMP Network |
|
|
Projection. When projecting using the optional Quick |
|
|
Wireless Connection USB Key, this button switches to |
|
|
that image. |
|
|
|
W |
[Source Search] |
Changes to the next input source that is sending an image. |
|
button |
s "Automatically Detect Input Signals and Change the |
|
|
Projected Image (Source Search)" p.31 |
|
|
|
Part Names and Functions
Name |
Function |
|
|
XRemote control lightOutputs remote control signals. emitting area
16
Replacing the remote control batteries
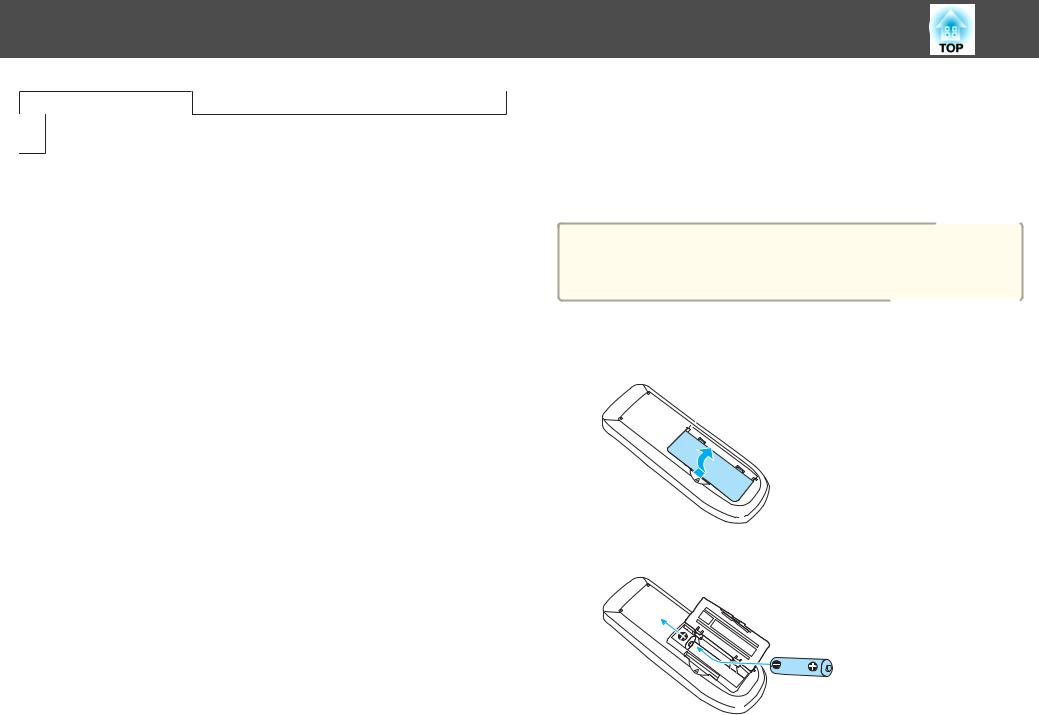
If delays in the responsiveness of the remote control occur or if it does not operate after it has been used for some time, it probably means that the batteries are becoming flat. When this happens, replace them with new batteries. Have two AA size manganese or alkaline batteries ready. You cannot use other batteries except for the AA size manganese or alkaline.
Attention
Make sure you read the following manual before handling the batteries.
s Safety Instructions
a Remove the battery cover.
While pushing the battery compartment cover catch, lift the cover up.
b Replace the old batteries with new batteries.
Part Names and Functions |
|
17 |
|
|
|
Caution
Check the positions of the (+) and (-) marks inside the battery holder to ensure the batteries are inserted the correct way.
c Replace the battery cover.
Press the battery compartment cover until it clicks into place.
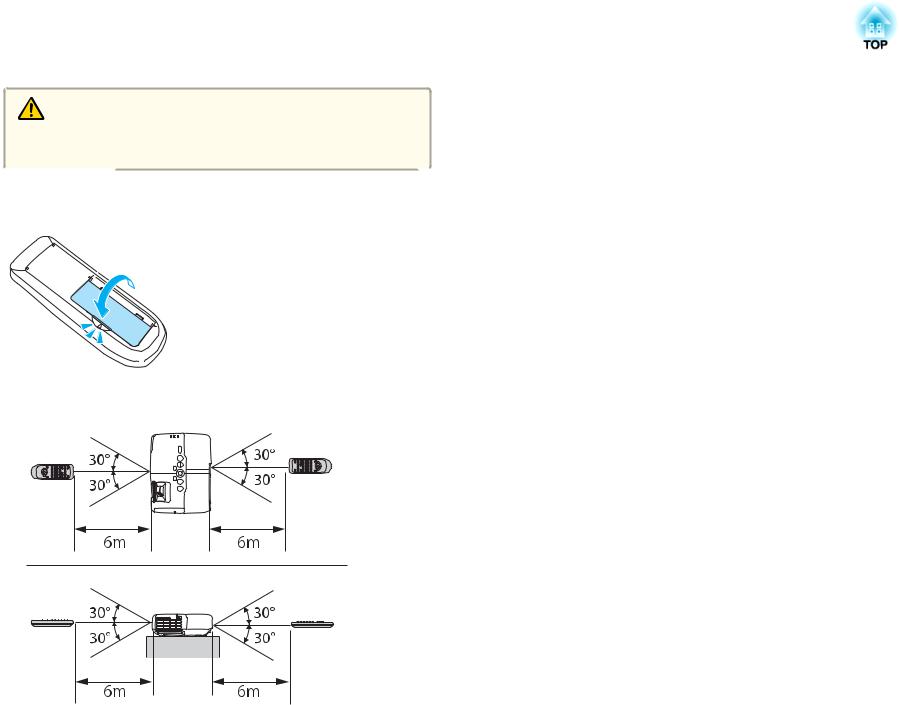
Remote control operating range

Preparing the Projector
This chapter explains how to install the projector and connect projection sources.
Installing the Projector |
|
19 |
|
|
|
Installation Methods
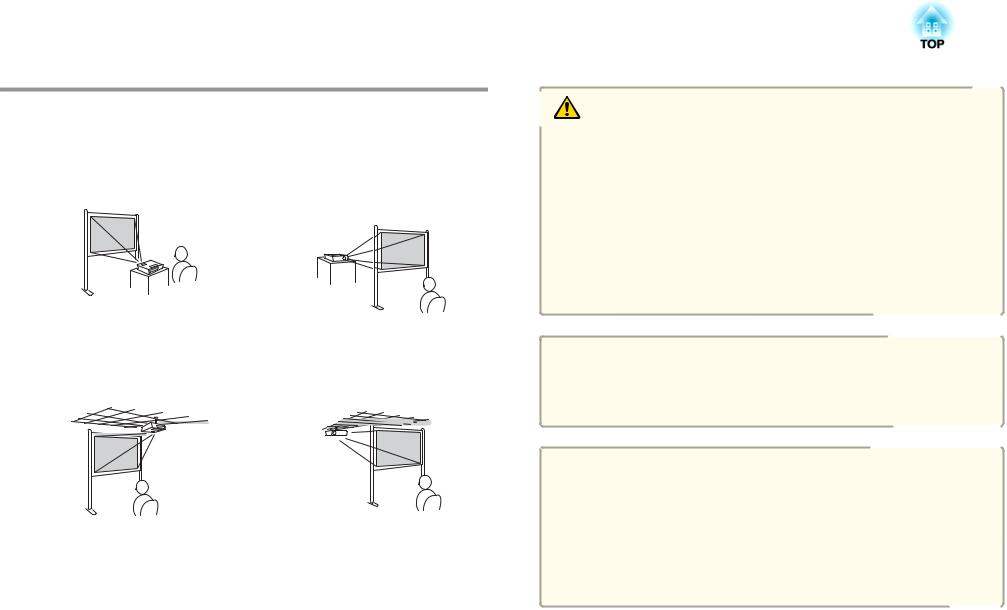
The projector supports the following four different projection methods. Install the projector according to the conditions of the installation location.
• Project images from in front of |
• Project images from behind a |
the screen. (Front projection) |
translucent screen. (Rear projec- |
|
tion) |
Warning
•A special method of installation is required when suspending the projector from a ceiling (ceiling mount). If it is not installed correctly, it could fall causing an accident and injury.
•If you use adhesives on the Ceiling mount fixing points to prevent the screws from loosening, or if you use things such as lubricants or oils on the projector, the projector case may crack causing it to fall from its ceiling mount. This could cause serious injury to anyone under the ceiling mount and could damage the projector.
When installing or adjusting the ceiling mount, do not use adhesives to prevent the screws from loosening and do not use oils or lubricants and so on.
•Suspend the projector from the ceiling and project images from in front of a screen. (Front/Ceiling projection)
•Suspend the projector from the ceiling and project images from behind a translucent screen.
(Rear/Ceiling projection)
Attention
•Do not use the projector on its side. This may cause malfunctions to occur.
•Do not cover the projector's air intake vent or air exhaust vent. If either of the vents are covered, the internal temperature could rise and cause a fire.
a• An optional Ceiling mount is required when suspending the projector from a ceiling.
s "Optional Accessories" p.118
•You can change the setting as follows by pressing down the [A/V Mute] button on the remote control for about five seconds.
FrontWFront/Ceiling
Set Rear or Rear/Ceiling from the Configuration menu. s Extended - Projection p.81
Installation methods
Install the projector as follows.
Installing the Projector |
|
20 |
|
|
|
• Install the projector so |
that it |
is parallel |
to the screen. |
If the projector is installed at an angle to |
the screen, keystone distortion |
||
occurs in the projected |
image. |
|
|
•Place the projector on a level surface.
If the projector is tilted the projected image is also tilted.
a• See the following if you cannot install the projector parallel to the screen.
s "Correcting Keystone Distortion" p.36
•See the following if you cannot install the projector on a level surface.
s "Adjusting the Horizontal Tilt" p.39
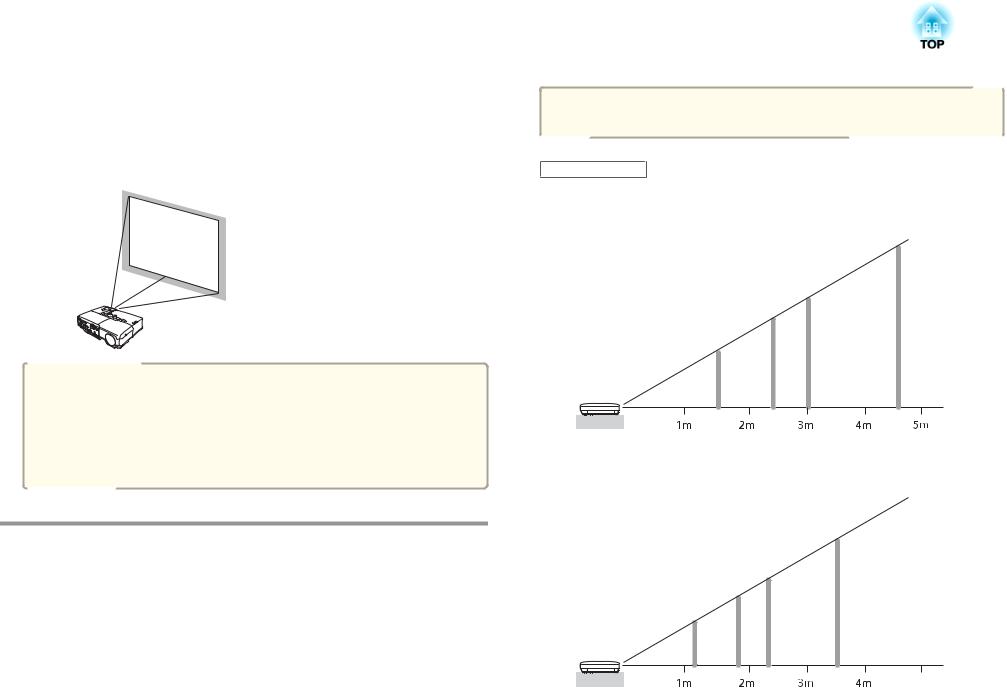
Screen Size and Approximate Projection Distance
Projection size is determined by the distance from the projector to the screen. See the illustrations on the right to select the best position according to the screen size. The illustrations show the approximate shortest distance at maximum zoom. See the following for more information on the projection distance.
s "Screen Size and Projection Distance" p.119
aWhen you correct keystone distortion, the projected image may be reduced.
16:10 Screen Size
EB-915W
150” |
(320×200cm) |
100” |
(220×130cm) |
80” |
(170×110cm) |
50” |
(110×67cm) |
EB-910W
150”
(320×200cm)
100”
(220×130cm)
80”
(170×110cm)
50”
(110×67cm)
5m
Installing the Projector |
|
21 |
|
|
|
EB-96W |
EB-900 |
150”
(320×200cm)
100”
(220×130cm)
80”
(170×110cm)
50”
(110×67cm)
150”
100”
80”
50”
5m
4:3 Screen Size |
EB-95 |
EB-925/EB-905 |
Connecting Equipment |
|
22 |
|
|
|
Illustrations in this section are of EB-925/EB-915W/EB-905/EB-96W/EB-95.
The port name, location, and connector orientation differ depending on the source being connected.
Connecting a Computer
To project images from a computer, connect the computer using one of the following methods.
AWhen using the supplied computer cable
Connect the computer's display output port to the projector's Computer1 or Computer2 port.
BWhen using a commercially available USB cable
Connect the computer's USB port to the projector's USB(TypeB) port.
CWhen using a commercially available HDMI cable
Connect the computer's HDMI port to the projector's HDMI port.
Computer1/2 |
Audio1/2 |
USB TypeB |
HDMI |
a• You can use a commercially available USB cable to connect the projector to a computer to project images from the computer. This function is called USB Display.
s "Projecting with USB Display" p.32
•You can output audio from the projector's speaker by connecting the computer's audio output port to the projector's Audio1 or Audio2 port using a commercially available audio cable.

Connecting Equipment |
|
23 |
|
|
|
Connecting Image Sources
To project images from DVD players or VHS video and so on, connect to the projector using one of the following methods.
AWhen using a commercially available video or S-video cable
Connect the video or S-video output port on the image source to the projector's Video or S-Video port.
BWhen using the optional component video cable s "Optional Accessories" p.118
Connect the component output port on the image source to the projector's Computer1 or Computer2 port.
CWhen using a commercially available HDMI cable
Connect the HDMI port on the image source to the projector's HDMI port using a commercially available HDMI cable.
Video |
S-VIDEO |
S-Video |
Audio(L-R) |
Computer1/2 |
Audio1/2 |
HDMI |

Connecting Equipment |
|
24 |
|
|
|
Attention
• If |
the |
input source is on when you connect it to the projector, it could |
cause a malfunction. |
• If |
the orientation or shape of the plug differs, do not try to force it in. The device could be damaged or could malfunction. |
||
a |
• If the source you want to connect to has an unusually shaped port, use the cable supplied with the device or an optional cable to connect to the projector. |
||
|
|
• When using a commercially available 2RCA(L/R)/stereo mini-pin |
audio cable, make sure it is labeled "No resistance". |
•You can output audio from the projector's speaker by connecting the audio output port on the image source to the projector's Audio-L/R port using a commercially available audio cable.
Connecting Equipment |
|
25 |
|
|
|
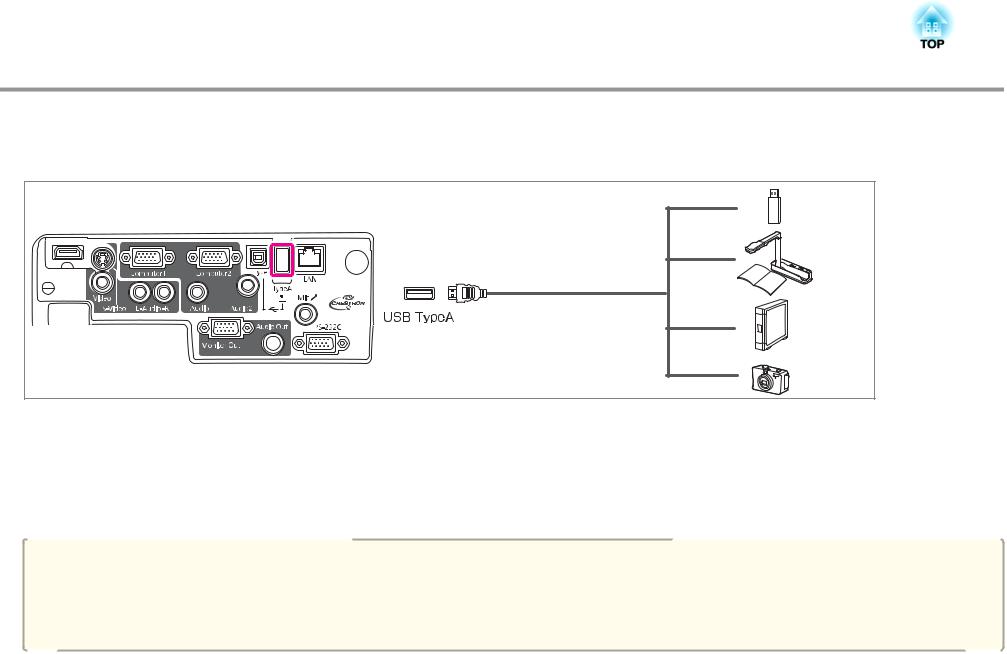
Connecting USB Devices
You can connect devices such as USB memory, the optional Document Camera, and USB compatible hard disks and digital cameras. Using the USB cable supplied with the USB device, connect the USB device to the USB(TypeA) port on the projector.
When the USB device is connected, you can project image files on the USB memory or digital camera using Slideshow. s "Slideshow examples" p.46
If the Document Camera is connected while projecting images from another input port, press the [USB] button on the remote control, or the [Source Search] button on the control panel, to switch to images from the Document Camera.
s "Automatically Detect Input Signals and Change the Projected Image (Source Search)" p.31
Attention
• If you |
use a USB hub, the connection may not operate |
correctly. Devices such as digital cameras and USB devices should be connected to the projector directly. |
|
• When |
connecting and using |
a USB-compatible hard disk, make sure you connect the AC adaptor supplied with the hard disk. |
|
• Connect a digital camera or |
hard disk to the projector |
using a USB cable supplied with or specified for use with the device. |
|
• Use a |
USB cable less than 3 |
m in length. If the cable |
exceeds 3 m, Slideshow may not function correctly. |
Connecting Equipment |
|
26 |
|
|
|
Removing USB devices
After finishing projecting, remove USB devices from the projector. For devices such as digital cameras or hard disks, turn off the device and then remove it from the projector.
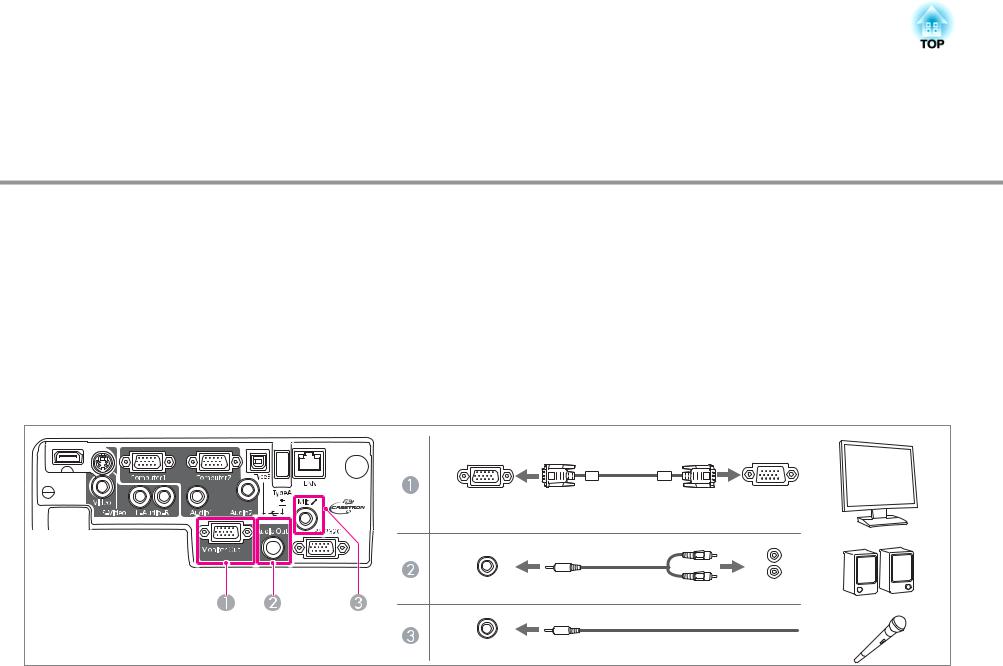
Connecting External Equipment
You can output images and audio by connecting an external monitor or speaker. You can also output microphone audio from the projector's speaker by connecting a microphone.
AWhen outputting images to an external monitor
Connect the external monitor to the projector's Monitor Out port using the cable supplied with the external monitor.
BWhen outputting audio to an external speaker
Connect the external speaker to the projector's Audio Out port using a commercially available audio cable.
CWhen outputting microphone audio
Connect the microphone to the projector's Mic port. When using a condenser microphone, set Plug-in Power to On. s Extended - Plug-in Power p.81
Monitor Out |
Audio Out |
Mic |
Connecting Equipment |
|
27 |
|
|
|
a |
• If you set Standby Mode to Communication On, you can perform |
the following operations |
even if the projector is in standby mode. |
|
- Outputting images to an external monitor |
|
|
|
- Outputting microphone audio from the projector's speaker (only when Standby Microphone is set to On). |
||
|
s Extended - Standby Mode p.81 |
|
|
|
s Extended - Standby Microphone p.81 |
|
|
|
• Only analog RGB signals from the Computer1 port can be output to an external monitor. You cannot output signals input from other ports or component video |
||
|
signals. |
|
|
|
• Setting gauges for functions such as Keystone, Configuration Menu, |
or Help screens are not |
output to the external monitor. |
•When the audio cable jack is inserted into the Audio Out port, audio stops being output from the projector's built-in speakers and switches to external output.
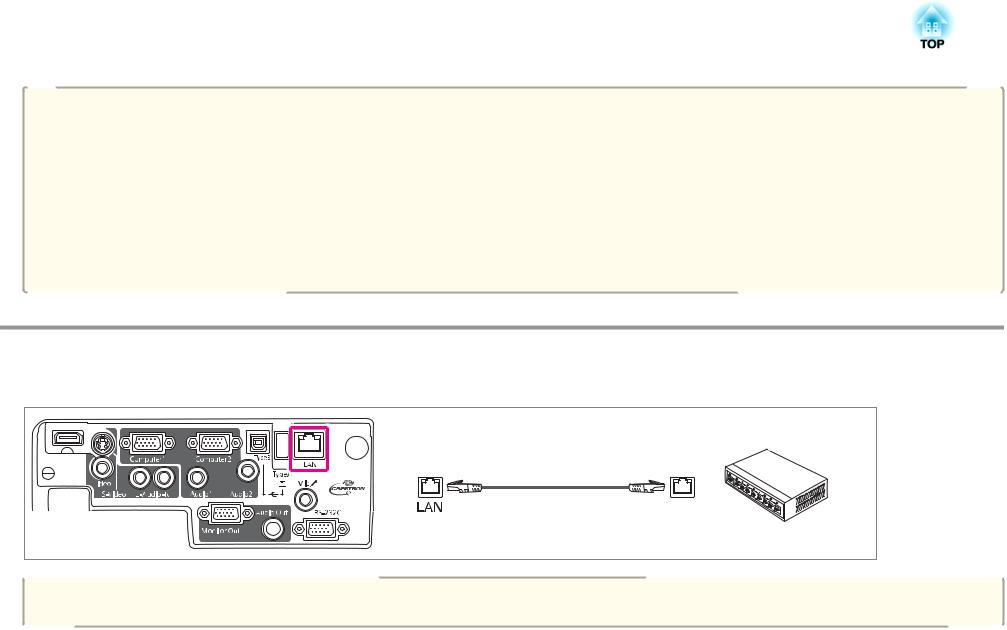
Connecting a LAN Cable (EB-925/EB-915W/EB-905/EB-96W/EB-95 only)
Connect a LAN port on network hubs or other equipment to the projector's LAN port with a commercially available 100BASE-TX or 10BASE-T LAN cable.
aTo prevent malfunctions, use a category 5 shielded LAN cable.

Connecting Equipment |
|
28 |
|
|
|
Installing the Wireless LAN Unit
a Open the air filter cover.
Slide the air filter cover open/close switch, and open the air filter cover.
d Fix the stopper in place with the screw.
b Remove the stopper for the Wireless LAN unit.


e Close the air filter cover.
c Install the Wireless LAN unit.

Basic Usage
This chapter explains how to project and adjust images.
Projecting Images
From Installation to Projection
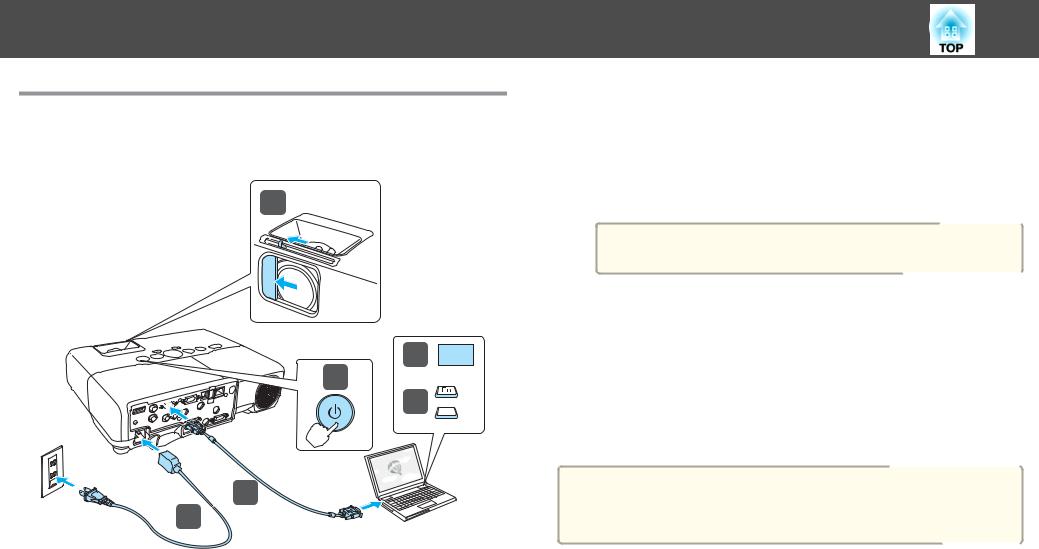
This section explains the procedure for connecting the projector to a computer with the computer cable and projecting images.
4
5 ON
3
6 b
2
1
a Connect the projector to an electrical outlet with the power cable. |
||
b |
Connect the projector to the computer with the computer cable. |
|
c |
Turn on the projector. |
|
d |
||
Slide open the A/V mute slide. |
||
|
||
30
e Turn on your computer.
f Change the computer's screen output.
When using a laptop computer, you need to change the screen output from the computer.
Hold down the Fn key (function key), and press the b key.
aThe method for changing differs depending on the computer being used. See the documentation supplied with the computer.
If the image is not projected, you can change the projected image using one of the following methods.
•Press the [Source Search] button on the control panel or the remote control.
s "Automatically Detect Input Signals and Change the Projected Image (Source Search)" p.31
•Press the button for the target port on the remote control. s "Switching to the Target Image by Remote Control" p.32
aAfter projecting the image, adjust the image if necessary. s "Correcting Keystone Distortion" p.36
s "Correcting the Focus" p.40
Loading...