


 Loading...
User’s Guide

Notations Used in This Guide
•Safety indications
The documentation and the projector use graphical symbols to show how to use the projector safely. Please understand and respect these caution symbols in order to avoid injury to persons or property.
|
|
Warning |
This symbol indicates information that, if ignored, could possibly result in personal injury or even death due to incorrect handling. |
|
|
|
|
|
|
|
|
Caution |
This symbol indicates information that, if ignored, could possibly result in personal injury or physical damage due to incorrect handling. |
|
|
|
|
|
|
• General information indications |
|
|||
|
|
|
|
|
|
|
Attention |
Indicates procedures which may result in damage or injury if sufficient care is not taken. |
|
|
|
|
|
|
|
|
q |
Indicates additional information and points which may be useful to know regarding a topic. |
|
|
|
|
|
|
|
|
|
|
|
|
|
s |
Indicates a page where detailed information regarding a topic can be found. |
|
|
|
|
|
|
|
|
g |
Indicates that an explanation of the underlined word or words in front of this symbol appears in the glossary of terms. See the "Glossary" |
|
|
|
|
|
section of the "Appendix". s p.114 |
|
|
|
|
|
|
|
|
|
Indicates operating methods and the order of operations. |
|
|
Procedure |
|
|
|
|
|
|
The procedure indicated should be carried out in the order of the numbered steps. |
|
|
[ (Name) ] |
Indicates the name of the buttons on the Remote Control or the Control panel. |
|
|
|
|
|
Example: [Esc] button |
|
|
|
||
|
"(Menu Name)" |
Indicates Configuration Menu items. |
||
|
|
Brightness |
Example: |
|
|
|
|
|
Select "Brightness" from the Image menu. |
|
|
|
|
Image menu - Brightness |
|
|
|
|
|

Contents |
|
3 |
|
|
|
Notations Used in This Guide . . . . . . . . . . . . . . . . . . . . . . . . 2
Introduction
Projector Features . . . . . . . . . . . . . . . . . . . . . . . . . . . . . . . . . . . . . . . . . . 7
Features Common to Each Model . . . . . . . . . . . . . . . . . . . . . . . . . . . . . . . . . . . 7 Easy to handle . . . . . . . . . . . . . . . . . . . . . . . . . . . . . . . . . . . . . . . . . . . . . . 7 Enhanced security functions . . . . . . . . . . . . . . . . . . . . . . . . . . . . . . . . . . . . . 7 EB-826WH/825H/85H Features . . . . . . . . . . . . . . . . . . . . . . . . . . . . . . . . . . . . . 8 Taking full advantage of a network connection . . . . . . . . . . . . . . . . . . . . . . . . 8 Projecting JPEG images without connecting a computer . . . . . . . . . . . . . . . . . . 8
Part Names and Functions . . . . . . . . . . . . . . . . . . . . . . . . . . . . . . . . . . . 9
Front/Top . . . . . . . . . . . . . . . . . . . . . . . . . . . . . . . . . . . . . . . . . . . . . . . . . . . 9 Rear . . . . . . . . . . . . . . . . . . . . . . . . . . . . . . . . . . . . . . . . . . . . . . . . . . . . . . . 10 Base . . . . . . . . . . . . . . . . . . . . . . . . . . . . . . . . . . . . . . . . . . . . . . . . . . . . . . 11 Control panel . . . . . . . . . . . . . . . . . . . . . . . . . . . . . . . . . . . . . . . . . . . . . . . . 12 Remote Control . . . . . . . . . . . . . . . . . . . . . . . . . . . . . . . . . . . . . . . . . . . . . . . 13
Various Applications
Changing the Projected Image . . . . . . . . . . . . . . . . . . . . . . . . . . . . . . 16
Automatically Detect Input Signal and Change the Projected Image (Source Search)
. . . . . . . . . . . . . . . . . . . . . . . . . . . . . . . . . . . . . . . . . . . . . . . . . . . . . . . . . . 16 Switch to Target Image by Remote Control . . . . . . . . . . . . . . . . . . . . . . . . . . . . 17
Connecting with a USB Cable and Projecting (USB Display) . . . . 18
System Requirements . . . . . . . . . . . . . . . . . . . . . . . . . . . . . . . . . . . . . . . . . . 18
Connecting . . . . . . . . . . . . . . . . . . . . . . . . . . . . . . . . . . . . . . . . . . . . . . . . . 18
Connecting for the first time . . . . . . . . . . . . . . . . . . . . . . . . . . . . . . . . . . . . 19
From the second time . . . . . . . . . . . . . . . . . . . . . . . . . . . . . . . . . . . . . . . . 21
Presentations Using Slideshow (EB-826WH/825H/824H/85H)
. . . . . . . . . . . . . . . . . . . . . . . . . . . . . . . . . . . . . . . . . . . . . . . . . . . . . . . . . . . 22
Files that can be Projected Using Slideshow . . . . . . . . . . . . . . . . . . . . . . . . . . . 22
Specifications for files that can be projected using Slideshow . . . . . . . . . . . . . . 22 Slideshow examples . . . . . . . . . . . . . . . . . . . . . . . . . . . . . . . . . . . . . . . . . 22 Presentations Using Slideshow . . . . . . . . . . . . . . . . . . . . . . . . . . . . . . . . . . . . 22 Starting and closing Slideshow . . . . . . . . . . . . . . . . . . . . . . . . . . . . . . . . . . 23 Slideshow basic operations . . . . . . . . . . . . . . . . . . . . . . . . . . . . . . . . . . . . . 23 Rotating the image . . . . . . . . . . . . . . . . . . . . . . . . . . . . . . . . . . . . . . . . . . 24 Projecting Image Files . . . . . . . . . . . . . . . . . . . . . . . . . . . . . . . . . . . . . . . . . . 24 Projecting images . . . . . . . . . . . . . . . . . . . . . . . . . . . . . . . . . . . . . . . . . . . 25 Projecting all image files in a folder in sequence (Slideshow) . . . . . . . . . . . . . . 26 Setting Image Display Conditions . . . . . . . . . . . . . . . . . . . . . . . . . . . . . . . . . . 26
Connecting to External Equipment . . . . . . . . . . . . . . . . . . . . . . . . . . 28
Connecting and Removing USB Devices . . . . . . . . . . . . . . . . . . . . . . . . . . . . . . 28 Connecting USB devices . . . . . . . . . . . . . . . . . . . . . . . . . . . . . . . . . . . . . . . 28 Removing USB devices . . . . . . . . . . . . . . . . . . . . . . . . . . . . . . . . . . . . . . . . 29 Connecting to an External Monitor (EB-826WH/825H/85H/84H/84L Only) . . . . . . . 29 Connecting to an External Speaker (EB-826WH/825H/85H/84H/84L Only) . . . . . . . 30 Connecting a Microphone . . . . . . . . . . . . . . . . . . . . . . . . . . . . . . . . . . . . . . . 31 Connecting a LAN Cable (EB-826WH/825H/85H/84H/84L Only) . . . . . . . . . . . . . . 31 Installing the Wireless LAN Unit (EB-826WH/825H/85H Only) . . . . . . . . . . . . . . . . 32
Functions for Enhancing Projection . . . . . . . . . . . . . . . . . . . . . . . . . 33
Selecting the Projection Quality (Selecting Color Mode) . . . . . . . . . . . . . . . . . . . 33 Setting the Auto Iris . . . . . . . . . . . . . . . . . . . . . . . . . . . . . . . . . . . . . . . . . . . . 34 Hiding the Image and Sound Temporarily (A/V Mute) . . . . . . . . . . . . . . . . . . . . . 34 Freezing the Image (Freeze) . . . . . . . . . . . . . . . . . . . . . . . . . . . . . . . . . . . . . . 35 Changing the Aspect Ratio . . . . . . . . . . . . . . . . . . . . . . . . . . . . . . . . . . . . . . . 35
Changing methods . . . . . . . . . . . . . . . . . . . . . . . . . . . . . . . . . . . . . . . . . . 35 Changing the Aspect for video equipment images . . . . . . . . . . . . . . . . . . . . . 36 Changing the Aspect for computer images (EB-825H/824H/85H/84H/84L) . . . . . 37 Changing the Aspect for computer images (EB-826WH) . . . . . . . . . . . . . . . . . 38 Pointer Function (Pointer) . . . . . . . . . . . . . . . . . . . . . . . . . . . . . . . . . . . . . . . . 40 Enlarging Part of the Image (E-Zoom) . . . . . . . . . . . . . . . . . . . . . . . . . . . . . . . . 41 Operating the Mouse Pointer by Remote Control (Wireless Mouse) . . . . . . . . . . . . 42
Security Functions . . . . . . . . . . . . . . . . . . . . . . . . . . . . . . . . . . . . . . . . . 44
Managing Users (Password Protect) . . . . . . . . . . . . . . . . . . . . . . . . . . . . . . . . . 44 Type of Password Protect . . . . . . . . . . . . . . . . . . . . . . . . . . . . . . . . . . . . . . 44 Setting Password Protect . . . . . . . . . . . . . . . . . . . . . . . . . . . . . . . . . . . . . . 44

Contents |
|
4 |
|
|
|
Entering the password . . . . . . . . . . . . . . . . . . . . . . . . . . . . . . . . . . . . . . . . 45 Restricting Operation (Control Panel Lock) . . . . . . . . . . . . . . . . . . . . . . . . . . . . 46 Anti-Theft Lock . . . . . . . . . . . . . . . . . . . . . . . . . . . . . . . . . . . . . . . . . . . . . . . 47 Installing the wire lock . . . . . . . . . . . . . . . . . . . . . . . . . . . . . . . . . . . . . . . . 47
Changing Settings Using a Web Browser (Web Control) . . . . . . . 48
Displaying Web Control . . . . . . . . . . . . . . . . . . . . . . . . . . . . . . . . . . . . . . . . . 48 Entering the IP address of the projector . . . . . . . . . . . . . . . . . . . . . . . . . . . . 48 Displaying Web Remote . . . . . . . . . . . . . . . . . . . . . . . . . . . . . . . . . . . . . . . . . 48
Using the Mail Notification Function to Report Problems . . . . . . 50 Management Using SNMP . . . . . . . . . . . . . . . . . . . . . . . . . . . . . . . . . . 51 Saving a User's Logo . . . . . . . . . . . . . . . . . . . . . . . . . . . . . . . . . . . . . . . 52 Saving a User Pattern . . . . . . . . . . . . . . . . . . . . . . . . . . . . . . . . . . . . . . 54
Configuration Menu
Using the Configuration Menu . . . . . . . . . . . . . . . . . . . . . . . . . . . . . . 57
List of Functions . . . . . . . . . . . . . . . . . . . . . . . . . . . . . . . . . . . . . . . . . . . 58
Image Menu . . . . . . . . . . . . . . . . . . . . . . . . . . . . . . . . . . . . . . . . . . . . . . . . . 58 Signal Menu . . . . . . . . . . . . . . . . . . . . . . . . . . . . . . . . . . . . . . . . . . . . . . . . . 59 Settings Menu . . . . . . . . . . . . . . . . . . . . . . . . . . . . . . . . . . . . . . . . . . . . . . . . 60 Extended Menu . . . . . . . . . . . . . . . . . . . . . . . . . . . . . . . . . . . . . . . . . . . . . . . 63 Network Menu (EB-826WH/825H/85H/84H/84L only) . . . . . . . . . . . . . . . . . . . . . 65
Notes on operating the Network menu . . . . . . . . . . . . . . . . . . . . . . . . . . . . . 66 Soft keyboard operations . . . . . . . . . . . . . . . . . . . . . . . . . . . . . . . . . . . . . . 66 Basic menu . . . . . . . . . . . . . . . . . . . . . . . . . . . . . . . . . . . . . . . . . . . . . . . . 67 Wireless LAN menu (EB-826WH/825H/85H only) . . . . . . . . . . . . . . . . . . . . . . 68 Security menu (EB-826WH/825H/85H only) . . . . . . . . . . . . . . . . . . . . . . . . . . 69 When WEP is selected . . . . . . . . . . . . . . . . . . . . . . . . . . . . . . . . . . . . . . . . 70 When WPA-PSK (TKIP) or WPA2-PSK (AES) is selected . . . . . . . . . . . . . . . . . . . 71 Wired LAN menu . . . . . . . . . . . . . . . . . . . . . . . . . . . . . . . . . . . . . . . . . . . . 72 Mail menu . . . . . . . . . . . . . . . . . . . . . . . . . . . . . . . . . . . . . . . . . . . . . . . . 73 Others menu . . . . . . . . . . . . . . . . . . . . . . . . . . . . . . . . . . . . . . . . . . . . . . 74 Reset menu . . . . . . . . . . . . . . . . . . . . . . . . . . . . . . . . . . . . . . . . . . . . . . . 75
Info Menu (Display Only) . . . . . . . . . . . . . . . . . . . . . . . . . . . . . . . . . . . . . . . . 76
Reset Menu . . . . . . . . . . . . . . . . . . . . . . . . . . . . . . . . . . . . . . . . . . . . . . . . . 77
Troubleshooting
Using the Help . . . . . . . . . . . . . . . . . . . . . . . . . . . . . . . . . . . . . . . . . . . . . 79
Problem Solving . . . . . . . . . . . . . . . . . . . . . . . . . . . . . . . . . . . . . . . . . . . 80
Reading the Indicators . . . . . . . . . . . . . . . . . . . . . . . . . . . . . . . . . . . . . . . . . . 80 t Indicator is lit or flashing red . . . . . . . . . . . . . . . . . . . . . . . . . . . . . . . . . . 81 m o Indicators are flashing or lit orange . . . . . . . . . . . . . . . . . . . . . . . . . . . . 82 When the Indicators Provide No Help . . . . . . . . . . . . . . . . . . . . . . . . . . . . . . . . 83 Problems relating to images . . . . . . . . . . . . . . . . . . . . . . . . . . . . . . . . . . . . 84 Problems when projection starts . . . . . . . . . . . . . . . . . . . . . . . . . . . . . . . . . 88 Other problems . . . . . . . . . . . . . . . . . . . . . . . . . . . . . . . . . . . . . . . . . . . . . 88
Reading Problem Mail Notification Function (EB-826WH/825H/ 85H/84H/84L Only) . . . . . . . . . . . . . . . . . . . . . . . . . . . . . . . . . . . . . . . . 91
Appendix
Installation Methods . . . . . . . . . . . . . . . . . . . . . . . . . . . . . . . . . . . . . . . 93
Cleaning . . . . . . . . . . . . . . . . . . . . . . . . . . . . . . . . . . . . . . . . . . . . . . . . . . 94
Cleaning the Projector's Surface . . . . . . . . . . . . . . . . . . . . . . . . . . . . . . . . . . . 94 Cleaning the Lens . . . . . . . . . . . . . . . . . . . . . . . . . . . . . . . . . . . . . . . . . . . . . 94 Cleaning the Air filter . . . . . . . . . . . . . . . . . . . . . . . . . . . . . . . . . . . . . . . . . . . 94
Replacing Consumables . . . . . . . . . . . . . . . . . . . . . . . . . . . . . . . . . . . . 95
Replacing the Remote Control Batteries . . . . . . . . . . . . . . . . . . . . . . . . . . . . . . 95 Replacing the Lamp . . . . . . . . . . . . . . . . . . . . . . . . . . . . . . . . . . . . . . . . . . . . 95 Lamp replacement period . . . . . . . . . . . . . . . . . . . . . . . . . . . . . . . . . . . . . . 95 How to replace the lamp . . . . . . . . . . . . . . . . . . . . . . . . . . . . . . . . . . . . . . 96 Resetting the Lamp Hours . . . . . . . . . . . . . . . . . . . . . . . . . . . . . . . . . . . . . . 99 Replacing the Air Filter . . . . . . . . . . . . . . . . . . . . . . . . . . . . . . . . . . . . . . . . . . 99 Air filter replacement period . . . . . . . . . . . . . . . . . . . . . . . . . . . . . . . . . . . . 99 How to replace the air filter . . . . . . . . . . . . . . . . . . . . . . . . . . . . . . . . . . . . . 99

Contents |
|
5 |
|
|
|
Optional Accessories and Consumables . . . . . . . . . . . . . . . . . . . . 101
Optional Accessories . . . . . . . . . . . . . . . . . . . . . . . . . . . . . . . . . . . . . . . . . . 101
Consumables . . . . . . . . . . . . . . . . . . . . . . . . . . . . . . . . . . . . . . . . . . . . . . . 101
Screen Size and Projection Distance . . . . . . . . . . . . . . . . . . . . . . . . 102
Projection Distance (EB-825H/824H/85H/84H/84L) . . . . . . . . . . . . . . . . . . . . . . 102
Projection Distance (EB-826WH) . . . . . . . . . . . . . . . . . . . . . . . . . . . . . . . . . . . 102
ESC/VP21 Commands . . . . . . . . . . . . . . . . . . . . . . . . . . . . . . . . . . . . . 104
Command List . . . . . . . . . . . . . . . . . . . . . . . . . . . . . . . . . . . . . . . . . . . . . . . 104
Cable Layouts . . . . . . . . . . . . . . . . . . . . . . . . . . . . . . . . . . . . . . . . . . . . . . . 104
Serial connection . . . . . . . . . . . . . . . . . . . . . . . . . . . . . . . . . . . . . . . . . . . 104
Communications protocol . . . . . . . . . . . . . . . . . . . . . . . . . . . . . . . . . . . . . 105
About PJLink . . . . . . . . . . . . . . . . . . . . . . . . . . . . . . . . . . . . . . . . . . . . . 106
Supported Monitor Displays . . . . . . . . . . . . . . . . . . . . . . . . . . . . . . . 107
Supported Monitor Displays (EB-825H/824H/85H/84H/84L) . . . . . . . . . . . . . . . . 107
Computer signals (analog RGB) . . . . . . . . . . . . . . . . . . . . . . . . . . . . . . . . . 107
Component Video . . . . . . . . . . . . . . . . . . . . . . . . . . . . . . . . . . . . . . . . . . 107
Composite Video/S-Video . . . . . . . . . . . . . . . . . . . . . . . . . . . . . . . . . . . . . 107
Supported Monitor Displays (EB-826WH) . . . . . . . . . . . . . . . . . . . . . . . . . . . . . 108
Computer signals (analog RGB) . . . . . . . . . . . . . . . . . . . . . . . . . . . . . . . . . 108
Component Video . . . . . . . . . . . . . . . . . . . . . . . . . . . . . . . . . . . . . . . . . . 108
Composite Video/S-Video . . . . . . . . . . . . . . . . . . . . . . . . . . . . . . . . . . . . . 108
Specifications . . . . . . . . . . . . . . . . . . . . . . . . . . . . . . . . . . . . . . . . . . . . 109
Projector General Specifications . . . . . . . . . . . . . . . . . . . . . . . . . . . . . . . . . . . |
109 |
Appearance . . . . . . . . . . . . . . . . . . . . . . . . . . . . . . . . . . . . . . . . . . . . . . 113
Glossary . . . . . . . . . . . . . . . . . . . . . . . . . . . . . . . . . . . . . . . . . . . . . . . . . 114
General Notes . . . . . . . . . . . . . . . . . . . . . . . . . . . . . . . . . . . . . . . . . . . . 116
About Notations . . . . . . . . . . . . . . . . . . . . . . . . . . . . . . . . . . . . . . . . . . . . . |
116 |
General Notice: . . . . . . . . . . . . . . . . . . . . . . . . . . . . . . . . . . . . . . . . . . . . . . |
116 |
Index . . . . . . . . . . . . . . . . . . . . . . . . . . . . . . . . . . . . . . . . . . . . . . . . . . . . 134

Introduction
This chapter explains the projector's features and the part names.
Projector Features |
|
7 |
|
|
|
Features Common to Each Model
Easy to handle
•The A/V mute slide makes it easy to project and store
You can stop and resume projection easily by opening and closing the A/V mute slide which makes giving clear presentations easier.
•A single foot design means you do not have to make any difficult leveling adjustments
You can easily make height adjustments with one hand. s Quick Start Guide
• No cool down delay
After turning the projector's power off, you can disconnect the projector's power cable without having to wait for the projector to cool down.
•Projection screen for WXGA (EB-826WH)
With a computer that has a 16:10 WXGA wide LCD display, the image can be projected in the same aspect. You can use whiteboards and other landscape format screens.
•Make effective use of white boards and so on with the Pattern function
Projects ruled lines or a grid onto a white board or black board, allowing you to easily write sentences or draw figures.
•Enlarge and project your files with the Document Camera
A USB compatible Document Camera is available as an optional extra. With this Document Camera there is no need for a power cable. You can connect easily with one USB cable, and its clean design really simplifies projecting and enlarging your documents.
•Connecting with a USB cable and Projecting (USB Display)
Simply by connecting the projector to a computer with the supplied USB cable you can project images from the computer screen. s p.18
Enhanced security functions
•Password Protect to restrict and manage users
By setting a Password you can restrict who can use the projector. s p.44
•Control Panel Lock restricts button operation on the Control panel
You can use this to prevent people changing projector settings without permission at events, in schools, and so on. s p.46
•Equipped with various anti-theft devices
The projector is equipped with the following types of anti-theft security devices. s p.47
•Security slot
•Security cable installation point

Projector Features |
|
8 |
|
|
|
EB-826WH/825H/85H Features
Taking full advantage of a network connection
You can make effective use of your network by using the supplied "EPSON Projector Software for Meeting & Monitoring" to perform efficient and varied presentations and meetings. s EasyMP Network Projection Operation Guide
•Connect a Computer to the projector via a network
You can project by connecting to an already constructed network system. You can hold efficient meetings by projecting from multiple computers connected to a network system without having to change any cables.
•Connecting wirelessly to a computer
When you install the optional wireless LAN unit in the projector, you can connect wirelessly to a computer.
•Connection method for various networks
The following methods are available for connecting the projector to a network. Select whichever method suites your environment. s EasyMP Network Projection Operation Guide
•Advanced Connection Mode
Advanced Connection Mode is an infrastructure connection, offering you a method of connecting to an already constructed network.
•Quick Connection Mode
Quick Connection Mode is a connection method that can only be executed when the optional wireless LAN unit is installed.
Quick Connection Mode temporarily allocates the projector's SSID to the computer in ad-hoc mode, and restores the computer's network settings after disconnecting.
•Network connection using Quick Wireless Connection USB Key
Using the optional Quick Wireless Connection USB Key, you can quickly connect a computer to the projector for projection.
q |
• Not compatible with the "Network Projector" function which is a |
standard feature on Windows Vista/Windows 7. |
|
|
• Limitations when projecting from Windows Media Center |
|
When Windows Media Center is displayed at full screen, you cannot |
|
project with Quick Wireless Connection USB Key. |
|
|
Projecting JPEG images without connecting a computer
You can project a slideshow of JPEG images saved on a USB device such as a USB compatible digital camera, hard disk, or USB memory by simply connecting to the projector. s EasyMP Network Projection Operation Guide
Part Names and Functions |
|
9 |
|
|
|
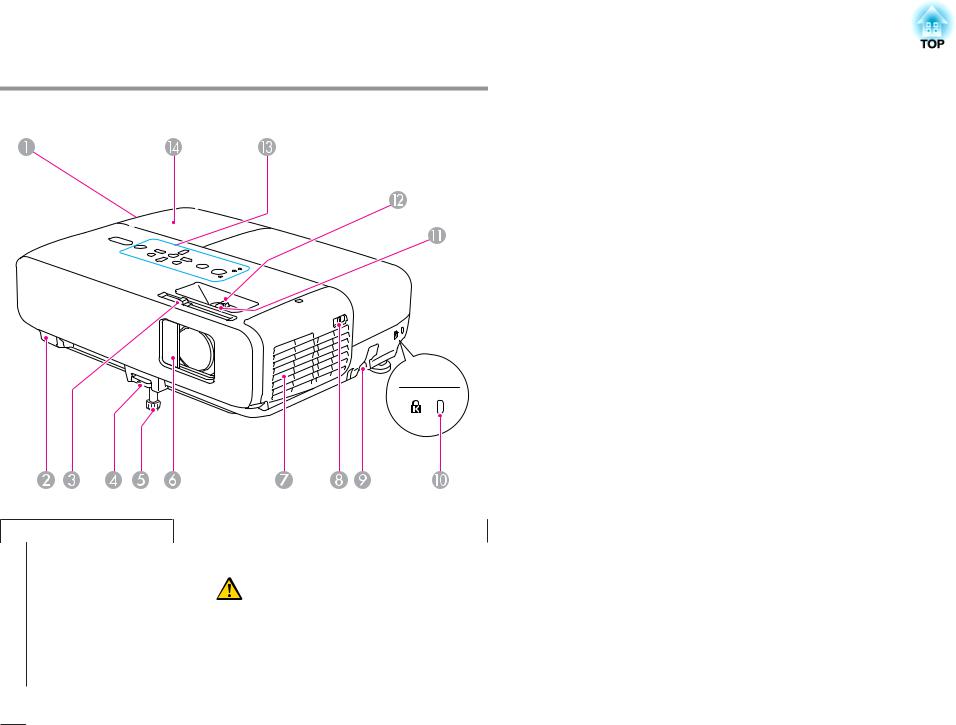
Front/Top
Name |
Function |
A Air exhaust vent |
Exhaust vent for air used to cool the projector internally. |
|
|
Caution |
|
|
|
Do not place objects that may become warped or |
|
|
|
otherwise affected by heat near the Air exhaust vent |
|
|
|
and do not put your face or hands near the vent |
|
|
|
while projection is in progress. |
|
|
|
|
|
|
|
|
|
B Remote Receiver |
Receives signals from the remote control. s Quick Start |
|
|
|
Guide |
|
|
|
Name |
Function |
C |
A/V mute slide knob |
Slide the knob to open and close the A/V mute slide. |
|
|
|
D |
Foot adjust lever |
Pull out the Foot adjust lever to extend and retract the |
|
|
Front adjustable foot. s Quick Start Guide |
|
|
|
E |
Front adjustable foot |
Extend and adjust the position of the projected image |
|
|
when the projector is placed on a surface such as a desk. |
|
|
s Quick Start Guide |
|
|
|
F |
A/V mute slide |
Close when not using the projector to protect the lens. By |
|
|
closing during projection you can hide the image and the |
|
|
sound (A/V Mute). s Quick Start Guide , s p.34 |
G |
Air intake vent |
Takes in air to cool the projector internally. If dust collects |
|
(Air filter) |
here it can cause the internal temperature to rise, and this |
|
|
can lead to problems with operation and shorten the |
|
|
optical engine's service life. Be sure to clean the Air filter |
|
|
regularly. s p.94, p.99 |
|
|
|
H |
Air filter cover |
Opens and closes the air filter cover. s p.99 |
|
open/close switch |
Open this cover when installing the optional Wireless |
|
|
LAN unit. |
|
|
|
I |
Security cable |
Pass a commercially available wire lock through here and |
|
installation point |
lock it in place. s p.47 |
|
|
|
J |
Security slot |
The Security slot is compatible with the Microsaver |
|
|
Security System manufactured by Kensington. |
|
|
s p.47 |
|
|
|
K |
Focus ring |
Adjusts the image focus. s Quick Start Guide |
|
|
|
L |
Zoom ring |
Adjusts the image size. s Quick Start Guide |
|
|
|
M |
Control panel |
s p.12 |
|
|
|
N |
Lamp cover |
Open this cover when replacing the projector's Lamp. |
|
|
s p.95 |
|
|
|
Part Names and Functions |
|
10 |
|
|
|
Rear
|
|
|
|
|
|
|
|
|
|
|
|
|
|
|
|
|
|
|
|
|
|
|
|
|
|
|
|
|
|
|
|
|
|
|
|
|
|
|
|
|
|
|
|
|
|
|
|
|
|
|
|
|
|
|
|
|
|
|
|
|
|
|
|
|
|
|
|
|
|
|
|
|
|
|
|
|
|
|
|
|
|
|
|
|
|
|
|
|
|
|
|
|
|
|
|
|
|
|
|
|
|
|
|
|
|
|
|
|
|
|
|
|
|
|
|
|
|
|
|
|
|
|
|
|
|
|
|
|
|
|
|
|
|
|
|
|
|
|
|
|
|
|
|
|
|
|
|
|
|
|
|
|
|
|
|
|
|
|
|
|
|
|
|
|
|
|
|
|
|
|
|
|
|
|
|
|
|
|
|
|
|
|
|
|
|
|
|
|
|
|
|
|
|
|
|
|
|
|
|
|
|
|
|
|
|
|
|
|
|
|
|
|
|
|
|
|
|
|
|
|
|
|
|
|
|
|
|
|
|
|
|
|
|
|
|
|
|
|
|
|
|
|
|
|
|
|
|
|
|
|
|
|
|
|
|
|
|
|
|
|
|
|
|
|
|
|
|
|
|
|
|
|
|
|
|
|
|
|
|
|
|
|
|
|
|
|
|
|
|
|
|
|
|
|
|
|
|
|
|
|
|
|
|
|
|
|
|
|
|
|
|
|
|
|
|
|
|
|
|
|
|
|
|
|
|
|
|
|
|
|
|
|
|
|
|
|
|
|
|
|
|
|
|
|
|
|
|
|
|
|
|
|
|
|
|
|
|
|
|
|
|
|
|
|
|
|
|
|
|
|
|
|
|
|
|
|
|
|
|
|
|
|
|
|
|
|
|
|
|
|
|
|
|
|
|
|
|
|
|
|
|
|
|
|
|
|
|
|
|
|
|
|
|
|
|
|
|
|
|
|
|
|
|
|
|
|
|
|
|
|
|
|
|
|
|
|
|
|
|
|
|
|
|
|
|
|
|
|
|
|
|
|
|
|
|
|
|
|
|
|
|
|
|
|
|
|
|
|
|
|
|
|
|
|
|
|
|
|
|
|
|
|
|
|
|
|
|
|
|
|
|
|
|
Name |
|
|
|
|
|
|
|
|
|
|
|
|
|
Function |
|||||||||||||||||||||
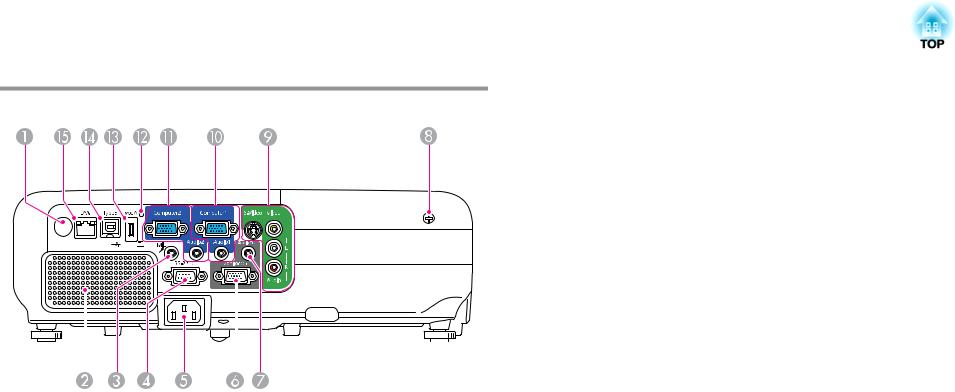
A |
|
Remote Receiver |
Receives signals from the remote control. s Quick Start |
|||||||||||||||||||||||||||||||||||||||||||||||||
|
|
|
|
|
|
|
|
|
|
|
|
|
|
|
|
|
|
|
|
|
Guide |
|||||||||||||||||||||||||||||||
|
|
|
|
|
|
|
|
|
|
|
|
|
|
|
|
|
|
|
|
|
|
|
|
|
|
|
|
|
|
|
|
|
|
|
|
|
|
|
|
|
|
|
|
|
|
|
|
|
||||
B |
|
Speaker |
Outputs audio from the Microphone (Mic) Input Port and |
|||||||||||||||||||||||||||||||||||||||||||||||||
|
|
|
|
|
|
|
|
|
|
|
|
|
|
|
|
|
|
|
|
|
the image currently being projected. |
|||||||||||||||||||||||||||||||
|
|
|
|
|
|
|
|
|
|
|
|
|
|
|
|
|
|
|
|
|
|
|
|
|
|
|
|
|
|
|
|
|
|
|
|
|
|
|
|
|
|
|
|
|
|
|
|
|
||||
C |
|
Microphone (Mic) |
Connects to a microphone. s p.31 |
|||||||||||||||||||||||||||||||||||||||||||||||||
|
|
|
Input Port |
|
|
|
|
|
|
|
|
|
|
|
|
|
|
|
|
|
|
|
|
|
|
|
|
|
|
|
|
|
|
|
|
|||||||||||||||||
|
|
|
|
|
|
|
|
|
|
|
|
|
|
|
|
|
|
|
|
|
|
|
|
|
|
|
|
|
|
|
|
|
|
|
|
|
|
|
|
|
|
|
|
|
|
|
|
|
||||
D |
|
RS-232C Port |
When controlling the projector from a computer, connect |
|||||||||||||||||||||||||||||||||||||||||||||||||
|
|
|
|
|
|
|
|
|
|
|
|
|
|
|
|
|
|
|
|
|
it to the computer with an RS-232C cable. This port is for |
|||||||||||||||||||||||||||||||
|
|
|
|
|
|
|
|
|
|
|
|
|
|
|
|
|
|
|
|
|
control use and should not normally be used. s p.104 |
|||||||||||||||||||||||||||||||
|
|
|
|
|
|
|
|
|
|
|
|
|
|
|
|
|
|
|
|
|
|
|
|
|
|
|
|
|
|
|
|
|
|
|
|
|
|
|
|
|
|
|
|
|
|
|
|
|
||||
E |
|
Power inlet |
Connects to the power cable. s Quick Start Guide |
|||||||||||||||||||||||||||||||||||||||||||||||||
|
|
|
|
|
|
|
|
|
|
|
|
|
|
|
|
|
|
|
|
|
|
|
|
|
|
|
|
|
|
|
|
|
|
|
|
|
|
|
|
|
|
|
|
|
|
|
|
|
||||
F |
|
Monitor Output |
Outputs to an external monitor the image signal from the |
|||||||||||||||||||||||||||||||||||||||||||||||||
|
|
|
(Monitor Out) Port |
computer connected to the Computer1 input port. This is |
||||||||||||||||||||||||||||||||||||||||||||||||
|
|
|
(EB-826WH/825H/ |
not available for component video signals or other signals |
||||||||||||||||||||||||||||||||||||||||||||||||
|
|
|
85H/84H/84L only) |
being input to any port other than the Computer1 input |
||||||||||||||||||||||||||||||||||||||||||||||||
|
|
|
|
|
|
|
|
|
|
|
|
|
|
|
|
|
|
|
|
|
port. s p.29 |
|||||||||||||||||||||||||||||||
|
|
|
|
|
|
|
|
|
|
|
|
|
|
|
|
|
|
|
|
|
|
|
|
|
|
|
|
|
|
|
|
|
|
|
|
|
|
|
|
|
|
|
|
|
|
|
|
|
|
|
|
|
|
Name |
Function |
G |
Audio Output (Audio |
Outputs audio from the Microphone (Mic) Input Port and |
|
Out) Port |
the image currently being projected to an external speaker. |
|
(EB-826WH/825H/ |
s p.30 |
|
85H/84H/84L only) |
|
|
|
|
H |
Lamp Cover Fixing |
Screw to fix the Lamp cover in place. s p.95 |
|
Screw |
|
|
|
|
I |
S-Video Input Port |
For S-video signals from video sources. |
|
Video Input Port |
For composite video signals from video sources. |
|
Audio-L/R port |
Connects to the audio out port when you want to output |
|
audio from equipment connected to the S-Video Input |
|
|
|
|
|
|
Port or the Video Input Port. |
|
|
s Quick Start Guide |
|
|
|
J |
Computer1 Input Port |
For video signals from a computer and component video |
|
Audio1 Port |
signals from other video sources. |
|
|
|
|
|
Connects to the audio out port when you want to output |
|
|
audio from equipment connected to the Computer1 Input |
|
|
Port. |
|
|
s Quick Start Guide |
|
|
|
K |
Computer2 Input Port |
For video signals from a computer and component video |
|
Audio2 Port |
signals from other video sources. |
|
|
|
|
|
Connects to the audio out port when you want to output |
|
|
audio from equipment connected to the Computer2 Input |
|
|
Port. Also, when you want to output audio from the |
|
|
projector for the following Sources, connect the audio |
|
|
source to the Audio2 port. |
|
|
- USB: When playing back a Slideshow from a USB storage |
|
|
device connected to USB (TypeA) Port, or when |
|
|
projecting from the optional Document Camera |
|
|
- USB Display |
|
|
- LAN |
|
|
s Quick Start Guide |
|
|
|
Part Names and Functions |
|
11 |
|
|
|
|
Name |
Function |
L |
USB indicator |
The following explains the status of USB devices |
|
(EB-826WH/825H/ |
connected to USB (TypeA) port. |
|
824H/85H only) |
OFF: USB device is not connected |
|
|
Orange Light ON: USB device is connected |
|
|
Green Light ON: USB device is operating |
|
|
Red Light ON: Error |
|
|
|
M |
USB (TypeA) Port |
Projects a JPEG image Slideshow when memories or |
|
(EB-826WH/825H/ |
digital cameras are connected to the USB compatible port. |
|
824H/85H only) |
s EasyMP Network Projection Operation Guide |
|
|
Also connects to the optional Document Camera. |
|
|
|
N |
USB (TypeB) Port |
Connects the projector to a computer via the supplied USB |
|
|
cable, and the image on the computer is projected. |
|
|
s p.18 |
|
|
Also use this port to connect to a computer via the |
|
|
supplied USB cable to use the wireless mouse function. |
|
|
s p.42 |
|
|
|
O |
LAN Port |
Connects to a LAN cable and then to a network. |
|
(EB-826WH/825H/ |
s p.31 |
|
85H/84H/84L only) |
|
|
|
|
Base
|
Name |
Function |
A |
Ceiling mount fixing |
Attach the optional Ceiling mount here when suspending |
|
points |
the projector from a ceiling. s p.93, p.101 |
|
(3 points) |
|
|
|
|
B |
Rear foot |
When setup on a desk, turn to extend and retract to adjust |
|
|
the horizontal tilt. s Quick Start Guide |
|
|
|
Part Names and Functions |
|
12 |
|
|
|
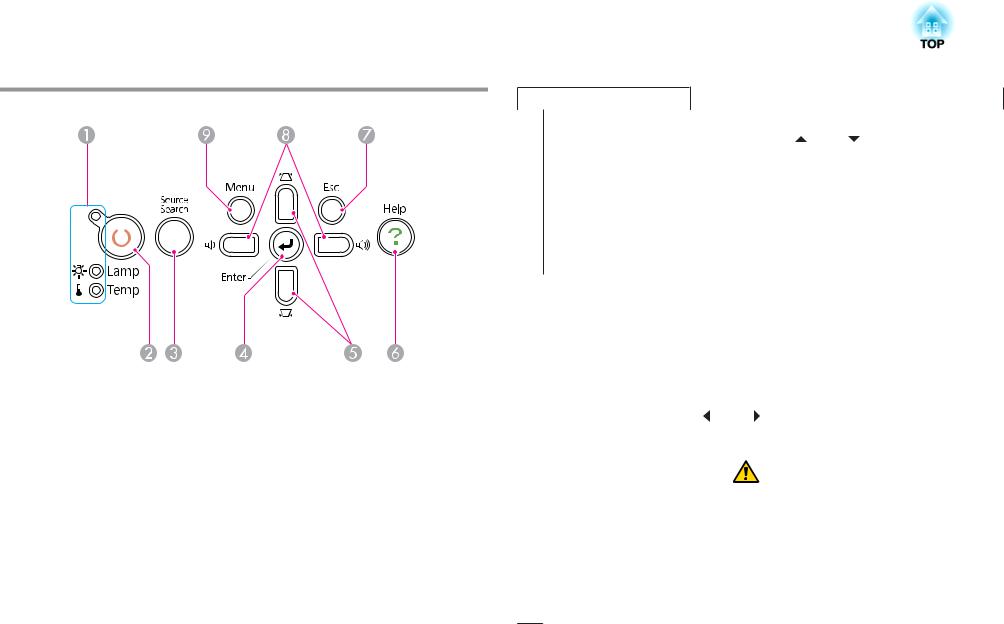
Control panel
|
|
|
|
|
|
|
|
|
Name |
Function |
|
A |
Status indicators |
The color of the indicators and whether they are flashing |
|
|
|
|
or lit indicate the status of the projector. s p.80 |
|
|
|
|
B |
[t] button |
Turns the projector power on or off. sQuick Start Guide |
|
|
|
|
|
C |
[Source Search] |
Changes to the next input source that is connected to the |
|
|
button |
projector and is sending an image. s p.16 |
|
|
|
|
|
D |
[Enter] button |
If pressed during projection of computer signal images, it |
|
|
|
|
automatically adjusts the Tracking, Sync., and Position to |
|
|
|
project the optimum image. |
|
|
|
When a Configuration Menu or a Help screen is displayed, |
|
|
|
it accepts and enters the current selection and moves to the |
|
|
|
next level. s p.57 |
|
|
|
|
Name |
Function |
E [w][v] button |
Corrects Keystone distortion. In the following cases, these |
|
buttons have the [ ] and [ ] functions. |
|
- When the projected image is being sent through a |
|
Network connection |
|
- When the Slideshow function is being used for |
|
projection |
|
If pressed when a Configuration Menu or a Help screen is |
|
displayed, these buttons select menu items and setting |
|
values. s Quick Start Guide , p.57 |
|
|
F [Help] button |
Displays and closes the Help screen which shows you how |
|
to deal with problems if they occur. s p.79 |
|
|
G [Esc] button |
Stops the current function. |
|
If pressed when a Configuration menu is displayed, it |
|
moves to the previous menu level. s p.57 |
|
|
H [a][b] buttons |
Adjusts the volume. If pressed while a Configuration |
|
Menu or a Help screen is displayed, these buttons have the |
|
[ ] and [ ] functions to select menu items and setting |
|
values. s Quick Start Guide , p.57 |
|
|
Caution |
|
|
|
Do not start at high volume. |
|
|
|
A sudden excessive volume may cause loss of |
|
|
|
hearing. Always lower the volume before powering |
|
|
|
off, so that you can power on and then gradually |
|
|
|
increase the volume. |
|
|
|
|
|
|
|
|
|
I [Menu] button |
Displays and closes the Configuration Menu. |
|
|
|
s p.57 |
|
|
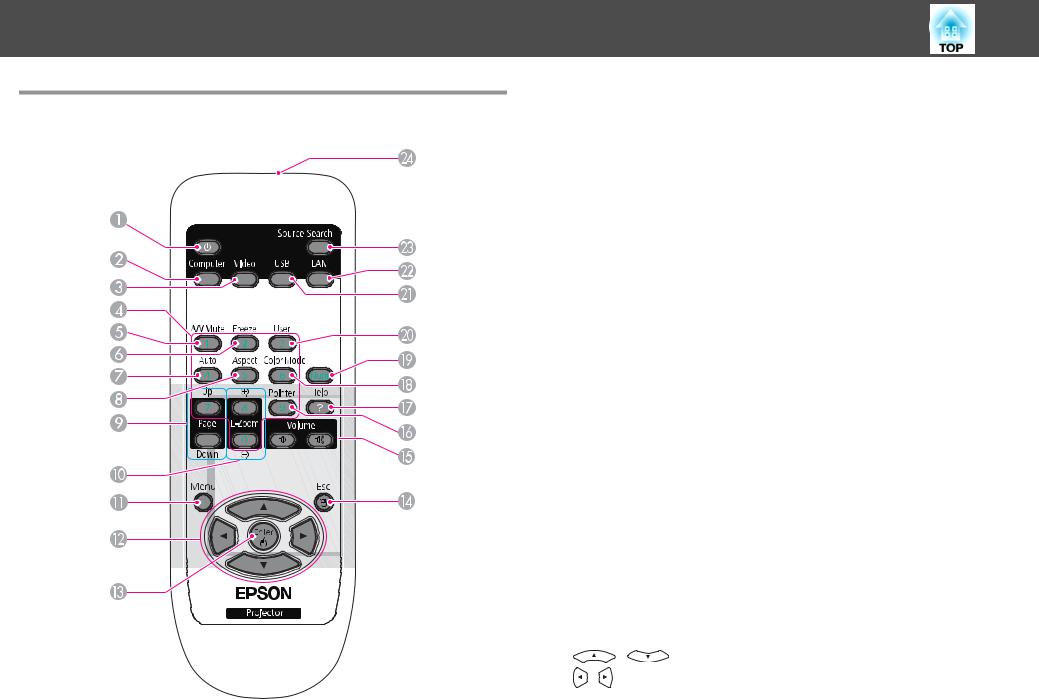
Part Names and Functions
Remote Control
13
|
|
Name |
|
Function |
A |
[t] button |
|
Turns the projector power On or Off. s Quick Start |
|
|
|
|
|
Guide |
|
|
|
||
B |
[Computer] button |
Each time the button is pressed, the image changes |
||
|
|
|
|
between the Computer1 and the Computer2 input port. |
|
|
|
|
s p.17 |
|
|
|
|
|
C |
[Video] button |
|
Each time the button is pressed, the image changes |
|
|
|
|
|
between the Video and the S-Video input port. |
|
|
|
|
s p.17 |
|
|
|
|
|
D |
Numeric buttons |
|
Use when entering a password. s p.44 |
|
|
|
|
||
E |
[A/V Mute] button |
Turns the video and audio on or off. s p.34 |
||
|
|
|
|
|
F |
[Freeze] button |
|
Images are paused or unpaused. s p.35 |
|
|
|
|
|
|
G |
[Auto] button |
|
If pressed during projection of computer signal images, it |
|
|
|
|
|
automatically adjusts the Tracking, Sync., and Position to |
|
|
|
|
project the optimum image. |
|
|
|
|
|
H |
[Aspect] button |
|
The Aspect Ratio changes each time the button is pressed. |
|
|
|
|
|
s p.35 |
|
|
|
|
|
I |
[Page] buttons |
|
• When using the Wireless Mouse function or projecting |
|
|
([Down] [Up]) |
|
such files as PowerPoint files in USB Display, you can |
|
|
|
|
|
page up and down by pressing these buttons. s p.18, |
|
|
|
|
p.42 |
|
|
|
|
• When projecting such files as PowerPoint files in |
|
|
|
|
EasyMP Network Projection, you can page up and down |
|
|
|
|
by pressing these buttons. (EB-826WH/825H/85H) |
|
|
|
|
s p.42, EasyMP Network Projection Operation |
|
|
|
|
Guide |
|
|
|
||
J |
[E-Zoom] buttons |
Enlarges/reduces the image without changing the |
||
|
([z][x]) |
|
projection size. s p.41 |
|
|
|
|
|
|
K |
[Menu] button |
|
Displays and closes the Configuration Menu. s p.57 |
|
|
|
|
|
|
L |
[ |
][ |
] |
When a Configuration Menu or Help screen is displayed, |
|
[ |
][ ] buttons |
|
it selects menu items and setting values. s p.57, |
|
|
p.79 |
||
|
|
|
|
|
|
|
|
|
During Wireless Mouse function, the mouse pointer |
|
|
|
|
moves in the direction the button is pushed. s p.42 |
|
|
|
|
|

Part Names and Functions |
|
14 |
|
|
|
Name |
Function |
M [Enter] button |
When a Configuration Menu or a Help screen is displayed, |
|
it accepts and enters the current selection and moves to the |
|
next level. s p.57, p.79 |
|
Acts as a mouse's left button when using the Wireless |
|
Mouse function. s p.42 |
|
|
N [Esc] button |
Stops the current function. If pressed when a |
|
Configuration Menu is displayed, it moves to the previous |
|
level. s p.57 |
|
Acts as a mouse's right button when using the Wireless |
|
Mouse function. s p.42 |
|
|
O [Volume] buttons |
[a] Decreases the Volume. |
([a][b]) |
[b] Increases the Volume. |
|
s Quick Start Guide |
|
|
Caution |
|
|
|
Do not start at high volume. |
|
|
|
A sudden excessive volume may cause loss of |
|
|
|
hearing. Always lower the volume before powering |
|
|
|
off, so that you can power on and then gradually |
|
|
|
increase the volume. |
|
|
|
|
|
|
|
|
|
P [Pointer] button |
Press to activate the on screen Pointer. s p.40 |
|
|
|
|
|
|
Q [Help] button |
Displays and closes the Help screen which shows you how |
|
|
|
to deal with problems if they occur. s p.79 |
|
|
|
|
|
|
R [Color Mode] button |
Each time the button is pressed, the Color Mode changes. |
|
|
|
s p.33 |
|
|
|
|
|
|
S [Num] button |
Use when entering a Password. s p.44 |
|
|
|
|
|
|
T [User] button |
Press to assign a frequently used item from the seven |
|
|
|
available Configuration Menu items. By pressing the |
|
|
|
button the assigned menu item selection/adjustment |
|
|
|
screen is displayed, allowing you to make one-touch |
|
|
|
settings/adjustments. s p.60 |
|
|
|
Power Consumption is assigned as the default setting. |
|
|
|
Name |
Function |
U |
[USB] button |
Each time the button is pressed, it changes to the image |
|
|
from equipment connected to USB Display/USB (TypeA) |
|
|
Port. Only changes to USB Display when using the |
|
|
EB-84H/84L. s p.17 |
|
|
|
V |
[LAN] button |
Changes to the image projected with EasyMP Network |
|
|
Projection. When projecting via Quick Wireless |
|
|
Connection using the optional Quick Wireless |
|
|
Connection USB Key, this button switches to that image. |
|
|
(EB-826WH/825H/85H only) s p.17 |
|
|
When using EB-824H/84H/84L, this does not function |
|
|
even if the button is pressed. |
|
|
|
W |
[Source Search] |
Changes to the next input source that is connected to the |
|
button |
projector and is sending an image. s p.16 |
|
|
|
X |
Remote control light- |
Outputs remote control signals. |
|
emitting area |
|
|
|
|

Various Applications
This chapter explains useful tips for giving presentations, connecting to external equipment, Security functions, and so on.
Changing the Projected Image |
|
16 |
|
|
|
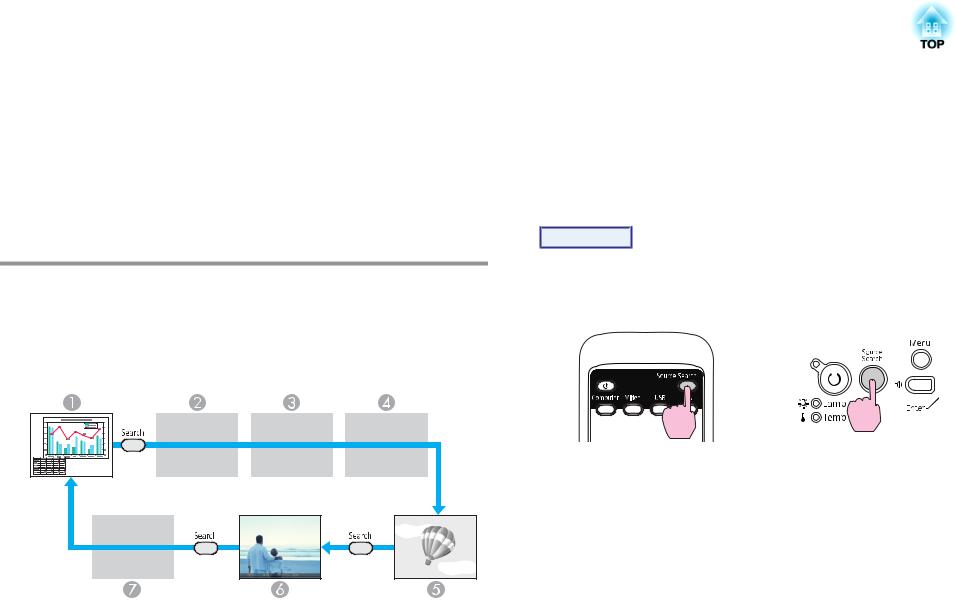
You can change the projected image in the following two ways.
•Changing by Source Search
The projector automatically detects signals being input from connected equipment, and the image being input from the equipment is projected.
•Changes to the target image.
You can use the Remote Control buttons to change to the target input port.
Automatically Detect Input Signal and Change the Projected Image (Source Search)
You can project the target image quickly as input ports with no image signal being input are ignored when you change by pressing the [Source Search] button.
F USB: When image is from a device connected to USB (TypeA) Port.
G LAN: When the projector is connected to a computer via a network, and images from EasyMP Network Projection are projected.
Skipped when no image signal is being input.
Only EB-826WH/825H/824H/85H can switch to USB.
Only EB-826WH/825H/85H can switch to LAN.
Procedure
When your video equipment is connected, start playback before this operation.
Using the Remote Control |
Using the Control panel |
|
|
|
|
|
|
|
When two or more pieces of equipment are connected, press the [Source Search] button until the target image is projected.
AComputer1
BComputer2
CS-Video
DVideo
EUSB Display

Changing the Projected Image |
|
17 |
|
|
|
q The following screen showing the status of image signals is displayed when only the image that the projector is currently displaying is available, or when no image signal can be found. You can select the input port where the equipment you want to use is connected. If no operation is performed after about 10 seconds, the screen closes.
USB is only displayed for EB-826WH/825H/824H/85H.
LAN is only displayed for EB-826WH/825H/85H.
Switch to Target Image by Remote Control
You can change directly to the target image by pressing the following buttons on the Remote Control.
Remote Control
AEach time the button is pressed, the image changes between the Computer1 and the Computer2 input port.
BEach time the button is pressed, the image changes between the Video and the S-Video input port.
CEach time the button is pressed, it changes to the image from equipment connected to USB Display/USB (TypeA) Port. Only changes to USB Display when using the EB-84.
DChanges to the image projected with EasyMP Network Projection. When projecting via Quick Wireless Connection using the optional Quick Wireless Connection USB Key, this button switches to that image. (EB-826WH/825H/85H only)
When using EB-824H/84H/84L, this does not function even if the button is pressed.

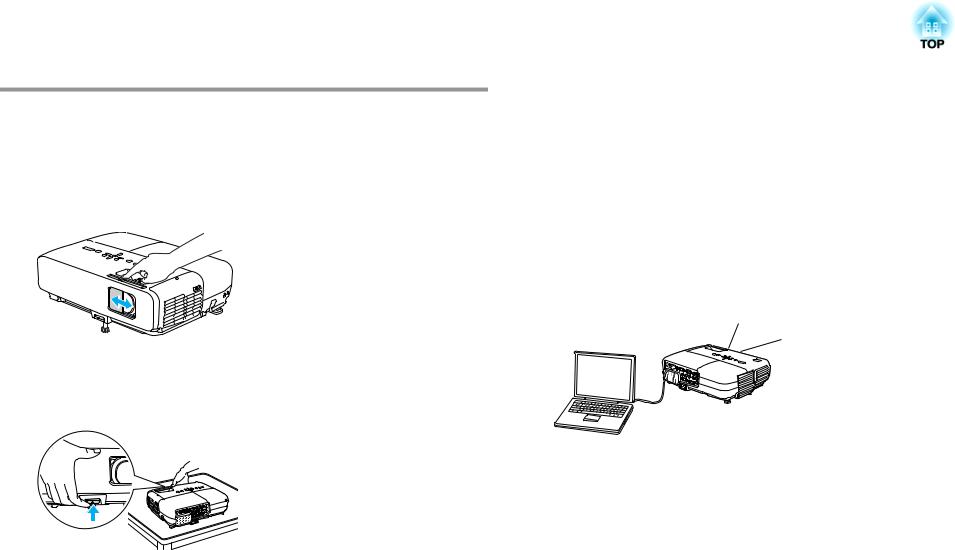
Connecting with a USB Cable and Projecting (USB Display) |
|
18 |
|
|
|
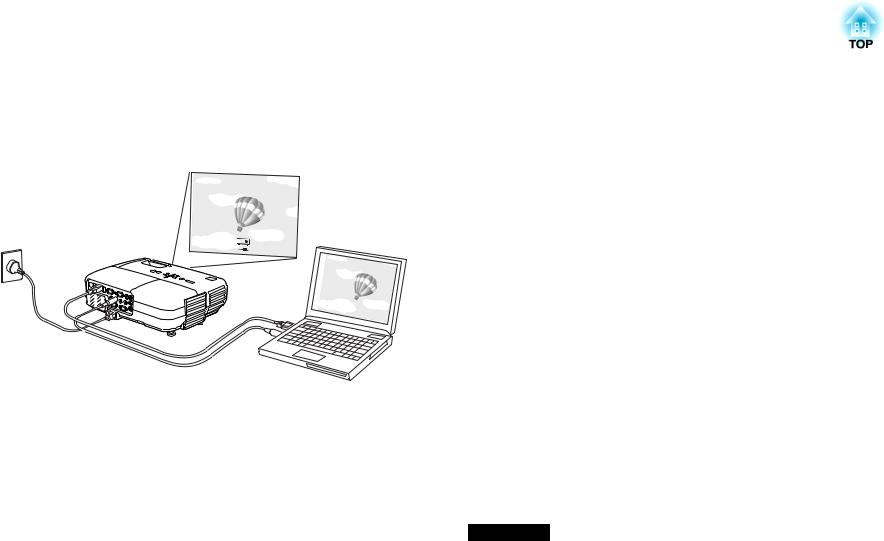
By using the supplied USB cable to connect the projector to a computer you can project images from the computer. This function is called USB Display. Simply by connecting via a USB cable, images from the computer can be displayed.
System Requirements
For Windows
Compatible OS |
Windows 2000 Service Pack4 |
|
|
|
Windows XP |
|
|
Windows XP Service Pack2 or later |
|
|
Windows Vista |
|
|
Windows Vista Service Pack1 |
|
|
Windows 7 |
|
|
|
CPU |
Mobile Pentium III 1.2 GHz or faster |
|
|
|
Recommended: Pentium M 1.6 GHz or faster |
|
|
|
Amount of Memory |
256 MB or more |
|
|
|
Recommended: 512 MB or more |
|
|
|
Hard Disk |
20 MB or more |
|
Free space |
|
|
|
|
|
Display |
Resolution greater than 640x480 and lower than |
|
|
|
1600x1200 |
|
|
Display color in 16-bit color or greater |
|
|
|
|
|
|
For Mac OS |
|
|
|
|
|
Compatible OS |
Mac OS X 10.5.1 or later |
|
|
|
Mac OS X 10.6 |
|
|
|
CPU |
Power PC G4 1 GHz or faster |
|
|
|
Intel Core Duo 1.83 GHz or faster |
|
|
|
Amount of Memory |
512 MB or more |
|
|
|
|
Hard Disk |
20 MB or more |
Free space |
|
|
|
Display |
Resolution greater than 640x480 and lower than |
|
1680x1200 |
|
Display color in 16-bit color or greater |
|
|
Connecting
Connecting with a USB Cable and Projecting (USB Display) |
|
19 |
|
|
|
Procedure
A Turn the computer on.
B Connect to the power cable (supplied).
C Turn the projector on.
D Open the A/V mute slide.
E Connect to the USB cable.
To output audio from the projector's speaker, connect an audio cable (commercially available) to the Audio2 Port.
s "Connecting for the first time" p.19
s "From the second time" p.21
Attention
Connect the projector directly to the computer and not via a USB hub.
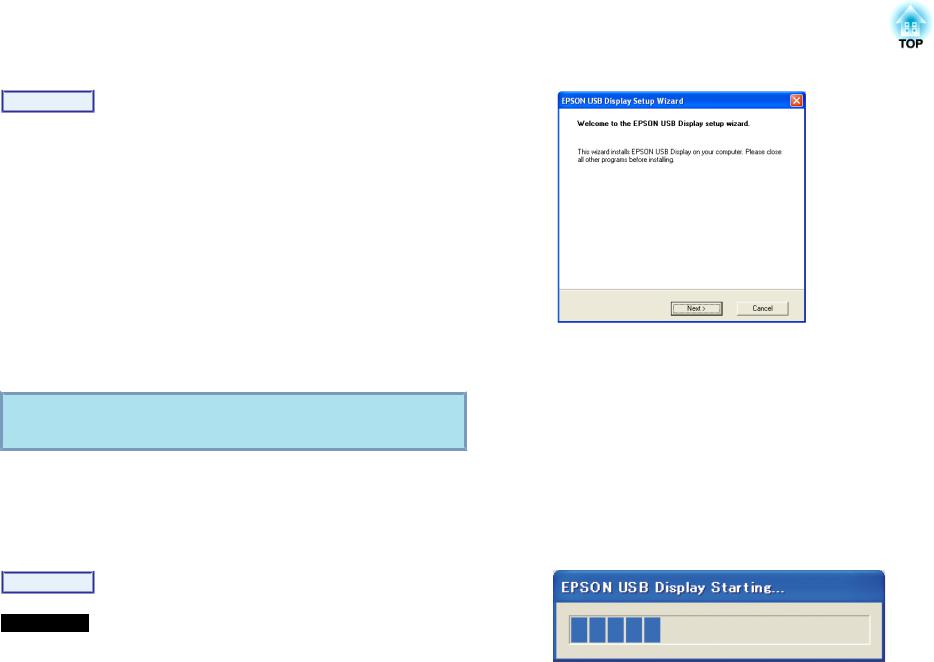
Connecting for the first time
When connecting for the first time, you need to install the driver. The installation procedure differs for Windows and Mac OS.
Procedure
For Windows
A Driver installation starts automatically.
When you are using Windows 2000, double-click My Computer -
EPSON PJ_UD - EMP_UDSE.exe, on your computer.
When using a computer running Windows 2000 under user authority, a Windows error message is displayed during installation and you may not be able to install the software. In this case, try updating Windows to the latest version, restart, and then try to connect again.
For more details, contact the nearest address provided in the Support and Service Guide. s Epson Projector Contact List
B Click "Agree".
If the driver is not installed, you cannot start USB Display. Select Agree to install the driver. If you want to cancel installation, click
Disagree.
Connecting with a USB Cable and Projecting (USB Display) |
|
20 |
|
|
|
C Computer images are projected.
It may take a while before computer images are projected. Until computer images are projected, leave the equipment as it is and do not disconnect the USB cable or turn off the power of the projector.
q |
• If it is not installed automatically, double-click My Computer - |
EPSON_PJ_UD - EMP_UDSE.EXE, on your computer. |
|
|
• If nothing is projected for some reason, click All Programs - |
|
EPSON Projector - EPSON USB Display - EPSON USB Display |
|
Vx.x, on your computer. |
|
• If the mouse pointer flickers on the computer screen, click All |
|
Programs - EPSON Projector - EPSON USB Display - EPSON |
|
USB Display Vx.x, and then clear the Transfer layered window |
|
checkbox. |
|
• To uninstall the driver, open Control Panel - Add/Remove |
|
Programs - and uninstall EPSON USB Display Vx.x. |
|
• Limitations when projecting from Windows Media Center |
|
When Windows Media Center is displayed at full screens, you |
|
cannot project with USB Display. |
|
• Disconnecting |
|
The projector can be disconnected simply by disconnecting the USB |
|
cable. There is no need to use the Safely Remove Hardware feature |
|
in Windows. |
|
• Applications that use part of DirectX functions may not be displayed |
|
correctly. |
|
|
See "From the second time" p.21 when connecting the next time.
For Mac OS
A The Setup folder for USB Display is displayed in Finder.
B Double-click the "UD_Installer" icon.
Enter the Administrator password to start installation.
C Follow the on-screen instructions to install.
Connecting with a USB Cable and Projecting (USB Display) |
|
21 |
|
|
|
D When the License Agreement screen is displayed, select |
It may take a while before computer images are projected. Please wait. |
||
|
"Agree". |
|
|
|
If Agree is not selected, you cannot start USB Display. If you want to |
|
|
|
cancel projection, click Disagree. |
|
|
|
When installation is complete, the USB Display icon is displayed in |
|
|
|
the Dock and on the menu bar. |
|
|
E Computer images are projected. |
|
||
|
It may take a while before computer images are projected. Until |
|
|
|
computer images are projected, leave the equipment as it is and do |
|
|
|
not disconnect the USB cable or turn off the power of the projector. |
|
|
|
|
|
|
|
q |
• If the Setup folder for USB Display is not automatically displayed in |
|
|
Finder, double-click EPSON PJ_UD - UD_Installer on the |
|
|
|
|
computer. |
|
|
|
• If nothing is projected for some reason, click the USB Display icon |
|
|
|
in the Dock. |
|
|
|
• If there is no USB Display icon in the Dock, run USB Display Vx.x |
|
|
|
from the Applications folder. |
|
|
|
• To uninstall the driver, run Remove USB Display Vx.x from the |
|
|
|
Tool folder in the Application folder. |
|
|
|
|
|
Attention
When disconnecting USB Display, click the menu bar icon or the Dock icon and execute Disconnect from the menu displayed, and then remove the USB cable.
If you select Quit from the Dock icon menu, USB Display does not start automatically the next time the USB cable is connected.
From the second time
Computer images are projected.

Presentations Using Slideshow (EB-826WH/825H/824H/85H) |
|
22 |
|
|
|
This section explains how to project image files stored on USB devices |
Slideshow examples |
directly from the projector as a Slideshow. |
|
|
Projecting images stored on USB storage and so on |
Files that can be Projected Using Slideshow
You can use Slideshow to directly project files stored in digital cameras and USB storage devices that are connected to the projector.
q USB storage devices that incorporate security functions sometimes cannot be used.
Specifications for files that can be projected using Slideshow
Type |
|
File Type (Ex- |
Notes |
|
|
tension) |
|
Image |
|
.jpg |
The following cannot be projected. |
|
|
|
- CMYK color mode formats |
|
|
|
- Progressive formats |
|
|
|
- Images with a resolution greater than 4608x3072 |
|
|
|
- Files with the extension ".jpeg" |
|
|
|
Normally, the image may not be projected clearly if |
|
|
|
compression is set too high. |
|
|
|
|
|
|
||
q |
• When using a USB hard disk, we recommend using an AC adapter |
||
|
power supply. |
|
|
|
• The projector does not support media formatted on some file |
||
|
|
systems. If you have trouble with projecting, use media formatted |
|
|
|
under Windows. |
|
|
• Format the media |
using the FAT16/32 file system. |
|
|
|
|
|
Example 1: Prepare multiple images and project them continuously (Slideshow) s p.25
Example 2: Select image files one at a time and projects p.25
Presentations Using Slideshow
Slideshow lets you play back and project image files stored on digital cameras and USB storage devices.
This section explains the basic operation of Slideshow.
Presentations Using Slideshow (EB-826WH/825H/824H/85H) |
|
23 |
|
|
|
Starting and closing Slideshow
Starting Slideshow
Procedure
A Switch the projected image to USB. s p.16
B When a USB storage device or digital camera is connected to the projector, Slideshow starts. s p.28
q |
• You can also connect to the projector by inserting a memory card in |
a USB card reader. However, some card readers may not be |
|
|
compatible. |
|
• When the following screen (Select Drive screen) is displayed, press |
|
the [ ] or [ ] buttons or the [a] or [b] buttons on the Control |
|
panel to select the drive you want to use, and then press the [Enter] |
|
button. |
•To display the Select Drive screen, position the cursor on Select Drive in the top half of the File List screen, and then press the [Enter] button.
Closing Slideshow
Procedure
To close Slideshow, disconnect the USB device connected to the projector's USB (TypeA) port. For digital cameras, hard disks, and so on, turn off the power of the device and then disconnect.
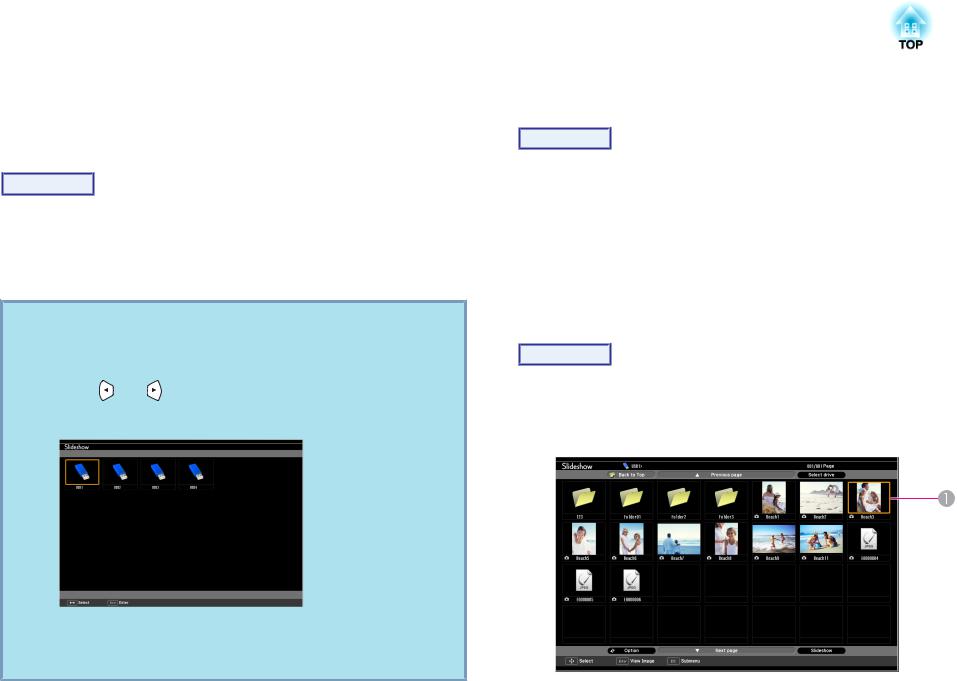
Slideshow basic operations
The following describes the procedures for playing images using Slideshow, and projection operations.
Procedure
A Press the [ ], [
], [ ], [
], [ ], or [
 ] buttons or the [w],
[v], [a], or [b] buttons on the Control panel to position the cursor on the file or folder you want to access.
A Cursor

Presentations Using Slideshow (EB-826WH/825H/824H/85H) |
|
24 |
|
|
|
•JPEG files are displayed as thumbnails (file contents are displayed as small images).
•Some JPEG files may be displayed as icons instead of thumbnails. In this case, a file icon is displayed.
B While projecting a JPEG image, press the [ ] button or the
[ ] button.
You can also operate with the [w] or [v] buttons on the Control panel.
q If all files and folders cannot be displayed at the same time in the current window, press the [u] button on the remote control or move the cursor to the Next Page button and press the [Enter] button.
To return to the previous screen, press the [d] button, or position the cursor on the Previous Page button and press the [Enter] button.
B Press [Enter].
The selected image is displayed.
When a folder is selected, the files in the selected folder are displayed. Select Back to Top on the screen that opened and press the [Enter] button to return to the previous screen.
Rotating the image
You can rotate Slideshow images in 90˚ increments when playing them. The rotating function is also available during Slideshow.
Rotate JPEG images in the following way.
Procedure
A Play images in JPEG format, or perform a Slideshow.
To play JPEG images s p.25
To play Slideshow s p.26
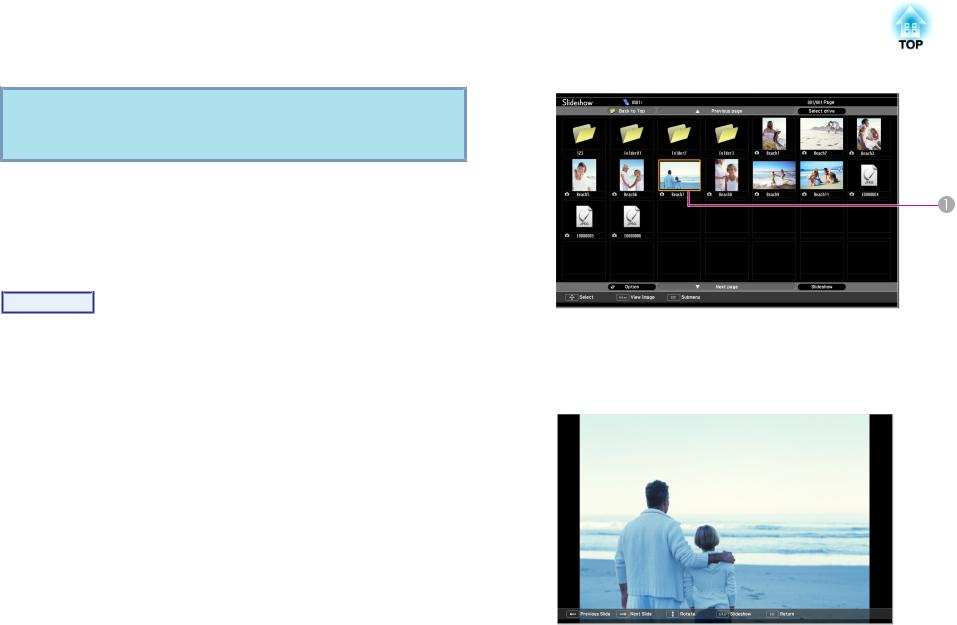
Projecting Image Files
Image files from a digital camera and image files stored on a USB storage device can be projected using Slideshow by either of the following two methods.
• Projecting selected image files
This is a function for projecting single files.
•Projecting all image files in a folder in sequence (Slideshow)
This is a function for projecting the file contents of a folder in order, one file at a time.
Presentations Using Slideshow (EB-826WH/825H/824H/85H) |
|
25 |
|
|
|
Attention
Do not disconnect the USB storage device while it is being accessed.Slideshow may not operate correctly.
You can perform the following operations on the remote control or the Control panel.
Projecting images
Procedure
A Start Slideshow. s p.23
The content of the connected digital camera or USB storage device is displayed.
B Position the cursor on the image file you want to project and press the [ ], [
], [ ], [
], [ ], or [
 ] buttons or the [w], [v], [a], or [b] buttons on the Control panel.
C
D
A Image file
Press [Enter].
The images are played back.
The following operation returns you to the file list.
• While projecting still images: Press the [Esc] button.

Presentations Using Slideshow (EB-826WH/825H/824H/85H) |
|
26 |
|
|
|
Projecting all image files in a folder in sequence (Slideshow)
You can project the image files in a folder in sequence, one at a time. This function is called Slideshow. Perform the Slideshow by the following procedure.
To change |
the files automatically when you run Slideshow, set the |
|
q Screen Switching Time in the |
Slideshow Option menu to anything |
|
other than |
No. Default setting: |
No s p.26 |
|
|
|
Procedure
A Start Slideshow. s p.23
The content of the connected digital camera or USB storage device is displayed.
B Press the [ ], [
], [ ], [
], [ ], or [
 ] buttons or the [w],
[v], [a], or [b] buttons on the Control panel to position the cursor over the folder for Slideshow, and then press the [Enter] button.
C Select Slideshow from the file list screen, and then press the
[Enter] button.
The Slideshow starts.
When the last file is projected, the File List is displayed again automatically. If you set Continuous Play to On from the Option screen, projection starts again from the beginning when it reaches the end. s p.26
You can proceed to the next screen, return to the previous screen, or stop playback during the projection of a Slideshow.
q If the Screen Switching Time setting in the option setting screen is set to No, files do not change automatically when you start a slideshow. Press the [Enter] or [d] button on the Remote Control to continue to the next file.
Setting Image Display Conditions
You can set the display condition for the Play Slideshow function.
Procedure
A Press the [ ], [
], [ ], [
], [ ], or [
 ] buttons or the [w],
[v], [a], or [b] buttons on the Control panel to position the cursor over the folder where you want to set display conditions, and then press the [Esc] button. Select "Option" from the menu displayed, then press the [Enter] button.
B When the following option setting screen is displayed, set each of the items.
Enable settings by positioning the cursor on the target item and pressing the [Enter] button.
Details of the items are given below.

Presentations Using Slideshow (EB-826WH/825H/824H/85H) |
|
27 |
|
|
|
Display Order |
You can set the order of the files to be displayed. You can |
|
sort into Name Order or Date Order. |
|
|
Continuous |
You can set whether to repeat the Slideshow. |
Play |
|
|
|
Screen Switch- |
You can set the time for a single file to be displayed in Play |
ing Time |
Slideshow. You can set a time between No (0) and 60 |
|
Seconds. When you set No, auto play is disabled. |
C Press the [ ], [
], [ ], [
], [ ], or [
 ] buttons or the [w],
[v], [a], or [b] buttons on the Control panel to position the cursor over "OK", and then press the [Enter] button.
The settings are applied.
If you do not want to apply the settings, position the cursor on Cancel and press the [Enter] button.
Connecting to External Equipment |
|
28 |
|
|
|
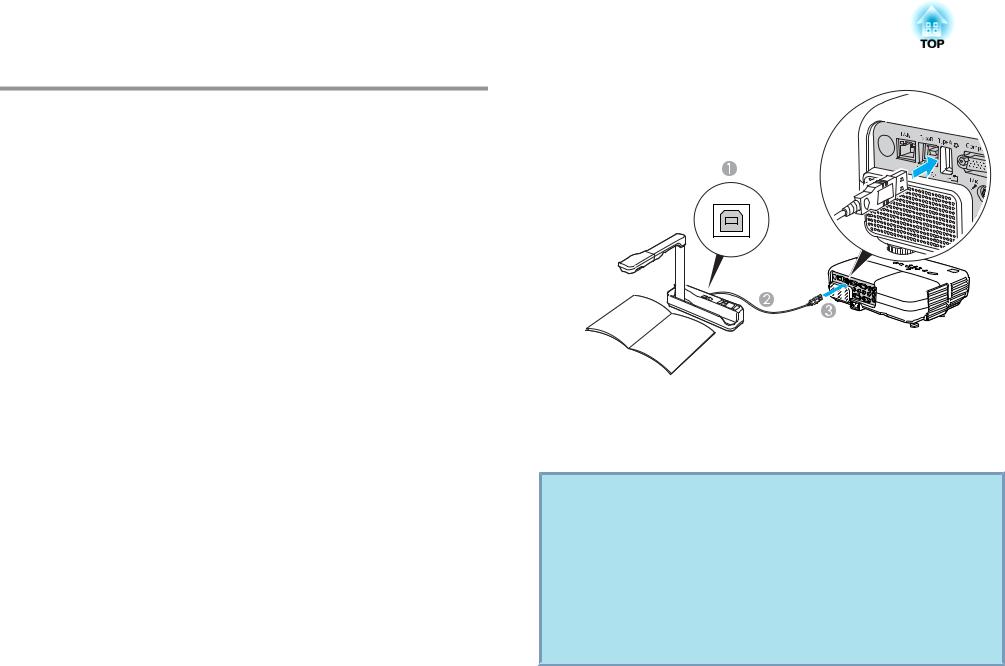
Connecting and Removing USB Devices
USB memories and USB compatible digital cameras, hard disk drives, and the optional Document Camera can be connected to the projector. Images on the connected digital camera or JPEG files on the USB storage device can be played as a Slideshow. s p.23
When the optional Document Camera is connected, images from the Document Camera will be projected.
Connecting USB devices
The following procedure describes how to connect USB devices, using the optional Document Camera as an example. Connect the Document Camera to the projector using the USB cable supplied with the Document Camera. When the Document Camera is connected to the projector during projection, press the [USB] button on the remote control or the [Source Search] button on the control panel to switch to images from the Document Camera. s p.16
ATo Document Camera USB port
BUSB cable
CTo USB (TypeA) port
Attention
•If you use a USB hub, the connection may not operate correctly. Devices such as digital cameras and USB storage devices should be connected to the projector directly.
•When connecting and using a USB-compatible hard disk, make sure you
connect |
the |
AC adaptor supplied with the hard disk. |
|
• Connect |
a |
digital |
camera or hard disk to the projector using a USB cable |
provided |
with, or |
specified for use with the device. |
|
•Use a USB cable less than 3 m in length. If the cable exceeds 3 m, Slideshow may not function correctly.
Connecting to External Equipment |
|
29 |
|
|
|
Removing USB devices
After finishing projecting, follow the procedure below to remove USB devices from the projector.
Procedure
Remove the optional Document Camera from the projector's USB (TypeA) Port.
For digital cameras, hard disks, and so on, turn off the power of the device and then remove.
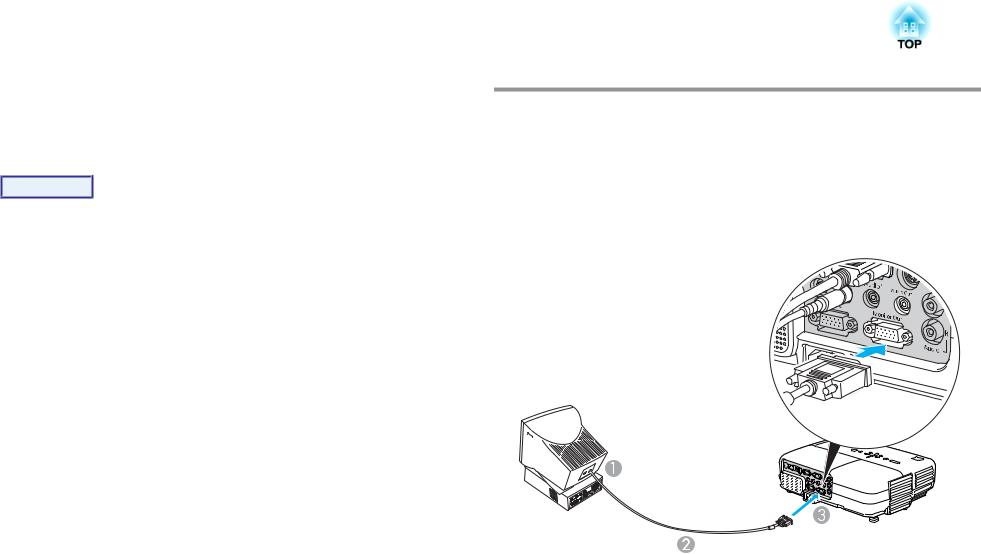
Connecting to an External Monitor (EB-826WH/ 825H/85H/84H/84L Only)
You can display computer images input from Computer1 Input Port on an external monitor and the screen connected to the projector at the same time. This means that you can check projected images on an external monitor when giving presentations even if you cannot see the screen. Connect using the cable supplied with the external monitor.
ATo Monitor port
BCable supplied with monitor
CTo Monitor Output (Monitor Out) Port
Connecting to External Equipment |
|
30 |
|
|
|
q |
• You cannot display images from equipment connected to the |
Component Video signal, Video input port, or S-Video input port |
|
|
on the external monitor. |
|
• Setting gauges, Configuration Menu, or Help screens for functions |
|
such as Keystone are not output to the external monitor. |
|
|
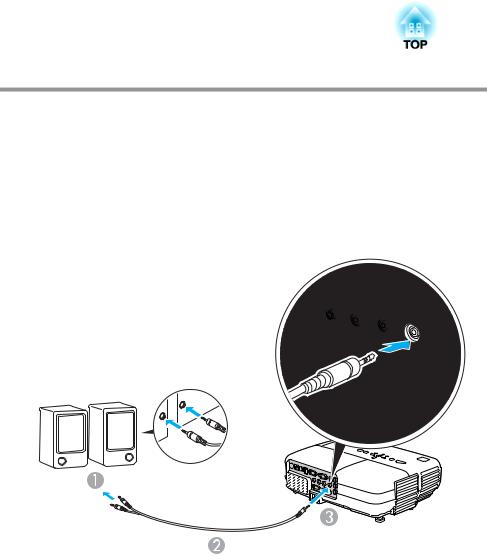
Connecting to an External Speaker (EB-826WH/ 825H/85H/84H/84L Only)
You can connect speakers with built-in amplifiers to the projector's Audio Output (Audio Out) port to enjoy a fuller quality of sound. Connect with a commercially available audio cable (such as pin plug W 3.5 mm stereo mini plug). Use an audio cable compatible with the connector on the external speakers.
ATo external audio equipment
BAudio cable (commercially available)
CTo Audio Output (Audio Out) Port
Loading...