Epson DFX-8500 User Manual

®
9-Pin Dot Matrix Printer
All rights reserved. No part of this publication may be reproduced, stored in a retrieval system, or transmitted in any form or by any means, mechanical, photocopying, recording, or otherwise, without the prior written permission of SEIKO EPSON CORPORATION. No patent liability is assumed with respect to the use of the information contained herein. Neither is any liability assumed for damages resulting from the use of the information contained herein.
Neither SEIKO EPSON CORPORATION nor its affiliates shall be liable to the purchaser of this product or third parties for damages, losses, costs, or expenses incurred by the purchaser or third parties as a result of: accident, misuse, or abuse of this product or unauthorized modifications, repairs, or alterations to this product.
SEIKO EPSON CORPORATION shall not be liable against any damages or problems arising from the use of any options or any consumable products other than those designated as Original EPSON Products or EPSON Approved Products by SEIKO EPSON CORPORATION.
EPSON and EPSON ESC/P are registered trademarks of SEIKO EPSON CORPORATION.
General Notice: Other product names used herein are for identification purposes only and may be trademarks of their respective owners.
Copyright © 1997 by SEIKO EPSON CORPORATION, Nagano, Japan.
User’s Guide

FCC Compliance Statement
For United States Users
This equipment has been tested and found to comply with the limits for a Class B digital device, pursuant to Part 15 of the FCC Rules. These limits are designed to provide reasonable protection against harmful interference in a residential installation. This equipment generates, uses and can radiate radio frequency energy and, if not installed and used in accordance with the instructions, may cause harmful interference to radio or television reception. However, there is no guarantee that interference will not occur in a particular installation. If this equipment does cause interference to radio and television reception, which can be determined by turning the equipment off and on, the user is encouraged to try to correct the interference by one or more of the following measures.
TReorient or relocate the receiving antenna
TIncrease the separation between the equipment and receiver
TConnect the equipment into an outlet on a circuit different from that to which the receiver is connected
TConsult the dealer or an experienced radio/TV technician for help.
WARNING
The connection of a non-shielded equipment interface cable to this equipment will invalidate the FCC Certification of this device and may cause interference levels which exceed the limits established by the FCC for this equipment. It is the responsibility of the user to obtain and use a shielded equipment interface cable with this device. If this equipment has more than one interface connector, do not leave cables connected to unused interfaces.
Changes or modifications not expressly approved by the manufacturer could void the user’s authority to operate the equipment.
For Canadian Users
This Class B digital apparatus meets all requirements of the Canadian InterferenceCausing Equipment Regulations.
Cet appareil numérique de la classe B respecte toutes les exigences du Règlement sur le matériel brouilleur du Canada.
ii

Declaration of Conformity
According to ISO/IEC Guide 22 and EN 45014
Manufacturer: |
SEIKO EPSON CORPORATION |
|
Address: |
3-5, Owa 3-chome, Suwa-shi, |
|
|
Nagano-ken 392-8502 Japan |
|
Representative: |
EPSON EUROPE B.V. |
|
Address: |
Prof. J. H. Bavincklaan 5 1183 |
|
|
AT Amstelveen |
|
|
The Netherlands |
|
Declares that the Product: |
|
|
Product Name: |
Dot Matrix Printer |
|
Type Name: |
|
DFX-8500 |
Model: |
|
P970A |
Conforms to the following Directive(s) and Norm(s):
Directive 89/336/EEC:
EN 55022 Class B
EN 61000-3-2
EN 61000-3-3
EN 50082-1
IEC 801-2
IEC 801-3
IEC 801-4
Directive 73/23/EEC:
EN 60950
March 1998
Y. Ishii
President of EPSON EUROPE B.V.
iii

Safety Information
Important Safety Instructions
Before using the printer, read all of these instructions to make sure you use the printer safely and effectively. Follow all warnings and instructions marked on the printer.
TDo not place the printer on an unstable surface or near a radiator or heat source.
TPlace the printer on a flat surface. The printer will not operate properly if it is tilted or at an angle.
TDo not block or cover the openings in the printer’s cabinet. Do not insert objects through the slots.
TUse only the type of power source indicated on the printer’s label.
TConnect all equipment to properly grounded power outlets. Avoid using outlets on the same circuit as photocopiers or air control systems that regularly switch on and off.
TDo not let the power cord become damaged or frayed.
TIf you use an extension cord with the printer, make sure the total ampere rating of the devices plugged into the extension cord does not exceed the cord’s ampere rating. Also, make sure the total ampere rating of all devices plugged into the wall outlet does not exceed the wall outlet’s ampere rating.
TUnplug the printer before cleaning. Clean with a damp cloth only. Do not spill liquid on the printer.
TExcept as specifically explained in this guide, do not attempt to service the printer yourself.
iv

TUnplug the printer and refer servicing to qualified service personnel under the following conditions:
If the power cord or plug is damaged; if liquid has entered the printer; if the printer has been dropped or the cabinet damaged; if the printer does not operate normally or exhibits a distinct change in performance. Adjust only those controls that are covered by the operating instructions.
TIf you plan to use the printer in Germany, observe the following:
To provide adequate short-circuit protection and over-current protection for this printer, the building installation must be protected by a 16 Amp circuit breaker.
Bei Anschluß des Druckers an die Stromversorgung muß sichergestellt werden, daß die Gebäudeinstallation mit einem 16 A-Überstromschalter abgesichert ist.
ENERGY STAR Compliance
As an ENERGY STAR Partner, EPSON has determined that this product meets the ENERGY STAR guidelines for energy efficiency.
The International ENERGY STAR Office Equipment Program is a voluntary partnership with the computer and office equipment industry to promote the introduction of energy-efficient personal computers, monitors, printers, fax machines, and copiers in an effort to reduce air pollution caused by power generation.
v

For United Kingdom Users
Use of options
Epson (UK) Limited shall not be liable against any damages or problems arising from the use of any options or consumable products other than those designated as Original EPSON Products or EPSON Approved Products by Epson (UK) Limited.
Safety information
wWarning: This appliance must be earthed. Refer to the rating plate for voltage and check that the appliance voltage corresponds to the supply voltage.
Important: The wires in the mains lead fitted to this appliance are coloured in accordance with the following code:
Green and yellow — Earth Blue — Neutral
Brown — Live
If you have to fit a plug:
As the colours of the wires in the mains lead of this appliance may not correspond with the coloured markings identifying the terminals in a plug, please proceed as follows:
The green and yellow wire must be connected to the terminal in the plug which is marked with the letter E or with the Earth symbol (G).
The blue wire must be connected to the terminal in the plug marked with the letter N.
The brown wire must be connected to the terminal in the plug marked with the letter L.
If damage occurs to the plug, replace the cord set or consult a qualified electrician.
Replace fuses only with a fuse of the correct size and rating.
vi

Contents
Introduction
Features . . . . . . . . . . . . . . . . . . . . . . . . . . . . . . . . |
0-1 |
Options . . . . . . . . . . . . . . . . . . . . . . . . . . . . . . . . |
0-2 |
How to Use This Manual . . . . . . . . . . . . . . . . . . . . . . |
0-2 |
Warnings, Cautions, and Notes . . . . . . . . . . . . . . . . . . |
0-3 |
If You Need Help . . . . . . . . . . . . . . . . . . . . . . . . . . |
0-4 |
Chapter 1 Setting Up the Printer |
|
|
|
Unpacking the Printer . . . . . . . . . . . . . . . . . . . . . . . |
1-2 |
Choosing a Place for the Printer . . . . . . . . . . . . . . . . . . |
1-4 |
Installing the Ribbon Cartridge . . . . . . . . . . . . . . . . . . |
1-6 |
Plugging in the Printer . . . . . . . . . . . . . . . . . . . . . . . |
1-10 |
Connecting the Printer to Your Computer . . . . . . . . . . . . |
1-11 |
Chapter 2 Setting Up Your Software |
|
|
|
For Windows 95 Users . . . . . . . . . . . . . . . . . . . . . . . |
2-2 |
Installing the printer driver using My Computer . . . . . . |
2-3 |
Installing the printer driver using plug-and-play . . . . . . |
2-4 |
Accessing the printer driver . . . . . . . . . . . . . . . . . . |
2-5 |
Changing the printer driver settings . . . . . . . . . . . . . |
2-6 |
For Windows 3.1 Users . . . . . . . . . . . . . . . . . . . . . . . |
2-8 |
Installing the printer driver . . . . . . . . . . . . . . . . . . |
2-8 |
Accessing the printer driver . . . . . . . . . . . . . . . . . . |
2-9 |
Changing the printer driver settings . . . . . . . . . . . . . |
2-11 |
vii

For Windows NT 4.0 Users . . . . . . . . . . . . . . . . . . . . . |
2-12 |
Installing the printer driver . . . . . . . . . . . . . . . . . . . |
2-12 |
Accessing the printer driver . . . . . . . . . . . . . . . . . . . |
2-13 |
Changing the printer driver settings . . . . . . . . . . . . . . |
2-15 |
For Windows NT 3.5x Users . . . . . . . . . . . . . . . . . . . . . |
2-16 |
Installing the printer driver . . . . . . . . . . . . . . . . . . . |
2-16 |
Accessing the printer driver . . . . . . . . . . . . . . . . . . . |
2-17 |
Changing the printer driver settings . . . . . . . . . . . . . . |
2-19 |
For DOS Program Users . . . . . . . . . . . . . . . . . . . . . . . |
2-21 |
Installing the printer driver . . . . . . . . . . . . . . . . . . . |
2-21 |
Chapter 3 Paper Handling |
|
|
|
Using the Two-Tractor System . . . . . . . . . . . . . . . . . . . |
3-2 |
Positioning the paper supply . . . . . . . . . . . . . . . . . . |
3-2 |
What paper types you can use . . . . . . . . . . . . . . . . . |
3-3 |
Loading Paper onto the Front Tractor . . . . . . . . . . . . . . . |
3-4 |
Loading Paper onto the Rear Tractor . . . . . . . . . . . . . . . . |
3-10 |
Adjusting the Paper Position . . . . . . . . . . . . . . . . . . . . |
3-17 |
Adjusting the top-of-form position . . . . . . . . . . . . . . . |
3-17 |
Adjusting the printing position . . . . . . . . . . . . . . . . . |
3-20 |
Tearing Off the Printed Pages . . . . . . . . . . . . . . . . . . . . |
3-21 |
Tear-off mode . . . . . . . . . . . . . . . . . . . . . . . . . . . |
3-21 |
Using the Tear Off button . . . . . . . . . . . . . . . . . . . . |
3-23 |
Adjusting the tear-off position . . . . . . . . . . . . . . . . . |
3-23 |
Switching Between Front and Rear Tractors . . . . . . . . . . . |
3-26 |
Changing the Paper . . . . . . . . . . . . . . . . . . . . . . . . . |
3-28 |
Printing on Multi-Part Forms and Labels . . . . . . . . . . . . . |
3-31 |
Using multi-part forms . . . . . . . . . . . . . . . . . . . . . . |
3-32 |
Using labels . . . . . . . . . . . . . . . . . . . . . . . . . . . . |
3-33 |
viii

Chapter 4 Using the Printer
Control Panel . . . . . . . . . . . . . . . . . . . . . . . . . . . . |
4-2 |
Lights . . . . . . . . . . . . . . . . . . . . . . . . . . . . . . . |
4-2 |
Buttons . . . . . . . . . . . . . . . . . . . . . . . . . . . . . . |
4-4 |
Other control panel features . . . . . . . . . . . . . . . . . . |
4-8 |
Using DIP Switches . . . . . . . . . . . . . . . . . . . . . . . . . |
4-9 |
Changing DIP switch settings . . . . . . . . . . . . . . . . . |
4-9 |
DIP switch tables . . . . . . . . . . . . . . . . . . . . . . . . |
4-11 |
DIP switch functions . . . . . . . . . . . . . . . . . . . . . . |
4-16 |
Using the Paper Memory Feature . . . . . . . . . . . . . . . . . |
4-22 |
Saving paper memory settings . . . . . . . . . . . . . . . . |
4-23 |
Chapter 5 Using EPSON Status Monitor 2 |
|
|
|
Installing EPSON Status Monitor 2 . . . . . . . . . . . . . . . . |
5-2 |
Accessing EPSON Status Monitor 2 . . . . . . . . . . . . . . . . |
5-3 |
Checking the Printer Status . . . . . . . . . . . . . . . . . . . . |
5-4 |
Using the EPSON Status Monitor 2 window . . . . . . . . . |
5-4 |
Using the Printer Status window . . . . . . . . . . . . . . . |
5-8 |
Setting Monitoring Preferences . . . . . . . . . . . . . . . . . . |
5-10 |
Turning on background monitoring . . . . . . . . . . . . . |
5-10 |
Using the background monitoring icon . . . . . . . . . . . |
5-12 |
Using the Paper Memory Utility . . . . . . . . . . . . . . . . . |
5-12 |
Accessing the paper memory utility . . . . . . . . . . . . . |
5-13 |
Registering or changing your paper settings . . . . . . . . . |
5-13 |
ix

Chapter 6 Using Printer Options
Using the Pull Tractor . . . . . . . . . . . . . . . . . . . . . . . . |
6-2 |
Installing the pull tractor . . . . . . . . . . . . . . . . . . . . |
6-2 |
Using the pull tractor with the front tractor . . . . . . . . . . |
6-5 |
Using the pull tractor with the rear tractor . . . . . . . . . . |
6-9 |
Removing the pull tractor . . . . . . . . . . . . . . . . . . . . |
6-11 |
Using the Perforation Cutter . . . . . . . . . . . . . . . . . . . . |
6-12 |
Installing the perforation cutter . . . . . . . . . . . . . . . . . |
6-13 |
Attaching the perforated paper output attachment |
|
and output tray . . . . . . . . . . . . . . . . . . . . . . . . . |
6-16 |
Paper handling . . . . . . . . . . . . . . . . . . . . . . . . . . |
6-18 |
Removing the perforation cutter . . . . . . . . . . . . . . . . |
6-20 |
Using the Paper Cutter . . . . . . . . . . . . . . . . . . . . . . . . |
6-24 |
Installing the paper cutter . . . . . . . . . . . . . . . . . . . . |
6-24 |
Paper handling . . . . . . . . . . . . . . . . . . . . . . . . . . |
6-28 |
Removing the paper cutter . . . . . . . . . . . . . . . . . . . |
6-32 |
Interface Cards . . . . . . . . . . . . . . . . . . . . . . . . . . . . |
6-35 |
Installing an interface card . . . . . . . . . . . . . . . . . . . |
6-36 |
Using a serial interface card (C82305@ or C82306@) . . . . . |
6-38 |
Chapter 7 Maintenance and Transportation |
|
|
|
Replacing the Ribbon Cartridge . . . . . . . . . . . . . . . . . . |
7-2 |
Cleaning the Printer . . . . . . . . . . . . . . . . . . . . . . . . . |
7-4 |
Transporting the Printer . . . . . . . . . . . . . . . . . . . . . . . |
7-5 |
x

Chapter 8 Troubleshooting
Using the Error Indicators . . . . . . . . . . . . . . . . . . . . . |
8-3 |
Printing a Self Test . . . . . . . . . . . . . . . . . . . . . . . . . |
8-5 |
Using the Hex Dump Mode . . . . . . . . . . . . . . . . . . . . |
8-6 |
Problems and Solutions . . . . . . . . . . . . . . . . . . . . . . . |
8-7 |
Power supply . . . . . . . . . . . . . . . . . . . . . . . . . . |
8-8 |
Paper handling . . . . . . . . . . . . . . . . . . . . . . . . . |
8-9 |
Operation . . . . . . . . . . . . . . . . . . . . . . . . . . . . . |
8-13 |
Printout . . . . . . . . . . . . . . . . . . . . . . . . . . . . . . |
8-15 |
Options . . . . . . . . . . . . . . . . . . . . . . . . . . . . . . |
8-18 |
Clearing a Paper Jam . . . . . . . . . . . . . . . . . . . . . . . . |
8-19 |
Appendix A Specifications |
|
|
|
Printer Specifications . . . . . . . . . . . . . . . . . . . . . . . . |
A-2 |
Printing . . . . . . . . . . . . . . . . . . . . . . . . . . . . . . |
A-2 |
Paper . . . . . . . . . . . . . . . . . . . . . . . . . . . . . . . |
A-4 |
Mechanical . . . . . . . . . . . . . . . . . . . . . . . . . . . . |
A-13 |
Electrical . . . . . . . . . . . . . . . . . . . . . . . . . . . . . |
A-14 |
Environmental . . . . . . . . . . . . . . . . . . . . . . . . . . |
A-14 |
Safety approvals . . . . . . . . . . . . . . . . . . . . . . . . . |
A-15 |
CE marking . . . . . . . . . . . . . . . . . . . . . . . . . . . . |
A-15 |
Parallel Interface Specifications . . . . . . . . . . . . . . . . . . |
A-16 |
Forward channel . . . . . . . . . . . . . . . . . . . . . . . . . |
A-16 |
Reverse channel . . . . . . . . . . . . . . . . . . . . . . . . . |
A-16 |
Serial Interface Specifications . . . . . . . . . . . . . . . . . . . |
A-17 |
Optional Perforation Cutter Specifications . . . . . . . . . . . . |
A-17 |
Appendix B Printer Commands and Character Tables |
|
|
|
EPSON ESC/P Control Codes . . . . . . . . . . . . . . . . . . . |
B-2 |
Barcode commands . . . . . . . . . . . . . . . . . . . . . . . |
B-3 |
IBM 2381 Plus Emulation Control Codes . . . . . . . . . . . . . |
B-6 |
Character Tables . . . . . . . . . . . . . . . . . . . . . . . . . . . |
B-7 |
xi

Appendix C Contacting Customer Support
For United States and Canada Users . . . . . . . . . . . . . . . . C-2 For United Kingdom and the Republic of Ireland Users . . . . . C-4
Enquiry Desk . . . . . . . . . . . . . . . . . . . . . . . . . . . |
C-4 |
Customer Support . . . . . . . . . . . . . . . . . . . . . . . . |
C-4 |
Faxon EPSON . . . . . . . . . . . . . . . . . . . . . . . . . . . |
C-5 |
EPtec - Bulletin Board Service for latest drivers and utilities |
C-5 |
World Wide Web . . . . . . . . . . . . . . . . . . . . . . . . . |
C-5 |
For Australian Users . . . . . . . . . . . . . . . . . . . . . . . . . |
C-6 |
EPSON FAXBACK . . . . . . . . . . . . . . . . . . . . . . . . |
C-6 |
EPSON Bulletin Board System . . . . . . . . . . . . . . . . . |
C-6 |
Internet URL http://www.epson.com.au . . . . . . . . . . . |
C-6 |
Your dealer . . . . . . . . . . . . . . . . . . . . . . . . . . . . |
C-6 |
EPSON Helpdesk . . . . . . . . . . . . . . . . . . . . . . . . . |
C-7 |
For Singapore Users . . . . . . . . . . . . . . . . . . . . . . . . . |
C-7 |
For Hong Kong Users . . . . . . . . . . . . . . . . . . . . . . . . |
C-7 |
Internet home page . . . . . . . . . . . . . . . . . . . . . . . . |
C-8 |
Electronic bulletin board system . . . . . . . . . . . . . . . . |
C-8 |
Technical Support Hotline . . . . . . . . . . . . . . . . . . . . |
C-8 |
For Philippines Users . . . . . . . . . . . . . . . . . . . . . . . . |
C-8 |
Glossary
Index
xii
Printer Parts
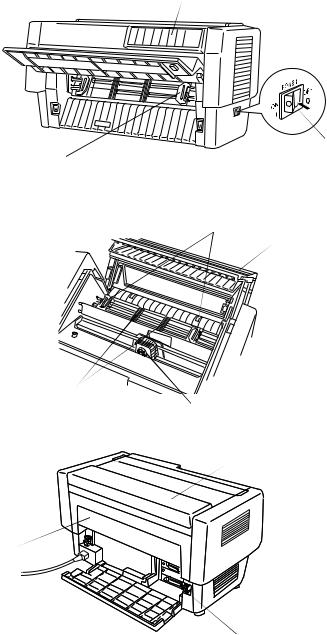
control panel
front cover 

|
power switch |
sprockets* |
* front tractor unit parts |
paper supports* |
|
sprockets** |
|
|
top cover |
ribbon cartridge |
|
paper bail |
|
|
|
|
paper supports** |
|
|
print head |
** rear tractor unit parts |
|
|
|
|
|
paper separator cover |
paper separator
rear flap |
|
rear cover |
serial interface |
|
parallel interface |

Introduction
The EPSON DFX-8500 printer is an advanced dot matrix printer designed for business applications. The printer combines high performance and reliability with a wide range of features, including high speed printing and automatic paper handling.
Features
THigh speed draft mode printing of up to 1120 characters per second (cps) at 10 characters per inch (cpi).
TBuilt-in front and rear push tractors for convenient paper handling. This dual system lets you switch between different types of continuous paper quickly and easily. The printer remembers separate top-of-form positions for each tractor.
TEight barcode fonts, as well as three bit-map fonts.
TThe ability to print on multi-part forms consisting of one original plus up to six copies at the front tractor.
TA convenient control panel that allows direct selection of fonts.
TSupport of advanced EPSON ESC/P® commands and IBM® 2380/2381 Plus emulation.
TA printer driver and a status monitor utility that let you change printer settings easily.
TA paper memory utility that lets you register paper information in the printer.
Introduction 1

Options
The following options are available for your printer:
TThe Pull tractor (#8309) improves the handling of heavy multi-part forms and labels. It also enhances printing alignment on preprinted forms.
TThe Perforation cutter (C81507@) and Paper cutter (C81500@) make it easier to handle continuous paper by cutting off printed documents for you.
TInterface cards are available to supplement the printer’s built-in serial and parallel interfaces. Chaper 6 provides guidelines for choosing the right interface and instructions for installing an interface card.
How to Use This Manual
This manual provides illustrated, step-by-step instructions for setting up and operating your printer.
Chapter 1 contains information on unpacking, setting up, and connecting the printer. Be sure to read this chapter first.
Chapter 2 explains how to set up your software, which includes a printer driver for Microsoft® Windows® operating systems.
Chapter 3 includes important information on paper handling and printing on various types of paper.
Chapter 4 describes how to use your printer’s control panel functions, change DIP switch settings, and use the paper memory feature.
Chapter 5 explains how to use the EPSON Status Monitor 2 for Windows 95.
2 Introduction

Chapter 6 explains how to use optional accessories with your printer.
Chapter 7 provides printer maintenance and transportation guidelines.
Chapter 8 contains troubleshooting tips. If the printer does not operate properly or the printed results are not what you expect, see this chapter for a list of problems and solutions.
Appendix A gives the printer’s specifications.
Appendix B lists ESC/P emulation commands and the printer’s built-in character tables.
Appendix C explains how to contact customer support if you need assistance.
A glossary and an index are provided at the end of this manual.
Warnings, Cautions, and Notes
This guide uses the following conventions:
w Warnings must be followed to avoid bodily injury.
c Cautions must be observed to avoid damage to your equipment.
Notes contain important information and useful tips on the operation of your printer.
Introduction 3

If You Need Help
If you need assistance in setting up or using your printer, see Appendix C for guidelines on how to get customer support.
4 Introduction

Chapter 1 |
|
1 |
Setting Up the Printer |
|
|
|
|
Unpacking the Printer . . . . . . . . . . . . . . . . . . . . . . . |
1-2 |
Choosing a Place for the Printer . . . . . . . . . . . . . . . . . . |
1-4 |
Installing the Ribbon Cartridge . . . . . . . . . . . . . . . . . . |
1-6 |
Plugging in the Printer . . . . . . . . . . . . . . . . . . . . . . . |
1-10 |
Connecting the Printer to Your Computer . . . . . . . . . . . . |
1-11 |
Setting Up the Printer 1-1
Unpacking the Printer
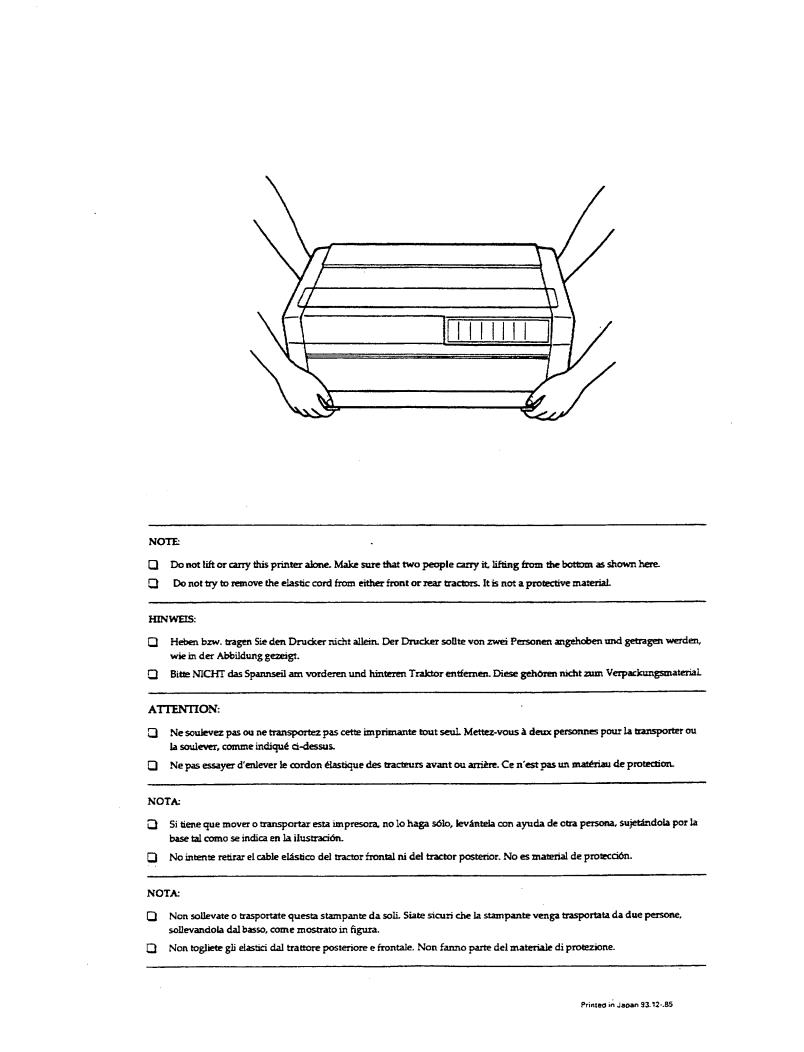
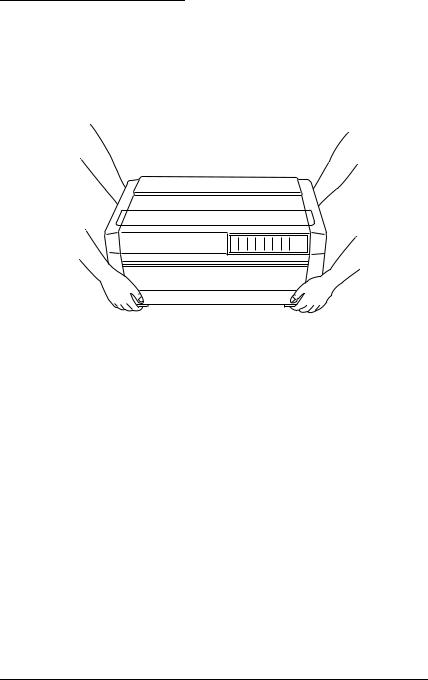
Because the printer weighs approximately 29 kg (64 lbs), you should not lift or carry it alone. Two people should carry it by the bottom, as shown here:
1-2 Setting Up the Printer
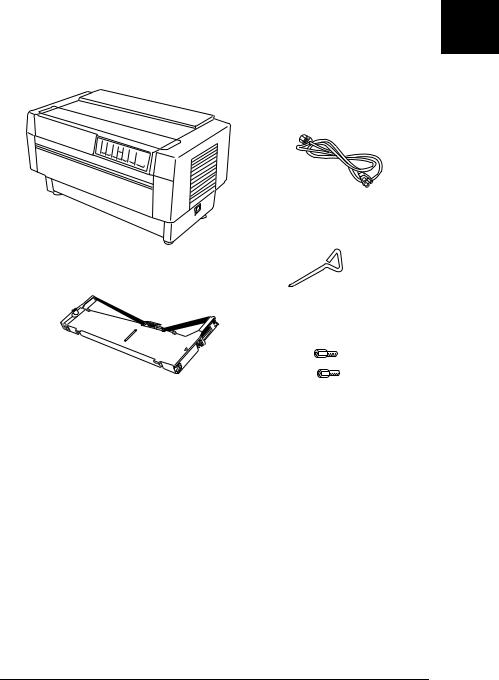
In addition to this guide, your printer box should include two EPSON printer driver diskettes, two Status Monitor software 1 diskettes, a Notice Sheet, and the following items:
power cord
printer
screwdriver
ribbon cartridge
optional connector lock nuts
Note:
Depending on your printer model, the power cord may be permanently attached to the printer. Also the shape of the power cord plug varies depending on the country in which you bought your printer; be sure the plug you have is right for your location.
Setting Up the Printer 1-3

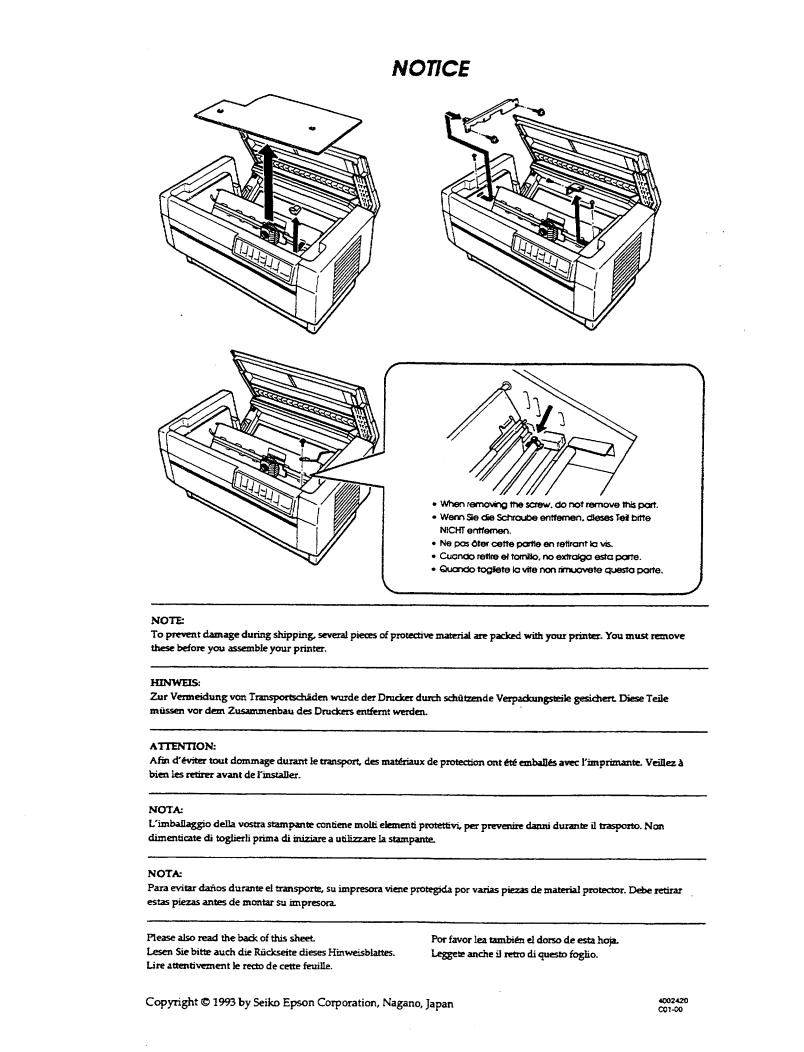
You must remove all protective materials packed around and inside your printer before you set it up and turn on the power. Follow the directions on the Notice Sheet to remove these materials. A screwdriver has been included for removing the transportation screw.
Save all packing and protective materials, including the protective locking clips on the paper tension unit and the transportation screw, in case you need to ship the printer in the future. It should always be transported in its original packaging, or equivalent materials.
cCaution:
There are several versions of the printer designed for different voltages, and it is not possible to adjust the printer for use at another voltage. If the label on the back of the printer does not show the correct voltage for your country, contact your dealer.
Choosing a Place for the Printer
When selecting a place to set up your printer, be sure to follow these guidelines:
TPlace the printer on a flat, stable surface, close enough to the computer for the interface cable to reach it.
TLeave adequate room around the printer for easy operation and maintenance.
TAvoid locations that are subject to direct sunlight, excessive heat, moisture, or dust.
TUse a properly grounded electrical outlet; do not use an adapter plug.
TPlace the printer where you can easily unplug the power cord.
1-4 Setting Up the Printer

T Avoid electrical outlets controlled by wall switches or |
1 |
|
automatic timers. An interruption of power can erase |
||
|
||
information in the memory of your printer or computer. |
|
|
|
|
TAvoid outlets on the same circuit as large motors or other appliances that can cause voltage fluctuations.
TKeep the entire computer system away from potential sources of electromagnetic interference, such as loudspeakers or the base units of cordless telephones.
If you plan to use a printer stand, follow these guidelines:
TUse a stand that supports at least 58 kg (128 lbs).
TNever use a stand that tilts the printer. The printer should always be kept level.
TIf you plan to load continuous paper through the bottom of the printer, choose a stand that provides an unobstructed paper path.
TPosition your printer’s power cord and interface cable so they do not interfere with paper feeding. If possible, secure the cables to a leg of the printer stand.
Setting Up the Printer 1-5
Installing the Ribbon Cartridge
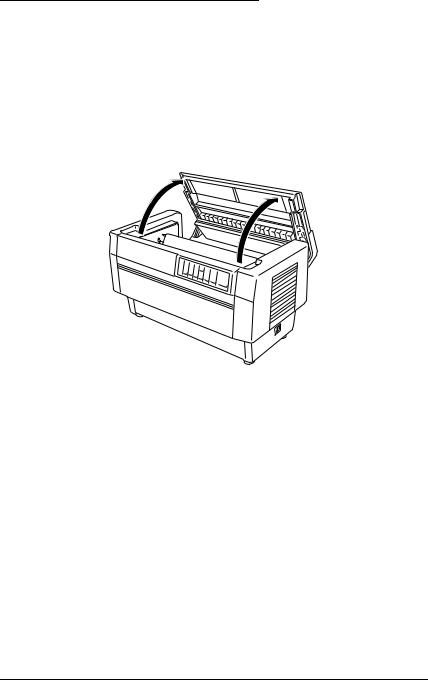
Before installing the ribbon cartridge, make sure that the protective packing materials have been removed and that the power cord is not plugged into an electrical outlet. Remove the ribbon cartridge from the box and plastic bag. Then follow these steps:
1. Open the top cover as shown below.
wWarning:
Never move the print head while the printer is turned on unless instructed to because this can damage the printer. Also, if you have been using the printer, the print head may be hot; let it cool for a few minutes before touching it.
1-6 Setting Up the Printer
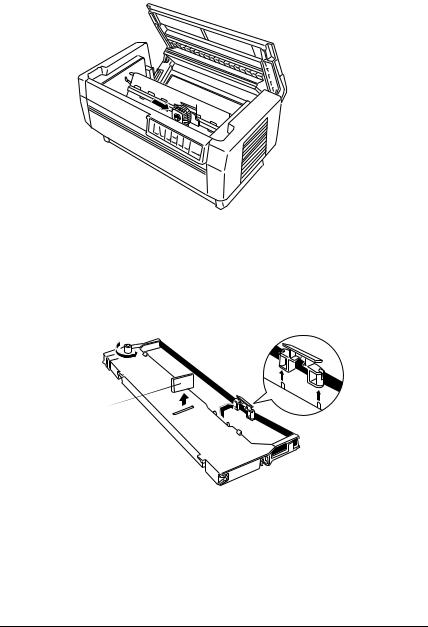
2. Slide the print head to the open section of the paper bail as |
1 |
|
shown below. |
||
|
||
|
|
 Position the print head here.
3.Remove the separator from the middle of the ribbon cartridge and discard it. Then detach the ribbon guide from the cartridge (but not from the ribbon) and turn the ribbon-tightening knob in the direction of the arrow to take up any slack in the ribbon.
 ribbon guide
separator
Setting Up the Printer 1-7
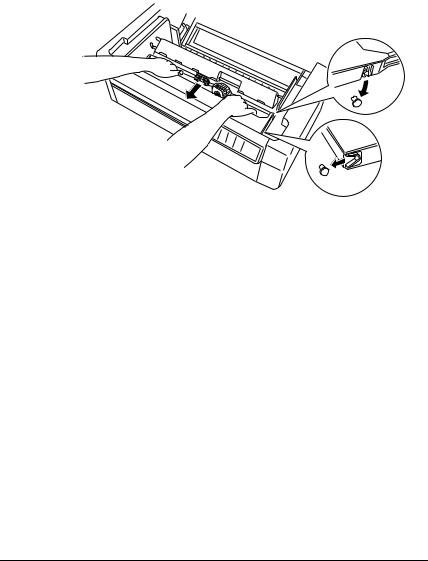
4.Hold the ribbon cartridge with both hands and lower it into the printer as shown below. Pulling the cartridge toward you, slide the notches nearest you over the two corresponding pins in the printer. Then push the cartridge down into position until the other two slots snap into place over the mounting pins in the printer.
5.Press lightly on both sides of the cartridge to make sure it is locked in place.
1-8 Setting Up the Printer
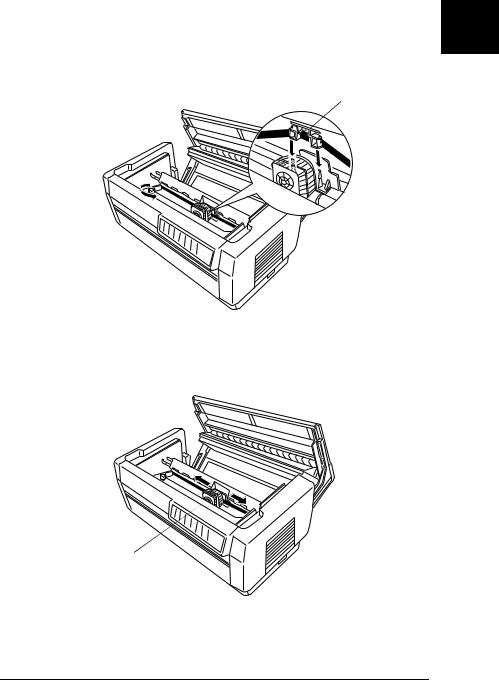
6. Insert the ribbon guide over the metal pins on each side |
1 |
|
of the print head as shown below. The smaller end of the |
||
|
||
guide should be on top, with its angled edge facing back |
|
|
toward the platen. Turn the ribbon-tightening knob again |
|
|
to remove any slack in the ribbon. |
|
|
ribbon guide |
|
7.Slide the print head from side to side to see that it moves smoothly and that the ribbon is not twisted or creased.
print head
Setting Up the Printer 1-9
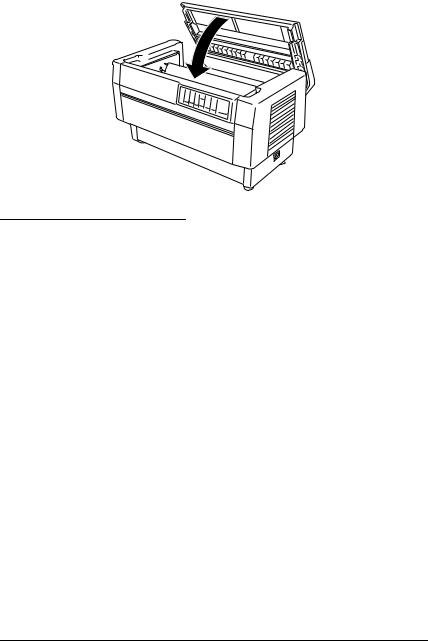
8. Close the top cover.
Plugging in the Printer
1.Make sure the printer is turned off. (The “½” symbol on the power switch located on the lower right side of the printer should be pressed down.)
2.Check the label on the back of the printer to make sure the voltage matches that of your electrical outlet.
cCaution:
If the rated voltage and your outlet voltage do not match, contact your dealer for assistance. Do not plug in the power cord.
3.If the power cord is not attached to the printer, connect the appropriate end to the AC inlet on the printer’s rear panel.
4.Plug the power cord into a properly grounded electrical outlet.
1-10 Setting Up the Printer
Connecting the Printer to Your Computer
1
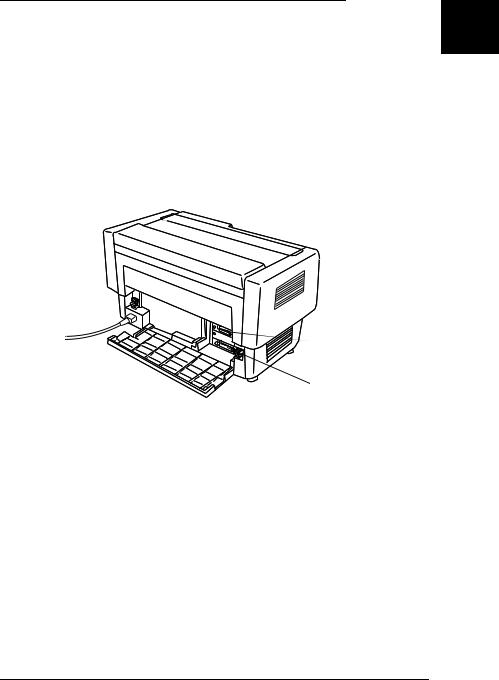
Your printer has two separate interface connections:
a Centronics® compatible parallel interface and an RS-232C- compatible serial interface. If you are not sure which one is required by your computer, check your computer manual.
Note:
Your printer has an auto interface mode function that allows you to connect to more than one interface at a time. See “Using DIP Switches” in Chapter 4.
serial interface
parallel interface
If you have a suitable shielded cable, you should be able to connect the printer immediately. If you have one of the few computers that requires a different type of interface, you need to use an optional interface card. See Chapter 6.
Setting Up the Printer 1-11
 Loading...