


 Loading...
Reader Comment Card
Apex 200\20 and Apex 200\40
Please use this card to evaluate this manual. Your comments and suggestions
will help us improve our publications.
Please rate the following: |
Excellent Good F a i r P o o r |
n Organization of this manual Technical accuracy Completeness of instructions Clarity of concepts and wording Quality of examples and pictures
n Quantity of examples and pictures
Comments :
Please list the software and any hardware you are using with your computer:
Name:
Title:
Company:
Address:
City:
State: |
|
Zip: |
Please cut out and mail in. Thank you!
EPSON
PLACE
STAMP
HERE
EPSON America, Inc.
2780 Lomita Blvd.
Torrance, CA 90505
M S 4-1
Fold Here

IMPORTANT NOTICE
DISCLAIMER OF WARRANTY
Epson America makes no representations or warranties, either express or implied, by or with respect to anything in this manual, and shall not be liable for any implied warranties of merchantability and fitness for a particular purpose or for any indirect, special, or consequential damages. Some states do not allow the exclusion of incidental or consequential damages, so this exclusion may not apply to you.
COPYRIGHT NOTICE
All rights reserved. No part of this publication may be reproduced, stored in a retrieval system, or transmitted, in any form or by any means, electronic, mechanical, photocopying, recording, or otherwise, without the prior written permission of Epson America, Inc. No patent liability is assumed with respect to the use of information contained herein. While every precaution has been taken in the preparation of this publication, Epson America assumes no responsibility for errors or omissions. Nor is any liability assumed for damages resulting from the use of the information
contained herein. Further, this publication and the features described herein are subject to change without notice.
TRADEMARKS
ActionPrinter and Apex are trademarks of Epson America, Inc. Epson is a registered trademark of Seiko Epson Corporation.
Hercules is a registered trademark of Hercules Computer Technology, Corp. IBM is a registered trademark of International Business Machines Corp. Intel is a registered trademark of Intel Corp.
MS-DOS and Microsoft are registered trademarks of Microsoft Corp. XTREE is a registered trademark of Executive Systems, Inc.
Copyright © 1989 by Epson America, Inc. |
|
Torrance, California |
Y16299100600 |
F C C C O M P L I A N C E S T A T E M E N T F O R A M E R I C A N U S E R S
This equipment generates and uses radio frequency energy and if not installed and used properly, that is, in strict accordance with the manufacturer’s instructions, may cause interference to radio and television reception. It has been type tested and found to comply with the limits for a Class B computing device in accordance with the specifications in Subpart J of Part 15 of FCC Rules, which are designed to provide reasonable protection against such interference in a residential installation. However, there is no guarantee that interference will not occur in a particular installation. If this equipment does cause interference to radio and television reception, which can be determined by turning the equipment off and on, you are encouraged to try to correct the interference by one or more of the following measures:
•Reorient the receiving antenna
•Relocate the computer with respect to the receiver
•Move the computer away from the receiver
•Plug the computer into a different outlet so that the computer and receiver are on different branch circuits.
If necessary, consult your dealer or an experienced radio/television technician for additional suggestions. You may find the following booklet prepared by the Federal Communications Commission helpful:
“Television Interference Handbook.”
This booklet is available from the U.S. Government Printing Office, Washington, DC 20402. Stock No. 004-000-00450-7.
Note: If the interference stops, it was probably caused by the computer or its peripheral devices. To further isolate the problem: Disconnect the peripheral devices and their input/output cables one at a time. If the interference stops, it is caused by either the peripheral device or its I/O cable. These devices usually require shielded I/O cables. For Epson peripheral devices, you can obtain the proper shielded cable from your dealer. For non-Epson peripheral devices contact the manufacturer or dealer for assistance.
WARNING: This equipment has been certified to comply with the limits for a Class B computing device, pursuant to Subpart J of Part 15 of FCC Rules. Only peripherals (computer input/output devices, terminals, printers, etc.) certified to comply with the Class B limits may be attached to this computer. Operation with non-certified peripherals is likely to result in interference to radio and TV reception. The connection of a non-shielded equipment interface cable to this equipment will invalidate the FCC Certification of this device and may cause interference levels that exceed the limits established by the FCC for this equipment.
This digital apparatus does not exceed the Class A/ Class B (whichever is applicable) limits for radio noise emissions from digital apparatus as set out in the radio interference regulations of the Canadian Department of Communications.
Le present appareil numérique n’émet pas de bruits radioelectriques dépassant les limites applicables aux appareils numériques de Classe A/de Classe B (selon le cas) prescrites dans le règlement sur le brouillage radioelectriques édicté par le Ministère des Communications du Canada.
i i i

Contents
Introduction.. . . . . . . . . . . . . . . . . . . . . . . . . . . . . . . . . . . . . .
How to Use This Manual . . . . . . . . . . . . . . . . . . . . . . . . . . . . .
Where to Get Help . . . . . . . . . . . . . . . . . . . . . . . . . . . . . . . . . .
1
2
3
Chapter 1 |
Setting Up Your System |
|
|
1 |
Unpacking. . . . |
. . . . . . . . . . . . . . . . . . . . . . . . . . . . . . . . . . . . . . . . . . 1-1 |
|
|
Removing the Diskette Drive Protector Card . . . . . . . . . |
1-3 |
|
2 Choosing a Location. . . . . . . . . . . . . . . . . . . . . . . . . . . . . . . |
1-4 |
||
3 |
Connecting |
a Monitor . . . . . . . . . . . . . . . . . . . . . . . . . . . . . |
1-5 |
4 Connecting a Printer, Mouse, or Modem. . . . . . . . . . . . . . . |
1-7 |
||
|
Using the Parallel Interface . . . . . . . . . . . . . . . . . . . . . . . |
1-8 |
|
|
Using the Serial Interface. . . . . . . . . . . . . . . . . . . . . . . . . |
1-9 |
|
5 |
Connecting the Power Cord . . . . . . . . . . . . . . . . . . . . . . . . . |
1-11 |
|
6 |
Connecting the Keyboard. . . . . . . . . . . . . . . . . . . . . . . . . . . |
1 - 12 |
|
|
Adjusting the Keyboard Angle. . . . . . . . . . . . . . . . . . . . . |
1-14 |
|
7 Setting the Front Monitor Switch . . . . . . . . . . . . . . . . . . . . |
1-14 |
||
8 |
Turning On the Computer . . . . . . . . . . . . . . . . . . . . . . . . . . |
1-15 |
|
|
The Command Prompt . . . . . . . . . . . . . . . . . . . . . . . . . . |
1-18 |
|
9 |
Copying System Diskettes . . . . . . . . . . . . . . . . . . . . . . . . . . |
1-18 |
|
Chapter 2 |
Running the Setup Program |
|
Changing the Amount of Memory. . . . . . . . . . . . . . . . . . . . . . |
2-3 |
|
Setting the Type of Display. . . . . . . . . . . . . . . . . . . . . . . . . . . . |
2-4 |
|
Adding an 80287 Coprocessor . . . . . . . . . . . . . . . . . . . . . . . . . |
2-6 |
|
Changing the Disk Drive Settings . . . . . . . . . . . . . . . . . . . . . . |
2-7 |
|
Setting the Real-time Clock. . . . . . . . . . . . . . . . . . . . . . . . . . . |
2-8 |
|
Leaving the Setup Program . . . . . . . . . . . . . . . . . . . . . . . . . . . . |
2-10 |
|
C o n t e n t s v

Chapter 3 Using Your Computer
Changing the Operating Speed . . . . . . . . . . . . . . . . . . . . . . . . 3-1 Special Keys on the Apex Keyboard. . . . . . . . . . . . . . . . . . . . . 3-2
Stopping a Command or Program . . . . . . . . . . . . . . . . . . . . . . 3-4 Resetting the Computer . . . . . . . . . . . . . . . . . . . . . . . . . . . . . . 3-5 Turning Off the Computer . . . . . . . . . . . . . . . . . . . . . . . . . . . . 3-6 Using Disks and Disk Drives. . . . . . . . . . . . . . . . . . . . . . . . . . . 3-6 How Disks Store Data . . . . . . . . . . . . . . . . . . . . . . . . . . . 3-6 Types of Diskette Drives. . . . . . . . . . . . . . . . . . . . . . . . . . 3-8
Caring for Diskettes and Diskette Drives. . . . . . . . . . . . . 3-10
Inserting and Removing Diskettes. . . . . . . . . . . . . . . . . . 3-12 Write-protecting Diskettes. . . . . . . . . . . . . . . . . . . . . . . . 3-14 Making Backup Copies . . . . . . . . . . . . . . . . . . . . . . . . . . . 3-15 Using a Single Diskette Drive . . . . . . . . . . . . . . . . . . . . . 3-16 Using the Hard Disk Drive . . . . . . . . . . . . . . . . . . . . . . . . 3-17
Chapter 4 Using MS-DOS With Your Computer
Starting and Exiting MS-DOS . . . . . . . . . . . . . . . . . . . . . . . . . 4-2
Loading MS-DOS From a Diskette . . . . . . . . . . . . . . . . . 4-2
Starting an Application Program . . . . . . . . . . . . . . . . . . . . . . . 4-3
Using Drive Designators . . . . . . . . . . . . . . . . . . . . . . . . . . . . . . 4-3
The Default Drive. . . . . . . . . . . . . . . . . . . . . . . . . . . . . . . 4-4
Changing the Default Drive. . . . . . . . . . . . . . . . . . . . . . . 4-4
Specifying the Drive Designator . . . . . . . . . . . . . . . . . . . 4-5
Types of MS-DOS Commands . . . . . . . . . . . . . . . . . . . . . . . . . 4-5
Entering an MS-DOS Command . . . . . . . . . . . . . . . . . . . . . . . 4-7
Creating and Managing Files . . . . . . . . . . . . . . . . . . . . . . . . . . 4-9
Naming Files. . . . . . . . . . . . . . . . . . . . . . . . . . . . . . . . . . 4-9
Copying Files . . . . . . . . . . . . . . . . . . . . . . . . . . . . . . . . . . 4-10
Renaming Files . . . . . . . . . . . . . . . . . . . . . . . . . . . . . . . . . 4-13
Deleting Files . . . . . . . . . . . . . . . . . . . . . . . . . . . . . . . . . . 4-14
Printing Files. . . . . . . . . . . . . . . . . . . . . . . . . . . . . . . . . . . 4-15

Using Directories. . . . . . . . . . . . . . . . . . . . . . . . . . . . . . . . . . . . 4-16 The Default Directory . . . . . . . . . . . . . . . . . . . . . . . . . . . 4-18 Changing the Default Directory. . . . . . . . . . . . . . . . . . . . 4-18 Using Pathname . . . . . . . . . . . . . . . . . . . . . . . . . . . . . . . . 4-19 Including Filenames With Pathnames. . . . . . . . . . . . . . . 4-20 Including Drive Letters With
Pathnames and Filenames . . . . . . . . . . . . . . . . . . . . . 4-20 Creating Directories . . . . . . . . . . . . . . . . . . . . . . . . . . . . . 4-22 Listing the Contents of a Directory . . . . . . . . . . . . . . . . . 4-23 Displaying a List of Directories . . . . . . . . . . . . . . . . . . . . 4-24 Removing Directories, . . . . . . . . . . . . . . . . . . . . . . . . . . . 4-25
Formatting Diskettes. . . . . . . . . . . . . . . . . . . . . . . . . . . . . . . . . 4-26 Formatting Diskettes With
One Diskette Drive (No Hard Disk) . . . . . . . . . . . . . 4-28 Backing Up Data. . . . . . . . . . . . . . . . . . . . . . . . . . . . . . . . . . . . 4-29 Using the DISKCOPY Command . . . . . . . . . . . . . . . . . . 4-29 Using the BACKUP Command. . . . . . . . . . . . . . . . . . . . 4-33 Using HELP. . . . . . . . . . . . . . . . . . . . . . . . . . . . . . . . . . . . . . . . 4-34 Using MENU. . . . . . . . . . . . . . . . . . . . . . . . . . . . . . . . . . . . . . . 4-36 MENU Program Options . . . . . . . . . . . . . . . . . . . . . . . . . 4-36 Using the XTREE Utility . . . . . . . . . . . . . . . . . . . . . . . . . . . . . 4-37 Running XTREE. . . . . . . . . . . . . . . . . . . . . . . . . . . . . . . . 4-38 Using an AUTOEXEC.BAT File . . . . . . . . . . . . . . . . . . . . . . . 4-41 Creating an AUTOEXEC.BAT File . . . . . . . . . . . . . . . . 4-42 Using HDCACHE for the Hard Disk. . . . . . . . . . . . . . . . . . . . 4-44
Chapter 5 Installing Option Cards
Removing the Cover. . . . . . . . . . . . . . . . . . . . . . . . . . . . . . . . . 5-1
Inserting the Option Card . . . . . . . . . . . . . . . . . . . . . . . . . . . . 5-4
Jumper Settings . . . . . . . . . . . . . . . . . . . . . . . . . . . . . . . . . . . . . 5-7
Changing a Jumper Setting . . . . . . . . . . . . . . . . . . . . . . . 5-8
Memory Card Jumpers . . . . . . . . . . . . . . . . . . . . . . . . . . . 5-8
Main Circuit Board Jumpers. . . . . . . . . . . . . . . . . . . . . . . 5-10
Multi-function Card Jumpers. . . . . . . . . . . . . . . . . . . . . . 5-12
Removing an Option Card . . . . . . . . . . . . . . . . . . . . . . . . . . . . 5-15
Replacing the Cover . . . . . . . . . . . . . . . . . . . . . . . . . . . . . . . . . 5-16
Post-installation Setup . . . . . . . . . . . . . . . . . . . . . . . . . . . . . . . 5-18
Contents vii

Chapter 6 Troubleshooting
The Computer Won’t Start . . . . . . . . . . . . . . . . . . . . . . . . . . . 6-1
The Computer Does Not Respond . . . . . . . . . . . . . . . . . . . . . . 6-2
Keyboard Problems . . . . . . . . . . . . . . . . . . . . . . . . . . . . . . . . . . 6-3
Monitor Problems . . . . . . . . . . . . . . . . . . . . . . . . . . . . . . . . . . . 6-4
Diskette Problems . . . . . . . . . . . . . . . . . . . . . . . . . . . . . . . . . . . 6-5
Diskette Drive Problems . . . . . . . . . . . . . . . . . . . . . . . . . . . . . . 6-8
Hard Disk Problems. . . . . . . . . . . . . . . . . . . . . . . . . . . . . . . . . . 6-9
Software Problems . . . . . . . . . . . . . . . . . . . . . . . . . . . . . . . . . . . 6-11
Printer Problems . . . . . . . . . . . . . . . . . . . . . . . . . . . . . . . . . . . . 6- 12
Option Card Problems . . . . . . . . . . . . . . . . . . . . . . . . . . . . . . . 6- 13
Appendix A |
Specifications |
CPU and Memory . . . . . . . . . . . . . . . . . . . . . . . . . . . . . . . . . . .
Controllers. . . . . . . . . . . . . . . . . . . . . . . . . . . . . . . . . . . . . . . . .
Interfaces . . . . . . . . . . . . . . . . . . . . . . . . . . . . . . . . . . . . . . . . . .
Power Supply. . . . . . . . . . . . . . . . . . . . . . . . . . . . . . . . . . . . . . .
Mass Storage . . . . . . . . . . . . . . . . . . . . . . . . . . . . . . . . . . . . . . .
Keyboard.. . . . . . . . . . . . . . . . . . . . . . . . . . . . . . . . . . . . . . . ..
Environmental Requirements. . . . . . . . . . . . . . . . . . . . . . . . . .
Physical Characteristics (CPU only) . . . . . . . . . . . . . . . . . . . .
Power Requirements . . . . . . . . . . . . . . . . . . . . . . . . . . . . . . . . .
Video and Display Options. . . . . . . . . . . . . . . . . . . . . . . . . . . .
Other Apex Options . . . . . . . . . . . . . . . . . . . . . . . . . . . . . . . . .
Monitors . . . . . . . . . . . . . . . . . . . . . . . . . . . . . . . . . . . . . .
ActionPrinters by Epson . . . . . . . . . . . . . . . . . . . . . . . . .
ActionPrinter Accessories . . . . . . . . . . . . . . . . . . . . . . . .
Computer Accessories . . . . . . . . . . . . . . . . . . . . . . . . . . .
Parallel Port Pin Assignments. . . . . . . . . . . . . . . . . . . . . . . . . .
Serial Port Pin Assignments . . . . . . . . . . . . . . . . . . . . . . . . . . .
Keyboard Connector Pin Assignments. . . . . . . . . . . . . . . . . . .
Parallel Port Loop-back Connector Pin Assignments . . . . . . .
Serial Port Loop-back Connector Pin Assignments. . . . . . . . .
A-1 A- 1 A-2 A-2 A-2 A- 3 A-4 A-4 A-4 A-4 A-5 A-5 A-5 A-6 A-7 A-7 A-8 A-8 A-9 A-9
Appendix B Power-on Diagnostics
System Device Check . . . . . . . . . . . . . . . . . . . . . . . . . . . . . . . .
Timer and CMOS RAM Check. . . . . . . . . . . . . . . . . . . . . . . .
RAM Check . . . . . . . . . . . . . . . . . . . . . . . . . . . . . . . . . . . . . . .
Keyboard Controller and Keyboard Check . . . . . . . . . . . . . . .
Display Card Check . . . . . . . . . . . . . . . . . . . . . . . . . . . . . . . . .
Optional RAM Check . . . . . . . . . . . . . . . . . . . . . . . . . . . . . . .
Diskette Drive Seek Check. . . . . . . . . . . . . . . . . . . . . . . . . . . .
Hard Disk Controller and Hard Disk Check . . . . . . . . . . . . . .
B-1 B-2 B-3 B-3
B-4
B-4 B-4 B-5
Appendix C Performing System Diagnostics
Starting System Diagnostics . . . . . . . . . . . . . . . . . . . . . . . . . . .
Modifying the DEVICE LIST. . . . . . . . . . . . . . . . . . . . . . . . . .
Selecting a Test. . . . . . . . . . . . . . . . . . . . . . . . . . . . . . . . . . . . .
Resuming From an Error. . . . . . . . . . . . . . . . . . . . . . . . . .
System Board Check . . . . . . . . . . . . . . . . . . . . . . . . . . . . . . . . .
Memory Check . . . . . . . . . . . . . . . . . . . . . . . . . . . . . . . . . . . . .
Keyboard Check . . . . . . . . . . . . . . . . . . . . . . . . . . . . . . . . . . . . .
Monochrome Display Adapter and CRT Check . . . . . . . . . . .
Monochrome Adapter Check . . . . . . . . . . . . . . . . . . . . .
Attribute Check . . . . . . . . . . . . . . . . . . . . . . . . . . . . . . . .
Character Set Check . . . . . . . . . . . . . . . . . . . . . . . . . . . .
Video Check . . . . . . . . . . . . . . . . . . . . . . . . . . . . . . . . . . . . . . . . . . . . .
Sync Check . . . . . . . . . . . . . . . . . . . . . . . . . . . . . . . . . .
Run All Above Checks . . . . . . . . . . . . . . . . . . . . . . . . . .
Color Graphics Display Adapter and CRT Check . . . . . . . . .
Color Graphics Adapter Check . . . . . . . . . . . . . . . . . . . .
Attribute Check . . . . . . . . . . . . . . . . . . . . . . . . . . . . . . . .
Character Set Check . . . . . . . . . . . . . . . . . . . . . . . . . . . .
40-column Character Set Check . . . . . . . . . . . . . . . . . . .
320x200 Graphics Mode Check. . . . . . . . . . . . . . . . . . . .
640x200 Graphics Mode Check. . . . . . . . . . . . . . . . . . . .
Screen Paging Check . . . . . . . . . . . . . . . . . . . . . . . . . . . .
Light Pen Check . . . . . . . . . . . . . . . . . . . . . . . . . . . . . . . .
Color Video Check. . . . . . . . . . . . . . . . . . . . . . . . . . . . . .
Sync Check . . . . . . . . . . . . . . . . . . . . . . . . . . . . . . . . . . . .
Run All Above Checks . . . . . . . . . . . . . . . . . . . . . . . . . .
C-1
C-3
C-5
C-6
C-7
C-8
C-8
C- 10 C- 11 C-11 C-12
C-12
C-13
C-13 C-13 C-14 C- 15 C-15 C-16 C- 17 C- 17 C- 18 C-19 C-20
C-20
C-20
Contents ix

Floppy Disk Drives and Controller Check . . . . . . . . . . . . . . . . |
C-21 |
|
Sequential Seek Check . . . . . . . . . . . . . . . . . . . . . . . . . . |
C-22 |
|
Random Seek Check . . . . . . . . . . . . . . . . . . . . . . . . . . . . |
C-22 |
|
Write, Read Check. . . . . . . . . . . . . . . . . . . . . . . . . . . . . . |
C-23 |
|
Speed Check. . . . . . . . . . . . . . . . . . . . . . . . . . . . . . . . . . . |
C-23 |
|
Disk Change Check . . . . . . . . . . . . . . . . . . . . . . . . . . . . . |
C-24 |
|
Run All Above Checks . . . . . . . . . . . . . . . . . . . . . . . . . . |
C-25 |
|
Math Coprocessor Check (80287) . . . . . . . . . . . . . . . . . . . . . . |
C-25 |
|
Parallel Port (Printer Interface) Check . . . . . . . . . . . . . . . . . . |
C-25 |
|
Parallel Port (on Video Adapter) Check . . . . . . . . . . . . . . . . . |
C-26 |
|
Serial Port (RS-232C) Check . . . . . . . . . . . . . . . . . . . . . . . . . . |
C-27 |
|
Alternate Serial Port Check. . . . . . . . . . . . . . . . . . . . . . . . . . . |
C-28 |
|
Dot-matrix Printer Check. . . . . . . . . . . . . . . . . . . . . . . . . . . . . |
C-28 |
|
Hard Disk Drives and Controller Check . . . . . . . . . . . . . . . . . |
C-30 |
|
Seek Check . . . . . . . . . . . . . . . . . . . . . . . . . . . . . . . . . . . . |
C-30 |
|
Write, Read Check. . . . . . . . . . . . . . . . . . . . . . . . . . . . . . |
C |
- 3 1 |
Head Select Check. . . . . . . . . . . . . . . . . . . . . . . . . . . . . . |
C-32 |
|
Error Detection and Correction Check. . . . . . . . . . . . . . |
C-32 |
|
Read, Verify Check . . . . . . . . . . . . . . . . . . . . . . . . . . . . . |
C-33 |
|
Run All Above Checks . . . . . . . . . . . . . . . . . . . . . . . . . . |
C |
- 3 3 |
Error Codes and Messages . . . . . . . . . . . . . . . . . . . . . . . . |
C-34 |
|
Appendix D Physically Formatting a Hard Disk
Formatting and Checking Options . . . . . . . . . . . . . . . . . . . . . . D- 1
Reformatting a Used Disk . . . . . . . . . . . . . . . . . . . . . . . . D-3
Formatting a New Disk. . . . . . . . . . . . . . . . . . . . . . . . . . . D-4
Starting the Formatting Process. . . . . . . . . . . . . . . . . . . . D-4
Conditional Format (Normal) . . . . . . . . . . . . . . . . . . . . . . . . . D-5
Unconditional Format . . . . . . . . . . . . . . . . . . . . . . . . . . . . . . . D-7
Destructive Surface Analysis. . . . . . . . . . . . . . . . . . . . . . . . . . . D- 10
Non-destructive Surface Analysis. . . . . . . . . . . . . . . . . . . . . . . D- 11

Appendix E Preparing a Hard Disk for Use
Partitioning the Hard Disk . . . . . . . . . . . . . . . . . . . . . . . . . . . .
Creating the MS-DOS Partition. . . . . . . . . . . . . . . . . . . . . . . .
Creating the Extended Partition. . . . . . . . . . . . . . . . . . . . . . . .
Formatting the Primary Partition . . . . . . . . . . . . . . . . . . . . . . .
Formatting the Extended Partition. . . . . . . . . . . . . . . . . . . . . .
Copying the Remaining Files to the Hard Disk . . . . . . . . . . . .
Creating the AUTOEXEC.BAT File. . . . . . . . . . . . . . . . . . . .
E-2
E-3
E-4
E-6
E-8
E-9
E-10
Appendix F Types of Hard Disk Drives
Disk Type Table . . . . . . . . . . . . . . . . . . . . . . . . . . , . . . . . . . . . F-1
Glossary
Index
Contents xi


Introduction
Your Apex’” personal computer is powerful, versatile, and easy to use. After setting up your system with the simple instructions in this manual, you’ll soon be using your favorite software programs.
The Apex 200 computer is available in these configurations:
The Apex 200\20 provides one 1.2MB (megabyte) diskette drive and one 20MB hard disk drive
The Apex 200\40 provides one 1.2MB diskette drive and one 40MB hard disk drive.
Both models come with 640KB (kilobyte) of internal memory, a total of six internal option slots, an MGA (multi-graphics adapter) card, and built-in serial and parallel interfaces. You can connect either a monochrome or color graphics monitor to the MGA card in the computer.
Your computer comes with version 3.3 of MS-DOS®- the operating system by Microsoft? In addition to the introduction to MS-DOS provided in this manual, you’ll find a complete reference manual for the operating system packed in the box with the computer.
As a supplement to MS-DOS, Epson has included several timesaving utilities that make MS-DOS easier to use: HELP, MENU, and XTREE? The HELP program lets you display information on the screen about any MS-DOS command. MENU provides an easier way to run many of the most common MS-DOS commands. XTREE is a file management utility that simplifies all file and directory operations; it is especially useful for managing data on a hard disk.
As your needs grow, so can your computer; you can expand your system by adding a wide variety of options. You can install most option cards compatible with the IBM® Personal
Introduction 1

Computer. For example, you can add an internal modem card to provide data communications. If you use software that executes lengthy mathematical calculations, you may want to install an 80287 math coprocessor to speed up processing.
How to Use This Manual
This manual explains how to set up and care for your computer. It also describes how to use your computer and run diagnostic checks. The instructions in this manual apply to both the Apex 200\20 and Apex 200\40, except where otherwise indicated.
You probably don’t need to read everything in this book; see the following chapter summaries.
Chapter 1 provides simple step-by-step instructions for setting up your computer. On the back cover foldout are illustrations identifying the different parts of the computer; you may want to refer to this while you are setting up your system.
Chapter 2 describes how to run the Setup program to set up your computer’s configuration.
Chapter 3 covers some general operating procedures, including how to use and care for your disks and disk drives.
Chapter 4 provides basic instructions for using MS-DOS with your computer.
Chapter 5 describes how to install option cards in your computer.
Chapter 6 contains troubleshooting tips in case you encounter any problems while using your computer.
Appendix A gives the technical specifications for the Apex 200\20 and Apex 200\40.
Appendix B provides information on the power-on diagnostics.

Appendix C outlines the system diagnostic checks you can perform on your computer. If you are having trouble with any part of the hardware, you may want to run some of these diagnostic checks.
Appendix D describes how to perform a low-level format on the hard disk. You need to do this only if you are having serious problems with the hard disk in your computer or if you have installed a new hard disk that has not received this type of format. (This is not the same type of format provided by the MS-DOS FORMAT command.)
Appendix E explains how to prepare a new hard disk for use. You need to follow these instructions only if you have installed a new hard disk in your computer or if you need to repartition or reformat the one you have been using.
Appendix F lists the types of hard disks you can use in your computer. You need to enter information from this table when you run the Setup program after installing an additional hard disk.
At the back of the manual you’ll find a glossary of the computer terms used in this manual and an index.
Where to Get Help
Customer service for Epson products is provided by a network of authorized Epson Customer Care Centers throughout the United States. Call the Epson Consumer Information Center at 1-800-922-8911 for the following:
Customer Care Center referrals
Technical support referrals
Information on Epson User Groups.
To locate or purchase accessories or supplies, contact your nearest Epson dealer or call 1-800-873-7766.
Introduction 3


Chapter 1
Setting Up Your System
Setting up your Apex personal computer is easy. Just follow the nine steps in this chapter. You may want to leave the back cover foldout of this book open so you can refer to the two illustrations identifying the different parts of the computer.
N o t e
If you have experience setting up computers, you may prefer to follow the brief instructions on the Read This First card included with this manual. (Turn to this chapter if you have any questions, and for instructions on copying your system diskettes.)
When you finish setting up your computer, go on to Chapter 2 and follow the instructions there to run the Setup program. The Setup program updates the list of equipment installed in the computer. You need to run this program the first time you use your computer and any time options are added or changed.
1 Unpacking
As you unpack the different parts of your computer system, be sure to inspect each piece. If anything is missing or looks damaged, contact the place where it was purchased for missing items or replacements. If you cannot obtain the necessary part or parts, call your Epson Customer Care Center for assistance. Please have the computer’s serial number ready when you call.
Setting Up Your System |
1-1 |
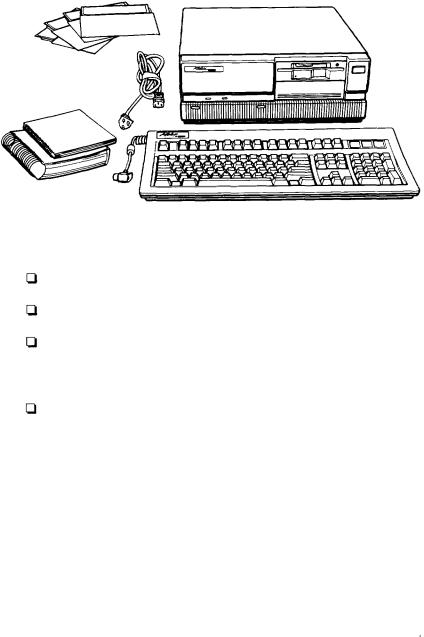
Besides this manual, you should have the following:
The computer and power cord
The keyboard with attached cable
Four diskettes: three that contain the MS-DOS operating system (Startup, Operating 1, and Operating 2), and a Reference diskette
An MS-DOS Reference Manual.
In addition to these items, you need a compatible monitor to use with the computer. With the MGA (multi-graphics adapter) card in the computer, you can use a monochrome or color graphics monitor.
You’ll find warranty and registration cards with the computer. Fill out the registration card and mail it to Epson. With this card on file, Epson can send you update information. You also should retain the computer’s receipt from the place of purchase. The receipt is all that is required for warranty service.
Be sure to keep your packing materials. They provide the best protection for your computer if you need to transport it later.
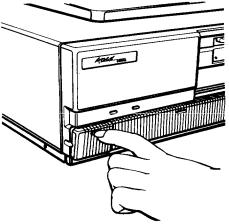
Removing the Diskette Drive Protector Card
A protective piece of cardboard occupies the slot of the diskette drive in your computer. This card is inserted at the factory to protect the read/write heads in the drive.
Be sure to remove the card from the diskette drive before you turn on the computer. Turn the diskette drive latch up until it is horizontal and carefully pull out the card.
Save the protector card and reinsert it whenever you move the computer. If you don’t plan to use your computer for a week or more, reinsert the card to help prevent dust from entering the disk drive.
Setting Up Your System |
1-3 |

2 Choosing a Location
Before you set up your computer, it is important to choose the right location. Select a spot that provides the following:
A large, sturdy desk or table that can easily support the weight of your system, including all of its components. Make sure the surface is hard and flat. Soft surfaces like beds and carpeted floors can generate static electricity, which may erase data on your disks and damage the computer’s circuitry. Soft surfaces also prevent proper ventilation.
Good air circulation. Air must be able to move freely under the system as well as behind it. Leave several inches of space around the computer to allow ventilation.
Moderate environmental conditions. Protect your computer from extremes in temperature, direct sunlight, or any other source of heat. High humidity also hinders operation, so select a cool, dry area. Avoid dust and smoke, which can damage disks and disk drives and cause you to lose valuable data.
Appropriate power sources. To prevent static charges, connect all your equipment to three-prong, 120-volt AC, grounded outlets. You need one outlet for the computer, one for the monitor, and additional outlets for a printer and any other peripherals.
If it has the appropriate power cord, you can plug the monitor into the auxiliary power outlet on the back panel of the computer, reducing the number of wall outlets you need. (The current required by the peripheral must not exceed 1 amp.) If you need more outlets, you may want to buy a power strip-available at any electronics store-to provide extra outlets. A power strip with surge suppression is recommended.

Cl No electromagnetic interference. Locate your system away from any electrical device, such as a telephone, that generates an electromagnetic field.
3 Connecting a Monitor
Your computer comes with an MGA (multi-graphics adapter) card installed. This card controls the monitor and provides the connection needed to attach the monitor to the computer. You can connect a monochrome or color graphics monitor to this card.
Note
If you are using a monitor that is neither monochrome nor color graphics (such as an EGA or VGA monitor) with your computer, you need a compatible display adapter card to control it. If the optional card is nut already installed in the computer, you need to install it before you can connect the monitor, See Chapter 5 for instructions on adding option cards (in this case, the video card).
The procedure you use to connect your monitor to the computer depends on the type of monitor you have. See your monitor manual for detailed instructions, or follow these general guidelines:
1.Place your monitor on top of or near the computer. It is easiest to connect the monitor cable if you are facing the back panels of both the monitor and the computer.
2.If necessary, connect the monitor cable to the monitor. (Some monitors, such as the color Apex monitor, come with permanently attached cables.)
Setting Up Your System |
1-5 |
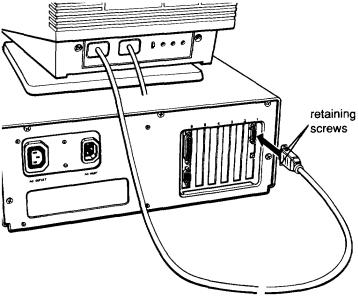
3.Connect the monitor cable to the video card connector on the back of the computer, as shown below. If the plug has retaining screws, tighten them securely.
4.If necessary, plug the monitor’s power cord into the monitor’s power inlet. (The power cord on Apex monitors is already attached.)
5.Plug the other end of the monitor’s power cord into an electrical outlet.
Note
If the monitor has the proper type of plug, you can plug it into the auxiliary AC outlet next to the AC inlet on the back of the computer.
6.If you connected the monitor to the MGA card in the computer, set the color/mono monitor switch on the card (shown in the following illustration) to match the type of monitor you are using, either color or monochrome.
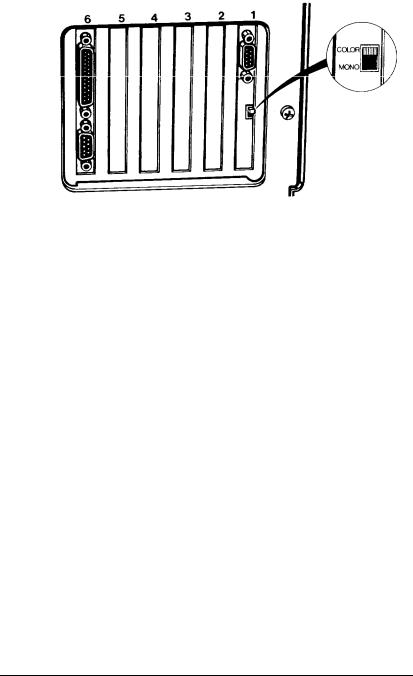
Note
Many color monitors display in only one color (such as green or amber), but are not monochrome monitors. If your monitor is not specifically a monochrome monitor, you should set the color/mono switch to color. Check the documentation that came with your monitor to verify the type of monitor.
Connecting a Printer, Mouse, or Modem
4The computer has a parallel interface and a serial interface on the back panel, so you can easily connect a printer or other type of device with either type of interface.
For example, you can use the parallel port to connect a parallel printer (most printers have a parallel interface). You can use the serial port to connect a serial printer, a serial mouse, or an external modem.
Follow the steps in this section to connect a printer or other peripheral device to either the parallel or serial interface.
Setting Up Your System |
1-7 |
Using the Parallel Interface
The parallel interface on your computer is Centronics® compatible and uses a 25-pin connector. To connect a parallel printer to your computer, you need an IBM-compatible printer cable. If you are not sure which one you need, or whether you have the right one, check with the store where you purchased the printer.
Once you have the correct printer cable, follow these steps to connect the printer to the parallel interface on the computer:
1.Place the printer next to your computer.
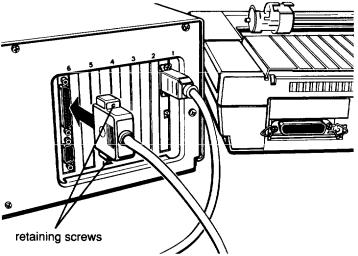
2.One end of the printer cable has a 25-pin, male connector. Connect this end to the parallel port on the back panel of the computer, as shown below. If the plug has retaining screws, tighten them securely.
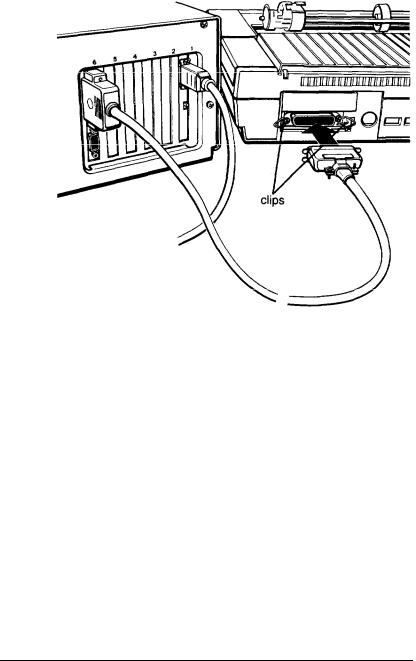
3.Connect the other end of the cable to the printer, as shown below. If the printer has retaining clips on each side of the printer port, squeeze the clips together to secure the cable.
4.Plug the printer’s power cord into an electrical outlet.
Using the Serial Interface
If you have a serial printer, modem, mouse, or any other peripheral with a serial interface, you can connect it to the serial (RS-232C) port on the back of the computer. Your computer uses an IBM-compatible, 9-pin, male connector, so be sure you have the proper cable. If you are not sure which one you need, or whether you have the right one, check with the store where you bought the cable.
Setting Up Your System |
1-8 |

To connect a serial device, follow the same steps outlined above for a parallel device, but connect the cable to the serial port, shown below.
Setting up the serial port for a printer
If you are using a serial printer but your software does not support a serial printer, you must do two things before you can print:
Set up the data transmission parameters for the serial port
Tell the computer to redirect printer data from the parallel port to the serial port.
The MS-DOS MODE command lets you define the baud rate, parity, data length, and number of stop bits for a primary and a secondary serial port. MODE also lets you redirect output from the parallel port to the serial port. (The MENU program offers an easy way to use MODE. For instructions, see the description of the Mode Settings option of the MENU program in your MS-DOS Reference Manual.)
5 Connecting the Power Cord
Follow these steps to connect the power cord:
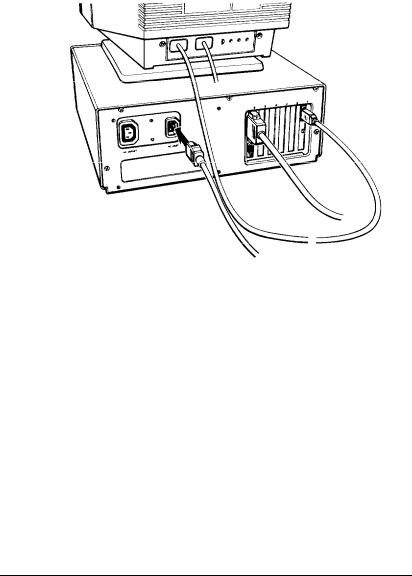
1.Insert the power cord into the AC inlet on the computer’s back panel, as shown below. To avoid an electric shock, be sure to plug the cord into the computer before plugging it into the wall socket.
2.Plug the other end of the power cord into a three-prong, grounded electrical outlet.
Setting Up Your System |
1-11 |
6Connecting the Keyboard
Follow these steps to connect the keyboard:
1.Facing the front of the computer, open the cover on the lower left comer. Push the top of the cover inward and then release it.
2.Plug the keyboard cable into the socket, as shown in the following illustration. Do not force the connector, but be sure to insert it all the way.
Loading...