


HOME THEATER SYSTEM with DVD/AUDIO CD PLAYER DOLBY DIGITAL DECODER
and AM/FM DIGITAL TUNING RECEIVER
OWNER’S MANUAL
AV101
Visit our web site at www.emersonradio.com
50
Welcome...…
And thank you for purchasing this Emerson Audio/Video Home Theater System. This state of the art system includes everything you need to experience movie theater quality digital video and audio in the comfort of your own living room. The only thing you need to add is your own TV. We have designed this system to be easy to set up, and even easier to use. But please, review this manual before you operate your system; have it handy while you are setting the system up; and keep it available for future reference, or in the unlikely event that you encounter any unexpected problems. We have tried to keep this manual as simple as possible. It begins with a description of the important controls on the main unit and the remote. It then explains how to connect the speakers, your TV, and optional external sources to the main unit, how to position the speakers for the most natural surround sound, and then how to operate the DVD/CD player and the AM/FM Stereo Receiver. If you follow the instructions carefully you can have the system up and operating in less than an hour.
All of the optional system settings have been preset at our factory for correct operation of the system in North America. All you have to do is insert a disc, sit back, and enjoy a great home theater experience.
Eventually you may want to change some of the optional settings. A description of all the optional settings, and instructions for changing them, is found in the second half of the manual.
This system was designed to provide you with many years of reliable operation with a minimum of care and maintenance. Every component in your system was in perfect working condition when it left our factory. If you experience any problems with the set up or operation of this system please review the Trouble Shooting Guide at the end of this manual before you contact your dealer or the Emerson Customer Service Department.
Thanks again from all of us at Emerson Radio Consumer Products Corp.
The serial number of your system can be found on a label on the back panel of the main unit, and also on the display carton. Please record the serial number in the space below. You may need to refer to this number if your system ever needs to be serviced.
Model No.: AV101
Serial No.:
Warning
To prevent fire or shock hazard, do not expose the unit to rain or moisture.
To avoid electrical shock, do not open the cabinet.
Refer servicing to qualified service personnel only.
The AC cord must only be changed at qualified service facility.
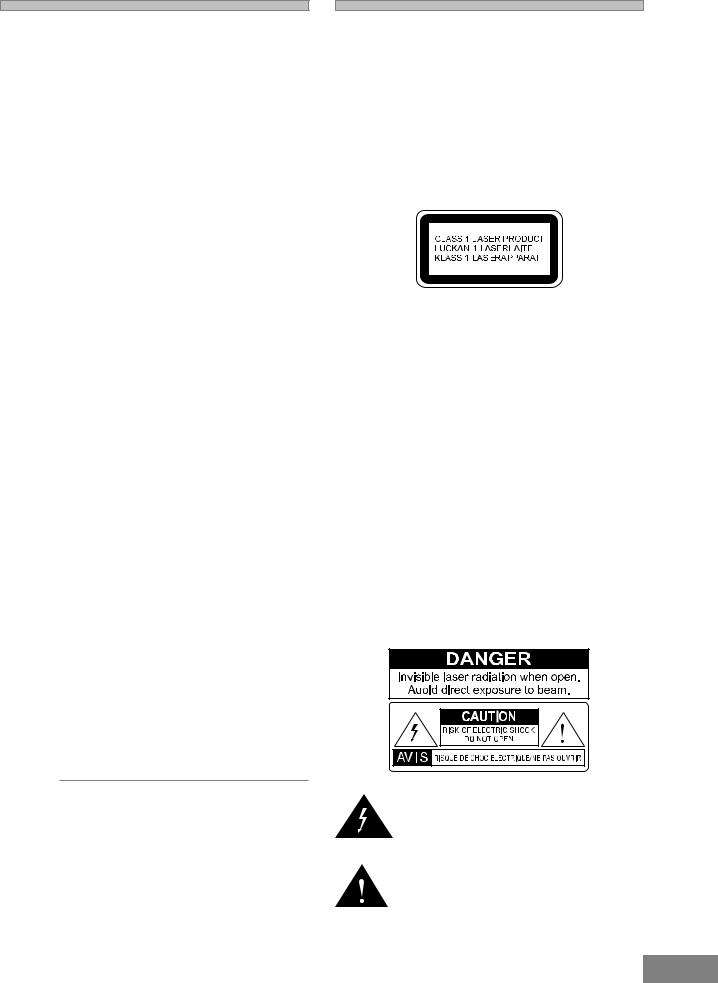
lThis appliance is classified as a CLASS 1 LASER product.
lThe CLASS 1 LASER PRODUCT MARKING is located on the rear panel.
lThis product contains a low power laser device. To ensure continued safety, do not remove any cover or attempt to gain access to the inside of the product.
Refer all servicing to qualified personnel only.
This product incorporates copyright protection technology that is protected by method claims of certain U.S. patents and other intellectual property rights owned by Macrovision Corporation and other rights owners. Use of this copyright protection technology must be authorized by Macrovision Corporation, and is intended for home and other limited viewing uses only unless otherwise authorized by Macrovision Corporation. Reverse engineering or disassembly is prohibited.
Caution
Refer servicing to qualified service personnel only.
The following marking is printed on the rear panel.
This symbol is intended to alert the user of the presence of uninsulated “dangerous voltage” within the product enclosure that may be of sufficient magnitude to constitute a risk of electric shock to persons.
This symbol is intended to alert the user to the presence of important operating and maintenance (servicing) instructions in the literature accompanying the applicance.
1

IMPORTANT SAFETY INSTRUCTIONS (CONTINUED)
Before using the unit, be sure to read all operating instructions carefully. Please note that these are general precautions and may not pertain to your unit. For example, this unit may not have the capability to be connected to an outdoor antenna.
1.READ INSTRUCTIONS
All the safety and operating instructions should be read before the product is operated.
2.RETAIN INSTRUCTIONS
The safety and operating instruction should be retained for future reference.
3.HEED WARNINGS
All warning on the product and in the operating instructions should be adhered to.
4.FOLLOW INSTRUCTIONS
All operating and use instructions should be followed.
5.CLEANING
Unplug this product from the wall outlet before cleaning. Do not liquid cleaners or awrosol cleaners. Use a damp cloth for cleaning.
6.ATTACHMENTS
Do not use attachments not recommended by the product’s manufacturer as they may cause hazards.
7.WATER AND MOISTURE
Do not use this product near waterfor example, near a bathtub, washbowl, kitchen sink, or laundry tub, in a wet basement, or near a swimming pool.
8.ACCESSORIES
Do not place this product on an unstable cart, stand, tripod, bracket, or table. The product may
fall, causing serious injury and serious damage to the product. Use only with a cart, stand, tripod, bracket, or table recommended by the manufacturer or sold with the product. Any mounting of the product should follow the manufacturer’s instructions, and should use a mounting accessory recommended by the manufacturer.
8A. An appliance and cart combination should be moved with care. Quick stops, excessive force, and uneven surface may cause the appliance and cart combination to overturn.
9.VENTILATION
Slots and openings in the cabinet and in the back or bottom are provided for ventilation and to ensure reliable operation of the product and to protect it from overheating. These openings must not be blocked or covered. The openings should never be blocked by placing the product on a bed, sofa, rug, or other similar surface. This product should never be placed near or over a radiator or heat source. This product should not be placed in a built-in installation such as a bookcase or rack unless proper ventilation is provided or the manufacturer’s instructions have been adhered to.
10.POWER SOURCES
This product should be operated inly from the type of power source indicated on the marking label. If you are not sure of the type of power supply to your home, consult your appliance dealer or local power company. For products intended to operate from battery power, or other sources, refer to the operating instruction.
11.GROUNDING OR POLARIZATION
This product is equipped with a alternating-current line plug (a plug having one blade wider than the other).
This plug will fit into the power outlet only one way. This is a safety feature. If you are unable to insert the plug fully into the outlet, try reversing the plug. If the plug should still fail to fit, contact your electrican to replace your obsolete outlet.
Do not defect the safety purpose of the polarized plug.
12.POWER-CORD PROTECTION
Power-supply cords should be routed so that they are not likely to be walked on or pinched by items placed upon or against them, paying particular attention to cords at plugs, convenience receptacles, and the point where they exit from the appliance.
13.LIGHTNING
To protect your product from a lightning storm, or when it is left unattended and unused for long periods of time, unplug it from the wall outlet and disconnect the antenna or cable system. This will prevent damage to the product due to lightning and power-line surges.
14.POWER LINES
An outside antenna system should not be located in the vicinity of overhead power lines or other electric light or power circuits, or where it can fall into such powerlines or circuits. When installing an outside antenna system, extreme care should be taken to keep from touching such power lines or circuits as contact with them might be fatal.
2
IMPORTANT SAFETY INSTRUCTIONS (CONTINUED)
15.OVERLOADING
Do not overload wall outlets and extension cords as this can result in a risk of fire or electric shock.
16.OBJECT AND LIQUID ENTRY
Never push ojects of any kind into this product through openings as they may touch dangerous voltage points or short out parts that could result in fire or electric shock. Never spill or spray any type of liquid on the product.
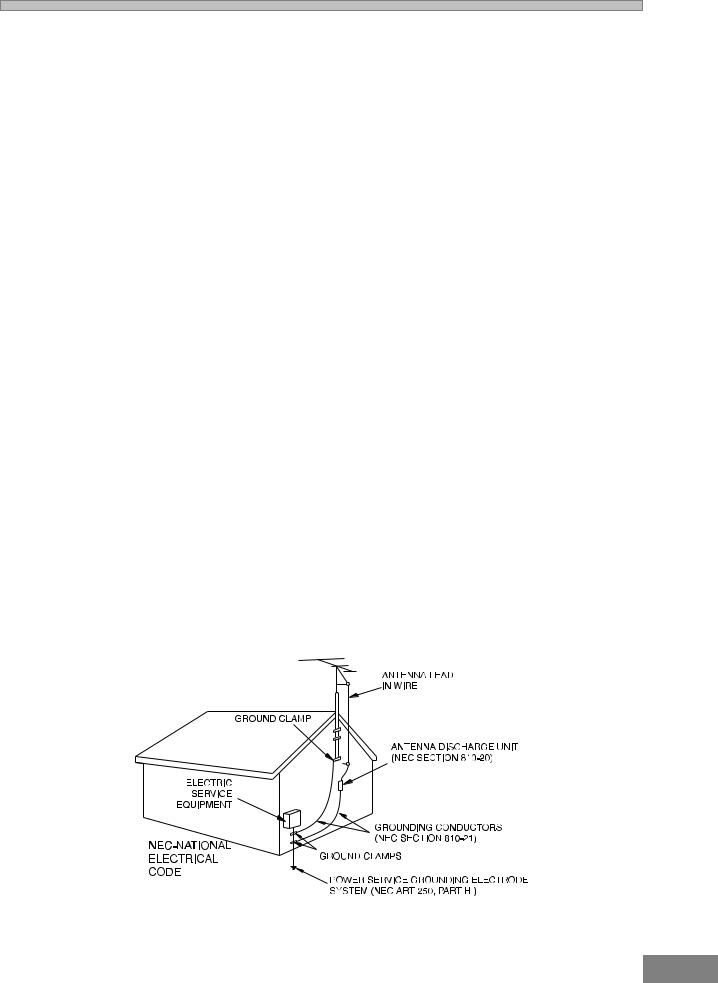
17.OUTDOOR ANTENNA GROUNDING
If an outside antenna is connected to the product, be sure the antenna system is grounded so as to provide some protection against voltage surges and built-up static charges. Section 810 of the National Electric Code, ANSI/NFPA 70, provides information with respect to proper grounding of the mast and supporting structure, grounding of the lead-in wire to an antenna discharge product, size of grounding conductors, location of antenna discharge product, connection to grounding electrodes, and requirements for grounding electrode.
18.SERVICING
Do not attempt to service this product yourself as opening or removing covers may expose you to dangerous voltage or other hazards. Refer all servicing to qualified service personnel.
19.REPLACEMENT PARTS
When replacement parts are required, be sure the service technician uses replacement parts specified by the manufacturer or those that have the same characteristics as the original part. Unauthorized substitution may result in fire, electric shock or other hazards.
20.SAFETYCHECK
Upon completion of any service or repairs to this product, ask the service technician to perform safety checks to determine that the product is in proper operating condition.
21.WALL OR CEILING MOUNTING
The product should be mounted to a wall or ceiling only as recomended by the manufacturer.
22.DAMAGE REQUIRING SERVICE
Unplug the product from the wall outlet and refer servicing to qualified service personnel under the following conditions:
a.When the power-supply cord or plug is damaged.
b.If liquid has been spilled, or objects have fallen into the product.
c.If the product has been exposed to rain or water.
d.If the product does not operate normally by following the operating instructions. Adjust only those controls that are covered by the operating instructions, as an adjustment of other controls may result on damage and will often require extensive work by a qualified technician to restore the product to its normal operation.
e.If the product has been dropped or the cabinet has been damaged.
f.When the product exhibits a distinct change in performance - this indicates a need for service.
23.HEAT
The product should be situated away from heat sources such as radiators, heat registers, stoves, or other products (including amplifiers) that produce heat.
24.NOTE TO CATV SYSTEM INSTALLER
This reminder is provided to call the CATV system installer’s attention to Article 820-40 of NEC that provides guidelines for proper grounding and, in particular, specifies that the cable ground shall be connected to the grounding system of the building, as close to the point of cable entry as practical.
3

IMPORTANT SAFETY INSTRUCTIONS (CONTINUED)
FCC NOTICE:
This equipment has been tested and found to comply with the limits for a Class B digital device, pursuant to part 15 of the FCC Rules. These limits are designed to provide reasonable protection against harmful interference in a residential installation. This equipment generates, uses, and can radiate radio frequency energy and, if not installed and used in accordance with the instructions, may cause harmful interference to radio communications. Howeve, there is no guarantee that interference will not occur in a particular installation. If this equipment does cause harmful interference to radio or television reception, which can be determined by turning the equipment off and on, the user is encouraged to try to correct the interference by one or more of the following measures:
=Reorient or relocate the receiving antenna.
=Increase the separation between the equipment and receiver.
=Connect the equipment into an outlet on a circuit different from that to which the receiver is connected.
=Consult the dealer or an experienced radio/TV technician for help.
FCC Caution:
To assure continued compliance, follow the attached installation instructions and use only shielded cables when connecting to other devices. Also, any changes or modifications not expressly approved by the party responsible for compliance could void the user’s authority to operate the equipment.
4

Table of Contents |
|
Warnings and Cautions |
|
Welcome ................................................................................ |
1 |
UL Safety Instructions ........................................................ |
1-3 |
FCC Notice ............................................................................. |
4 |
Basic System Information |
|
Index ...................................................................................... |
5 |
Location of Controls & Indicators ........................................... |
6 |
Location of Jacks and Terminals ............................................ |
7 |
Main Display Indicators .......................................................... |
8 |
Remote Controller .................................................................. |
9 |
Important Safeguards and Precautions ................................. |
10 |
Features of This System ....................................................... |
11 |
Important Information Regarding This Manual ........................ |
11 |
Types of Discs That Can be Played on This System ................. |
12 |
Notes on Disc Handling ....................................................... |
13 |
Setting and Adjustments |
|
Using the SETUP Menu and Navigation Buttons ........................ |
31 |
SETUP Menu Listing ................................................................ |
32 |
TV Display Setting ................................................................ |
33 |
TV Type Setting (Multi /NTSC/PAL) ................................. |
33 |
Selecting Angle Mark ................................................................ |
34 |
Selecting The On Screen Display (OSD) Language .............. |
34 |
Selecting Captions .............................................................. |
35 |
Screen Saver Setting (SCR Saver) ..................................... |
35 |
Dynamic Range Setting ...................................................... |
35 |
Preferences |
|
Selecting the Language for Audio ........................................ |
36 |
Selecting the Language for Subtitles .................................... |
36 |
Selecting the Language for Disc Menus................................ |
36 |
Setting the Parental Control Level ........................................ |
37 |
Installations and Connections |
|
Unpacking.............................................................................. |
14 |
Inserting Batteries into the Remote Control ........................... |
14 |
Speaker System Connection ................................................. |
15 |
Antenna Connections ........................................................... |
16 |
TV and Optical Component Connections .............................. |
17 |
Connecting the AC power Cord ............................................ |
17 |
Basic System Set Up |
|
Speaker Positioning Information ....................................... |
18-19 |
Typical Speaker Set up ......................................................... |
20 |
Controls and Their Functions ................................................ |
21 |
Presetting Radio Stations .................................................. |
22 |
Recalling Preset Stations ...................................................... |
22 |
Changing Preset Stations .................................................. |
22 |
Last Station Memory .......................................................... |
22 |
Special Functions During Playback |
|
Zoom Control .................................................................. |
38 |
Angle Selection ..................................................................... |
39 |
Subtitle Language Selection ................................................ |
39 |
Audio Language Selection .................................................... |
39 |
Other Functions |
|
Listening to the Radio ....................................................... |
40-41 |
Bass and Treble Adjustments ........................................... |
41 |
Adjusting the Left/Right Balance ........................................... |
41 |
Center, Rear, and Subwoofer Level Adjustments................... |
41 |
Other Sound Effects ............................................................... |
41 |
Listening to an External Source ............................................ |
42 |
Nignt Playback Mode (DVD Only) ....................................... |
42 |
Speaker Configuration Setup ............................................. |
42 |
Headphone Jack ................................................................ |
42 |
Playing Discs |
|
Basic Playback ................................................................ |
23-24 |
Slow Motion Playback ........................................................... |
24 |
Frame By frame Advance (Step) .......................................... |
24 |
High-Speed Search (Fast Forward or Fast Reverse)............ |
24 |
Skipping Chapter or Tracks .................................................. |
24 |
Adjusting the Speaker Levels (TEST TONE) ........................ |
25 |
Understanding DVD Disc Menus ............................................ |
26 |
Repeat Playback .................................................................... |
27 |
A-B Repeat Playback ............................................................ |
27 |
Program Play (Audio CDs Only) ............................................ |
28 |
Selecting a Start Point by Chapter or Time Code ................... |
29 |
Selecting a CD Track Using Number Buttons .............................. |
29 |
Checking Disc information Using Display Button ................... |
30 |
Additional Information |
|
Troubleshooting ........................................................... |
43-44 |
Glossary ............................................................................... |
45 |
Specifications ....................................................................... |
46 |
Contact Customer Service .................................................... |
47 |
Warranty .............................................................................. |
48 |
5
LOCATION OF CONTROLS AND INDICATORS
Main Unit (Front View)
|
|
|
|
|
|
|
|
|
|
|
|
|
|
|
|
|
|
|
|
|
|
|
|
|
|
|
|
|
|
|
|
|
|
|
|
|
|
|
|
|
|
|
|
|
|
|
|
|
|
|
|
|
|
|
|
|
|
|
|
|
|
|
|
|
|
|
|
|
|
|
|
|
|
|
|
|
|
|
|
|
|
|
|
|
|
|
|
|
|
|
|
|
|
|
|
|
|
|
|
|
|
|
|
|
|
|
|
|
|
|
|
|
|
|
|
|
|
|
|
|
|
|
|
|
|
|
|
|
|
|
|
|
|
|
|
|
|
|
|
|
|
|
|
|
|
|
|
|
|
|
|
|
|
|
|
|
|
|
|
|
|
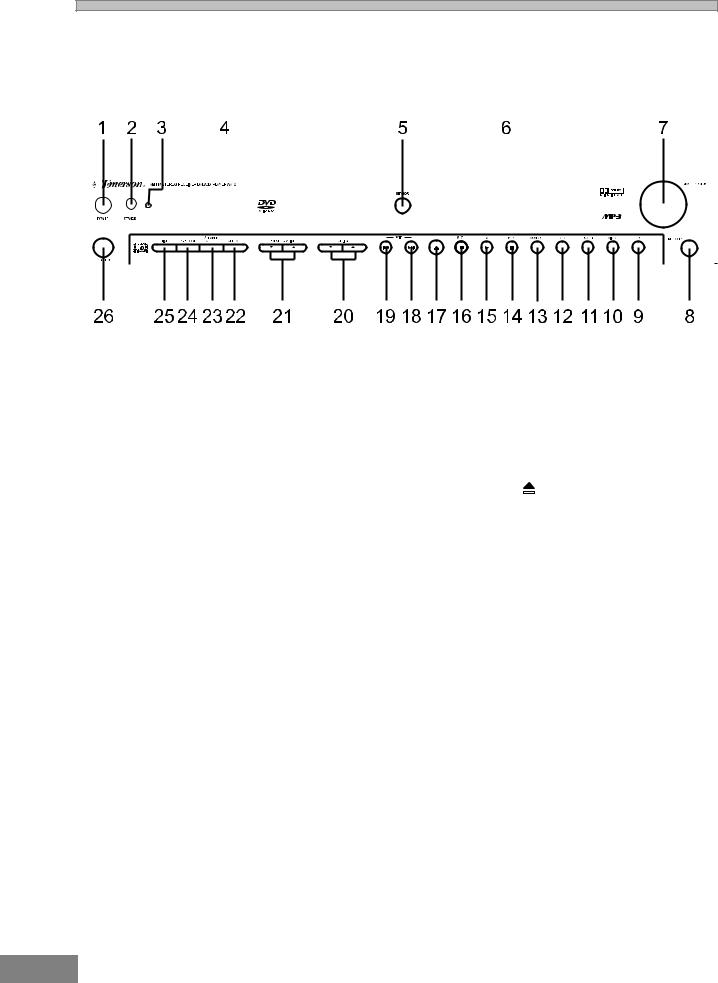
1. |
|
POWER button |
14. |
PAUSE ;Button |
|||||||||||||
2. |
|
STANDBY button |
15. |
PLAY 4 Button |
|||||||||||||
3. |
|
Standby LED |
16. STOP <Button |
||||||||||||||
4. |
|
Disc Tray |
17. |
OPEN/CLOSE |
|
|
Button |
||||||||||
|
|
||||||||||||||||
5. |
|
Remote SENSOR |
18. |
SKIP Forward : Button |
|||||||||||||
6. |
|
Display |
19. |
SKIP Reverse 9 Button |
|||||||||||||
7. |
|
MASTER VOLUME Control |
20. TUNING Up 5 |
/ Down 6 Button |
|||||||||||||
8. |
|
MEMORY Button |
21. PRESET STATION Up 5 / Down 6 Button |
||||||||||||||
9. |
|
TV Button |
22. |
SELECT Button |
|||||||||||||
10. |
VIDEO Button |
23. |
SPEAKER SETUP Button |
||||||||||||||
11. |
TUNER Button |
24. |
DSP MODE Button |
||||||||||||||
12. |
DVD Button |
25. |
NIGHT Button |
|
|
|
|
||||||||||
13. |
MONO/ST. Button |
26. |
PHONES Jack |
|
|
|
|
||||||||||
6
LOCATION OF JACKS AND TERMINALS
Main Unit (Rear View)
|
|
|
|
|
|
|
|
|
|
|
|
|
|
|
|
|
|
|
|
|
|
|
|
|
|
|
|
|
|
|
|
|
|
|
|
|
|
|
|
|
|
|
|
|
|
|
|
|
|
|
|
|
|
|
|
|
|
|
|
|
|
|
|
|
|
|
|
|
|
|
|
|
|
|
|
|
|
|
|
|
|
|
|
|
|
|
|
|
|
|
|
|
|
|
|
|
|
|
|
|
|
|
|
|
|
|
|
|
|
|
|
|
|
|
|
|
|
|
|
|
|
|
|
|
|
|
|
|
|
|
|
|
|
|
|
|
|
|
|
|
|
|
|
|
|
|
|
|
|
|
|
|
|
|
|
|
|
|
|
|
|
|
|
|
|
|
|
|
|
|
|
|
|
|
|
|
|
|
|
|
|
|
|
|
|
|
|
|
|
|
|
|
|
|
|
|
|
|
|
|
|
|
|
|
|
|
|
|
|
|
|
|
|
|
|
|
|
|
|
|
|
|
|
|
|
|
|
|
|
|
|
|
|
|
|
|
|
|
|
|
|
|
|
|
|
|
|
|
|
|
|
|
|
|
|
|
|
|
|
|
|
|
|
|
|
|
|
|
|
|
|
|
|
|
|
|
|
|
|
|
|
|
|
|
|
|
|
|
|
|
|
|
|
|
|
|
|
|
|
|
|
|
|
|
|
|
|
|
|
|
|
|
|
|
|
|
|
|
|
|
|
|
|
|
|
|
|
|
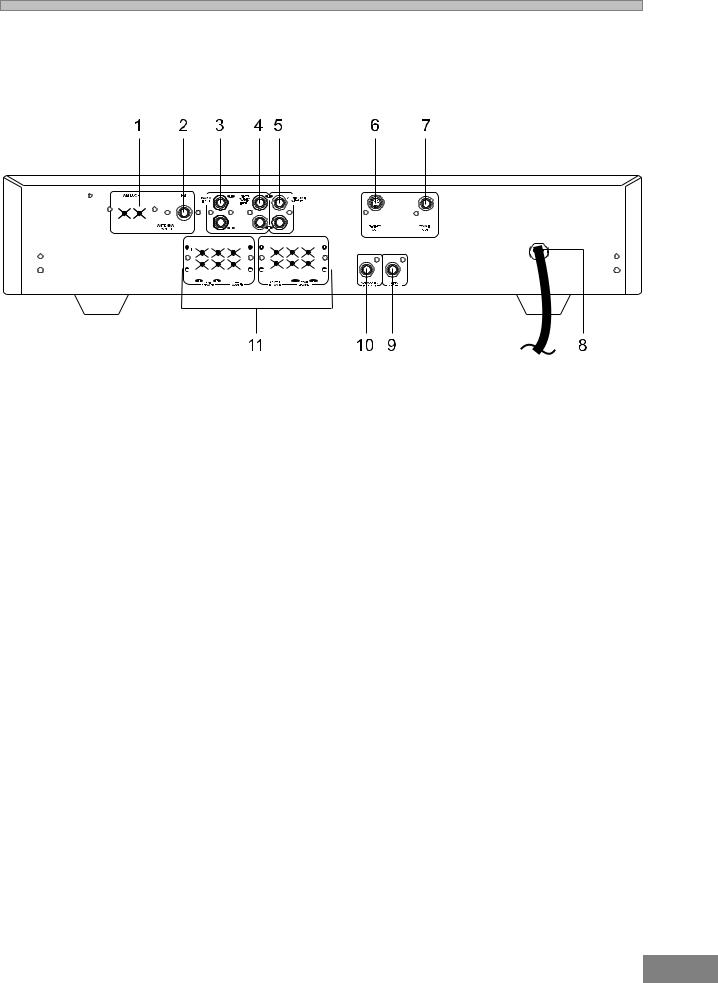
1. |
AM Loop Antenna Terminal |
7. |
|
|
Coaxial Digital Audio Output |
|||||||||||||||||||||||||||||||||||||||||
2. |
Coaxial FM Antenna Terminal |
8. |
|
|
|
Power Cord |
||||||||||||||||||||||||||||||||||||||||
3. |
TV/AUX Input |
9. |
|
|
|
Video Output |
||||||||||||||||||||||||||||||||||||||||
4. |
Video (Audio) Input |
10. |
Subwoofer Pre Output |
|||||||||||||||||||||||||||||||||||||||||||
5. |
Audio (DVD) Output |
11. |
Speakers (Main, Center, Rear & Subwoofer) |
|||||||||||||||||||||||||||||||||||||||||||
6. |
S-Video Output |
|
|
|
|
|
|
|
|
|
|
|
|
|
|
|
|
Output |
||||||||||||||||||||||||||||
7
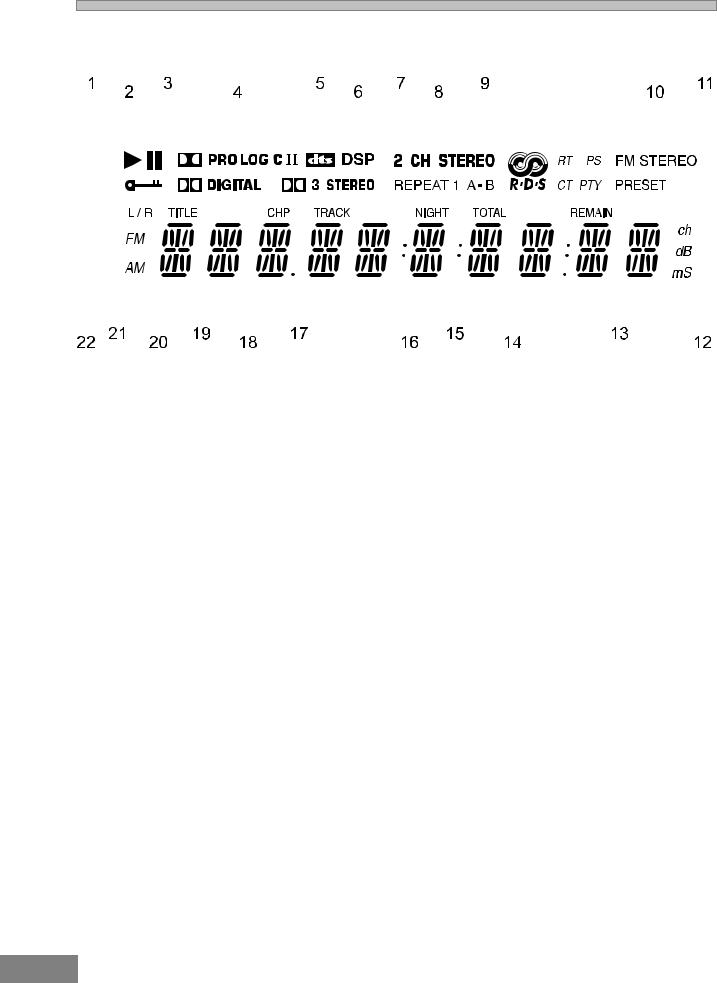
MAIN DISPLAY INDICATORS
|
|
|
|
|
|
|
|
|
|
|
|
|
|
|
|
|
|
|
|
|
|
|
|
|
|
|
|
|
|
|
|
|
|
|
|
|
|
|
|
|
|
|
|
|
|
|
|
|
|
|
|
|
|
|
|
|
|
|
|
|
|
|
|
|
|
|
|
|
|
|
|
|
|
|
|
|
|
|
|
|
|
|
|
|
|
|
|
|
|
|
|
|
|
|
|
|
|
|
|
|
|
|
|
|
|
|
|
|
|
|
|
|
|
|
|
|
|
|
|
|
|
|
|
|
|
|
|
|
|
|
|
|
|
|
|
|
|
|
|
|
|
|
|
|
|
|
|
|
|
|
|
|
|
|
|
|
|
|
|
|
|
|
|
|
|
|
|
|
|
|
|
|
|
|
|
|
|
|
|
|
|
|
|
|
|
|
|
|
|
|
|
|
|
|
|
|
|
|
|
|
|
|
|
|
|
|
|
|
|
|
|
|
|
|
|
|
|
|
|
|
|
|
|
|
|
|
|
|
|
|
|
|
|
|
|
|
|
|
|
|
|
|
|
|
|
|
|
|
|
|
|
|
|
|
|
|
|
|
|
|
|
|
|
|
|
|
|
|
|
|
|
|
|
|
|
|
|
|
|
|
|
|
|
|
|
|
|
|
|
|
|
|
|
|
|
|
|
|
|
|
|
|
|
|
|
|
|
|
|
|
|
|
|
|
|
|
|
|
|
|
|
|
|
|
|
|
|
|
|
|
|
|
|
|
|
|
|
|
|
|
|
|
|
|
|
|
|
|
|
|
|
|
|
|
|
|
|
|
|
|
|
|
|
|
|
|
|
|
|
|
|
|
|
|
|
|
|
|
|
|
|
|
|
|
|
|
|
|
|
|
|
|
|
|
|
|
|
|
|
|
|
|
|
|
|
|
|
|
|
|
|
|
|
|
|
|
|
|
|
|
|
|
|
|
|
|
|
|
|
|
|
|
|
|
|
|
|
|
|
|
|
|
|
|
|
|
|
|
|
|
|
|
|
|
|
|
|
|
|
|
|
|
|
|
|
|
|
|
|
|
|
|
|
|
|
|
|
|
|
|
|
|
|
|
|
|
|
|
|
|
|
|
|
|
|
|
|
|
|
|
|
|
|
|
|
|
|
|
|
|
|
|
|
|
|
|
|
|
|
|
|
|
|
|
|
|
|
|
|
|
|
|
|
|
|
|
|
|
|
|
|
|
|
|
|
|
|
|
|
|
|
|
|
|
|
|
|
|
|
|
|
|
|
|
|
|
|
|
|
|
|
|
|
|
|
|
|
|
|
|
|
|
|
|
|
|
|
|
|
|
|
|
|
|
|
|
|
|
|
|
|
|
|
|
|
|
|
|
|
|
|
|
|
|
|
|
|
|
|
|
|
|
|
|
|
|
|
|
|
|
|
|
|
|
|
|
|
|
|
|
|
|
|
|
|
|
|
|
|
|
|
|
|
|
|
|
|
|
|
|
|
|
|
|
|
|
|
|
|
|
|
|
|
|
|
|
|
|
|
|
|
|
|
|
|
|
|
|
|
|
|
|
|
|
|
|
|
|
|
|
|
|
|
|
|
|
|
|
|
|
|
|
|
|
|
|
|
|
|
|
|
|
|
|
|
|
|
|
|
|
|
|
|
|
|
|
|
|
|
|
|
|
|
|
|
|
|
|
|
|
|
|
|
|
|
|
|
|
|
|
|
|
|
|
|
|
|
|
|
|
|
|
|
|
|
|
|
|
|
|
|
|
|
|
|
|
|
|
|
|
|
|
|
|
|
|
|
|
|
|
|
|
|
|
|
|
|
|
|
|
|
|
|
|
|
|
|
|
|
|
|
|
|
|
|
|
|
|
|
|
|
|
|
|
|
|
|
|
|
|
|
|
|
|
|
|
|
|
|
|
|
|
|
|
|
|
|
|
|
|
|
|
|
|
|
|
|
|
|
|
|
|
|
|
|
|
|
|
|
|
|
|
|
|
|
|
|
|
|
|
|
|
|
|
|
|
|
|
|
|
|
|
|
|
|
|
|
|
|
|
|
|
|
|
|
|
|
|
|
|
|
|
|
|
|
|
|
|
|
|
|
|
|
|
|
|
|
|
|
|
|
|
|
|
|
|
|
|
|
|
|
|
|
|
|
|
|
|
|
|
|
|
|
|
|
|
|
|
|
|
|
|
|
|
|
|
|
|
|
|
|
|
|
|
|
|
|
|
|
|
|
|
|
|
|
|
|
|
|
|
|
|
|
|
|
|
|
|
|
|
|
|
|
|
|
|
|
|
|
|
|
|
|
|
|
|
|
|
|
|
|
|
|
|
|
|
|
|
|
|
|
|
|
|
|
|
|
|
|
|
|
|
|
|
|
|
|
|
|
|
|
|
|
|
|
|
|
|
|
|
1. |
Key Lock Indicator |
|
|
|
12. Channel / Decibel / Milliseconds Indicators |
|||||||||||||||||||||||||||||||||||||||||||||
2. |
Play/Pause Indicator |
|
|
|
13. Remain Time Indicator |
|||||||||||||||||||||||||||||||||||||||||||||
3. |
Dolby Digital Indicator |
14. |
Total Indicator |
|||||||||||||||||||||||||||||||||||||||||||||||
4. |
Dolby Surround Pro logic Indicator |
|
|
|
15. Night Indicator |
|||||||||||||||||||||||||||||||||||||||||||||
5. |
DTS Indicator |
16. |
Status Bar Indicator |
|||||||||||||||||||||||||||||||||||||||||||||||
6. |
DSP Mode Indicator |
17. |
Track Indicator |
|||||||||||||||||||||||||||||||||||||||||||||||
7. |
Dolby 3-Stereo Indicator |
|
|
|
18. Chapter Indicator |
|||||||||||||||||||||||||||||||||||||||||||||
8. |
2 Channel Stereo Indicator |
|
|
|
19. Title Indicator |
|||||||||||||||||||||||||||||||||||||||||||||
9. |
Repeat 1/A-B Indicator |
20. |
AM Band Indicator |
|||||||||||||||||||||||||||||||||||||||||||||||
10. FM Stereo Indicator |
21. |
FM Band Indicator |
||||||||||||||||||||||||||||||||||||||||||||||||
11. |
Preset Station Indicator |
|
|
|
22. Left / Right Channel Indicator |
|||||||||||||||||||||||||||||||||||||||||||||
8

REMOTE CONTROLLER
1.OPEN/CLOSE Button
2.KEY LOCK Button
3.PBC Button
4.SUB TITLE Button
5.TITLE MENU Button
6.AUDIO MENU Button
7.DIGEST Button
8.DVD MENU Button
9.AUDIO MODE Button 10. BOOKMARK Button 11. SEARCH Button
12. DISPLAY Button
13. RETURN Button
14. SEARCH REVERSE 7 Button
15. RANDOM Button
16. SKIP REVERSE 9 Button
17. PROGRAM Button
18. TREBLE Button
19. SLOW/R Button
20. BASS Button
21. TEST TONE Button
22. MUTE Button
23. DSP MODE Button
24. PRESET STATION UP 5 / DOWN 6 Button
25. TUNING UP 5 / DOWN 6 Button
26. SPEAKER CHANGE LEVEL +/- Buttons
27. VOLUME UP 5 / DOWN 6 Button
28. SLOW/F Button
29. PAUSE ; Button
30. STOP <Button
31. SKIP FORWARD : Button
32. PLAY 4 Button
33. SEARCH FORWARD 8 Button
34. ENTER Button
35. NAVIGATION ARROWS (3/4/5/6) 36. SETUP Button
37. REPEAT Button
38. REPEAT A-B Button
39. ZOOM Button
40. ANGLE Button
41. CLEAR Button
42. NUMBER 0 TO +9 Button
43. STANDBY Button
44. FUNCTION Button
9
Important Safeguards and Precautions
Power Cord Protection
To avoid any malfunctions of the unit, and to protect against electric shock, fire or personal injury, please observe the following:
ŸHold the plug firmly when connecting or disconnecting the AC power cord.
ŸKeep the AC power cord away from heating appliances.
ŸNever put any heavy object on the AC power cord.
ŸDo not attempt to repair or reconstruct the AC power cord in any way.
Location and Handling
ŸAir vents are provided in the cabinet to prevent excessive temperatures inside the unit. Do not place this unit in closed spaces, cover it, or otherwise block the vents.
ŸDo not place this unit in direct sunlight, or near heat sources.
ŸKeep this unit away from strong magnetic objects.
ŸDo not insert or drop anything into this unit through the air vents as this could cause serious damage; possibly resulting in fire.
ŸDo not place any object containing water or other liquids on this unit. In the event that liquid should enter the cabinet, unplug this unit immediately and contact the retailer or service center immediately.
ŸDo not remove the cabinet. Touching parts inside the cabinet could result in electric shock and / or damage to the unit.
ŸDo not use the unit in a car. The operation can not guaranteed.
Non-Use Periods
ŸWhen the unit is not being used, turn the unit off.
ŸWhen left unused for a long period of time, the unit should be unplugged from the household AC outlet.
No Fingers or Other Objects Inside
Do not put any foreign object on the disc tray.
Stacking
Place the unit in a horizontal position, and do not place anything heavy on it.
Condensation
Moisture may form on the pickup lens in the following conditions:
ŸImmediately after a heater has been turned on.
ŸIn a steamy or very humid room.
ŸWhen the unit is suddenly moved from a cold environment to a warm one.
If moisture forms inside this unit, it may not operate properly. In this case, turn on the power and wait about one hour for the moisture to evaporate.
On Adjusting Volume
Do not turn up the volume while listening to a portion with very low level inputs or no audio signals. If you do, the speakers may be damaged when a peak level portion is played.
If There is Noise Interference on the TV While a Broadcast is Being Received
Depending on the reception condition of the TV, interference may appear on the TV monitor while you watch a TV broadcast and the unit is left on. This is not a malfunction of the unit or the TV. To watch a TV broadcast, turn off the unit.
Service
ŸDo not attempt to service the unit yourself.
ŸPlease call 1-800-287-4871 for the name of the nearest service center.
Copyright
Audio-visual material may consist of copyrighted works which must not be recorded without the authority of the owner of the copyright. Please refer to relevant laws covering copyright protection.
Copy protection
This DVD player supports Macrovision copy protection. On DVD discs that include a copy protection code, if the contents of the DVD disc are copied using a VCR, the copy protection code prevents the videotape copy from playing normally.
Recommended measures for Optimum Performance
This unit is a precision device that is constructed using extremely accurate technology. Soiling or friction affecting the pickup lens or disc drive can impair the image quality. In the worst case, neither video nor audio will be played back. To obtain optimum picture quality, the player should be checked (cleaning and replacement of some parts) every 1,000 hours. Note that this period varies depending on the environment (tempera ture, humidity, dust, etc..) in which the player is used.
Do not attempt to clean the pickup lens yourself.
10

Features of This System
ŸDVD player with built-in and Dolby Digital* decoder, supporting Dolby Pro Logic and Virtual Surround.
Ÿ5.1 Channel amplifiers and subwoofer.
ŸAM/FM digital tuner.
ŸCompatible with DVD, MP3, CD-R/RW, KODAK PHOTO CDs and CD-DA discs.
ŸDVD navigation functions.
ŸFluorescent front panel display and on screen display menu.
ŸFull function remote control.
*Manufactured under license from Dolby Laboratories. “Dolby”, “AC-3”, “Pro Logic” and the double-D symbol are trademarks of Dolby Laboratories. Confidential Unpublished Works. ã1992-1997 Dolby Laboratories, Inc. All rights reserved.
Important Information Regarding This Manual
ŸThe types of functions and operations that can be used for a particular disc vary depending on the features of that disc. In some cases, these functions and operations may differ from the descriptions given in this Operations Manual. In this event, follow the instructions given on the screen. This Operations Manual only covers basic disc operations.
ŸFor some operations, the 

 icon may appear on the screen. This indicates that the operation described in this Operations Manual is not available on the disc in the player.
ŸThe drawings about the TV screen and front panel display used in this Operations Manual are purely for the purposes of explanation. The actual displays may differ slightly from what are shown here.
11

TYPES of DISCS That Can be Played on This System
This player can playback discs bearing any of the following marks:
Note-1
ŸDVD players and discs are designed with region numbers which dictate the regions in which a disc can be played. If the region number on the disc you want to play does not match the region number in your DVD player, you will not be able to play the disc. If you try to play the DVD, the message“WRONG REGION” will appear on the screen display.
The region number for this DVD player is 1.
The region code of this player is printed on the rear of the unit.
Note-2
ŸThe specific playback functionality for some DVD and video CD discs is determined by the disc manufacturer. Because this DVD player plays disc data in accordance with the disc manufacturer’s guidelines, some functions may not be available on some discs.
Be sure to read the instructions provided with the disc.
The“Prohibited” icon 

 displayed during DVD player operation indicates that such manufacturer imposed restrictions apply.
Note-3
ŸThe audio on a DVD disc recorded in MPEG version 2.0 format may not play properly on some discs, only the image will appear in this case.
Discs that Cannot the Played
ŸYou cannot play CD-G, CD-EXTRA, CD-ROM and DVD-ROM discs.
ŸYou cannot play illegally produced discs.
ŸYou cannot play scratched discs.
ŸYou cannot play discs that are dusty, soiled or marked with fingerprints.
Icons used on DVD discs
Sample Icons:
Glossary of Disc Terms
ŸTitle (DVD)
The longest sections of picture or a music piece on a DVD, a movie, etc., for a picture piece on a video disc; or an album, etc., for a music piece on an audio disc. Each title is assigned a title number enabling you to locate the title you want.
ŸChapter (DVD)
Sections of a picture or a music piece that are smaller than titles. A title is composed of several chapters. Each chapter is assigned a chapter number enabling you to locate the chapter you want. Some discs may not contain chapters.
ŸTrack (Audio CD)
Sections of a music piece on an audio CD. Each track is assigned a track number enabling you to locate the track you want.
12
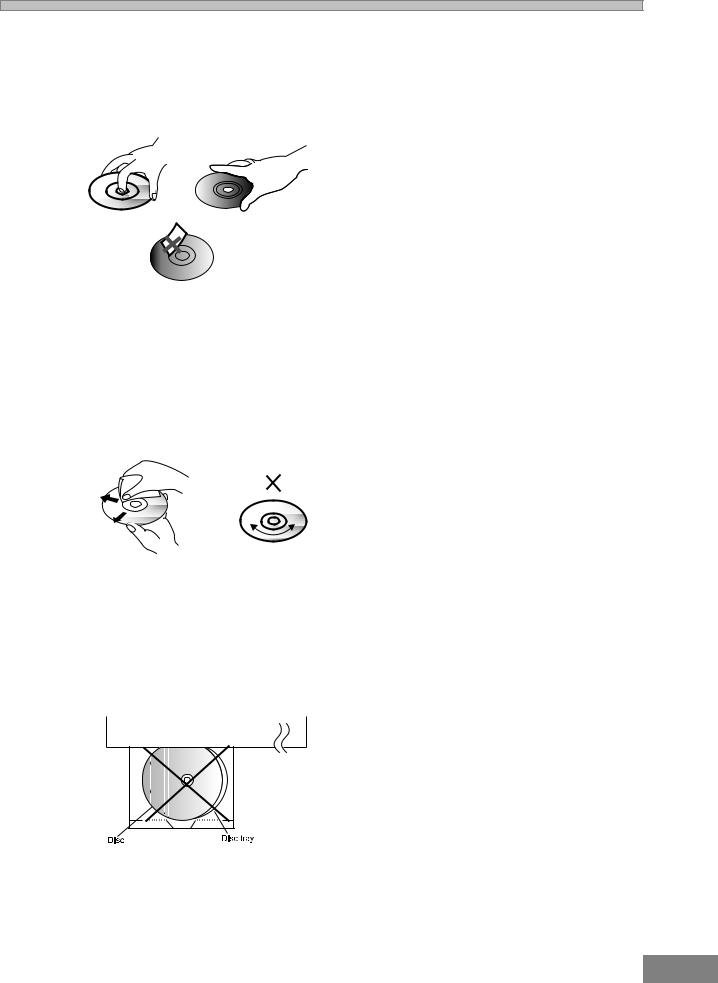
Notes on Discs
Disc handling precautions
ŸTo keep the disc clean, handle the disc by its edge. Do not touch the surface.
ŸDo not stick paper or tape on the disc.
If there is glue (or a similar substance) on the disc, remove the glue completely before using the disc.
ŸDo not expose the disc to direct sunlight or sources such as hot air ducts, or leave it in a car parked in direct sunlight as there can be considerable rise in temperature inside the car.
ŸAfter playing, store the disc in its case.
ŸDo not write on the label side with a ball-point pen or other writing utensils.
ŸBe careful not to drop or bend the disc.
Disc cleaning precautions
Ÿ Before playing, clean the disc with a cleaning cloth. Wipe the disc from the center out.
ŸDo not use solvents such as benzine, thinner, commercially available cleaners or anti-static spray intended for vinyl LPs.
Disc installing precautions
ŸDo not install more than 1 disc on disc tray.
ŸDo not place the disc on the tray up-side down.
ŸDo not try to close the disc tray when the disc is not installed and centered properly.
13
Installation
This section describes how to connect the system to the speakers, a TV monitor with audio / video input jacks and other video components. You cannot connect this system to a TV monitor which does not have a video input connector. Be sure to turn off the power of each component before making the connections.
Unpacking
Check that you have the following items:
ŸMain unit (1).
ŸSubwoofer (1).
ŸSpeakers (5).
ŸRemote control (1).
ŸVideo cable (4 feet x 1).
ŸAM loop antenna (1).
ŸFM antenna (1).
ŸOwner’s Manual (1).
ŸQuick Set Up Guide.
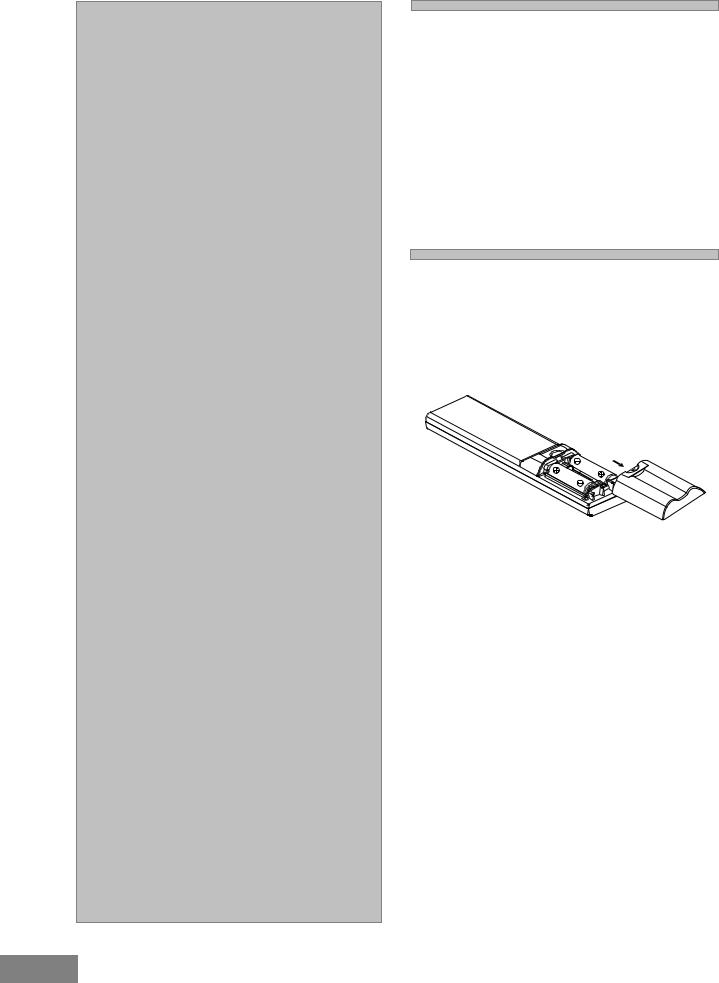
Inserting Remote Control Batteries
You can control the system using the supplied remote. Insert two batteries by matching the + and - on the batteries with the markings in the battery compartment. When using the remote, point it at the remote sensor on the front panel of this system.
Notes:
ŸDo not leave the remote in an extremely hot or humid place.
ŸDo not use a new battery with an old one.
ŸDo not drop any foreign object into the remote casing, particularly when replacing the batteries.
ŸDo not expose the remote sensor to direct sunlight or lighting apparatuses. Doing so many cause a malfunction.
ŸIf you will not use the remote for an extended period of time, remove the batteries to avoid possible damage from battery leakage and corrosion.
ŸUse only the size and type of batteries specified.
ŸBe sure to follow the correct polarity when installing the batteries as indicated in the battery compartment. Reversed batteries may cause damage to the device.
ŸDo not mix different types of batteries together (e.g. Alkaline and Carbon-zinc) or old batteries with fresh ones.
14
 Loading...