


Installation Manual
 5500 Series, Catalog A5510
Thin Web Server
software version 5
|
|
|
...................................................................................................Warnings |
|
i |
|
|
|
|
||
|
Welcome............................................................................................................. |
|
ii |
||
1 |
General |
|
|
||
|
Overview & Technical Specifications .............................................................. |
|
1-1 |
||
2 |
Mounting |
|
|
||
|
Installation ....................................................................................................... |
|
2-1 |
||
|
Outline and mounting drawing.................................................................. |
|
771812 |
||
3 |
Connections |
|
|
||
|
ATS network, phone line, power ..................................................................... |
|
3-1 |
||
|
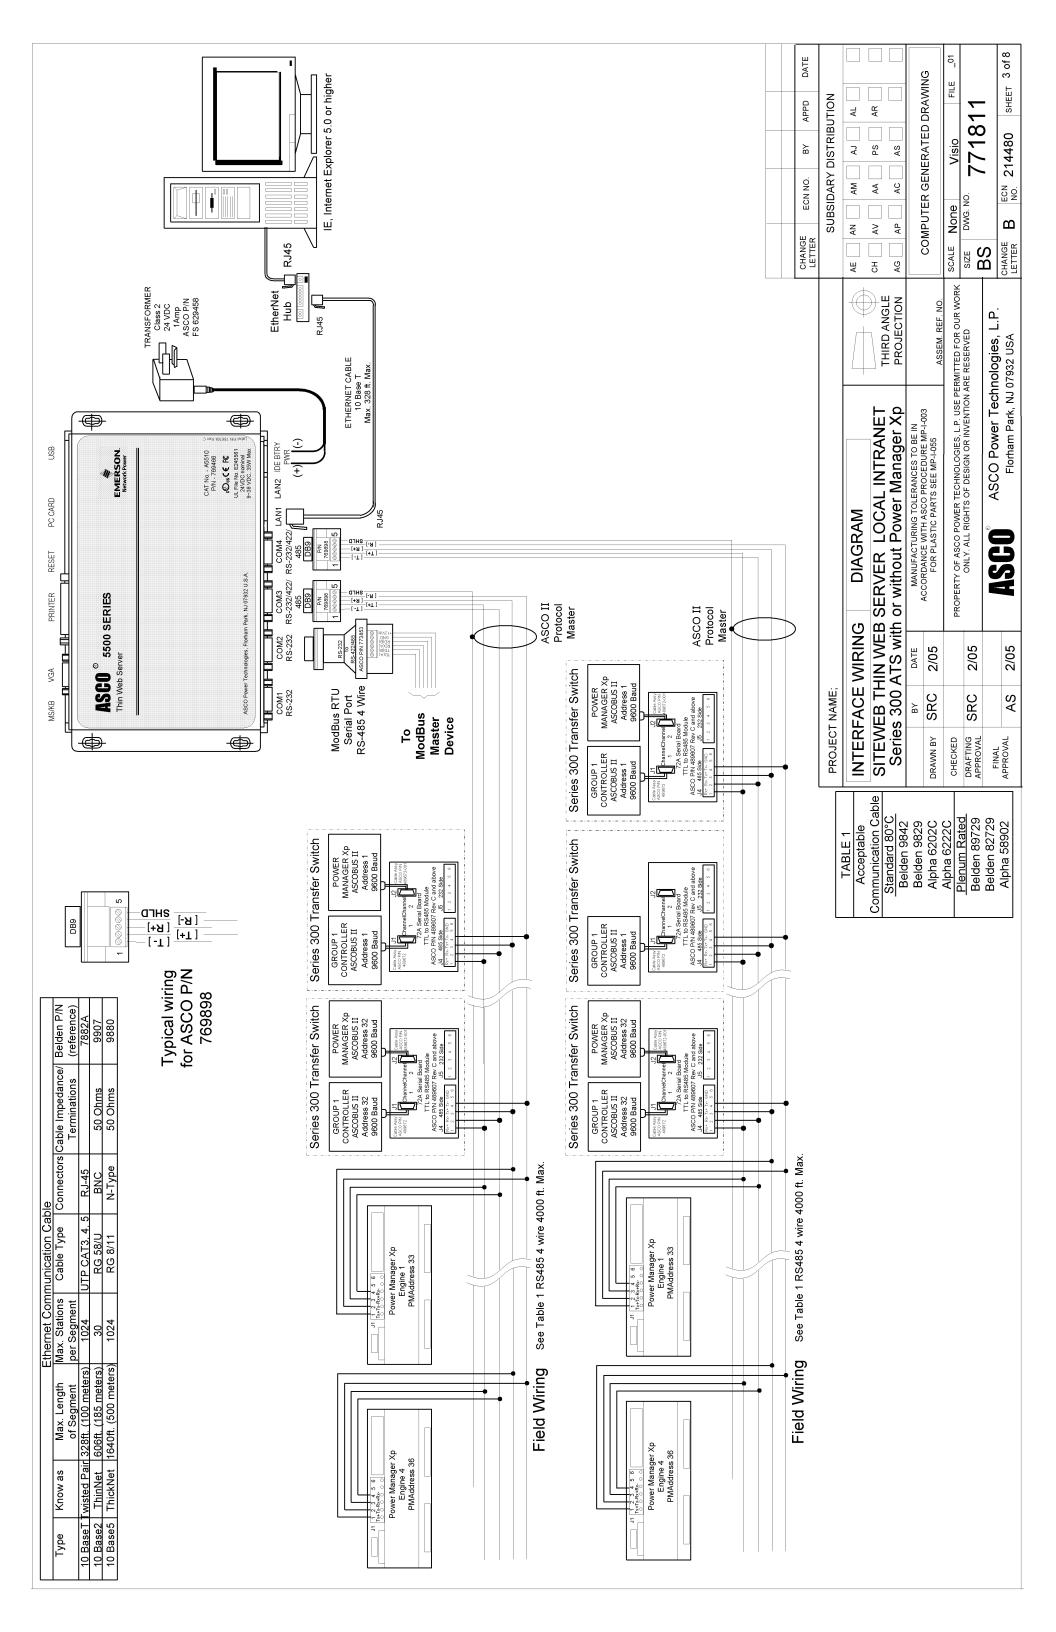
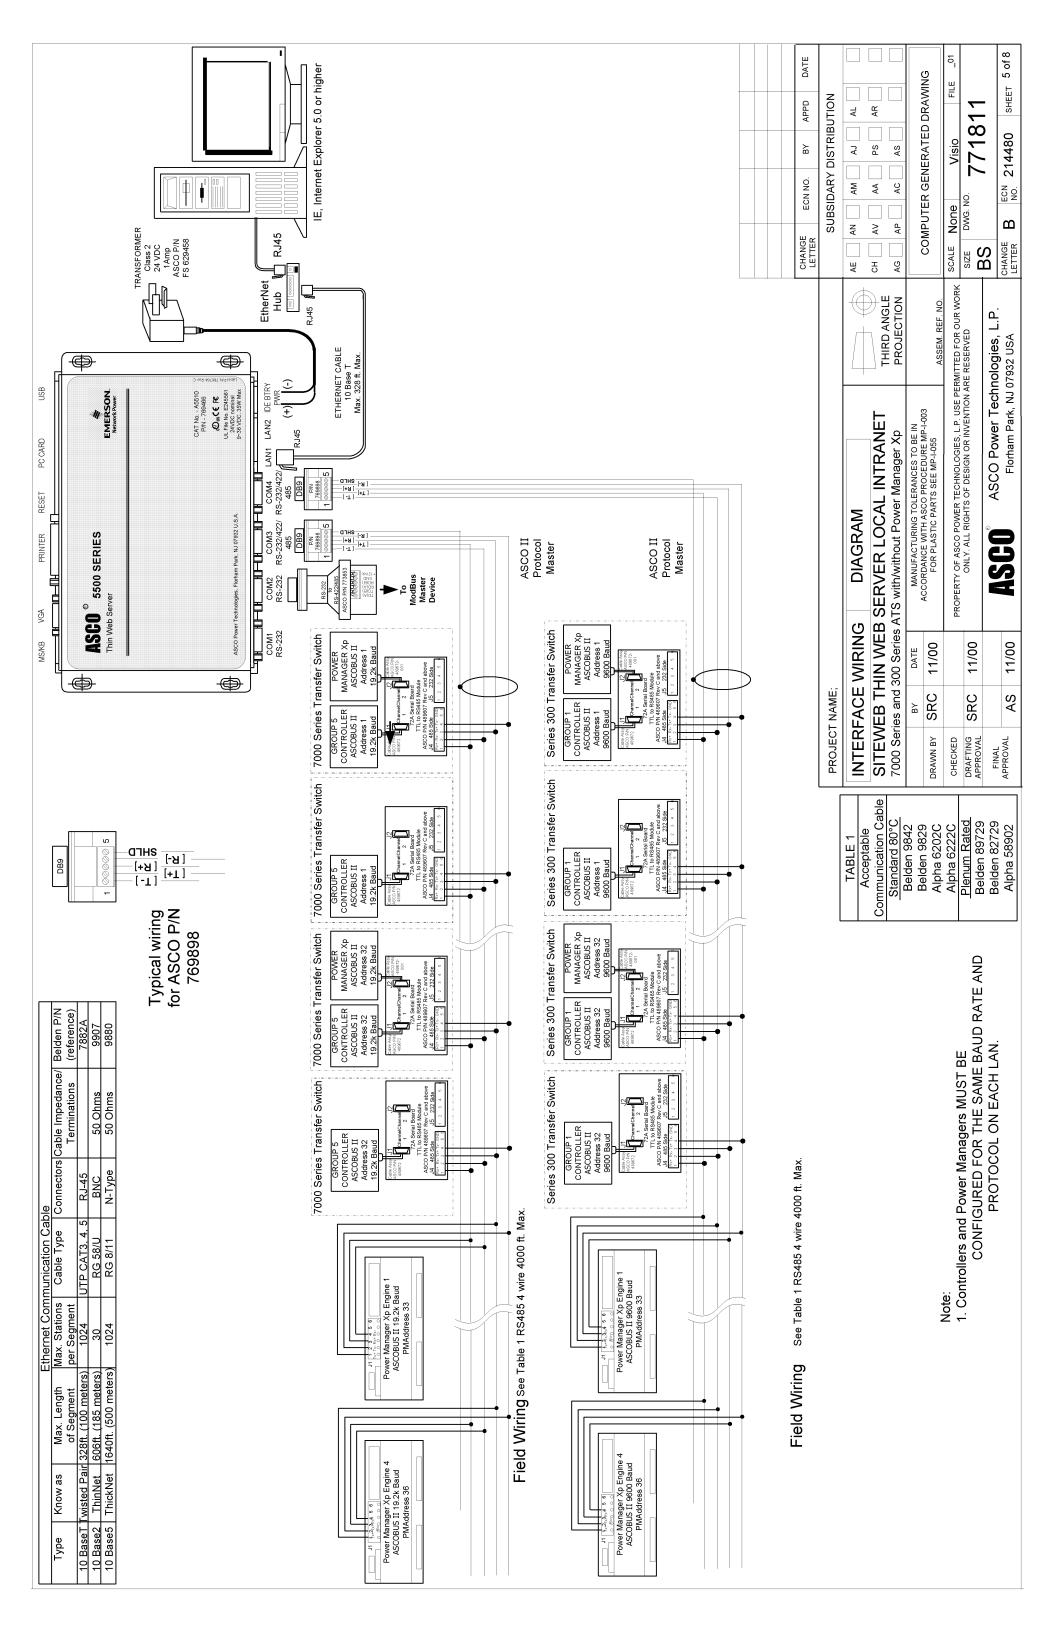
Interface wiring diagram ........................................................................... |
|
771811 |
||
4 |
Setup Procedure |
|
|
||
|
How to install the Thin Web Server Setup program ........................................ |
|
4-1 |
||
|
How to start and setup the TWS software through serial connection ............. |
|
4-3 |
||
|
Uninstalling the program.................................................................................. |
|
4-6 |
||
|
How to Establish Communication with the TWS via Ethernet connection |
...... 4-7 |
|||
5 |
File Management Utilities |
|
|
||
|
How to copy, delete, and view files in the Thin Web Server ........................... |
|
5-1 |
||
6 |
SSL Certificate |
|
|
||
|
How to install SSL certificate and private key files.......................................... |
|
6-1 |
||
7 |
Connectivity Module Configuration |
|
|
||
|
How to add configuration setting for a Connectivity Module ........................... |
|
7-1 |
||
8 |
Client Settings |
|
|
||
|
How to create an Ethernet TCP/IP network connection.................................. |
|
8-1 |
||
Troubleshooting ..................................................................................................... |
|
end |
|||
Appendix Communication Address Forms............................................... |
in the back |
||||
Index |
.................................................................................................................. |
|
|
last page |
|
381333-277 F
50 Hanover Rd, Florham Park, NJ 07932-1591 USA |
|
Call 1 800 800-2726 (ASC0) for sales or service |
www.ascopower.com |

Thin Web Server |
Warnings |
The ASCO 5500 Catalog A5510 Thin Web Server (TWS) provides real-time monitoring and control of ASCO Automatic Transfer Switches and enginegenerator sets over the Internet or an Intranet. These precautions must be followed by all users:
WARNING
Be sure that Users to whom you give access are knowledgeable enough to have control of load transfer and of the generator.
WARNING
Verify that conditions are safe for load transfer before you transfer or retransfer an Automatic Transfer Switch (ATS).
 WARNING
Fill in the Communication Address Forms in the back of this manual. Be sure that you enter correct information about each Automatic Transfer Switch and Power Manager and that address recorded on the Communication Address Forms corresponds with the address set in the ATS’s Controller and Power Manager.
© ASCO Power Technologies, L.P. 2008 Microsoft and Windows are registered trademarks of Microsoft Corporation.
All Rights Reserved.

Welcome Thin Web Server
Who Should Use this Installation Manual
This installation manual for the Thin Web Server should be used to assist individuals who will:
•install and connect the Thin Web Server
•configure the Thin Web Server with the setup program
Prerequisites |
A working knowledge of Windows® 2000 or XP is necessary to use this |
|
|
software. Use of a mouse is assumed and that you are right handed. |
|
|
If you are left handed see personalizing Windows (switch mouse buttons) |
|
|
in Windows Help Index and switch the left and right mouse buttons. |
|
|
|
Click means to press and release the left mouse button once when |
|
|
the cursor is on the appropriate location on the screen. |
|
|
Double click means to quickly press and release left mouse twice |
|
|
when the cursor is on the appropriate location on the screen. |
|
|
Right Click means to press and release the right mouse once when |
|
|
the cursor is on the appropriate location on the screen. |
|
|
Enter means to press the Enter key on the PC keyboard. |
Important information |
To properly set up the software, you will need the nameplate data and other |
|
that you will need |
information from all your Automatic Transfer Switches (up to 64) including: |
|
|
• ATS Name (your designation for the ATS) |
|
|
• ATS Address |
|
|
|
(set in each Controller, Comm. Interface Module, or Acc. 72A) |
|
• Voltage Rating, Ampere Rating, and number of Poles for each ATS |
|
|
• Catalog No. and Serial No. of each ATS |
|
|
• Type of ATS (ATS or ATS/BP [ATS with bypass-isolation switch]) |
|
|
• Power Manager Address (set in each Power Manager or Data Monitor) |
|
Manuals that |
Catalog 214A700 & 214A701 Data Monitor Operator’s Manual |
381333-143 |
||||
you may need |
Catalog 5200 |
& 5200T |
Power Manager |
Operator’s Manual |
381333-192 |
|
|
Catalog 5220 |
& 5220T |
Power Manager Xp |
Operator’s Manual |
381333-199 |
|
|
7000 Series ATS Group 5 Controller |
User’s Guide |
381333-126 |
|||
|
Catalog 5110 |
Serial Module |
Installation Manual |
381333-240 |
||
|
Series 300 ATS Communication Interface Module Instructions |
381339-189 |
||||
|
ASCO 940, 962, 436, 434,447, 448 ATS Acc. 72A Instructions |
381339-172 |
||||
Tip |
Ö |
Communication Address forms are included at the back to help you fill in |
||||
|
|
needed information on your ATSs and Power Managers / Data Monitors. |
||||
User’s Guide Refer to Power Monitoring & Control System User’s Guide 381333-276D for version 5.
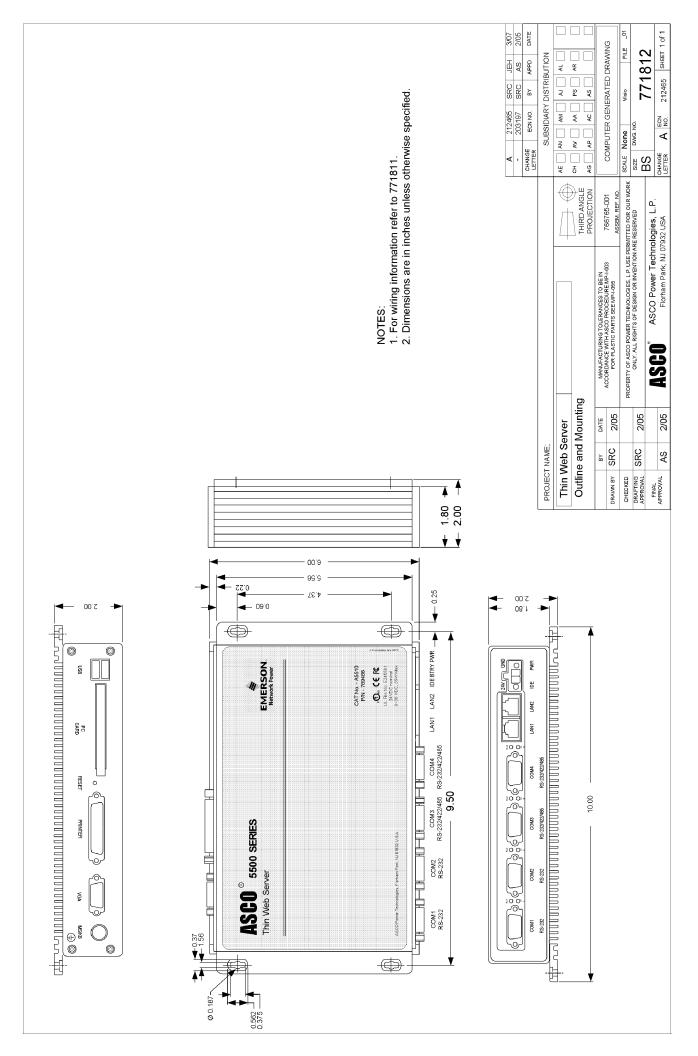
1-1 Overview, Specifications, Ground Connection |
Thin Web Server |
Overview
The ASCO 5500 Series Catalog A5510 Thin Web Server (TWS) provides real-time monitoring and control of ASCO Automatic Transfer Switches and engine-generator sets over the Internet or an intranet. The TWS also logs critical alarms and analog information.
The TWS can be used with ASCO 4000 & 7000 Series and Series 300 Automatic Transfer Switches that have Accessory 72A Communication Interface Modules.
Specifications
Power Requirements: 24 Vdc nominal (9-36 Vdc)
|
35 Watts max. |
Dimensions: |
6” H, 10” W, 2” D |
|
(15.2 cm, 25.5 cm, 5 cm) |
Weight: |
3.5 lb. (1.6 kg) |
Operating Temperature: 14 to 122° F (-10 to 50° C) at 5-85% relative humidity
Lights: |
power, IDE, & internal low |
|
battery alarm (RAM backup) |
LAN Ports: |
two 10/100 base T RJ45 |
USB Ports: |
two USB 1.1 |
Serial Ports (DB-9): |
two RS-232 and |
|
two RS-232/422/485 |
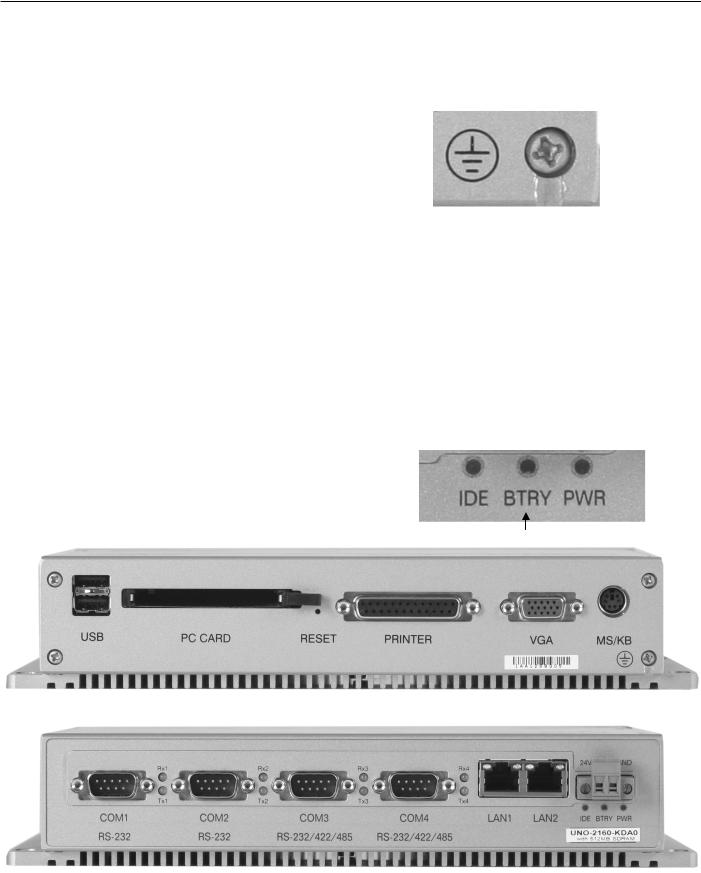
Ground Connection
The TWS has a chassis ground point on the top left corner. Back out the screw and connect a braided lead as short as possible to earth ground.
When the TWS is mounted on a door, a conductive strap must be used between the enclosure and the door. This connection provides proper grounding which does not rely upon the door hinges.
Backup Battery - type BR2032
The SRAM memory is retained by an internal backup battery. If the battery light BTRY comes on, this battery must be replaced. The battery is located on the left side of the main circuit board. De-energize all power first. Then remove the bottom four screws and slide the the cover down and off. Use 3 V lithium type BR2032 only; do not substitute.
Low battery light
top view
bottom view

Thin Web Server |
Mounting 2-1 |
Mount the Thin Web Server
Refer to the outline and mounting drawing 771812 and mount the Thin Web Server vertically to a flat surface in a clean and dry location. If it is mounted in an enclosure it must provide adequate ventilation for cooling.
Four 3/16” diameter mounting holes are provided in the back mounting plate. Securely mount the Thin Web Server as shown on the drawing.

Thin Web Server |
Connections 3-1 |
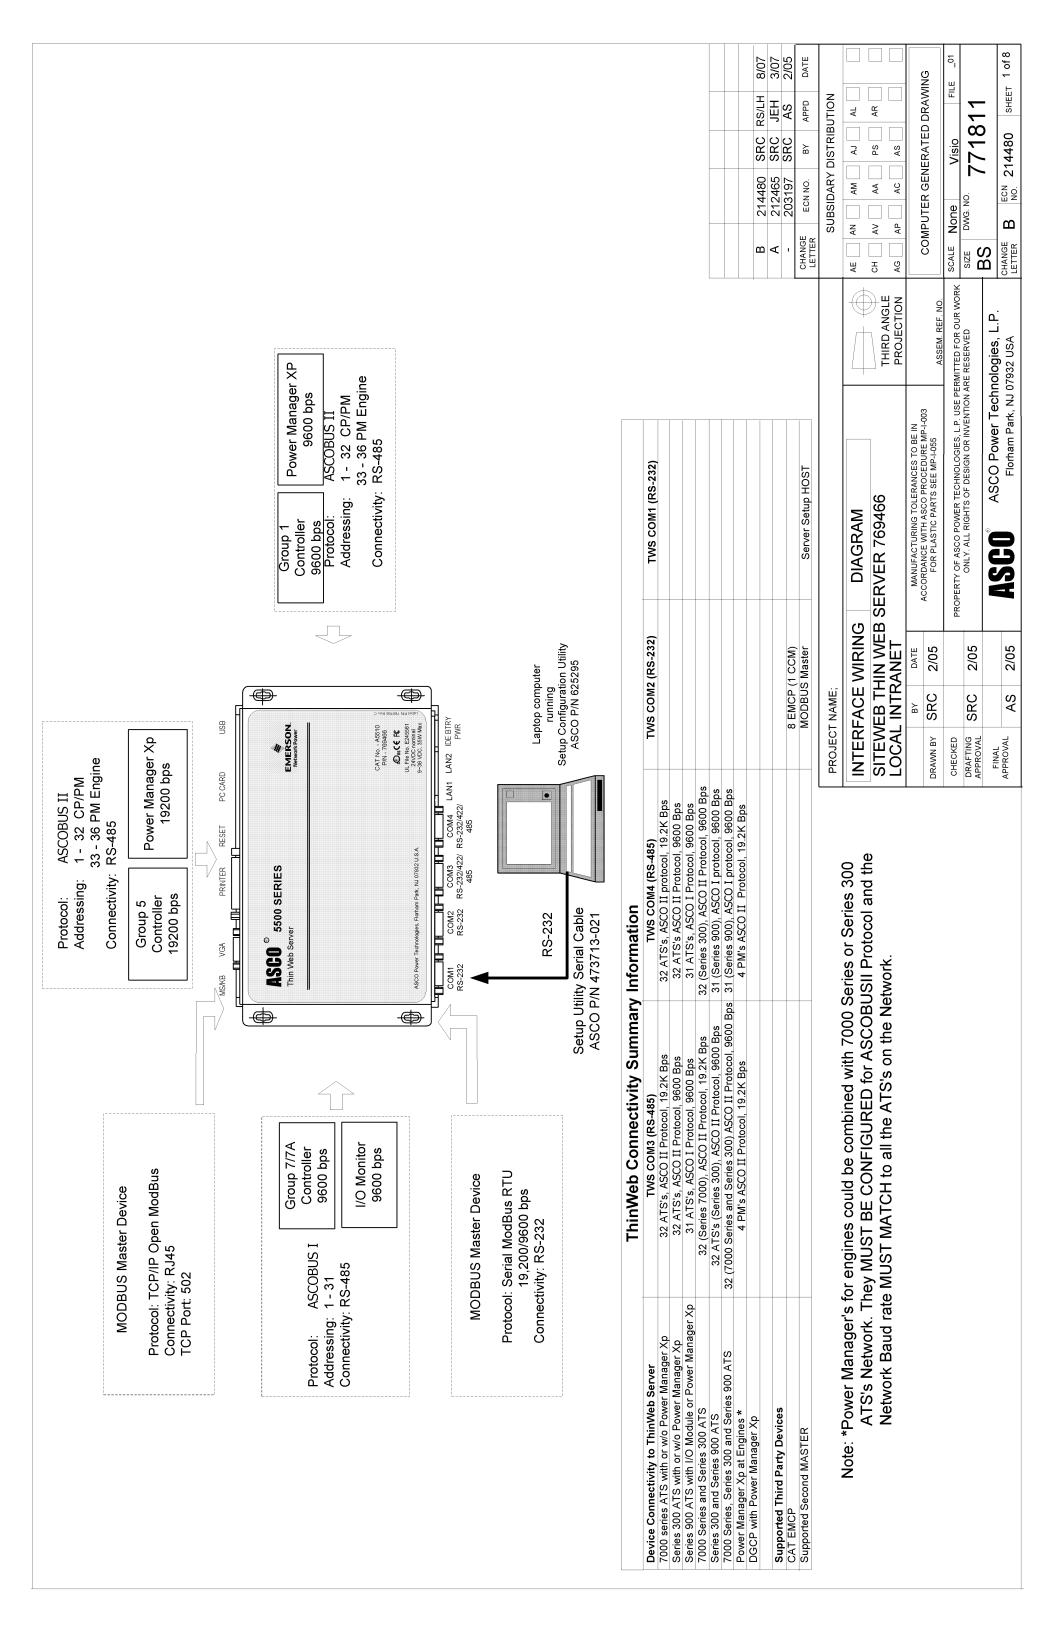
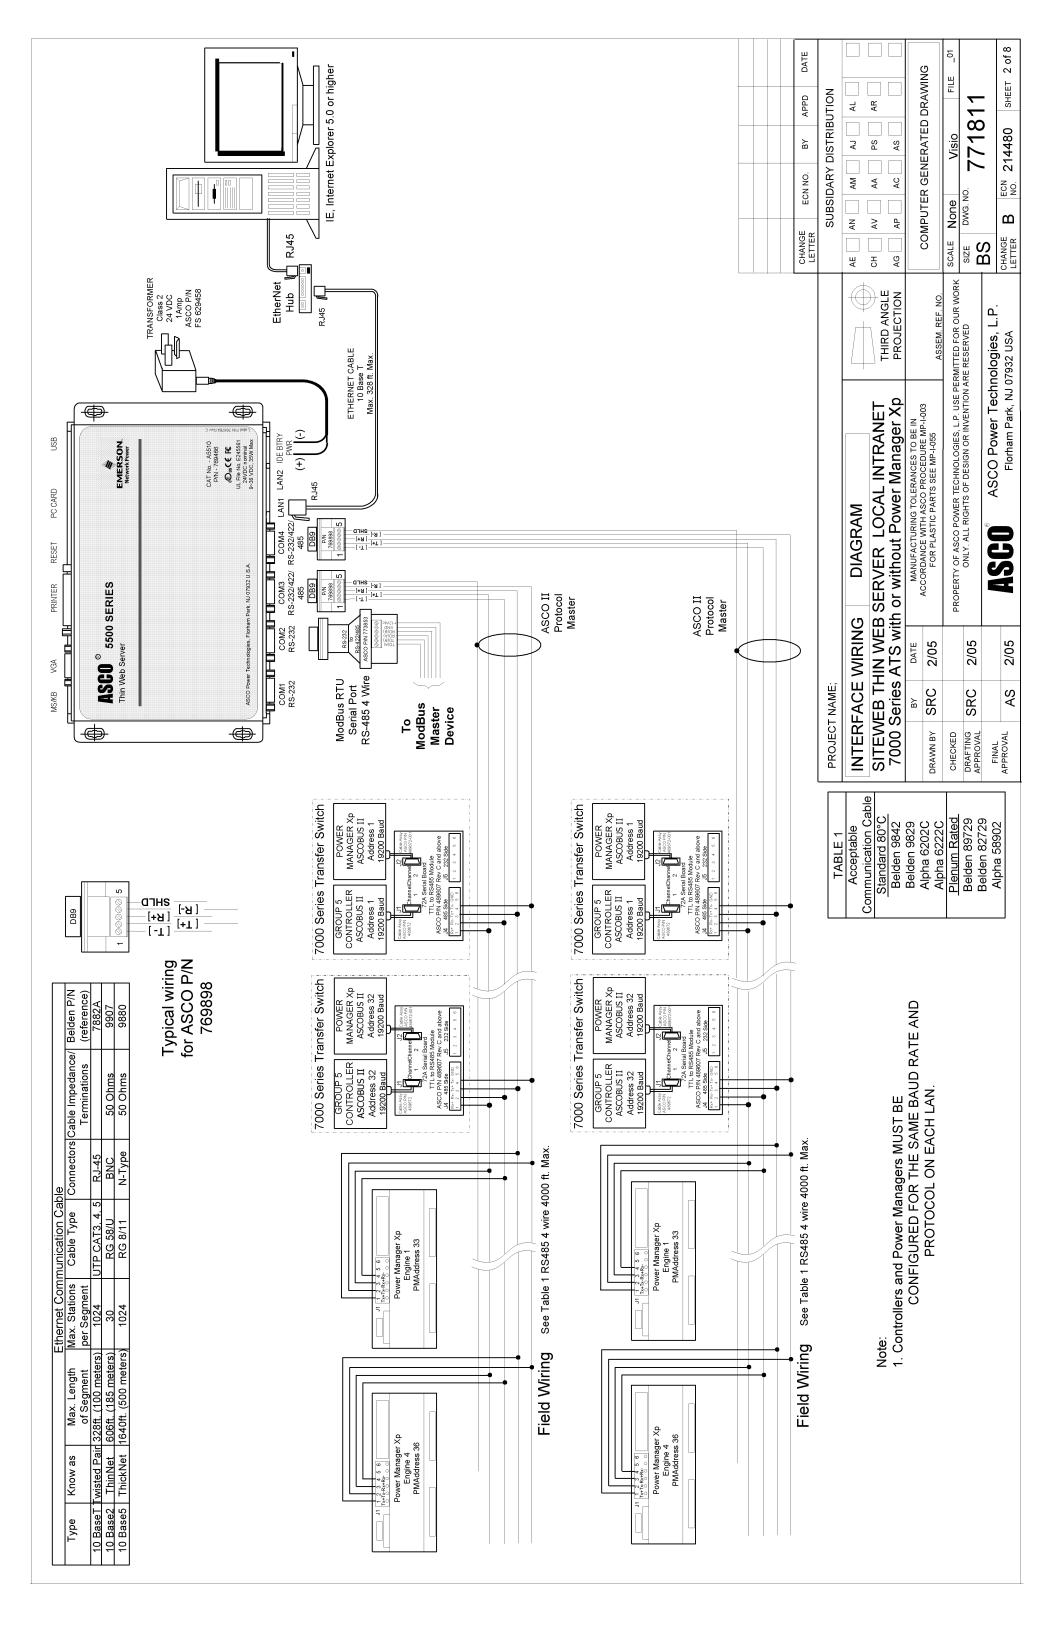
Connect the ATS Network
Refer to Interface Wiring Diagram 771811. Use only the recommended communication cable listed below to connect the ATS network to the Thin Web Server.
Standard 80º C |
Plenum Rated |
Belden 1419A, 9842, or 9829 |
Belden 89729 or 82729 |
Alpha 6202C or 6222C |
Alpha 58902 |
Connect the Power
Refer to Interface Wiring Diagram 711811. Use a UL-Approved Class 2, 24 VDC nominal power supply (plug-in transformer 120 VAC to 24 VDC, 1 amp.; ASCO part no. 629458). Connect it to the Phoenix connector (bottom right).

 Loading...