


DF36 Refrigerator Frost Free
Refrigerador Frost Free DF36
Manual
Manual deInstrucciones
Instructions

Instructions Manual
Thanks you for choosing our products. You will find all needed information on safety and appropriate use of your Refrigerator in this manual.
Before operating your Technical please read all instructions and keep this manual handy for further reference.
Keep Bill of Sales. The guarantee is only valid by presenting it to our Technical Service Center.
Do not remove identification label from appliance. The information contained on this label will be required by our Technical Service Center for any further replacement of parts or repair.
Environmental Tips
All packing material is recyclable. Therefore, sort out plastic, paper and cardboard and send them to recycling companies.
As a contribution to a clean environment, this product cooling gas is R134a (Carbonhydrofluoride – CHF), that does not cause damage to the ozone layer and has low greenhouse effect.
Contents |
|
Safety..................................................... |
03 |
Refrigerator Description....................... |
04 |
Installation ............................................ |
08 |
Operation .............................................. |
11 |
Cleaning and Maintenance.................. |
14 |
Troubleshooting..................................... |
17 |
Tips and Hints ...................................... |
20 |
Technical Specifications ....................... |
23 |
2
Safety
For Children
Avoid accidents. After removing Refrigerator from its packaging, keep packaging material out of children reach.
Don’t let children play with or around, or use Refrigerator, even when it’s turned off.
In case you find a package of silica gel inside your Refrigerator, throw it away and do not allow children play with it.
User / Installer
Unplug refrigerator during cleaning and maintenance.
Never unplug refrigerator by pulling on the electrical cord. Always use the plug.
Do not twist, bend or tie electrical cable.
If electrical cable is damaged, do not try to fix it. Call our Technical Service Center to replace it.
Check if Refrigerator is sitting on the power cord.
Do not alter Refrigerator specifications or characteristics.
Avoid any type of oil or grease to come in contact with plastic components of your Refrigerator.
Do not store medicine, toxic or chemical products in your refrigerator, as they may contaminate food.
Products labeled INFLAMMABLE or with the symbol of a small flame, CANNOT BE STORED in any refrigerator.An explosion may occur.
Do not freeze liquid in glass containers, sealed cans or plastic bottles, unless you find a written recommendation by manufacturer on the label of the product.
Never clean your refrigerator with flammable products, such as: alcohol, kerosene, gas, thinner, cleaning liquid, solvents, or with chemical or abrasive products, such as: detergent, acid or vinegar.
English
“Electrolux launched the first ecological non-freon |
|
refrigerator in Brazil in 1997.” |
3 |
|
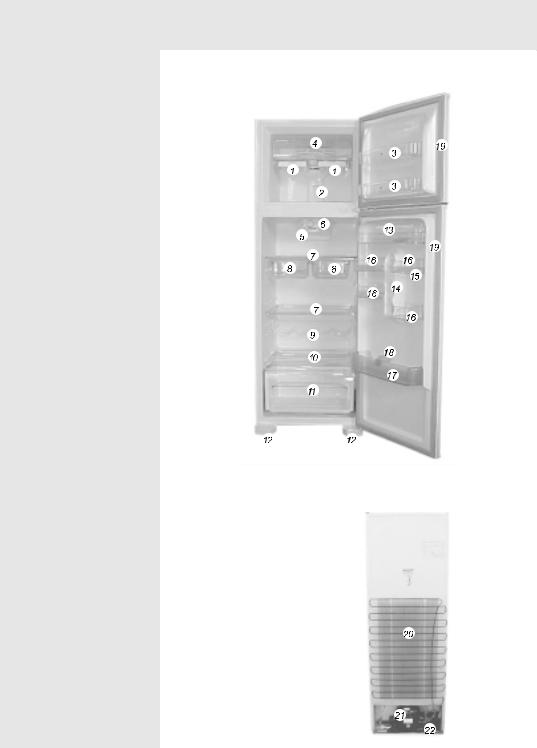
Refrigerator Description
DF36 Model
4

Parts
 Ice Cube Tray
 Air Circulation Control (Freezer / Refrigerator)
 Freezer Door Shelf
 Fast Freezing Compartment
 Lamp
Lamp
 Temperature Control Dial (Thermostat)
 Removable Shelf
 Adjustable and Removable Multi-Use Drawer
 Bottle Wired Shelf
 Vegetable / Fruit Tray
 Vegetable / Fruit Drawer
 Leveling Feet
 Dairy Compartment
 Can Dispenser
 Egg Tray (3 for each Refrigerator)
 Refrigerator Door Shelf
 Bottle Shelf
 Bootle Blocking Feature
 Irreversible Door
 Condenser
 Compressor
  Evaporation Collector
English
5
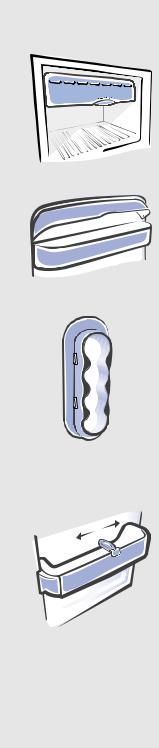
Fast Freezing Compartment (04)
This compartment freezes food much faster because of the tilting lid designed to retain the cold air.
Dairy Compartment (13)
Designed to store dairy products such as butter and cheese, etc. It is provided with a sliding protection lid.
Can Dispenser (14)
Designed to store 350ml cans.
Shelf and Bottle Blocking
Bottle Self (17):
Bottle shelf designed to store four 2 liter bottles.
Bottle Blocking Feature (18):
The Bottle Retainer feature was designed to prevent bottles fron tipping over. After fitting it to the shelf you can slide it to the right or to the left. See illustration.
Refrigerador Door Shelf (16):
To store a variety of foods, including egg racks.
6
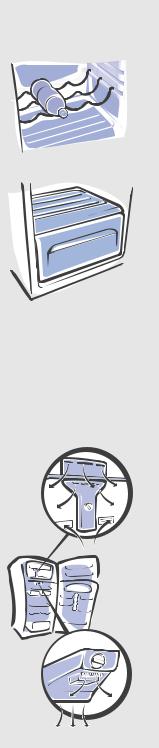
Wired Shelf for Bottles (9)
This shelf was conceived to store four bottles of up to 2,5 liters in the horizontal position inside the refrigerator compartment.
Vegetable / Fruit Drawer (11)
Protects vegetables fron direct contact with the cold air, keeping its moisture and freshness and prevents green vegetable fron drying out.
This drawer comes with runners for better sliding and also with a larger opening for better access to food.
Doors (19)
Doors are not reversible.
Air Flow System (TopFlow)
Freezer (2):
The Air Flow System was developed to distribute the cold air inside the freezer compartment to freeze food homogeneously. Do not place food or other objects close to the air outlet. It Could affect air circlation and refrigerator’s operation.
Refrigerador (6):
The Air Flow System was developed to distribute the cold air inside the refrigerator compartment to cool food homogeneously. Do not place food or other objects close to air outlet. It could affect air circulation and refrigerator’s operation.
7
Installation
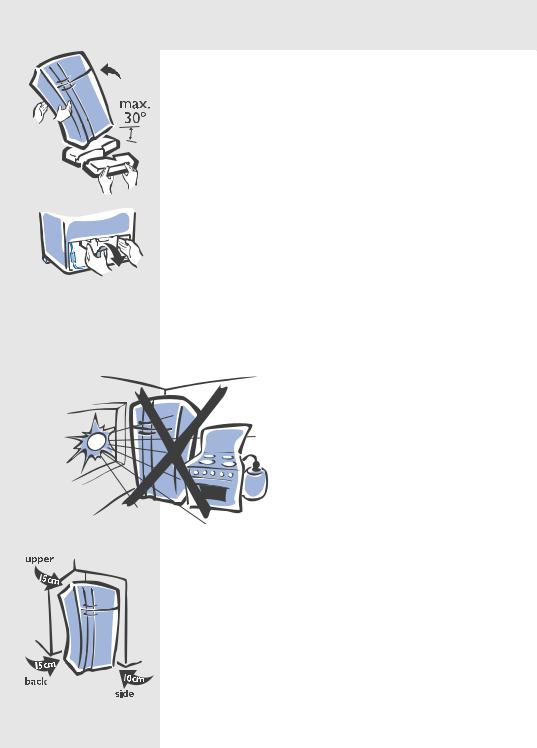
Removing the Base
Gently tilt Refrigerator to one of its sides.
Ask for help to remove the base.
Tilt Refrigerator to the other side and remove the remaining part of the base.
Remove compressor's block in back of your Refrigerator before connecting it. Do not leave block in your appliance.
Installation Site
Install Refrigerator in a ventilated place away from direct sunlight and heat sources such as stoves and ovens, flammable products or places where water is frequently used such as sinks or wash tanks.
Do not install Refrigerator outdoor.
Observe minimum recommended distances for installation: -Upper side: 15 cm
-Sides: 10 cm -Back: 15 cm
Check if door can be easily opened.
8
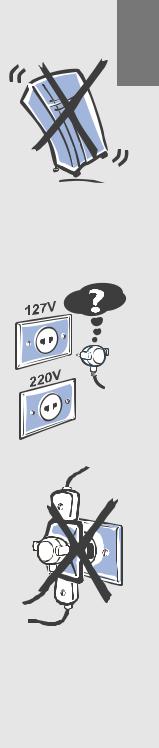
Leveling
Close Refrigerator's door before leveling it.
Check with a bubble level to see if the appliance is properly leveled on the floor and if its four leveling feet are firmly touching the floor.
Gently tilt appliance and adjust leveling feet.
Leveling avoids movements, vibration and eventual problem with your Refrigerator.
Do not use other than the original feet.
Wait for two consecutive hours before connecting your freezer to avoid any problems.
Every time you move your refrigerator, its leveling feet have to be adjusted.
Set the front leveling feet slightly higher than the rear feet, so that the door will close more easily.
Electrical Installation
Before connecting your Freezer, check if socket voltage is compatible to fridge voltage. Please refer to label on power cord next to plug or on identification label attached to Refrigerator.
Do not place Refrigerator on the power cord.
Connect your freezer to an exclusive outlet. Do not use extension cords or triple adaptors.
This kind of connection can cause overload on your electrical network, affecting refrigerator performance.
For your safety, ask a trusted electrician to check power network condition at Freezer installation site.
The wall electrical circuit where your Refrigerator will be plugged into must be at least 2,5 mm2 (14AWG) area of copper.
English
9

Check if maximum allowed voltage variation at installation site is according to table below. If voltage at the installation site is out of these limits, use a voltage regulator with no less than 2000 watts of capacity.
Allowable Voltage Variations
Voltage (V) |
Minimum(V) |
Maximum(V) |
|
|
|
127 |
106 |
132 |
220 |
196 |
242 |
Grounding
Do not use Refrigerator without grounding it.
The grounding cable (green or yellow and green cable) located at the back of your Refrigerator must be connected to an efficient grounded outlet and should not be connected directly to the electric power network or to water and/or gas pipes, electricity, telephone conduits, lightning rods, etc.
First Class appliances are delivered with a three prong grounding plug extra safety. Do not use adaptor to by pass it. Do not replace it for a two prong plug.
For your safety ask a trusted electrician to ground your appliance or refer to the Electrical Power Company.
10
Operation
Your refrigerator is provided with a Frost Free refrigation system to prevent ice formation. It makes cleaning and maintenance easier and refrigerator does not need to be defrosted.
The circulation and distribution of cold air fron the Frost Free system on the inside of the appliance, improve the freezeng of foods in the freezer compartment and make for faster homogeneous cooling in the refrigerator compartment preserving the nutritional properties os foods.
ToTurn it On or Off
To turn your Refrigerator on, just connect it in the electric current and regulate thermostat to desired position.
To turn it off, adjust temperature control to OFF position and remove plug from outlet.
Follow this procedure every time you need to disconnect your Refrigerator for prolonged absences, such as long trips.
Any time your Refrigerator is turned off, wait 10 minutes before turning it on again.
Loading and Supply
When using appliance for the first time or right after cleaning it:
1.Connect plug to the outlet and regulate temperature on MAX position.
2.Wait for two consecutive hours, to stabilize its internal temperature, before storing any food inside of it.
3.First fill internal shelves, leaving door compartment for last. Observe loading limits as indicated below.
4.If food is not cold, load Refrigerator gradually, allowing one hour between each loading.
5.Regulate thermostat up to the best position, following instructions on Item "How to Regulate Temperature".
English
11

Loading Limits
Freezing Capacity
This Refrigerator can freeze up to 6 kg of food every 24 hours.
The Freezer compartment preserves food under -18º C  .
.
Freezer's door shelves maintains food between -12ºC and -18ºC
 . It is designed to store frozen food to be consumed in a short period of time.
Air Circulation Control System
The air circulation control changes temperature inside freezer and refrigerator compartments according to the table below.
12
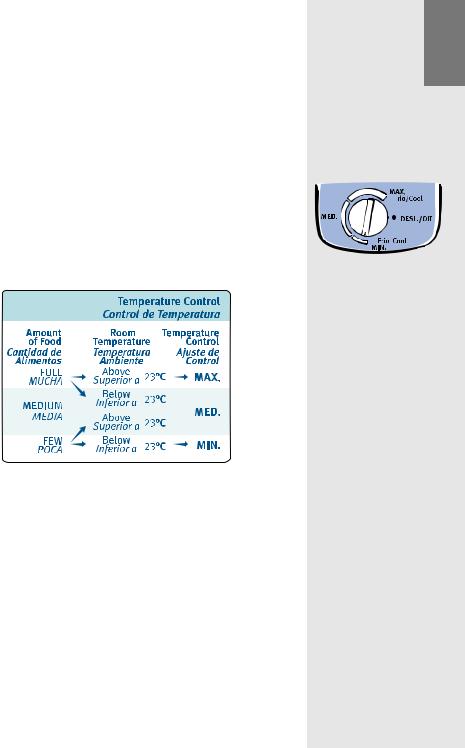
Refrigerator Temperature Adjustment
Thermostat Position:
As well as its adjustment are specifc for your DF36 Refrigerator. Therefore, they shold not be compared to control grading of any other refrigerator model or brand.
To set temperature the following itens should be considered:
1.The amount of food to be stored.
2.Room temperature
3.Do not exceed temperature control dial (MAX. and MIN.). The marking should match with the dial.
When regulating refrigerator temperature, do it gradually.
Avoid setting temperature in the MAX as it may freeze food inside refrigerator compartment and increase energy consumption.
Using the MIN. setting may affect refrigerator performance and will not decrease energy consumpition.
Refrigerator internal temperature depends on room temperature, the number of times the door is opened and the amount of food stored in it.
English
13
Cleaning and Maintenance
Never clean your Refrigerator with inflammable substances such as alcohol, kerosene, gas, thinner, solvents, and other chemical or abrasive products such as detergent, acid or vinegar.
Before any maintenance and/or cleaning work, unplug appliance from power supply.
After cleaning, replace accessories inside refrigerator.
If you spill any food on refrigerator surface clean it immediately as they may stain or damage the plastic parts of the appliance if they remain on it for long periods.
Do not use metallic tools, brushes, abrasive or alkaline products to clean plastic surfaces.
Before starting the cleaning, remember that humid objects may adhere to extremely cold surfaces. Therefore, do not touch low temperature parts of appliance with wet sponge, cloth or wet hands.
Rubber Door Seal
Clean them with a mild detergent and damp cloth. Rinse and wipe them carefully with a dry cloth. Be careful not to damage it.
Door seals are not Removable.
Every 6 months clean the back of your refrigerator using a vacuum cleaner or a duster.
Accumulated dust prevents condenser from functioning correctly, affecting your appliance’s performance and incurring greater energy consumption.
Always disconect refrigerator before cleaning. Do not touch condenser or compressor as the may be hot. Wait until they cool down.
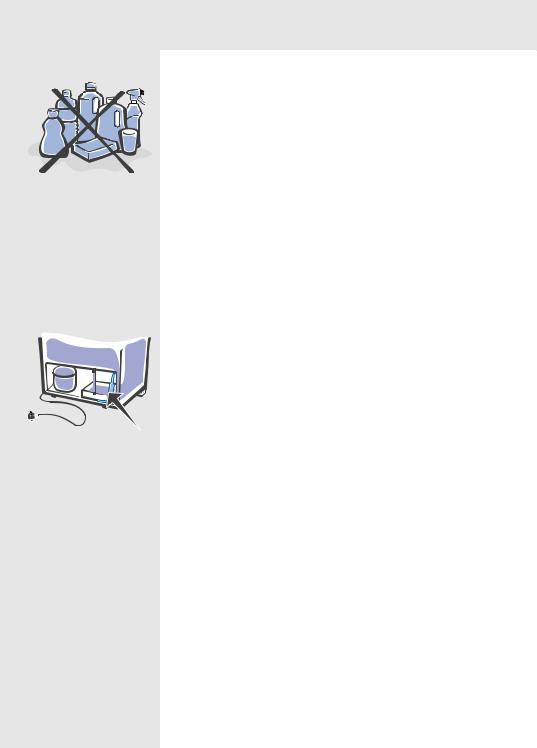
Cleaning the Water Collector
Your Refrigerator is provided water collector is located in rear of refrigerator to collect and eliminate defrost water through evaporation.
Cleaning the collector is not important factor for a good performance. Unplug refrigerator and clean it with a wet cloth. Do not remove water collector.
Do not directly spray with water any of the Refrigerator’s outer or inner surfaces.
14
Internal Surfaces
To clean the internal surfaces, use only a wet cloth dipped in water and sodium bicarbonate solution (one tablespoon of bicarbonate in one liter of water). Dry it carefully.
Plastic parts should not be washed with hot water.
Outer Surface
Use only a cloth dipped in water and mild soap to clean the outer part of your refrigerator, then wipe it carefully with a dry cloth.
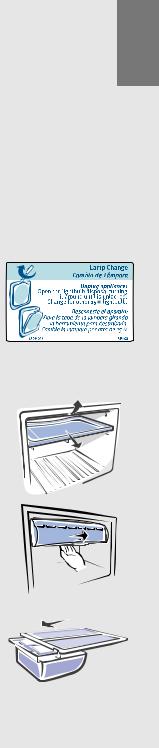
Changing the Light Bulb
Umplug the appliance from power suply and folow these steps:
Refrigerator Compartment:
1.Open the light bulb disposal turning it around.
2.Replace bulb with a new one with the same dimension, voltage and 15W power at the most.
How to Remove Accessories
All shelves are removable and can be rearranged to suit your needs.
Freezer Shelf:
Freezer shelf can be removed together with ice cube trays. Open the tilting cover, pull it as far as the stopper will allow and lift it.
Fast Freezing compartment lid:
Hold the lid in the middle and press bending it outwards until it releases fron the inside lateral fittings located at the internal box of the freezer. To put it back to its original position, follow the process in reverse.
Multi-Use Shelf:
The multi-use shelf and the holder are removable. They slide on the plastic shelf and can used according to needs. For the drawer-support unit to slide out, just move one os them the plastic shelf.
English
15
 Loading...