


WA S H E R - D RY E R
INSTRUCTION BOOKLET
EWD 1214 I
132 984 350 |
GB |
|

 Important Safety Information
It is most important that this instruction book should be retained with the appliance for future reference. Should the appliance be sold or transferred to another owner, or should you move house and leave the appliance, always ensure that the book is supplied with the appliance in order that the new owner can get to know the functioning of the appliance and the relevant warnings.
These warnings have been provided in the interest of safety. You MUST read them carefully before installing or using the appliance.
Installation |
● |
Before washing, ensure that all pockets are empty |
|
|
This appliance is heavy. Care should be taken when |
|
and buttons and zips are fastened. Avoid washing |
● |
|
frayed or torn articles and treat stains such as paint, |
|
|
moving it. |
|
ink, rust, and grass before washing. Underwired bras |
● |
It is dangerous to alter the specifications or attempt |
|
must NOT be machine washed. |
|
to modify this product in any way. |
● |
Any objects such as coins, safety pins, nails, screws, |
● |
All packing and transit bolts must be removed before |
|
stones or any other hard, sharp material can cause |
|
use. Serious damage can occur to the product and to |
|
extensive damage and must not be placed into the |
|
property if this is not adhered to. See relevant section |
|
machine. |
|
in instructions. |
● |
Garments which have been in contact with volatile |
● |
Any plumbing work required to install this appliance |
|
petroleum products should not be machine washed. |
|
should be carried out by a qualified plumber or |
|
If volatile cleaning fluids are used, care should be |
|
competent person. |
|
taken to ensure that the fluid is removed from the |
● |
Any electrical work required to install this appliance |
|
garment before placing in the machine. |
|
should be carried out by a qualified electrician or |
● |
Wash small items such as socks, laces, washable |
|
competent person. |
|
belts etc in a washing bag or pillow case as it is |
● |
Care must be taken to ensure that the appliance does |
|
possible for such items to slip down between the tub |
|
not stand on the electrical supply cable. |
|
and the inner drum. |
|
|
Only use the advised quantities of fabric softener. |
|
● |
If the machine is situated on a carpeted floor, please |
● |
|
|
adjust the feet in order to allow air to circulate freely. |
|
Damage to the fabric can ensue if you over-fill. |
|
|
Refer to the manufacturer’s recommendations of |
|
|
|
|
|
Child Safety |
|
quantities. |
|
|
This appliance is designed to be operated by adults. |
● |
As some duvets and eiderdowns should be washed |
● |
|
in large commercial machines because of their bulk, |
|
|
Children should not be allowed to tamper with the |
|
please check with the manufacturer of the item |
|
controls or play with the product. |
|
before washing in a domestic machine. |
● |
Pets and children have been known to climb into |
● |
Never tumble dry items that have had contact with |
|
washing machines. Please check your drum before |
|
chemicals such as dry cleaning fluid.These are of a |
|
use. |
|
volatile nature and could cause an explosion. |
● |
The glass door becomes very hot during the washing |
|
Only tumble dry items which have been washed in |
|
and drying cycle. Keep children away from the |
|
water or require airing. |
|
|
Plastic detergent dispensers should not remain in the |
|
|
vicinity of the appliance whilst it is in operation. |
● |
|
● Keep all packaging well away from children. |
|
drum during the drying cycle, as the plastic used is |
|
|
not designed to withstand the heat. If you wish to |
||
● Keep all detergents in a safe place out of children’s |
|
||
|
wash-through-to-dry you should use the |
||
|
reach. |
|
|
|
|
conventional detergent dispenser drawer. |
|
Use |
● |
Leave the porthole door slightly ajar between washes |
|
|
Always unplug the appliance and turn off the water |
|
to preserve the door seal. |
● |
● |
Under no circumstances should you attempt to repair |
|
|
supply after use. |
||
|
|
the machine yourself. Repairs carried out by |
|
|
Do not overload the appliance. See relevant section |
|
|
● |
|
inexperienced persons may cause injury or serious |
|
|
in the instruction book. |
|
malfunctioning. Contact your local Electrolux |
● |
Only wash fabrics which are designed to be machine |
|
Service Force Centre. Always insist on genuine |
|
washed. If in doubt, consult the care label on the |
2 |
Electrolux spare parts. |
|
clothes. |
|
|
|
|
|
|

Contents
For the User |
|
Wash Care Symbols |
|
Important Safety Information |
2 |
Maintenance and Cleaning |
|
Descaling |
|||
|
|
||
Your New Washer-Dryer |
4 |
After each wash |
|
Description of the Appliance |
5 |
Maintenance wash |
|
External cleaning |
|||
Detergent dispenser drawer |
5 |
||
Cleaning the dispenser drawer |
|||
Child safety feature |
5 |
||
Cleaning the drawer recess |
|||
The Control Panel |
|
||
6 |
Cleaning the filter |
||
Operating sequence |
7-11 |
The dangers of freezing |
|
Something Not Working |
|||
Washing 5 kg of white cotton at 95°C |
7 |
||
Service and Spare Parts |
|||
Load the laundry |
7 |
||
Measure out the detergent |
7 |
Customer care |
|
Measure out the fabric softener |
7 |
Guarantee Conditions |
|
Select the required options |
7 |
||
Select the required programme |
7 |
For the Installer |
|
Start the machine |
8 |
||
At the end of the programme |
8 |
Installation Instructions |
|
Washing 2 kg of mixed fabrics at 50°C |
9 |
||
Load the laundry |
9 |
Technical Specifications |
|
Measure out the detergent |
9 |
Unpacking |
|
Measure out the fabric softener |
9 |
||
Positioning |
|||
Select the required options |
9 |
||
Water inlet |
|||
Select the required programme |
9 |
||
Water drainage |
|||
Start the machine |
9 |
||
Levelling |
|||
At the end of the programme |
9 |
||
Special conditions |
|||
Drying 2.5 kg of cotton |
10 |
||
In the interest of the environment |
|||
Load the laundry |
10 |
||
Electrical connection |
|||
Select the programme |
10 |
Building-in |
|
Select the required time |
10 |
|
|
Start the machine |
10 |
|
|
At the end of the programme |
10 |
|
|
Autodrying 1 kg of mixed fabrics |
11 |
|
|
Load the laundry |
11 |
|
|
Measure out the detergent and fabric softener |
11 |
|
|
Select the required programme |
11 |
|
|
Select the required option |
11 |
|
|
Select the required time |
11 |
|
|
Start the machine |
11 |
|
|
At the end of the programme |
11 |
|
|
Washing and Drying Hints |
12 |
|
|
Which detergent to use?.... |
12 |
|
|
And in which form? |
12 |
|
|
Washing and Drying Programmes |
14-16 |
|
Guide to use the Instruction Book
The following symbols will be found in the text to guide you throughout the instructions:
 Safety instructions
 Hints and tips
  Environmental information
17
18-19
18
18
18
18
18
18
18-19
19
20-21
21
22
22
23
23
24
24
24-25
25-26
26
26
26
27
28-291
3

 Your New Washer-Dryer
Your new machine meets all modern requirements for effective treatment of laundry with low water, energy and detergent consumption.
It is gentle with your laundry, simple to use and easy to care for.
●Programme and temperature setting using the programme selector.
●The special wool programme with its new delicate wash system treats your woollens with extreme care.
●Automatic cooling of the wash water to 60°C before draining, with the 95°C programme. This reduces thermal shock to fabrics, helping to prevent creasing.
●The two drying programmes will give your wash that soft, relaxed feel whatever the weather.
 Ecological hints
To save water and energy and help protect the environment, we recommend that you follow these hints:
●Adjust the quantity of detergent according to the hardness of your water supply, the amount of laundry and the degree of soiling.
●Select a “Quick” option for lightly soiled laundry.
●A programme without prewash is sufficient for normally soiled laundry.
●Try to load the maximum drying capacity of the machine as small loads are uneconomical.
●Always load well spun laundry. The higher the spin speed, the lower the electricity consumption and the shorter the drying times.
 In the interest
of the environment
●Materials marked with the symbol  are recyclable.
●Check with your local Council or Environmental Health Office to see if there are facilities in your area for re-cycling this appliance.
●When the appliance is to be scrapped, cut off the power supply cable and make the door lock device unusable to prevent young children from being trapped inside.
●Help to keep your country tidy - use authorised disposal sites for your old appliance.
The symbol  on the product or on its packaging indicates that this product may not be treated as household waste. Instead it shall be handed over to the applicable collection point for the recycling of electrical and electronic equipment. By ensuring this product is disposed of correctly, you will help prevent potential negative consequences for the environment and human health, which could otherwise be caused by inappropriate waste handling of this product. For more detailed information about recycling of this product, please contact your local city office, your household waste disposal service or the shop where you purchased the product.
How do we help to protect the environment?
We use recycled paper!
Important
Your machine is fitted with a balance control device, which ensures the machine is stable during the spin.
If the wash load appears not to have been spun sufficiently at the end of the wash cycle, because it is not evenly distributed in the drum, the balance control device may have operated. It will therefore be necessary to redistribute the wash load manually and select a spin programme. For more detailed information see the section headed "Something Not Working".
4
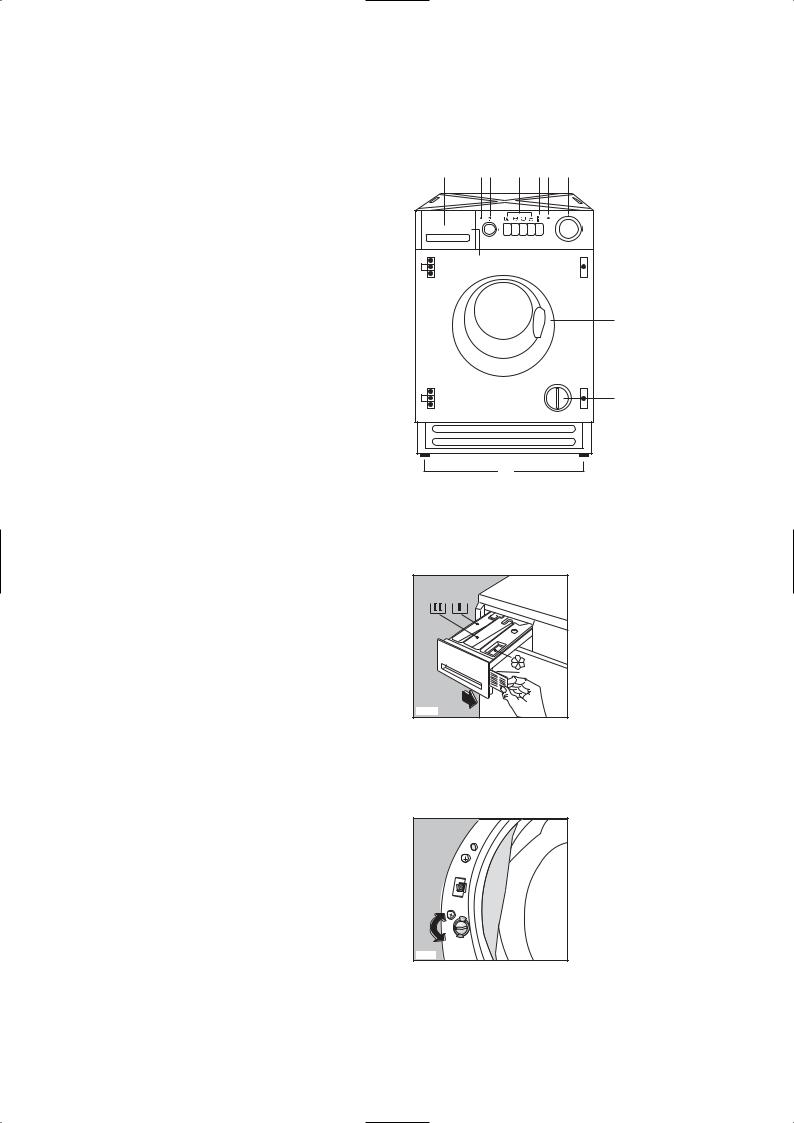
Description of the Appliance
1 |
Detergent dispenser drawer |
1 |
34 |
5 |
6 7 |
8 |
|
2 |
Programme guide |
||||||
|
|
|
|
|
|||
3 |
Drying indicator light |
|
|
|
|
|
|
4 |
Drying time selector dial |
|
|
|
|
EWD 1214 I |
|
5 |
“Option” buttons |
|
|
|
|
|
|
6 |
“ON/OFF” button |
|
2 |
|
|
|
|
7 |
“Mains-on” light |
|
|
|
|
|
|
8 |
Programme selector dial |
|
|
|
|
9 |
|
9 Door opening handle |
|
|
|
|
|||
10Filter
11Adjustable feet
10
11
Detergent dispenser drawer
 Prewash
 Main wash
  Fabric softener
Child safety feature
This machine incorporates a special child safety feature to prevent small children from being trapped inside the machine.
To activate this device, rotate the button (without pressing it) inside the door clockwise until the groove is horizontal. If necessary use a coin.
To disable this device and restore the possibility of closing the door, rotate the button anti-clockwise until the groove is vertical.
Programme chart |
P0239S |
P1131 |
5
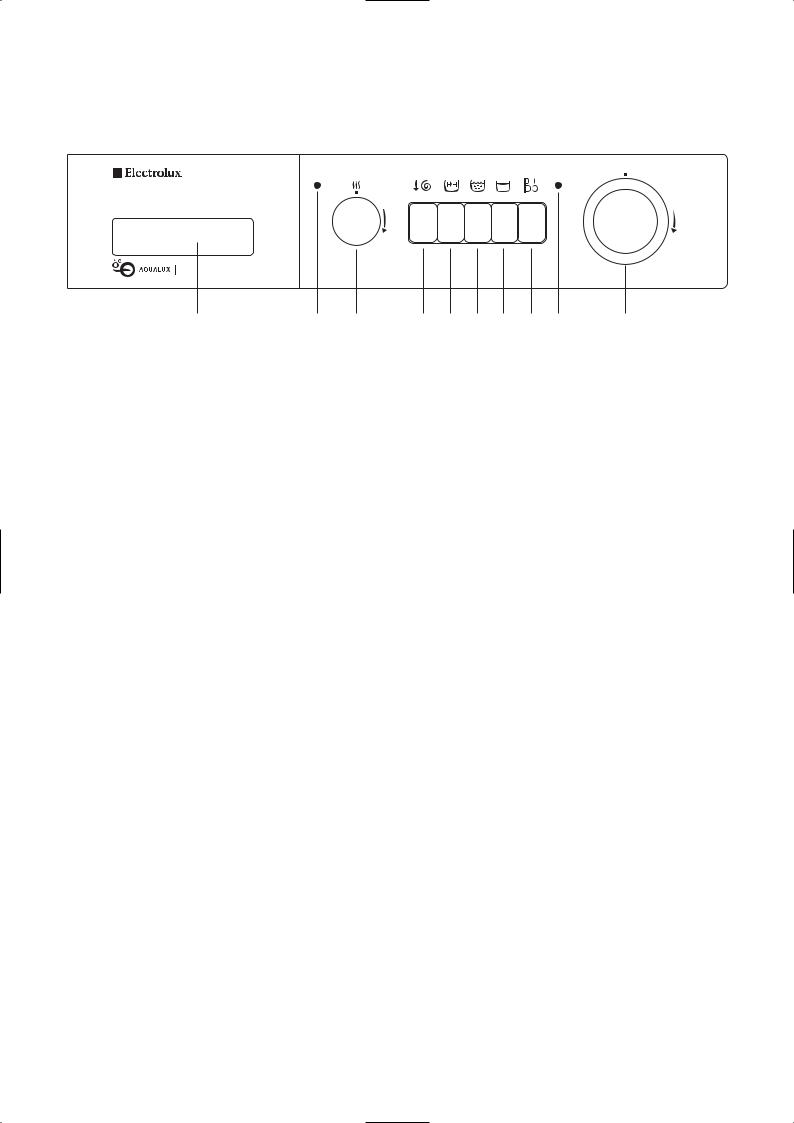
The Control Panel
1000
1 |
2 |
3 |
1 Detergent dispenser drawer
2 Drying indicator light
This light illuminates when the machine is drying.
3 Drying time selector dial 

Graduated up to 120 mins for cottons and synthetics, this dial allows you to select the desired drying time according to the type and quantity of laundry and the required degree of dryness:
-Blue sector for cottons
-Green sector for synthetics
Turn the dial clockwise only. Depress the dial to pop it out.
Cooling phase 
To allow the laundry to cool down, a cooling phase starts automatically 10 minutes before the end of drying and this phase must in no circumstances be reduced or interrupted.
4 Spin speed reduction button 
By depressing this button the spin speed is reduced as follows:
-cotton & linen: from 1200 rpm to 650 rpm;
-synthetics and wool: from 850 rpm to 650 rpm.
-delicates: from 650 rpm to 450 rpm.
Important!
In order to save energy and to avoid too long drying times we suggest not to reduce the spin speed when you wash and dry automatically.
EWD 1214 I
4 |
5 |
6 |
7 |
8 |
9 |
10 |
6 Super Rinse button 
By depressing this button on programmes for cottons and linens the machine will perform an additional rinse.
This is recommended for people who are allergic to detergents and in areas where the water is very soft.
7 Rinse Hold button
Press this button to make the machine stop with water in the drum after the last rinse.
This prevents any creasing which may occur if the clothes are left damp in the drum. When it is convenient for you to empty the machine, simply press this button again so that the machine can proceed to drain and spin, or turn the dial to the drain programme “R”.
If this button is not activated, the washing programmes will end with a spin.
Important!
This button is not compatible with the automatic washing & drying programme.
8 ON/OFF button 
By depressing this button the machine starts operating. When depressing it again, the machine stops.
The push button is provided with a child-proof safety lock. Move the small slider placed in the middle of the button downwards to lock the button in the «off» position.
9 Mains-on light
This light will illuminate when the machine starts working and goes out when the ON/OFF button is depressed again to switch the machine off.
5 Quick wash button 
By depressing this button on programmes A, B, C, D and H the wash time is reduced.
This is suitable only for garments which are lightly soiled.
10 Programme selector dial
With the programme selector dial you choose the desired washing and drying programme.
Turn it clockwise.
Depress the dial to pop it out.
Before setting the dial to any position the machine must be switched off by depressing the ON/OFF button.
6
Operating Sequence
Before the first wash, we recommend that you run a cotton cycle at 95°C, without any laundry in the machine, to remove any manufacturing residue from the drum and tub.
Pour 1/2 a measure of detergent into the dispenser drawer and start the machine.
WASHING 5 KG OF WHITE COTTON AT 95°C
Suppose you have 5 kg of normally dirty laundry to wash. It is white cotton and is suitable for high temperature washing.
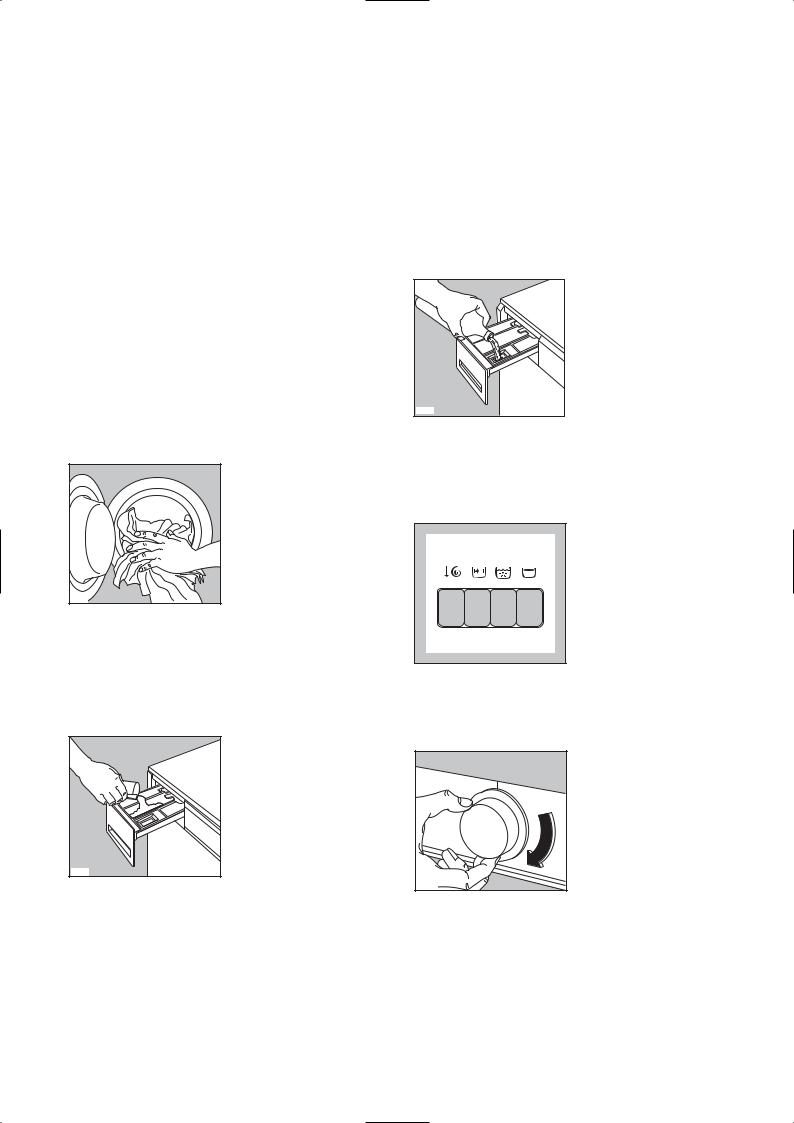
1. Load the laundry
Open the door by pulling the catch outward. Place the laundry in the drum, one item at a time,
shaking them out as much as possible. Close the door.
P0004
2. Measure out the detergent
Pull out the dispenser drawer until it stops.
Measure out the amount of detergent required and pour it into the main wash compartment  .
.
If you wish to carry out the prewash, pour detergent into the compartment marked  .
.
P0006 |
3.Measure out the fabric softener
If required, pour fabric softener into the compartment marked  (the amount used must not exceed the “MAX” mark in the drawer).
Close the drawer gently.
P0005 |
4. Select the required option(s)
Depress SPIN REDUCTION and/or QUICK WASH and/or SUPER RINSE and/or RINSE HOLD button, if required.
5. Select the required programme
Turn the programme selector dial clockwise to the programme B.
B |
P0429S |
7
6. Start the machine
Before starting up the machine check that:
●the appliance is plugged in
●the water supply taps are turned on
●the drain hose is correctly and securely positioned
●the door and the detergent dispenser drawer are closed.
Depress the ON/OFF button  .: the mains-on light will ill uminate and the machine starts operating.
P0471
7. At the end of the programme
The machine stops automatically.
If you have depressed the RINSE HOLD button  , the machine will stop with the water of the last rinse left in the tub, to prevent the fabric from creasing. To drain the water and spin, release the same button. To drain only, select programme “R”.
The door is controlled by a safety device which releases 2 minutes after the end of the programme.
Switch the machine off by depressing the ON/OFF button again. The mains-on light goes out.
When the programme has finished you are advised to unplug the appliance and turn off the water taps.
8

WASHING 2 KG OF MIXED FABRICS AT 50°C
Suppose you have 2 kg of mixed fabrics to wash. They are rather delicate fabrics and should not be washed at a high temperature.
1. Load the laundry
Open the door by pulling the catch outward. Place the laundry in the drum, one item at a time,
shaking them out as much as possible. Close the door.
P0004
2.Measure out the detergent and the fabric softener
Pull out the dispenser drawer until it stops.
Measure out the amount of detergent required and pour it into the main wash compartment  .
.
If required, pour fabric softener into the compartment marked  (the amount used must not exceed the “MAX” mark in the drawer).
Close the drawer gently.
P0006 |
P0005 |
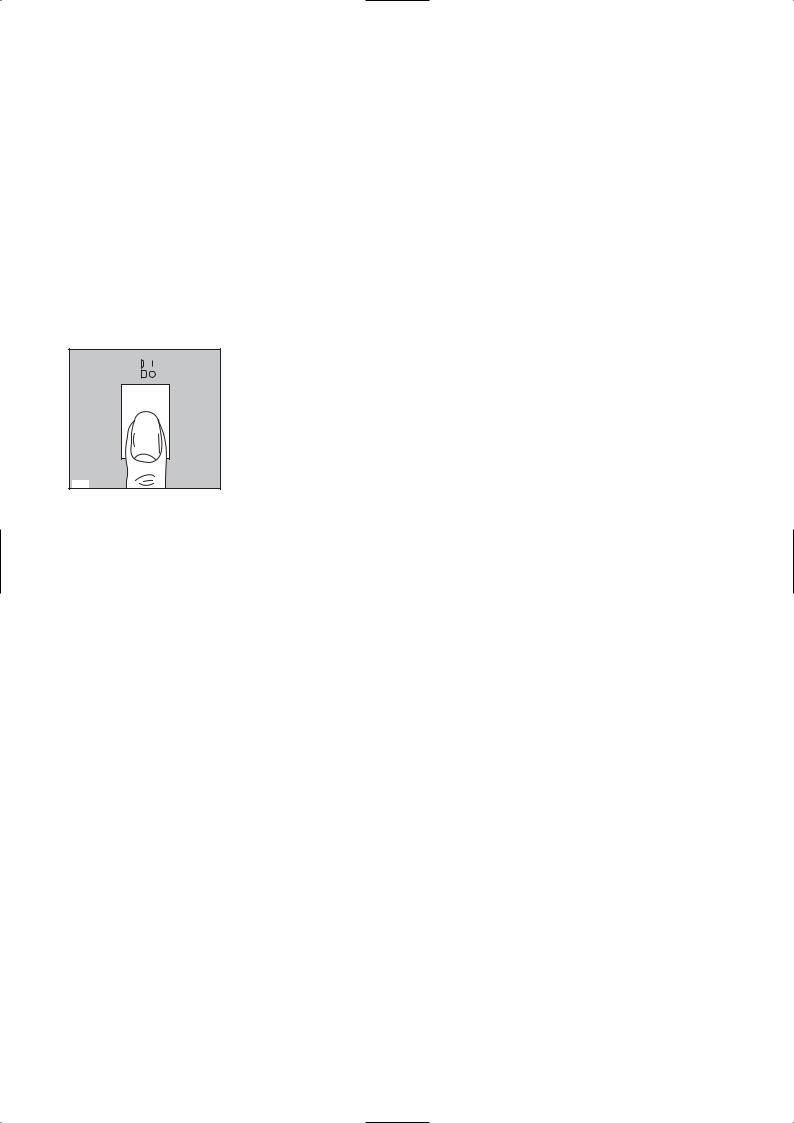
3. Select the required option(s)
Depress SPIN REDUCTION, QUICK WASH or RINSE HOLD button, if required.
4. Select the required programme
Turn the programme selector dial clockwise to the programme H.
H |
P0673S |
5. Start the machine
Before starting up the machine check that:
●the appliance is plugged in
●the water supply taps are turned on
●the drain hose is correctly and securely positioned
●the door and the detergent dispenser drawer are
closed.
Depress the ON/OFF button  : the mains-on light will illuminate and the machine starts operating.
P0471
6. At the end of the programme
The machine stops automatically.
If you have depressed the RINSE HOLD button, the machine will stop with the water of the last rinse left in the tub, to prevent the fabric from creasing. To drain the water and spin, release the same button. To drain only, select programme “R”.
The door is controlled by a safety device which releases 2 minutes after the end of the programme.
Switch the machine off by depressing the ON/OFF button again. The mains-on light goes out.
When the programme has finished you are advised to unplug the appliance and turn off the water taps.
9
 Loading...