


Use & Care Guide
Wine Cooler / Beverage Center
Guia de Uso y Cuidado
Refrigerador de Vinos / Centro de Bebidas
Guide D’utilisation et D’entretien
Refroidisseur à Vin / Centre de Boissons
241888404 Jan 2009

2 |
Finding Information |
|
|
Please Read and Save This Guide
Thank you for choosing Electrolux, the new premium brand in home appliances. This Use & Care Guide is part of our commitment to customer satisfaction and product quality throughout the service life of your new wine cooler / beverage center.
We view your purchase as the beginning of a relationship. To ensure our ability to continue serving you, please use this page to record key product information.
IMPORTANT
PLEASE READ all instructions completely before attempting to install or operate the unit.
All wine coolers / beverage centers require a connection to an electrical power source.
Improper hook-up can result in a safety hazard and potential damage to the product or contents! Proper installation, in accordance with the manufacturer’s specifications and all local codes, is the sole responsibility of the consumer. The manufacturer is not responsible for any installation expenses or damages incurred due to improper installation. If you are unsure of your ability to safely connect electric power to the unit, consult a licensed and insured professional to perform all electrical work.
Once you have your unit installed, we suggest you keep this manual in a safe place for future reference. Should any problems occur, refer to the “Troubleshooting” section of this manual. This information will help you quickly identify a problem and get it remedied. In the event you require assistance, please contact the dealer where you purchased your unit.
Make a Record for Quick Reference
Whenever you call to request information or service, you will need to know your model number and serial number. You can find this information on the serial plate located on the ceiling of your unit and on the product registration card.
Product Registration Card
The package containing this manual also includes your product registration information. Warranty coverage begins at the time your Electrolux wine cooler / beverage center was purchased.
NOTE
Registering your product with Electrolux enhances our ability to serve you. You can register online at www.electroluxappliances. com or by dropping your Product Registration Card in the mail. Complete and mail the Product Registration Card as soon as possible to validate the registration date.
Please record the purchase date of your Electrolux unit and your dealer’s name, address and telephone number.
_________________________________________
Purchase Date
_________________________________________
Electrolux Model Number
_________________________________________
Electrolux Serial Number
_________________________________________
Dealer Name
_________________________________________
Dealer Address
_________________________________________
Dealer Telephone
Keep this manual and the sales receipt together in a safe place for further reference.
Questions?
For toll-free telephone support in the U.S. and Canada:
1-877- 4ELECTROLUX (1-877-435-3287)
For online support and Internet product information: www.electroluxappliances.com
Finding Information |
3 |
|
|
|
|
|
|
Table of Contents |
|
|
|
Finding Information.................................................................................. |
2 |
|
|
Please Read and Save This Guide....................................................................................... |
2 |
|
|
Make a Record for Quick Reference.................................................................................... |
2 |
|
|
Product Registration Card.................................................................................................. |
2 |
|
|
Questions?.......................................................................................................................... |
2 |
|
|
Safety................................................................................................... |
4 |
|
|
Important Safety Instructions............................................................................................. |
4 |
|
|
Safety Precautions.......................................................................................................... |
4 |
|
|
Definitions...................................................................................................................... |
4 |
|
|
General Precautions....................................................................................................... |
4 |
|
|
Installation ............................................................................................ |
5 |
|
|
Installing the Wine Cooler / Beverage Center...................................................................... |
5 |
|
|
Site Preparation.................................................................................................................. |
6 |
|
|
Leveling................................................................................................ |
7 |
|
|
Leveling the Unit................................................................................................................. |
7 |
|
|
Door Reversal......................................................................................... |
8 |
|
|
Reversing the Door............................................................................................................. |
8 |
|
|
Start-Up and Temperature Control................................................................ |
11 |
|
|
Starting the Unit................................................................................................................ |
11 |
|
|
Adjusting the Temperature................................................................................................ |
11 |
|
|
Operation............................................................................................. |
12 |
|
|
Description of Features..................................................................................................... |
12 |
|
|
Alarms.............................................................................................................................. |
12 |
|
|
Notifications...................................................................................................................... |
12 |
|
|
Sabbath Mode................................................................................................................... |
12 |
|
|
Storage................................................................................................ |
13 |
|
|
Proper Storage................................................................................................................. |
13 |
|
|
Display Rack (Wine Cooler Only)...................................................................................... |
13 |
|
|
Stocking Recommendations (Wine Cooler Only).............................................................. |
13 |
|
|
Maintenance......................................................................................... |
14 |
|
|
Maintaining Your Wine Cooler / Beverage Center.............................................................. |
14 |
|
|
Exterior Cleaning for Your Stainless Steel Model.......................................................... |
14 |
|
|
Interior Cleaning........................................................................................................... |
14 |
|
|
Wine Rack Removal/Installation................................................................................... |
14 |
|
|
Glass Shelf Removal/Installation (Beverage Center Only)............................................. |
15 |
|
|
Troubleshooting...................................................................................... |
16 |
|
|
Before You Call for Service............................................................................................... |
16 |
|
|
If Service is Required........................................................................................................ |
16 |
|
|
Warranty Information............................................................................... |
17 |
|
|
|
|
|
|
|
|
|
|
4 Safety
Important Safety Instructions
Safety Precautions
Do not attempt to install or operate your unit until you have read the safety precautions in this manual. Safety items throughout this manual are labeled with a Danger, Warning or Caution based on the risk type.
Definitions
 This is the safety alert symbol. It is used to alert you to potential personal injury hazards. Obey all safety messages that follow this symbol to avoid possible injury or death.
DANGER
DANGER indicates an imminently hazardous situation which, if not avoided, will result in death or serious injury.
 WARNING
WARNING indicates a potentially hazardous situation which, if not avoided, could result in death or serious injury.
 WARNING
•Never attempt to repair or perform maintenance on the unit until the electricity has been disconnected.
•Altering, cutting of power cord, removal of power cord, removal of power plug, or direct wiring can cause serious injury, fire and/or loss of property and/or life and will void the warranty.
•Do not lift unit by door handle.
CAUTION
•Use care when moving the unit. Some edges are sharp and may cause personal injury. Wear gloves when moving or repositioning the unit.
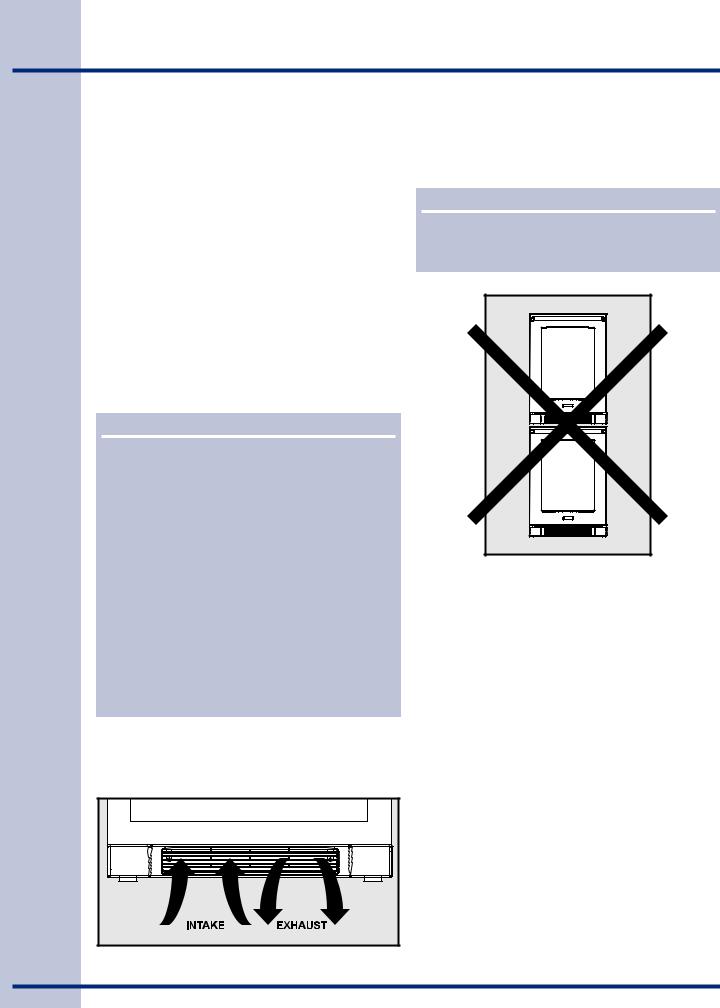
•Never install the unit behind closed doors.
Be sure front grille is free of obstruction. Obstructing free air flow can cause the unit to malfunction, and may void the warranty.
•Allow unit temperature to stabilize for 24 hours before use.
CAUTION
CAUTION indicates a potentially hazardous situation which, if not avoided, may result in minor or moderate injury.
IMPORTANT
Indicates installation, operation or maintenance information which is important but not hazardrelated.
General Precautions
 WARNING
RISK OF CHILD ENTRAPMENT. Before you throw away your old appliance, take off the doors and leave shelves in place so that children may not easily climb inside.
CAUTION
•Use only genuine Electrolux replacement parts. Imitation parts can damage the unit and may void the warranty.
Installation 5
Installing the Wine Cooler / Beverage Center
Your Electrolux wine cooler / beverage center has been designed for either free-standing or built-in installation. When built-in, your wine cooler does not require additional air space for top, sides or rear. In either case, the front grille must NOT be obstructed.
NOTE
To ease unit installation and removal, it is recommended that the cabinet rough opening dimensions be increased by at least ¼ inch over the dimensions given for your unit.
NOTE
All units require zero clearance when installed flush with a cabinet or wall. Electrolux stainless steel models require a minimum 2⁄ inch handle clearance when installed against a wall or cabinet that extends beyond the front edge of the unit.
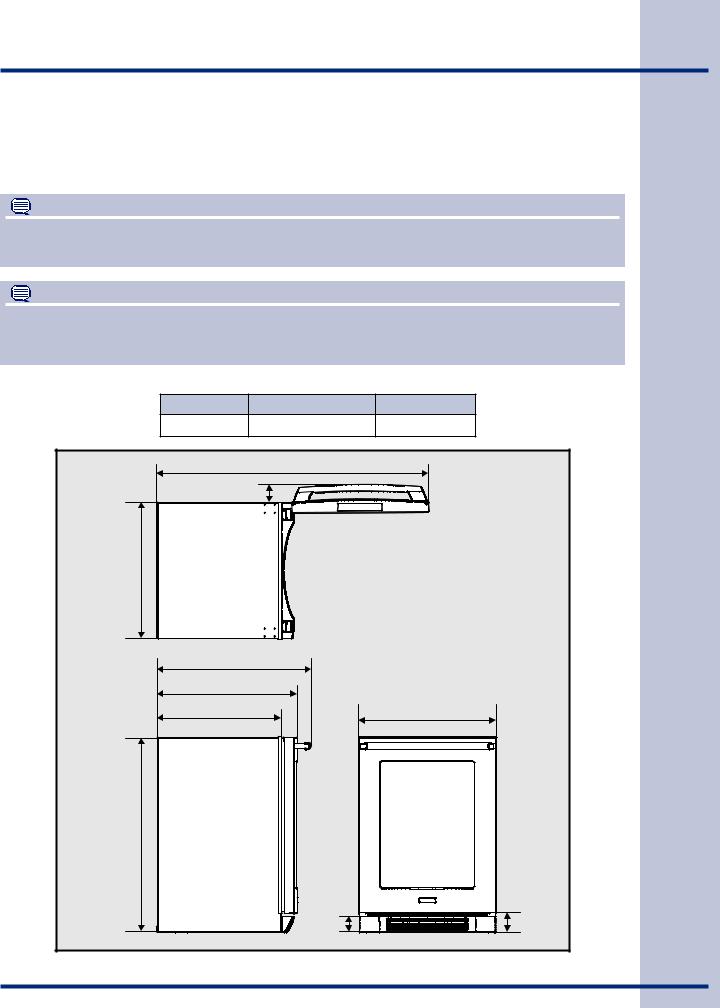
Unit Dimensions
|
Width |
Height |
Depth |
|
23 13/16 inch |
34 5/16 - 35 inches |
26 3/4 inch |
|
|
47” |
|
|
2 7/8” |
|
|
23 5/8” |
Top |
|
|
View |
|
|
|
|
|
|
|
|
26 3/4” |
|
|
|
24 1/4” |
|
|
|
21 9/16” |
|
23 13/16” |
34-5/16” |
Side |
|
Front |
|
|
||
Adjustable to |
View |
|
View |
35” |
|
||
|
|
|
|
|
|
2 3/4” |
3 5/16” |
Product Dimensions
6 Installation
Site Preparation
1Position the unit on a flat, level surface capable of supporting the entire weight of the unit. Remember the unit will be significantly heavier once it is fully loaded.
2This unit requires a grounded and polarized 115 VAC, 60Hz, 15A circuit (normal household current).
3Avoid connecting the unit to a Ground Fault Interruptor (GFI). GFIs are prone to
nuisance tripping which will cause the unit to shut down. GFIs are generally not used on circuits which power equipment that must run unattended for long periods of time.
4The unit must be installed according to your state and local laws and regulations.
 WARNING
ELECTROCUTION HAZARD!
Electrical Grounding Required. This appliance is equipped with a three prong (grounding) polarized plug for your protection against possible shock hazards.
•NEVER remove the round grounding prong from the plug.
•NEVER use a two-prong grounding adapter.
•NEVER use an extension cord to connect power to the unit.
Where a two-prong wall receptacle is encountered or a longer power cord is required, contact a qualified electrician to have it replaced in accordance with applicable electrical codes.
5Position the unit to allow free air flow through the front grille.
6Wipe out inside of unit with a damp cloth.
7Be sure to install the Anti-Tip bracket. Follow the instructions provided with the Anti-Tip bracket kit.
 WARNING
The Anti-Tip Kit must be installed on this unit before it is used. Double stacking units may cause serious personal injury.
 Loading...