


English
Copyright© by Edimax Technology Co, LTD. all rights reserved. No part of this publication may be reproduced, transmitted, transcribed, stored in a retrieval system, or translated into any language or computer language, in any form or by any means, electronic, mechanical, magnetic, optical, chemical, manual or otherwise, without the prior written permission of this Company .
This company makes no representations or warranties, either expressed or implied, with respect to the contents hereof and specifically disclaims any warranties, merchantability or fitness for any particular purpose. Any software described in this manual is sold or licensed "as is". Should the programs prove defective following their purchase, the buyer (and not this company, its distributor, or its dealer) assumes the entire cost of all necessary servicing, repair, and any incidental or consequential damages resulting from any defect in the software. Further, this company reserves the right to revise this publication and to make changes from time to time in the contents hereof without obligation to notify any person of such revision or changes.
The product you have purchased and the setup screen may appear slightly different from those shown in this QIG. For more detailed information about this product, please refer to the User Manual on the CD-ROM. The software and specifications are subject to change without notice. Please visit our web site www.edimax.com for the update. All rights reserved including all brand and product names mentioned in this manual are trademarks and/or registered trademarks of their respective holders .
Notice according to GNU/GPL-Version 2
This product includes software that is subject to the GNU/GPL-Version 2. You find the text of the license on the product cd/dvd. The program is free software and distributed without any warranty of the author. We offer, valid for at least three years, to give you, for a charge no more than the costs of physically performing source distribution, a complete machine-readable copy of the corresponding source code.
Please contact Edimax at: Edimax Technology co., Ltd, NO. 3, Wu-Chuan
3rd RD Wu-Ku-Industrial Park, Taipei Hsien, Taiwan. R.O.C., TEL : +886-2-77396888, FAX : +886-2-77396887, sales@edimax.com.tw
2
C A T A L O G |
|
Chapter I: Product Information....................................................................................... |
6 |
1-1 Introduction and safety information .......................................................................... |
6 |
1-2 Safety Information ..................................................................................................... |
8 |
1-3 System Requirements ................................................................................................. |
9 |
1-4 Package Contents .................................................................................................... |
10 |
1-5 Familiar with your new wireless broadband router ................................................ |
11 |
Chapter II: System and Network Setup........................................................................... |
13 |
2-1 Establish network connection.................................................................................. |
13 |
2-2 Setup client computers to obtain IP address automatically .................................... |
15 |
2-2-1 Windows 95/98/Me IP address setup: ................................................ |
16 |
2-2-2 Windows 2000 IP address setup:........................................................ |
18 |
2-2-3 Windows XP IP address setup:........................................................... |
20 |
2-2-4 Windows Vista IP address setup:........................................................ |
22 |
2-3 Connect to broadband router by web browser ........................................................ |
24 |
2-4 Using ‘Quick Setup’................................................................................................. |
28 |
2-4-1 Using ‘Dynamic IP’ as broadband connection type ........................... |
32 |
2-4-2 Using ‘Fixed-IP xDSL’ as broadband connection type ...................... |
34 |
2-4-3 Using ‘PPPoE xDSL’ as broadband connection type ......................... |
36 |
2-4-4 Using ‘PPTP xDSL’ as broadband connection type ........................... |
38 |
2-4-5 Using 'L2TP xDSL' as broadband connection type............................ |
41 |
2-4-6 Using 'Telstra Big Pond' as broadband connection type .................... |
44 |
2-4-7 WISP (Wireless ISP Connection mode) ............................................. |
46 |
Chapter III: General Setup ........................................................................................... |
48 |
3-1 System ...................................................................................................................... |
50 |
3-1-1 Time Zone .......................................................................................... |
50 |
3-1-2 Password Settings............................................................................... |
52 |
3-1-3 Remote Management.......................................................................... |
53 |
3-2 WAN ......................................................................................................................... |
55 |
3-2-1 Dynamic IP......................................................................................... |
58 |
3-2-2 Static IP .............................................................................................. |
60 |
3-2-3 PPPoE................................................................................................. |
62 |
3-2-4 PPTP................................................................................................... |
65 |
3-2-5 L2TP................................................................................................... |
65 |
3-2-6 Telstra Big Pond ................................................................................. |
68 |
3-2-7 WISP ( Wireless ISP Connection Mode )........................................... |
70 |
3-3 LAN (Wired)............................................................................................................. |
72 |
3-3-1 Start .................................................................................................... |
72 |
3-3-2 LAN IP ............................................................................................... |
73 |
3
3-3-2 LAN IP ............................................................................................... |
74 |
|
3-3-3 DHCP Server...................................................................................... |
75 |
|
3-3-4 Static DHCP Leases ........................................................................... |
76 |
|
3-4 Wireless |
.................................................................................................................... |
78 |
3-4-1 Basic Settings ..................................................................................... |
79 |
|
.................................................................................. |
3 - 4 - 1 - 1 AP mode |
80 |
.............................................................. |
3 - 4 - 1 - 2 Station - Infrastructure |
84 |
......................................................... |
3 - 4 - 1 - 3 AP Bridge - Point to Point |
87 |
.............................................. |
3 - 4 - 1 - 4 AP Bridge - Point to Multi - Point |
90 |
...................................................................... |
3 - 4 - 1 - 5 AP Bridge - WDS |
92 |
.................................................................. |
3 - 4 - 1 - 6 Universal Repeater |
95 |
3 ...............................................................................-4-2 Security Settings |
102 |
|
3 ..................................................................................................-4-4 WPS |
109 |
|
3 ............................................................................-4-5 Wireless Schedule |
111 |
|
3-5 Advance ..................................................................................................Settings* |
112 |
|
3 ...................................................................................................-5-1 QoS |
113 |
|
................................................................ |
3 - 5 - 1 - 1 Basic QoS Settings |
113 |
............................................................ |
3 - 5 - 1 - 2 Add a new QoS entry |
115 |
3 ..................................................................................................-5-2 NAT |
117 |
|
........................................................................ |
3 - 5 - 2 - 1 Virtual Server |
118 |
.............................................................. |
3 - 5 - 2 - 2 Special Applications |
120 |
....................................................................... |
3 - 5 - 2 - 3 UPnP Settings |
123 |
......................................................................... |
3 - 5 - 2 - 4 ALG Settings |
124 |
........................................................................ |
3 - 5 - 2 - 5 Static Routing |
125 |
3 .............................................................................................-5-3 Firewall |
127 |
|
...................................................................... |
3 - 5 - 3 - 1 Access Control |
127 |
....................................................................... |
3 - 5 - 3 - 2 URL Blocking |
132 |
....................................................................................... |
3 - 5 - 3 - 3 DoS |
134 |
3 ...............................................................................................-5-4 DDNS |
137 |
|
3 ................................................................................-5-5 Port Forwarding |
140 |
|
3 .................................................................................................-5-6 DMZ |
143 |
|
Chapter IV ................................................................................................. |
EZ View |
146 |
Chapter V: ...................................................................................................... |
Status |
154 |
5 .............................................................................-1 Internet Connection |
156 |
|
5 .......................................................................................-2 Device Status |
157 |
|
5 ..........................................................................................-3 System Log |
158 |
|
5 ........................................................................................-4 Security Log |
159 |
|
5 ............................................................................-5 Active DHCP Client |
160 |
|
5-6 Statistics............................................................................................................. |
161 |
|
Chapter VI : ........................................................................................................Tools |
162 |
|
4
6-1 |
Configuration Tools ........................................................................................... |
164 |
6-2 |
Firmware Upgrade............................................................................................. |
165 |
6-3 |
Restart................................................................................................................ |
166 |
Chapter VII : Language ............................................................................................... |
167 |
|
5
Chapter I: Product Information
1-1 Introduction and safety information
Thank you for purchasing Edimax BR-6225n / BR-6226n nLite wireless broadband router! This high cost-efficiency router is the best choice for Small office / Home office users, all computers and network devices can share a single xDSL / cable modem internet connection at high speed. Easy install procedures allows any computer users to setup a network environment in very short time - within minutes, even inexperienced. When the number of your computers and network-enabled devices grow, you can also expand the number of network slot by simple attach a hub or switch, to extend the scope of your network!
With built-in IEEE 802.11b/g wireless network capability, all computers and wireless-enabled network devices (including PDA, cellular phone, game console, and more!) can connect to this broadband router without additional cabling. New Draft-N wireless capability also gives you the highest speed of wireless experience ever! With a compatible wireless card installed in your PC, you can transfer file for up to 150 Mbps! The radio coverage is also doubled, so don’t worry if your office or house is really big!
Other features of this router including:
•Provide 12-languages user interface
•Support WISP (Wireless ISP) connection mode
•Support EZview to manage LAN devices
•Support wireless schedule setting
•Built-in 16-languages EZmax Setup Wizard to setup router
•High Internet Access throughput
•Allow multiple users to share a single Internet connection
•Supports up to 253 LAN users sharing a single Cable or xDSL internet connection
•Four wired LAN ports (10/100Mbps) and one WAN port (10/100Mbps)
•Comply with wireless IEEE 802.11b/g standards
6
•Compatible with wireless IEEE802.11n standard
•Support DHCP (Server/Client) for easy client IP-address setup
•Advanced network and security features like: Special Applications, DMZ, Virtual Servers, URL blocking, QoS, Access Control, Firewall.
•Allow you to monitor the router’s status like: DHCP Client Log, System Log, Security Log and Device/Connection Status
•Easy to use Web-based GUI for network configuration and management purposes
•Remote management function allows configuration and upgrades from a remote computer (over the Internet)
•Auto MDI / MDI-X function for all wired Ethernet ports.
7
1-2 Safety Information
In order to keep the safety of users and your properties, please follow the following safety instructions:
1.This router is designed for indoor use only; DO NOT place this router outdoor.
2.DO NOT put this router at or near hot or humid places, like kitchen or bathroom. Also, do not left this router in the car in summer.
3.DO NOT pull any connected cable with force; disconnect it from the router first.
4.If you want to place this router at high places or hang on the wall, please make sure the router is firmly secured. Falling from high places would damage the router and its accessories, and warranty will be void.
5.Accessories of this router, like antenna and power supply, are danger to small children under 3 years old. They may put the small parts in their nose or month and it could cause serious damage to them. KEEP THIS ROUTER OUT THE REACH OF CHILDREN!
6.The router will become hot when being used for long time (This is normal and is not a malfunction), DO NOT put this router on paper, cloth, or other flammable materials.
7.There’s no user-serviceable part inside the router. If you found that the router is not working properly, please contact your dealer of purchase and ask for help. DO NOT disassemble the router, warranty will be void.
8.If the router falls into water when it’s powered, DO NOT use your hand to pick it up. Switch the electrical power off before you do anything, or contact an experienced technician for help.
9.If you smell something strange, or even see some smoke coming out from the router or power supply, remove the power supply or switch the electrical power off immediately, and call dealer of purchase for help.
8
1-3 System Requirements
zInternet connection, provided by xDSL or cable modem with a RJ-45 Ethernet port.
zComputer or network devices with wired or wireless network interface card.
zWeb browser (Microsoft Internet Explorer 4.0 or above, Netscape Navigator 4.7 or above, Opera web browser, or Safari web browser).
zAn available power socket
9

1-4 Package Contents
Before you starting to use this router, please check if there’s anything missing in the package, and contact your dealer of purchase to claim for missing items:
□ Router ………………………………………………………… 1
□Quick installation guide (1 pcs) ………………………………… 2
□CDROM (with multi-languages setup wizard, multi-languages Quick installation guide and User manual )(1 pcs) …………………….. 3
□12V 1A power adapter (1 pcs)…………………………………..... 4
□Ethernet Cable (1 pcs)………………………………………..... 5
□Holding base (1 pcs)…………………………………………..... 6
□Antenna (1 pcs for BR-6225n only)…………………………….....7
□Accessories (1 pcs) ……………………………………………..... 8
You can configure the router by running the Setup Wizard in the CD-ROM provided in the package. The wizard provides quick setup for the Internet connection, SSID, wireless security, firmware upgrade and changing router’s password. When you start the Setup Wizard, you will get the following Welcome screen. Please choose the language to start with and follow the easy steps in the Wizard. No instruction for the Setup Wizard is given here.
If you lost the CD-ROM or you prefer the traditional web setup, please follow the procedures in this Manual ( or Quick Installation Guide ) to configure the router
10
1-5 Familiar with your new wireless broadband router
Front Panel
LED Name |
Light Status |
Description |
PWR |
ON |
Router is switched on and correctly powered |
|
On |
Wireless network is switched on |
WLAN |
Off |
Wireless network is switched off |
|
Flashing |
Wireless LAN activity (transferring data) or |
|
|
WPS mode is on. (LED will on and off every |
|
|
1 second) |
WAN |
On |
WAN port is connected |
|
Off |
WAN port is not connected |
LNK/ACT |
Flashing |
WAN activity (transferring data) |
LAN |
On |
LAN port is connected |
|
Off |
LAN port is not connected |
LNK/ACT |
Flashing |
LAN activity (transferring data) |
11
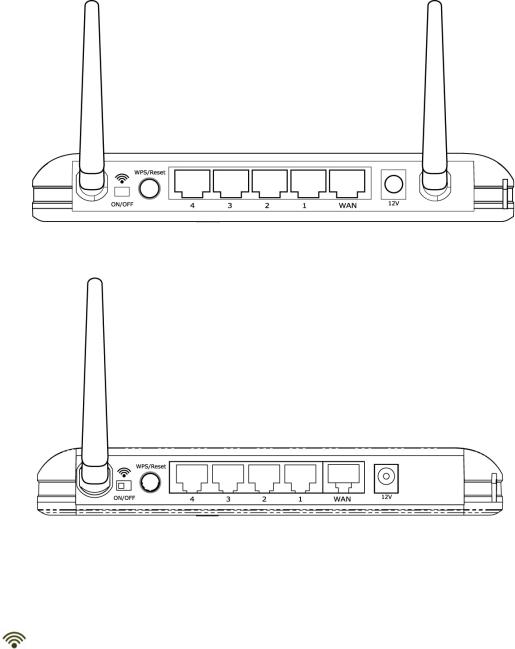
Back Panel
BR-6226n
|
BR-6225n |
Item Name |
Description |
Antenna |
High gain 3dBi Antenna |
ON/OFF |
Enable / Disable wireless signal |
You can not connect the router via wireless adapter, |
|
|
when you disable (OFF) the wireless signal. |
12V (Power) |
Power connector, connects to power adapter |
Reset / WPS |
Reset the router to factory default settings (clear all |
|
settings) or start WPS function. Press this button and |
|
hold for 20 seconds to clear all settings, and press this |
|
button 3~5 seconds to start WPS function. |
1 - 4 |
Local Area Network (LAN) ports 1 to 4 |
WAN |
Wide Area Network (WAN / Internet) port |
12

Chapter II: System and Network Setup
2-1 Establish network connection
Please follow the following instruction to build the network connection between your new Broadband router and your computers, network devices:
1.Connect your xDSL / cable modem to the WAN port of router by Ethernet cable.
2.Connect all your computers, network devices (network-enabled consumer devices other than computers, like game console, or switch / hub) to the LAN port of the router.
13
3.Connect the power adapter to the wall socket, and then connect it to the ‘Power’ socket of the router.
4.Please check all LEDs on the front panel. ‘PWR’ LED should be steadily on, WAN and LAN LEDs should be on if the computer / network device connected to the respective port of the router is powered on and correctly connected. If PWD LED is not on, or any LED you expected is not on, please recheck the cabling.
14
2-2 Setup client computers to obtain IP address automatically
After the network connection is established, the next step you should do is setup the router with proper network parameters, so it can work properly in your network environment.
Before you can connect to the router and start configuration procedures, your computer must be able to get an IP address automatically (use dynamic IP address). If it’s set to use static IP address, or you’re unsure, please follow the following instructions to configure your computer to use dynamic IP address:
If the operating system of your computer is….
Windows 95/98/Me |
- please go to section 2-2-1 |
Windows 2000 |
- please go to section 2-2-2 |
Windows XP |
- please go to section 2-2-3 |
Windows NT |
- please go to section 2-2-4 |
15

2-2-1 Windows 95/98/Me IP address setup:
1.Click ‘Start’ button (it should be located at lower-left corner of your computer), then click control panel. Double-click Network icon, and Network window will appear. Select ‘TCP/IP’, then click ‘Properties’.
16
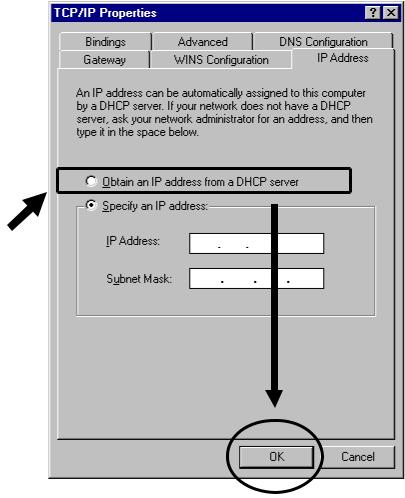
2. Select ‘Obtain an IP address from a DHCP server’, then click ‘OK’.
17

2-2-2 Windows 2000 IP address setup:
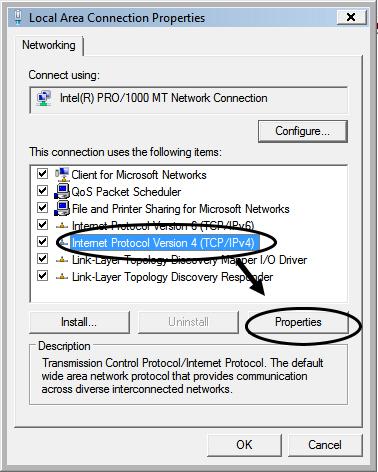
1. Click ‘Start’ button (it should be located at lower-left corner of your computer), then click control panel. Double-click Network and Dial-up Connections icon, double click Local Area Connection, and Local Area Connection Properties window will appear. Select ‘Internet Protocol (TCP/IP)’, then click ‘Properties’
18
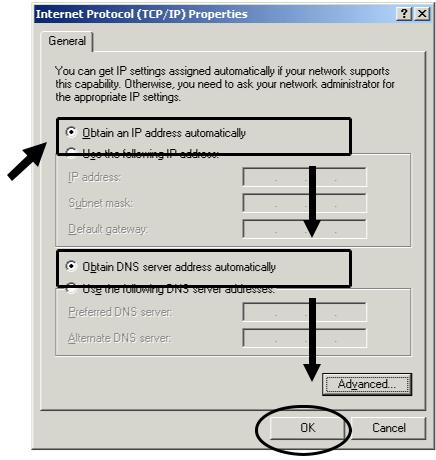
2. Select ‘Obtain an IP address automatically’ and ‘Obtain DNS server address automatically’, then click ‘OK’.
19
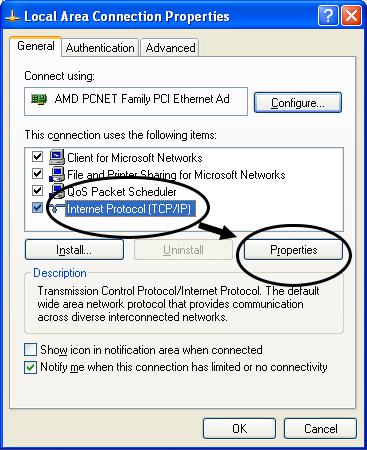
2-2-3 Windows XP IP address setup:
1. Click ‘Start’ button (it should be located at lower-left corner of your computer), then click control panel. Double-click Network and Internet Connections icon, click Network Connections, then double-click Local Area Connection, Local Area Connection Status window will appear, and then click ‘Properties’
20
2. Select ‘Obtain an IP address automatically’ and ‘Obtain DNS server address automatically’, then click ‘OK’.
21
2-2-4 Windows Vista IP address setup:
1. Click ‘Start’ button (it should be located at lower-left corner of your computer), then click control panel. Click View Network Status and Tasks, then click Manage Network Connections..Right-click Local Area
Netwrok, then select ‘Properties’. Local Area Connection Properties window will appear, select ‘Internet Protocol Version 4 (TCP / IPv4), and then click ‘Properties’
22
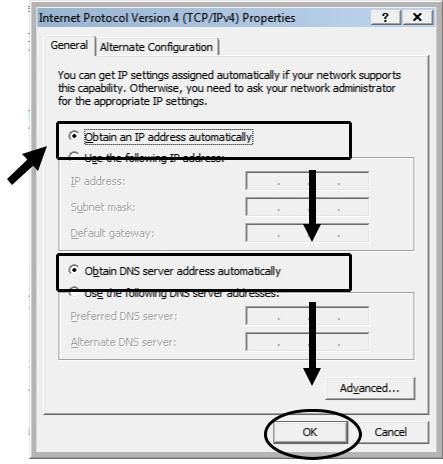
2. Select ‘Obtain an IP address automatically’ and ‘Obtain DNS server address automatically’, then click ‘OK’.
23

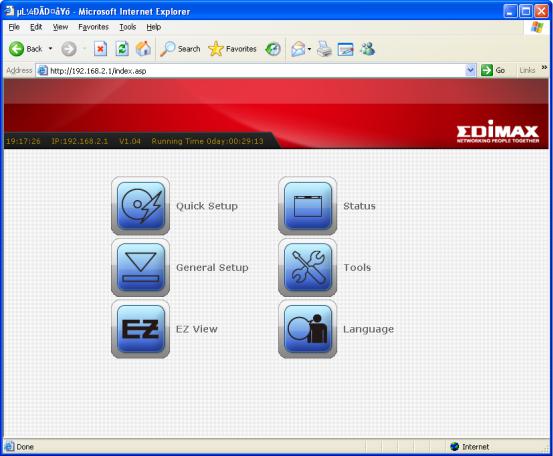
2-3 Connect to broadband router by web browser
Default IP address of this broadband router is ‘192.168.2.1’, and you can connect to broadband router’s web-based configuration interface by any connected computer with web browser (Internet Explorer 5.x or above, Firefox, or Netscape).
Please input ‘192.168.2.1’ in web browser’s address bar and press ‘Enter’ key to establish connection:
You should see the following authentication window:
24
Please input ‘admin’ in ‘User name’ field, and ‘1234’ in ‘Password’ field, and click ‘OK’ button to enter web configuration interface.
TIPS: If you can’t establish connection with broadband router with web browser (got ‘The page cannot be displayed’ or similar error message), the IP address you inputted may be wrong. If you’ve changed the IP address of this broadband router previously, please input correct IP address instead of the default IP address ’192.168.2.1’.
If the DHCP server function of this broadband router is enabled, please follow the following instructions to find out the IP address of this broadband router:
25
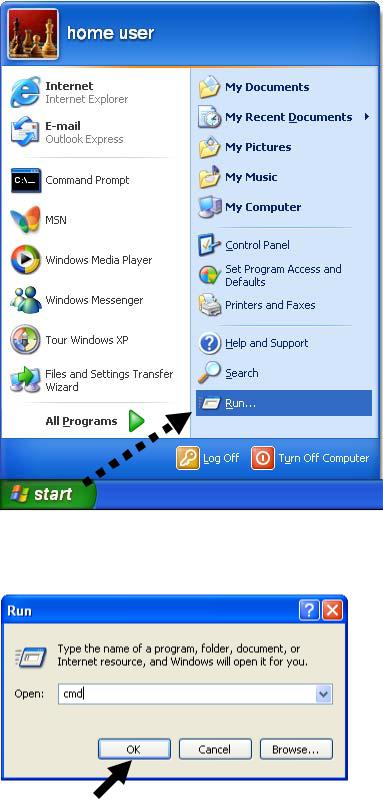
Please click ‘start’ -> ‘run’ at the bottom-lower corner of your desktop:
Input ‘cmd’, then click ‘OK’
26
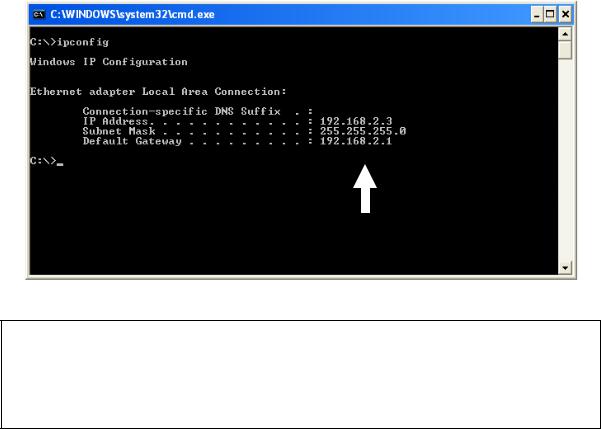
Input ‘ipconfig’, then press ‘Enter’ key. Please check the IP address followed by ‘Default Gateway’ (In this example, the IP address of router is 192.168.2.1, please note that this value may be different.)
NOTE: If the IP address of Gateway is not displayed, or the address followed by ‘IP Address’ begins with ‘169’, please recheck network connection between your computer and router, and / or go to the beginning of this chapter, to recheck every step of network setup procedure.
If you tried the instructions listed above and still can not find the IP address of this broadband router / you forget the password, please jump to chapter 6-1 to reset the broadband router.
27
2-4 Using ‘Quick Setup’
This broadband router provides a ‘Quick Setup’ menu, and you can setup basic parameters of this broadband router.
Please follow the following instructions to use ‘Quick Setup’ menu:
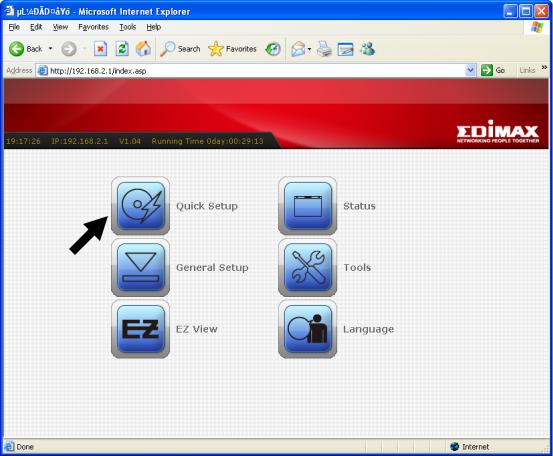
1. Click ‘Quick Setup’ after logged in.
28
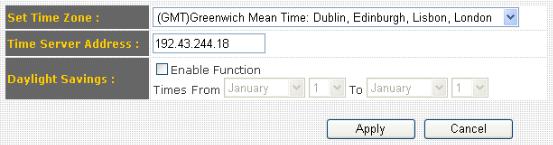
2.In the first step of quick setup, you can setup automatic time synchronization settings.
The descriptions of every setting items are listed as follow:
Item Name |
Description |
Time Zone |
Please select a time zone of the country or |
|
region of your residence here. If you can’t find |
|
the country / region of your residence here, |
|
please select a city / region which time zone is |
|
the same with the country / region of your |
|
residence. |
Time Server Address |
This load-balance router supports NTP |
|
(Network Time Protocol). NTP server will |
|
provide correct time for this router to setup the |
|
date and time of the router automatically. |
|
Please input the host name or IP address of |
|
NTP server here. If you don’t know the host |
|
name or IP address of time server, please ask |
|
network administrator or use ‘pool.ntp.org’ as |
|
time server. |
Daylight Savings |
If the country / region of your residence use |
|
daylight saving time, please check ‘Enable |
|
Function’ box, and select the beginning and |
|
ending date of daylight time saving. |
29

After you finish with time zone settings, please click ‘Next’ to proceed to next step of quick setup - broadband type:
Please choose the broadband (Internet connection) type you’re using in this page. There are six types of Internet connection, they are:
Dynamic IP |
- Please go to section 2-4-1 |
Fixed-IP xDSL |
- Please go to section 2-4-2 |
PPPoE xDSL |
- Please go to section 2-4-3 |
PPTP xDSL |
- Please go to section 2-4-4 |
L2TP xDSL |
- Please go to section 2-4-5 |
Telstra Big Pond |
- Please go to section 2-4-6 |
WISP |
- P lease go to section 2-4-7 |
30
 Loading...