


XD7500
INSTALLATION/OWNERS MANUAL
AM/FM/CD Receiver with Remote

XD7500 INSTALLATION
Preparation
Please read entire manual before installation.
Before You Start
•Disconnect negative battery terminal. (consult a qualified technician for instructions)
•Avoid installing the unit where it would be subject to high temperatures, such as from direct sunlight, or where it would be subject to dust, dirt or excessive vibration.
Getting Started
•Remove 2 transit screws located on top of the unit.
•Insert the supplied keys into the slots as shown, and slide the unit out of the mounting sleeve.
•Install mounting sleeve into
opening, bending tabs to secure.
• Connect wiring harness and antenna. (consult a qualified
technician if you are unsure) KEYS
• Certain vehicles may require an installation kit and/or wiring harness adapter (sold separately).
•Test for correct operation and slide into mounting sleeve to secure.
• Snap trim ring into place.
TYPICAL MOUNTING METHOD
2
XD7500 INSTALLATION
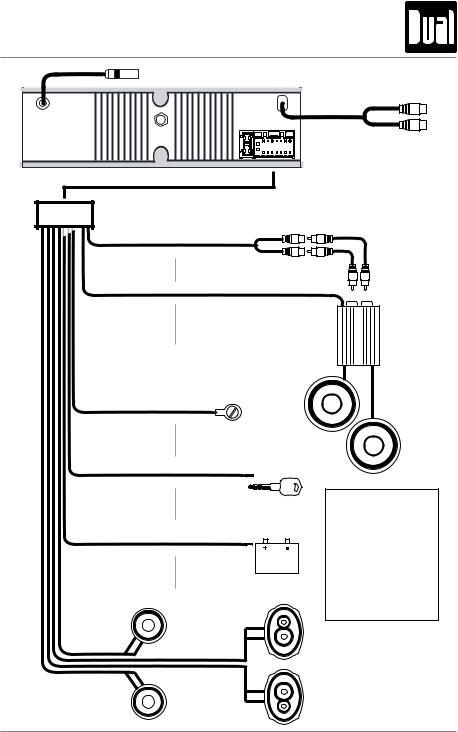
Antenna Connector
Wiring Diagram
YELLOW Auxiliary Input
GRAY Rear Preamp Output
Connect to amplifier RCA Input
BLUE Remote Turn-On
Connect to amplifier or power antenna. Insulate wire if not used.
BLACK |
Ground |
|
Connect to vehicle |
|
chassis ground. |
RED |
Accessory |
|
Connect to existing ignition |
|
circuit or switched 12 volt source. |
YELLOW |
Memory |
|
Connect to battery |
|
circuit or constant 12 volt source. |
Right Front |
Right Rear |
Gray/Black (-) |
Violet/Black (-) |
Gray (+) |
Violet (+) |
Left Front |
Left Rear |
White/Black (-) |
Green/Black (-) |
White (+) |
Green (+) |
RCA Cable
(sold separately)
AMP
FUSE
When replacing a fuse, make sure new fuse is the correct type and amperage. Using an incorrect fuse could damage the radio. The XD7500 uses one
10 amp ATM fuse located beside the wiring connector.
3

XD7500 OPERATION
Control Locations - Receiver
1 |
2 |
3 |
4 |
5 |
6 |
7 |
8 |
9 |
10 |
11 |
12 |
13 |
24 |
23 |
22 |
21 |
20 |
19 |
18 |
17 |
16 |
15 |
14 |
1 |
Open |
13 |
Eject |
2 |
Local/Distance |
14 |
Mute |
3 |
EQ |
15 |
Infrared Sensor |
4 |
Band/Play/Pause |
16 |
Preset 6 |
5 |
Auto Store/Preset Scan |
17 |
Preset 5 |
6 |
Audio |
18 |
Preset 4 |
7 |
Volume |
19 |
Preset 3/CD Intro |
8 |
Display |
20 |
Preset 2/CD Random |
9 |
Tune/Track Down |
21 |
Preset 1/CD Repeat |
10 |
Mode |
22 |
Loudness |
11 |
Scan |
23 |
Power |
12 |
Tune/Track Up |
24 |
Reset |
4
 Loading...