


 Loading...
CARAVAN SANITATION SYSTEM OWNER’S MANUAL
VacuFlush® 1600 Series Toilets and Holding Tank Systems for European Caravans (HTS-EC)
1
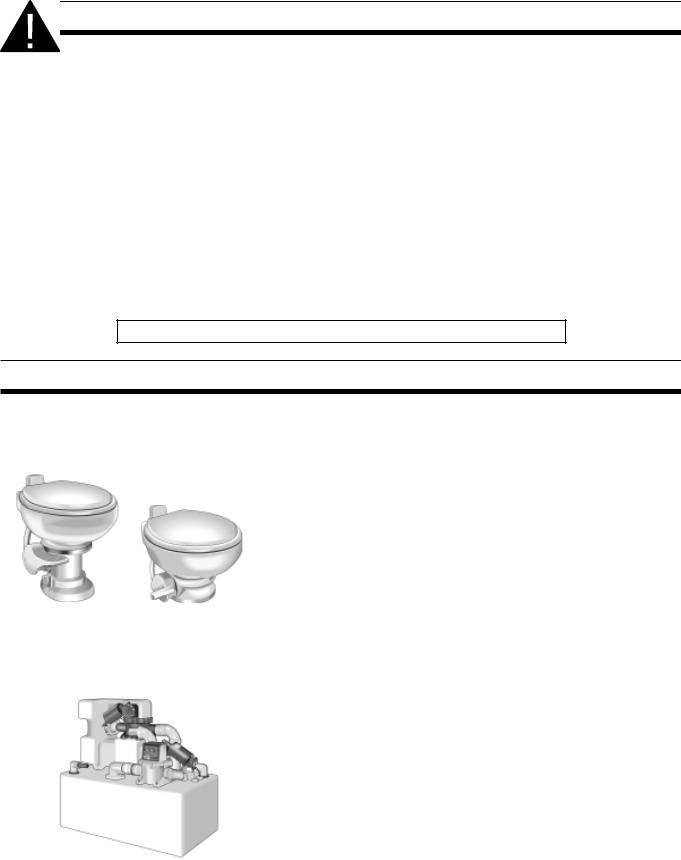
TABLE OF CONTENTS
Features |
2 |
Spare Parts |
8 |
Model Numbers and Dimensions |
3 |
Service Tip |
8 |
Key System Components |
4 - 5 |
Ordering Parts |
8 |
Important Information Before Operation |
5 |
Toilet Model Identification |
9 |
System Start-Up |
5 |
Special Toilet Tissue and Cleaner |
9 |
Vacuum Toilet Operation |
6 |
Troubleshooting Guide |
10 - 12 |
Holding Tank Operation – Discharge |
6 |
Parts Lists |
13 - 19 |
Cleaning – Holding Tank |
6 |
Wiring |
20 |
Winterizing – Holding Tank |
6 |
Parts Distributors |
21 |
Proper Toilet Cleaning and Maintenance |
7 |
Sales Offices |
22 |
Winterizing – Toilet |
7 |
Manufacturer's Warranty |
24 |
Maintenance Schedule |
8 |
|
|
WARNING – PUMP STARTS AUTOMATICALLY.
Turn off electrical power before servicing.
Read and understand the complete contents of this manual before operating or servicing the holding tank system. Failure to follow these precautions may result in damage to the sanitation system.
Dometic reserves the right to change specifications without notice.
FEATURES
Dometic Caravan Sanitation Systems are the newest standard in mobile sanitation. Each system is comprised of a VacuFlush 1600 series toilet and a vacuum holding tank system – a fully integrated vacuum generator/holding tank module designed specifically for European caravans.
The Comfortable Choice. Dometic VacuFlush toilets are handcrafted from vitreous china, are easy to clean and are durable – much like the one in your home. The lustrous bowl provides all the beauty and easy cleanability of a household toilet, while the full-size seat and lid provide the same comfort.
Fully Integrated Design. Dometic HTS-EC systems combine the vacuum generator, level indicators, discharge pump and holding tank into one, easy-to-install package. Available in 35-, 60-, and 90-liter capacities.
Extended Tank Capacity. Because the VacuFlush® toilet consumes as little as 0.4 liters of water per flush, the holding tank provides sufficient capacity for several days of travelling without having to empty the onboard system.
Vigorous Flushing Action. Vacuum action clears the bowl in an instant while fragmenting the waste before it enters the holding tank.
No Unpleasant Odours. No Chemicals. The holding tank is fitted outside the bathroom with an in-line filter that stops malodours from escaping through the vent connection.
Easy Operation. The status panel in the bathroom signals when it is okay to flush, when the holding tank is full, and when the vacuum level is too low for flushing. A separate monitor panel displays the tank capacity status. A safety feature automatically shuts down the sanitation system if the holding tank is full.
Unmatched Durability. Holding tank comes with nominal 10 mm wall thickness. All inlet and outlet fittings connect from the top of the tank for easy access.
Dumping with a Push of a Button. No cassette tanks to carry – just position your vehicle within a few meters of the dumping station, unroll flexible sanitation hose, and turn on the discharge pump. The tank is emptied in minutes.
2
MODEL NUMBERS AND DIMENSIONS
1600 SERIES TOILETS
Model |
Description |
Size |
Weight |
|
Length x Width x Height |
||||
|
|
|
||
1606 |
Low-profile vacuum toilet. Below-floor discharge. |
495 mm x 438 mm x 356 mm |
10 Kg |
|
19 1/2" x 17 1/4" x 14" |
22 Lbs. |
|||
|
|
|||
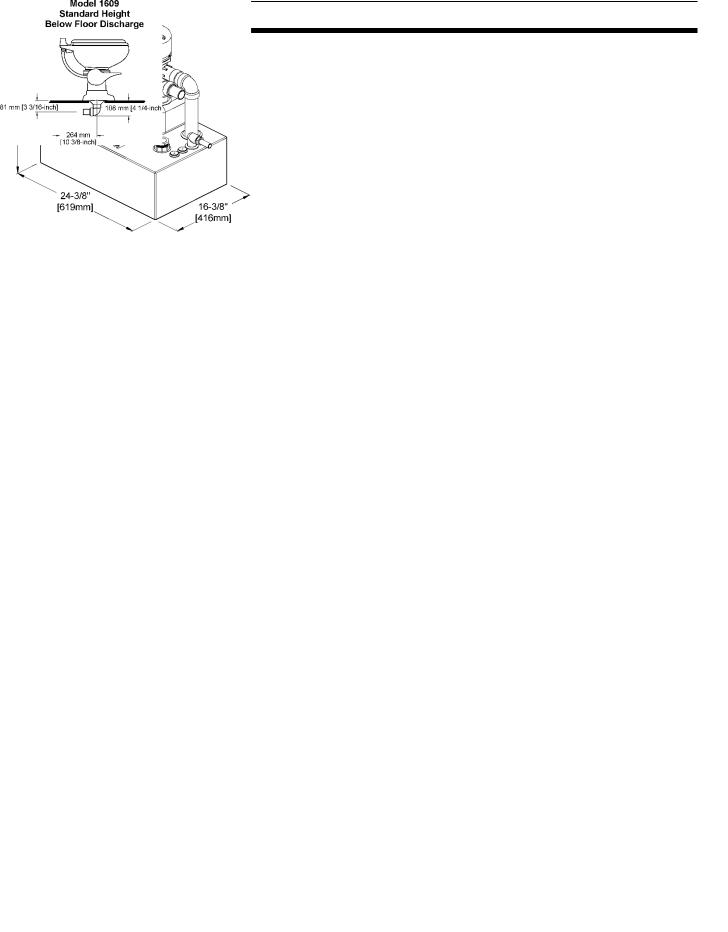
1609 |
Standard-height vacuum toilet. Below-floor discharge. |
495 mm x 378 mm x 457 mm |
10.4 Kg |
|
19 1/2" x 14 7/8" x 18" |
23 Lbs. |
|||
|
|
|||
1648 |
Standard-height vacuum toilet. Above-floor, rear discharge. |
495 mm x 378 mm x 457 mm |
10.4 Kg |
|
19 1/2" x 14 7/8" x 18" |
23 Lbs. |
|||
|
|
All models flush with as little as .47 liters (1 pint) of water. Dimensions may vary 10mm (3/8"). Weights may vary 5%.
*
MODEL 1606
* Width measurement |
MODELS 1609, 1648 |
|
|
|||
includes flush pedal. |
|
|
||||
HTS-EC MODELS |
|
|
|
|
||
|
|
|
|
|
|
|
Model |
Size |
Usable |
Weight |
Max. Weight |
Number of |
|
Length x Width x Height |
Capacity |
Flushes* |
||||
|
|
|
||||
35 HTS-EC |
619mm x 416mm x 578mm |
35 Liters |
20.2 Kg |
55.3 Kg |
27 |
|
24 3/8" x 16 3/8" x 22 3/4" |
9.2 Gallons |
44.5 Lbs. |
122 Lbs. |
|||
|
|
|||||
60 HTS-EC |
718 mm x 362 mm x 657 mm |
60 Liters |
22.9 Kg |
83 Kg |
47 |
|
28 1/4" x 14 1/4" x 25 7/8" |
15.8 Gallons |
50.5 Lbs. |
183 Lbs. |
|||
|
|
|||||
90 HTS-EC |
902 mm x 330 mm x 746 mm |
90 Liters |
27.4 Kg |
117.9 Kg |
70 |
|
35 1/2" x 13" x 29 3/8" |
23.8 Gallons |
60.5 Lbs. |
260 Lbs. |
|||
|
|
|||||
* VacuFlush toilets use as little as 0.4 l (0.11 gal.) of water per flush. Because we recommend adding more water when flushing solids, we conservatively estimate average water use at 0.76 l (0.2 gal.) per flush. Total effluent averages 1.29 l (.34 gal.) per flush.
35 HTS-EC |
60 HTS-EC |
90 HTS-EC |
3

KEY SYSTEM COMPONENTS
Vacuum Toilet: The VacuFlush toilet operates differently as compared to other toilets. VacuFlush systems use a small amount of water (from as little as 400 ml) per flush in addition to a powerful vacuum. The toilet is connected to a pressurized freshwater system. Because a vacuum generator is located between the vacuum toilet and the waste holding tank, the result is an odor-free bathroom compartment. VacuFlush toilets are equipped with an integral anti-siphon vacuum breaker which prevents the possible contamination of the fresh water supply.
Vacuum Generator: The vacuum generator creates the vacuum required to move waste from the toilet to the waste holding tank. It combines a vacuum tank and a vacuum pump in one unit. System vacuum level is monitored by a vacuum switch located on the vacuum tank. When this switch senses a drop in vacuum in the system, it automatically signals the pump to energize and bring the vacuum to operating level. This process is normally completed in less than one minute. The vacuum pump design is both an efficient air and liquid pump that handles solids without a problem. It has two duckbill valves on each side of the pump chamber to maintain vacuum and prevent backflow of waste. It is manufactured of long-lasting polypropylene and draws only 4 to 6 amps of current at 12 volts DC.
VacuStat® Status Panel: The status panel is mounted in the bathroom. A green light indicates that sufficient vacuum is available for the next flush. The red light indicates that the vacuum is building and the pump is running. The red light also indicates that the holding tank is full and the pump has been deactivated until the tank is emptied.
TankWatch® Level Monitor: Includes four tank level indicator lights – Empty, Low, Mid and Full, and international symbology of four tank levels. One light is always on to indicate that system is operating. Panel is connected to three (Empty, Mid, Full) probes in holding tank. No electrical components come in contact with waste or water. Operates on 12 or 24-volt DC. Uses only .017 amps at 12 volts.
VacuFlush Shutdown Relay: To prevent overfilling of a holding tank, a shutdown relay is supplied as standard with the TankWatch panel. The relay shuts off power to the vacuum generator when the holding tank reaches the "Full" level, preventing overfilling of the holding tank.
Vacuum
Toilet
Vacuum
Generator
VacuStat Panel
TankWatch Panel
4
KEY SYSTEM COMPONENTS (cont'd)
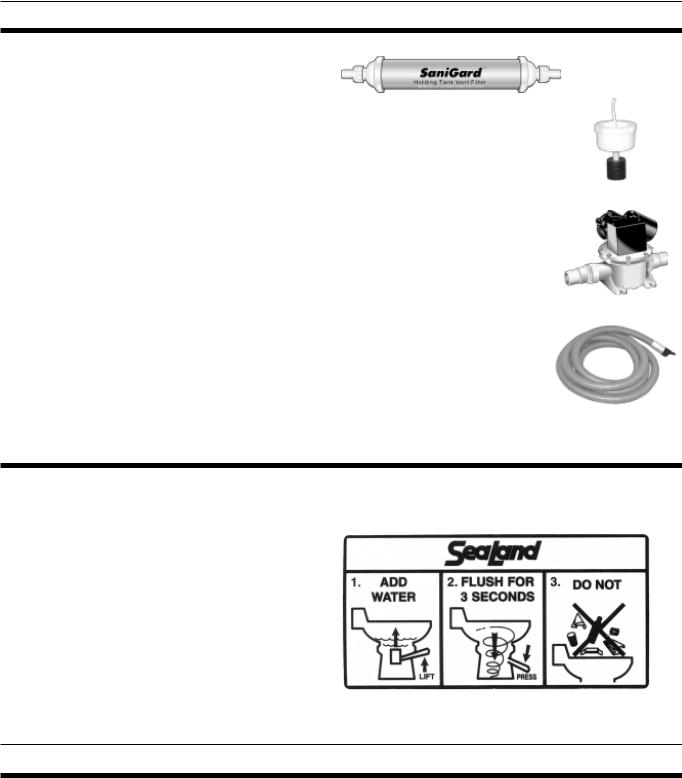
SaniGard™ Holding Tank Vent Filter: The vent |
|
SaniGard Vent |
|||
filter stops odors that escape from the holding tank |
|
||||
vent. It contains odor-removing filter media to keep |
|
|
Filter |
||
your boat smelling clean and pleasant. Each cartridge |
|
|
|
|
|
|
|
|
|||
|
|
|
|
||
is good for an entire season and is easily replaced for |
|
|
|
||
|
|
|
|||
a fresh start. |
Tank Full |
||||
"Tank Full" Float Switch: The Tank Full Float Switch is mounted in top of the |
Float |
||||
holding tank or vent pipe, and shuts the vacuum pump or vacuum generator off when |
Switch |
||||
the float switch is activated by the rising contents of the holding tank. This relay also |
|
|
|
||
sends a signal to the status panel red light. This relay is prewired and mounted to the |
|
|
|
||
pump on the vacuum generator. For systems using a vacuum tank and separate |
|
|
|
||
pump, it is mounted separately during installation and wired accordingly. |
Discharge |
||||
SaniPump™ Discharge Pump: For thorough, trouble-free holding tank |
Pump |
||||
|
|
|
|||
pump-out, our discharge pump offers many benefits. Its specially designed bellows |
|
|
|
||
diaphragm allows it to run dry without harm. It handles up to 315 gallons (1192 |
|
|
|
||
liters) per hour, while drawing only 6 amps at 12 volts DC. |
|
|
|
||
NOTE: On/Off switch for discharge pump is supplied by installer. |
|
|
|
||
Discharge |
|||||
Discharge Hose: Reinforced, 32 mm ID, 3-meter discharge hose. Includes |
|||||
Hose |
|||||
38 mm adapter to connect to discharge pump outlet. |
|||||
|
|
|
|||
|
|
|
|
|
|
|
|
|
|
|
|
IMPORTANT INFORMATION BEFORE OPERATION
1.Fill freshwater tank and add deodorant to holding tank through toilet bowl.
2.Make sure all guests understand the operation of the VacuFlush system and the instruction label is in plain sight and easy for guests to read. If this label is not included in this manual, please contact Dometic’s
Customer Service Department immediately.
3.Remember the vacuum pump starts automatically. Shut off the electrical power to the system before servicing and do not leave the recreational vehicle with toilet system breaker on.
4.Never use drain openers, alcohol, solvents, etc. in the system.
5.If the system does not function properly, refer to the Troubleshooting Section of this manual and repair as necessary. If problem persists, contact your local Dometic product dealer or see the Customer Service section of this manual.
SYSTEM START-UP
1.Turn on electrical power to sanitation system.
2.Flush water into system by depressing flush lever on toilet until water starts flowing through the vacuum pump and into the holding tank (blackwater tank). This wets the pump interior for efficient operation. If the vacuum pump does not run, check for loose electrical connections. Refer to the system Wiring Diagram.
3.The vacuum pump will run for approximately 30 to 90 seconds until the system reaches operating vacuum level and then will shut off.
5
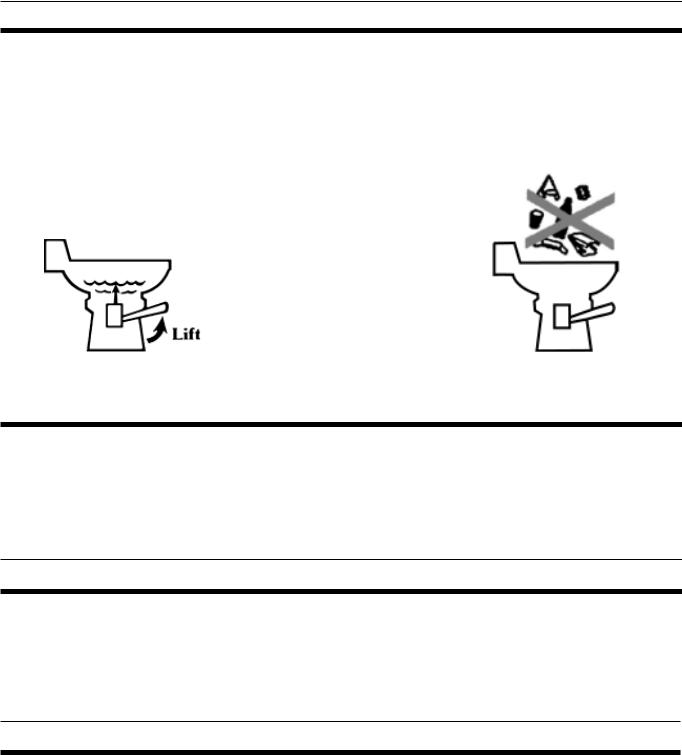
VACUUM TOILET OPERATION
|
1. To add water to the toilet before |
2. To flush toilet, press flush lever |
3. Do not dispose of sanitary napkins |
|
|
using, raise flush lever until desired |
sharply down to the floor until contents |
or other non-dissolving items in toilet, |
|
|
water level is reached. Generally, more |
clear bowl. A sharp popping noise is |
such as facial tissue or paper towels. |
|
|
water is required only when flushing |
normal when the vacuum seal is bro- |
These items can cause plugging of the |
|
|
solids. |
ken and flushing action begins. |
system. Refer to the Deodorants and |
|
|
|
Be sure to hold lever down for three |
Special Tissue section in this manual |
|
|
|
seconds. If flush lever is accidentally |
for more information. |
|
|
|
released before waste clears bowl, do |
|
|
|
|
not attempt to flush toilet again until |
|
|
|
|
vacuum pump stops running. A small |
|
|
|
|
amount of water should remain in the |
|
|
|
|
bowl after flushing. |
|
|
|
|
|
|
|
|
|
|
|
|
HOLDING TANK OPERATION – DISCHARGE
1.Position vehicle close to sewage dumping facility.
2.Unroll discharge hose, remove plastic cap, and insert end into dumping facility.
3.Activate discharge pump.
4.After tank is empty, the tank can be rinsed. (Note: Rinsing systems vary by vehicle. Consult vehicle dealer.)
5.Discharge rinse water into dumping facility. Drain all water from discharge hose. Put plastic cap on end of hose. Roll up and store hose.
CLEANING – HOLDING TANK
A small amount of water remains in all holding tanks. It is good practice to rinse the tank after the contents have been discharged. This can be accomplished by adding water to the toilet bowl. Add 237 ml (8 oz.) of SeaLand® Holding Tank Deodorant to the bowl. Flush the entire contents into the holding tank and continue flushing until the discharge from the holding tank is clear.
Do not use chlorine-based cleaners, caustic cleaners or chemicals, such as drain-opening products, as they may damage the system’s seals and hose.
WINTERIZING – HOLDING TANK
If using antifreeze to winterize the holding tank system, use only propylene glycol freshwater antifreeze that does not contain alcohol. Antifreeze that contains alcohol will result in damage to your sanitation system.
1.Pump out holding tank.
2.Thoroughly flush the system with fresh water before adding propylene glycol freshwater antifreeze to the HTS.
3.Turn off electrical power.
6
PROPER TOILET CLEANING AND MAINTENANCE
Dometic china toilets should be cleaned regularly for maximum sanitation and operational efficiency. You can clean it just as you would a household toilet.
Do not use caustic chemicals, such as drain-opening types, as they will damage the seals.
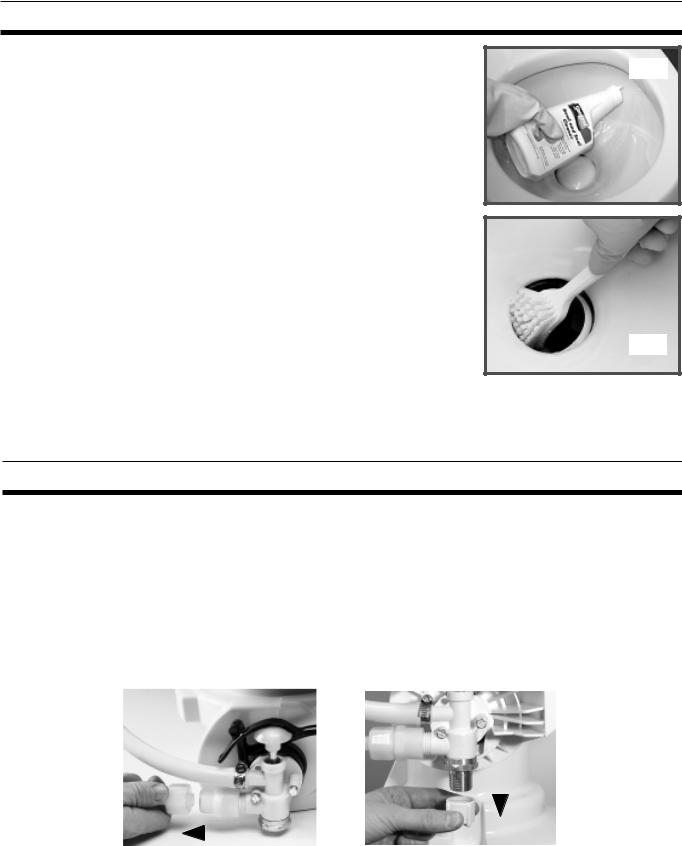
BOWL CLEANING: For stubborn stains, use SeaLand® Bowl and Seal Cleaner (Fig. A). It’s manufactured especially for use with Dometic toilets. In certain locations where water is hard, a build-up of lime may dull the toilet bowl finish. Restore the shine with this SeaLand cleaner. If you cannot find it in your area, contact Dometic for your nearest dealer. If this cleaner is not available, you can also use Bar Keepers Friend® cleanser. It is not necessary to vigorously scrub with either product. Please follow label instructions.
SEAL CLEANING: After an extended time, mineral deposits from hard water can build up under the edge of the rubber bowl seal, resulting in a slow leakdown of water from the bowl. To prevent this mineral build-up, periodically clean under the bowl seal with SeaLand Bowl and Seal Cleaner (Fig. B).
1.Shut off water supply and power to vacuum pump or vacuum generator.
2.Apply cleanser onto a cleaning brush, open the flush ball by pressing on flush lever, and scrub under the seal. Make sure to push brush bristles between bottom of seal and top of flush ball surface to scrub all parts of seal that come into contact with flush ball.
3.Close ball and wait 2-3 minutes.
4.Open flush ball. Use brush and water to rinse away cleanser and loosened deposits.
5.After cleaning, turn on water and electrical power to toilet system.
WINTERIZING – TOILET
Fig. A
Fig. B
At the end of each season, the Dometic toilet should be winterized for storage by either draining or using potable water-safe antifreeze in the system.
To drain:
1.Thoroughly flush system with fresh water.
2.Empty holding tank.
3.Model 1606 only: Shut off water supply to toilet(s), and remove inlet waterline (Fig. C). Do not remove brass cap on bottom of valve.
Model 1609, 1648: Shut off water supply to toilet(s), and remove plastic cap from bottom of brass fitting (Fig. D).
Do not remove brass fitting on bottom of water valve.
4.Press flush lever until all water is drained from toilet(s).
|
|
|
|
|
|
|
|
|
|
|
|
Fig. C |
|
|
|
|
|
|
|
Fig. D |
|
|
|
|
|
|
|
|
|
|
|
|
|
|
|
|
|
|
|
|
|
|
|
|
|
|
|
|
|
|
|
|
|
|
|
|
|
|
|
|
|
|
|
|
|
|
|
|
|
|
|
|
|
|
|
|
|
|
|
|
|
|
|
|
|
|
|
7

MAINTENANCE SCHEDULE
Maintenance intervals and normal parts replacement vary widely depending on numerous factors such as frequency of system use, quality of flushing water, etc. The following chart is intended strictly as a general guide in keeping the sanitation system 100% ready for any conditions of use.
Maintenance Procedure |
Recommended |
Parts Required |
|
Date of Service |
|||
|
|
||
ROUTINE MAINTENANCE |
|||
Toilet flush ball seal cleaning |
Monthly |
SeaLand Bowl and Seal Cleaner |
|
Tighten toilet seat mounting |
Monthly |
N/A |
|
hardware |
(or as needed) |
|
|
MAJOR SYSTEM MAINTENANCE |
|||
Replace duckbill valves in vacuum |
Every three years |
Duckbill Valve Kit: |
|
generator or vacuum pump |
|
Item No. 310076 (2) |
|
Replace flush ball seal and flush |
Every three years |
Flush Ball Seal: see Parts List |
|
ball (if needed) |
|
Flush Ball: see Parts List |
|
|
|
|
|
SPARE PARTS
It is recommended that the following parts be kept at all times. They are especially important for vacuum system emergency repair when you are in areas where replacement parts are not readily available.
Description |
Part Number |
Quantity |
Where Used |
|
|
|
|
|
|
Flush Ball Seal |
see Parts List |
1 |
|
|
Flush Ball |
see Parts List |
1 |
Vacuum Toilet |
|
Water Valve |
see Parts List |
1 |
||
|
||||
Vacuum Breaker Assembly |
see Parts List |
1 |
|
|
Vacuum Switch Kit |
see Parts List |
1 |
Vacuum Generator |
|
1.5-inch Duckbill Valve Kit |
310076 |
2 |
(or Vacuum Pump and |
|
(2 ea. per kit) |
|
|
Vacuum Tank) |
SERVICE TIP
Checking for water leaks behind or under toilets or other appliances can make it difficult to locate the source. Dripping water at room temperature makes it difficult to feel wetness. Taking four or five sheets of toilet tissue and wiping all seams and waterline connections offers a simple means of locating the general area of the leakage. Start at the top of the unit since gravity will cause a leak to run downward. When the tissue comes in contact with the leaking water, it will immediately change texture.
ORDERING PARTS
Dometic is ready to assist you in the event that service is required. Before calling your local dealer or parts distributor, please have the following information available. Your cooperation in having this information ready is appreciated.
1.Toilet Model Number (See following section.)
2.Serial Number
3.Part Number, Description and Quantity (See Parts List information.)
8
Loading...