


Owner’s Manual
DECLARATION OF CONFORMITY
Manufacturer’s Name: |
DigiTech® |
|
Manufacturer’s Address: |
8760 S. Sandy Parkway |
|
|
Sandy, Utah 84070, U.S.A. |
|
declares that the product: |
|
|
Product name: |
CF 7 |
|
Product option: |
all (requires Class II power adapter that conforms |
|
|
to the requirements of EN60065, EN60742, or |
|
|
equivalent.) |
|
conforms to the following Product Specifications: |
||
|
Safety |
IEC 60065 (1998) |
|
EMC |
EN 55013 (1990) |
|
|
EN 55020 (1991) |
Supplementary Information:
The product herewith complies with the requirements of the Low Voltage Directive 73/23/EEC and the EMC Directive 89/336/EEC as amended by Directive 93/68/EEC.
|
Vice-President of Engineering - MI |
|
8760 S. Sandy Parkway |
|
Sandy, Utah 84070, U.S.A. |
|
Date: September 11, 2006 |
European Contact: |
Your local DigiTech Sales and Service Office or |
|
Harman Music Group |
|
8760 South Sandy Parkway |
|
Sandy, Utah, 84070 U.S.A. |
|
Ph: (801) 566-8800 |
|
Fax: (801) 568-7583 |
Warning
For your protection, please read the following: Important Safety Instructions
1.Read these instructions.
2.Keep these instructions.
3.Heed all warnings.
4.Do not use this apparatus near water.
5.Clean only with dry cloth.
6.Do not block any ventilation openings. Install in accordance with the manufacturer’s instructions.
7.Do not install near any heat sources such as radiators, heat registers, stoves, or other apparatus (including amplifiers) that produce heat.
8.Protect the power cord from being walked on or pinched particularly at plugs, convenience receptacles, and the point where they exit from the apparatus.
9.Unplug this apparatus during lightning storms or when unused for long periods of time.
10.No user serviceable parts inside. Refer all servicing to qualified service personnel. Servicing is required when the apparatus has been damaged in any way, such as power-supply cord or plug is damaged, liquid has been spilled or objects have fallen into the apparatus, the apparatus has been exposed to rain or moisture, does not operate normally, or has been dropped.
11.WARNING:To reduce the risk of fire or electric shock, do not expose this apparatus to rain or moisture.
12.Refer to labels on the unit, including bottom cover, or other markings and pertinent information.
Congratulations, you are the proud owner of a DigiTech® CF-7 Chorus Factory™. The CF-7 offers the lush sounds from seven of the most popular chorus pedals ever designed into a single compact pedal.
Maybe you’ll only use one model, on one setting; or maybe you’ll explore all seven classic models to their full capacity, and use both the CF-7’s outputs to connect to two amps for the full stereo experience. Either way, you’ll have a full arsenal of rich chorus sounds!
You will definitely appreciate the sonic richness of each model, thanks to our custom AudioDNA2® DSP chip. The CF-7’s models were meticulously designed to capture every nuance each pedal has to offer. And just like all X-Series™ pedals, the CF-7 features our Flexible Output ModeTM, equipped with our acclaimed CIT™ cabinet modeling for whenever you need a guitar amp response when running the CF-7 directly into a mixer or recording device.
So plug in your CF-7 and get ready for takeoff. You’ve got a whole world of choruses and mod effects to discover.
Disclaimer: DigiTech, X-Series, CIT, Multi Chorus, Flexible Output Mode,AudioDNA2 and Chorus Factory are trademarks of Harman International Industries, Inc. Other product names modeled in this product are trademarks of their respective companies that do not endorse and are not associated or affiliated with DigiTech or Harman International Industries, Inc.They are trademarks of other manufacturers and were used merely to identify products whose sounds were reviewed in the creation of this product.
Included Items
The DigiTech® Chorus FactoryTM Pedal includes the following items:
•DigiTech® Chorus FactoryTM Pedal
•This Owner’s Manual
•DigiTech Warranty Card
•DigiTech Brochure
Please make sure that all of these items have been included before you get started.
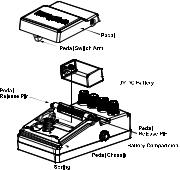
Battery Replacement Directions
1.Using the tip of a 1/4" guitar cable, push one of the release pins in on either side of the pedal, and remove the pedal from the pedal chassis.
2. Remove the battery from the battery compartment and disconnect the battery cable.
3. Connect a new battery to the battery
cable and put it back in the battery compartment. Make sure the battery
cable does not interfere with the spring or pedal switch arm.
4. Place one hole of the pedal over its corresponding pin.
5. Push the opposite pin in and lower the
other side of the pedal into place over the depressed pin. Release the pin.
When the pedal is properly fastened, both release pins are flush with the outer side of the pedal.
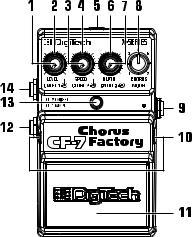
1.LEVEL (Tip)
Controls the effect output level or mix of the selected Model.
2.CNTRL 1 (Ring)
Model dependent. Refer to the Chorus Model Control Table on page 14 for more information.
3.SPEED (Tip)
Adjusts the modulation speed (or rate) of the selected Model.
4.CNTRL 2 (Ring)
Model dependent. Refer to the Chorus Model Control Table on page 14 for more information.
5.POWER SUPPLY JACK
Connect only the DigiTech® PS200R (9V DC) power supply to this jack.
6.CNTRL 3 (Ring)
Model dependent. Refer to the Chorus Model Control Table on page 14 for more information.
7.DEPTH (Tip)
Controls the effect depth of the selected Model.
8.CHORUS MODEL
Selects one of the following seven Chorus Models:
MODEL 1: DigiTech® Multi Chorus®
MODEL 2: Based on the Voodoo LabTM Analog Chorus
MODEL 3: Based on the TC Electronic® Stereo Chorus Flanger
MODEL 4: Based on the Fulltone® Choralflange™
MODEL 5: Based on the Boss® CH- 1 Super ChorusTM
MODEL 6: Based on the ElectroHarmonix® Small Clone®
MODEL 7: Based on the Boss® CE- 5 Chorus EnsembleTM
Please refer to the Model Descriptions section on the following pages for more information regarding each model.
9.INPUT
Connect your instrument to this jack. Connecting a guitar cable to this jack supplies battery power even though the Indicator LED may not be lit.To prolong battery life, disconnect all cables when not in use.
10.PEDAL RELEASE PINS
These two pins are spring-loaded hinges that hold the pedal in place. Push these pins in to release the pedal from the pedal chassis exposing the battery compartment. Refer the Battery Replacement Diagram on page 3 for more information.
11.PEDAL
Press the pedal to turn the effect on and off.
12.OUT 1 (MONO)
Connect this output to a single guitar amplifier when only one amp is being used. Use unbalanced 1/4" instrument cables only.
13.INDICATOR LED
This LED indicates when the effect is turned on. If the LED does not light when the cables are connected, the battery needs to be replaced.
14.OUT 2
Connect this output to a second amplifier for true stereo chorusing. Stereo is the best way to get the most effective chorusing experience from the Chorus FactoryTM pedal. Use unbalanced 1/4" instrument cables only.
 Loading...