


 Loading...
Propane/LP Table Top Patio Heater
Owner’s Manual


 86NH
86NH
MODEL SPC-21PHTSA

 WARNING: For outdoor use only.
IMPORTANT: Read and understand this manual before assembling, starting or servicing heater. Improper use of heater can cause serious injury. Keep this manual for future reference.
 WARNING CARBON MONOXIDE HAZARD
This appliance can produce carbon monoxide which has no odor.
Using it in an enclosed space can kill you.
Never use this appliance in an enclosed space such as a camper, tent, car, or home.
Save this manual for future reference. For more information, visit www.desatech.com

 GENERAL HAZARD WARNING:
Failure to comply with the precautions and instructions provided with this heater, can result in death, serious bodily injury and property loss or damage from hazards of fire, explosion, burn, asphyxiation, carbon monoxide poisoning and/or electrical shock.
Only persons who can understand and follow the instructions should use or service this heater.
Ifyouneedassistanceorheaterinformationsuchasaninstructions manual, labels, etc. contact the manufacturer.
TABLE OF CONTENTS
Specifications ...................................................... |
2 |
Cleaning and Maintenance.................................. |
|
7 |
Safety Information ............................................... |
2 |
Storage................................................................ |
|
8 |
Propane/LP Safety .............................................. |
4 |
Servicing.............................................................. |
|
8 |
Product Identification........................................... |
5 |
Troubleshooting................................................... |
|
9 |
Product Features................................................. |
5 |
Technical Service ............................................... |
|
11 |
Unpacking ........................................................... |
5 |
Accessories........................................................ |
|
11 |
Assembly Instructions ......................................... |
5 |
Replacement Parts............................................. |
|
11 |
Propane/LP Supply.............................................. |
6 |
Illustrated Parts Breakdown and Parts List ....... |
12 |
|
Operating Instructions ......................................... |
6 |
Warranty and Repair Service .............. |
Back Cover |
|
SPECIFICATIONS
Rating |
10,000-15,000 |
Btu/hr (2.93-4.40 kW) |
|
Type of Gas |
Propane/LP Only |
||
Gas Supply Pressure to regulator |
Maximum - 150 psi (1034.2 kPa) Minimum - 5 psi (34.5 kPa) |
||
Gas Supply Pressure Regulator out |
11" W.C. (2.74 kPa) |
||
Ignition |
Piezo Ignition |
|
|
Fuel Consumption |
10,000 |
Btu/hr: |
2 hr, .016 lb/hr (0.21 kg/hr) |
(per 16 oz propane/LP cylinder) |
15,000 |
Btu/hr: |
1.25 hr, .070 lb/hr (0.32 kg/hr) |
Flame Safety |
Thermocouple Operated Gas Valve with Oxygen Depletion System |
||
SAFETY INFORMATION
 WARNING:Thisproductcontainsand/orgenerateschemicals known to the State of California to cause cancer or birth defects, or other reproductive harm.
 WARNING: Not for home or recreational vehicle use.
 WARNING: Fire, burn, inhalation, and explosion hazard. Keep solidcombustibles,suchasbuildingmaterials,paperorcardboard, a safe distance away from the heater as recommended by the instructions.Neverusetheheater inspaceswhichdoormaycontain volatileorairbornecombustibles, orproductssuchasgasoline,solvents,paintthinner,dustparticles or unknown chemicals.
2 |
www.desatech.com |
114082-01A |

SAFETY INFORMATION
Continued
We cannot foresee every use which may be made of our heaters. Check with your local fire safety authority if you have questions about heater use.
Other standards govern the use of fuel gases and heat producing products for specific uses. Your local authorities can advise you about these.
Carbon Monoxide Poisoning: Direct-Fired means that all of the combustion products enter the heated space. Even though this heater operates very close to 100 percent combustion efficiency, it still produces small amounts of carbon monoxide. Some people are more affected by carbon monoxide than others. Early signs of carbon monoxide poisoning resemble the flu, with headaches, dizziness, and/or nausea. If you have these signs, the heater may not be working properly.Getfreshairatonce!Check for proper ventilation and have heater serviced.
Propane Gas: Propane gas is odorless. An odormaking agent is added to propane gas. The odor helps you detect a propane gas leak. However, the odor added to propane gas can fade. Propane gas may be present even though no odor exists.
This is a propane, direct-fired heater. Propane is heavier than air. If propane leaks from a connection or fitting, it sinks to the floor, collecting there with the surrounding air, forming a potentially explosive mixture.Obviously,propaneleaksshouldbeavoided, so set up the propane supply with utmost care. Read Propane/LP Safety, page 4 for additional information about detecting propane leaks. Leak check new connections or reconnections with a soap and water solutionandfollowallconnectioninstructionsherein. Also, ask your propane dealer for advice on the propane application and supply installation and ask them to check it if there are any questions.
Whentheheateristobeoperatedinthepresenceof otherpeopletheuserisresponsibleforproperlyacquainting those present with the safety precautions and instructions, and of the hazards involved.
Make certain you read and understand all warnings. Keep this manual for reference. It is your guide to safe and proper operation of this heater.
1.Check the heater thoroughly for damage. DO NOT operate a damaged heater.
2.DO NOTmodify the heater or operate a heater which has been modified from its original condition.
3.Use only propane/LP gas.
4.Use only VAPOR WITHDRAWAL propane supply.Thepropanecylindermustbearranged for vapor-withdrawal, in accordance with the
Compress Gas Associations, Small Propane BottleAssembly. If there is any question about vapor withdrawal, ask your propane dealer.
5.Never use the heater if the ballast weight is not assembled onto the base. The base must be weighted to avoid tipping.
6.Use only the factory preset regulator provided withtheheater.Useonlyreplacementpressure regulators specified in this manual.
7.If used, inspect the hose before each use of the heater. If it is evident there is excessive abrasion or wear, or the hose is cut, it must be replaced prior to the heater being put into operation. Use replacement hose assembly kit 100427-01 (see Accessories, page 11).
8.This heater is for OUTDOOR USE ONLY, even so, make sure that there is ample fresh air ventilation. Do not use in buildings, garages or other enclosed spaces.
9.If at any time gas odor is detected, IMMEDIATELY DISCONTINUE operation until the source of gas has been located and corrected. Read Propane Safety, page 4 for additional information about detecting propane leaks.
10.Install the heater such that it is not directly exposed to water spray, rain and/or dripping water.
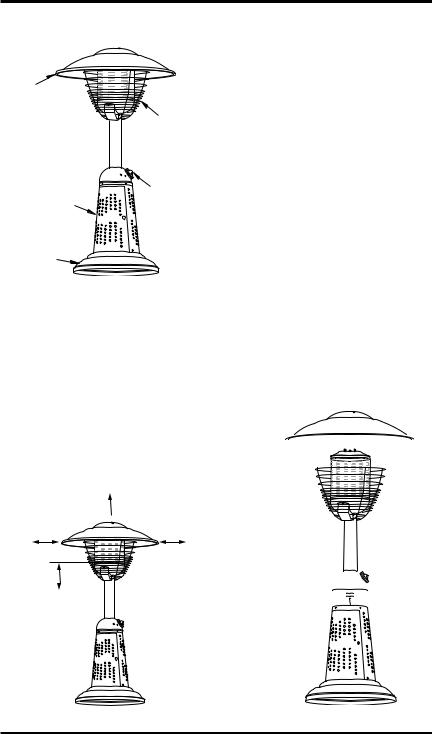
11.Maintain minimum clearance to people or normal combustible material (like paper) of 3.6 ft. (1100 mm) from top and 2 ft. (609 mm) from the reflector.
12.Operate only on a stable, level surface.
13.Do not spray aerosols near the heater during use or shortly thereafter.
14.Do not clean heater with combustible or corrosive cleaners. Use warm, soapy water.
15.Check control compartment burners and circulation air passageways for free air passage, makesurethattherearenoobstructions.These areas are a common location for spider webs, which can present a dangerous condition, damage the heater and render it unsafe for use. The heater must be checked if any of the following conditions exist:
a)Gas smell along with predominate yellow tipping of the burner.
b)Heater does not reach temperature.
c)Uneven burner glow.
d)Burner makes popping noises during normal use, other than during shutdown.
114082-01A |
www.desatech.com |
3 |
SAFETY INFORMATION
Continued
16.Use only soapy water (1 part liquid dishwashing detergent to 3 parts water) to conduct leak tests whenever a propane cylinder is connected. Bubbles indicate a leak.
17.Do not adjust gas regulator. If you are unsure of your appliances gas type or pressure, call a qualified service person.
18.Place the control knob on "OFF" position when heater is not in use.
19.Always disconnect the gas supply after the heater is turned "OFF".
20.Do not move, handle or service while hot or burning.
21.Allow 45 minutes to cool down after use before attempting to move heater.
22.Do not operate this appliance in windy conditions.Maximumallowablewindspeedis10mph (16 Km/h).
23.Do not operate this appliance in temperature conditions below 40° F (5° C).
24.Keepheaterawayfromareaswhereflammable liquids, vapors or solids are stored or used.
25.If operated in salt air environments, the unit will require more frequent cleaning; otherwise, the longevity of the unit will deteriorate rapidly. Use warm soapy water to clean the unit.
26.Items or material, when stored under the heater, will be subjected to radiant heat and could be seriously damaged.
27.Use only in accordance with local codes, or in the absence of local codes, with the National Fuel Gas Code ANSI Z223.1.
Any guard or other protective device removed for servicing must be replaced prior to operating the heater.
Surface temperatures become very hotwhenoperatingheater.Children andadultsshouldstayawaytoavoid burns or clothing ignition.
Young children should be carefully supervisedwhentheyareinthearea of the heater.
Clothing or other flammable materials should not be hung from the heater, or placed on or near heater.
Installation and repair should be done by a qualified service person. The heater should be inspected before use and at least annually by a qualified service person. More frequentcleaningsmayberequired as necessary. It is imperative that controlcompartments,burnersand circulating air passageways of the heater be kept clean.
 CAUTION: The gas pressure regulator provided with this appliancemustbeused.Thisregulatorissetforanoutputpressure of 11" W.C. (2.74 kPa).
PROPANE/LP SAFETY
 WARNING: For outdoor use only.
ASPHYXIATION HAZARD
•Donotusethisheaterforheatinghuman living quarters.
•Do not use in unventilated areas.
•The flow of combustion and ventilation air must not be obstructed.
•Proper ventilation air must be provided to support the combustion air requirements of the heater being used.
•RefertotheSpecifications,page2,heater dataplateorcontactDESAHeatingProductstodeterminecombustionairventilation requirements of the heater.
•Lack of proper ventilation air will lead to improper combustion.
•Impropercombustioncanleadtocarbon monoxide poisoning leading to serious injuryordeath.Symptomofcarbonmonoxide poisoning can include headaches dizziness and difficulty in breathing.
4 |
www.desatech.com |
114082-01A |
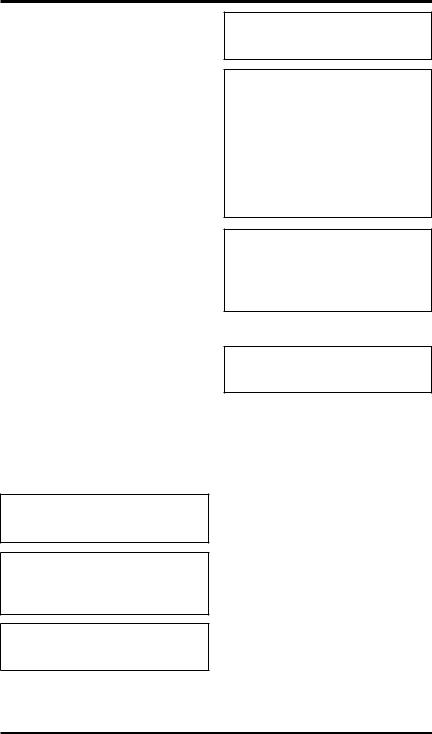
PRODUCT
IDENTIFICATION
Dome
Reflector
Wire
Guard
Propane/LP |
Control |
|
Knob |
||
Cylinder |
||
|
||
Housing |
|
|
Base |
|
Figure 1 - Propane/LP Table Top Patio
Heater
PRODUCT FEATURES
SAFETY PILOT
This heater has a pilot with an Oxygen Depletion Sensing (ODS) safety shutoff system. The ODS/pilot is a required feature for table top patio heaters.The ODS/pilot shuts off the heater if there is not enough fresh air.
PIEZO IGNITION SYSTEM
This heater has a piezo ignitor. This system requires no matches, batteries, or other sources to light heater.
16"
(40.64 cm) 16" 
(40.64 cm)
16" (40.64 cm)
30" (76.20 cm) Below Burner
UNPACKING
1.Remove heater from carton.
2.Remove all protective packaging applied to heater for shipment.
3.Check heater for any shipping damage. If heater is damaged, promptly return to dealer where you bought heater.
ASSEMBLY
INSTRUCTIONS
Tools Required:
•Phillips Head Screwdriver
•Standard Pliers
Inspect heater components for possible shipping damage. If any is found, immediately notify the dealer. Check to make sure that all components are included with your heater (see pages 12 and 13).
1.Attach burner and controls assembly to base assemblywith4screws(seeFigure3).Tighten screws.Placeoperatinginstructionlabelunder control knob for easy review.
2.Align3domeholeswiththe3studsprotruding from burner top (see Figure 3). Place dome onto the studs. Install 3 cap nuts onto studs. Tighten with pliers.
The installation must conform with local codes or in the absence of local codes, The National Fuel Gas Code, ANSI Z223.1.
Cap Nuts 


Dome 

Reflector
Burner and
Controls 
Assembly
Screws 


Base
Assembly 
Figure 2 - Clearances from Combustibles |
Figure 3 - Heater Assembly |
114082-01A |
www.desatech.com |
5 |

PROPANE/LP SUPPLY
Propane/LP gas and propane/LP tank(s) are to be furnished by the user. The propane/LP cylinder to be used must be constructed and marked in accordance with the specifications for the propane/LP gas cylinders of the U.S. Department of Transportation (DOT).
Use this heater only with a propane/LP vapor withdrawal supply system. See Chapter 5 of the
Standard for Storage and Handling of Liquefied Petroleum Gas, ANSI/NFPA 58 and/or CAN/CGA B149.2. Your local library or fire department will have this booklet.
The amount of propane/LPgas ready for use from propane/LP tanks varies. Two factors decide this amount:
1.The amount of propane/LP gas in tank(s)
2.The temperature of tank(s)
OPERATING
INSTRUCTIONS
PREPARING FOR OPERATION
1.Check heater for possible shipping damage. If any is found, immediately notify the factory.
2.Follow all safety information.
3.Make sure control knob is in the OFF position.
4.Open door to propane/LPcylinder housing by turning latching knob counterclockwise.
5.Check regulator inlet and propane/LPcylinder for contamination such as dirt, webs, etc. Clean if needed.
6.Screw threaded end of propane/LP canister clockwise into threaded regulator inlet until hand tight.
IMPORTANT:Useonlystandard16.4ozpropane/LP cylinder constructed and marked in accordance with the U.S. Dept. of Transportation (D.O.T.) No. 600 connection type. Disconnect the cylinder when the appliance is not in use.
7.Apply a soap and water solution to connection at regulator and cylinder. Bubbles forming show a leak.
8.In case of any leaks, remove propane/LP cylinder. Check and clean connection. Reconnect regulator and propane/LP cylinder and leak test again. If leak persists, call DESAHeating Products at 1-866-672-6040.
9.Close and latch door
TO START HEATER
1.Turn gas control knob clockwise to OFF position.
2.Push in and turn gas control knob counterclockwise to ON/HIGH. This will light the burner. If necessary, keep pressing and turning knob clockwise then counterclockwise until burner lights.
3.Keep control knob pressed in for at least 30 seconds after lighting burner.After 30 seconds release control knob.
4.If the burner does not stay lit, turn control knob clockwise to OFF immediately, wait 5 minutes then repeat steps 2 and 3.
5.When burner is lit, turn gas control knob to desired setting.
TO STOP HEATER
1.Turn control knob clockwise to OFF position.
2.If heater is not to be relit, remove propane/LP cylinder by rotating counterclockwise. Remove cylindr when heater is not in use.
3.Do not relight heater for 5 minutes after propane/LP cylinder has been removed.
TO RESTART HEATER
1.Turn control knob clockwise to OFF position.
2.Wait 5 minutes.
3.Restart following To Start Heater.
 WARNING: FOR YOUR SAFETY
If you smell gas:
•Shut off gas to the appliance.
•Extinguish any open flames.
•Ifodorcontinues,immediately call your gas supplier.
See Safety Information, page 2 for more information.
6 |
www.desatech.com |
114082-01A |
CLEANING AND
MAINTENANCE
 WARNING: Turn off heater and let cool before cleaning.
 CAUTION: You must keep controlareas,burner,andcirculatingairpassagewaysofheater clean. Inspect these areas of heater before each use. Have heater inspected yearly by a qualified service person.
 CAUTION: You must check and keep burner/venturi tubes cleanofinsectandinsectnest.A clogged tube can lead to a fire.
 WARNING: Failure to keep the primary air opening(s) of theburner(s)cleanmayresultin sooting and property damage.
ODS/PILOT AND BURNER
Use a vacuum cleaner, pressurized air, or small, soft bristled brush to clean.
BURNER PILOT AIR INLET
The primary air inlet holes allow the proper amount of air to mix with the gas. This provides a cleanburningflame.Keeptheseholesclearofdust, dirt, and lint. Clean these air inlet holes prior to each heating season. Blocked air holes will create soot. We recommend that you clean the unit every three months during operation and have heater inspected yearly by a qualified service person.
We also recommend that you keep the burner tube and pilot assembly clean and free of dust and dirt. To clean these parts we recommend using compressed air no greater than 30 PSI. Your local computer store, hardware store, or home center may carry compressed air in a can. You can use a vacuum cleaner in the blow position. If using compressed air in a can, please follow the directions on the can. If you don't follow directions on the can, you could damage the pilot assembly.
Always keep the heater area clear and free from combustible materials, gasoline and other flammable vapors and liquids.
Keep the vent areas (slots in the bottom and the top at the front of heater) clear at all times.
Visually inspect the pilot flame and burner periodically during use. The burner should be bright orange without a noticeable flame. If the burner has a noticeable flame, cleaning may be required. Use the following procedure to inspect burner assembly.
It is necessary to periodically check the burner orifice and burner venturi tube to make sure they are clear of insects, nests or spider webs that may accumulate over time. A clogged tube can lead to a fire.
1.Allow heater to thoroughly cool before performing any maintenance.
2.Turn control knob to the OFF position and remove disposable 1 lb. cylinder from heater.
3.Removefourscrewssecuringburnerassembly to base assembly (see Figure 3, page 5).
4.Remove burner assembly from base assembly.
5.Inspect interior of burner assembly for accumulation of dust, lint or spider webs. If necessary, clean interior with a vacuum cleaner or apply air pressure. Do not damage anycomponentswithinburnerassemblywhen you are cleaning.
6.Inspect and clean main burner orifice by using a vacuum or apply air pressure at orifice opening.
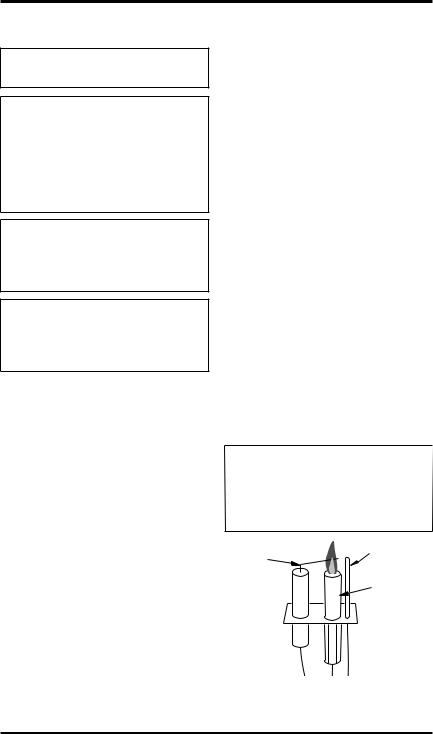
7.Inspect and clean pilot (mounted to bracket) by using a vacuum or apply air pressure through the air holes in the pilot (see Figure 4).
 WARNING: Never use needles,wires,orsimilarcylindrical objectstocleanthepilottoavoid damaging the calibrated ruby that controls the gas flow.
Ignitor |
Thermocouple |
|
|
Electrode |
|
|
Burner |
Figure 4 - Pilot
114082-01A |
www.desatech.com |
7 |

CLEANING AND
MAINTENANCE
Continued
8.Applyairpressureintotheventuritube(withcone on end) to remove dust, lint or spider webs.
9.Reinstall burner assembly to base assembly.
CABINET
Air Passageways
Use a vacuum cleaner or pressurized air to clean.
Exterior
Use a soft cloth dampened with a mild soap and water mixture. Wipe the cabinet to remove dust.
STORAGE
1.Allow at least 45 minutes for heater to cool down after using.
2.Store heater upright in a sheltered area away from inclement weather and dust.
3.If desired, cover heater after heater has cooled.
4.Ifheaterisnottobeusedforanextendedperiod of time, disconnect and remove propane/LP gas cylinder and store in accordance with the
StandardforStorageandHandlingofLiquefied Petroleum Gases, ANSI/INFPA 58.
SERVICING
To assure safety, proper function and longevity of the heater, regular maintenance is required. The frequency of maintenance will depend on the usage of the unit. Review the following concerning the criteria for a properly functioning heater. Failing to follow proper, regular maintenance will void warranty.
A hazardous condition may result if a heater is used that has been modified or is not functioning properly. When the heater is working properly:
•The flame is contained within the heater.
•The flame is essentially blue with perhaps some yellow tipping.
•There is no strong disagreeable odor, eye burning or other physical discomfort.
•There is no smoke or soot internal or external to the heater.
•There are no unplanned or unexplained shut downs of the heater.
The parts lists and wiring diagram show the heater as it was constructed. Do not use a heater which is different from that shown. In this regard, use only the hose, regulator and cylinder connection fitting (called a POL fitting) supplied with the heater. IMPORTANT: Do not use alternates. For this heater, the regulator must be set as shown inSpecifications, page 2. If there is any uncertainty about the regulator setting, have it checked.
8 |
www.desatech.com |
114082-01A |

TROUBLESHOOTING
 WARNING: Turn off heater and let cool before servicing. Only a qualified service person should service and repair heater.
 CAUTION: Never use a wire, needle, or similar object to clean ODS/pilot. This can damage ODS/pilot unit.
Note:All troubleshooting items are listed in order of operation.
OBSERVED PROBLEM |
POSSIBLE CAUSE |
REMEDY |
|
|
|||
|
|
|
|
|
|
||
When ignitor button is actuated, |
1. Ignitor electrode positioned |
1. |
Replace pilot assembly |
||||
there is no spark at ODS/pilot |
|
wrong |
2. |
Replace pilot assembly |
|||
|
|
2. |
Ignitor electrode broken |
||||
|
|
3. |
Ignitor electrode not con- |
3. |
Reconnect ignitor cable |
||
|
|
|
nected to ignitor cable |
4. |
Free ignitor cable if pinched |
||
|
|
4. |
Ignitor cable pinched or wet |
||||
|
|
|
|
|
by any metal or tubing. Keep |
||
|
|
|
|
|
ignitor cable dry |
||
|
|
5. |
Broken ignitor cable |
5. |
Replace ignitor cable |
||
|
|
6. |
Bad piezo ignitor |
6. |
Replace piezo ignitor valve |
||
|
|
|
|
|
assembly |
|
|
|
|
|
|
|
|||
ODS/pilot lights but flame |
1. Control knob not fully pressed in |
1. |
Press in control knob fully |
||||
goes out when control knob is |
2. Control knob not pressed in |
2. |
After ODS/pilot lights, keep |
||||
released |
|
long enough |
|
control knob pressed in 30 |
|||
|
|
3. |
Safety interlock system has |
|
seconds |
|
|
|
|
3. |
Wait one minute for safety |
||||
|
|
|
been triggered |
|
interlock system to reset. |
||
|
|
4. |
Thermocouple connection |
|
Repeat ignition operation. |
||
|
|
4. |
Hand tighten until snug, then |
||||
|
|
|
loose at control valve |
|
tighten 1/4 turn more |
||
|
|
5. |
Pilot flame not touching |
5. |
A) Replace propane/LP gas |
||
|
|
|
thermocouple, which allows |
|
cylinder |
|
|
|
|
|
thermocouple to cool, caus- |
|
|
|
|
|
|
|
ing pilot flame to go out. This |
|
B) Clean ODS/pilot (see |
||
|
|
|
problem could be caused by |
|
Cleaning and Maintenance, |
||
|
|
|
one or both of the following: |
|
page 7) or replace ODS/pilot |
||
|
|
|
A) Low gas pressure |
|
assembly |
|
|
|
|
|
B) Dirty or partially clogged |
|
|
|
|
|
|
|
ODS/pilot |
|
|
|
|
|
|
6. |
Thermocouple damaged |
6. |
Replace pilot assembly |
||
|
|
7. |
Control valve damaged |
7. |
Replace control valve |
||
|
|
|
|
|
|||
BurnerdoesnotlightafterODS/ |
1. Burner orifice is clogged |
1. |
Cleanburnerorifice(seeClean- |
||||
pilot is lit |
|
|
|
ing and Maintenance, page 7) |
|||
|
|
|
|
|
or replace burner orifice |
||
|
|
2. |
Inlet gas pressure is too low |
2. |
Replace |
propane/LP gas |
|
|
|
|
|
|
cylinder |
|
|
|
|
|
|
|
|
||
Delayed ignition of burner |
1. Manifold pressure is too low |
1. |
Replace |
propane/LP gas |
|||
|
|
2. |
Burner orifice is clogged |
|
cylinder |
|
|
|
|
|
|
2. |
Cleanburnerorifice(seeClean- |
||
|
|
|
|
|
ing and Maintenance, page 7) |
||
|
|
|
|
|
or replace burner orifice |
||
114082-01A |
www.desatech.com |
9 |

TROUBLESHOOTING
Continued
 WARNING: If you smell gas
•Shut off gas supply.
•Do not try to light any appliance.
•Do not touch any electrical switch; do not use any phone in your building.
•Immediately call your gas supplier from a neighbor’s phone. Follow the gas supplier’s instructions.
•If you cannot reach your gas supplier, call the fire department.
IMPORTANT: Operating heater where impurities in air exist may create odors. Cleaning supplies, paint, paint remover, cigarette smoke, cements and glues, new carpet or textiles, etc., create fumes. These fumes may mix with combustion air and create odors.
OBSERVED PROBLEM |
POSSIBLE CAUSE |
REMEDY |
||||
|
|
|
|
|
||
Burner backfiring during com- |
1. Burner orifice is clogged or |
1. |
Cleanburnerorifice(seeClean- |
|||
bustion |
|
damaged |
|
ing and Maintenance, page 7) |
||
|
|
2. |
Inlet gas pressure is too low |
|
or replace burner orifice |
|
|
|
2. |
Replace propane/LP gas |
|||
|
|
3. |
Burner damaged |
|
cylinder |
|
|
|
3. |
Replace burner |
|||
|
|
4. |
Gas regulator defective |
4. |
Replace gas regulator |
|
|
|
|
|
|
||
Slight smoke or odor during |
1. Residues from manufacturing |
1. |
Problem will stop after a few |
|||
initial operation |
|
processes |
|
hours of operation |
||
|
|
|
|
|
|
|
Heater produces unwanted |
1. Heater burning vapors from |
1. |
For outdoor use only. Stop |
|||
odors |
|
paint, hair spray, glues, etc. |
|
using odor-causing products |
||
|
|
|
See IMPORTANT statement |
|
while heater is running |
|
|
|
|
above |
2. |
Replace propane/LP gas |
|
|
|
2. |
Low fuel supply |
|||
|
|
|
|
|
cylinder |
|
|
|
3. |
Gas leak. See Warning |
3. |
Locate and correct all leaks |
|
|
|
|
statement at top of page |
|
|
|
|
|
|
|
|||
Heater shuts off in use |
1. Not enough fresh air is avail- |
1. |
For outdoor use only. Provide |
|||
|
|
|
able |
|
adequate ventilation |
|
|
|
2. |
Low line pressure |
2. |
Replace propane/LP gas |
|
|
|
3. |
ODS/pilot is partially |
|
cylinder |
|
|
|
3. |
CleanODS/pilot(seeCleaning |
|||
|
|
|
clogged |
|
and Maintenance, page 7) |
|
|
|
4. |
Tip over switch activated |
4. |
Relight heater |
|
|
|
|
from bumping heater |
|
|
|
|
|
|
|
|
|
|
Gasodorevenwhencontrolknob |
1. Gas leak. See Warning |
1. |
Locate and correct all leaks |
|||
is in OFF position |
|
statement at top of page |
|
|
|
|
|
|
2. |
Control valve defective |
2. |
Replace control valve |
|
10 |
www.desatech.com |
114082-01A |
TECHNICAL SERVICE
A heater which is not working right must be repaired, but only by a trained, experienced service person. To find the service center closest to you, or if you have further questions about this heater, contactDESAHeatingProductsʼTechnicalService Department at 1-866-672-6040. When calling, please have your model and serial numbers of your heater ready.
YoucanalsovisitDESAHeatingProductsʼTechnical Service web site at www.desatech.com.
You may also obtain in-warranty or out-of-war- ranty service by taking the product to your local service center.
ACCESSORIES
Purchase this heater accessory from your local dealer. If they cannot supply this accessory, call DESA Heating Products at 1-866-672-6040 for referral information. You can also write to the address listed on the back page of this manual.
5 FT. PROPANE/LP HOSE ASSEMBLY - P4122
Includes 1"-20 male throwaway cylinder thread x POL with handwheel.
REPLACEMENT PARTS
 WARNING:Useonlyoriginal replacement parts. This heater must use design-specific parts. Donotsubstituteorusegeneric parts. Improper replacement parts could cause serious or fatalinjuries.Thiswillalsoprotect yourwarrantycoverageforparts replaced under warranty.
PARTS UNDER WARRANTY
Contact authorized dealers of this product. If they canʼt supply original replacement part(s), either contact your nearest Parts Central or call DESA Heating Productsʼ Technical Service Department at 1-866-672-6040.
When calling DESAHeating Products, have ready
•your name
•your address
•model number of your heater
•how heater was malfunctioning
•purchase date
PARTS NOT UNDER WARRANTY
Contact authorized dealers of this product. If they canʼt supply original replacement part(s), either contact your nearest Parts Central (listed in Authorized Service Center booklet) or call DESA Heating Products at 1-866-672-6040 for referral information.
When calling DESAHeating Products, have ready
•model number of your heater
•the replacement part number
114082-01A |
www.desatech.com |
11 |

ILLUSTRATED PARTS BREAKDOWN
MODEL SPC-21PHTSA
19
18
16 


22
14
12
13
|
15 |
|
|
10 |
|
8 |
|
7 |
|
|
|
|
9 |
|
|
29 |
6 |
|
5 |
|
|
|
30
31
4
17
20
21
23
24
11
25
26
27
28
32
3
2
1
12 |
www.desatech.com |
114082-01A |

PARTS LIST
This list contains replaceable parts used in your heater. When ordering parts, follow the instructions listed under Replacement Parts on page 11 of this manual.
KEY |
PART |
|
|
NO. |
NUMBER |
DESCRIPTION |
QTY. |
1 |
114051-01 |
Base |
1 |
2 |
114052-01 |
Ballast Plate |
1 |
3 |
114053-01 |
Cylinder Housing |
1 |
4 |
114054-01 |
Door |
1 |
5 |
114055-01 |
Regulator |
1 |
6 |
114056-01 |
Regulator Mounting Bracket |
1 |
7 |
114057-01 |
Tilt Switch |
1 |
8 |
114058-01 |
Regulator Connector |
1 |
9 |
114059-01 |
Valve Mounting Bracket |
1 |
10 |
114060-01 |
Valve |
1 |
11 |
114061-01 |
Knob |
1 |
12 |
114185-01 |
ODS Pilot |
1 |
13 |
114186-01 |
Pilot Cover |
1 |
14 |
114237-01 |
Burner Bracket |
1 |
15 |
114065-01 |
Thermocouple Bracket |
1 |
16 |
114066-01 |
Burner Assembly |
1 |
17 |
114067-01 |
Wire Guard |
1 |
18 |
114068-01 |
Emitter Screen Assembly |
1 |
19 |
114069-01 |
Reflector |
1 |
20 |
114070-01 |
Bottom Emitter |
1 |
21 |
114071-01 |
Nozzle |
1 |
22 |
114072-01 |
Heat Shield |
1 |
23 |
114073-01 |
Post |
1 |
24 |
114074-01 |
Ring Housing |
1 |
25 |
114075-01 |
Valve Housing |
1 |
26 |
114076-01 |
Gas Pipe Assembly |
1 |
27 |
114077-01 |
Compression Ferrule |
2 |
28 |
114078-01 |
Compression Nut |
2 |
29 |
114079-01 |
Compression Fitting |
1 |
30 |
114080-01 |
Door Knob |
1 |
31 |
114081-01 |
Door Latch |
1 |
32 |
114239-01 |
Regulator Mounting Bracket |
1 |
|
|
|
|
|
PARTS AVAILABLE - NOT SHOWN |
|
|
|
|
|
|
|
114085-01 |
Model Data Decal |
1 |
|
114084-01 |
Operating Instruction Decal (English) |
1 |
|
114086-01 |
Warning Decal (English) |
1 |
|
114086-02 |
Warning Decal (Spanish) |
1 |
|
114086-03 |
Warning Decal (French) |
1 |
|
114086-04 |
Operating Instruction Decal (Spanish) |
1 |
|
114086-05 |
Operating Instruction Decal (French) |
1 |
|
114238-01 |
Hardware Package |
1 |
|
114083-01 |
O-Ring |
1 |
|
|
|
|
114082-01A |
www.desatech.com |
13 |

WARRANTY AND REPAIR SERVICE
KEEP THIS WARRANTY
Model
Serial No.
Date of Purchase
LIMITED WARRANTY
DESA Heating Products warrants this product and any parts thereof, to be free from defects in materials and workmanship for one (1) year from the date of first purchase when operated and maintained in accordance with instructions. This warranty is extended only to the original retail purchaser, when proof of purchase is provided.
This warranty covers only the cost of parts and labor required to restore the product to proper operating condition. Transportation and incidental costs associated with warranty repairs are not reimbursable under this warranty.
Warranty service is available only through authorized dealers and service centers.
This warranty does not cover defects resulting from misuse, abuse, negligence, accidents, lack of proper maintenance, normal wear, alteration, modification, tampering, contaminated fuels, repair using improper parts, or repair by anyone other than an authorized dealer or service center. Routine maintenance is the responsibility of the owner.
THIS EXPRESSWARRANTYIS GIVEN IN LIEU OFANYOTHERWARRANTYEITHER EXPRESSED OR IMPLIED, INCLUDING WARRANTIES OF MERCHANTABILITY AND FITNESS FOR A PARTICULAR PURPOSE.
DESAHeating Products assumes no responsibility for indirect, incidental or consequential damages. Some states do not allow the exclusion or limitation of incidental or consequential damages or limitations or exclusions may not apply to you. This Limited Warranty gives you specific legal rights and you may also have other rights which vary from state to state.
This warranty does not cover discoloration due to operation of heater. We reserve the right to amend these specifications at any time without notice. The only warranty applicable is our standard written warranty. We make no other warranty, expressed or implied.
WARRANTY SERVICE
Should your heater require service, return it to your nearest authorized service center. Proof of purchase must be presented with the heater. The heater will be inspected. A defect may be caused by faulty materials or workmanship. If so, DESA Heating Products will repair or replace the heater without charge.
REPAIR SERVICE
Return the heater to your nearest authorized service center. Each Service Center is independently owned and operated. Repairs not covered by the warranty will be billed at standard prices.We reserve the right to amend these specifications at any time without notice.
For information about this warranty write:
2701 Industrial Drive
P.O. Box 90004
Bowling Green, KY 42102-9004
ATTN: Customer Service Department
Loading...