


7600
®
Food Steamer
Model #7600
IMPORTANT!
Please keep these instructions and
your original box packaging.
INSTRUCTIONS
www.deni.com
FOR PROPER USE AND CARE

®
IMPORTANT SAFEGUARDS
When using this electrical appliance, safety precautions should
always be observed, including the following:
n Read all of the instructions before using.
n Close adult supervision must be provided when this appliance
is used by or near children.
n Keep steamer out of the reach of children.
n Using attachments not recommended or sold by Keystone
Manufacturing Co., Inc. may cause hazards.
n Do not operate with a damaged cord or plug. If the
appliance is not working as it should, has been dropped or
damaged, left outdoors or dropped into water, do not use it
and return it to the manufacturer for proper service and
replacement or repair.
n Do not let cord hang over the edge of the table or counter,
or touch hot surfaces.
n Do not operate appliance without water or while taking food
out.
n Cooking surfaces will get hot. Use potholders when handling
cover and hot containers to avoid burns.
n The rice bowl will get hot during use. Be sure to use a
potholder when removing from steaming basket.
n Use caution when removing the lid. Make sure the vent hole
is facing away from you. Lift the far side first to avoid a rush
of steam being directed at you. NOTE: The steaming baskets
must be removed from the steamer before the food is
removed to avoid scalding.
n Avoid reaching over the steamer when in use.
n Be sure there is water in the reservoir prior to use.
n Make sure appliance is off before unplugging from wall
outlet.
n Always unplug before cleaning and removing parts.
n For indoor use only.
n Do not place near hot gas or electric burner.
n Do not use near or under curtains or cupboards.
n Always use in a well ventilated area.
n To protect against electrical shock, do not immerse plug, cord
or water reservoir in water or any other liquid.
n To prevent work surfaces from becoming excessively wet,
place a drip mat or towel on the work surface underneath the
unit to absorb the water.
n Do not use an extension cord with this steamer. However, if
one is used, it must have a rating equal to or exceeding the
rating of this appliance.
n The steamer is for household use only.
n The steamer should not be used for other than the intended
use.
n Extreme caution should be used when moving any appliance
containing hot food or liquid.
n Servicing or repair should only be completed by a qualified
technician.
n The steamer has a polarized AC (Alternating Current) plug
(one blade is wider than the other). This plug will fit in a
polarized outlet only one way, as a safety feature. Reverse
the plug if the plug does not fit fully in the outlet. Contact a
qualified electrician if it still does not fit. Do not attempt to
defeat this safety feature.
SAVE THESE INSTRUCTIONS
1
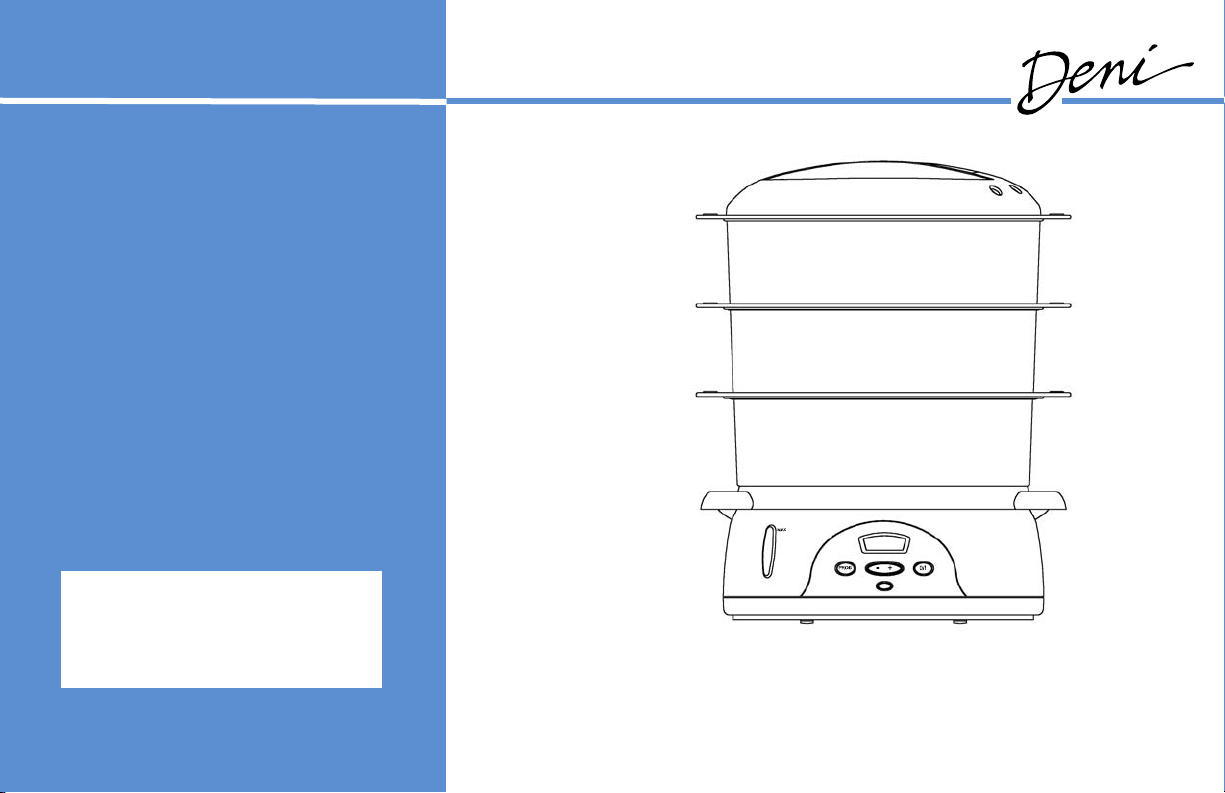
FEATURES
Lid
Rice Bowl
Steaming Baskets
with built-in egg
holders
2
Water Reservoir
Exterior Water Level Indicator
Indicator Light
Drip Tray
Turbo Ring
Interior Water Level Indicator
Heating Element
Digital Display
On/Off Button

®
Before First Use
1. Remove all packing materials and literature.
2. Wash all removable parts in warm soapy water. Rinse
and dry all parts thoroughly. Wipe the water reservoir
with a clean damp cloth. NEVER immerse the water
reservoir in water or any other liquid. NEVER clean any
parts in a dishwasher.
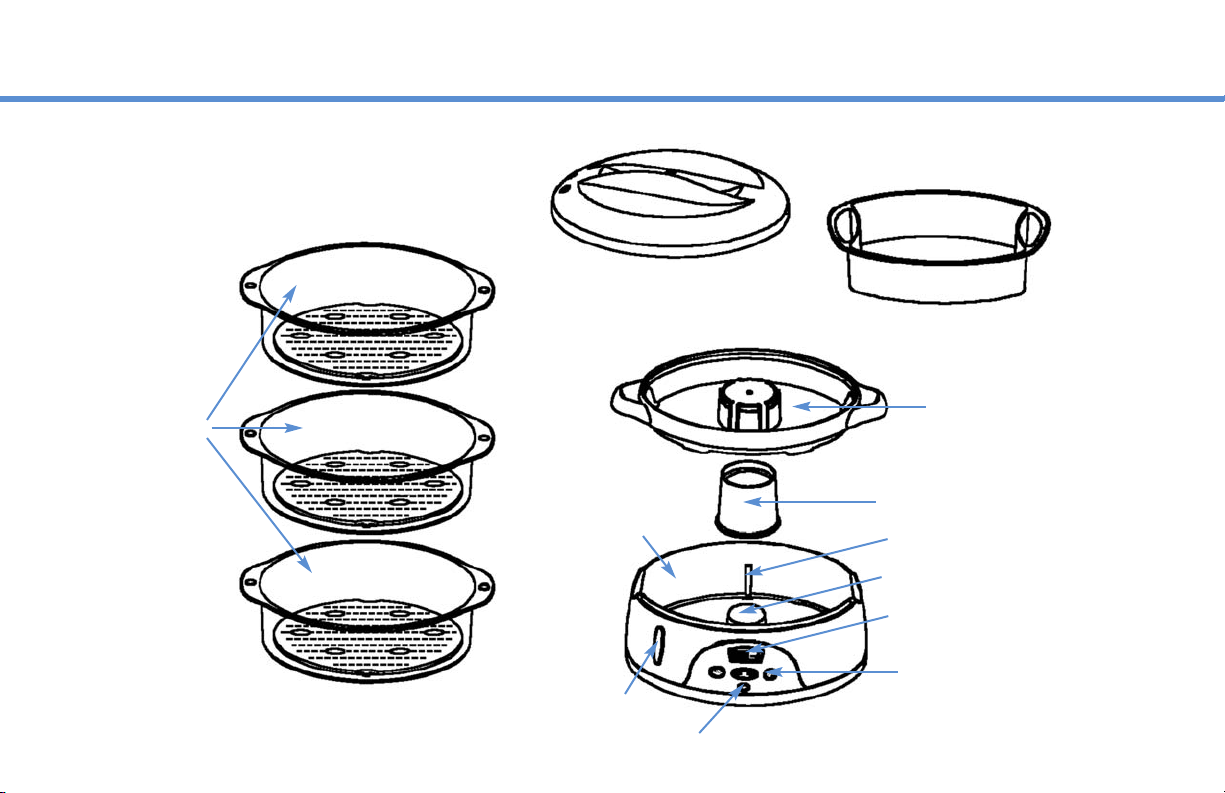
How To Assemble
1. Make sure the unit is unplugged before assembling.
2. Place the base on a flat, level surface.
3. Position the turbo ring around the
heating element.
4. Fill the water reservoir with cold or
warm water to the max level. Use fresh
water with each use.
5. Position the drip tray over the water
reservoir. Whenever possible, use the
retained liquid in the drip tray for
making gravies, sauces, soups, etc.
6. Position the steaming baskets.
a) Place the food in the steaming baskets.
b) The baskets are labeled 1,2, and 3
for easy positioning.
c) Position basket 1 on the lower level,
2 on the middle level, and 3 on the
top level.
How To Operate
To set the digital clock:
1. Plug the steamer into a wall outlet. The display will
read 00:00.
2. Press the “Program” and On/Off buttons at the same
time. A beep will sound.
3. Increase or decrease the time by pressing the +/-
button. Note: the time will increase in 10 minute
intervals and decrease in 1 minute intervals.
Immediate Steam Mode:
1. Push the On/Off button until the display shows 45.
2. Set the steaming time by pressing the +/- buttons. The
time will change in 5 minute intervals. Press any button
to stop the procedure.
3. After the steaming time is set, the unit will sound for 2
3

seconds and the red indicator light will illuminate. The
clock will begin to count down.
4. When setting the time to 0, the electric timer will return
to the clock mode automatically. The maximum steaming
time is 90 minutes.
5. When steaming, press the +/- button to change the set
time. Press the On/Off to stop the steam process. The
display will return back to clock mode.
4
Timing The Steam Mode:
1. Press the “Program” button. “Prog” will appear on the
upper left of the display.
2. Set the time by pressing the +/- button. The time will
increase and decrease in 10 minute intervals.
3. Press the “Program” button until the display shows 45.
Press the +/- button to adjust the steaming time.
4. Press the “Program” button again. The display will show
the time and “Prog”. This indicates the start of the timing
steam mode.
5. When the start time is reached, the unit will sound, the
red indictor light will illuminate and the steamer will
begin to steam.
6. If you want to cancel the timing steam mode, press the
“Program” button. This will return the unit back to the
clock mode.
At the end of steaming:
1. The steamer will automatically go into a hold mode after
the steaming time is finished.
2. The display will show the time and a holding symbol in
the lower left corner. The green indicator light will
illuminate.
3. The hold mode will warm for 2 minutes every 8 minutes,
after the unit stops steaming.
4. To cancel the hold mode, press the On/Off button. The
display will return to the clock mode.

®
Cleaning and Maintenance
It is important to thoroughly clean the unit after each use to
avoid the build up of food residue.
1. Unplug and allow the appliance to cool completely
before cleaning.
2. Empty the water reservoir and wipe with a clean, damp
cloth. DO NOT immerse the water reservoir in water.
3. Wash all removable parts in warm soapy water.
4. Be sure that the turbo ring is cleaned regularly.
5. The steaming baskets can be stacked inside one
another for compact storage.
Descaling the appliance:
1. Descale the appliance after every eight uses.
2. Position the turbo ring upside down (largest part on top)
around the heating element.
3. Fill the water take up to the MAX level with cold water.
4. Fill the inside of the turbo ring with white vinegar to the
same level.
5. DO NOT heat up. (This will eliminate the descaling
odor.) Let sit over night.
6. After the unit has soaked, rinse out the inside of the
water tank with warm water, several times. Dry
thoroughly.
Hints and Tips
n Read all the instructions and save for future reference.
n The water level should be topped off if it falls too low.
n The lid should be kept on at all times during steaming.
n To ensure even cooking, single items of food should be
the same thickness. Thicker foods may take longer to
cook.
n Arrange the food in a single layer. Be sure the food
doesn’t touch the sides of the unit.
n Any of the levels can be used for cooking rice, pasta,
fruit, and eggs.
n Foods that require gentle steaming or shorter cooking
times should be placed on the top level.
n Food that requires longer cooking time should be
placed on the lower rack.
n Poultry or fish can be placed in any of the steaming
baskets. However, juices may drip and transfer flavors
to the lower levels of food. Wrap fish in foil or
parchment paper to retain the juices.
n Protect lower levels of delicate foods from condensation
drips by laying a sheet of parchment paper on the
above surface.
5

QUICK REFERENCE GUIDES
The following charts are guidelines only and will vary
depending upon individual tastes and textures.
Steaming Fish
Whole Fish Weight Time
Bream 7 oz 8-10 mins
Dab 7 oz 9-10 mins
Herring 4 oz 4-5 mins
Mackerel 5 oz 5-7 mins
Mullet 7 oz 8-10 mins
Red Snapper 7 oz 8-10 mins
Sardine 3.5 oz 2-3 mins
Lemon Sole 7 oz 15-17 mins
Trout 9 oz 3-5 mins
6
Steaks or Fillets Weight Time
Petrale Sole 4 pieces, 5 oz each 10-12 mins
Cod 4 pieces, 5 oz each 5-8 mins
Coley 4 pieces, 5 oz each 6-8 mins
Hake 4 pieces, 5 oz each 5-6 mins
Haddock 4 pieces, 5 oz each 5-7 mins
Salmon 4 pieces, 5 oz each 7-9mins
Shark 4 pieces, 5 oz each 10-12 mins
Skate Wings 4 pieces, 5 oz each 5-8 mins
Squid Rings 3-5 mins
Tuna 4 pieces, 5 oz each 10-12 mins
 Loading...