


Instruction Manual
7-Quart Stand Mixer
5-Quart Stand Mixer
Mode D’emploi
Batteur sur socle de 6,62 litres
Batteur sur socle de 4,73 litres
Manual de Instrucciones
Robot de Cocina de 6,6 litros
Robot de Cocina de 4,7 litros
Traduzione del manuale d’istruzioni
Sbattitore da 6,6 litri
Sbattitore da 4,7 litri
DSM5 - 7 Series / Serié
Register this product on-line and receive a free trial issue of Cook’s Illustrated.
Enregistrez ce produit en ligne et recevez un numéro gratuit de Cook’s Illustrated. Visitez www.prodregister.com/delonghi.
Registre este producto en línea y reciba un ejemplar gratis de Cook’s Illustrated. Visite www.prodregister.com/delonghi.
Registra questo prodotto “on-line” per riceuere una copia omaggio délla rivista. Visita www.prodregister.com/delonghi.
Visit www.delonghi.com for a list of service centers near you. (U.S. Only)
Visitez www.delonghi.com pour y voir une liste des centres de réparation proches de chez vous. (É.-U. uniquement)
Visite www.delonghi.com para ver la lista de centros de servicios cercanos a usted. (Solamente en los Estados Unidos)
Visita www.delonghi.com per una lisa dei centri di servizio a te piu vicini.
(Solo negli Stati Uniti)
Read and Save These Instructions - Lisez et conservez ces instructions |
|
Guardar estas instrucciones después de haberlas leído - Leggete e conservate queste istruzioni |
|
© De’Longhi 2004 |
89042/1 |

Thank you for choosing De’Longhi!
A steadfast commitment to quality and innovation has made De’Longhi a leader in household appliances around the world for over 100 years. Our Italian heritage is reflected in every product, every feature and every design. And we are dedicated to creating products that enhance and benefit the lives of our consumers. We hope that you’ll enjoy your De’Longhi appliance for years to come!
Now that you’ve discovered us, we think you’ll agree, that each and every De’Longhi appliance is truly a “Living Innovation”.
Get to know us better…visit us at www.delonghi.com for our full line of products.
-2-

TABLE OF CONTENTS |
|
Important Safeguards............................................... |
4 |
Short Cord Instructions............................................. |
4 |
Know Your Stand Mixer............................................. |
5 |
Before First Use........................................................ |
5 |
Overload Protection Device...................................... |
5 |
Included Accessories and Parts............................... |
6 |
Operating Your Stand Mixer....................................... |
6 |
Food Tips.................................................................. |
7 |
Maximum Capacities................................................ |
7 |
Speed Suggestions................................................... |
8 |
Using Your Splash Guard.......................................... |
8 |
Troubleshooting......................................................... |
9 |
Cleaning Your Stand Mixer and Parts....................... |
10 |
Recipes..................................................................... |
11 |
Available Accessories............................................... |
15 |
Accessory Order Form............................................. |
17 |
Limited Warranty....................................................... |
18 |
Extended Warranty.................................................... |
19 |
Technical Information................................................ |
20 |
-3-

 IMPORTANT SAFEGUARDS
When using electrical appliances, basic safety precautions should always be followed to reduce the risk of fire, electrical shock and/or personal injury.
1) Read all instructions.
2) Close supervision is necessary when any appliance is used by or near children.
3) To protect against fire, electric shock and/or personal injury, do not place cord, plugs, or appliance in water or any other liquid.
4) Turn the unit off and unplug it from the outlet when not in use, before cleaning and before installing or removing attachments.
5) Do not operate any appliance with a damaged cord or plug or after the appliance malfunctions, or has been damaged in any manner. Return appliance to an authorized De’Longhi service center for examination, repair or adjustment.
6) To disconnect, remove plug from wall outlet. Always hold the plug, but never pull the cord.
7) Do not use outdoors.
8) Do not let cord hang over edge of table or counter, or touch hot surfaces. 9) Do not use appliance for other than intended use.
10) Keep fingers away from moving parts and fitted attachments. 11) Do not leave machine unattended.
12) Do not use unauthorized attachments.
13) Do not exceed the maximum capacity. (See “Overload Protection Device”) 14) When using an attachment, be sure to read the safety instructions.
15) For household use only
SAVE THESE INSTRUCTIONS
SHORT CORD INSTRUCTIONS
A short power cord is provided to reduce the risk resulting from entanglement or tripping over a longer cord. Longer detachable power supply cords are available and may be used if care is exercised in their use. If a longer detachable power cord or extension cord is used (1) the marked electrical rating of the extension cord should be at least as great as the electrical rating of the appliance, and (2) the longer cord should be arranged so that it will not drape over the countertop or table top where it can be pulled on by children or tripped over unintentionally. The electrical rating of the appliance is listed on the bottom of the unit. If the appliance is of the grounded type, the extension cord should be a grounded type 3 wire cord. This appliance has a polarized plug. One blade is wider than the other. As a safety feature this plug will fit in a polarized outlet only one way. If the plug does not fit, contact a qualified electrician. Do not attempt to defeat this safety feature.
-4-
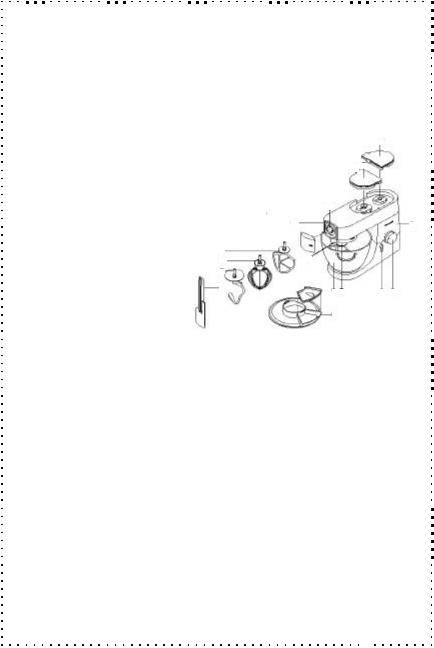
KNOW YOUR STAND MIXER
A) High-Speed Outlet |
F) Outlet Catch |
K) Non-Stick Flat Beater |
B) Medium Speed Outlet |
G) Stainless Steel Bowl |
L) Stainless Steel Whisk |
C) Low-Speed Outlet |
H) Head-Lift Lever |
M) Non-Stick Dough Hook |
D) Mixing Tools Outlet |
I) On/Off, Pulse and Speed Control Dial |
N) Spatula |
E) Mixer Head |
J) Body |
O) Splash Guard |
NOTE: Each outlet is specifically for the use with only certain attachments. For more details on the optional attachments, please see Accessory Order Form.
A) High-Speed Outlet:
High-Speed Slicer and Shredder
1.2-Liter (40-Ounce Blender)
Mini Food Processor and Chopper
Continuous Juice Extractor
B)Medium Speed Outlet :
Citrus juicer Food processor
C)Low-Speed Outlet:
Pasta Maker
Grain Mill
Professional-Quality Food Grinder
|
|
|
A |
|
|
|
B |
|
|
C |
|
K |
E |
|
J |
|
|||
|
|
|
|
L |
|
F |
|
M |
|
|
|
N |
|
G D |
H I |
|
|
O
BEFORE YOUR FIRST USE
Carefully unpack your stand mixer and remove all packaging material. Remove any labels or stickers from the stand mixer. To remove any dust that may have accumulated during packaging, wash the stand mixer and its included attachments thoroughly before using for the first time. (See “Cleaning Your Stand Mixer and Parts”) section of this manual). Note: You may find a small amount of grease on the lowspeed outlet. This is normal and it will not affect the performance of your machine. Just wipe the grease off with a paper towel.
OVERLOAD PROTECTION DEVICE
Your stand mixer is equipped with an Overload Protection Device that will automatically terminate operation if overloaded. If the Overload Protection Device is activated, turn the On/Off, Pulse and Speed Control Dial to the “O” position and then unplug the stand mixer. Remove some of the ingredients to reduce the load, then allow the unit to stand for a few minutes. Plug the unit back in, select a speed with the On/Off, Pulse and Speed Control Dial, and the stand mixer should resume operation. If the unit does not start immediately, allow it to stand for a longer period of time. If the stand mixer fails to restart after 20 minutes please refer to the LIMITED
WARRANTY section of your instruction manual to obtain servicing information.
-5-
INCLUDED ACCESSORIES AND PARTS
•Non-Stick Flat Beater: For making cakes, biscuits, pastry, icing, fillings and mashed potatoes.
•Stainless Steel Whisk: For eggs, cream, batters, meringues, cheese cakes, mousses and souffles. To avoid damaging the machine, do not use the whisk for heavy mixtures.
•Non-Stick Dough Hook:For yeast mixtures.
•Splash Guard: Allows you to easily add ingredients.
•Stainless Steel Bowl: Features handles for easy transportation.
•Outlet Covers: Protect the attachment mechanisms from dust and dirt.
OPERATING YOUR STAND MIXER
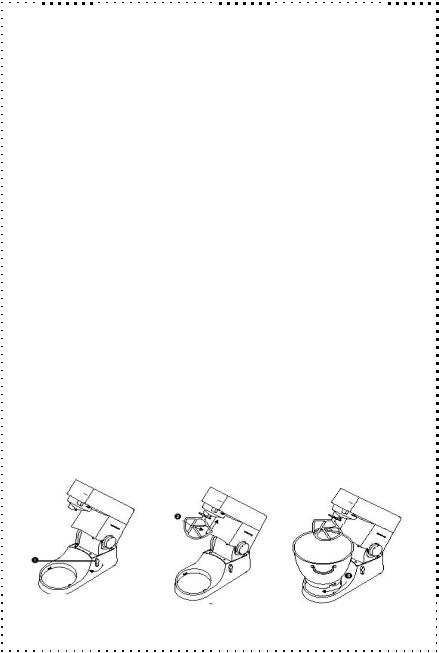
1)Turn the head lift lever clockwise and the mixer head (E) will pop up. Raise the mixer head until it locks into place. See Figure 1.
2)To insert an attachment (dough hook, whisk or flat beater), place it in the Mixing Tools Outlet (D). Push the attachment firmly into the outlet until it clicks and locks into place. See Figure 2.
3)Place the stainless steel bowl (G) on the base and align the two grooves on the base of the bowl with two the notches on the base of the stand mixer. Once in position, turn the bowl clockwise until it locks into place. See Figure 3.
4)To lower the mixer head, raise it slightly, then turn the head lift lever clockwise. Lower into locked position. If the mixer head fails to lock into place, check the bowl to make sure that it is properly positioned.
Figure 1 |
|
Figure 2 |
Figure 3 |
|
|||
|
|
|
|
-6-

OPERATING YOUR STAND MIXER (continued)
5)Plug the unit into a 120V/60Hz AC only outlet.
Figure 4
6)To turn the stand mixer ON, turn the On/Off, Pulse and Speed Control Dial (I) clockwise, then adjust the speed accordingly by continuing to turn the control clockwise. Turn the On/Off, Pulse and Speed Control Dial counter clockwise to pulse for short bursts (pulse is indicated by the letter “P”). See Figure 4.
7)When finished mixing, turn the On/Off, Pulse and Speed Dial to the “O” position for OFF.
8)To remove an attachment (dough hook, whisk or flat beater), repeat step 1 and remove the attachment by turning it clockwise.
9)Scrape the bowl with the spatula (N) provided to remove contents.
FOOD TIPS
GENERAL:
1)Eggs that are at room temperature are best for whisking.
2)Before using the whisk for egg whites, make sure there is no grease or egg yolk on the whisk or bowl.
3)Use cold ingredients for pastries unless your recipe indicates otherwise.
MAKING BREAD:
1)IMPORTANT: Never exceed the maximum capacities listed below.
2)If you hear the machine laboring, switch the unit OFF and remove half the dough and do each separately.
3)The ingredients mix best if you add the liquid first.
MAXIMUM CAPACITIES
DSM7 Series
Food Type |
Weight Type |
Amount |
Pastry Dough |
Flour Weight |
2 lbs. |
Yeast Dough |
Flour Weight |
3 lbs. 5 oz. |
Cake Mix |
Total Weight |
10 lbs. |
Eggs |
|
16 |
|
|
|
DSM5 Series
Food Type |
Weight Type |
Amount |
Pastry Dough |
Flour Weight |
1 lb. 8 oz. |
Yeast Dough |
Flour Weight |
3 lbs. |
Cake Mix |
Total Weight |
6 lbs. |
Eggs |
|
12 |
|
|
|
-7-

SPEED SUGGESTIONS FOR ATTACHMENTS
NON-STICK FLAT BEATER:
1)Creaming fat and sugar: Start on MIN and gradually increase to MAX.
2)Beating eggs into creamed mixture: 4 to MAX
3)Adding flour or fruit: Min to 1
4)Cake Mix: Start on MIN speed and gradually increase to MAX.
5)Mixing fat into flour: MIN to 2.
STAINLESS STEEL WHISK:
1) Gradually increase to MAX.
NON-STICK DOUGH HOOK:
1)Start on MIN and gradually increase to 1 (for mixing ingredients)
2)Speed 2 (for kneading dough).
USING YOUR SPLASH GUARD
1)Follow direction 1 under the “Operating Your Stand Mixer” section of the manual.
2)Slide the Splash Guard onto the Mixer Head (E) by firmly pushing up. See Figure 1. The ingredient opening should be positioned as shown. See Figure 2.
3)Insert required attachment tool and follow direction 2 under the “Operating Your Stand Mixer” section of the manual.
4)During mixing, ingredients can be added directly to the bowl by simply lifting off the removable section of the Splash Guard. See Figure 3.
5)You do not need to remove the Splash Guard to change attachment tools.
6)To remove the Splash Guard, raise the mixer head according to direction (1) in the “Operating Your Stand Mixer” section of the manual. Once the mixer head has been raised and is locked into place, slide the Splash Guard down.
Figure 1 |
Figure 2 |
Figure 3 |
-8-
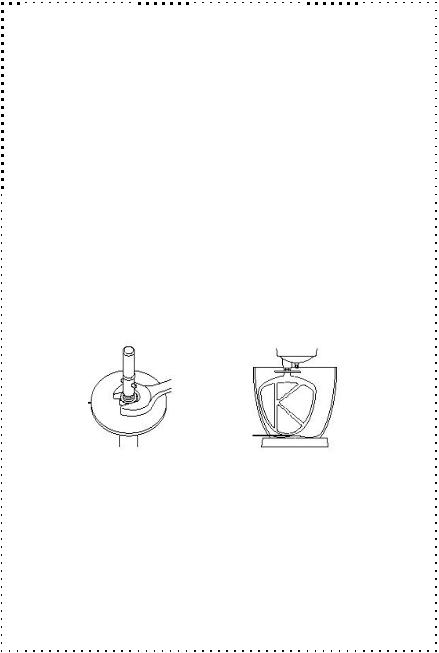
TROUBLESHOOTING
PROBLEM:
The whisk or flat beater knocks against the bottom of the bowl or is not reaching the ingredients towards the bottom.
SOLUTION:
Adjust the height. Here’s how:
1)Unplug the unit and raise the mixer head. Insert the stainless steel whisk or non-stick flat beater.
2)Hold the attachment and then loosen nut. See Figure 1.
3)Lower the mixer head and adjust the height by turning the shaft.
4)Ideally, the stainless steel whisk or non-stick flat beater should be almost touching the bottom of the bowl. See Figure 2.
5)Raise the head, hold the stainless steel whisk or non-stick flat beater and tighten the nut.
Figure 1 |
Figure 2 |
-9-

CLEANING YOUR STAND MIXER AND PARTS
1)CAUTION: Be sure to switch off and unplug this appliance before cleaning the body and its attachments. To protect against electrical shock, do not immerse cord, plug or unit in water or liquid. After each use, always make sure plug is first removed from wall outlet.
2)A small amount of grease may appear on the low-speed outlet when you first use it. This is normal and it will not affect the performance of your machine. Just wipe the grease off with a paper towel.
•BODY: Wipe the body of the stand mixer with a damp cloth and then dry with a towel. Do not use harsh or abrasive cleansers on the exterior of the unit. Do not immerse the body in water.
•STAINLESS STEEL BOWL: Never use a wire brush, steel wool or bleach to clean the stainless steel bowl. The stainless steel bowl may be placed in your dishwasher. The bowl can also be washed by hand with mild detergent.
•ACCESSORY ATTACHMENTS: Wash the non-stick flat beater and non-stick dough hook attachments by hand with mild detergent, and then dry thoroughly. The stainless steel whisk may be placed in the top rack of your dishwasher.
•SPLASH GUARD: Wash by hand with mild detergent, and then dry thoroughly.
-10-
RECIPES
SUGAR COOKIES (Using Non-Stick Flat Beater)
INGREDIENTS:
•3/4 cup butter or margarine, softened
•3/4 cup sugar
•1 egg
•1 teaspoon vanilla extract
•1 1/2 cups all-purpose flour
•1 teaspoon baking powder
•1/2 teaspoon salt
DIRECTIONS:
1)Attach flat beater to mixer head.
2)Add butter and sugar to mixing bowl and blend thoroughly using speed 3.
3)Gradually increase speed to 6 and continue mixing until light and fluffy.
4)Turn stand mixer OFF, and add egg and vanilla extract.
5)Mix together using speed 3 until well blended.
6)Turn down to speed 1 and slowly add flour, baking power and salt.
7)Gradually increase speed to 3 until well blended.
8)Turn stand mixer OFF, and shape dough into a ball and wrap in wax paper.
9)Refrigerate for about 2 hours and then preheat oven to 375ºF.
10)Divide dough in half. On lightly floured surface roll dough 1/4-inch thick
11)Using a floured cookie cutter, cut dough and place cookies on greased sheet.
12)Sprinkle with sugar, if desired. Bake for 7 to 8 minutes or until lightly browned.
Makes about 5 dozen cookies.
POUND CAKE (Using Non-Stick Flat Beater)
INGREDIENTS:
•1 cup butter or margarine, softened
•1 1/2 cups sugar
•4 eggs
•2 teaspoons vanilla extract
•2 cups cake flour
•1 teaspoon baking powder
•1/2 teaspoon salt
•1/4 cup milk
DIRECTIONS:
1)Preheat oven to 325ºF. Grease a 9 x 5 x 2 3/4-inch loaf pan.
2)Attach flat beater to the mixer head.
3)Add butter and sugar to mixing bowl.
4)Blend thoroughly using speed 3.
5)Gradually increase speed to 6 and continue mixing until light and fluffy.
6)Turn OFF mixer. Add eggs, one at a time, blending thoroughly using speed 3.
-11-

RECIPES (CONTINUED)
POUND CAKE (Using Non-Stick Flat Beater) - continued
7)Blend in vanilla extract, and then turn mixer down to speed 1.
8)Add flour, baking powder, salt and milk. Scrape side of bowl if necessary.
9)Gradually increase to speed 3 until well blended.
10)Pour batter into prepared baking pan.
11)Bake for 55 minutes to 1 hour, or until toothpick inserted in the center comes out clean.
Makes 1 loaf.
WHITE BREAD (Using Non-Stick Dough Hook)
INGREDIENTS:
•1 cup milk
•1/4 cup butter or margarine
•2 teaspoons salt
•2 packages active dry yeast
•1/4 cup sugar
•1 cup warm water (105º - 115º F)
•5 1/2 cups all-purpose flour
DIRECTIONS:
1)In a 1-quart saucepan add milk, butter and salt. Heat over low heat until very warm and butter melts. Set aside to cool.
2)Attach dough hook to mixer head.
3)Dissolve yeast and sugar in warm water in mixing bowl.
4)Allow mixture to stand for 5 minutes or until mixture looks foamy.
5)Add cooled milk mixture and 2 cups of flour. Blend thoroughly using speed 2.
6)Kneading on speed 2, gradually add additional flour until mixture leaves the side of the bowl.
7)Knead for about 3 minutes or until dough becomes smooth and elastic. Add additional flour if necessary.
8)Coat dough lightly with oil. Cover bowl tightly; allow dough to rise in a warm draft-free location for 1 hour or until doubled in size.
9)Remove dough from bowl and punch down. Divide dough in half.
10)Roll out each half to a rectangle; roll up tightly.
11)Place in two greased 8 1/2 x 4 1/2 x 3-inch loaf pans.
12)Brush top of loaves with oil. Cover and let rise for 1 hour or until doubled in size.
13)Preheat oven to 350º F. Bake for 35 to 40 minutes or until loaves sound hollow when tapped.
Makes 2 loaves.
-12-

RECIPES (CONTINUED)
PIZZA DOUGH (Using Non-Stick Dough Hook)
INGREDIENTS:
•1 package active dry yeast
•1 teaspoon sugar
•3/4 cup warm water (105º - 115º F)
•1/2 teaspoon salt
•1 tablespoon olive oil
•2 1/4 cups all-purpose flour
DIRECTIONS:
1)Attach dough hook to mixer.
2)Dissolve yeast and sugar in warm water in mixing bowl.
3)Allow mixture to stand for 5 minutes or until mixture looks foamy.
4)Add remaining ingredients and blend thoroughly using speed 2.
5)Kneading on speed 2 blend until smooth. Dough will be sticky.
6)Scrape dough from side of bowl. Cover with plastic wrap; allow dough to rise in a warm (90º F) draft-free location for 1 hour or until doubled in size.
7)Use as directed in pizza recipe.
CREAMY ITALIAN DRESSING (Using Stainless Steel Whisk)
INGREDIENTS:
•1 cup mayonnaise
•1/4 cup red wine vinegar
•1 teaspoon oregano
•1 teaspoon basil
•1/2 teaspoon parsley
•1/2 teaspoon garlic powder
•1/2 teaspoon salt
•1/4 teaspoon black pepper
DIRECTIONS:
1)Attach whisk to mixer.
2)Add all ingredients to mixing bowl.
3)Blend thoroughly on maximum speed.
4)Place in airtight container and refrigerate.
Makes 1 2/3 cups dressing.
-13-

RECIPES (CONTINUED)
SWEETENED WHIPPED CREAM (Using Stainless Steel Whisk)
INGREDIENTS:
•1 cup heavy cream
•2 tablespoons sugar
•1/2 teaspoon vanilla extract
DIRECTIONS:
1)Attach whisk to mixer. Add cream to mixing bowl.
2)Beat cream using speed 3 until foamy. Gradually increase speed to maximum, adding remaining ingredients.
3)Whip until soft peaks form.
Makes about 2 cups.
-14-
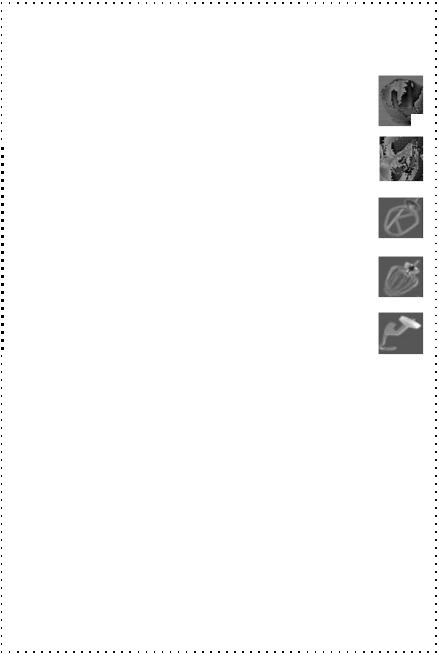
AVAILABLE ACCESSORIES
Thank you for your interest in a De’Longhi stand mixer! To order, simply fill out the form (located on page 16 of the manual) and send it in with your payment. Your accessory will be shipped directly to your home. U.S. ONLY
1) A936: PASTA MAKER (fits 5-quart and 7-quart models) :
Includes 6 screens: spaghetti, lasagna, tagliatelle, rigatoni and small or large macaroni. Also
includes a measuring cup and cleaning tool. COST: $79.99 USD
2) A998: HIGH-SPEED SLICER / SHREDDER (fits 5-quart and 7-quart models) :
Includes 3 discs for coarse and fine shredding, thick and thin slicing and chipping. Excellent for
preparing salads, vegetables, shredding cheeses and carrots. COST: $99.99 USD
3) A938: MINI FOOD PROCESSOR AND CHOPPER (fits 5-quart and 7-quart models) :
Includes 4 glass jars with airtight lids. It blends, chops, mills and grinds. COST: $49.99 USD
4)A980: FOOD PROCESSOR (fits 5-quart and 7-quart models) : Includes 3 discs and stainless steel chopping blade. Perfect for processing large and small foods. COST: $77.99 USD
5)A935: CONTINUOUS JUICE EXTRACTOR (fits 5-quart and 7-quart models) :
Perfect for juicing all non-citrus fruits and vegetables. COST: $89.99 USD
6) A941: GRAIN MILL (fits 5-quart and 7-quart models) :
You have the choice of 6 settings from coarse to fine milling. COST: $99.99 USD
7) A950: PROFESSIONAL-QUALITY FOOD GRINDER (fits 5-quart and 7-quart models) :
Includes 3 high-quality stainless steel screens, an acrylic collecting dish, food stomper, sausage and Kielbasa maker (5-piece set) and a cleaning brush. COST: $99.99 USD
8) A994: 1.2-LITER (40-OUNCE) GLASS BLENDER (fits 5-quart and 7-quart models) :
Features a removable base, lid and cap for easy cleaning. COST: $49.99 USD
9) A960: CITRUS JUICER (fits 5-quart and 7-quart models) :
Juices oranges, lemons, limes, grapefruit and all other citrus fruits. COST: $43.99 USD
1
2
3
4
5
6
7
8
9
10) A930: 7-QUART; A992: 5-QUART: FRUIT AND VEGETABLE STRAINER: |
10 |
Includes 2 screens for fine or coarse. It’s perfect for pureeing fruits and vegetables, making baby food, wine, preserves and soups. COST (A930): $89.99 / (A992): $84.99 USD
11
11) A952: 7-QUART; A934: 5-QUART: POTATO PEELER:
Peels potatoes and other root vegetables. COST (A952): $79.99 / (A934): $74.99 USD
-15-
AVAILABLE ACCESSORIES (continued)
Additional Accessories:
12) 36386002: 7-QUART; 36385002: 5-QUART: STAINLESS STEEL BOWL:
Attractive and durable stainless steel bowl. COST (7-Quart): $89.99 / (5-Quart): $79.99 USD
|
|
12 |
13) 34445002: SPLASH GUARD (fits 5-quart and 7-quart models) : |
|
|
Prevents splattering of contents when mixing large amounts. COST: $17.99 USD |
|
|
|
|
|
|
|
13 |
14) 35764: 7-QUART; 35762: 5-QUART: NON-STICK FLAT BEATER: |
|
|
Ideal for mixing cake and cookie batter. COST: (7-Quart): $29.99 / (5-Quart): $29.99 USD |
|
|
|
|
|
15) 36120: 7-QUART; 29475: 5-QUART: STAINLESS STEEL WHISK: |
|
14 |
|
|
|
Perfect for mousses, souffles and meringues.COST: (7-Quart): $43.99 / (5-Quart): $39.99 USD |
|
|
16) 35766: 7-QUART; 35760: 5-QUART: NON-STICK DOUGH HOOK: |
|
|
15 |
||
Makes mixing and kneading quick and effortless.COST: (7-Quart): $29.99 / (5-Quart): $29.99 USD |
|
|
|
|
|
|
|
16 |
-16-
ACCESSORY ORDER FORM - U.S. ONLY
Make the most of your De’Longhi stand mixer with optional attachments. Cut along the dotted line and order now!
I t e m |
|
|
For Use With |
F o r U s e W i t h |
P r i c e P e r |
|
|
N u m b e r |
Item Description |
5 - Q u a r t M o d e l |
7 - Q u a r t M o d e l |
A c c e s s o r y |
Quantity |
T o t a l C o s t |
|
A 9 5 0 |
Professional Quality Food Grinder |
h |
h |
$ 9 9 . 9 9 |
|
|
|
A 9 3 5 |
Continuous Juice Extractor |
h |
h |
$ 8 9 . 9 9 |
|
|
|
A 9 6 0 |
Citrus Juicer |
h |
h |
$ 4 3 . 9 9 |
|
|
|
A 9 3 6 |
Pasta Maker |
h |
h |
$ 7 9 . 9 9 |
|
|
|
A 9 4 1 |
Grain Mill |
h |
h |
$ 9 9 . 9 9 |
|
|
|
A 9 3 8 |
Mini Food Processor and Chopper |
h |
h |
$ 4 9 . 9 9 |
|
|
|
A 9 9 2 |
5 |
-Quart Fruit and Vegetable Strainer |
h |
|
$ 8 4 . 9 9 |
|
|
A 9 3 0 |
7 |
-Quart Fruit and Vegetable Strainer |
|
h |
$ 8 9 . 9 9 |
|
|
A 9 9 8 |
High-Speed Slicer/Shredder |
h |
h |
$ 9 9 . 9 9 |
|
|
|
A 9 3 4 |
5 |
-Quart Potato Peeler |
h |
|
$ 7 4 . 9 9 |
|
|
A 9 5 2 |
7 |
-Quart Potato Peeler |
|
h |
$ 7 9 . 9 9 |
|
|
A 9 9 4 |
1 |
.2-Liter (40-Oz.) Glass Blender |
h |
h |
$ 4 9 . 9 9 |
|
|
A 9 8 0 |
Food Processor |
h |
h |
$ 7 7 . 9 9 |
|
|
|
34445002 |
Splash Guard |
h |
h |
$ 1 7 . 9 9 |
|
|
|
36385002 |
5 - Quart Stainless Steel Bowl |
h |
|
$ 7 9 . 9 9 |
|
|
|
36386002 |
7 - Quart Stainless Steel Bowl |
|
h |
$ 8 9 . 9 9 |
|
|
|
35762 |
5 |
-Quart Non-Stick Flat Beater |
h |
|
$ 2 9 . 9 9 |
|
|
35764 |
7 |
-Quart Non-Stick Flat Beater |
|
h |
$ 2 9 . 9 9 |
|
|
29475 |
5 |
-Quart Stainless Steel Whisk |
h |
|
$ 3 9 . 9 9 |
|
|
36120 |
7 |
-Quart Stainless Steel Whisk |
|
h |
$ 4 3 . 9 9 |
|
|
35760 |
5 |
-Quart Non-Stick Dough Hook |
h |
|
$ 2 9 . 9 9 |
|
|
35766 |
7 |
-Quart Non-Stick Dough Hook |
|
h |
$ 2 9 . 9 9 |
|
|
Method of Payment (check one)
Check |
|
Master Card |
Make remittance payable to: |
|
|
|
De’Longhi America Inc. |
|
|
|
|
Money Order |
|
|
Attn: Accessory Sales |
|
VISA |
Park 80 West Plaza One |
|
|
|
||
|
|
|
Saddle Brook, NJ 07663 |
|
|
|
Credit Card Account Number (fill in below)
Expiration Date
Cardholder’s Signature
Cardholder’s Address
(if different from shipping address)
To place an order by phone, call 1-800-865-6330 between 8:30 AM and 5:00 PM (EST) Monday - Friday.
Ship To Name: |
|
|
|
|
|
|
Merchandise Total: |
$ |
|
|
|||
Address: |
|
|
|
|
|
|
|
NJ Residents Add 6.0% Sales Tax$ |
|
|
|||
City: |
|
|
|
|
State: |
|
|
Shipping & Handling (see table) $ |
|
||||
|
|
|
|
|
|
||||||||
Zip Code: |
|
|
Phone: |
|
|
|
|
TOTAL AMOUNT DUE: |
$ |
|
|
||
-17-

De’Longhi is the distributor of Kenwood home appliances.
This warranty applies to all home appliances with De’Longhi or Kenwood
brand names.
Limited Warranty
What does the warranty cover?
We warrant each appliance to be free from defects in material and workmanship. Our obligation under this warranty is limited to repair at our factory or authorized service center of any defective parts or part thereof, other than parts damaged in transit. In the event of a products replacement or return, the unit must be returned transportation prepaid. The repaired or new model will be returned at the company expense.
This warranty shall apply only if the appliance is used in accordance with the factory directions, which accompany it, and on an Alternating current ( AC ) circuit.
How long does the coverage last?
This warranty runs for one year ( 1 ) from the purchase date found on your receipt and applies only to the original purchaser for use.
What is not covered by the warranty?
The warranty does not cover defects or damage of the appliance, which result from repairs or alterations to the appliance outside our factory or authorized service centers, nor shall it apply to any appliance, which has been subject to abuse, misuse, negligence or accidents. Also, consequential and incidental damage resulting from the use of this product or arising out of any breach of contract or breach of this warranty are not recoverable under this warranty. Some states do not allow the exclusion or limitation of incidental or consequential damage, so the above limitation may not apply to you.
How do you get service?
If repairs become necessary, see contact information below:
U.S. Residents:
Please contact our toll free hotline at 1-800-322-3848 or log onto our website at www.delonghi.com. For all accessories, spare parts or replacement parts, please contact our parts division at 1-800-865-6330.
Residents of Canada: Please contact our toll free hotline at 1-888-335-6644 or log onto our website at www.delonghi.com.
Residents of Mexico: Please refer to the Limited Warranty statement for Mexico.
Please refer to the back page of the manual for De’Longhi addresses.
The above warranty is in lieu of all other express warranties and representations. All implied warranties are limited to the applicable warranty period set forth above. This limitation does not apply if you enter into an extended warranty with De’Longhi. Some states do not allow limitations on how long an implied warranty lasts, so the above exclusions may not apply to you. De’Longhi does not authorize any other person or company to assume for it any liability in connection with the sale or use of its appliance.
How does state law apply?
This warranty gives you specific legal rights, and you may also have other rights, which vary from state to state.
-18-

PROTECT YOUR INVESTMENT WITH DELONGHI’S EXTENDED SERVICE PLAN
For your convenience and protection an optional extended service plan is available!
CUT ALONG DOTTED LINE
For a small price you can be sure that your appliance is protected. If your product needs repair two years beyond the manufacturer’s limited warranty, we will fix it at no cost to you. Note: The motors for the stand mixers and food processors are not covered under this extended service plan.
If you choose to enroll, please detach and fill out this form and mail with payment (check or money order only). Your Extended Service Plan certificate will be sent to you by return mail.
PLEASE PRINT
Name: ______________________________________________________
Address: ____________________________________________________
City, State and Zip Code: ________________________________________
TWO-YEAR EXTENDED SERVICE PLAN |
|
Stand Mixers .............................................................................................. |
$90.00 |
Food Processors ....................................................................................... |
$70.00 |
Mini Food Processor and Chopper ............................................................. |
$20.00 |
Electric Citrus Juicer .................................................................................. |
$15.00 |
Electric Food and Cheese Grater ............................................................... |
$15.00 |
MAIL TO:
DeLonghi America, Inc.
Park 80 West, Plaza One
Saddle Brook, NJ 07663
Attn: Consumer Service Dept.
-19-

Made in U.K.
Power Requirement: 120 Volts / 60 Hz
Power Consumption: 980 Watts (DSM7)
Power Consumption: 780 Watts (DSM5)
Web Site: www.delonghi.com
10-Year Warranty on Stand Mixer Motor
The maximum rating is based on the attachment that draws the greatest load. Other attachments may draw significantly less power.
De’Longhi America, Inc.
Park 80 West, Plaza One
Saddle Brook, NJ 07663
1-800-322-3848
www.delonghi.com
-20-
Merci d’avoir choisi De’Longhi!
Un engagement inébranlable envers la qualité et l’innovation a fait de De’Longhi un chef de file mondial pendant plus cent ans dans le secteur des appareils ménagers. Nos origines italiennes sont reflétées dans chaque produit, chaque fonction et chaque conception. Et nous nous consacrons à la création de produits qui améliorent les vies de nos clients. Nous espérons que vous profiterez bien de votre appareil De’Longhi pendant de nombreuses années!
Maintenant que vous nous avez découverts, nous pensons que vous serez d’accord pour dire que chacun des appareils De’Longhi est véritablement une « Innovation pour la vie ».
Apprenez à mieux nous connaître… rendez-nous visite à www.delonghi.com pour y voir notre gamme complète de produits.
-21-

TABLE DES MATIÈRES |
|
PRÉCAUTIONS IMPORTANTES....................................................................... |
23 |
INSTRUCTIONS SPÉCIALES POUR LE CORDON ÉLECTRIQUE........... |
23 |
VOTRE BATTERUR SUR SOCLE..................................................................... |
24 |
AVANT LA PREMIÈRE UTILISATION................................................................. |
24 |
DISPOSITIF PROTECTEUR CONTRE LES SURINTENSITÉS................... |
25 |
ACCESSOIRES ET PIÈCES INCLUS.............................................................. |
25 |
UTILISATION DU BATTEUR SUR SOCLE...................................................... |
25 |
CONSEILS DE PRÉPARATION.......................................................................... |
26 |
CAPACITÉS MAXIMALES..................................................................................... |
27 |
VITESSES RECOMMANDÉES POUR LES ACCESSOIRES........................ |
27 |
UTILISATION DU PARE-ÉCLABOUSSURES.................................................. |
27 |
DÉPANNAGE........................................................................................................ |
28 |
NETTOYAGE DU BATTEUR SUR SOCLE ET DE SES ACCESSOIRES.... |
29 |
RECETTES........................................................................................................... |
30 |
ACCESSOIRES EN OPTION............................................................................. |
34 |
GARANTIE LIMITÉE............................................................................................. |
36 |
L'INFORMATION TECHNIQUE.......................................................................... |
37 |
-22-
 Loading...