


CONVECTION OVEN WITH ELECTRONIC CONTROLS
Instructions for use
AD699
|
CONTENTS |
|
CHAP. 1 GENERAL |
|
|
1.1 |
Control panel . . . . . . . . . . . . . . . . . . . . . . . . . . . . . . . . . . . . . . . . . . . . . . . . . . . . |
3 |
1.2 |
Description and accessories provided . . . . . . . . . . . . . . . . . . . . . . . . . . . . . . . . . . . |
4 |
1.3 |
Important safeguards . . . . . . . . . . . . . . . . . . . . . . . . . . . . . . . . . . . . . . . . . . . . . . |
5 |
1.4 |
Summary of operation . . . . . . . . . . . . . . . . . . . . . . . . . . . . . . . . . . . . . . . . . . . . . . |
.6 |
1.5 |
Correct wire shelf position . . . . . . . . . . . . . . . . . . . . . . . . . . . . . . . . . . . . . . . . . . . . |
7 |
1.6 |
Installation . . . . . . . . . . . . . . . . . . . . . . . . . . . . . . . . . . . . . . . . . . . . . . . . . . . . . . . |
8 |
1.7 |
Important tips and techniques . . . . . . . . . . . . . . . . . . . . . . . . . . . . . . . . . . . . . . . . . |
8 |
CHAP. 2 USING THE CONTROLS AND SETTING THE MODES
2.1 Setting the clock . . . . . . . . . . . . . . . . . . . . . . . . . . . . . . . . . . . . . . . . . . . . . . . . . . .9 2.2 Bake and Fan/Bake modes . . . . . . . . . . . . . . . . . . . . . . . . . . . . . . . . . . . . . . . . . .10 2.3 Broiling mode . . . . . . . . . . . . . . . . . . . . . . . . . . . . . . . . . . . . . . . . . . . . . . . . . . . .14 2.4 Toasting mode . . . . . . . . . . . . . . . . . . . . . . . . . . . . . . . . . . . . . . . . . . . . . . . . . . .16 2.5 Defrosting mode . . . . . . . . . . . . . . . . . . . . . . . . . . . . . . . . . . . . . . . . . . . . . . . . . .17 2.6 Dehydrating mode . . . . . . . . . . . . . . . . . . . . . . . . . . . . . . . . . . . . . . . . . . . . . . . .18
CHAP. 3 CLEANING AND MAINTENANCE
3.1 Care and cleaning . . . . . . . . . . . . . . . . . . . . . . . . . . . . . . . . . . . . . . . . . . . . . . . .19
2
GENERAL1
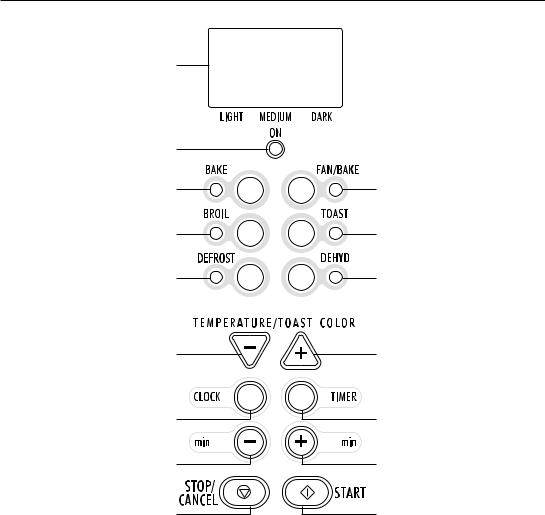
1.1 - CONTROL PANEL
|
1 |
|
|
|
2 |
|
|
|
3 |
|
10 |
|
4 |
|
11 |
|
5 |
|
12 |
|
6 |
|
13 |
|
7 |
|
14 |
|
8 |
|
15 |
|
9 |
|
16 |
1 |
Display |
9 |
STOP/CANCEL button |
2 |
ON pilot light |
10 |
FAN/BAKE button/pilot light |
3 |
BAKE button/pilot light |
11 |
TOAST button/pilot light |
4 |
BROIL button/pilot light |
12 |
DEHYDRATE button/pilot light |
5 |
DEFROST button/pilot light |
13 |
TEMPERATURE/TOAST COLOR setting |
6 |
TEMPERATURE/TOAST COLOR setting |
14 |
TIMER button |
7 |
CLOCK button |
15 |
“min +” button |
8 |
“min -” button |
16 |
START button |
3

GENERAL1
1.2 - DESCRIPTION AND ACCESSORIES PROVIDED
A B
C
F
D E
@@@@@@@@@@@@@@@@@@АААААААААААААААААА;;;;;;;;;;;;;;;;;;yyyyyyyyyyyyyyyyyy
@@@@@@@@@@@@@@@@@@АААААААААААААААААА;;;;;;;;;;;;;;;;;;yyyyyyyyyyyyyyyyyy
@@@@@@@@@@@@@@@@@@АААААААААААААААААА;;;;;;;;;;;;;;;;;;yyyyyyyyyyyyyyyyyy
@@@@@@@@@@@@@@@@@ААААААААААААААААА;;;;;;;;;;;;;;;;;yyyyyyyyyyyyyyyyy
@@@@@@@@@@@@@@@@@ААААААААААААААААА;;;;;;;;;;;;;;;;;yyyyyyyyyyyyyyyyy
@@@@@@@@@@@@@@@@@ААААААААААААААААА;;;;;;;;;;;;;;;;;yyyyyyyyyyyyyyyyy
@@@@@@@@@@@@@@@@@ААААААААААААААААА;;;;;;;;;;;;;;;;;yyyyyyyyyyyyyyyyy
@@@@@@@@@@@@@@@@@ААААААААААААААААА;;;;;;;;;;;;;;;;;yyyyyyyyyyyyyyyyy L @@@@@@@@@@@@@@@@@ААААААААААААААААА;;;;;;;;;;;;;;;;;yyyyyyyyyyyyyyyyy
@@@@@@@@@@@@@@@@@@АААААААААААААААААА;;;;;;;;;;;;;;;;;;yyyyyyyyyyyyyyyyyy
@@@@@@@@@@@@@@@@@@АААААААААААААААААА;;;;;;;;;;;;;;;;;;yyyyyyyyyyyyyyyyyy
@@@@@@@@@@@@@@@@@@ААААААААААААААААААyyyyyyyyyyyyyyyyyy;;;;;;;;;;;;;;;;;;
@@@@@@@@@@@@@@@@@ААААААААААААААААА;;;;;;;;;;;;;;;;;yyyyyyyyyyyyyyyyy
@@@@@@@@@@@@@@@@@ААААААААААААААААА;;;;;;;;;;;;;;;;;yyyyyyyyyyyyyyyyy
@@@@@@@@@@@@@@@@@ААААААААААААААААА;;;;;;;;;;;;;;;;;yyyyyyyyyyyyyyyyy
@@@@@@@@@@@@@@@@@ААААААААААААААААА;;;;;;;;;;;;;;;;;yyyyyyyyyyyyyyyyy
@@@@@@@@@@@@@@@@@ААААААААААААААААА;;;;;;;;;;;;;;;;;yyyyyyyyyyyyyyyyy
@@@@@@@@@@@@@@@@@ААААААААААААААААА;;;;;;;;;;;;;;;;;yyyyyyyyyyyyyyyyy
@@@@@@@@@@@@@@@@@@АААААААААААААААААА;;;;;;;;;;;;;;;;;;yyyyyyyyyyyyyyyyyy
@@@@@@@@@@@@@@@@@@АААААААААААААААААА;;;;;;;;;;;;;;;;;;yyyyyyyyyyyyyyyyyy
@@@@@@@@@@@@@@@@@@АААААААААААААААААА;;;;;;;;;;;;;;;;;;yyyyyyyyyyyyyyyyyy
@@@@@@@@@@@@@@@@АААААААААААААААА;;;;;;;;;;;;;;;;yyyyyyyyyyyyyyyy
yyyyyyyyyyyyyyyyy;;;;;;;;;;;;;;;;;ААААААААААААААААА@@@@@@@@@@@@@@@@@
yyyyyyyyyyyyyyyyy;;;;;;;;;;;;;;;;;ААААААААААААААААА@@@@@@@@@@@@@@@@@
yyyyyyyyyyyyyyyyyy;;;;;;;;;;;;;;;;;;АААААААААААААААААА@@@@@@@@@@@@@@@@@@
yyyyyyyyyyyyyyyyyy;;;;;;;;;;;;;;;;;;АААААААААААААААААА@@@@@@@@@@@@@@@@@@
yyyyyyyyyyyyyyyyy;;;;;;;;;;;;;;;;;ААААААААААААААААА@@@@@@@@@@@@@@@@@
yyyyyyyyyyyyyyyyy;;;;;;;;;;;;;;;;;ААААААААААААААААА@@@@@@@@@@@@@@@@@
yyyyyyyyyyyyyyyyy;;;;;;;;;;;;;;;;;ААААААААААААААААА@@@@@@@@@@@@@@@@@
yyyyyyyyyyyyyyyyy;;;;;;;;;;;;;;;;;ААААААААААААААААА@@@@@@@@@@@@@@@@@
M
AUpper heating element
BOven light
CControl panel
DLower heating element
ECrumb tray
FCookie Sheet (two provided)
GBroiling rack
HShallow pan
IWire shelf (two provided)
LDehydrator kit (optional)
MHandgrip (optional)
G
H
I
4

G1E N E R A L
1.3 - IMPORTANT SAFEGUARDS
Your product is equipped with a polarized alternating current line plug (a plug having one blade wider than the other).
This plug will fit into the power outlet only one way. This is a safety feature. If you are unable to insert the plug fully into the outlet, try reversing the plug. If the plug should still fail to fit, contact your electrician to replace your obsolete outlet. Do not defeat the safety purpose of the polarized plug.
When using electric appliances basic safety precautions should always be followed, including the following:
1)Read all instructions.
2)Do not touch hot surfaces. Use handles, dials and hot pads.
3)To protect against electrical shock, do not place oven in or under water. See instructions for cleaning.
4)Close supervision is necessary when any appliance is used by or near children.
5)Unplug from outlet when not in use and before cleaning. Always press the STOP/CANCEL button before unplugging. Allow to cool before putting on or taking off parts and before cleaning the appliance.
6)Do not operate any appliance with a damaged cord or plug or after the appliance malfunctions, or has been damaged in any way. Return appliance to the nearest authorized service facility for examination, repair or adjustment.
7)The use of accessory attachments not recommended by the appliance manufacturer may cause injuries.
8)Do not use outdoors.
9)Do not let cord hang over edge of table or counter, or touch hot surfaces.
10)Do not place on or near a hot gas or electric burner.
11)Extreme caution must be used when moving an appliance containing hot oil or other hot liquids.
12)If the plug gets hot, please call a qualified electrician.
13)Do not use this appliance for other than intended use.
14)Use extreme caution when removing the broiling tray or disposing of hot grease.
15)Do not clean oven with metal scouring pads. Pieces can break off the pad and touch electrical parts creating a risk of electric shock.
16)To disconnect the appliance, press the STOP/CANCEL button. Then unplug the cord from the wall outlet.
17)To assure safe operation, oversized utensils or food must not be inserted into the oven.
18)A fire may occur if this appliance is covered or touching flammable material, including curtains, draperies, walls, etc. when in operation.
19)Condensation and a grease deposit may form around the door and the air and steam outlet grilles. This is normal.
20)CAUTION: Never leave the oven unattended when in use (especially when broiling and toasting).
21)Extreme caution should be exercised when using containers other than ovenproof metal, glass or ceramic.
22)Do not store any materials other than the manufacturer’s recommended accessories in the oven when not in use.
23)Do not place any of the following materials in the oven: paper, cardboard, plastic and the like.
24)Do not cover crumb tray or any part of the oven with metal foil; this can cause overheating of the oven. Use aluminum foil on or under food only as directed in the appliance instructions.
THIS PRODUCT IS FOR HOUSEHOLD USE ONLY
SAVE THESE INSTRUCTIONS
5
|
|
|
|
G E N E R A L |
|
|
|
|
|
|
1.4 - SUMMARY OF OPERATION |
1 |
|
|
|
|
|
|
|||
|
|
|
|
|
|
|
|
|
|
|
|
|
|
|
TEMPERATURE |
POSITION OF |
|
|
|||
PROGRAM |
MODES |
|
SETTING/DISPLAY |
WIRE RACK/ |
NOTES/TIPS |
|||||
|
|
|
|
INDICATION |
ACCESSORIES |
|
|
|||
|
|
|
|
|
|
|
|
|
|
|
|
|
|
|
|
|
|
|
|
Ideal for meat, cakes in |
|
|
|
|
|
|
|
|
|
|
general and food which |
|
|
|
|
|
|
|
|
|
|
need to be crispy on the |
|
|
|
|
|
|
|
|
|
|
surface (as gratined dish- |
|
|
|
|
|
140° - 450°F |
|
|
|
es). Roast meats and |
||
|
|
|
|
|
|
|
|
|
poultry will cook faster. |
|
CONVECTION |
FAN/BAKE |
|
|
|
|
|
|
|
Use of a meat thermome- |
|
OVEN COOKING |
|
|
|
|
|
|
|
|
ter will help avoid over- |
|
|
|
|
|
|
|
|
|
cooking. |
|
|
|
|
|
|
|
|
|
|
|
|
|
|
|
|
|
|
|
|
|
|
||
|
|
|
|
|
|
Single tray |
BAKED GOODS: |
|||
|
|
|
|
|
|
|
|
|
||
|
|
|
|
300° - 350°F |
|
|
|
Select one or two wire |
||
|
|
|
|
|
|
|
racks with cookies sheets |
|||
|
|
|
|
|
|
|
|
|
||
|
|
|
|
|
|
with cookie sheets |
depending |
upon the |
||
|
|
|
|
|
|
quantity. |
|
|||
CONVECTION OVEN |
PRESS TWICE |
|
|
|
|
Double trays |
Baked foods (cakes, pies, |
|||
|
|
|
|
|||||||
|
|
|
|
|
|
|
||||
COOKING ON TWO |
|
|
|
|
|
|
|
cookies, etc.) may |
||
FAN/BAKE |
|
|
|
|
|
|
|
|||
TRAYS SIMULTANE- |
|
|
|
|
|
|
|
require a lower tempera- |
||
|
|
|
|
|
|
|
||||
|
|
|
|
|
|
|
|
ture to prevent over- |
||
OUSLY |
|
|
|
|
|
|
|
|
||
|
|
|
|
|
with cookie sheets |
browning (see page 13) |
||||
|
|
|
|
|
|
|
|
|||
|
|
|
|
|
|
|
|
|
|
|
|
|
|
|
|
|
|
|
|
Bake casseroles, pizza |
|
TRADITIONAL |
|
|
|
|
|
|
|
|
fruit desserts, |
fish, stuffed |
BAKE |
|
|
140° - 470°F |
|
|
|
vegetables, puddings and |
|||
OVEN COOKING |
|
|
|
|
|
other moist foods that |
||||
|
|
|
|
|
|
|
|
|||
|
|
|
|
|
|
|
|
|
don’t require browning |
|
|
|
|
|
|
|
|
|
|
and crisping. |
|
|
|
|
|
|
|
|
|
|
|
|
|
|
|
|
|
|
|
|
|
Always use the broiling |
|
|
|
|
|
|
|
|
|
|
rack set in the shallow |
|
|
|
|
|
|
|
|
|
|
pan. Place it on the wire |
|
|
|
|
|
|
|
|
|
|
shelf in position that puts |
|
|
|
|
|
|
|
|
|
|
the food about two inches |
|
|
|
|
|
|
|
|
|
|
from the top element, |
|
BROILING |
|
|
|
|
|
|
|
|
more for thick food such |
|
AND TOP BROWN- |
BROIL |
|
|
|
|
|
|
|
as chicken. Foods such as |
|
|
|
|
|
|
|
|
hamburgers, |
steaks, |
||
ING |
|
|
|
|
|
|
|
|
kebabs, sausages are to |
|
|
|
|
|
|
|
|
|
|
be placed directly on the |
|
|
|
|
|
|
|
|
|
|
||
|
|
|
|
|
|
|
|
|
broiling rack. Use the broil |
|
|
|
|
|
|
|
|
|
|
settings to top-brown |
|
|
|
|
|
|
|
|
|
|
open-face sandwiches, |
|
|
|
|
|
|
|
|
|
|
cheese toppings, hors |
|
|
|
|
|
|
|
|
|
|
d’ouevres. |
|
|
|
|
|
|
|
|
|
|
|
|
|
|
|
|
|
|
|
|
|
Some breads, muffins, etc. |
|
|
|
|
|
|
|
|
|
|
will take longer than oth- |
|
TOASTING |
TOAST |
|
|
|
|
|
|
|
ers. Reset dial if results |
|
|
|
to |
|
|
|
are too light. Place the |
||||
|
|
|
|
|
|
|
|
|
bread to be toasted fol- |
|
|
|
|
|
|
|
|
|
|
lowing instructions on |
|
|
|
|
|
|
|
|
|
|
page. 16. |
|
|
|
|
|
|
|
|
|
|
|
|
6
G1E N E R A L
|
|
TEMPERATURE |
POSITION OF |
|
|
PROGRAM |
MODES |
SETTING/DISPLAY |
WIRE RACK/ |
|
NOTES/TIPS |
|
|
INDICATION |
ACCESSORIES |
|
|
|
|
|
|
|
|
|
|
|
|
Turn to this setting to keep |
|
|
|
|
|
hot food warm. Do not |
|
KEEPING |
FAN/BAKE |
140°F |
|
hold food more than an |
|
|
hour or reheat cold food. |
||||
WARM |
|
||||
|
|
|
If not hot enough for serv- |
||
|
|
|
|
||
|
|
|
|
ing turn temperature dial |
|
|
|
|
|
up. |
|
|
|
|
|
|
|
|
|
|
|
To thaw frozen food in |
|
|
|
|
|
freezer packaging place |
|
|
|
|
|
it on wire shelf or on shal- |
|
DEFROSTING |
DEFROST |
|
|
low |
pan to catch any |
|
|
juices. Do not try to thaw |
|||
|
|
|
|
||
|
|
|
|
large roasts or allow any |
|
|
|
|
|
food to overthaw (see |
|
|
|
|
|
page. 17). |
|
|
|
|
|
|
|
|
|
|
|
Place prepared food on |
|
|
|
|
|
the dehydrator kit (if pro- |
|
|
|
|
|
vided) without covering |
|
DEHYDRATING |
DEHYD |
|
|
shelves with plastic food |
|
|
|
wrap. The fan and low |
|||
|
|
|
|
heat will dry food in 8 to |
|
|
|
|
|
14 hours. Consult a book |
|
|
|
|
|
on drying foods for treat- |
|
|
|
|
|
ment of various foods. |
|
|
|
|
|
|
|
|
|
|
|
|
|
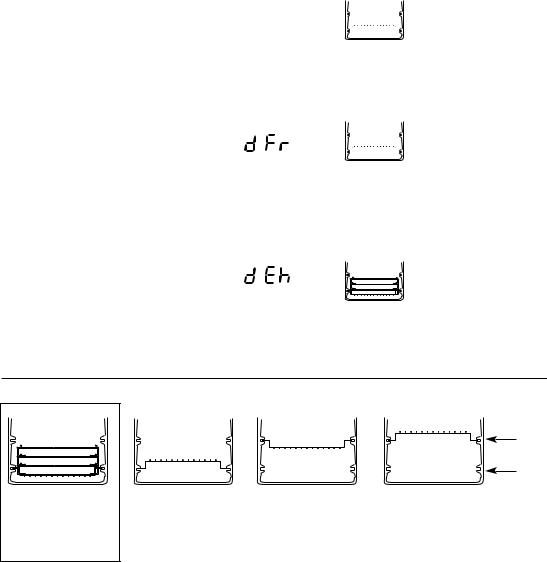
1.5 - CORRECT WIRE SHELF POSITIONS
|
|
|
slot 2 |
|
|
|
|
slot 1 |
|
ONLY for |
(1) |
(2) |
(3) |
|
dehydrating |
||||
|
|
|
7
 Loading...