


 Loading...
Dell™ Inspiron™ 4100
Solutions Guide
w w w . d e l l . c o m | s u p p o r t . d e l l . c o m

Hints, Notices, and Cautions
HINT: A HINT indicates important information that helps you make better use of your computer.
NOTICE: A NOTICE indicates either potential damage to hardware or loss of data and tells you how to avoid the problem.
 CAUTION: A CAUTION indicates a potential for property damage, personal injury, or death.
Abbreviations and Acronyms
For a complete list of abbreviations and acronyms, see the Tell Me How help file. To access the help file, see page 34.
____________________
Information in this document is subject to change without notice. © 2001 Dell Computer Corporation. All rights reserved.
Reproduction in any manner whatsoever without the written permission of Dell Computer Corporation is strictly forbidden.
Trademarks used in this text: Dell, the DELL logo, DellNet, DellPlus, Dell TravelLite, TrueMobile, Inspiron, Dell Precision, Dimension, OptiPlex, Latitude, and DellWare are trademarks of Dell Computer Corporation; Intel and Pentium are registered trademarks and Celeron is a trademark of Intel Corporation; Microsoft and Windows are registered trademarks of Microsoft Corporation.
Other trademarks and trade names may be used in this document to refer to either the entities claiming the marks and names or their products. Dell Computer Corporation disclaims any proprietary interest in trademarks and trade names other than its own.
This product incorporates copyright protection technology that is protected by method claims of certain U.S. patents and other intellectual property rights owned by Macrovision Corporation and other rights owners. Use of this copyright protection technology must be authorized by Macrovision Corporation, and is intended for home and other limited viewing uses only unless otherwise authorized by Macrovision Corporation. Reverse engineering or disassembly is prohibited.
November 2001 |
P/N 2H767 |
Rev. A00 |

Contents
Safety and EMC Instructions: Portable Computers . . . . . . . . |
9 |
Safety Instructions . . . . . . . . . . . . . . . . . . . . . . . |
9 |
EMC Instructions . . . . . . . . . . . . . . . . . . . . . . . . |
13 |
When Using Your Computer . . . . . . . . . . . . . . . . . . . |
14 |
Ergonomic Computing Habits . . . . . . . . . . . . . . . . . . |
15 |
When Removing or Replacing Parts . . . . . . . . . . . . . . . |
17 |
Protecting Against Electrostatic Discharge . . . . . . . . . . . |
17 |
1 Setting Up
Connecting a Printer . . . . . . . . . . . . . . . . . . . . . . . . |
20 |
Parallel Printer . . . . . . . . . . . . . . . . . . . . . . . . . |
20 |
USB Printer . . . . . . . . . . . . . . . . . . . . . . . . . . |
21 |
Installing the Printer Driver . . . . . . . . . . . . . . . . . . . |
22 |
Transferring Information to a New Computer |
|
(Windows® XP Only) . . . . . . . . . . . . . . . . . . . . . . . . |
23 |
Setting Up a Home and Office Network |
|
(Windows XP Only) . . . . . . . . . . . . . . . . . . . . . . . . . |
23 |
Turning Off the Computer . . . . . . . . . . . . . . . . . . . . . |
24 |
Windows Me and Windows 2000 . . . . . . . . . . . . . . . . |
24 |
About the Module Bay . . . . . . . . . . . . . . . . . . . . . . . |
24 |
Swapping Devices While the Computer Is Turned Off . . . . . . |
25 |
Swapping Devices While Windows Is Running . . . . . . . . . . |
25 |
Enabling the Infrared Sensor . . . . . . . . . . . . . . . . . . . . |
26 |
Setting Up the Dolby Headphone . . . . . . . . . . . . . . . . . |
27 |
Contents 3

Setting Up the APR to Connect to a Network . . . . . . . . . . |
28 |
Power Protection Devices . . . . . . . . . . . . . . . . . . . . . |
28 |
Surge Protectors . . . . . . . . . . . . . . . . . . . . . . . . |
28 |
Line Conditioners . . . . . . . . . . . . . . . . . . . . . . . |
29 |
Uninterruptible Power Supply Devices . . . . . . . . . . . . . |
29 |
2 Solving Problems
Finding Solutions . . . . . . . . . . . . . . . . . . . . . . . . . |
32 |
Accessing Help . . . . . . . . . . . . . . . . . . . . . . . . . . |
34 |
Power Problems . . . . . . . . . . . . . . . . . . . . . . . . . . |
35 |
Error Messages . . . . . . . . . . . . . . . . . . . . . . . . . . |
36 |
Video and Display Problems . . . . . . . . . . . . . . . . . . . . |
38 |
If the display is blank . . . . . . . . . . . . . . . . . . . . . |
38 |
If the display is difficult to read . . . . . . . . . . . . . . . . |
39 |
If only part of the display is readable . . . . . . . . . . . . . . |
40 |
Sound and Speaker Problems . . . . . . . . . . . . . . . . . . . |
40 |
If you have a problem with integrated speakers . . . . . . . . . |
40 |
If you have a problem with external speakers . . . . . . . . . . |
40 |
Printer Problems . . . . . . . . . . . . . . . . . . . . . . . . . |
41 |
If you cannot print to a parallel port printer . . . . . . . . . . |
41 |
If you cannot print to a USB printer . . . . . . . . . . . . . . |
42 |
Modem and Internet Connection Problems . . . . . . . . . . . . |
43 |
Scanner Problems . . . . . . . . . . . . . . . . . . . . . . . . . |
46 |
Touch Pad or Mouse Problems . . . . . . . . . . . . . . . . . . |
47 |
External Keyboard Problems . . . . . . . . . . . . . . . . . . . |
48 |
Unexpected Characters . . . . . . . . . . . . . . . . . . . . . . |
49 |
4 Contents

Drive Problems . . . . . . . . . . . . . . . . . . . . . . . . . . . |
49 |
If you cannot save a file to a floppy disk . . . . . . . . . . . . . |
49 |
If you cannot play a CD, CD-RW, or DVD . . . . . . . . . . . . |
51 |
If you cannot play a DVD movie . . . . . . . . . . . . . . . . . |
52 |
If you cannot eject the CD, CD-RW, or DVD drive tray . . . . . |
52 |
If you hear an unfamiliar scraping or grinding sound . . . . . . |
52 |
If the CD-RW drive stops writing . . . . . . . . . . . . . . . . |
52 |
If you have problems with a hard drive . . . . . . . . . . . . . |
53 |
Network Problems . . . . . . . . . . . . . . . . . . . . . . . . . |
53 |
General Program Problems . . . . . . . . . . . . . . . . . . . . . |
54 |
A program crashes . . . . . . . . . . . . . . . . . . . . . . . |
54 |
A program stops responding . . . . . . . . . . . . . . . . . . . |
54 |
A solid blue screen appears . . . . . . . . . . . . . . . . . . . |
55 |
A program is designed for an earlier version of the |
|
Windows operating systems . . . . . . . . . . . . . . . . . . . |
55 |
Error messages appear . . . . . . . . . . . . . . . . . . . . . |
55 |
E-Mail Problems . . . . . . . . . . . . . . . . . . . . . . . . . . |
56 |
If Your Computer Gets Wet . . . . . . . . . . . . . . . . . . . . . |
56 |
If You Drop or Damage Your Computer . . . . . . . . . . . . . . |
57 |
Resolving Other Technical Problems . . . . . . . . . . . . . . . . |
58 |
Reinstalling Drivers and Utilities . . . . . . . . . . . . . . . . . . |
58 |
Reinstalling the Modem or Network Adapter Driver . . . . . . . |
59 |
Using the Windows XP Device Driver Rollback . . . . . . . . . |
61 |
Resolving Software and Hardware Incompatibilities . . . . . . . |
62 |
Windows XP . . . . . . . . . . . . . . . . . . . . . . . . . . |
62 |
Windows Me . . . . . . . . . . . . . . . . . . . . . . . . . . |
63 |
Windows 2000 . . . . . . . . . . . . . . . . . . . . . . . . . |
64 |
Using System Restore . . . . . . . . . . . . . . . . . . . . . . . |
65 |
Windows XP . . . . . . . . . . . . . . . . . . . . . . . . . . |
65 |
Windows Me . . . . . . . . . . . . . . . . . . . . . . . . . . |
66 |
Creating a Restore Point . . . . . . . . . . . . . . . . . . . . |
66 |
Contents 5

|
Restoring the Computer to an Earlier Operating State . . . . . |
67 |
|
Undoing the Last System Restore . . . . . . . . . . . . . . . |
68 |
|
Reinstalling Windows XP . . . . . . . . . . . . . . . . . . . . . |
68 |
|
Reinstalling Windows Me . . . . . . . . . . . . . . . . . . . . . |
70 |
|
Reinstalling Windows 2000 . . . . . . . . . . . . . . . . . . . . |
72 |
|
Enabling Hibernate Support . . . . . . . . . . . . . . . . . . |
73 |
3 |
Replacing Parts |
|
|
Using the Advanced Port Replicator . . . . . . . . . . . . . . . |
76 |
|
Connecting External Devices to the APR . . . . . . . . . . . . |
76 |
|
APR Controls and Indicators . . . . . . . . . . . . . . . . . . |
78 |
|
Docking the Computer . . . . . . . . . . . . . . . . . . . . . |
78 |
|
Undocking the Computer . . . . . . . . . . . . . . . . . . . . |
79 |
|
Monitor Stand . . . . . . . . . . . . . . . . . . . . . . . . . |
81 |
|
Adding Memory . . . . . . . . . . . . . . . . . . . . . . . . . . |
81 |
|
Adding a Mini PCI Card . . . . . . . . . . . . . . . . . . . . . . |
85 |
|
Replacing the Hard Drive . . . . . . . . . . . . . . . . . . . . . |
87 |
|
Returning a Hard Drive to Dell . . . . . . . . . . . . . . . . . |
89 |
|
Adding a Daughter Card Modem . . . . . . . . . . . . . . . . . |
90 |
4 |
Appendix |
|
|
Specifications . . . . . . . . . . . . . . . . . . . . . . . . . . . |
94 |
|
Standard Settings . . . . . . . . . . . . . . . . . . . . . . . . . |
101 |
|
Viewing the System Setup Screens . . . . . . . . . . . . . . . |
101 |
|
System Setup Screens . . . . . . . . . . . . . . . . . . . . . |
101 |
|
Returning Items for Warranty Repair or Credit . . . . . . . . . . |
102 |
6 Contents

Dell Technical Support Policy (U.S. Only) . . . . . . . . . . . . |
102 |
Definition of "Dell-Installed" Software and Peripherals . . . . . 103 |
|
Definition of "Third-Party" Software and Peripherals . . . . . . |
103 |
Contacting Dell . . . . . . . . . . . . . . . . . . . . . . . . . . |
103 |
Returning Items for Warranty Repair or Credit . . . . . . . . |
118 |
Regulatory Information . . . . . . . . . . . . . . . . . . . . . . |
118 |
FCC Notices (U.S. Only) . . . . . . . . . . . . . . . . . . . |
119 |
Battery Disposal . . . . . . . . . . . . . . . . . . . . . . . |
122 |
NOM Information (Mexico Only) . . . . . . . . . . . . . . . |
123 |
Información para NOM (únicamente para México) . . . . . . |
124 |
Limited Warranties and Return Policy . . . . . . . . . . . . . . |
124 |
One-Year Limited Warranty (U.S. Only) . . . . . . . . . . . . |
125 |
Two-Year Limited Warranty (U.S. Only) . . . . . . . . . . . . |
127 |
Three-Year Limited Warranty (U.S. Only) . . . . . . . . . . . |
130 |
One-Year Limited Warranty (Canada Only) . . . . . . . . . . |
133 |
Two-Year Limited Warranty (Canada Only) . . . . . . . . . . |
135 |
Three-Year Limited Warranty (Canada Only) . . . . . . . . . |
138 |
"Total Satisfaction" Return Policy |
|
(U.S. and Canada Only) . . . . . . . . . . . . . . . . . . . . |
142 |
One-Year End-User Manufacturer Guarantee |
|
(Latin America and the Caribbean Only) . . . . . . . . . . . . |
143 |
Index . . . . . . . . . . . . . . . . . . . . . . . . . . . . . . . . . . |
145 |
Contents 7

8 Contents
Safety and EMC Instructions: Portable
Computers
The following information defines the meaning of additional symbols used only in the Safety and Electromagnetic Compatibility (EMC) Instructions.
Risk of explosion |
Aircraft |
Risk of fire |
Use of this feature may be prohibited |
|
on aircraft |
Risk of electric shock |
|
Safety Instructions
General
•Do not attempt to service the computer yourself unless you are an authorized service technician. Always follow installation instructions closely.
•If you use an extension power cable with your AC adapter, ensure that the total ampere rating of the products plugged in to the extension power cable does not exceed the ampere rating of the extension cable.
•Do not push objects into air vents or openings of your computer. Doing so can cause fire or electric shock by shorting out interior components.
•Place the AC adapter in a ventilated area, such as a desk top or on the floor, when you use it to run the computer or to charge the battery. Do not cover the AC adapter with papers or other items that will reduce cooling; also, do not use the AC adapter inside a carrying case.
Safety and EM C Ins tr uct ions : Port abl e Computer s |
9 |

w w w . d e l l . c o m | s u p p o r t . d e l l . c o m
•Do not allow your portable computer to operate with the base resting directly on exposed skin for extended periods of time. The surface temperature of the base will rise during normal operation (particularly when AC power is present). Allowing sustained contact with exposed skin can cause discomfort or, eventually, a burn.
•Do not use your computer in a wet environment, for example, near a bath tub, sink, or swimming pool or in a wet basement.
•If your computer includes an integrated or optional (PC Card) modem, disconnect the modem cable if an electrical storm is approaching to avoid the remote risk of electric shock from lightning via the telephone line.
•To help avoid the potential hazard of electric shock, do not connect or disconnect any cables or perform maintenance or reconfiguration of this product during an electrical storm. Do not use your computer during an electrical storm unless all cables have been disconnected and the computer is operating on battery power.
•If your computer includes a modem, the cable used with the modem should be manufactured with a minimum wire size of 26 American wire gauge (AWG) and an FCC-compliant RJ-11 modular plug.
•PC Cards may become very warm during normal operation. Use care when removing PC Cards after their continuous operation.
•Before you clean your computer, remove power. Clean your computer with a soft cloth dampened with water. Do not use liquid or aerosol cleaners, which may contain flammable substances.
10 Safety and EMC Instr uc tions: Port able Computer s
Power (Safety Instructions, continued)
•Use only the Dell-provided AC adapter approved for use with this computer. Use of another AC adapter may cause a fire or explosion.
•Before you connect the computer to an electrical outlet, check the AC adapter voltage rating to ensure that the required voltage and frequency match the available power source.
•To remove power from the computer, turn it off, remove the battery pack, and disconnect the AC adapter from the electrical outlet.
•To help prevent electric shock, plug the AC adapter and peripheral power cables into properly grounded power sources. These power cables may be equipped with three-prong plugs to provide an earth grounding connection. Do not use adapter plugs or remove the grounding prong from the power cable plug. If you use a power extension cable, use the appropriate type, twoprong or three-prong, to mate with the AC adapter power cable.
•Be sure that nothing rests on your AC adapter's power cable and that the cable is not located where it can be tripped over or stepped on.
•If you are using a multiple-outlet power strip, use caution when plugging the AC adapter's power cable into the power strip. Some power strips may allow you to insert the plug incorrectly. Incorrect insertion of the power plug could result in permanent damage to your computer, as well as risk of electric shock and/or fire. Ensure that the ground prong of the power plug is inserted into the mating ground contact of the power strip.
Safety and EM C Ins tr uct ions : Port abl e Computer s |
11 |

w w w . d e l l . c o m | s u p p o r t . d e l l . c o m
Battery (Safety Instructions, continued)
•Use only Dell battery modules that are approved for use with this computer. Use of other types may increase the risk of fire or explosion.
•Do not carry a battery pack in your pocket, purse, or other container where metal objects (such as car keys or paper clips) could short-circuit the battery terminals. The resulting excessive current flow can cause extremely high temperatures and may result in damage to the battery pack or cause fire or burns.
•The battery poses a burn hazard if you handle it improperly. Do not disassemble it. Handle a damaged or leaking battery pack with extreme care. If the battery is damaged, electrolyte may leak from the cells and may cause personal injury.
•Keep away from children.
•Do not store or leave your computer or battery pack near a heat source such as a radiator, fireplace, stove, electric heater, or other heat-generating appliance or otherwise expose it to temperatures in excess of 60ºC (140ºF). When heated to excessive temperatures, battery cells could explode or vent, posing a risk of fire.
•Do not dispose of your computer's battery in a fire or with normal household waste. Battery cells may explode. Discard a used battery according to the manufacturer's instructions or contact your local waste disposal agency for disposal instructions. Dispose of a spent or damaged battery promptly.
12 Safety and EMC Instr uc tions: Port able Computer s

Air Travel (Safety Instructions, continued)
•Certain Federal Aviation Administration regulations and/or airline-specific restrictions may apply to the operation of your Dell™ computer while you are onboard an aircraft. For example, such regulations/restrictions may prohibit the use of any personal electronic device (PED) that has the capacity for intentional transmission of radio frequency or other electromagnetic signals while on an aircraft.
–In order to best comply with all such restrictions, if your Dell portable computer is equipped with Dell TrueMobile™ or some other wireless communication device, please disable this device before you board the aircraft and follow all instructions provided by airline personnel with regard to such device.
–Additionally, the use of any PED, such as a portable computer, may be prohibited in aircraft during certain critical phases of flight, for example, takeoff and landing. Some airlines may further define the critical flight phase as any time the aircraft is below 3050 m (10,000 ft). Please follow the airline's specific instructions as to when the use of a PED is allowed.
EMC Instructions
•Use shielded signal cables to ensure that you maintain the appropriate EMC classification for the intended environment. For parallel printers, a cable is available from Dell. If you prefer, you can order a cable from Dell at its world-wide website at http://accessories.us.dell.com.
•Static electricity can harm electronic components inside your computer. To prevent static damage, discharge static electricity from your body before you touch any of your computer’s electronic components, such as a memory module. You can do so by touching an unpainted metal surface on the computer's input/output panel.
Safety and EM C Ins tr uct ions : Port abl e Computer s |
13 |

w w w . d e l l . c o m | s u p p o r t . d e l l . c o m
When Using Your Computer
Observe the following safety guidelines to prevent damage to your computer:
•When setting up the computer for work, place it on a level surface.
•When traveling, do not check the computer as baggage. You can put your computer through an X-ray security machine, but never put your computer through a metal detector. If you have the computer checked by hand, be sure to have a charged battery available in case you are asked to turn on the computer.
•When traveling with the hard drive removed from the computer, wrap the drive in a nonconducting material, such as cotton cloth or paper. If you have the drive checked by hand, be ready to install the drive in the computer. You can put the hard drive through an X-ray security machine, but never put the drive through a metal detector.
•When traveling, do not place the computer in overhead storage compartments where it could slide around. Do not drop your computer or subject it to other mechanical shocks.
•Protect your computer, battery, and hard drive from environmental hazards such as dirt, dust, food, liquids, temperature extremes, and overexposure to sunlight.
•When you move your computer between environments with very different temperature and/or humidity ranges, condensation may form on or within the computer. To avoid damaging the computer, allow sufficient time for the moisture to evaporate before using the computer.
NOTICE: When taking the computer from low-temperature conditions into a warmer environment or from high-temperature conditions into a cooler environment, allow the computer to acclimate to room temperature before turning on power.
•When you disconnect a cable, pull on its connector or on its strainrelief loop, not on the cable itself. As you pull out the connector, keep it evenly aligned to avoid bending any connector pins. Also, before you connect a cable make sure both connectors are correctly oriented and aligned.
•Handle components with care. Hold a component such as a memory module by its edges, not its pins.
14 Safety and EMC Instr uc tions: Port able Computer s

•When preparing to remove a memory module from the system board or disconnect a peripheral device from the computer, turn off the computer, disconnect the AC adapter cable, and then wait 5 seconds before proceeding to help avoid possible damage to the system board.
•Clean the display with a soft, clean cloth and commercial window cleaner that does not contain wax or abrasives. Apply the cleaner to the cloth; then stroke the cloth across the display in one direction, moving from the top of the display to the bottom. If the display contains grease or some other contaminant, use isopropyl alcohol instead of commercial window cleaner.
•If your computer gets wet or is damaged, follow the procedures described in "If Your Computer Gets Wet" on page 56. If, after following these procedures, you confirm that your computer is not operating properly, contact Dell (see page 103 for the appropriate contact information).
Ergonomic Computing Habits
 CAUTION: Improper or prolonged keyboard use may result in injury.
 CAUTION: Viewing the display or external monitor screen for extended periods of time may result in eye strain.
For comfort and efficiency, observe the following ergonomic guidelines when setting up and using your computer:
•Position your computer directly in front of you as you work.
•Adjust the tilt of the computer’s display, its contrast and/or brightness settings, and the lighting around you (such as overhead lights, desk lamps, and the curtains or blinds on nearby windows) to minimize reflections and glare on the display.
•When using an external monitor with your computer, set the monitor at a comfortable viewing distance (usually 510 to 610 millimeters [20 to 24 inches] from your eyes). Make sure the monitor screen is at eye level or slightly lower when you are sitting in front of the monitor.
•Use a chair that provides good lower-back support.
•Keep your forearms horizontal with your wrists in a neutral, comfortable position while using the keyboard, touch pad, track stick, or external mouse.
Safety and EM C Ins tr uct ions : Port abl e Computer s |
15 |

w w w . d e l l . c o m | s u p p o r t . d e l l . c o m
•Always use the palm rest with the keyboard, touch pad, or track stick. Leave space to rest your hands when using an external mouse.
•Let your upper arms hang naturally at your sides.
•Sit erect with your feet resting on the floor and your thighs level.
•When sitting, make sure the weight of your legs is on your feet and not on the front of your chair seat. Adjust your chair’s height or use a footrest, if necessary, to maintain proper posture.
•Vary your work activities. Try to organize your work so that you do not have to type for extended periods of time. When you stop typing, try to do things that use both hands.
wrists relaxed and flat
 computer positioned directly in front of user
arms at desk level
16 Safety and EMC Instr uc tions: Port able Computer s

When Removing or Replacing Parts
Before removing or installing memory modules, or adding a modem or Mini PCI card, perform the following steps in the sequence indicated.
NOTICE: The only time you should ever access the inside of your computer is when you are installing memory modules, or adding a modem or Mini PCI card.
NOTICE: Wait 5 seconds after turning off the computer before disconnecting a peripheral device or removing a memory module to help prevent possible damage to the system board.
1Turn off your computer and any attached peripherals.
2Disconnect your computer and peripherals from electrical outlets to reduce the potential for personal injury or shock. Also, disconnect any telephone or telecommunication lines from the computer.
3Remove the main battery from the battery bay and, if necessary, the secondary battery from the module bay.
4Ground yourself by touching the unpainted metal surface of the I/O panel on the back of the computer.
While you work, periodically touch the I/O panel to dissipate any static electricity that might harm internal components.
Protecting Against Electrostatic Discharge
Static electricity can harm electronic components inside your computer. To prevent static damage, discharge static electricity from your body before you touch any of your computer’s electronic components, such as a memory module. You can do so by touching an unpainted metal surface on the computer’s I/O panel.
As you continue to work inside the computer, periodically touch an I/O connector to remove any static charge your body may have accumulated.
Safety and EM C Ins tr uct ions : Port abl e Computer s |
17 |

w w w . d e l l . c o m | s u p p o r t . d e l l . c o m
You can also take the following steps to prevent damage from electrostatic discharge (ESD):
•When unpacking a static-sensitive component from its shipping carton, do not remove the component from the antistatic packing material until you are ready to install the component. Just before unwrapping the antistatic packaging, be sure to discharge static electricity from your body.
•When transporting a sensitive component, first place it in an antistatic container or packaging.
•Handle all sensitive components in a static-safe area. If possible, use antistatic floor pads and workbench pads.
The following notice may appear throughout this document to remind you of these precautions:
NOTICE: See "Protecting Against Electrostatic Discharge" in the safety instructions.
18 Safety and EMC Instr uc tions: Port able Computer s

S E C T I O N 1
Setting Up
Connecting a Printer
Transferring Information to a New Computer (Windows® XP Only)
Setting Up a Home and Office Network
(Windows XP Only)
Turning Off the Computer
About the Module Bay
Enabling the Infrared Sensor
Setting Up the Dolby Headphone
Setting Up the APR to Connect to a Network Power Protection Devices
1
m o c . l l e d . t r o p p u s | m o c . l l e d .w w w

w w w . d e l l . c o m | s u p p o r t . d e l l . c o m
HINT: For complete printer driver installation instructions, refer to your printer documentation.
Connecting a Printer
See the documentation that came with the printer for any recommended preparation procedures, such as:
•Removing the packaging
•Installing the toner or ink cartridge
•Loading paper
Then follow the instructions that came with the printer to connect it to the computer. If no information is provided, see the following sections.
Parallel Printer
1 Turn off the computer (see page 24).
NOTICE: Use only a standard IEEE 1284 parallel cable measuring 3 m (10 ft) or less to connect the printer to the computer. Use of a nonstandard cable may prevent the printer from working.
2Attach the parallel printer cable to the parallel connector on the computer and tighten the two screws. Attach the cable to the parallel connector on the printer and snap the two clips into the two notches.
20 Se tting Up
screws (2)
parallel connector on  computer
parallel connector on printer
clips (2)
parallel printer cable
notches (2) 
3Turn on the printer and then turn on the computer. If the Add New Hardware Wizard window appears, click Cancel.
4Install the printer driver if necessary (see page 22).
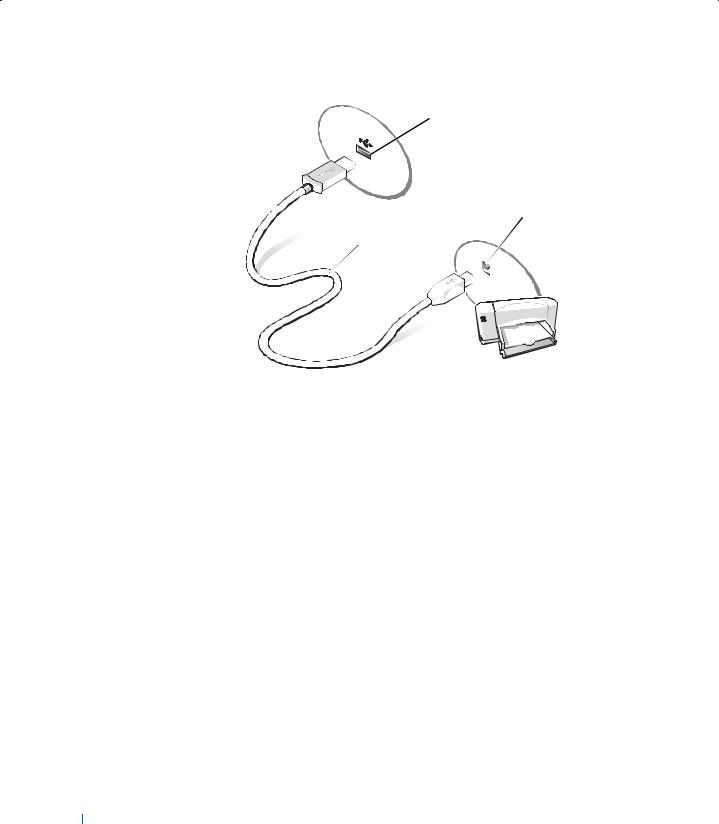
USB Printer
1Install the printer driver if necessary (see page 22).
2Attach the USB printer cable to the USB connector on the computer and the printer. The USB connectors fit only one way.
HINT: You can connect USB devices while the computer is turned on.
Se tting Up |
21 |
w w w . d e l l . c o m | s u p p o r t . d e l l . c o m
 USB connector on back of computer
USB connector on printer
 USB printer cable
Installing the Printer Driver
If you need to install a printer driver, insert the installation CD into the CD or DVD drive. Then follow the prompts on the screen and use the instructions that came with the printer.
If your printer installation CD does not automatically run, click the Start button, click Run, and type x:\setup.exe (where x is the letter of your CD or DVD drive [usually drive D]). Then click OK and follow the prompts on your screen. If your printer installation CD still does not run, check the documentation that came with your printer for instructions on how to start the printer installation CD.
To determine whether your printer driver is installed on a computer running the Microsoft® Windows XP operating system, click the Start button, click
Control Panel, click Printers and Other Hardware, and then click View installed printers or fax printers. If your computer runs either Microsoft® Windows 2000 or Windows Millennium Edition (Me), click the Start button, point to Settings, and then click Printers. If your printer model is listed in the Printers window, the printer is ready to use.
22 Se tting Up

Transferring Information to a New Computer (Windows® XP Only)
Windows XP provides a Files and Settings Transfer Wizard to move data, such as e-mails, window sizes, toolbar settings, and Internet bookmarks, from one computer to another. First you collect the data from the source computer, and then you import the data to the new computer.
If the source computer uses another Windows operating system, you can launch the wizard from the Windows XP Operating System CD or from a floppy disk created on a computer that is running Windows XP. You can transfer the data to the new computer over a network or serial connection, or you can store it on a removable medium, such as a floppy disk, a Zip disk, or a writable CD.
1On the computer running Windows XP, click the Start button, point to All Programs—> Accessories—> System Tools, and then click Files and Settings Transfer Wizard.
2On the welcome screen, click Next.
3On the Which computer is this? screen, select New Computer, and then click Next.
4Follow the instructions on the screen.
Setting Up a Home and Office Network
(Windows XP Only)
Windows XP provides a Network Setup Wizard to guide you through the process of sharing files, printers, or an Internet connection between computers in a home or small office.
1Click the Start button, point to All Programs—>Accessories —>Communications, and then click Network Setup Wizard.
2On the welcome screen, click Next.
3Click checklist for creating a network.
Se tting Up |
23 |

w w w . d e l l . c o m | s u p p o r t . d e l l . c o m
HINT: Selecting the This computer connects directly to the Internet connection method enables the integrated firewall provided with Windows XP.
HINT: If you are having difficulties turning off your computer, see "General Program Problems" on page 52.
4Complete the checklist and required preparations, and then return to the Network Setup Wizard.
5Follow the instructions on the screen.
Turning Off the Computer
NOTICE: To prevent data loss, you must turn off your computer through the Start menu rather than by pressing the power button.
Windows XP
1Save and close any open files and exit any open programs.
2Click the Start button and then click Turn off Computer.
3Click Turn off.
The computer automatically turns off after the shutdown process finishes.
Windows Me and Windows 2000
1Save and close any open files and exit any open programs.
2Click the Start button and then click Shut Down.
3Click the pull-down menu under What do you want the computer to do?.
4Click Shut down and then click OK.
The computer automatically turns off after the shutdown process finishes.
About the Module Bay
The module bay supports several types of devices, including the following:
•Floppy drive
•CD drive
•CD-RW drive
•DVD drive
•Zip drive
•Second hard drive
24 Se tting Up

•Second battery
•Dell TravelLite™ module
NOTICE: To prevent damage to the docking connector, do not remove or replace devices while the computer is connected to an advanced port replicator (APR).
Swapping Devices While the Computer Is Turned Off
1Save and close any open files, exit any open programs, and shut down the computer (see page 24).
2If the computer is connected (docked) to an APR, undock it (see page 79).
3Close the display and turn the computer over.
4Slide and hold the latch release, and pull the device out of the module bay.
NOTICE: To prevent damage to devices, place them in a travel case when they are not inserted into the computer. Store devices in a dry, safe place, and avoid pressing down on them or placing heavy objects on top of them.
NOTICE: Insert devices before you dock and turn on the computer.
5Insert the new device into the bay, and push it until you hear a click.
6Turn on the computer.
Swapping Devices While Windows Is Running
NOTICE: To prevent damage to the docking connector, do not remove or replace devices while the computer is connected to an APR.
In Microsoft Windows XP
1Double-click the Unplug or Eject Hardware icon in the Windows taskbar.
2Click the device you want to eject.
3Keep the display open, and tilt the computer back so that you can access the bottom of the computer.
4Slide and hold the latch release, and pull the device out of the bay.
5Insert the new device into the bay, and push it until you hear a click.
6If necessary, enter your password to unlock your computer.
Se tting Up |
25 |

w w w . d e l l . c o m | s u p p o r t . d e l l . c o m
HINT: You cannot use the infrared sensor when the computer is docked.
In Microsoft Windows Me
1Right-click the Softex BayManager icon on the Microsoft Windows taskbar.
2Click Remove/Swap.
3Wait a few seconds until the device is ready to be ejected.
4Keep the display open, and tilt the computer back so that you can access the bottom of the computer.
5Slide and hold the latch release, and pull the device out of the module bay.
6Insert the new device into the bay, and push it until you hear a click.
7Click OK. Then click OK again to close the Softex BayManager window.
In Microsoft Windows 2000
1Double-click the Unplug or Eject Hardware icon on the Microsoft Windows taskbar.
2Click the device you want to eject and then click Stop.
3Click OK, and wait until the device you want to eject is cleared from the list of devices in the Unplug or Eject Hardware window.
4Keep the display open, and tilt the computer back so that you can access the bottom of the computer.
5Slide and hold the latch release, and pull the device out of the module bay.
6Insert the new device into the bay, and push it until you hear a click.
7When Windows recognizes the new device, click Close.
Enabling the Infrared Sensor
1Turn on your computer, and enter the system setup program by pressing  when the Dell™ logo appears.
26 Se tting Up

2Press 
 and repeat to locate the Infrared Data Port option under the Basic Device Configuration heading of the system setup program.
3Press the down-arrow key to highlight Disabled next to Infrared Data Port.
4Press the right-arrow key to highlight a COM port.
Ensure that the COM port that you highlight is different from the
Serial Port and Modem COM ports.
5Press the down-arrow key to highlight Fast IR or Slow IR.
Dell recommends that you use Fast IR. If the infrared device cannot communicate with your computer, turn off the computer and repeat this procedure to change the setting to Slow IR.
6Press  to save the changes and exit the system setup program. If you are prompted to restart your computer, click Yes.
7Follow the instructions on the screen while the infrared sensor driver is installing.
8At the end of the install process, click Yes to restart the computer.
9When your computer detects the presence of another activated infrared device, double-click the infrared icon that appears on the Windows taskbar.
10See the infrared device documentation for device setup instructions.
Setting Up the Dolby Headphone
1Double-click the Intervideo Win DVD icon on the Windows desktop.
2Click the Properties icon.
3Click the Dolby Headphone tab.
4Click Enable Dolby Headphone.
5Select one of the four options to set the level of surround sound effects. Option 1 is a baseline stereo option, and Options 2, 3, and 4 are surround sound levels.
HINT: If the infrared device cannot communicate with your computer after you repeat this procedure to change the system setup program setting to Slow IR, contact the infrared device manufacturer.
HINT: The Dolby headphone feature is available only if your computer has a DVD drive.
HINT: Icon labels may be visible only when you place the pointer over the icon.
Se tting Up |
27 |

w w w . d e l l . c o m | s u p p o r t . d e l l . c o m
HINT: A network adapter is also referred to as a network interface controller (NIC).
6Click Apply, and then click OK to close the WinDVD Properties window.
7Click Exit.
Setting Up the APR to Connect to a Network
NOTICE: Do not install a network adapter or a network adapter/modem combination PC Card until you complete the advanced port replicator (APR) setup.
NOTICE: To prevent serious operating system problems, do not dock your computer to an APR until the Windows operating system setup on the computer is complete.
An APR lets you more fully integrate your portable computer into a desktop environment.
For instructions and details on setting up an APR, refer to the documentation that came packaged with the device.
Power Protection Devices
Several devices are available that protect against power fluctuations and failures. Power protection devices include:
•Surge protectors
•Line conditioners
•Uninterruptible power supplies (UPS)
Surge Protectors
Surge protectors and power strips equipped with surge protection help to prevent damage to your computer from voltage spikes that can occur during electrical storms or following power interruptions. The level of protection is usually commensurate with the cost of the surge protector. Some surge protector manufacturers include warranty coverage for certain types of damage. Dell recommends that you carefully read the device warranty when choosing a surge protector. Compare joule ratings to determine the relative effectiveness of different devices.
28 Se tting Up

NOTICE: Most surge protectors do not protect against lightning strikes. Dell recommends that you disconnect your computer from the electrical outlet when lightning occurs in your area.
NOTICE: Surge protectors do not protect against power fluctuations or power interruptions.
Power surges on telephone lines can damage modems. Dell recommends that you disconnect the telephone line from the telephone wall jack during electrical storms. Many surge protectors have a telephone jack for modem protection. See the surge protector documentation for modem connection instructions.
NOTICE: Network adapter protection is not available on surge protectors. Dell recommends that you disconnect the network cable from the network wall jack during electrical storms.
Line Conditioners
NOTICE: Line conditioners do not protect against power interruptions.
Line conditioners are designed to maintain AC voltage at a fairly constant level. Line conditioners can cost up to several hundred dollars more than surge protectors.
Uninterruptible Power Supply Devices
NOTICE: Loss of power while data is being saved to the hard drive may result in data loss or file damage.
A UPS protects against power fluctuations and interruptions. UPS devices contain a battery that provides temporary power to connected devices when AC power is interrupted. The battery charges while AC power is available.
See the UPS manufacturer documentation for information on battery operating time and to ensure that the device is approved by Underwriters Laboratories (UL).
HINT: To ensure maximum battery operating time, connect only your computer to a UPS. Connect other devices, such as a printer, to a separate power strip that provides surge protection.
Se tting Up |
29 |

w w w . d e l l . c o m | s u p p o r t . d e l l . c o m
Up tting Se 30
Loading...