


Dell™ Dimension™ 4500C
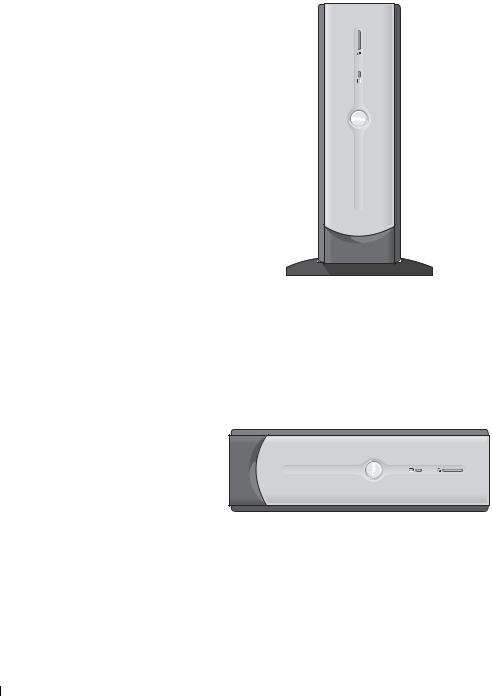
front door 
 power button

hard-drive light

breakaway hinge 

IEEE 1394 connector* |
CD or DVD drive light |
PC Card connectors (2)** |
breakaway hinge |
USB 2.0 connectors (2) |
headphone connector

*On computers with integrated IEEE 1394 connectors.
**On computers with integrated PC Card connectors.
parallel connector
serial connector
integrated video connector (see the setup diagram)
diagnostic lights (4)
keyboard connector 
USB 2.0 connectors (4) 
 microphone connector

line-out connector 
line-in connector
IEEE 1394 connector
mouse connector
network connector
 optional video card connector (see the setup diagram)
 modem connectors (2)
power connector
 voltage selection switch (see page 11)
w w w . j p . d e l l . c o m | s u p p o r t . j p . d e l l . c o m

Hints, Notices, and Cautions
HINT: A HINT indicates important information that helps you make better use of your computer.
 NOTICE: A NOTICE indicates either potential damage to hardware or loss of data and tells you how to avoid the problem.
 CAUTION: A CAUTION indicates a potential for property damage, personal injury, or death.
Abbreviations and Acronyms
For a complete list of abbreviations and acronyms, see the Tell Me How help file. To access help files, see page 38.
____________________
Information in this document is subject to change without notice. © 2003 Dell Computer Corporation. All rights reserved.
Reproduction in any manner whatsoever without the written permission of Dell Computer Corporation is strictly forbidden.
Trademarks used in this text: Dell, the DELL logo, Dimension, Inspiron, Latitude, OptiPlex, and Dell Precision are trademarks of Dell Computer Corporation; Intel and Pentium are registered trademarks of Intel Corporation; Microsoft and Windows are registered trademarks of Microsoft Corporation.
Other trademarks and trade names may be used in this document to refer to either the entities claiming the marks and names or their products. Dell Computer Corporation disclaims any proprietary interest in trademarks and trade names other than its own.
This product incorporates copyright protection technology that is protected by method claims of certain U.S. patents and other intellectual property rights owned by Macrovision Corporation and other rights owners. Use of this copyright protection technology must be authorized by Macrovision Corporation, and is intended for home and other limited viewing uses only unless otherwise authorized by Macrovision Corporation. Reverse engineering or disassembly is prohibited.
June 2003 |
P/N 6M515 Rev. A03 |

Contents
CAUTION: Safety Instructions . . . . . . . . . . . . . . . . . . . |
9 |
General . . . . . . . . . . . . . . . . . . . . . . . . . . . . . |
9 |
When Using Your Computer . . . . . . . . . . . . . . . . . . . . |
11 |
When Working Inside Your Computer . . . . . . . . . . . . . . |
12 |
Protecting Against Electrostatic Discharge . . . . . . . . . . . |
13 |
Ergonomic Computing Habits . . . . . . . . . . . . . . . . . . |
13 |
Battery Disposal . . . . . . . . . . . . . . . . . . . . . . . . |
14 |
Finding Information for Your Computer . . . . . . . . . . . . . . |
15 |
1 Setting Up
Connecting the AC Adapter . . . . . . . . . . . . . . . . . . . . |
20 |
Attaching and Removing the Computer Stand . . . . . . . . . . . |
21 |
Setting Up a Printer . . . . . . . . . . . . . . . . . . . . . . . . |
23 |
Printer Cable . . . . . . . . . . . . . . . . . . . . . . . . . . |
23 |
Connecting a Parallel Printer . . . . . . . . . . . . . . . . . . |
23 |
Connecting a USB Printer . . . . . . . . . . . . . . . . . . . . |
24 |
Connecting an IEEE 1394 Device (Optional) . . . . . . . . . . . |
25 |
Transferring Information to a New Computer . . . . . . . . . . . |
26 |
Setting Up a Home and Office Network . . . . . . . . . . . . . . |
28 |
Connecting to a Network Adapter . . . . . . . . . . . . . . . . |
28 |
Network Setup Wizard . . . . . . . . . . . . . . . . . . . . . |
28 |
Connecting to the Internet . . . . . . . . . . . . . . . . . . . . . |
29 |
Setting Up Your Internet Connection . . . . . . . . . . . . . . |
29 |
Contents 3

Copying CDs . . . . . . . . . . . . . . . . . . . . . . . . . . . . |
30 |
Using Easy CD Creator Basic . . . . . . . . . . . . . . . . . |
31 |
Using Blank CD-R Discs or Blank CD-RW Discs . . . . . . . . |
32 |
Helpful Tips . . . . . . . . . . . . . . . . . . . . . . . . . . |
32 |
How to Copy a CD . . . . . . . . . . . . . . . . . . . . . . . |
33 |
Hyper-Threading . . . . . . . . . . . . . . . . . . . . . . . . . . |
34 |
Turning Off Your Computer . . . . . . . . . . . . . . . . . . . . |
34 |
2 Solving Problems
Finding Solutions . . . . . . . . . . . . . . . . . . . . . . . . . |
36 |
Finding Help Information . . . . . . . . . . . . . . . . . . . . . |
38 |
Battery Problems . . . . . . . . . . . . . . . . . . . . . . . . . |
38 |
Drive Problems . . . . . . . . . . . . . . . . . . . . . . . . . . |
39 |
CD drive problems . . . . . . . . . . . . . . . . . . . . . . . |
39 |
Problems writing to a CD-RW drive . . . . . . . . . . . . . . |
40 |
DVD drive problems . . . . . . . . . . . . . . . . . . . . . . |
40 |
Hard drive problems . . . . . . . . . . . . . . . . . . . . . . |
41 |
E-Mail, Modem, and Internet Problems . . . . . . . . . . . . . |
41 |
Error Messages . . . . . . . . . . . . . . . . . . . . . . . . . . |
43 |
General Problems . . . . . . . . . . . . . . . . . . . . . . . . . |
44 |
A program stops responding . . . . . . . . . . . . . . . . . . |
44 |
A program crashes repeatedly . . . . . . . . . . . . . . . . . |
44 |
A program is designed for an earlier Windows operating system |
44 |
A solid blue screen appears . . . . . . . . . . . . . . . . . . |
45 |
Other software problems . . . . . . . . . . . . . . . . . . . . |
45 |
Other technical problems . . . . . . . . . . . . . . . . . . . . |
46 |
General hardware problems . . . . . . . . . . . . . . . . . . |
46 |
IEEE 1394 Problems . . . . . . . . . . . . . . . . . . . . . . . |
47 |
Keyboard Problems . . . . . . . . . . . . . . . . . . . . . . . . |
47 |
4 Contents

Mouse Problems . . . . . . . . . . . . . . . . . . . . . . . . . . |
48 |
Network Problems . . . . . . . . . . . . . . . . . . . . . . . . . |
49 |
PC Card Problems . . . . . . . . . . . . . . . . . . . . . . . . . |
50 |
Power Problems . . . . . . . . . . . . . . . . . . . . . . . . . . . |
51 |
Printer Problems . . . . . . . . . . . . . . . . . . . . . . . . . . |
52 |
Scanner Problems . . . . . . . . . . . . . . . . . . . . . . . . . |
53 |
Sound and Speaker Problems . . . . . . . . . . . . . . . . . . . |
54 |
Video and Monitor Problems . . . . . . . . . . . . . . . . . . . . |
55 |
If the screen is blank . . . . . . . . . . . . . . . . . . . . . . |
55 |
If the screen is difficult to read . . . . . . . . . . . . . . . . . |
56 |
3
Diagnostic Lights . . . . . . . . . . . . . . . . . . . .
Using System Restore . . . . . . . . . . . . . . . . .
. . . . . . . . . . . . . .
Restoring the Computer to an Earlier Operating State
Undoing the Last System Restore
Dell Diagnostics . . . . . . . . . . .
When to Use the Dell Diagnostics Starting the Dell Diagnostics . .
Drivers . . . . . . . . . . . . . . .
What Is a Driver? . . . . . . . .
Identifying Drivers . . . . . . .
Reinstalling Drivers . . . . . . .
. . . . . . . . . .
. . . . . . . . . .
. . . . . . . . . .
. . . . . . . . . .
. . . . . . . . . .
. . . . . . . . . .
. . . . . . . . . .
. . . . . . . . . .
. . . . . . |
60 |
. . . . . . |
62 |
. . . . . . |
62 |
. . . . . . |
62 |
. . . . . . |
63 |
. . . . . . |
64 |
. . . . . . |
64 |
. . . . . . |
65 |
. . . . . . |
67 |
. . . . . . |
67 |
. . . . . . |
68 |
. . . . . . |
68 |
Resolving Software and Hardware Incompatibilities . . . . . . . |
70 |
Reinstalling Windows® XP . . . . . . . . . . . . . . . . . . . . . |
71 |
Contents 5

4 Adding Parts
Front and Back View of the Computer . . . . . . . . . . . . . . |
76 |
Front View . . . . . . . . . . . . . . . . . . . . . . . . . . . |
76 |
Back View . . . . . . . . . . . . . . . . . . . . . . . . . . . |
78 |
Reattaching the Front Door . . . . . . . . . . . . . . . . . . . . |
79 |
Opening the Computer Cover . . . . . . . . . . . . . . . . . . . |
80 |
Looking Inside Your Computer . . . . . . . . . . . . . . . . . . |
82 |
System Board . . . . . . . . . . . . . . . . . . . . . . . . . |
83 |
Adding PC Cards (Optional) . . . . . . . . . . . . . . . . . . . . |
84 |
PC Card Types . . . . . . . . . . . . . . . . . . . . . . . . . |
84 |
Installing a PC Card . . . . . . . . . . . . . . . . . . . . . . |
84 |
Removing a PC Card . . . . . . . . . . . . . . . . . . . . . . |
85 |
Adding Other Cards . . . . . . . . . . . . . . . . . . . . . . . . |
86 |
Removing a Video Card
Installing a Video Card
. . . . . . . . . . . . . . . . |
88 |
. . . . . . . . . . . . . . . . . . . . |
88 |
. . . . . . . . . . . . . . . . . . . . |
89 |
Adding Memory . . . . . . . . . . . . . . . . . . . . . . . . . . 90
Closing the Computer Cover . . . . . . . . . . . . . . . . . . . 92
5 Appendix
Specifications . . . . . . . . . . . . . . . . . . . . . . . . . . . |
96 |
Standard Settings . . . . . . . . . . . . . . . . . . . . . . . . . |
100 |
Viewing Settings . . . . . . . . . . . . . . . . . . . . . . . . |
101 |
System Setup Program Screens . . . . . . . . . . . . . . . . |
101 |
Clearing Forgotten Passwords . . . . . . . . . . . . . . . . . . . |
102 |
Replacing the Battery . . . . . . . . . . . . . . . . . . . . . . . |
103 |
Dell Technical Support Policy . . . . . . . . . . . . . . . . . . . |
104 |
6 Contents

Contacting Dell . . . . . . . . . . . . . . . . . . . . . . . . . . 105
Regulatory Information . . . . . . . . . . . . . . . . . . . . . . 106
Index . . . . . . . . . . . . . . . . . . . . . . . . . . . . . . . . . . 107
Contents 7

8 Contents

 CAUTION: Safety Instructions
Use the following safety guidelines to help ensure your own personal safety and to help protect your computer and working environment from potential damage.
General
•Do not attempt to service the computer yourself unless you are a trained service technician. Always follow installation instructions closely.
•To help prevent electric shock, plug the computer and device power cables into properly grounded electrical outlets. These cables are equipped with 3-prong plugs to help ensure proper grounding. Do not use adapter plugs or remove the grounding prong from a cable. If you must use an extension cable, use a 3-wire cable with properly grounded plugs.
•To help avoid the potential hazard of electric shock, do not use your computer during an electrical storm.
•To help avoid the potential hazard of electric shock, do not connect or disconnect any cables or perform maintenance or reconfiguration of this product during an electrical storm.
•If your computer includes a modem, the cable used with the modem should be manufactured with a minimum wire size of 26 American wire gauge (AWG) and an FCCcompliant RJ-11 modular plug.
•Before you clean your computer, disconnect the computer from the electrical outlet. Clean your computer with a soft cloth dampened with water. Do not use liquid or aerosol cleaners, which may contain flammable substances.
•To help avoid possible damage to the system board, wait 5 seconds after turning off the computer before disconnecting a device from the computer.
CAUTION: Safety Instr uctions |
|
9 |
|

w w w . j p . d e l l . c o m | s u p p o r t . j p . d e l l . c o m
 CAUTION: Safety Instructions (continued)
•To avoid shorting out your computer when disconnecting a network cable, first unplug the cable from the network adapter on the back of your computer, and then from the network jack. When reconnecting a network cable to your computer, first plug the cable into the network jack, and then into the network adapter.
•To help protect your computer from sudden, transient increases and decreases in electrical power, use a surge suppressor, line conditioner, or uninterruptible power supply (UPS).
•Ensure that nothing rests on your computer’s cables and that the cables are not located where they can be stepped on or tripped over.
•Do not push any objects into the openings of your computer. Doing so can cause fire or electric shock by shorting out interior components.
•Keep your computer away from radiators and heat sources. Also, do not block cooling vents. Avoid placing loose papers underneath your computer; do not place your computer in a closed-in wall unit or on a bed, sofa, or rug.
10 CAUTION: Safety Instr uctions
When Using Your Computer
As you use your computer, observe the following safe-handling guidelines.
 CAUTION: Do not operate your computer with any cover(s) (including computer covers, bezels, filler brackets, front-panel inserts, and so on) removed.
•Your computer is equipped with one of the following:
–A fixed-voltage power supply — Computers with a fixed-voltage power supply do not have a voltage selection switch on the back panel and operate at only one voltage (see the regulatory label on the outside of the computer for its operating voltage).
–An auto-sensing voltage circuit — Computers with an auto-sensing voltage circuit do not have a voltage selection switch on the back panel and automatically detect the correct operating voltage.
–A manual voltage selection switch — Computers with a voltage selection switch on the back panel must be manually set to operate at the correct operating voltage.
 NOTICE: To help avoid damaging a computer with a manual voltage selection switch, set the switch for the voltage that most closely matches the AC power available in your location. For Japan, the voltage selection switch must be set to the 115-V position even though the AC power available in Japan is 100 V. Also, ensure that your monitor and attached devices are electrically rated to operate with the AC power available in your location.
•Before working inside the computer, unplug the computer to help prevent electric shock or system board damage. Certain system board components continue to receive power any time the computer is connected to AC power.
When Using Your Computer |
|
11 |
|

w w w . j p . d e l l . c o m | s u p p o r t . j p . d e l l . c o m
When Using Your Computer (continued)
When Working Inside Your Computer
Before you open the computer cover, perform the following steps in the sequence indicated.
 CAUTION: Do not attempt to service the computer yourself, except as explained in your online Dell™ documentation or in instructions otherwise provided to you by Dell. Always follow installation and service instructions closely.
 NOTICE: To help avoid possible damage to the system board, wait 5 seconds after turning off the computer before removing a component from the system board or disconnecting a device from the computer.
1Perform an orderly computer shutdown using the operating system menu.
2Turn off your computer and any devices connected to the computer.
3Ground yourself by touching an unpainted metal surface on the chassis, such as the metal around the card-slot openings at the back of the computer, before touching anything inside your computer.
While you work, periodically touch an unpainted metal surface on the computer chassis to dissipate any static electricity that might harm internal components.
4Disconnect your computer and devices, including the monitor, from their electrical outlets. Also, disconnect any telephone or telecommunication lines from the computer.
Doing so reduces the potential for personal injury or shock.
In addition, take note of these safety guidelines when appropriate:
•When you disconnect a cable, pull on its connector or on its strain-relief loop, not on the cable itself. Some cables have a connector with locking tabs; if you are disconnecting this type of cable, press in on the locking tabs before disconnecting the cable. As you pull connectors apart, keep them evenly aligned to avoid bending any connector pins. Also, before you connect a cable, ensure that both connectors are correctly oriented and aligned.
12 When Using Your Computer
When Using Your Computer (continued)
•Handle components and cards with care. Do not touch the components or contacts on a card. Hold a card by its edges or by its metal mounting bracket. Hold a component such as a microprocessor chip by its edges, not by its pins.
 CAUTION: There is a danger of a new battery exploding if it is incorrectly installed. Replace the battery only with the same or equivalent type recommended by the manufacturer. Do not dispose of the battery along with household waste. Contact your local waste disposal agency for the address of the nearest battery deposit site.
Protecting Against Electrostatic Discharge
Static electricity can harm delicate components inside your computer. To prevent static damage, discharge static electricity from your body before you touch any of your computer’s electronic components, such as the microprocessor. You can do so by touching an unpainted metal surface on the computer chassis.
As you continue to work inside the computer, periodically touch an unpainted metal surface to remove any static charge your body may have accumulated.
You can also take the following steps to prevent damage from electrostatic discharge (ESD):
•Do not remove components from their antistatic packing material until you are ready to install the component in your computer. Just before unwrapping the antistatic packaging, discharge static electricity from your body.
•When transporting an electrostatic sensitive component, first place it in an antistatic container or packaging.
•Handle all electrostatic sensitive components in a static-safe area. If possible, use antistatic floor pads and workbench pads.
Ergonomic Computing Habits
 CAUTION: Improper or prolonged keyboard use may result in injury.
 CAUTION: Viewing the monitor screen for extended periods of time may result in eye strain.
For comfort and efficiency, observe the ergonomic guidelines in the Tell Me How help file when setting up and using your computer.
When Using Your Computer |
|
13 |
|

w w w . j p . d e l l . c o m | s u p p o r t . j p . d e l l . c o m
When Using Your Computer (continued)
 Battery Disposal
Your computer uses a lithium coin-cell battery. The lithium coin-cell battery is a long-life battery, and it is very possible that you will never need to replace it. However, should you need to replace it, see page 103.
Do not dispose of the battery along with household waste. Contact your local waste disposal agency for the address of the nearest battery deposit site.
14 When Using Your Computer
Finding Information for Your Computer
What Are You Looking For? |
Find it Here |
|
|
• A diagnostic program for my computer |
Re s o u r c e C D |
• Drivers for my computer |
|
• My computer documentation |
|
• My device documentation |
|
|
You can use this CD to access documentation and reinstall drivers (see |
|
page 67). |
• How to set up a printer |
O w n e r ’ s M a n u a l |
•How to troubleshoot and solve problems
•How to add parts
•How to contact Dell
•Warranty information
• Express Service Code and Service Tag |
E x p r e s s S e r v i c e C o d e a n d P r o d u c t Ke y |
Number |
|
• Microsoft® Windows® License Label |
|
Located on your computer.
Finding Information for Your Computer |
|
15 |
|
w w w . j p . d e l l . c o m | s u p p o r t . j p . d e l l . c o m
What Are You Looking For? |
Find it Here |
|
|
• How to reinstall my operating system |
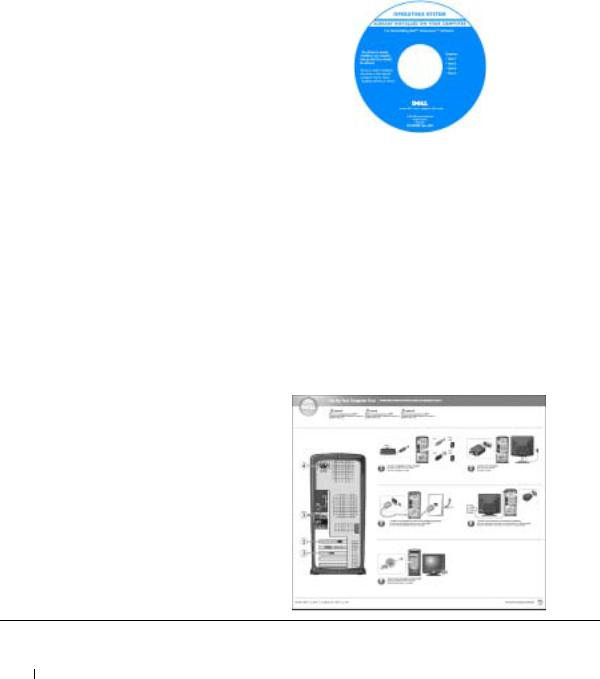
O p e r a t i n g S y s t e m C D |
|
If you reinstall your operating system, use the ResourceCD to reinstall |
|
|
drivers for the devices that came with your computer. |
|
|
|
|
• Latest drivers for my computer |
D e l l S u p p o r t w e b s i t e |
|
• Answers to technical service and support |
The Dell Support website provides several online tools, including: |
|
questions |
• Knowledge Base — hints, tips, and online courses |
|
• Online discussions with other users and |
||
• Customer Forum — online discussion with other Dell customers |
||
technical support |
||
• Upgrades — upgrade information for components, such as memory, |
||
• Documentation for my computer |
||
the hard drive, and the operating system |
||
|
||
|
• Customer Care — contact information, order status, warranty, and |
|
|
repair information |
|
|
• Downloads — drivers, patches, and software updates |
|
|
• Reference — computer documentation, product specifications, and |
|
|
white papers |
|
|
|
|
• How to set up my computer |
S e t u p D i a g r a m |
16 Finding Information for Your Computer
What Are You Looking For? |
Find it Here |
|
|
• Tips on using Windows |
Te l l M e H o w H e l p F i l e |
• How to clean my computer |
1 Click the Start button, and then click Help and Support. |
• How to use my mouse and keyboard |
2 Click User and system guides, and then click User’s guides. |
|
3 Click Tell Me How. |
|
|
• How to use Windows® XP |
W i n d o w s X P H e l p a n d S u p p o r t C e n t e r |
• Documentation for my computer and |
1 Click the Start button, and then click Help and Support. |
devices |
2 Type a word or phrase that describes your problem, and then click |
|
the arrow icon. |
|
3 Click the topic that describes your problem. |
|
4 Follow the instructions shown on the screen. |
|
|
Finding Information for Your Computer |
|
17 |
|

w w w . j p . d e l l . c o m | s u p p o r t . j p . d e l l . c o m
Computer Your for Information Finding 18

1
S E C T I O N 1
Setting Up
Connecting the AC Adapter
Attaching and Removing the Computer Stand
Setting Up a Printer
Connecting an IEEE 1394 Device (Optional)
Transferring Information to a New Computer
Setting Up a Home and Office Network
Connecting to the Internet
Copying CDs
Hyper-Threading
Turning Off Your Computer
w w w . j p . d e l l . c o m | s u p p o r t . j p . d e l l . c o m
Connecting the AC Adapter
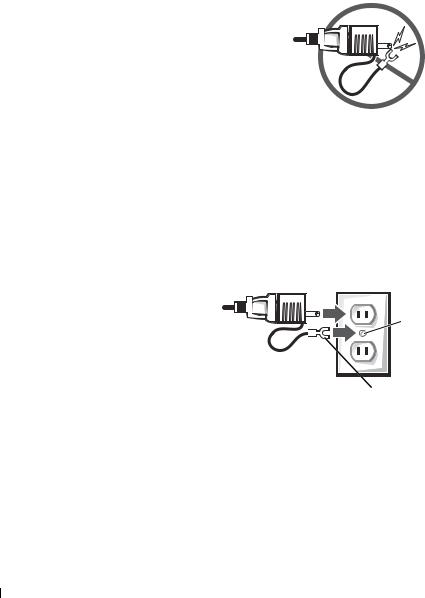
1 Connect the AC adapter to the plug on the AC power cable.
 CAUTION: If you decide to connect the green ground wire to an electrical outlet, do not permit contact between the green ground wire and power leads because electrical shock, fire, or damage to your computer can occur (see the following figure).
2If you decide not to connect the green ground wire to the electrical outlet, go to step 4.
3Connect the metal ground connector to the grounding source on the outlet (see the following figure):
a Loosen the grounding source.
bSlide the metal ground connector behind the grounding source, and tighten the grounding source.
grounding source
metal ground connector
4 Connect the AC power cable to the outlet.
20 Setting Up
Attaching and Removing the Computer Stand
To attach the stand:
1Rotate the computer to an upside-down position.
2Insert the screw into the bottom of the stand.
3Align the two tabs and the screw on the stand with the tab holes and screw hole in the bottom of the computer.
screw |
screw hole |
tabs (2) 
tab holes (2) 
HINT: Place your computer on a soft surface to prevent scratching the top cover.
4 Tighten the screw.
Setting Up |
|
21 |
|
w w w . j p . d e l l . c o m | s u p p o r t . j p . d e l l . c o m
5 Place the computer in the upright position.
To remove the stand:
1Turn the computer over so that the stand is at the top.
2Loosen the screw and lift the stand away.
3Place the computer in a horizontal position until you reattach the stand.
22 Setting Up
Setting Up a Printer
 NOTICE: Complete the operating system setup before you connect a printer to the computer.
See the documentation that came with the printer for setup information, including how to:
•Obtain and install updated drivers
•Connect the printer to the computer
•Load paper and install the toner or ink cartridge
•Contact the printer manufacturer for technical assistance
Printer Cable
Your printer connects to your computer with either a USB cable or a parallel cable. Your printer may not come with a printer cable, so if you purchase a cable separately, ensure that it is compatible with your printer. If you purchased a printer cable at the same time you purchased your computer, the cable may arrive in the computer box.
Connecting a Parallel Printer
1Complete the operating system setup, if you have not already done so.
2Turn off the computer (see page 34).
 NOTICE: For best results, use a 3-m (10-ft) or shorter parallel cable.
3Attach the parallel printer cable to the parallel connector on the computer and tighten the two screws. Attach the cable to the connector on the printer and snap the two clips into the two notches.
Setting Up |
|
23 |
|
w w w . j p . d e l l . c o m | s u p p o r t . j p . d e l l . c o m
HINT: You can connect USB devices while the computer is turned on.
|
parallel connector on computer |
|
connector on printer |
screws (2) |
clips (2) |
parallel printer |
|
cable |
|
notches (2)
4Turn on the printer and then turn on the computer. If the Add New Hardware Wizard window appears, click Cancel.
5Install the printer driver if necessary. See the documentation that came with your printer.
Connecting a USB Printer
1Complete the operating system setup if you have not already done so.
2Install the printer driver if necessary. See the documentation that came with your printer.
3Attach the USB printer cable to the USB connectors on the computer and the printer. The USB connectors fit only one way.
24 Setting Up
 USB connector on computer
|
USB connector |
USB printer |
on printer |
|
|
cable |
|
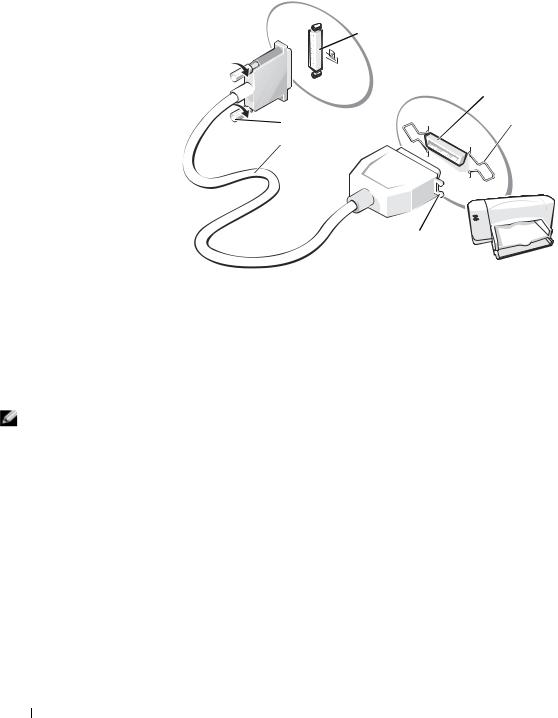
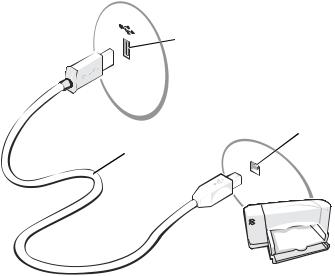
Connecting an IEEE 1394 Device (Optional)
IEEE 1394 devices can move large amounts of data between computers and peripheral devices and are ideal for use with multimedia devices, such as digital video cameras.
Your computer provides a IEEE 1394 connector on both the front and back panels (see "Front and Back View of the Computer" on page 76 for locations.)
Setting Up |
|
25 |
|

w w w . j p . d e l l . c o m | s u p p o r t . j p . d e l l . c o m
HINT: The connector can accept six-pin IEEE 1394 devices with the use of an adapter.
IEEE 1394 connector 
 IEEE 1394 cable
Transferring Information to a New Computer
The Microsoft® Windows® XP operating system provides a Files and Settings Transfer wizard to move data from the source computer to the new computer. You can move data such as:
•E-mails
•Toolbar settings
•Window sizes
•Internet bookmarks
You can transfer the data to the new computer over a network or serial connection, or you can store it on a removable medium, such as a writable CD or floppy disk.
To prepare the new computer for the file transfer:
1Click the Start button, point to All Programs→ Accessories→ System Tools, and then click Files and Settings Transfer Wizard.
2When the Files and Settings Transfer Wizard welcome screen appears, click Next.
3On the Which computer is this? screen, click New Computer, and then click Next.
26 Setting Up
4On the Do you have a Windows XP CD? screen, click I will use the wizard from the Windows XP CD, and then click Next.
5When the Now go to your old computer screen appears, go to your old or source computer.
To copy data from the old computer:
1Insert the Windows XP Operating System CD into your CD or DVD drive.
2On the Welcome to Microsoft Windows XP screen, click Perform additional tasks.
3Under What do you want to do?, click Transfer files and settings.
4On the Files and Settings Transfer Wizard welcome screen, click Next.
5On the Which computer is this? screen, click Old Computer, and then click Next.
6On the Select a transfer method screen, click the transfer method you prefer.
7On the What do you want to transfer? screen, select the items you want to transfer and then click Next.
After the information has been copied, the Completing the Collection Phase screen appears.
8Click Finish.
To transfer data to the new computer:
1On the Now go to your old computer screen, click Next.
2On the Where are the files and settings? screen, select the method you chose for transferring your settings and files, and then click Next.
The wizard reads the collected files and settings and applies them to your new computer.
When all of the settings and files have been applied, the Finished screen appears.
3Click Finished and restart the new computer.
Setting Up |
|
27 |
|
w w w . j p . d e l l . c o m | s u p p o r t . j p . d e l l . c o m
Setting Up a Home and Office Network
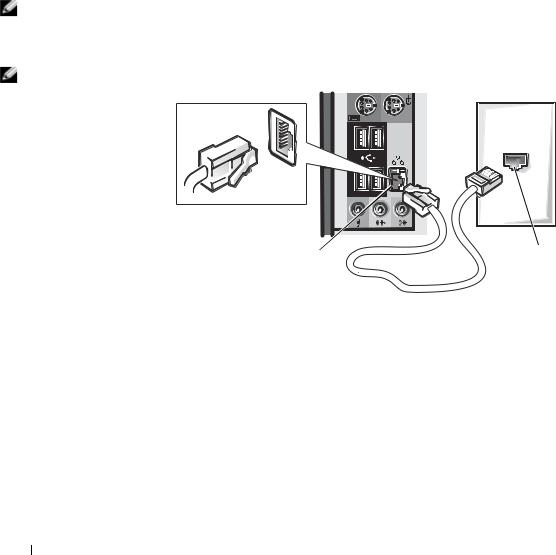
Connecting to a Network Adapter
Before you connect your computer to a network, the computer must have a network adapter installed and a network cable connected to it.
To connect a network cable:
|
1 |
Connect the network cable to the network adapter connector on the |
|
|
back of your computer. |
HINT: Insert the cable |
2 |
Connect the other end of the network cable to a network connection |
until it clicks into place, |
|
device, such as a network wall jack. |
and then gently pull it to ensure that it is secure.
HINT: Do not use a network cable with a telephone wall jack.
network adapter
connector on computer 
 network wall jack
network cable 
Network Setup Wizard
The Microsoft® Windows® XP operating system provides a Network Setup
Wizard to guide you through the process of sharing files, printers, or an
Internet connection between computers in a home or small office.
1Click the Start button, point to All Programs→ Accessories→ Communications, and then click Network Setup Wizard.
2On the welcome screen, click Next.
28 Setting Up

3Click Checklist for creating a network.
4Complete the checklist and required preparations, and return to the Network Setup Wizard.
5Follow the instructions on the screen.
Connecting to the Internet
To connect to the Internet, you need a modem or network connection and an Internet service provider (ISP), such as AOL or MSN. Your ISP will offer one or more of the following Internet connection options:
•Dial-up connections that provide Internet access through a phone line. Dial-up connections are considerably slower than DSL and cable modem connections.
•DSL connections that provide high-speed Internet access through your existing phone line. With a DSL connection, you can access the Internet and use your phone on the same line simultaneously.
•Cable modem connections that provide high-speed Internet access through your local cable TV line.
If you are using a dial-up connection, connect a telephone line to the modem connector on your computer and to the telephone wall jack before you set up your Internet connection. If you are using a DSL or cable modem connection, contact your ISP for setup instructions.
Setting Up Your Internet Connection
To set up an AOL or MSN connection:
1Save and close any open files, and exit any open programs.
2Double-click the MSN Explorer or AOL icon on the Windows® desktop.
3Follow the instructions on the screen to complete the setup.
HINT: Selecting the connection method This computer connects directly to the Internet enables the integrated firewall provided with Windows XP.
HINT: ISPs and ISP offerings vary by country.
Setting Up |
|
29 |
|

w w w . j p . d e l l . c o m | s u p p o r t . j p . d e l l . c o m
HINT: If you do not know which type of connection to select, contact your ISP.
If you do not have an MSN Explorer or AOL icon on your desktop or if you want to set up an Internet connection with a different ISP:
1Save and close any open files, and exit any open programs.
2Click the Start button and click Internet Explorer. The New Connection Wizard appears.
3Click Connect to the Internet.
4In the next window, click the appropriate option:
•If you do not have an ISP and want to select one, click Choose from a list of Internet service providers (ISPs).
•If you have already obtained setup information from your ISP but you did not receive a setup CD, click Set up my connection manually.
•If you have a CD, click Use the CD I got from an ISP.
5Click Next.
If you selected Set up my connection manually, continue to step 6. Otherwise, follow the instructions on the screen to complete the setup.
6Click the appropriate option under How do you want to connect to the Internet?, and then click Next.
7Use the setup information provided by your ISP to complete the setup.
If you are having problems connecting to the Internet, see "E-Mail, Modem, and Internet Problems" on page 41. If you cannot connect to the Internet but have successfully connected in the past, the ISP might have a service outage. Contact your ISP to check the service status, or try connecting again later.
HINT: Ensure that you follow all copyright laws when you create CDs.
Copying CDs
This section applies only to computers that have a CDor DVD-recording device.
30 Setting Up
 Loading...