


6dw
Table of contents
 Loading...
Dell V515w User's Guide
April 2009 www.dell.com | support.dell.com
Machine type(s):
4443
Model(s):
2dw, 6dw

Trademarks
Information in this document is subject to change without notice.
Reproduction in any manner whatsoever without the written permission of Dell Inc. is strictly forbidden. Trademarks used in this text: Dell and the
DELL logo are trademarks of Dell Inc.; Microsoft and Windows are r egistered trademarks of Microsoft Corp oration. Other trademarks and trade name s
may be used in this document to refer to the entities claiming the marks and names of their products. Dell Inc. disclaims any proprietary interest
in trademarks and trade names other than its own.

Contents
Safety information.............................................................................7
About your printer.............................................................................8
Thank you for choosing this printer!...............................................................................................................................8
Minimizing your printer's environmental impact......................................................................................................8
Finding information about the printer...........................................................................................................................9
Understanding the parts of the printer.......................................................................................................................11
Ordering and replacing supplies...................................................13
Replacing ink cartridges....................................................................................................................................................13
Ordering ink cartridges.....................................................................................................................................................14
Recycling Dell products.....................................................................................................................................................15
Using the printer control panel buttons and menus................16
Using the printer control panel......................................................................................................................................16
Using the printer menus...................................................................................................................................................18
Changing temporary settings into new default settings......................................................................................20
Changing the Power Saver timeout.............................................................................................................................21
Resetting to factory settings............................................................................................................................................21
Saving energy with Eco-Mode........................................................................................................................................22
Using the printer software.............................................................23
Minimum system requirements.....................................................................................................................................23
Using the Windows printer software............................................................................................................................23
Updating the printer software (Windows only)........................................................................................................25
Reinstalling the printer software...................................................................................................................................25
Loading paper and original documents......................................26
Loading paper.......................................................................................................................................................................26
Saving paper default settings.........................................................................................................................................28
Loading original documents on the scanner glass.................................................................................................29
Loading original documents into the ADF.................................................................................................................29
Printing...............................................................................................31
Tips for printing....................................................................................................................................................................31
Contents
3

Printing basic documents.................................................................................................................................................31
Printing specialty documents.........................................................................................................................................33
Printing on both sides of the paper (duplexing) manually..................................................................................34
Working with photos..........................................................................................................................................................36
Printing from a Bluetooth-enabled device.................................................................................................................41
Managing print jobs...........................................................................................................................................................44
Copying...............................................................................................47
Tips for copying....................................................................................................................................................................47
Making copies.......................................................................................................................................................................47
Copying photos....................................................................................................................................................................47
Enlarging or reducing images.........................................................................................................................................48
Adjusting copy quality.......................................................................................................................................................48
Making a copy lighter or darker.....................................................................................................................................49
Collating copies using the printer control panel.....................................................................................................49
Repeating an image on one page.................................................................................................................................50
Copying multiple pages on one sheet.........................................................................................................................50
Making a duplex copy manually....................................................................................................................................50
Canceling copy jobs...........................................................................................................................................................51
Scanning.............................................................................................52
Tips for scanning..................................................................................................................................................................52
Scanning to a local or network computer..................................................................................................................52
Scanning to a flash drive or memory card..................................................................................................................53
Scanning photos into an editing application............................................................................................................53
Scanning documents into an editing application...................................................................................................54
Scanning directly to e-mail..............................................................................................................................................54
Scanning to a PDF...............................................................................................................................................................55
Scanning FAQ.......................................................................................................................................................................55
Canceling scan jobs............................................................................................................................................................56
Faxing.................................................................................................57
Setting up the printer to fax............................................................................................................................................57
Configuring the fax settings............................................................................................................................................68
Creating a contact list........................................................................................................................................................70
Sending faxes........................................................................................................................................................................71
Receiving faxes.....................................................................................................................................................................72
Contents
4

Faxing FAQ.............................................................................................................................................................................73
Networking........................................................................................80
Installing the printer on a wireless network..............................................................................................................80
Advanced wireless setup..................................................................................................................................................84
Networking FAQ..................................................................................................................................................................88
Maintaining the printer...................................................................98
Maintaining ink cartridges...............................................................................................................................................98
Cleaning the exterior of the printer..............................................................................................................................99
Cleaning the scanner glass............................................................................................................................................100
Troubleshooting.............................................................................101
Before you troubleshoot................................................................................................................................................101
Using the Service Center to solve printer problems............................................................................................101
If Troubleshooting does not solve your problem..................................................................................................101
Setup troubleshooting....................................................................................................................................................101
Jams and misfeeds troubleshooting..........................................................................................................................106
Print troubleshooting......................................................................................................................................................108
Copy and scan troubleshooting..................................................................................................................................110
Fax troubleshooting.........................................................................................................................................................112
Memory card troubleshooting.....................................................................................................................................118
Wireless troubleshooting...............................................................................................................................................119
Index.................................................................................................135
Contents
5

6

Safety information
Connect the power cord to a properly grounded electrical outlet that is near the product and easily accessible.
Do not place or use this product near water or wet locations.
Use only the power supply and power cord provided with this product or the manufacturer's authorized
replacements.
This product is designed, tested, and approved to meet strict global safety standards with the use of specific
manufacturer's components. The safety features of some parts may not always be obvious. The manufacturer is not
responsible for the use of other replacement parts.
CAUTION—POTENTIAL INJURY: Do not cut, twist, bind, crush, or place heavy objects on the power cord. Do
not subject the power cord to abrasion or stress. Do not pinch the power cord between objects such as furniture
and walls. If any of these things happen, a risk of fire or electrical shock results. Inspect the power cord regularly
for signs of such problems. Remove the power cord from the electrical outlet before inspecting it.
Refer service or repairs, other than those described in the user documentation, to a professional service person.
CAUTION—SHOCK H AZARD: To avoid the risk of el ectric shock when cleani ng the exterior of the printer, unplug
the power cord from the wall outlet and disconnect all cables from the printer before proceeding.
CAUTION—SHOCK HAZARD: Do not use the fax feature during a lightning storm. Do not set up this product
or make any elec trical or cabling connect ions, such as the fax feature, p ower cord, or telephone, during a l ightning
storm.
SAVE THESE INSTRUCTIONS.
Safety information
7

About your printer
Thank you for choosing this printer!
We've worked hard to make sure it will meet your needs.
To start using your new printer right away, use the setup materials that came with the printer, and then skim the
User’s Guide to learn how to perform basic tasks. To get the most out of your printer, read the User’s Guide carefully,
and make sure you check the latest updates on our Web site.
We're committed to delivering performance and value with our printers, and we want to make sure you're satisfied.
If you do encounter any problems along the way, one of our knowledgeable support representatives will be delighted
to help you get back on track fast. And if you find something we could do better, please let us know. After all, you
are the reason we do what we do, and your suggestions help us do it better.
Minimizing your printer's environmental impact
We are committed to protecting the environment and are continually improving our printers to reduce their
environmental impact. By selecting certain printer settings or tasks, you may be able to reduce your printer's
environmental impact even further.
Conserving energy
• Eco-Mode. This feature sets the screen brightness to low and sets the printer to change to Power Saver mode
after the printer is left idle for 10 minutes. Eco-Mode is enabled by default in your printer.
• Select the lowest Power Saver timeout. The Power Saver feature puts the printer in a minimum-power standby
mode after the printer has been idle for a set amount of time (the Power Saver timeout).
• Share your printer. Wireless/network printers allow you to share a single printer among multiple computers,
thus conserving energy and other resources.
Conserving paper
• Print more than one page image on one side of the paper. The “Pages per sheet” feature allows you to print
multiple pages on one sheet. You can print up to 8 page images on one side of a sheet of paper.
• Print on both sides of the paper. Duplexing lets you print on both sides of the paper manually or automatically
(depending on your printer model).
• Preview print jobs before printing. Use the preview features found in the Print Preview dialog or the printer
display (depending on your printer model).
• Scan and save. To avoid printing multiple copies, you can scan documents or photographs and save them to a
computer program, application, or flash drive for presentation.
• Use recycled paper.
Conserving ink
• Use Quick Print or Draft Mode. These modes can be used to print documents using less ink than normal and
are ideal for printing documents that are mostly text.
• Use High Yield cartridges. Inks in High-Yield cartridges allow you to print more pages with fewer cartridges.
About your printer
8
• Clean the printhead. Before replacing and recycling your ink cartridges, try using the “Clean Printhead” and
“Deep Clean Printhead” features. These features clean the printhead nozzles to improve the quality of your prints.
Recycling
• Return empty ink cartridges for reuse or recycling through the Dell Cartridge Collection Program. To return
an empty ink cartridge, go to www.dell.com/recycling to request a postage-paid bag.
• Recycle the product packaging.
• Recycle your old printer instead of throwing it away.
• Recycle paper from discarded print jobs.
• Use recycled paper.
Finding information about the printer
Publications
What are you looking for? Find it here
Initial setup instructions:
• Connecting the printer
• Installing the printer software
Setup documentation
The setup documentation came with the printer.
Additional setup and instructions for using the printer:
• Selecting and storing paper and specialty media
• Loading paper
• Performing printing, copying, scanning, and faxing tasks,
depending on your printer model
• Configuring printer settings
• Viewing and printing documents and photos
• Setting up and using printer software
• Setting up and configuring the printer on a network,
depending on your printer model
• Caring for and maintaining the printer
• Troubleshooting and solving problems
User's Guide
The User's Guide is available on the installation software
CD.
For updates, check our Web site at support.dell.com.
About your printer
9

What are you looking for? Find it here
Help using the printer software Windows Help
Open a printer software program or application, and
then click Help.
Click
to view context-sensitive information.
Notes:
• The Help installs automatically with the printer
software.
• The printer software is located in the printer
Program folder or on the desktop, depending on
your operating system.
The latest supplemental information, updates, and online
technical support:
• Troubleshooting hints and tips
• Frequently asked questions
• Documentation
• Driver downloads
• Live chat support
• E-mail support
• Telephone support
Dell Support Web site—support.dell.com
Note: Select your region, and then select your product
to view the appropriate support site.
Support telephone numbers and hours of operation for
your region or country can be found on the Support
Web site.
Have the following information ready when you
contact support so that they may serve you faster:
• Service Tag
• Express Service Code
Note: The Service Tag and Express Service Code appear
on labels located on your printer.
• Software and Drivers—Certified drivers for your printer and
installers for Dell printer software
• Readme files—Last-minute technical changes, or advanced
technical reference material for experienced users or
technicians
Installation software CD
Note: If you purchased your Dell computer and printer
at the same time, then documentation and drivers for
your printer are already installed on your computer.
• Supplies and accessories for your printer
• Replacement cartridges
Dell Printer Supplies Web site–dell.com/supplies
You can purchase printer supplies online, by telephone,
or in select retail stores.
• Safety information for preparing to operate your printer
• Regulatory information
• Warranty information
Product Information Guide
Product Information Guide
Note: The Product Information Guide may not be
available in your country or region.
About your printer
10
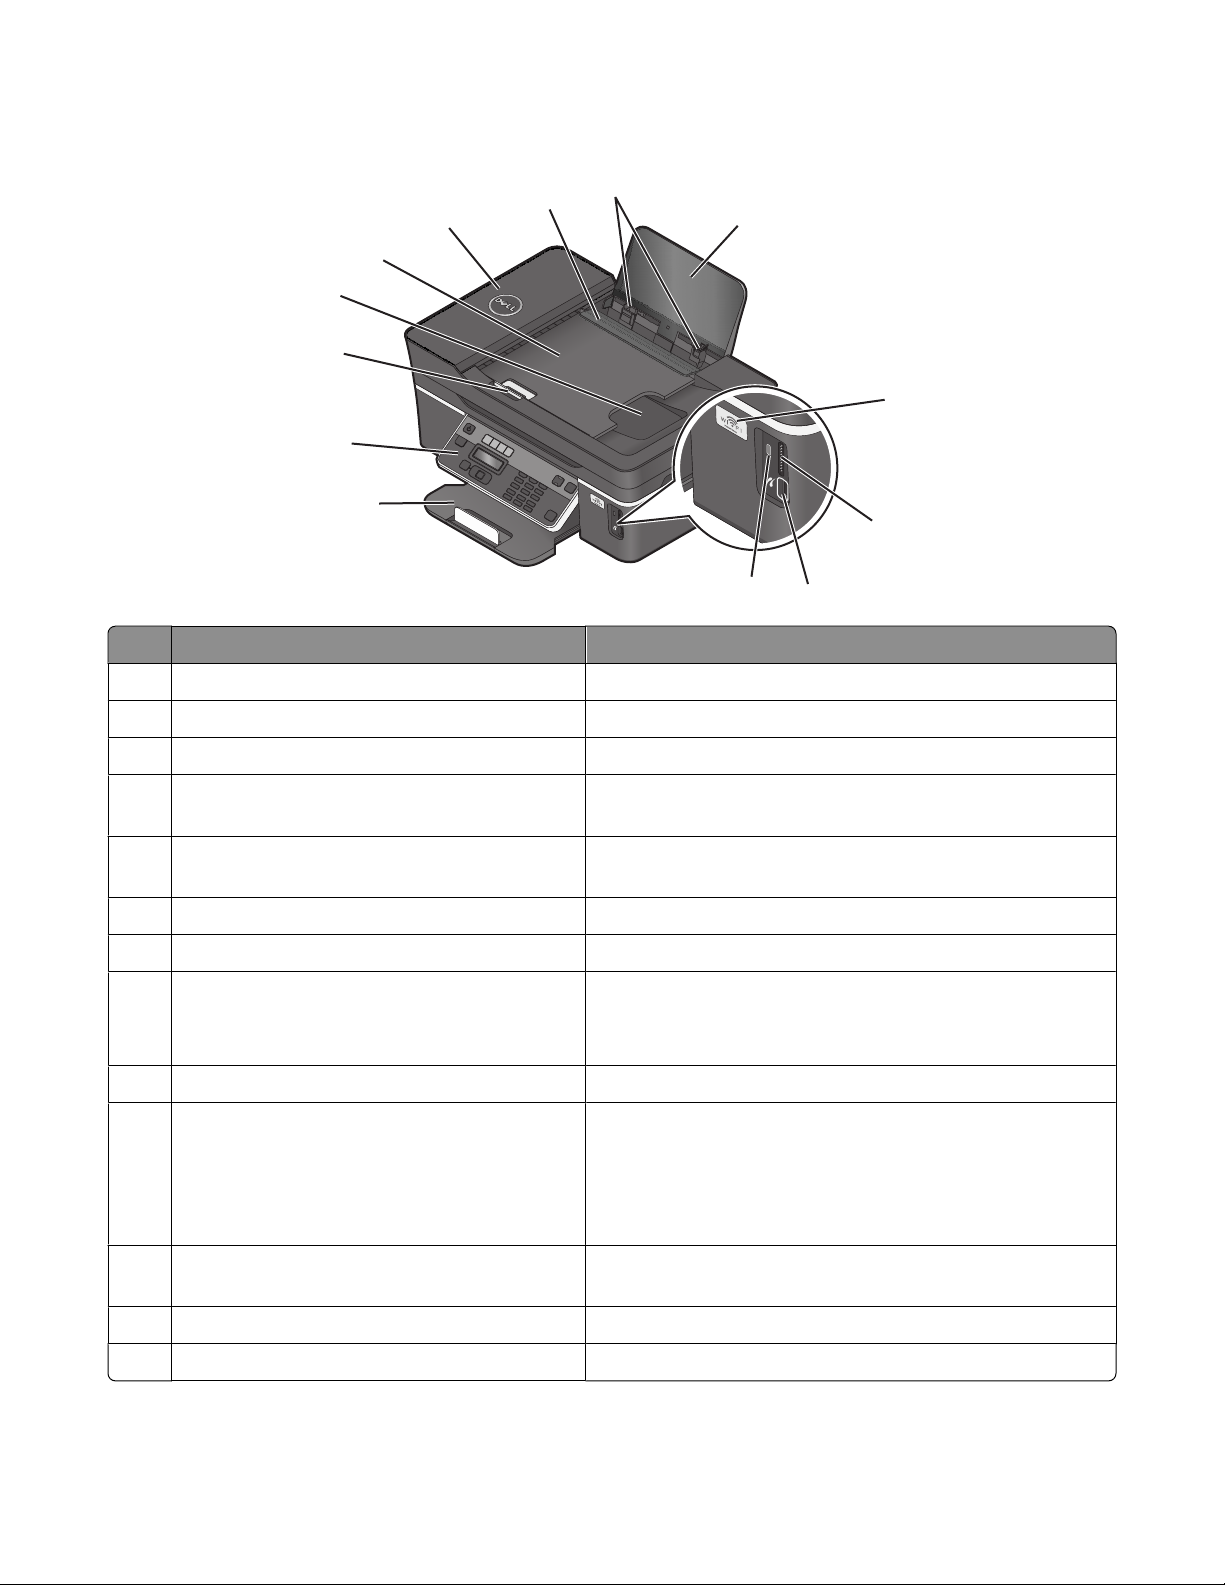
Understanding the parts of the printer
5
8
9
13
12
10
11
1
2
3
4
6
7
Use the To
1 Paper support Load paper.
2
Wi-Fi indicator Check wireless status.
3 Memory card slots Insert a memory card.
4
PictBridge and USB port Connect a PictBridge-enabled digital camera, USB Bluetooth
adapter, or a flash drive to the printer.
5 Card reader light Check card reader status. The light blinks to indicate that a
memory card is being accessed.
6
Paper exit tray Hold paper as it exits.
7
Printer control panel Operate the printer.
8
Automatic Document Feeder (ADF) paper guide Keep paper straight when feeding it into the ADF.
Note: Adjust the paper guide on the ADF tray to the width of
the original document.
9
ADF output tray Hold documents as they exit from the ADF.
10 ADF tray Load original documents in the ADF. Recommended for
scanning, copying, or faxing multiple-page documents.
Note: Do not load post cards, photos, small items, or thin medi a
(such as magazine clippings) into the ADF. Place these items on
the scanner glass.
11
ADF Scan, copy, or fax multiple-page letter-, legal-, and A4-size
documents.
12 Paper feed guard Prevent items from falling into the paper slot.
13
Paper guides Keep paper straight when feeding.
About your printer
11
1
2
3
4
5
6
7
8
9
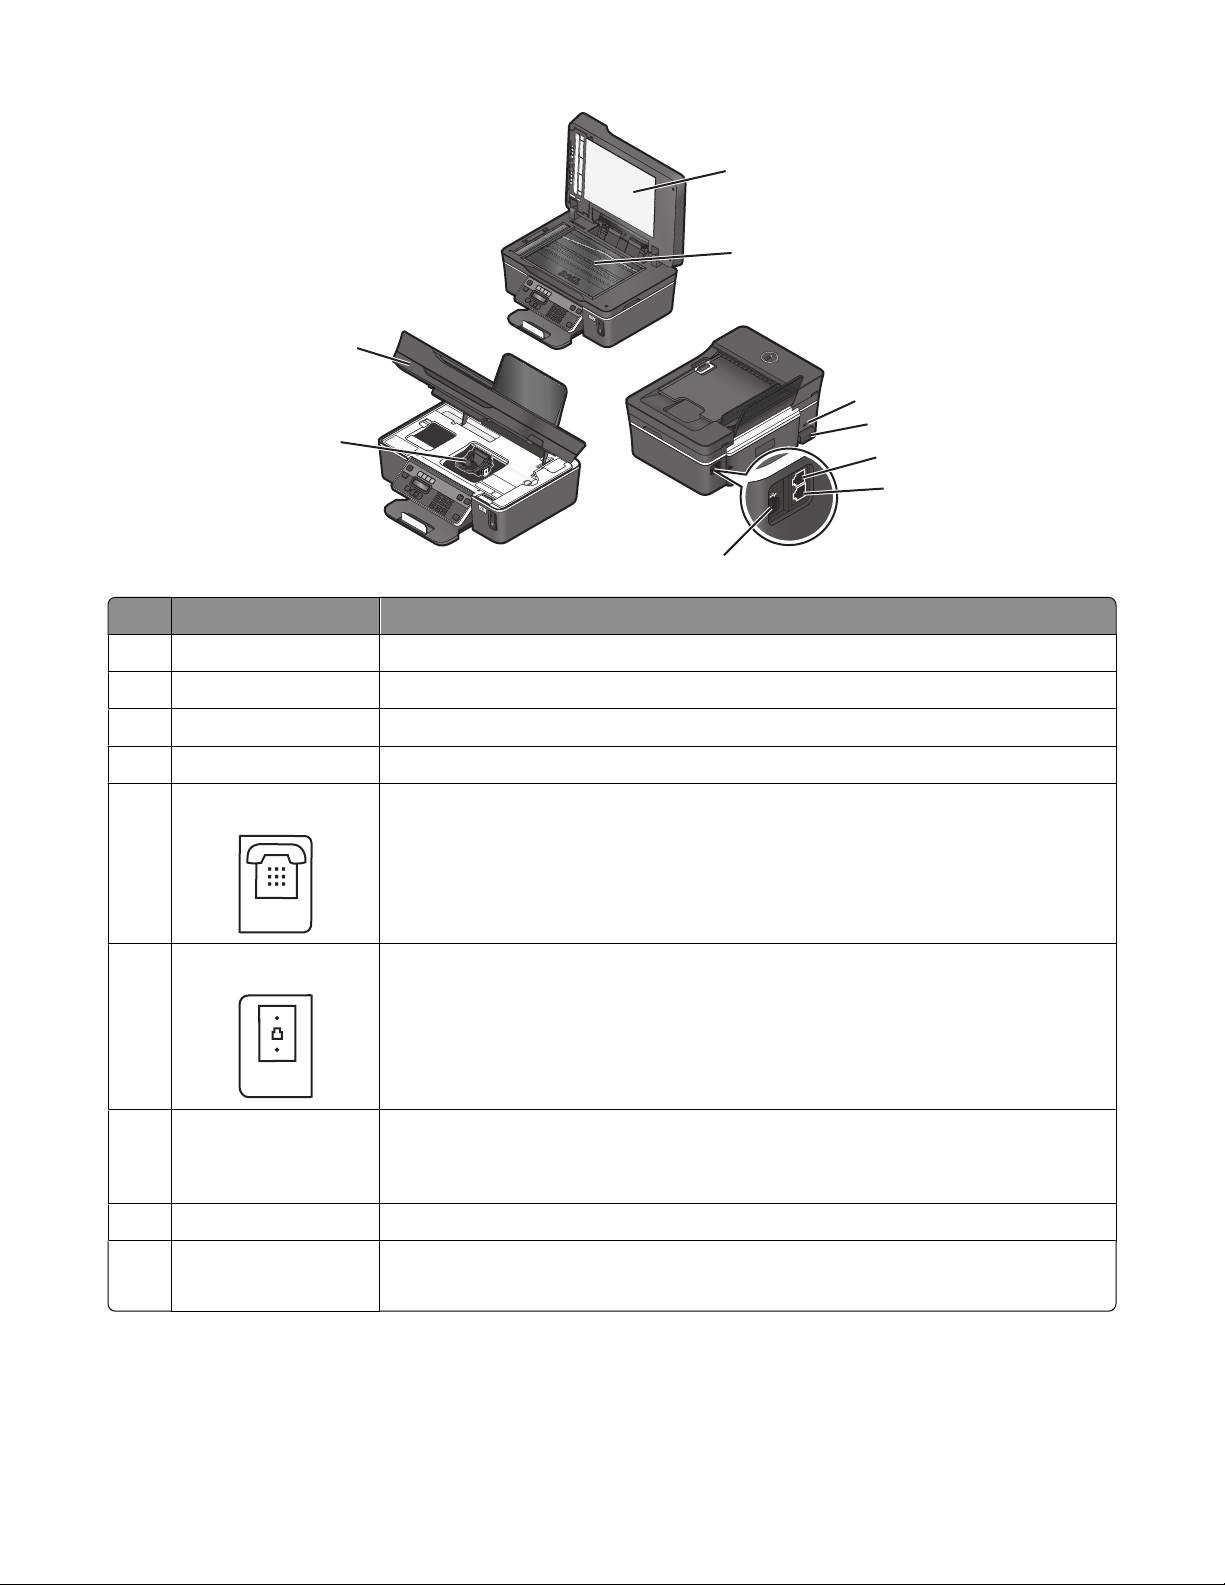
Use the To
1 Top cover Access the scanner glass.
2
Scanner glass Scan and copy photos and documents.
3 Security slot Install an anti-theft cable on your printer.
4
Power supply with port Connect the printer to a power source.
5
EXT Port
EXT
Connect additional devices (telephone or answering machine) to the printer and the
telephone line. Use this port if you do not have a dedicated fax line for the printer, and
if this connection method is supported in your country or region.
Note: Remove the plug to access the port.
6
LINE Port
LINE
Connect the printer to an active telephone line (through a standard wall jack, DSL filter,
or VoIP adapter) to send and receive faxes.
7 USB port Connect the printer to a computer using a USB cable.
Warning—Potential Damage: Do not touch the USB port except when plugging in or
removing a USB cable or installation cable.
8 Printhead Install, replace, or remove ink cartridges.
9
Scanner unit
• Access the ink cartridges and printhead.
• Remove paper jams.
About your printer
12
Ordering and replacing supplies
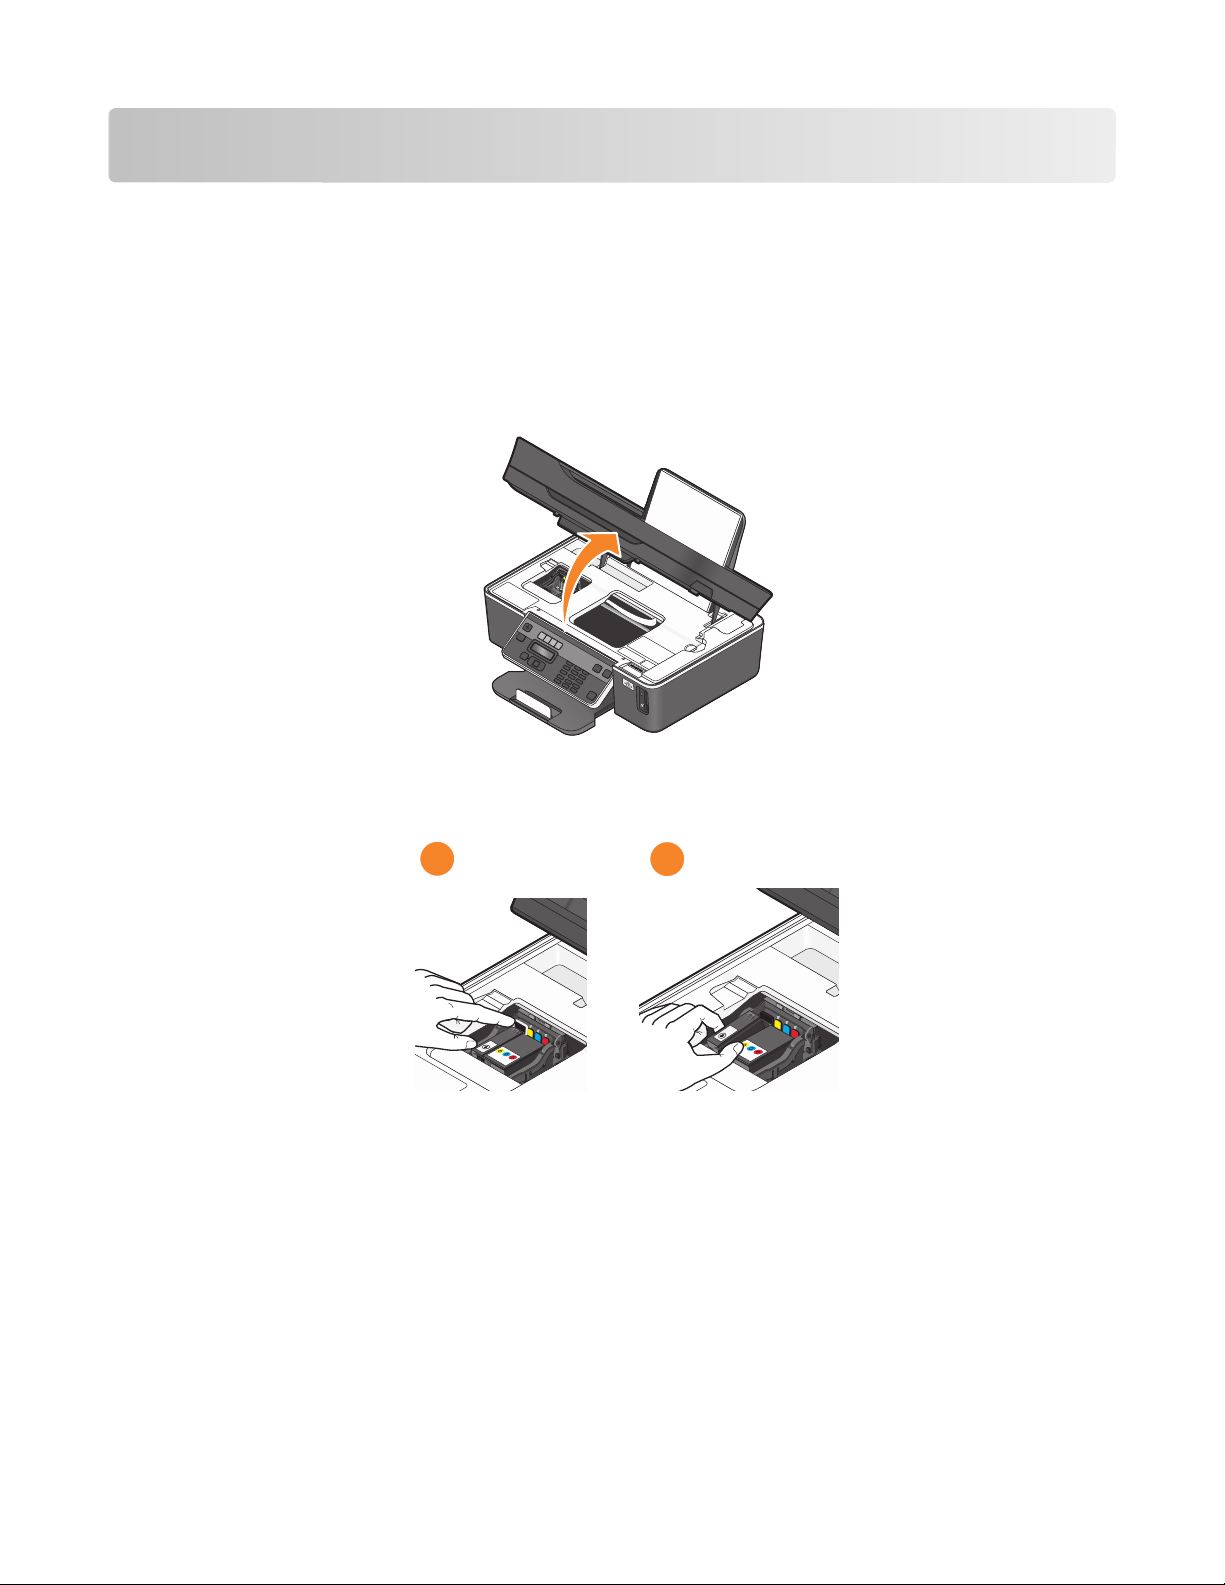
Replacing ink cartridges
Make sure you have a new ink cartridge or cartridges before you begin. You must install new cartridges immediately
after removing the old ones, or the ink remaining in the printhead nozzles may dry out.
1 Turn on your printer.
2 Open the printer.
Note: The printhead moves to the cartridge installation position.
3 Press the release tab, and then remove the used ink cartridge or cartridges.
1
2
Note: Do not reinstall used ink cartridges once you remove them from the printhead.
Ordering and replacing supplies
13
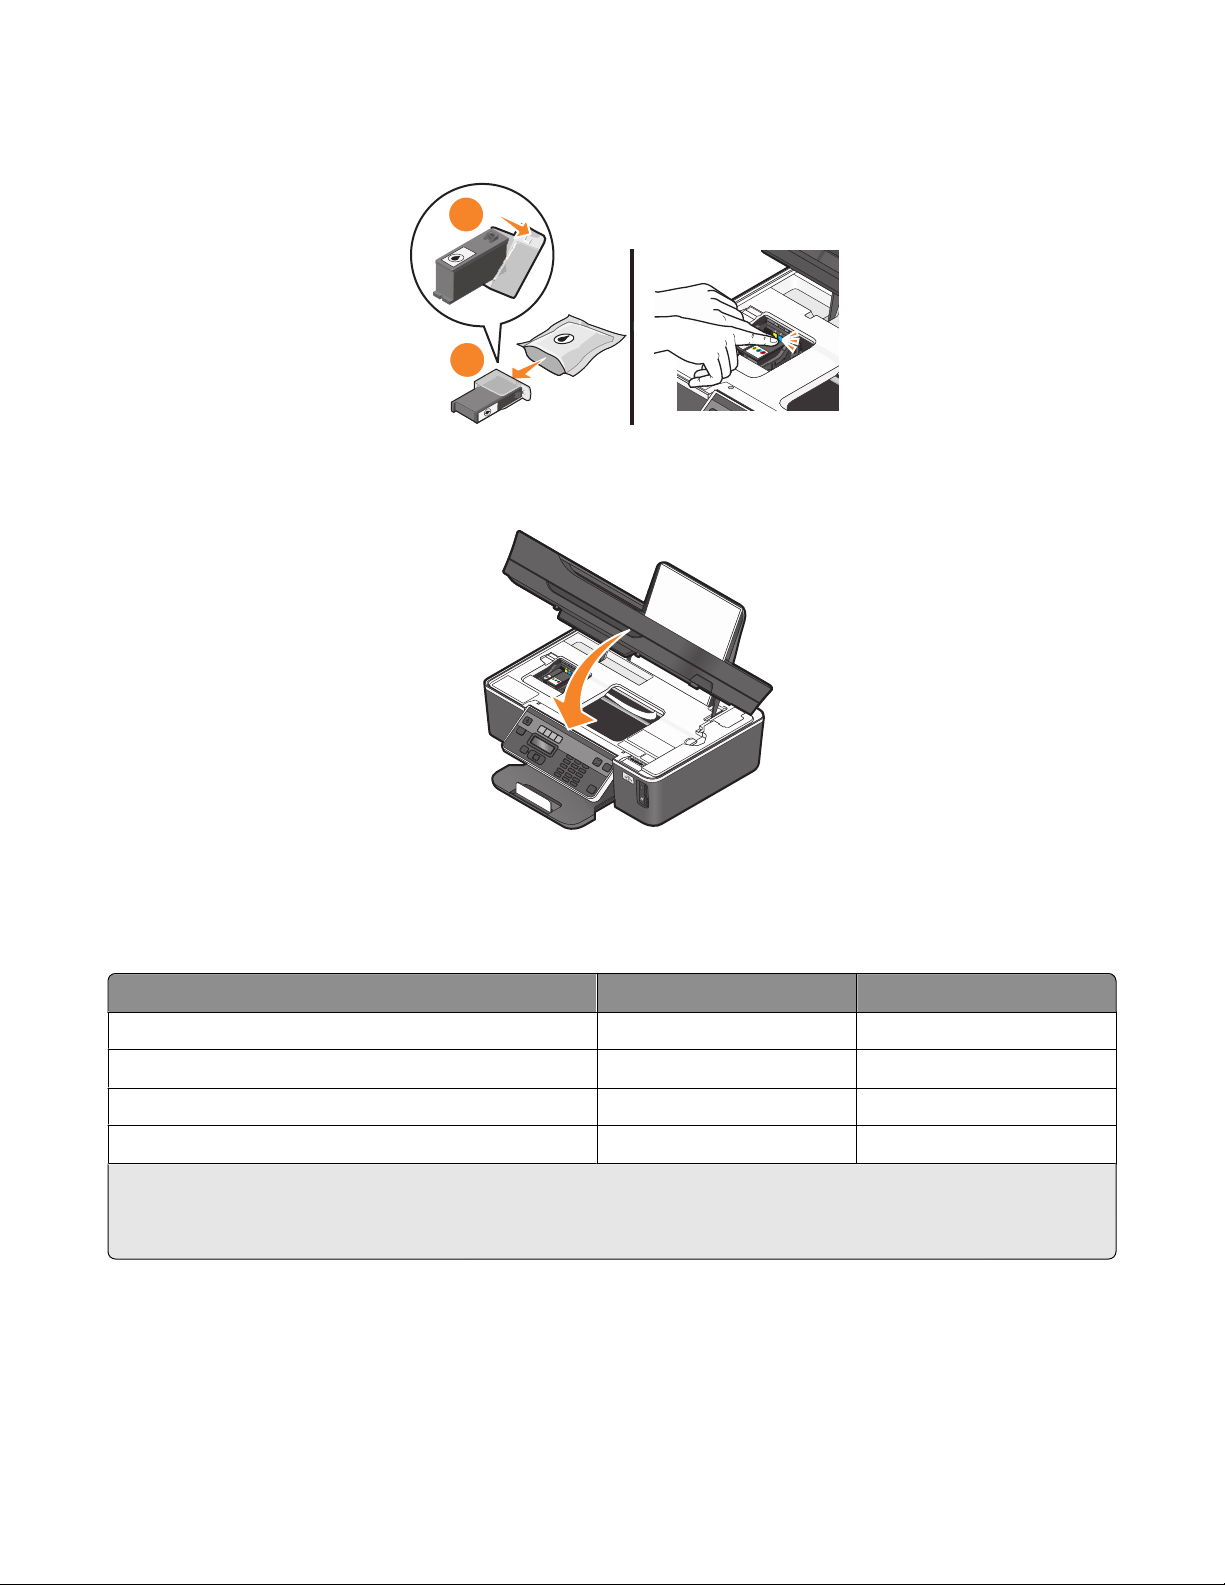
4 Remove the new cartridges from the foil, and then remove the protective cap from each of the ink cartridges.
Install the black ink cartridge and then the color ink cartridge. Use two hands to install each cartridge.
1
2
Note: Install the ink cartridges immediately after removing the protective cap to avoid exposing the ink to air.
5 Close the printer.
Ordering ink cartridges
Page yields available at www.dell.com/supplies. For best results, use only Dell ink cartridges.
Item
Licensed cartridge
1
Regular cartridge
Black cartridge Series 21 Series 21R
Black cartridge, high yield
2
Series 23 Series 23R
Color cartridge Series 21 Series 21R
Color cartridge, high yield
2
Series 23 Series 23R
1
Licensed for a single use only. After use, return this cartridge to Dell for remanufacturing, refilling, or recycling. To know
more about recycling Dell products, visit www.dell.com/recycling.
2
Available only on the Dell Web site at www.dell.com/supplies.
Ordering and replacing supplies
14

Recycling Dell products
To return Dell products to Dell for recycling:
1 Click or Start.
2 Click All Programs or Programs, and then select the printer program folder from the list.
3 Select Printer Home.
4 Choose your printer from the printer drop-down list.
5 Click Order supplies in the Maintenance tab.
6 Click .
7 Follow the instructions on the computer screen.
Ordering and replacing supplies
15
Using the printer control panel buttons
and menus
Using the printer control panel
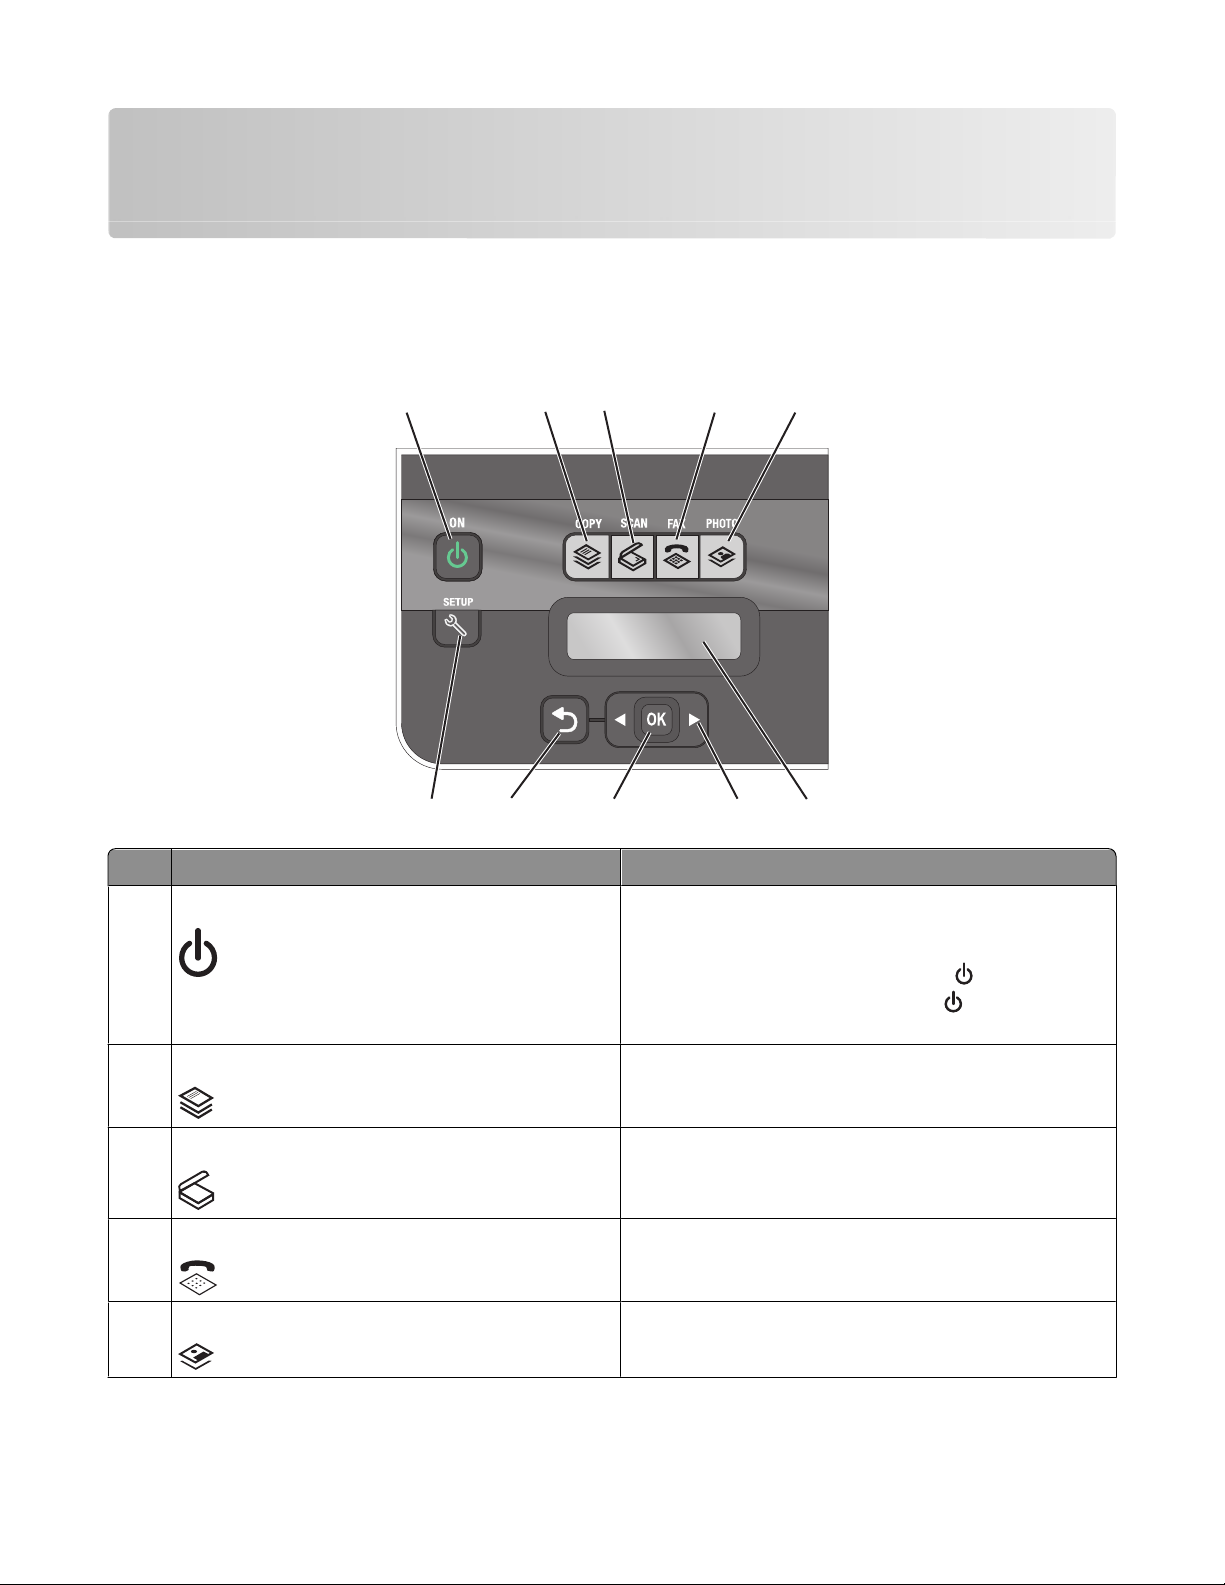
The following diagrams explain the sections of the printer control panel:
6
7
8
9
10
1
5
2
3
4
Use the: To
1
Power button
• Turn the printer on and off.
• Switch to Power Saver mode.
Note: When the printer is on, press
to switch to
Power Saver mode. Press and hold
for three seconds
to turn off the printer.
2
Copy button Access the copy menu and make copies.
3 Scan button Access the scan menu and scan documents.
4 Fax button Access the fax menu and send faxes.
5
Photo button Access the photo menu and print photos.
Using the printer control panel buttons and menus
16
Use the: To
6
Display
Note: The display is turned off in Power Saver mode.
View:
• Printer status
• Messages
• Menus
7
Arrow buttons Choose a menu or submenu item that appears on the
display.
8 Select button
• Select menu options.
• Save settings.
• Feed or eject paper. Press and hold for 3 seconds to feed
or eject paper from the printer.
9 Back button
• Return to the previous screen.
• Exit from one menu level to a higher one.
10 Setup button Access the setup menu and change printer settings.
Note: The Copy, Scan, Fax, and Photo button lights are off
when this button is selected.
1
2
3
4
5
7
6
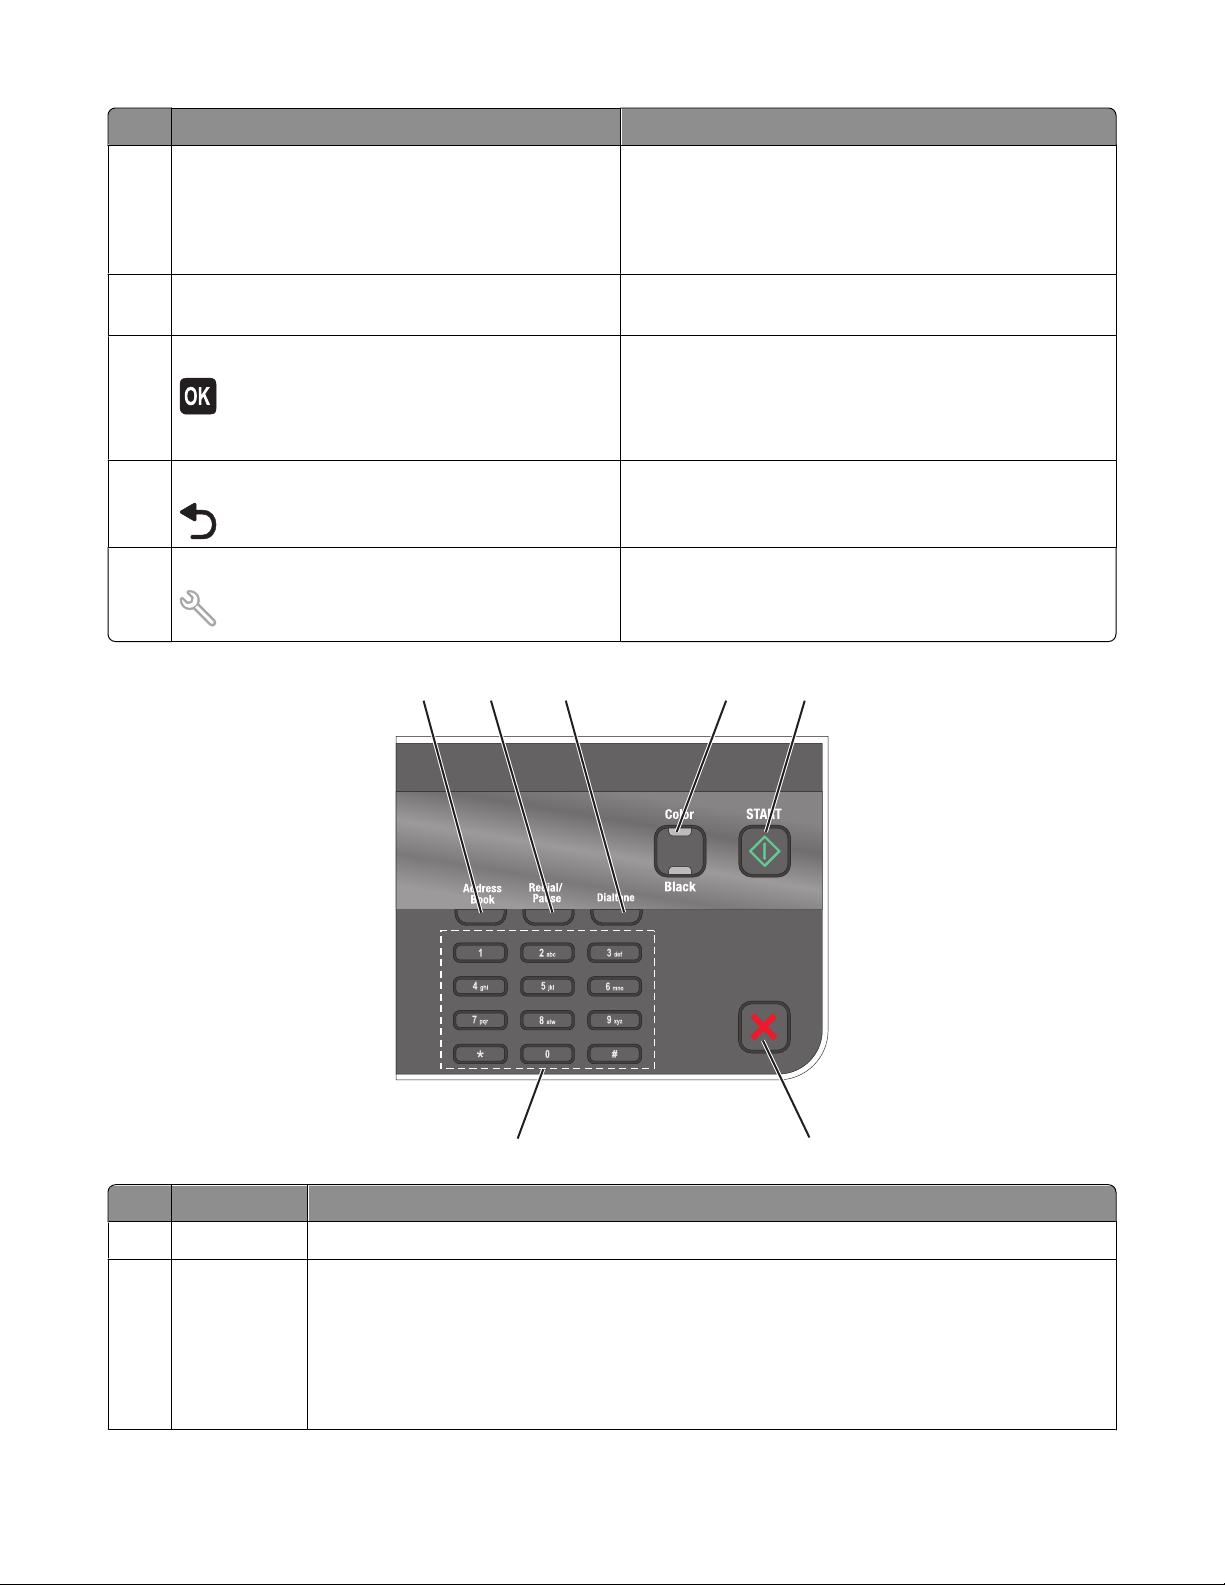
Use the: To
1 Address Book
Access fax numbers from a saved list of numbers.
2 Redial/Pause In Fax mode:
• Insert a three-second pause in a fax number to wait for an outside line or get through an
automated answering system. Enter a pause only when you have already begun entering the
number.
• Display the last number dialed. Press the left or right arrow button to view the last five numbers
dialed.
Using the printer control panel buttons and menus
17
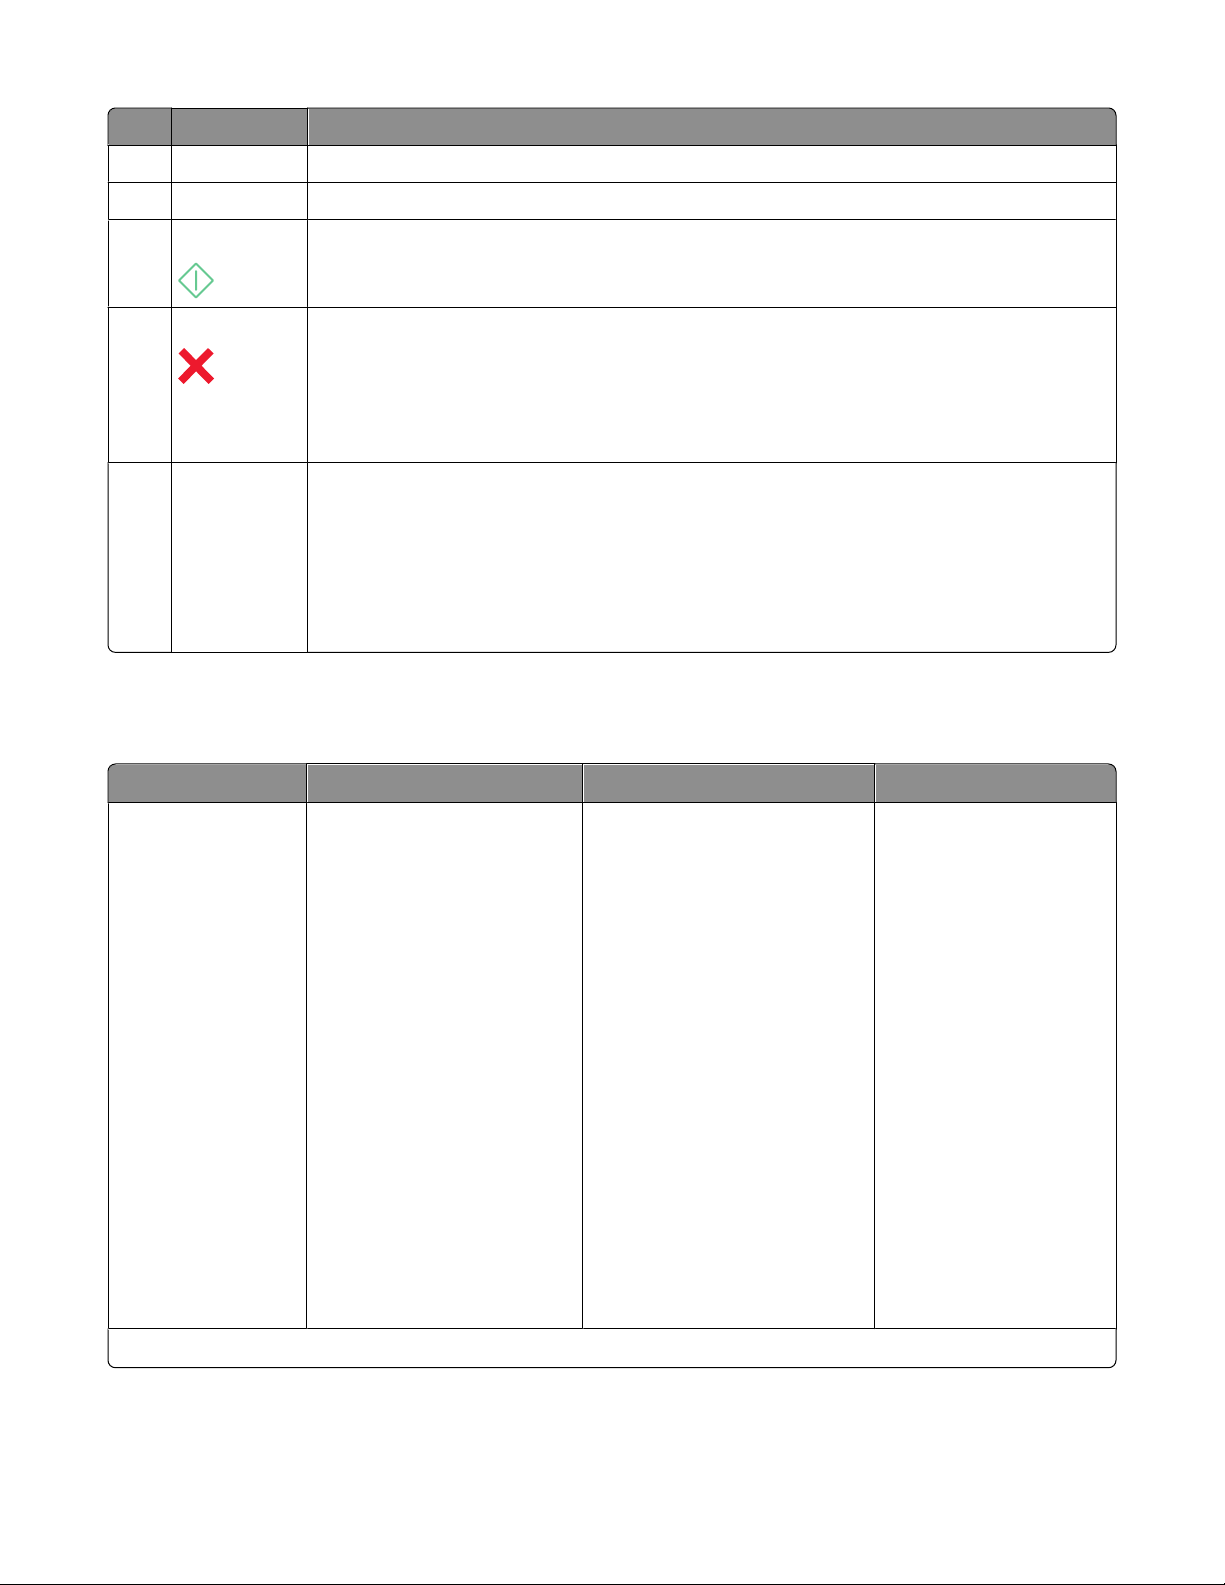
Use the: To
3 Dialtone
Dial the telephone number manually using the keypad before sending the fax.
4 Color/Black Switch to color mode or black-and-white mode.
5 Start button Start a print, scan, fax, or copy job, depending on which mode is selected.
6
Cancel button
• Cancel a print, copy, scan, or fax job in progress.
• Exit from a menu level of the Copy, Scan, Fax, Photo, or File Print menu to the top level of a
menu.
• Exit from a menu level of the Setup menu to the top level of the previous mode.
• Clear current settings or error messages, and return to default settings.
7 Keypad
In Copy mode or Photo mode: enter the number of copies or prints you want to make.
In Fax mode:
• Enter fax numbers.
• Navigate an automated answering system.
• Select letters when creating a Speed Dial list.
• Type numbers to enter or edit the date and time shown on the display.
Using the printer menus
Copy menu Scan menu Fax menu
PictBridge menu
1
Copies
Quality
Lighter/Darker
Resize
Original Size
Photo Reprint
Collate
Pages per Sheet
Copies per Sheet
Content Type
ID Card Copy
Scan to
• Computer
– Application
– Quality
– Original Size
• Network
– Quality
– File Type
– Original Size
• USB Flash Drive
– Quality
– File Type
– Original Size
• Memory Card
– Quality
– File Type
– Original Size
Fax to
Quality
• Standard
• Fine
• Superfine
• Ultrafine
Lighter/Darker
Original Size
• Letter
• A4
• Legal
Schedule Fax
• Send Now
• Send Later
• View Pending
Paper Size
Photo Size
Paper Type
Layout
Quality
1
This menu appears only when a PictBridge-enabled camera is inserted into the PictBridge port.
Using the printer control panel buttons and menus
18
Photo menu
Easy Photo
• Print
– Last Photo
– All Photos
– Date Range
– Photo Number
• Paper Size
• Photo Size
Print Photos
• Print
– Last Photo
– All Photos
– Date Range
– Photo Number
– Print DPOF
1
• Lighter/Darker
• Photo Effects
– None
– Auto Enhance
– Sepia
– Antique Grey
– Antique Brown
• Paper Size
• Photo Size
• Paper Type
• Layout
• Quality
Proof Sheet
• Print Last 20
• Print All
• Print Date Range
• Scan Sheet
Save Photos
• Computer
2
• Network
• USB Flash Drive
3
• Memory Card
3
Select Computer (appears only
in printers connected to a
network)
1
This menu appears only when there is a valid DPOF file in your memory device.
2
This menu appears only when the printer is connected to the computer through the USB port.
3
This menu appears only when a memory device is inserted into the card slot or USB port.
Setup menu
Paper Setup
• Paper Size
• Paper Type
Maintenance
• Ink Levels
• Clean Printhead
• Deep Clean
Printhead
• Align Printer
• Print Test Page
• Replace Printhead
Device Setup
• Language
• Country/Region
• Date/Time
• Host Fax Settings
• Button Beep
• Power Saver
• Auto Screen Dim
• Eco-Mode
• Clear Settings Timeout
Network Setup
1
• Print Setup Page
• Wi-Fi Protected Setup
• Wireless Information
• TCP/IP
• File Print
• Reset Network Adapter
Defaults
Fax Setup
• Address Book
• Reports
• Ringing and Answering
• Fax Printing
• Dialing and Sending
• Fax Blocking
Bluetooth Setup
2
• Enable
• Discovery
• Printer Name
• Security Level
• Paper Size
• Photo Size
• Paper Type
• Quality
• Pass Key
• Clear Device List
Defaults
• Photo Print Size
• Set Defaults
– Use Current
– Use Factory
Demo Mode
• On
• Off
1
This menu appears only in printers that support wireless printing.
2
This menu appears only when a USB Bluetooth adapter is inserted into the USB port.
Note: The File Print menu is enabled when you insert a memory device that contains document files into the printer.
The menu is composed of the folders and files stored on the memory device.
Using the printer control panel buttons and menus
19
Changing temporary settings into new default
settings
The following menus revert to default settings after two minutes of inactivity or after the printer is turned off:
Copy menu
• Copies
• Quality
• Lighter/Darker
• Resize
• Original Size
• Pages per Sheet
• Copies per Sheet
• Content Type
Scan menu
• Quality
• Original Size
Fax menu (selected models
only)
• Lighter/Darker
• Quality
Photo menu The following Photo options will not time out after two minutes of inactivity or after you
turn off the printer, but they will return to the factory default settings when a memory
card or flash drive is removed.
• Photo Effects
• Photo Size
• Layout
• Quality
To change the temporary settings into new default settings
1 From the printer control panel, press .
2 Press the arrow buttons to scroll to Defaults, and then press .
3 Press the arrow buttons to scroll to Set Defaults, and then press .
Use Current appears on the display.
4 Press again to select Use Current.
5 Press until you exit Setup, or press another mode button.
To disable the settings timeout feature
You can disable the settings timeout feature if you do not want the printer to revert to the default settings after two
minutes of inactivity or after the printer is turned off.
1 From the printer control panel, press .
2 Press the arrow buttons to scroll to Device Setup, and then press .
3 Press the arrow buttons to scroll to Clear Settings Timeout, and then press .
Using the printer control panel buttons and menus
20

4 Press the arrow buttons to scroll to Never, and then press .
5 Press until you exit Setup, or press another mode button.
Changing the Power Saver timeout
The Power Saver timeout is the time it takes for the printer to switch to Power Saver mode when the printer is left
idle. The Power Saver feature optimizes energy efficiency by reducing the printer power consumption (as much as
28 percent on some printer models) compared to the default printer settings. To save the most energy, select the
lowest Power Saver timeout.
1 From the printer control panel, press .
2 Press the arrow buttons to scroll to Device Setup, and then press .
3 Press the arrow buttons to scroll to Power Saver, and then press .
4 Press the arrow buttons to select a Power Saver timeout, and then press .
5 Press until you exit Setup, or press another mode button.
Resetting to factory settings
Resetting to factory default settings will delete all the printer settings you have previously selected.
Using the printer control panel menus
1 From the printer control panel, press .
2 Press the arrow buttons to scroll to Defaults, and then press .
3 Press the arrow buttons to scroll to Set Defaults, and then press .
4 Press the arrow buttons to scroll to Use Factory, and then press .
5 When prompted to set the initial settings of your printer, make your selections using the printer control panel
buttons.
Initial Setup Complete appears on the display.
Using a button combination (if you cannot read the current
language)
1 Turn off the printer.
Note: If you have set the Power Saver timeout in the Setup menu, then press and hold the for three seconds
to turn off the printer.
2 From the printer control panel, press and hold and , and then press to turn the printer on.
3 Release all three buttons.
4 When prompted to set the initial settings of your printer, make your selections using the printer control panel
buttons.
Initial Setup Complete appears on the display.
Using the printer control panel buttons and menus
21

Saving energy with Eco-Mode
The Eco-Mode feature optimizes energy efficiency and saves money.
When Eco-Mode is enabled, the printer automatically switches to the following settings:
• The printer display is dimmed.
• The printer changes to Power Saver mode after ten minutes.
Notes:
• If you are using Eco-Mode, then the Eco-Mode settings override any changes you may make to individual settings
that are part of Eco-Mode.
• Eco-Mode is enabled by default.
To change the Eco-Mode setting:
1 From the printer control panel, press .
2 Press the arrow buttons to scroll to Device Setup, and then press .
3 Press the arrow buttons to scroll to Eco-Mode.
4 Select the Eco-Mode setting, and then press .
5 Press until you exit Setup, or press another mode button.
Using the printer control panel buttons and menus
22

Using the printer software
Minimum system requirements
The printer software requires up to 500 MB of free disk space.
Supported operating systems
• Microsoft Windows 7 (Web only)
• Microsoft Windows Vista
• Microsoft Windows XP
• Microsoft Windows 2000 (SP4 or greater)
• Linux Ubuntu 8.04 LTS and 8.10 (Web only)
• Linux OpenSUSE 11.0 and 11.1 (Web only)
• Linux Fedora 10 (Web only)
Using the Windows printer software
Software installed during printer installation
When you set up the printer using the installation software CD, all the necessary software was installed. You may
have chosen to install some additional programs. The following table provides an overview of various software
programs and what they can help you do.
If you did not install these additional programs during initial installation, then reinsert the installation software CD,
run the installation s oftware, and then select Install Additional Software from the Software Already Installed screen.
Printer software
Use the To
Dell Printer Home
(referred to as Printer Home)
• Launch applications or programs.
• Access the Fax Solutions software.
• Scan or e-mail a photo or document.
• Edit scanned documents.
• Scan documents to PDF.
• Adjust settings for the printer.
• Order supplies.
• Maintain ink cartridges.
• Print a test page.
• Register the printer.
• Contact technical support.
Dell Fast Pics
(referred to as Fast Pics)
Manage, edit, transfer, and print photos and documents.
Using the printer software
23
Use the To
Adobe
TM
Photo Album Starter Edition
View, manage, and edit photos.
Dell Toolbar
(referred to as Toolbar)
Print, scan, or convert local files from Windows.
Dell Ink Management System Order ink.
Dell Fax Solutions
(referred to as Fax Solutions)
• Send a fax.
• Receive a fax in three-in-one printers.
• Add, edit, or delete contacts in the built-in phone book.
• Access the Dell Fax Setup Utility. Use the Fax Setup Utility to set the Speed
Dial and Group Dial numbers, set Ringing and Answering, and print fax
history and status reports.
Abbyy Sprint OCR Scan a document and produce text that you can edit with a word-processing
program.
Dell Wireless Setup Utility
(referred to as Wireless Setup Utility)
• Set up the wireless printer on a wireless network.
• Change the wireless settings of the printer.
Note: This program is installed automatically with the printer software if the
printer has wireless capability.
Dell Service Center
(referred to as Service Center)
• Troubleshoot the printer.
• Access the printer maintenance functions.
• Contact technical support.
Notes:
• This program is installed automatically with the printer software.
• You may be prompted to install this program from the Web, depending on
your printer model.
Printing Preferences
When you select File Print with a document open and then click
Properties, a Printing Preferences dialog appears. The dialog lets you select
options for the print job, such as the following:
• Select the number of copies to print.
• Print two-sided copies.
• Select the paper type.
• Add a watermark.
• Enhance images.
• Save settings.
Note: Printing Preferences is installed automatically with the printer software.
Note: Your printer m ay not come with some of these programs or so me of the functions of thes e programs, depending
on the features of the printer that you purchased.
Using the printer software
24

Updating the printer software (Windows only)
Checking for software updates
1 Click or Start.
2 Click All Programs or Programs, and then select the printer program folder from the list.
3 Select Printer Home.
4 Choose your printer from the printer drop-down list.
5 From the Support tab, select Check for updates.
6 Follow the instructions on the computer screen.
Reinstalling the printer software
If you encountered problems while installing, or if your printer does not appear in the Printers folder or as a printer
option when you send a print job, then try removing and reinstalling the printer software.
Uninstalling the printer software
1 Click or Start.
2 Click All Programs or Programs, and then select the printer program folder from the list.
3 Select the uninstall option.
4 Follow the instructions on the computer screen to remove the software.
5 Once the uninstall process in complete, restart your computer.
Installing the printer software
Note: If you installed the printer software on this computer before but need to reinstall the software, then uninstall
the current software first.
1 Close all open software programs.
2 Insert the installation software CD.
If the Welcome screen does not appear after a minute, then launch the CD manually:
a Click , or click Start and then click Run.
b In the Start Search or Run box, type D:\setup.exe, where D is the letter of your CD or DVD drive.
3 Follow the instructions on the Welcome screen.
Using the World Wide Web
Updated printer software may be available at www.support.dell.com.
Using the printer software
25
Loading paper and original documents
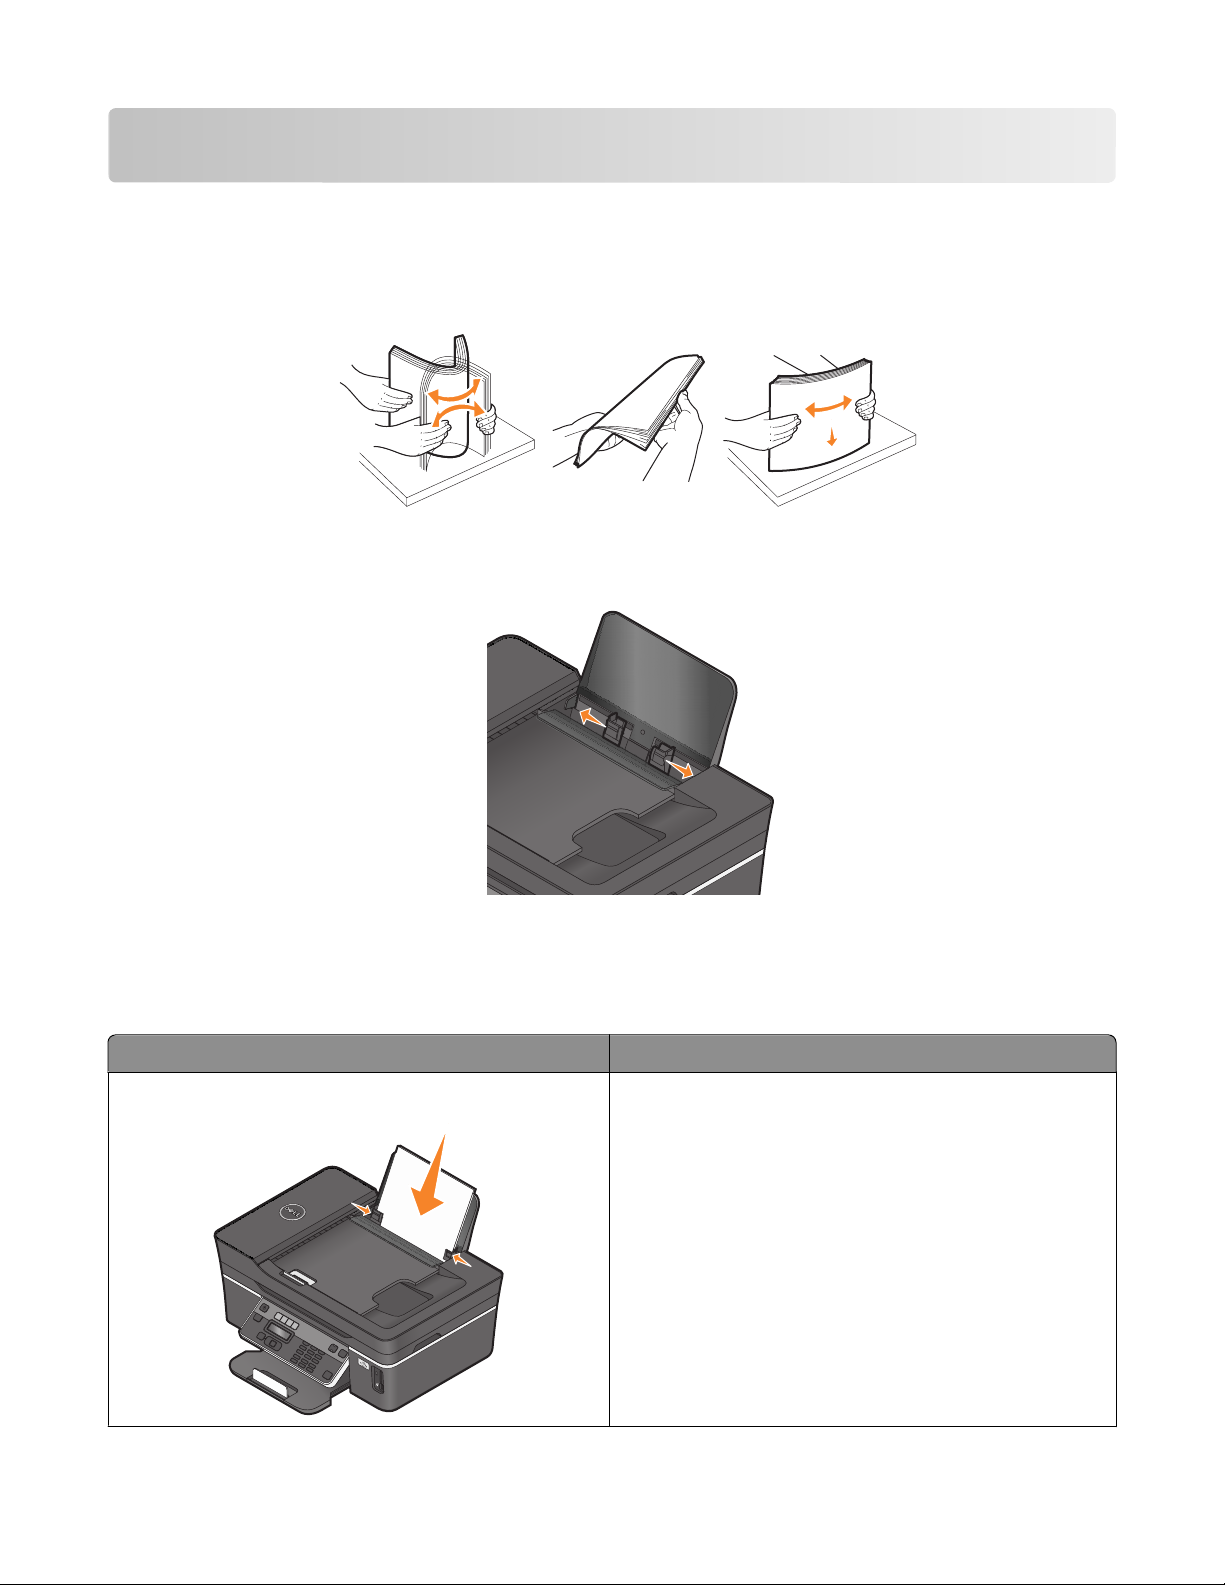
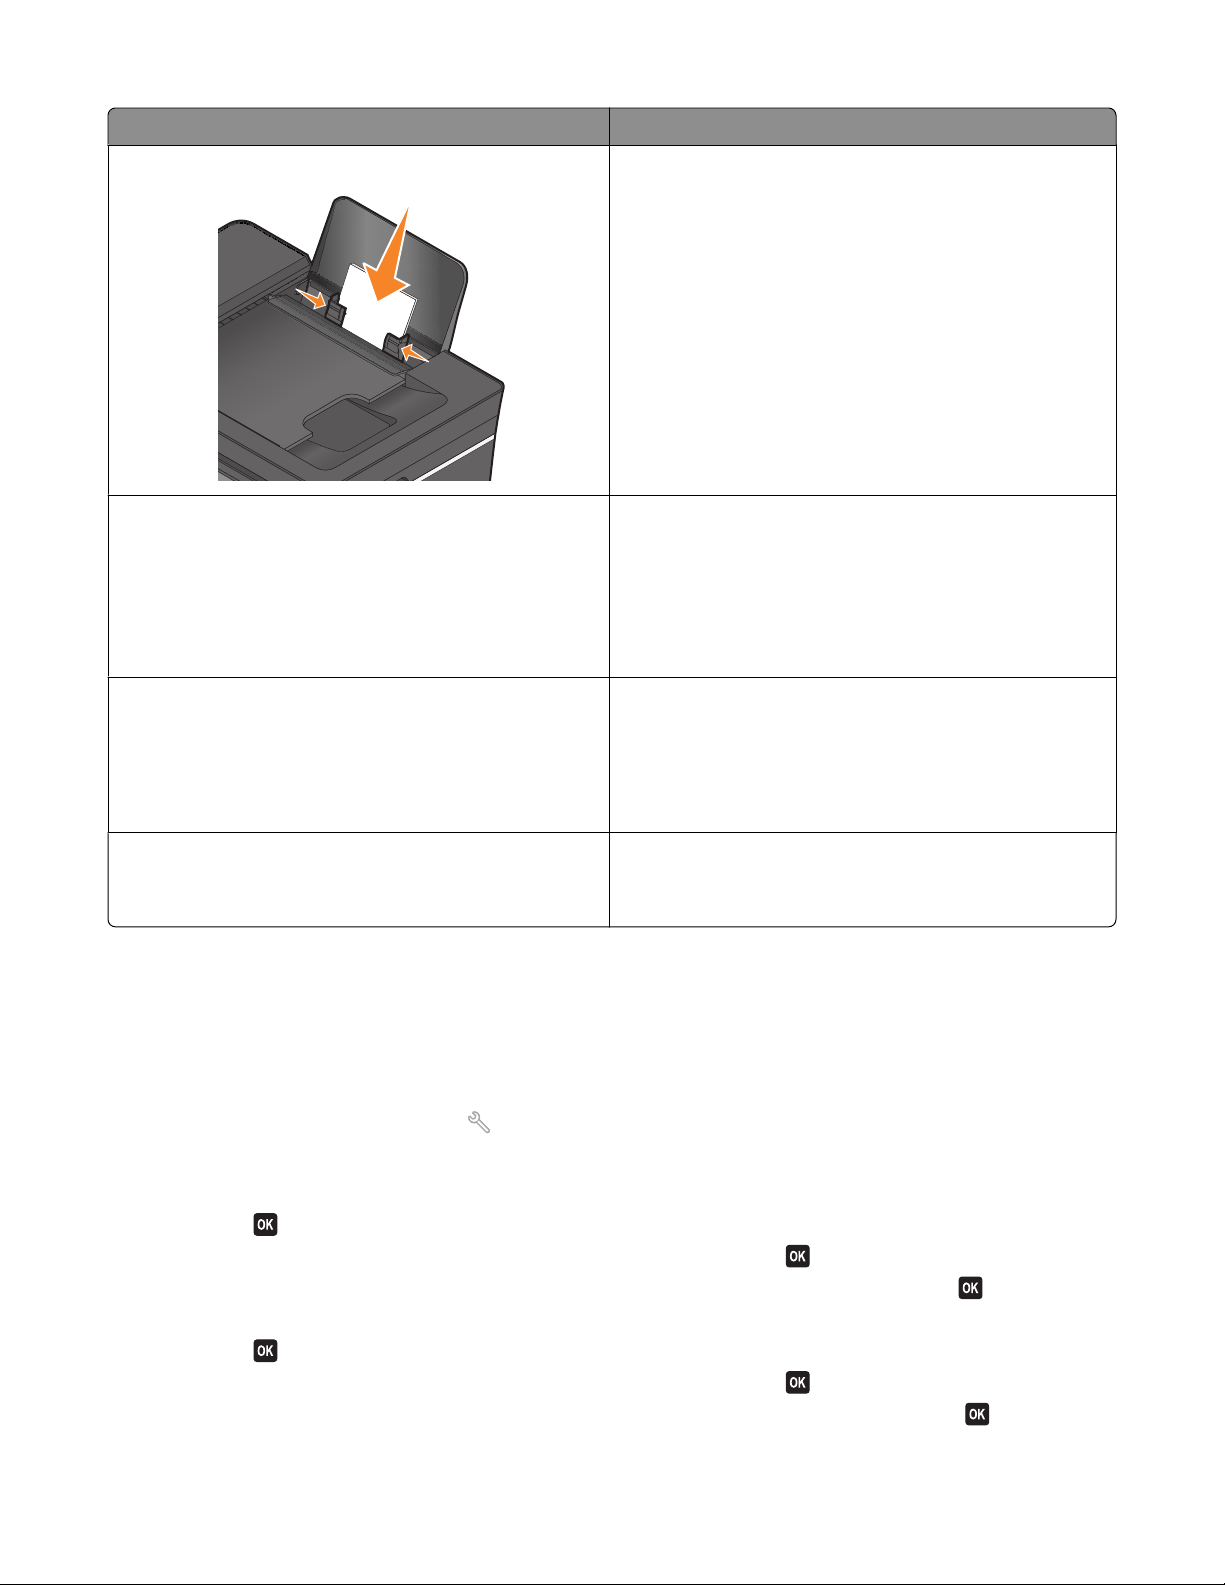
Loading paper
1 Fan the paper.
2 Center the paper on the paper support.
3 Adjust the paper guides so they rest against the edges of the paper.
Note: Do not force paper into the printer. The paper should be flat against the paper support, and the edges
should be flush against both paper guides.
Paper and specialty media guidelines
Load up to: Make sure that:
100 sheets of plain paper
• The paper guides rest against the edges of the paper.
• You load letterhead paper with the print side faceup and
the top of the letterhead going into the printer first.
Loading paper and original documents
26

Load up to: Make sure that:
25 sheets of heavyweight matte paper
• The print side of the paper is faceup.
• The paper guides rest against the edges of the paper.
• You select Automatic, Normal, or Photo print quality.
Note: Draft mode is available but is not recommended for
use with expensive paper such as heavyweight matte, labels,
photo cards and glossy paper.
20 sheets of banner paper
• You remove all paper from the paper support before
inserting banner paper.
• You use banner paper designed for inkjet printers.
• You place a stack of banner paper on or behind the
printer, and feed in the first sheet.
• The paper guides rest against the edges of the paper.
• You select A4 Banner or Letter Banner paper size.
10 envelopes
• The print side of the envelope is faceup.
• The paper guides rest against the edges of the
envelopes.
• You print the envelopes with Landscape orientation.
Note: If you are mailing within Japan, then the envelope
can be printed in Portrait orientation with the stamp in
the lower right corner or in Landscape orientation with
the stamp in the lower left corner. If you are mailing
internationally, then print in Landscape orientation with
the stamp in the upper left corner.
• You select the correct envelope size. Select the next
biggest size if the exact envelope size is not listed, and
set the left and right margins so your envelope is
correctly positioned.
25 sheets of labels
• The print side of the label is faceup.
• The paper guides rest against the edges of the paper.
• You select Automatic, Normal, or Photo print quality.
Note: Draft mode is available but is not recommended for
use with expensive paper such as heavyweight matte, labels,
photo cards and glossy paper.
Loading paper and original documents
27
Load up to: Make sure that:
25 greeting cards, index cards, postcards, or photo cards
• The print side of the card is faceup.
• The paper guides rest against the edges of the cards.
• You select Automatic, Normal, or Photo print quality.
Note: Draft mode is available but is not recommended for
use with expensive paper such as heavyweight matte, labels,
photo cards and glossy paper.
25 sheets of photo/glossy paper
• The print side of the paper is faceup.
• The paper guides rest against the edges of the paper.
• You select Automatic, Normal, or Photo print quality.
Note: Draft mode is available but is not recommended for
use with expensive paper such as heavyweight matte, labels,
photo cards and glossy paper.
10 iron-on transfers
• You follow the loading instructions on the iron-on
transfer packaging.
• The print side of the transfer is faceup.
• The paper guides rest against the edges of the transfer.
• You select Automatic, Normal, or Photo print quality.
50 transparencies
• The rough side of the transparencies is faceup.
• The paper guides rest against the edges of the
transparencies.
Saving paper default settings
You can set the default paper size, paper type, and photo print size for the documents and photos that you print.
Note: These default settings apply only to print, copy, and scan jobs that you initiate from the printer.
1 From the printer control panel, press .
2 Choose the default settings:
• If you want to set the default paper size:
a Press to select Paper Setup.
b Press the arrow buttons to scroll to Paper Size, and then press .
c Press the arrow buttons to select the default paper size for the printer, and then press .
• If you want to set the default paper type:
a Press to select Paper Setup.
b Press the arrow buttons to scroll to Paper Type, and then press .
c Press the arrow buttons to select the default paper type for the printer, and then press .
Loading paper and original documents
28
• If you want to set the default photo print size:
a Press the arrow buttons to scroll to Defaults, and then press .
b Press to select Photo Print Size.
c Press the arrow buttons to select the default photo print size for the printer, and then press .
3 Press until you exit Setup, or press another mode button.
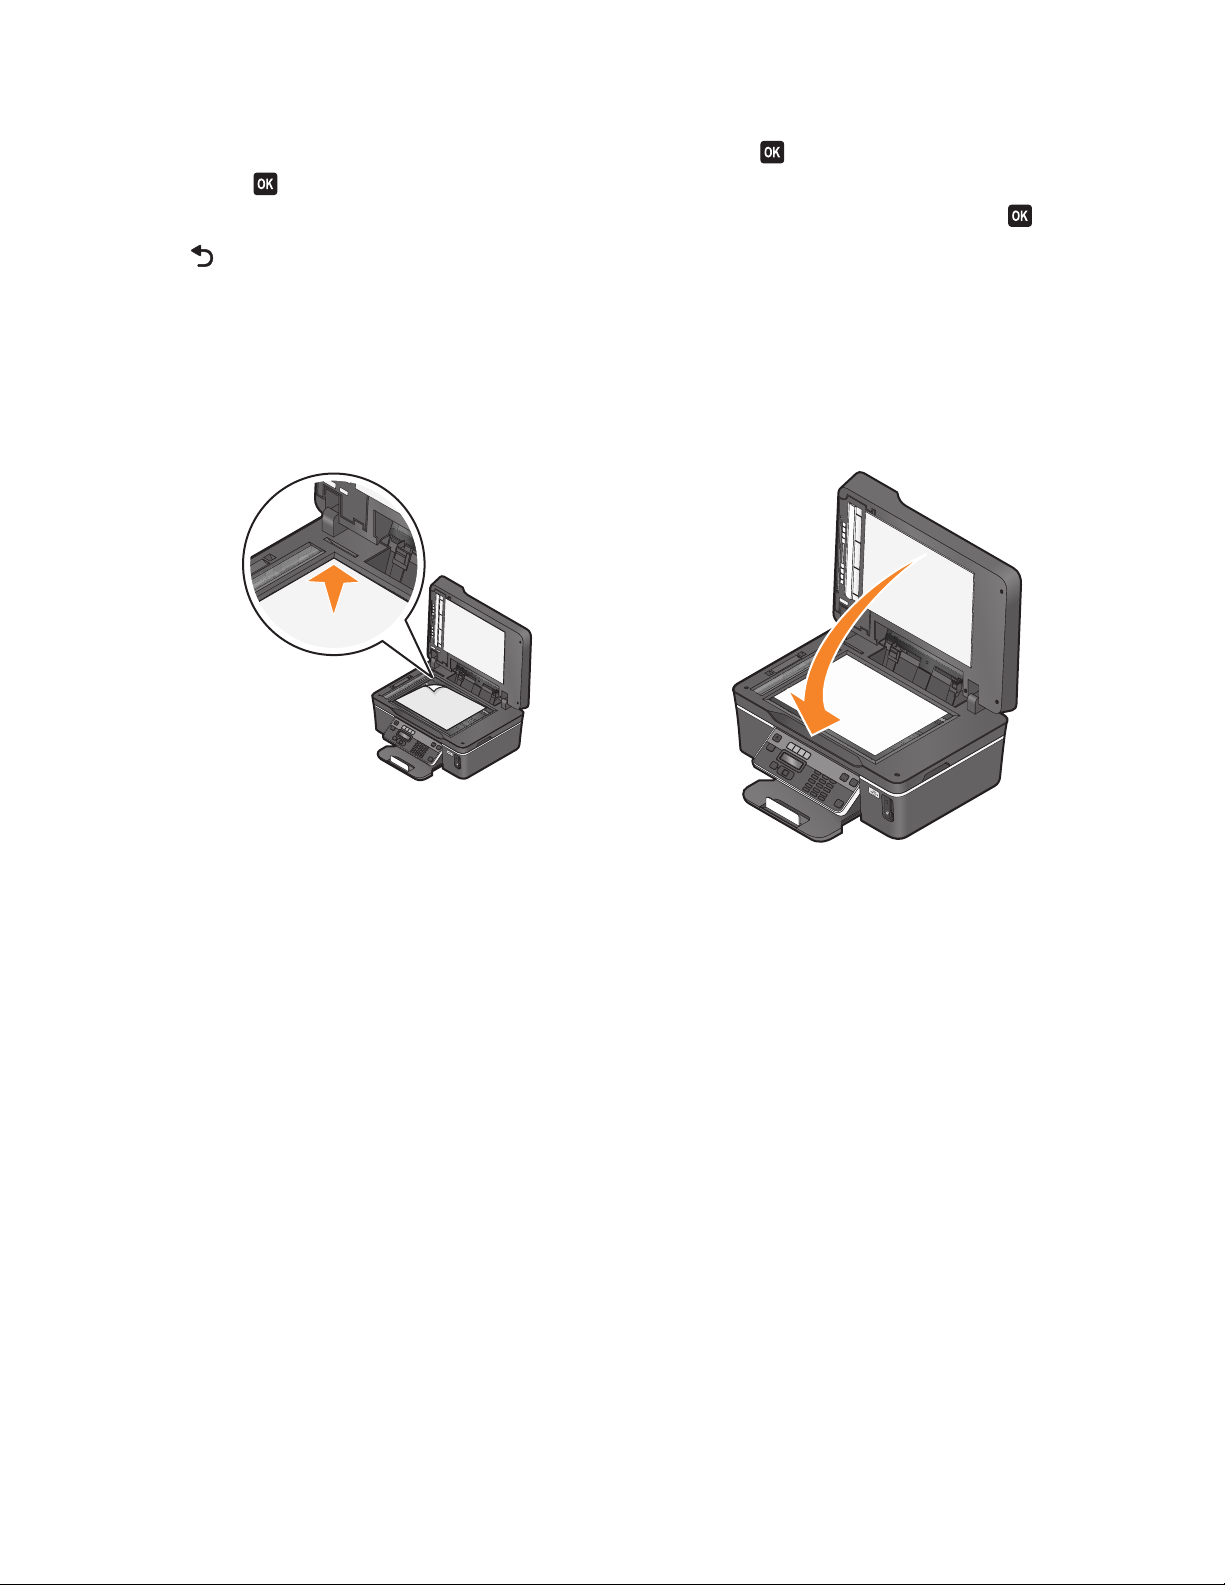
Loading original documents on the scanner glass
1 Open the top cover and place the document facedown on the scanner glass.
2 Close the top cover.
Loading original documents into the ADF
You can load up to 35 sheets of an original document into the ADF for scanning, copying, and faxing. You can load
A4-, letter-, or legal-size paper into the ADF.
1 Adjust the paper guide on the ADF tray to the width of the original document.
2 Load the original document faceup and top edge first into the ADF until you hear a beep.
Loading paper and original documents
29
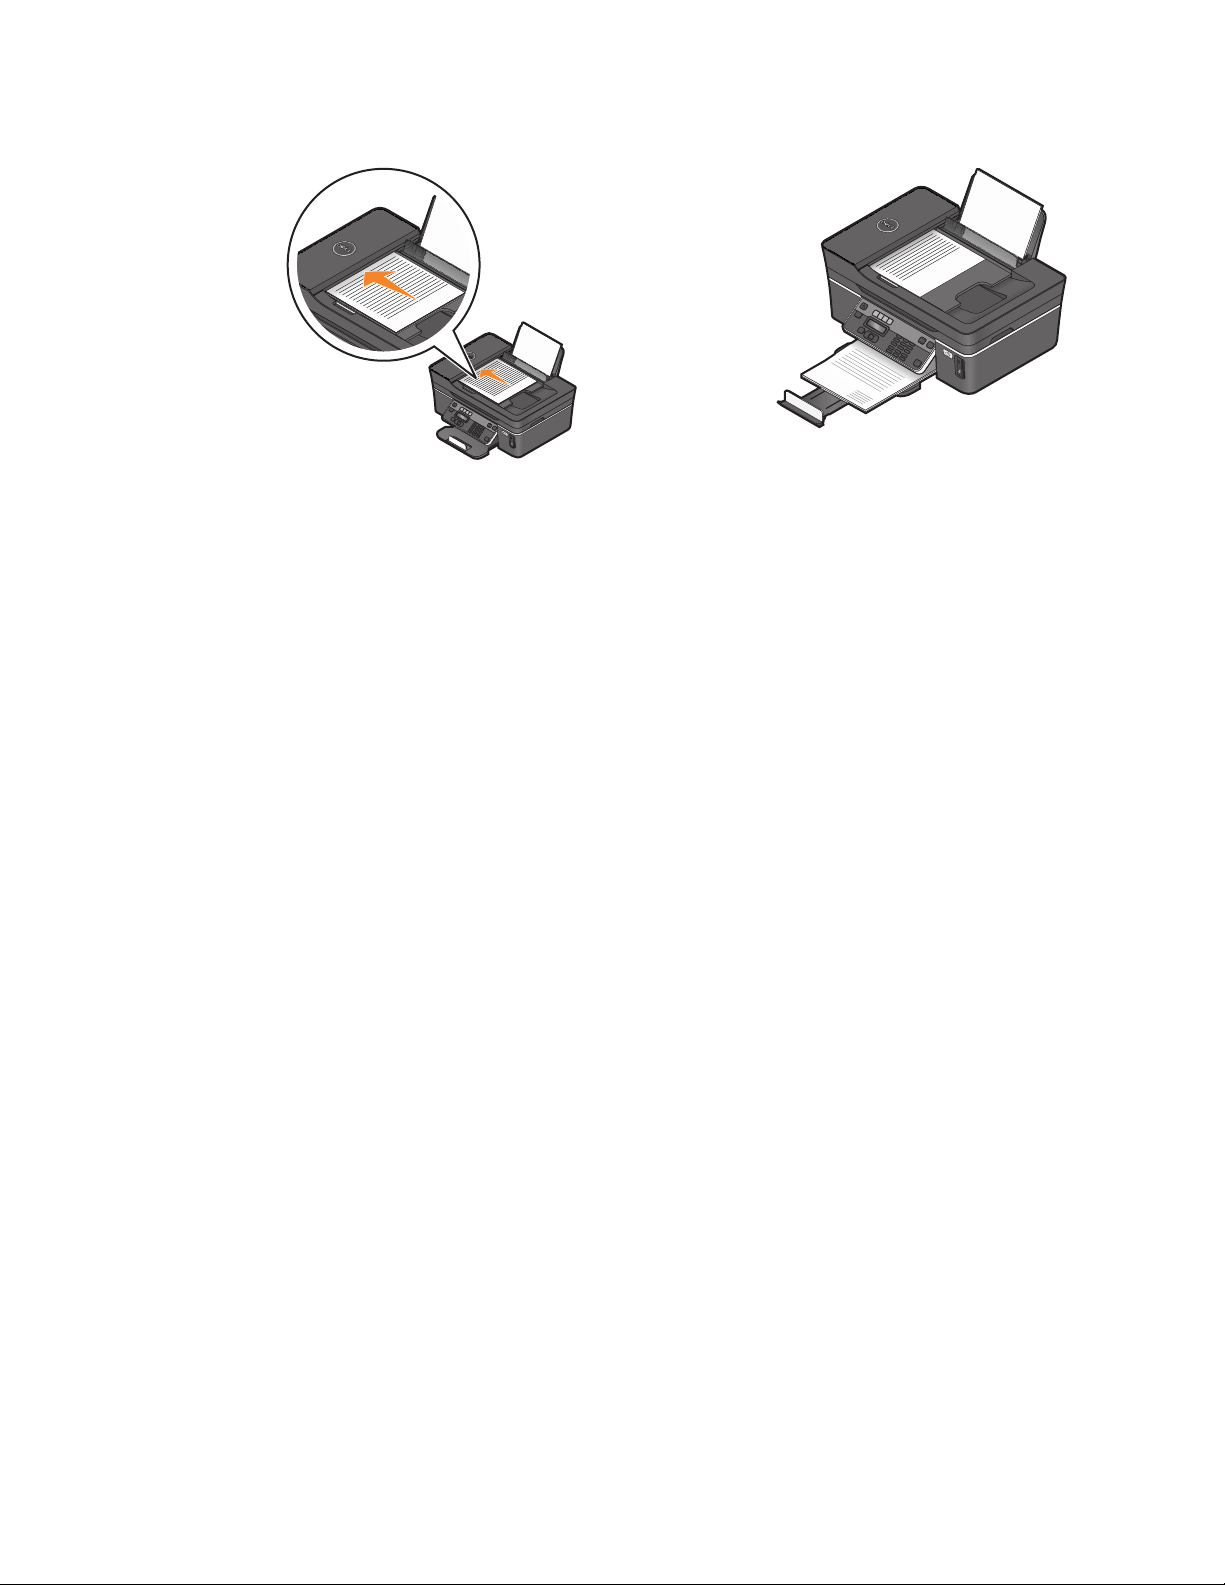
3 The document feeds into the ADF.
Loading paper and original documents
30
Loading...