


Mythos STS
Mythos STS SuperTower® Loudspeaker with Built-In Powered Subwoofer
Owner’s Manual
Thank You
Thank you for choosing the Definitive Technology Mythos STS SuperTower Loudspeaker System. The Mythos STS is a unique speaker which includes a built-in powered subwoofer system with a high-power digital amplifier. This extraordinary speaker truly revolutionize the state-of-the-art in music and home theater loudspeaker technology and performance. You chose wisely.
Our engineers have spent many years in developing this product. In order to ensure that you experience the finest performance possible, we encourage you to take a moment to fully read this owner’s manual and familiarize yourself with the proper installation and set-up procedures for your Mythos STS speakers.
Safety Precautions
CAUTION
RISK OF ELECTRIC SHOCK
DO NOT OPEN
CAUTION! To reduce the risk of electric shock and fire, do not remove the cover or back plate of this device. There are no user serviceable parts inside. Please refer all servicing to licensed service technicians. Avis: Risque de choc electricque, ne pas ouvrir.
CAUTION! The international symbol of a lightning bolt inside a triangle is intended to alert the user to uninsulated “dangerous voltage” within the device’s enclosure. The international symbol of an exclamation point inside a triangle is intended to alert the user to the presence of important operating, maintenance and servicing information in the manual accompanying the device.
CAUTION! To prevent electrical shock, match wide blade of plug to wide slot, fully insert. Attention: Pour eviter les chocs electriques, introduire la lame la plus large de la fiche dans la borne correspondante de la prise et pousser jusqu'au fond.
CAUTION! To reduce the risk of electrical shock, do not expose this equipment to rain or moisture.
1.Read Instructions—All safety and operating instructions should be read before operating the device.
2.Retain Instructions—The safety and operating instructions should be retained for future reference.
3.Heed Warnings—All warnings on the device and in the operating instructions should be adhered to.
4.Follow Instructions—All operating and safety instructions should be followed.
5.Water & Moisture—The device should never be used in, on or near water for risk of fatal shock.
6.Carts & Stands—The device should only be used on carts or stands recommended by the manufacturer.
7.Wall & Ceiling Mounting—The device should be mounted on a wall or ceiling only as recommended by the manufacturer.
8.Ventilation—The device should always be located in such a way that it maintains proper ventilation. It should never be placed in a built-in installation or anywhere that may impede the flow of air through its heat sink.
9.Heat—Never locate the device near heat sources such as radiators, floor registers, stoves or other heat-generating devices.
10.Power Supply—The device should only be connected to a power supply of the type described in the operating instructions or as marked on the device.
11.Power Cord Protection—Power cables should be routed so they are not likely to be stepped on or crushed by items placed on them or against them. Special attention should be paid to areas where the plug enters a socket or fused strip and where the cord exits the device.
12.Cleaning—The device should be cleaned in accordance with manufacturer’s instructions.
13.Periods Of Non-Use—The device should be unplugged when not being used for extended periods.
14.Dangerous Entry—Care should be taken that no foreign objects or liquids fall or are spilled inside the device.
15.Damage Requiring Service—The device should be serviced by licensed technicians when:
•The plug or power supply cord has been damaged.
•Objects have fallen or liquid has spilled inside the device.
•The device has been exposed to moisture.
•The device does not appear to be operating properly or exhibits a marked change in performance.
•The device has been dropped or the cabinet becomes damaged.
16.Service—The device should always be serviced by licensed technicians. Only replacement parts specified by the manufacturer should be used. The use of unauthorized substitutions may result in fire, shock, or other hazards.
2

Safety Precautions Specific to Mythos STS
The cautionary marking label is located on the bottom of the speaker, visible through an opening in the granite base.
Power Supply
1.The fuse and power disconnect device are located on the bottom of the speaker, accessible through a hole in the granite base.
2.The disconnect device is the power cord, detachable at either the speaker or the wall.
3.The power cord must be disconnected from the speaker before servicing.
Unpacking Your Mythos STS
Please Inspect For Shipping Damage
Each loudspeaker leaves our plant in perfect condition. Any visible or concealed damage most likely occurred in handling after it left our plant and should be reported at once to your Definitive dealer or the delivery company that delivered your loudspeaker. Please unpack your system carefully. Save all cartons and packing materials in case you move or need to ship your system. Record the serial number found on the back of the Mythos STS in the appropriate place on your warranty card, answer all questions and send it in.
VERY IMPORTANT: Accessories
Various parts and accessories that you will need to assemble your Mythos STS are in the carton but are easy to overlook. Open both ends of the shipping carton. Carefully examine the contents of the shipping carton and packing material to find the plastic bags with accessories.
Base Installation Instructions
Tools required: 4mm (or 5/32") Allen wrench (also called Hex Key driver) included in carton
Parts required: Polished Granite Base, Cable Clip for AC Cord, four Allen head bolts, eights plastic washers. All required parts are included in the product carton.
Instructions:
1.Carefully lay the Mythos STS on its side. Lift the base of the speaker about six inches and support it with a soft padded object, such as a pillow. Do NOT support the speaker with a hard object, as you might dent or scratch the aluminum finish.
2.Place one plastic washer on each bolt.
3.Insert the bolts into the granite base from the bottom (the same side that the levelling feet are attached).
3

4.Place another plastic washer on each bolt so the washer is against the granite.
5.Finger tighten all four bolts into the
threaded holes on the bottom of the Mythos. If this has been done correctly, washers will be between the metal surface of the Mythos STS, the granite, and the heads of the bolts.
6. GENTLY tighten each bolt with the Allen wrench. Do NOT overtighten or you may crack the granite.
7. Attach the AC cord through the hole at the bottom of the granite base.
8. Note the label showing the height adjustment ring and locking collar on the levelling feet. Carefully return the speaker to the upright position and adjust the feet to level the speaker.
Installing Cable Clip for AC Cord
The cable clip supplied in the accessories bag holds the power cable in place to prevent accidental disconnection of the cable from the inlet socket. To use, peel backing and apply to bottom of granite base half-way between center opening and back of the base, slightly off to one side of the rear foot, as shown in the diagram. After plugging supplied power cable into the inlet socket, it may then be pressed into the opening in the cable clip to secure it in place.
SELF-ADHESIVE POWER CABLE
RESTRAINING CLIP FOR MYTHOS STS
SUGGESTED CLIP LOCATION
4
IInstalling Leveling Feet and Spikes
We have provided leveling feet and metal spikes with your Mythos STSs; they are in the same bag as this manual. The plastic tips are for hard floor surfaces such as tile and wood while the metal spikes are for use on carpeted floors. Be careful when using spikes as they may cause damage to wooden or other floors which are susceptible to being scratched. Definitive Technology is not responsible for floor damage which may result from the use of spikes.
Screw the leveling feet into the five threaded inserts on the bottom of the base. If you plan on using spikes, it would be best to experiment with speaker positioning first, then add the spikes once you are sure you’ve determined the speakers’ permanent position. To install the carpet spikes, unscrew the nonmarking tips from the centers of the five leveling feet and screw the spikes in their places. Then, with the help of another person, lift the speaker upright and lower it to the desired location; push down on the top of the speaker to force the spikes through the carpet and make contact with the floor beneath.
Once you have positioned the speakers, wiggle them to see if they are stable and level. Adjust the height of the leveling feet/spikes accordingly for best stability.
Positioning the Mythos Speakers in Your Room
Your new Mythos speakers are very flexible in terms of positioning and placement options and they will produce excellent sound in almost any location. Following a few simple guidelines will, however, optimize their performance for the more critical listener. Although the following recommendations will usually yield the best results, all rooms and listening sets-ups are different, so do not be afraid to experiment with the speaker placement. Whatever sounds best to you is correct.
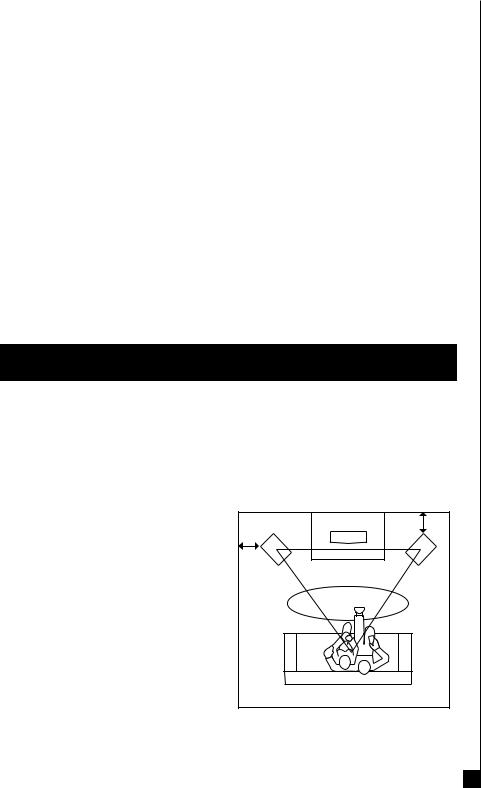
Positioning Mythos STS as Left/Right Main Speakers
For best results create an equilateral triangle between the speakers and the listening position as shown in the illustration. Angle the speakers toward the center of the listening position for brighter, clearer sound with a sharper focus and a more solid central image (recommended). Pointing the speakers straight forward, parallel with each other, will result in a warmer less sharply focused sound.
≥3' (1M) |
≥3' (1M) |
The Mythos STSs are magnetically shielded for safe placement near TV or |
|
video monitors. If you notice video distortion or discoloration, immediately move |
|
the speakers farther away from the video display. To get the best possible imaging |
|
and most even tonal response avoid placing the speakers less than 3 feet (1 Meter) |
5 |
from back and side walls. |
 Loading...