


UK
Instruction manual
Colour televideo
VIDEO AUDIO |
REC |
/ |
STAND-BY POWER REC |
PR |
GB14F8T1
GB20F8T2
GB21F1T2


W O R T H
k n o w i n g
Please keep the video machine’s guarantee card and receipt safe for warranty purposes.
Precautions
 Read carefully through this manual to familiarise yourself with this highquality televideo.
 Make sure the rating of your household electricity supply matches that shown on the back of the televideo.
 Refer to this chapter and the “Initial installation” chapter (pages 4-9) to help you install and adjust your televideo.
Do not…
 expose the televideo to high levels of humidity and heat, to avoid the risk of fire and electric shock.
 open the televideo. Have a qualified technician carry out repairs.
 connect the televideo to the power supply if you have just moved it from a cold to warm environment. This can result in condensation inside the recorder and cause serious damage to the machine and cassettes. Wait around two hours to allow it to reach room temperature.
Make sure…
the televideo is placed on a steady, flat surface.
you place the televideo where there is good ventilation all around.
you clean the televideo only with a soft, lint-free cloth; do not use aggressive or alcohol-based cleaning agents. (Unplug the set from the mains)
 you disconnect the power supply if the televideo appears to be working incorrectly, is making an unusual sound, has a strange smell, has smoke emitting from it or liquids have got inside it.
Have a qualified technician check the televideo.
 you disconnect the power supply and aerial if you will not be using the televideo for a long period or during a thunderstorm.
|
The power cable must be fitted with a fused plug approved by |
5A |
ASTA or BSI to BS 1362 and provided with a 5A fuse. |
5A |
The fuse cover must always be securely replaced. If the televideo is |
not worikng, the fuse may need replacing (see also “Electrical Connection” on page 4). (U.K. Only)
For your own safety!
 There are no components in this televideo you can service or repair yourself.
 Do not open the case of the televideo. Only allow qualified personnel to repair or service your set.
 This televideo is designed for continuous operation. Switching it off does not disconnect it from the mains (stand-by). To disconnect it from the mains, you have to unplug it.
 Recording any copyright protected material may infringe a copyright.
NOTE : If the receiver is moved or placed in a different direction, the main power switch must be switched off for at least 15 minutes in order to take out colour purity errors on the screen.

Before doing anything with the televideo, please read the chapter “Initial installation”.
Contents
W O R T H
k n o w i n g
Controls |
2 |
The remote control unit |
|
The televideo, On-screen display |
3 |
Initial installation |
|
Moulded plugs |
4 |
Connecting up the televideo, Fitting the remote control’s batteries |
6 |
Setting time and date |
7 |
Tuning in stations, EDIT, Manual Tuning |
8~10 |
Playing cassettes |
12 |
Playing back |
|
Still, Variable picture search, Continuous play |
13 |
Recording cassettes |
14 |
Simple recording, One touch recording (OTR) |
|
Timer recording using VideoPlus+ |
15 |
When record time overlaps, Watching Programmes while recording |
16 |
Normal timer recording |
17 |
Timer Review-erasing or changing |
18~19 |
More functions
Accessing the beginning of the next recording,Accessing the beginning of the previous
recording, Resetting the counter to zero, Accessing counter zero position |
20 |
Cassettes, V-Lock, Child Lock, Mute |
21 |
Picture adjustments, picture type selection, Changing on-screen displays |
22 |
Television timer, Snooze automatic |
23 |
VideoPlus+ guide numbers |
24 |
Teletext, teletext character set |
25 |
Connections and copying |
26 |
copying, Assembling |
|
Scart socket |
27 |
Appendix |
28 |
Before you ask a specialist |
|
Playing back, Simple recording, Auto tracking, One touch recording |
29 |
Index, Technical data |
30 |
Your product guarantee |
31/32 |
 On the following pages, the pictures show the buttons you press on the remote control to perform the function, and what you should see in the on-screen display or machine display (if present)
 VideoPlus+ is a trademark applied for by Gemstar Development Corp.. The VideoPlus+ system is manufactured under license from Gemstar Development Corporation.
1

C O N T R O L S
max. 7 m
30˚ | 30˚
The remote control is the principle means of control, but the main playback and record functions are also available on the front of the machine.
Press the main power switch on the front panel to turn on the set, then press  button.
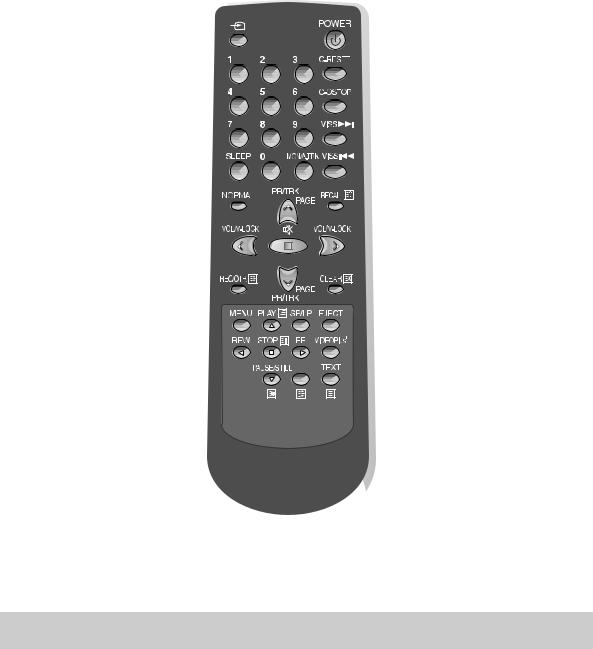
The remote control unit
TV stations-input sockets
To switch combined TV/video on and off (stand by)
to reset the counter
to wind the cassette to counter position 0:00:00to
Record monitoring (only 2Tuners Model), Auto tracking
to select on-screen displays
Sound on/off
a button for selecting input sources for recording:
Volume up/down
V-lock up/down
To select channels and adjust
Manual tracking up/down
Teletext page up/down
playback start/stop. |
pause while recording, |
still while playing back |
rewinding/fast forwarding a cassette from Stop, or |
picture search backwards/forwards from playback mode |
the menu control. |
the controls for timer recording using the VideoPlus+ |
codes via on-screen display |
Teletext on/off
Teletext size
the record or OTR button
(One Touch Recording means : each time you press the button recording is extended by 30 minutes)
FAVOURITE/NORMAL1/NORMAL2
a button that doubles the maximum recording time for very long recordings (SP/LP) : (only U.K. Model)
button for the sleep timer (press repeatedly)
2
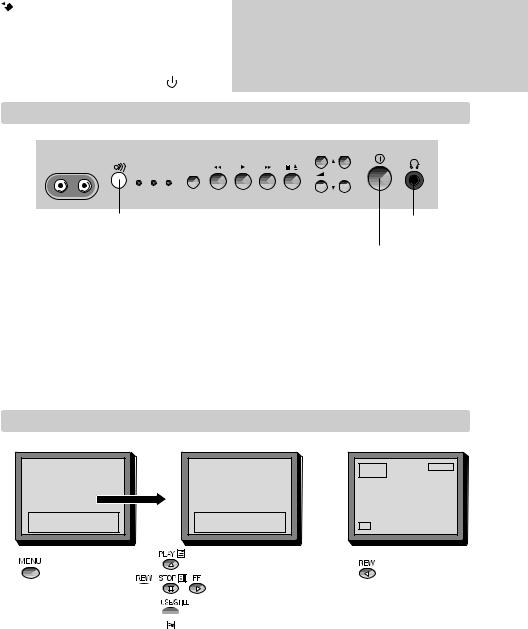
Press the main power switch on the front panel to |
C O N T R O L S |
turn on the set, then press POWER( ) button. |
The televideo
VIDEO AUDIO |
|
REC |
/ |
STAND-BY POWER |
REC |
PR |
|
|
|
|
|
|
|
|
|
|
|
|
|
|
|
|
|
|
|
|
|
|
|
|
|
|
|
|
|
|
|
|
|
|
|
|
|
|
|
|
|
|
|
|
|
|
|
|
|
|
|
|
|
|
|
|
|
|
|
|
|
|
|
|
|
|
|
|
|
|
|
|
|
|
|
|
|
|
|
|
|
|
|
|
|
|
|
|
|
|
|
|
|
|
|
|
|
|
|
|
|
|
|
|
|
|
|
|
|
|
|
|
|
|
|
|
|
|
|
|
|
|
|
|
|
|
|
|
|
|
|
|
|
|
|
|
|
|
|
|
|
|
|
|
|
|
|
|
|
|
|
|
|
|
|
|
|
|
|
|
|
|
|
|
|
|
|
|
|
|
|
|
|
|
|
|
|
|
|
|
|
|
|
|
|
|
|
|
|
|
|
|
|
Remote |
|
|
|
|
|
|
|
|
|
|
|
|
|
|
|
|
|
|
|
|
|
|
|
|
|
|
|
HEAD |
|
|||
|
|
|
|
sensor |
|
|
|
|
|
|
|
|
|
|
|
|
|
|
|
|
|
|
|
|
|
|
|
|
|
|
PHONE |
|
||||
|
|
|
|
|
|
|
|
|
|
|
|
|
|
|
|
|
|
|
|
|
|
|
|
|
|
|
|
|
|
|
|
|
|
|
|
|
|
Video |
input |
|
|
|
|
|
|
|
|
|
|
|
|
|
|
|
|
|
|
|
|
|
|
|
|
|
|
|
|
|
|
|
|
||
|
|
|
|
|
|
|
|
|
|
|
|
|
|
|
|
|
|
|
|
|
|
|
|
|
|
|
|
|
|
MAIN POWER |
|
|
||||
|
Audio input |
|
|
|
|
|
|
|
|
|
|
|
|
|
|
|
|
|
|
|
|
|
|
|
|
|
|
|
|
|
|
|
||||
|
|
|
|
|
|
|
|
|
|
|
|
|
|
PLAY : Play |
|
|
|
|
|
|
|
|
|
|
SWITCH |
|
|
|||||||||
|
|
|
|
|
|
|
|
|
|
|
|
|
|
|
|
|
|
|
|
|
|
|
|
|
|
|
|
|
||||||||
|
|
|
|
|
|
|
|
|
|
|
|
|
|
|
|
|
|
|
|
|
|
|
||||||||||||||
|
|
|
|
|
|
|
|
|
|
|
|
|
|
|
|
|
|
|
|
|
|
|
|
|
|
|
|
|
|
|
|
|
|
|
||
|
Indicator |
|
|
|
|
|
|
|
|
|
|
|
|
|
|
|
|
|
|
|
|
|
|
|
|
|
|
|
|
|
|
|
||||
|
|
|
|
|
|
|
|
|
|
|
|
|
|
|
|
|
|
|
|
VOLUME Down/Up Buttons |
||||||||||||||||
|
STAND BY : STAND BY(Red) |
|
|
|
|
|
|
|
|
|
|
|
|
|
|
|
|
|
|
|
|
|
|
|||||||||||||
|
|
|
|
|
|
|
|
|
|
|
|
|
|
|
|
|
|
|
|
|
|
PROGRAM Down/Up Buttons |
||||||||||||||
|
POWER : Operation(Green) |
|
|
|
|
|
|
|
|
|
|
|
|
|
|
|
|
|
|
|
|
|
|
|||||||||||||
|
|
|
|
|
|
|
|
|
|
|
|
|
|
|
|
|
|
|
|
|
|
|
||||||||||||||
|
|
|
|
|
|
|
|
|
|
|
|
|
|
|
|
|
|
|
|
|
|
|
|
|
|
|
|
|
|
|
|
|||||
|
REC : Record(Yellow) |
|
|
|
|
|
|
|
|
|
|
|
|
|
|
|
|
|
|
|
|
|
|
|
|
|
|
|
|
|||||||
|
|
|
|
|
|
|
|
|
|
|
|
|
|
|
|
|
|
|
|
|
STOP/EJECT: |
|
|
|
|
|
|
|
||||||||
|
|
|
|
|
REC : Record |
|
|
|
|
|
|
|
|
|
|
|
|
|
|
|
|
|||||||||||||||
|
|
|
|
|
|
|
|
|
|
|
|
|
|
|
|
To stop and to eject |
|
|
|
|
|
|
|
|||||||||||||
|
|
|
|
|
|
|
|
|
|
|
|
|
|
|
|
|
|
|
|
|
|
|
|
|
|
|
|
|||||||||
|
|
REW / FF: |
|
|
|
|
|
|
|
|
|
|
the loaded cassette |
|
|
|
|
|
|
|
||||||||||||||||
|
|
Rewind and Fast forward wind |
|
|
|
|
|
|
|
|
|
|
|
|
|
|
|
|
|
|
|
|
|
|
|
|
|
|
||||||||
|
|
|
|
|
|
|
|
|
|
|
|
|
|
|
|
|
|
|
|
|
|
|
|
|
|
|
|
|||||||||
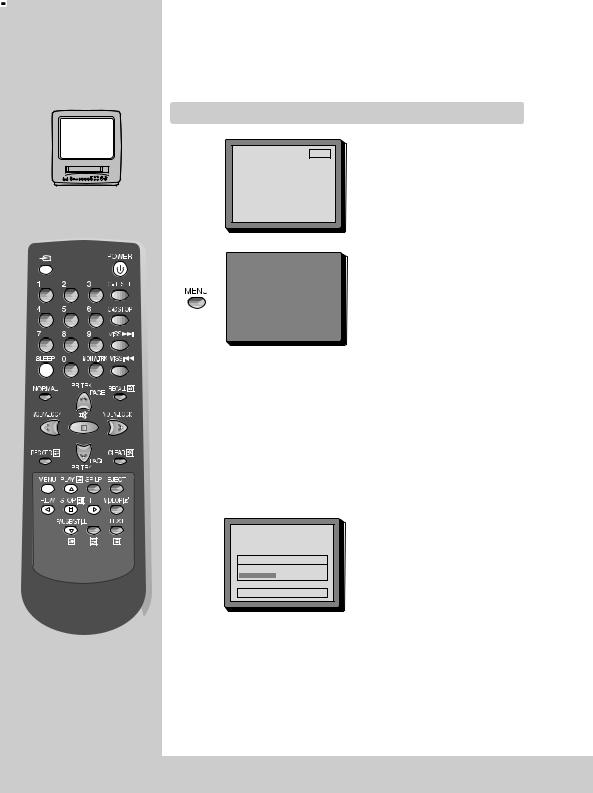
On-screen display
|
MAIN MENU |
|
|
|
|
TV TIMER |
|
|
PICTURE |
|
|
|
DATE |
|
01:01:1997 WED |
|
TV TIMER |
|
|
|
TIME |
02:30 |
|
|
RECORD TIMER |
|
|
ON TIMER |
06:00 OFF |
||
|
PRESET |
|
|
PR |
01 |
||
|
MISCELLANEOUS |
|
|
OFF TIMER |
00:00 OFF |
||
|
SELECT |
example |
|
MOVE |
|
|
|
SELECT |
|
MENU |
ENTER |
|
CLEAR |
CLEAR |
EXIT |
|
MENU |
EXIT |
The televideo’s menu system gives you easy-to-understand
  access to the less used
functions such as tuning to stations, clock setting and more.
 The menus show you which
  button to press for the next step.
REW |
01 ABCC |
– 0:01:33 |
|
SP |
|
In addition, some other functions appear on screen if you want (press RECALL up to 3 times for on-screen displays).
NOTE : The combined TV/video close menus automatically after approx. 1 minute. |
3 |
if no entry is made. |
|
|
|

I n i t i a l
INSTALLATION
For your own safety read the following instructions carefully before attempting to connect this unit to mains.
Moulded plugs
 Should it be necessary to remove a moulded on plug from the mains cable, it should be cut off and replaced with a suitable replacement.
If the terminals in the plug are unmarked or you are in any doubt as to the correct connections, consult a qualified electrician.
 The wires in this mains lead are coloured in accordance with the following code
Blue |
Neutral |
Brown |
Live |
As the colour of the wires in the mains lead of this appliance may not correspond with the coloured markings identifying the terminals in your replacement plug proceed as follows.
The wire which is coloured blue must be connected to the terminal which is marked with letter N or coloured black.
The wire which is coloured brown must be connected to the terminal which is marked with letter L or coloured red.
 The moulded plug cannot be used for any other appliance, therefore remove the fuse and dispose immediately and safely to prevent anyone, especially children from plugging it in to a wall socket, which will create a safety hazard.
 After replacement of the fuse in the moulded plug, the fuse cover must be refitted. If the fuse cover is lost a replacement cover must be obtained. The colour of the correct replacement fuse cover is that of the coloured insert in the base of the plug or the colour that is embossed in words in the base of the plug recess or elsewhere on the plug. Always state this colour when ordering a replacement fuse cover.
 Only 5 amp. replacement fuses which are ASTA approved to BS 1362 should be fitted. (U.K. Only)
 We recommend the use of a good quality plug.
4
I n i t i a l
INSTALLATION
This symbol means that this unit is double insulated, an earth connection is not necessary.
Caution :
To prevent electric shock, do not remove any covers.
Caution :
No user serviceable parts inside, refer servicing to qualified service personnel.
Caution :
When operating this unit on 220-240V mains supply, please note that when the power switch is in the off mode, the unit is not disconnected from the mains supply. However, please be assured that it is perfectly safe to leave the unit connected to the mains supply.
5
I n i t i a l
INSTALLATION
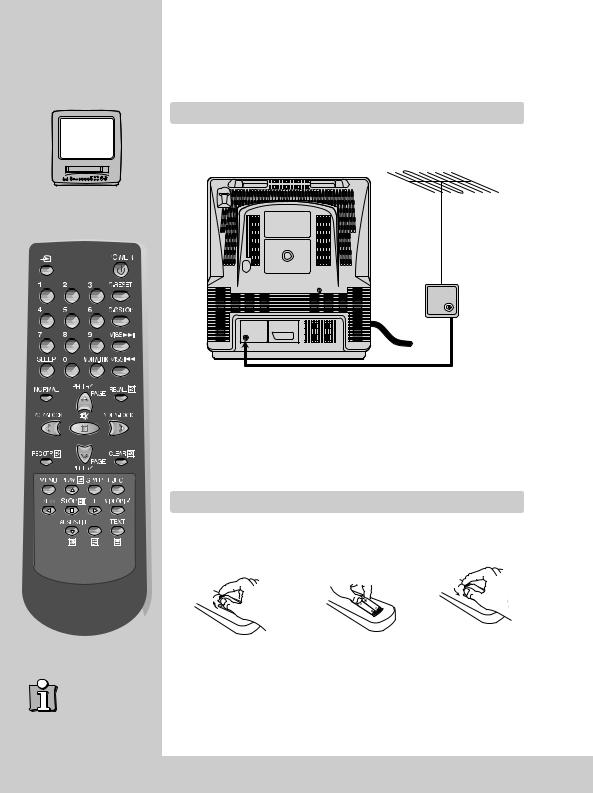
Place your televideo
horizontally on a flat, steady base so that air can circulate around it for ventilation. away from humidity and heat, magnetic fields, such as those from loudspeakers etc., and with no heavy objects placed on top.
Connecting up the televideo
Switch off all components when connecting or disconnecting cables.
 Plug the aerial cable into the “ANT” socket of the televideo.
 Make sure the rating of the household mains supply matches the rating shown on the back of the televideo.
Now plug in the mains lead.
The buttons to use are marked on the following pages.
Fitting the remote control’s batteries
Remove the battery cover |
2 |
Install two barreries |
Replace the battery |
1on the reverse side of the |
(“AAA” size) into the |
3 cover. |
|
remote control. |
|
remote control. |
|
|
|
|
|
 Fit the batteries, size 1.5V AAA as shown above.
 Protect your environment by returning used batteries to your dealer. Since batteries contain toxic substances they require special disposal methods.
 Make sure the batteries are always of the same type and age, and remove them from the remote control if you are not using it for a long period.
6
Timer controlled events require the exact time and the correct date.
Press the main power switch on the front panel to turn on the set, then press  button.
Setting time and date
I n i t i a l
INSTALLATION
01 ARD
Switch your televideo on.
|
|
|
|
|
|
|
|
|
MAIN MENU |
|
|
||
|
PICTURE |
|
|
|
|
|
|
TV TIMER |
|
|
|
|
|
|
RECORD TIMER |
|
|
|||
|
PRESET |
|
|
|
Call the televideo’s MAIN MENU. |
|
|
MISCELLANEOUS |
|
||||
|
|
|
SELECT |
|
|
|
|
|
|
ENTER |
|
|
|
|
MENU |
EXIT |
|
|
||
|
|
|
|
|||
|
|
|
|
|
||
|
|
MAIN MENU |
|
|
||
|
PICTURE |
|
|
|
|
|
|
TV TIMER |
|
|
|
Move the cursor down to the “TV TIMER”line. |
|
|
RECORD TIMER |
|
||||
|
PRESET |
|
|
|
|
|
|
MISCELLANEOUS |
|
|
|||
|
|
|
ENTER |
|
Confirm by pressing the ENTER/STOP button. |
|
|
|
|
SELECT |
|
|
|
|
MENU |
EXIT |
|
|
||
|
|
|
|
|
||
|
|
|
|
|
|
|
|
|
|
TV TIMER |
|
|
|
|
DATE |
|
|
01:01:1997 WED |
|
|
|
TIME |
02:30 |
|
Set the numbers for the exact time and the correct |
||
|
ON TIMER |
|
06:00 OFF |
|
||
|
PR |
01 |
|
date. Both the On timer and the off timer can be |
||
|
OFF TIMER |
|
00:00 OFF |
|
||
|
|
|
|
|||
|
|
|
|
|
switched ON or OFF but both must be on to enable the |
|
|
|
|
MOVE |
|
||
|
|
|
SELECT |
|
|
|
|
CLEAR |
CLEAR |
|
timer to function. |
||
|
MENU |
EXIT |
|
|||
|
|
|
|
|
|
|
|
|
|
|
|
|
DATE : dd/mm/yy |
|
|
|
|
|
|
TIME : Hour/Min |
|
|
|
|
|
|
Store leaving “TV TIMER” |
|
|
|
|
|
|
Continue with the following page. |
 Mistake or change ?
Move curson to the position you wish to correct by using  /
/
 /
/ and RE-ENTER on the remote control.
 If you do not set ‘DATE’ and ‘TIME’ menu, you can not set ‘on/off Timer’.
7
I n i t i a l
INSTALLATION
Have handy a TV guide or newspaper to help you to identify the stations.
Tuning in stations
01 ARD
(If you see “AV” instead of “PR”, press the  button)
|
|
|
|
|
|
|
|
MAIN MENU |
|
|
|
|
PICTURE |
|
|
|
|
|
TV TIMER |
|
|
||
|
RECORD TIMER |
|
If not on-screen, call the televideo’s |
||
|
PRESET |
|
|
|
|
|
MISCELLANEOUS |
|
“MAIN MENU”. |
||
|
|
SELECT |
|
||
|
|
|
|
||
|
|
ENTER |
|
|
|
|
MENU |
EXIT |
|
|
|
|
|
|
|
|
|
AUTOMATIC TUNING SYSTEM
Select the PRESET menu at the MAIN MENU.
Place the cursor to “ATSS” with the up/down button.
Press the ENTER button until the tunning screen appears above the PRESET menu.
The cursor will move from left to right on the VHF-L line, then VHF-H, then UHF. Please wait until the EDIT menu appears.
ATSS SETTING
PR08 |
UHF |
MENU EXIT
8
 Loading...