


Quick Start Guide
Discovery™ iQ Wall Oven
Models: DYO130, DYO230, DYOV130 and DYOV230
Thank you for purchasing the Dacor Discovery™ iQ wall oven. In order for you to get the most from your oven and to take advantage of the Android operating system's capabilities, we want to ensure that your oven has been properly set up and connected to your wireless network.
|
These steps will help |
many potential |
|
|
screens that might |
described what |
|
|
actions to take based |
please contact |
|
|
the Dacor Customer |
|
|
|
|
||
Instructions: |
|
||
|
|
|
|
|
WARNING - |
to the included |
|
|
STEP 1 When |
program will run. It |
|
|
begins |
touch display, skip to |
|
|
step 8 of |
|
|
|
screen |
|
|
|
guide to |
|
|
|
If any other |
|
|
|
display, |
|
|
|
page, to restart the setup process. |
|
|
Our Network |
|
|
|
|
|
|
|
|
|
|
|
||
|
|
|
|
|
|
|
dacorworld |
|
|
|
|
|
Oven Home Screen, Double Oven - Go to step 6. |
|
|
|
|
|||
|
|
|
|
|
|
|
N Router |
|
|
|
|
|
|
|
|
|
|
|
|
|
|
|
|||||
|
|
|
|
|
|
|
WiFi Setup Screen - Text in gray area will vary.
Go to step 8.
Oven Home Screen, Single Oven - Go to step 6.
Part No. 107694 Rev. A

Discovery iQ Wall Oven
STEP 2 Select the screen that currently appears on the touch display from the pictures shown.
Perform the instructions below the picture to perform the setup restart process.
Our Network dacorwo
N Route
WiFi keyboard - Touch |
No, go to step 8. |
Privacy Policy - Touch |
then go to step 5. |
Name Screen - Go to step 5. |
Address Screen - Go to step 5. |
Profile keyboard - Go to step 5. |
Congratulations Screen - Go to step 5. |
Page 2
Quick Start Guide
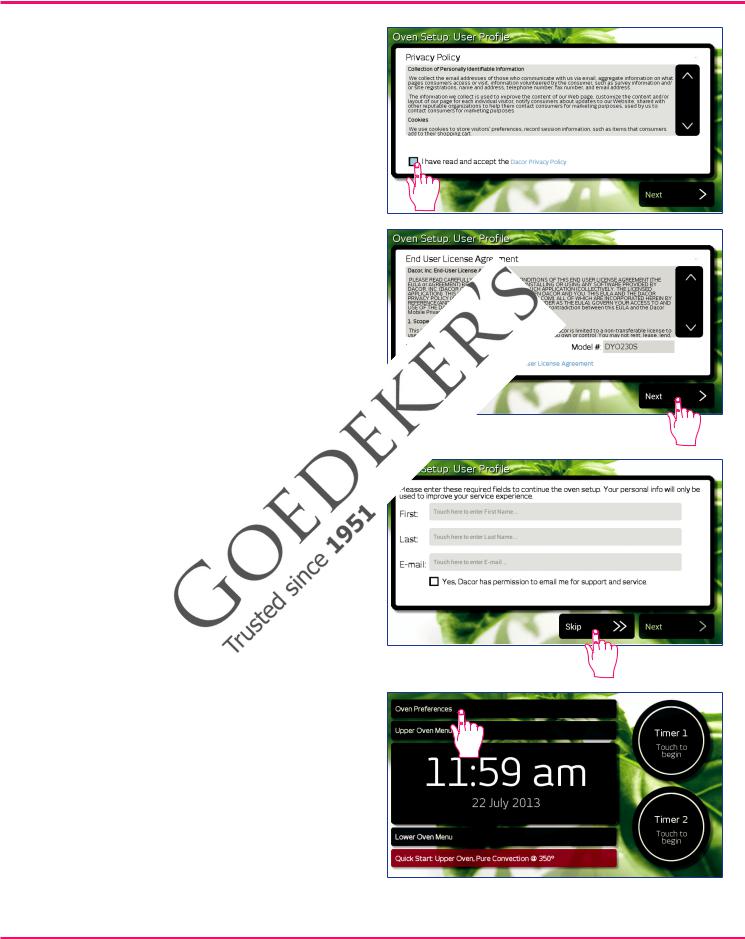
STEP 3 On the Privacy Policy screen, touch the check box at the bottom left.
Touch Next.
STEP 4 On the End User License Agreement screen, touch the check box at the bottom
STEP 5 Touch screens, appears
STEP 6 Touch Oven Preferences on the oven home screen.
Oven Home Screen -
Double Oven shown.
Page 3
 Loading...