


Hydrostatic Zero-Turn
Commercial Riding Mower
Professional Turf Equipment
Z - Wing 48
OPERATOR’S AND SERVICE MANUAL

TABLE OF CONTENTS |
|
Foreword. . . . . . . . . . . . . . . . . . . . . . . . . . . . . . . . . . . . . . . . . . . . . . . . . . . . . . . . . . . . . . |
. 3 |
General Safety Operations . . . . . . . . . . . . . . . . . . . . . . . . . . . . . . . . . . . . . . . . . . . . . . . . |
. 4 |
A.Danger . . . . . . . . . . . . . . . . . . . . . . . . . . . . . . . . . . . . . . . . . . . . . . . . . . . . . . . . . |
. 4 |
B. Warning . . . . . . . . . . . . . . . . . . . . . . . . . . . . . . . . . . . . . . . . . . . . . . . . . . . . . . . . |
. 4 |
C. Caution . . . . . . . . . . . . . . . . . . . . . . . . . . . . . . . . . . . . . . . . . . . . . . . . . . . . . . . . . |
. 4 |
Safety Precautions . . . . . . . . . . . . . . . . . . . . . . . . . . . . . . . . . . . . . . . . . . . . . . . . . . . . . . |
. 4 |
A. General. . . . . . . . . . . . . . . . . . . . . . . . . . . . . . . . . . . . . . . . . . . . . . . . . . . . . . . . . |
. 4 |
B. Related to Fuel . . . . . . . . . . . . . . . . . . . . . . . . . . . . . . . . . . . . . . . . . . . . . . . . . . . |
. 5 |
C. When Mowing . . . . . . . . . . . . . . . . . . . . . . . . . . . . . . . . . . . . . . . . . . . . . . . . . . . . |
. 5 |
Safety Decals . . . . . . . . . . . . . . . . . . . . . . . . . . . . . . . . . . . . . . . . . . . . . . . . . . . . . . . . . . |
. 6 |
Specifications . . . . . . . . . . . . . . . . . . . . . . . . . . . . . . . . . . . . . . . . . . . . . . . . . . . . . . . . . . |
. 7 |
Operating Instructions . . . . . . . . . . . . . . . . . . . . . . . . . . . . . . . . . . . . . . . . . . . . . . . . . . . |
. 8 |
A. General. . . . . . . . . . . . . . . . . . . . . . . . . . . . . . . . . . . . . . . . . . . . . . . . . . . . . . . . . |
. 8 |
B. Controls . . . . . . . . . . . . . . . . . . . . . . . . . . . . . . . . . . . . . . . . . . . . . . . . . . . . . . . . |
. 9 |
C. Initial Adjustments . . . . . . . . . . . . . . . . . . . . . . . . . . . . . . . . . . . . . . . . . . . . . . . . |
11 |
D. Zero Turn Break-In and Operating Procedures . . . . . . . . . . . . . . . . . . . . . . . . . . |
12 |
Maintenance and Service . . . . . . . . . . . . . . . . . . . . . . . . . . . . . . . . . . . . . . . . . . . . . . . . . |
14 |
A. Mower Deck . . . . . . . . . . . . . . . . . . . . . . . . . . . . . . . . . . . . . . . . . . . . . . . . . . . . . |
14 |
B. Hydraulic Oil . . . . . . . . . . . . . . . . . . . . . . . . . . . . . . . . . . . . . . . . . . . . . . . . . . . . . |
16 |
C. Electrical System . . . . . . . . . . . . . . . . . . . . . . . . . . . . . . . . . . . . . . . . . . . . . . . . . |
17 |
D. Tires . . . . . . . . . . . . . . . . . . . . . . . . . . . . . . . . . . . . . . . . . . . . . . . . . . . . . . . . . . . |
19 |
E. Brakes . . . . . . . . . . . . . . . . . . . . . . . . . . . . . . . . . . . . . . . . . . . . . . . . . . . . . . . . . |
19 |
F. Hydraulic System . . . . . . . . . . . . . . . . . . . . . . . . . . . . . . . . . . . . . . . . . . . . . . . . . |
20 |
G.Storage . . . . . . . . . . . . . . . . . . . . . . . . . . . . . . . . . . . . . . . . . . . . . . . . . . . . . . . . . |
21 |
Maintenance Schedule . . . . . . . . . . . . . . . . . . . . . . . . . . . . . . . . . . . . . . . . . . . . . . . . . . . |
22 |
Performance Adjustments . . . . . . . . . . . . . . . . . . . . . . . . . . . . . . . . . . . . . . . . . . . . . . . . |
24 |
A. High Speed Tracking Adjustment . . . . . . . . . . . . . . . . . . . . . . . . . . . . . . . . . . . . . |
24 |
B. Engine RPM Check and Adjustment . . . . . . . . . . . . . . . . . . . . . . . . . . . . . . . . . . |
24 |
C. Deck Corner Ball Wheel Roller Settings . . . . . . . . . . . . . . . . . . . . . . . . . . . . . . . . |
25 |
D. Deck Center Anti-Scalp Roller Settings . . . . . . . . . . . . . . . . . . . . . . . . . . . . . . . . |
25 |
E. Lap Bar Adjustment . . . . . . . . . . . . . . . . . . . . . . . . . . . . . . . . . . . . . . . . . . . . . . . |
25 |
F. Deck Leveling Procedure . . . . . . . . . . . . . . . . . . . . . . . . . . . . . . . . . . . . . . . . . . . |
26 |
G.Deck Lift Cable Adjustment Procedure. . . . . . . . . . . . . . . . . . . . . . . . . . . . . . . . . |
26 |
Wiring Diagram. . . . . . . . . . . . . . . . . . . . . . . . . . . . . . . . . . . . . . . . . . . . . . . . . . . . . . . . . |
28 |
Slope Gauge. . . . . . . . . . . . . . . . . . . . . . . . . . . . . . . . . . . . . . . . . . . . . . . . . . . . . . . . . . . |
29 |
Warranty |
|
This product may be covered by one or more of the following patents:
D409,208; 5,946,894; 6,070,690; 6,662,538 Pending
2

FORWARD
The Z-Wing 48 Hydrostatic Zero-Turn Commercial Riding Mower provides superb maneuverability, mid-mount cutting capability for professional landscapers, commercial lawn service companies, professional turf managers and golf course superintendents. The machine incorporates many safety features that should be studied by all operators and maintenance personnel before use. The list of safety precautions should receive particular attention.
This manual presents all of the operating and maintenance instructions necessary to keep your mower at peak efficiency. If operated and maintained properly, your mower will give dependable service.
 CAUTION:
Only thoroughly trained persons should operate and maintain this mower. This machine can cause serious injury to anyone who misuses it and does not understand its operation. For their personal safety, all operators and maintenance personnel are required to read this entire manual before operating the mower.
Hazard control and accident prevention are partially dependent upon the design and configuration of the equipment. Notwithstanding, these factors are also dependent upon the awareness, concern, prudence and proper training of the personnel involved in the operation, transport, maintenance and storage of the equipment.
 WARNING
•The engine exhaust, some of its constituents, and certain vehicle components contain or emit chemicals known to the State of California to cause cancer, birth defects or other reproductive harm.
•This unit is equipped with an internal combustion engine and should not be used on or near any unimproved forest-covered, brush-covered, or grass-covered land unless the engine’s exhaust system is equipped with a spark arrester meeting applicable local or state laws (if any). If a spark arrester is used, it should be maintained in effective working order by the operator.
•In the State of California, the above is required by law (Section 4442 of the California Public Resources Code). Other States may have similar laws. Federal laws apply to federal lands. A spark arrester muffler may be available.
NOTE: The engine manufacturer is responsible for all engine-related issues with regards to performance, power-rating, specifications, warranty and service. Please refer to the engine manufacturer’s owner’s/operator’s manual, packed seperately with your unit, for more information.
MODEL LISTED IN THIS MANUAL 23HP Z-Wing 48,
53AI5BBY750
3
GENERAL SAFETY
OPERATIONS
A.DANGER
1.Do not operate machine in confined areas where exhaust gases can accumulate.
2.Do not operate machine without mower chute deflector in place and operational.
3.Do not carry passengers.
4.This is a narrow track Zero-Turn mower, and it should not be operated on steep slopes. Refer to slope gauge on page 28.
B.WARNING
1.Do not operate machines under the influence of alcohol or drugs.
2.Do not operate machines without all guards and safety devices in place and functional.
3.Do not start machines if there are fuel or oil leaks or spillage — clean it up.
4.Do not operate machines near spilled or leaking fuels.
5.Do not stop or park machine over dry leaves, grass, debris, etc. that could be combustible.
6.Use extreme care when backing up.
7.Do not operate machine on slopes greater than 15 degrees (27%).
8.Do not operate machines on slopes when traction is reduced (wet grass, ice, soft ground, loose ground, leaves, pine needles, debris, etc.).
9.Avoid turning downhill if possible, go slowly and use extra care when turning downhill.
10.Do not operate machines during reduce visibility (low light, fog, rain, etc.).
11.Do not operate machines with non-approved attachments.
12.Do not operate machines that are damaged.....have machine repaired.
13.Do not operate machines that have not been properly maintained.
14.Use only replacement parts that are the same or equivalent to the original equipment.
15.Do not modify machines or any of their components, especially the engine governor!
16.Do not operate machine for more than 2 hours without hearing protection.
C.CAUTION
1.Use proper protective equipment when operating machine (gloves, boots, and hearing protection are recommended).
2.Read entire machine Operator’s Manual.
3.Make sure operators are fully trained in the safe use of the machine.
4.Follow all safety instructions when using the machine.
5.Keep all safety signs legible and properly installed.
6.Do not check for hydraulic leaks with any part of the body.
7.Do not add fuel to a machine when the engine is running and/or the exhaust system is hot.
8.Keep machine clean and free of debris, grass, leaves, oil, grease, etc.
9.Place lap bars in neutral/start position, set park brake, disengage P.T.O., turn engine off, and remove ignition key before you dismount from machine.
10.Use machines laterally or diagonally across slopes, avoid going downhill when possible.
11.Go slowly and use extra care when descending slopes.
12.Disengage P.T.O. when crossing surfaces such as asphalt, concrete, loose ground, sand, gravel, etc.
13.Use extra care when loading and unloading machines from trucks or trailers.
SAFETY PRECAUTIONS
A.General
1.Read this Operator’s Manual before starting the mower. Study the controls and learn the proper sequence of operation.
2.Do not allow anyone to operate or maintain this machine who has not read this manual. Never permit children to operate this machine.
3.Never carry passengers.
4.Do not remove any shields, guards or safety devices. If a shield, guard or safety device is damaged or does not function, repair or replace it before operating the mower.
5.Always wear safety glasses and safety shoes when operating or maintaining this mower. Do not wear loose-fitting clothing.
6.Disconnect the spark plug wires and remove the key from the ignition to prevent the engine from accidentally starting before performing any maintenance on this mower.
7.Never run the engine indoors without adequate ventilation. Exhaust fumes are deadly.
8.To avoid serious burns, do not touch the engine, exhaust pipe or muffler while the engine is running or until it has cooled after it has been shut off.
9.The liquid in the battery is dilute sulfuric acid. Always wear safety glasses and rubber gloves when working on the battery. Do not overfill the battery.
4
10.Lead-acid batteries generate hydrogen and oxygen gases which form an explosive mixture. Keep sparks and flames away at all times.
11.When looking for oil leaks, never run your hand over hydraulic hoses, lines or fittings. Never tighten or adjust hydraulic hoses, lines or fittings while the system is under pressure. If high-pressure oil penetrates the skin, the oil must be removed within a few hours by a doctor familiar with this form of injury or serious complications may result.
B.Related to Fuel
1.Fuel is highly flammable and its vapors can explode if ignited. Please respect it.
2.Do not smoke or permit others to smoke while handling fuel.
3.Always use approved containers for fuel and fill slowly to decrease the chance of static electricity buildup and spillage.
4.Store fuel in well ventilated and unoccupied buildings away from sparks and flames.
5.When dispensing gasoline into approved containers, place the container on the ground when refueling to avoid a possible static electricity ignition of fuel vapors.
6.Do not fill containers while it is inside a vehicle, trunk, the bed of a pickup or floor of a trailer.
7.Always shut off the engine and permit it to cool before removing the fuel tank cap.
8.Always fill the fuel tank outdoors.
9.If the fuel container spout will not fit inside the fuel tank opening, use a funnel.
10.When filling the fuel tank, stop when the fuel reaches one inch from the top. This space is necessary for tank expansion. Do not overfill.
11.Wipe up any spilled fuel.
C.When Mowing
1.Keep adults, children and pets away from the area to be mowed.
2.When operating this mower in the forward direction, DO NOT allow the steering levers to return to the neutral position on their own. Always maintain a firm grip on the levers, operate them smoothly and avoid any sudden
movements of the levers when starting or stopping.
3.If the mower is equipped for side discharge, never use the mower without the discharge chute installed and placed in the down position.
4.Always remove debris and other objects from the area to be mowed.(Note: debris and loose grass will reduce traction.)
5.Mow only in daylight.
6.Watch for holes, sprinkler heads and other hidden hazards.
7.Avoid driving too close to trees, creeks, ditches, sand traps and other obstacles.
8.Before backing up, check behind you and watch where you’re going.
9.Always reduce speed when making a turn, and when grass is wet.
10.Always mow across slopes, never up and down the slope. Do not operate on steep slopes and slow down before turning.
11.Be careful when crossing gravel paths or roadways. Always turn off the blade clutch switch and wait until the blades stop rotating and raise the cutting deck to the transport position. Always allow other vehicles to have the right-of-way.
12.If you hit a solid object while mowing, turn off the blade clutch switch, place the left and right steering levers in the neutral, opened-out position, move the throttle to slow, set the parking brake, shut off the engine and take the key from the ignition switch. Inspect for damage. Repair any damage. Make sure the blades are in good condition and that the blade bolts are tight before restarting the engine.
13.Never leave the mower unattended without: turning off the blade clutch switch; placing the left and right steering levers in the neutral opened-out position; moving the throttle to slow; setting the parking brake; shutting off the engine and taking the key from the ignition switch.
14.Never walk or stand on the discharge side of a mower with the engine running. Turn off the blade clutch switch if another person approaches while you are operating the mower.
15.Never attempt to operate the traction unit without the mowing deck attached.
16.Keep the mower and especially the engine and hydraulic components clean and free of grease, grass and leaves to reduce the chance of fire and to permit proper cooling.
5
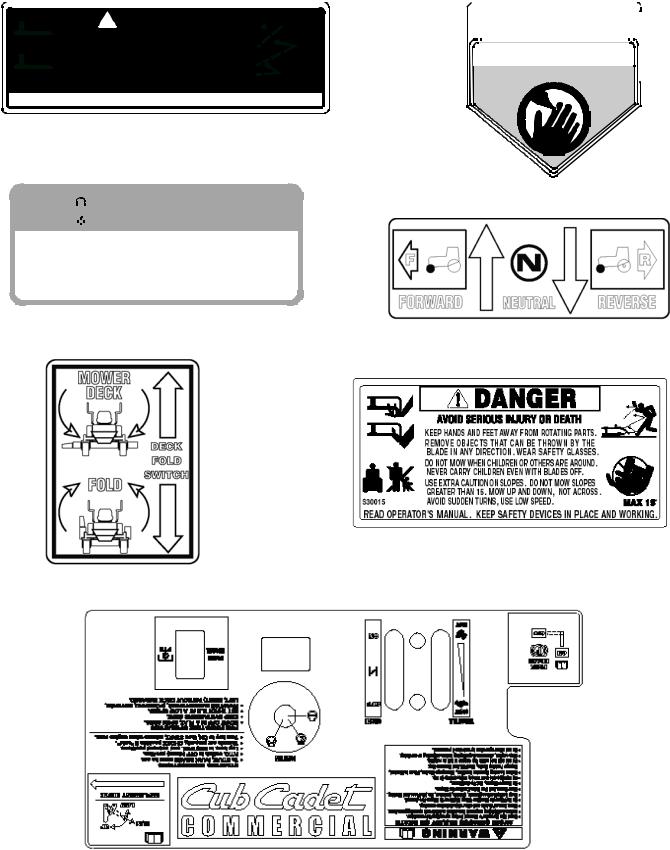
SAFETY DECALS AND LABELS
|
|
|
|
|
|
|
|
|
|
|
|
|
|
|
TO RE D UC E TH E R IS K OF IN JU RY, |
|||||
|
|
|
|
|
|
DANGER |
|
|
|
|
|
|
|
|
||||||
|
|
|
|
|
|
|
|
|
|
|
|
|
|
CAT CHER IS IN IT S PR OPER P LACE . |
||||||
|
|
|
|
|
|
|
|
|
|
|
|
|
|
|
D O N OT O P E R AT E M OW E R U N L E S S |
|||||
|
|
|
|
|
|
|
|
|
|
|
|
|
|
|
DISCHARGE CHUTE COVER OR GRASS |
|||||
|
|
|
|
|
|
KEEP HANDS AND FEET AWAY. |
|
|
|
|
|
|
|
|
|
|
|
|
|
|
|
|
|
|
|
|
|
|
|
|
|
|
|
|
|
|
|
|
|
||
|
|
|
|
|
|
|
|
|
|
|
|
|
||||||||
|
|
|
|
|
|
DO NOT OPERATE MOWER |
|
|
|
|
|
|
|
DANGER |
|
|||||
|
|
|
|
|
|
|
|
|||||||||||||
|
|
|
|
|
|
UNLESS CHUTE DEFLECTOR |
|
|
|
|
|
|
|
|
||||||
|
|
|
|
|
|
|
|
|
|
|
|
|
|
|||||||
|
|
|
|
|
|
OR ENTIRE GRASS CATCHER IS |
|
|
|
|
|
|
KEEP HANDS and FEET AWAY |
|||||||
|
|
|
|
|
|
IN ITS PROPER PLACE. |
|
|
S30503 |
|
|
|
|
|
|
|
||||
ASSEMBLE CHUTE DEFLECTOR TO THIS UNIT BEFORE OPERATING. |
Part Number: 777S30503
 WARNING
SHIELD MISSING  DO NOT OPERATE
Part Number: 01002166
Part Number: 00030635
Part Number: 777I22491
Part Number: 777S30015
Part Number: 777I22490
Part Number: 777S32530
6
SPECIFICATIONS
Engine: |
23HP Kohler |
Type: |
Vertical air cooled V-Twin |
|
|
Air Cleaner: |
Paper Element |
|
|
Lube System: |
Pressurized with oil filter |
Starter: |
12-volt electric |
|
|
Traction Drive: |
Variable-speed hydraulic pumps with wheel motors on each drive |
|
wheel |
|
|
Hydraulic Tank: |
2 quart capacity, One pint filter, 5W40 full synthetic oil |
|
|
Cutter Deck;Drive: |
48" Belt Driven, folding-fabricated-floating |
Clutch: |
Electric BBC |
|
|
Deck Lift: |
Hand lever w/pin lock for height adjustment |
|
|
Cutting Height: |
1-1/2" to 4" |
No. of Blades |
3, belt-driven, power take-off from engine |
|
|
Controls: |
Engine ignition and start switch; throttle; choke; left and right |
|
steering levers; electric blade clutch switch; parking brake; mower |
|
deck lift, mower power folding |
|
|
Parking Brake: |
Mechanical linkage attached to the brake handle |
|
|
Front Caster Wheels: |
13 x 5.00 - 6 |
|
|
Tire Pressure: |
10-12 psi Rear, 20-25 psi front caster |
Drive Wheels: |
21 x 7.00 - 10 |
|
|
Frame: |
1” x 2" Steel square tube and plate, all welded construction |
|
|
Seat: |
Adjustable seat. 4" Adjustment |
Fuel Tank: |
Two 5.0 gallon w/individual shutoff valves |
|
|
Ground Speed: |
0-8 MPH forward. 0-4 MPH reverse |
|
|
Instrumentation |
Hour meter, Tachometer, Maintenance-minder |
Net Weight: |
778 lbs w/48" deck |
|
|
7
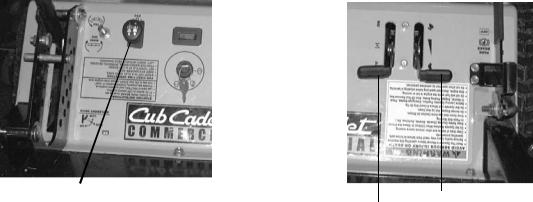
OPERATING INSTRUCTIONS
Figure. 1
Electric Blade |
|
|
|
|
|
|
|
Tach and |
|
||
Clutch Switch |
Hour Meter |
||
|
|
|
|
Ignition Switch
A.General
1.When Mowing:
a.Keep adults, children, and pets away from the area to be mowed.
b.When operating this mower, in the forward direction, do not allow the steering levers to return to Neutral on their own. Always maintain a firm grip on the levers, operate them smoothly and avoid any sudden movements of the levers when starting and stopping.
c.If the mower is equipped for side discharge, never use the mower without the discharge chute installed and placed in the down position.
d.Always remove debris and other objects from the area to be mowed (Note: debris and loose grass will reduce traction).
e.Mow only in daylight.
f.Watch for holes, sprinkler heads, and other hidden hazards.
g.Avoid driving too close to trees, creeks, ditches, sand traps, and other obstacles.
h.Before backing up, check behind and watch where you are going.
i.Always reduce speed when making a turn, and when grass is wet.
j.Always mow across slopes, never up and down the slope. Do not operate on steep slopes and slow down before turning.
Avoid turning downhill if possible, start at the bottom and work up to the top. Use extra care and go slowly when turning downhill. Control the speed and direction of the zero turn machine “primarily” with the speed/directional control (lap bar) of the downhill side of the machine...I.E.,
Figure. 2
Engine throttle
Choke Lever
maintain the uphill side lap bar “essentially” in a fixed position.
k.Be careful when crossing gravel paths or roadways. Always turn off the blade clutch switch and wait until the blades stop rotating and raise the cutting deck to the transport position. Always allow other vehicles to have the right of way.
l.If you hit a solid object while mowing, turn off the blade clutch switch, place the steering levers in the neutral, opened-out position, move the throttle to slow, set the parking brake, shut off the engine, and take the key from the ignition switch. Inspect for damage. Repair the damage. Make sure the blades are in good condition and that the blade bolts are tight before restarting the engine.
m.Never leave the mower unattended without observing the following: turn off the blade clutch switch, placing the steering levers in the neutral open-out position, moving the throttle to slow, setting the parking brake, shutting off the engine and taking the key from the ignition switch.
n.Never walk or stand on the discharge side of the mower when the engine is running. Turn off the blade clutch switch if another person approaches while you are operating the mower.
o.Never attempt to operate the traction unit without having the mowing deck attached.
p.Keep the mower and especially the engine and hydraulic components clean and free of grease, grass, and leaves to reduce the chance of fire and permit proper cooling.
2.Safety Awareness when Mowing
a.Do not operate on steep slopes, those above 15 degrees (27% slope).
8
b.Avoid turning downhill if possible, if not use extra care and go slowly.
c.Avoid turning when going downhill, traction is at a minimum going downhill.
d.Do not operate with discharge side of the mower toward streets, buildings, playgrounds, parking lots, other machines, animals, and other people.
e.Avoid operation or use extreme care if the traction surface is wet, unstable, or slippery.
f.Use extra care when grass clippings, leaves, pine needles, or debris are present as traction can be reduced.
g.Slow-down before turning and come to a complete stop before any zero turn maneuver.
h.Do not stop machine or park machine over combustible materials such as dry grass, leaves, debris, etc.
3.To Mow Grass and Produce a Striped Pattern
a.Pick a point on the opposite side of the area to be mowed (post, tree, shrub, etc.).
b.If on an hillside, start at the bottom so that the turns are uphill rather than downhill.
c.Align the mower so as to head directly toward the object on the far side.
d.Slowly increase the speed of the machine to match cutting conditions, terrain, and operator familiarity with the controls and keep the machine headed directly toward the alignment object. Do not go fast as to reduce cut quality or to be uncomfortable in controlling the speed and direction of the machine.
e.When approaching the other end of a strip, slow down or stop before turning. A U-turn is recommended unless a zero turn is required. The speed of a U-turn that will allow for machine controllability and minimal turf defacement will be dependent on several factors including: the speed of the turn, the radius of the turn, the tire tread pattern, the traction coefficient of the tire to the traction surface, the slope of the traction surface.
f.Remember, a zero turn requires that the forward or reverse travel of the machine be stopped prior to the initiation of the turn or severe turf defacement can occur.
g.To prevent rutting or grooving of the turf, change the direction that the strips are mowed by approximately 45 degrees the next and each subsequent time that the area is mowed.
B.Controls
1.Engine Ignition and Start Switch: (See Figure 1.) Located on the instrument housing of the seat in the center support. When the key is inserted and turned clockwise, 45 degrees, the ignition circuit is closed. Turning the switch further against spring pressure starts the engine. The engine will only start if the blade clutch switch is in the “off” position, the parking brake is engaged and the left and right steering levers are in the neutral. The key should always be removed from the switch if the operator leaves the mower’s seat.
2.Engine Throttle Control: (See Figure 2.) Located on the left side of the seat support. Moving the throttle control from the rear to the front will increase the engine speed from slow to fast.
3.Left and Right Steering Levers: (See Figure 3.) These levers control all of the movements of the mower. Pushing both levers forward causes the mower to move forward. Pulling both levers back causes the mower to move backward. Pushing one lever ahead of the other lever causes the traction wheel on the side where the lever is ahead to rotate faster than the other traction wheel, making the mower turn toward the side where the lever is behind. When one lever is pushed forward and the other lever pulled back the same amount, one traction wheel will turn in reverse and the mower will turn within its own length.
In order to start the engine, both steering levers must be in the neutral position; the parking brake must be engaged; and the blade clutch switch must be “off”. However, once the engine starts, the parking brake must be released before the operator moves the steering levers out of neutral position or the engine will automatically shut off.
Note: The Steering Lever will return toward neutral when released, but they should be placed in neutral by the driver. If the Drive Handles are not placed in neutral, the tractor may creep.
9
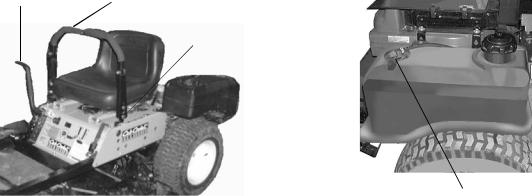
Deck Lift Handle |
Steering Levers |
Brake
Figure. 3
4.Electric Blade Clutch Switch: (See Figure 1.) Located on the seat support beside the ignition switch. This is an “on/off” push pull switch that controls the electric blade clutch which supplies power to the cutting blades through the PTO. The switch must be turned off to start the engine and should be turned off for safety any time another person approaches the mower or the mowing deck is raised to the transport position. Power to the electric clutch will also be cut off if the operator leaves the operator’s seat.
5.Parking Brake: (See Figure 3.) Located on the left side of the traction unit. The handle is an overcenter lever which applies the drumtype brake on each drive wheel when the handle is pulled to the rear. The brake must be engaged in order to start the engine.
6.Deck Lift Handle: (See Figure 3.) Located on the right front corner of the mowing deck. Raise the mowing deck to the transport position, by pulling the lever to the rear and moving it inward into the stop for transport. To lower the mowing deck, pull the deck lift handle and move it outward. This lower’s the deck to the cutting position.
7.Fuel Shutoff Valve: (See Figure 4.) Located on top of the fuel tank(s). When turned in a clockwise direction until it stops, it will shut off the flow of fuel to the engine. When turned in a counterclockwise direction it will open and allow fuel to flow to the engine. Close this valve if you are not going to run the mower for a period of 30 minutes or more to prevent flooding the engine.
8.Seat Adjustment Lever: The Seat Adjustment Lever is located beneath the seat. The Seat Adjustment Lever is used to move the seat forward and backward. To place the seat in the desired position pull the seat adjustment lever to the left then push the seat forward or back to the desired position. Release the lever so the seat will lock in place.
Figure. 4 |
Fuel Shutoff Valve |
9.Digital Tachometer and Hour Meter: (See Figure 1) Located on the seat support above the ignition switch. When the machine is running the tachometer displays engine rpm.
When the machine is off the tachometer displays running time.
Note: There will be a flashing “LUBE” for each recommended lubrication interval. There is a flashing “OIL” at each recommended engine oil and filter change.
10.Choke Lever: (See Figure 2) The Choke Lever is located on the left side of the seat support. The Choke Lever is operated manually. Having the Choke Lever in the ON position helps the engine to start during initial start-up. During normal operation the Choke Lever should be in the OFF position.
11.Folding Deck Control: The switch for the electrically powered deck folding mechanism is located on the seat support. Pull upward on the switch to fold up, and push downward to fold down.
10
 Loading...